
Sorry, there were no results found for “”
Sorry, there were no results found for “”
Sorry, there were no results found for “”
40% of digital workers use more apps than they need, and 5% bounce between 26+ tools every single day. That’s not productivity. That’s tool sprawl.
And the cost of this constant switching is a staggering $625B in lost productivity across the global workforce.
ClickUp delivers the world’s first Converged AI Workspace in the form of a digital environment where your work, teammates, and tools operate in context. It’s powerful because of its extensive customization options, but it’s easy to miss features that could simplify half your workflow.
So in this ClickUp terms and features guide, we’ll explore everything you need to know. Start taking notes! 📝
ClickUp’s Project Hierarchy organizes your work into a simple, scalable structure: Workspace > Space > Folder > List > Tasks > Subtasks.

Let’s understand the benefits that make ClickUp unique. 👇
Your ClickUp Workspace is the home base for your entire organization. It contains all your Spaces, Folders, Lists, Tasks, people, and workspace-wide settings.
Suppose you’re a small digital marketing agency setting up ClickUp to manage client projects. Your entire company can operate inside a single Workspace titled ‘Swift Sites Agency’.
ClickUp Spaces divide your workspace into major groups. Think of them as departments, teams, clients, or big initiatives. Each Space has its own:
Inside your Workspace, you create a Space called ‘Client Work’ dedicated to all client-facing projects, complete with its own settings and permissions.
ClickUp Folders sit inside Spaces and help you group Lists for more complex workflows. They’re optional, but extremely useful when you’re running big or multi-stage projects.
Within the Space, you add a Folder named ‘Acme Corp Website’. This groups all the Lists related to that specific client project, such as:
ClickUp Lists are containers that hold all the actionable Tasks for a specific project, workflow stage, or topic. They’re the core building blocks of your work in ClickUp, sitting within Spaces or Folders, and providing structure and clarity to your projects.
For small projects, a single List may be enough to manage all Tasks. For larger projects, use multiple Lists within a Folder to represent different phases or teams. Examples would be:
❗️Note: A List is not the same as a List View. A list is a location, whereas List View is one of the Customizable Views you can use to visualize Tasks.
ClickUp Tasks are the basic units for organizing work within your projects. Each Task lets you break down actionable steps and hold every relevant detail in one place, so your team knows exactly what to do and what’s next. This is where you add:
📌 Example: Inside the ‘Design’ List of the ‘Acme Corp Website’ Folder, your team creates a Task called ‘Create Wireframes’. This becomes the central hub for that deliverable, housing the design brief, reference links, attached screenshots, feedback threads, and the final link.
❗️Note: Every Task can have Assignees (the people doing the work) and Followers (people who just need visibility). For instance, on a client deliverable, the account manager watches the Tasks while the designer is assigned. Both stay up to date, but only the assigned teammate is responsible for execution.
ClickUp Subtasks break a Task into smaller action items. You can add up to three layers of Subtasks by default or enable the Nested Subtasks ClickApp to create several more layers (perfect for complex work).
For example, within the ‘Create Wireframes’ Tasks, your UX designer adds Subtasks to break down the workflow:
📮 ClickUp Insight: 18% of our survey respondents want to use AI to organize their lives through calendars, tasks, and reminders. Another 15% want AI to handle routine tasks and administrative work.
To do this, an AI needs to be able to: understand the priority levels for each task in a workflow, run the necessary steps to create tasks or adjust tasks, and set up automated workflows.
Most tools have one or two of these steps worked out. However, ClickUp has helped users consolidate up to 5+ apps! Experience AI-powered scheduling, where tasks and meetings can be easily allocated to open slots in your calendar based on priority levels. You can also set up custom automation rules via ClickUp Brain to handle routine tasks. Say goodbye to busy work!
Here’s the go-to cheat sheet for understanding ClickUp Features.
Once you know what Tasks and Subtasks are, the next step is bringing them into your workflow in a way that keeps work clear, trackable, and easy to execute.
Start by creating Tasks directly inside the List that mirrors how your team works. You can add Tasks from any List, the Create button in your toolbar, the AI Command Bar, saved templates, and automations (e.g., ‘When a form is submitted → Create Tasks’).
Whether you’re using ClickUp for small businesses or large enterprises, you can create Tasks for:
Subtasks come in when work naturally breaks into different stages or roles. You’ll create manageable Subtasks when:
💡 Pro Tip: To help you plan your structure properly, here are important limits and capabilities to keep in mind:
ClickUp Views are a flexible system for displaying your work in different formats. Visualize, manage, and organize multiple projects in a way that fits your workflow
Here’s how you can use them:
The ClickUp List View displays specific Tasks in a column-and-row format where every detail is visible at once. It’s the most precise view for editing fields, scanning statuses, and managing work in bulk.
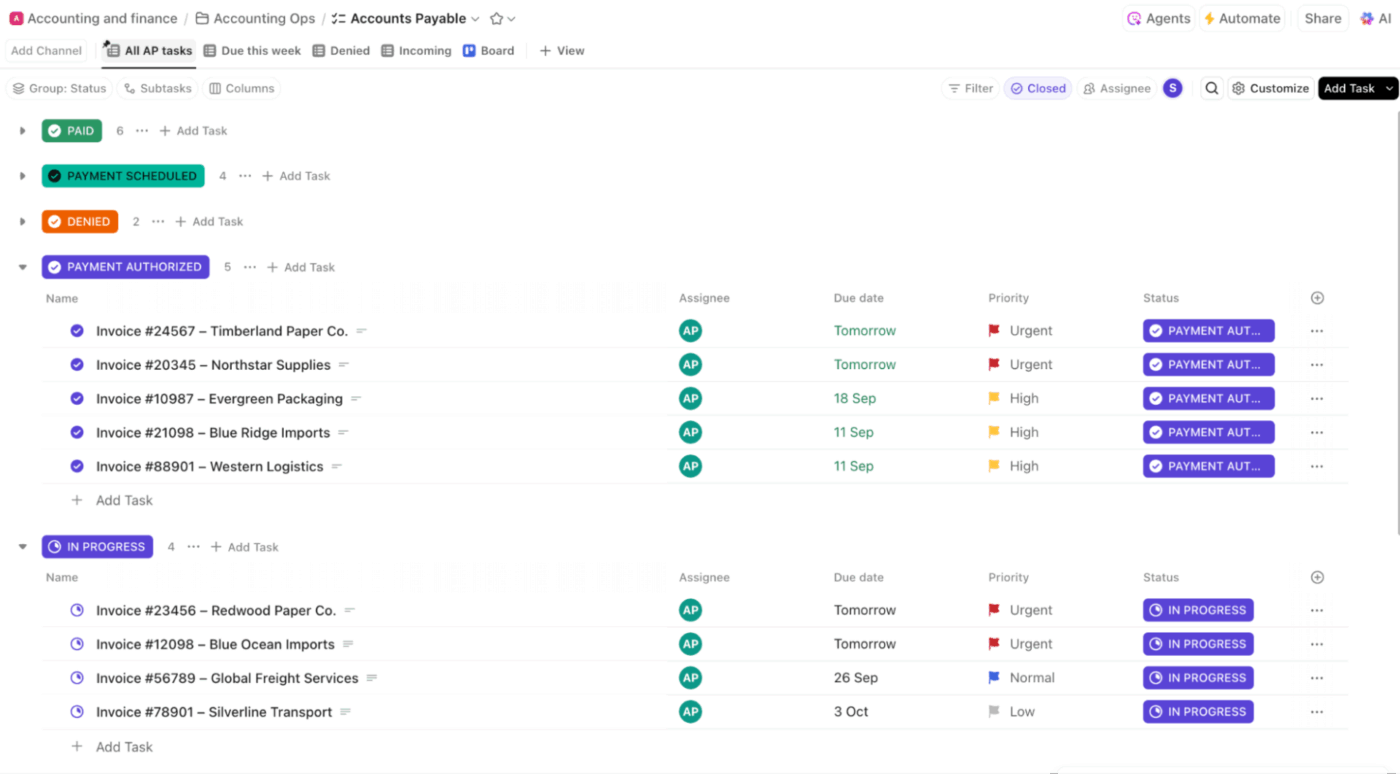
Teams use it to:
The ClickUp Board View is a Kanban-style layout for visual progress tracking that arranges Tasks into columns based on your grouping selection, such as status, assignee, and priority. It’s designed for drag-and-drop movement and quick status updates.

Teams use it to:
The ClickUp Calendar View is a date-based layout for scheduling and plotting Tasks on a monthly, weekly, or daily grid based on start and due dates.
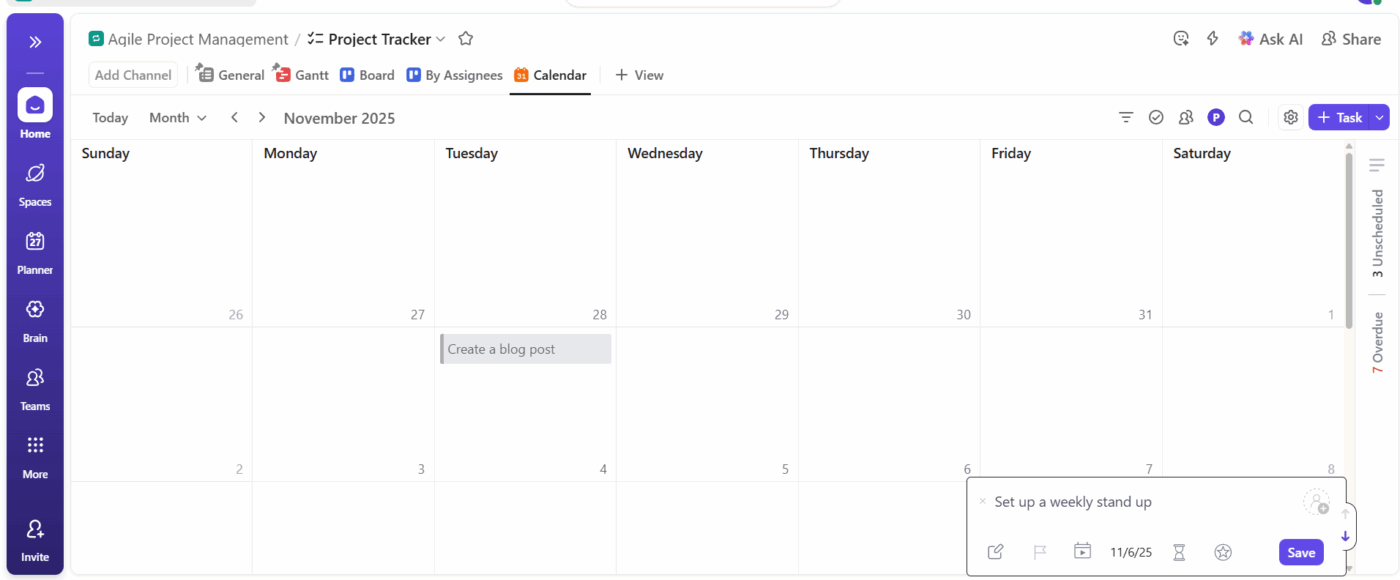
Teams use it to:
The ClickUp Gantt Chart View displays Tasks as horizontal bars along a timeline, allowing you to plan durations, visualize dependencies, and manage milestones.

Teams use it to:
The ClickUp Timeline View is a people-first schedule for workload balancing that shows Tasks in a linear timeline. You can group tasks by assignee, status, Team, and more.
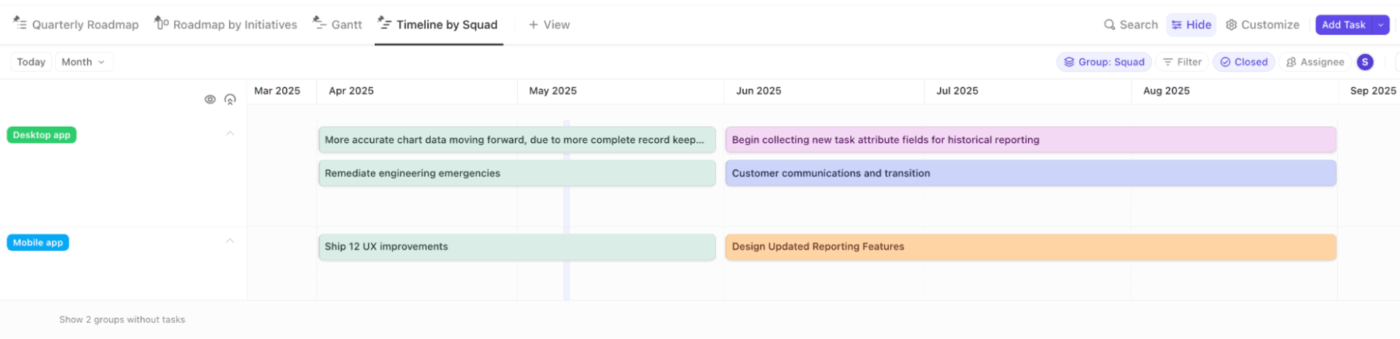
Need help with capacity planning? This is your tool.
Teams use it to:
The ClickUp Table View displays Tasks in a spreadsheet format without hierarchy, making it ideal for high-volume editing, analysis, and operational tracking.
Teams use it to:
ClickUp Forms automatically convert submissions into Tasks. Every answer is mapped to a Custom Field, ensuring that requests enter the system cleanly and consistently.
You can customize your Forms by adding different question types with dropdowns, text fields, dates, priorities, and file uploads. Use conditional logic (on Business Plus and above) to show or hide questions based on someone’s response, and brand your Form with custom layouts, themes, and cover images.
Teams use it to:
❗️Note: There is no functional difference between ClickUp Forms and ClickUp Form View. Forms is the general term for the online form itself that people fill out, and Forms View is the interface you add to a List, Folder, or Space to build, edit, and manage your Form.
ClickUp Docs are built-in collaborative documents designed to help teams create, organize, and maintain living knowledge. They sit alongside Tasks, Views, and projects, making them a central source of truth for everything from specs to wikis.

📌 Example: Product teams can build a multi-level feature spec where each subpage holds API requirements, acceptance criteria, and open questions. The Doc stays linked to the build Tasks so engineers never need to hunt across tools. Any changes made by the product manager, designer, or engineer are instantly reflected for everyone.
ClickUp Whiteboards give teams a shared visual canvas for brainstorming, mapping workflows, and turning ideas into actionable Tasks.
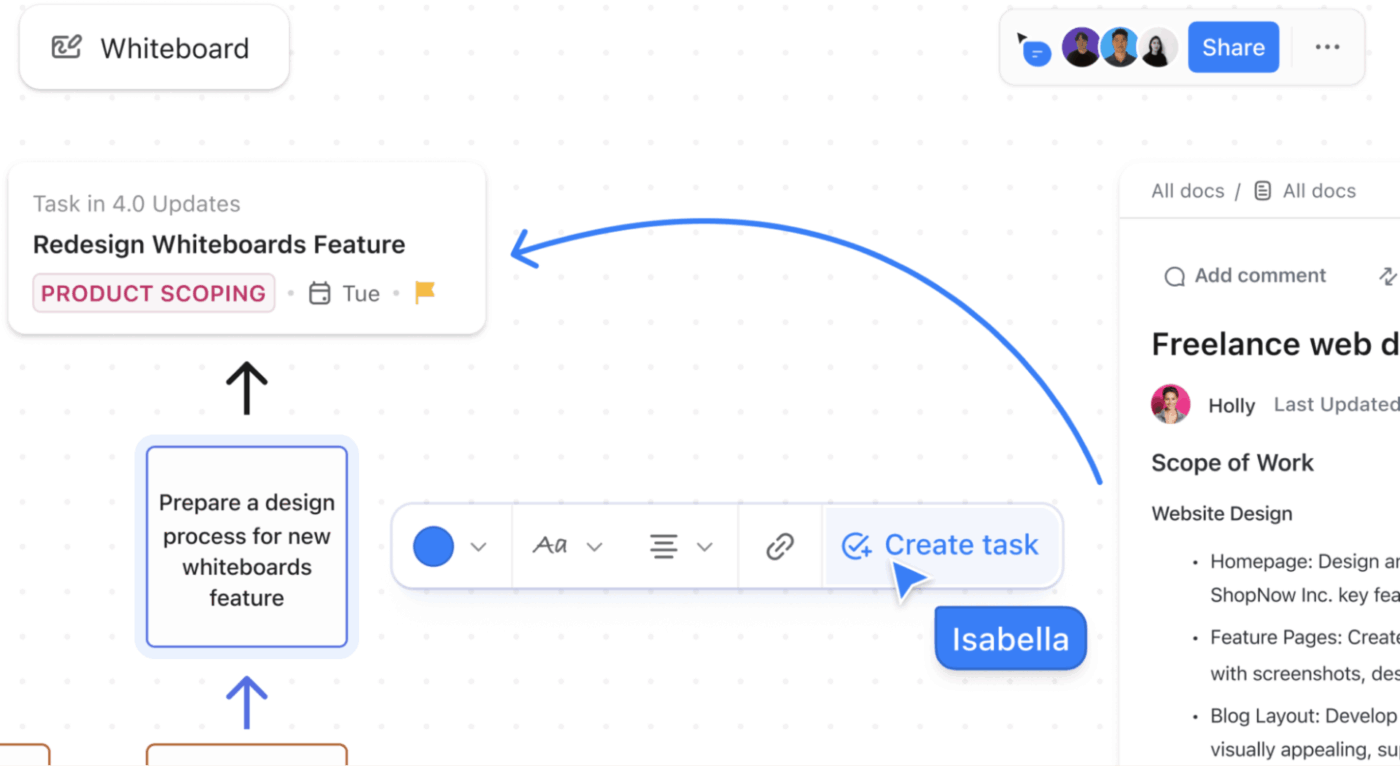
Here’s how to use a digital Whiteboard:
📌 Example: An engineering lead opens a ClickUp Whiteboard during sprint planning. They drop in shapes to represent each service and use connectors to show API calls. As the team discusses edge cases, they turn sticky notes into new Tasks instantly, keeping the entire system design and execution plan tightly connected.
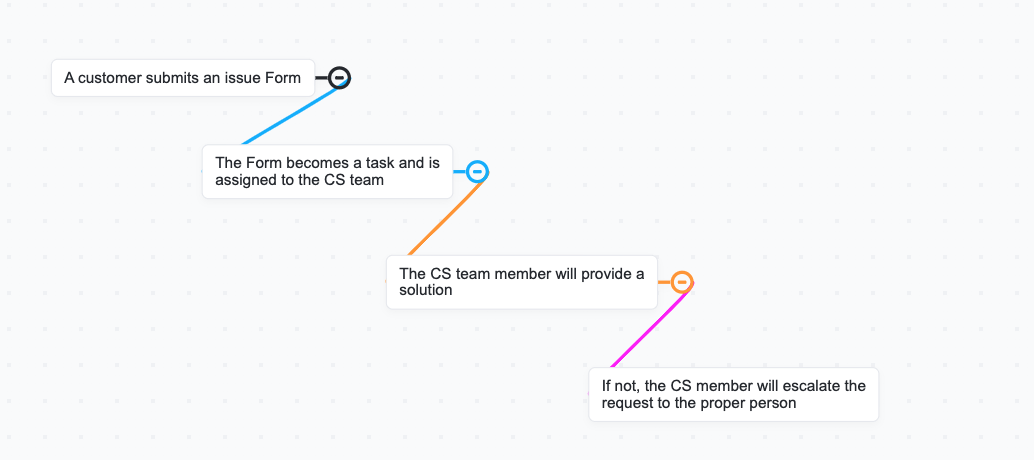
ClickUp Mind Maps give you a visual, branching canvas to structure ideas, Tasks, and workflows. Unlike traditional lists or tables, they help you see how your project components connect with each other.
You can use them in two ways:
Here’s how Mind Maps in ClickUp help:
📌 Example: A product designer is planning a ‘Unified Account Settings’ overhaul and opens a ClickUp Mind Map to map the entire experience. They start with the main node ‘Account Settings’ and branch it into:
Each of these nodes can instantly become a ClickUp Task, and as priorities shift, the designer drags nodes around to restructure the hierarchy without losing context.
💡 Pro Tip: In order to bulk edit without leaving the Map, hold Command/Ctrl > select multiple task nodes > use the bulk toolbar. You can change the status, assign users, move Tasks, and update priorities.
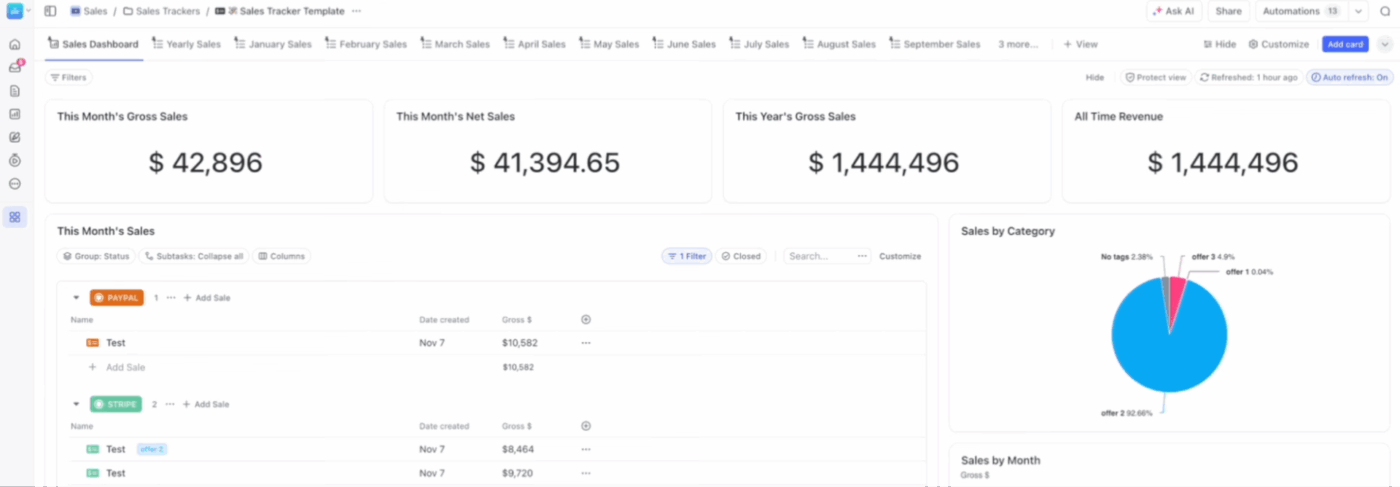
ClickUp Dashboards give you a high-level snapshot of your workspace for tracking work, understanding progress, and reporting outcomes using customizable cards. Each card pulls real-time data, providing quick visibility into different metrics of your project performance.
Create Dashboards to:
📌 Example: A SaaS growth team builds a ‘Weekly Revenue & Experiment Review’ Dashboard to keep their entire funnel in one place. They add:
ClickUp Automations eliminate repetitive work by running actions based on custom ‘if this, then do that’ instructions.
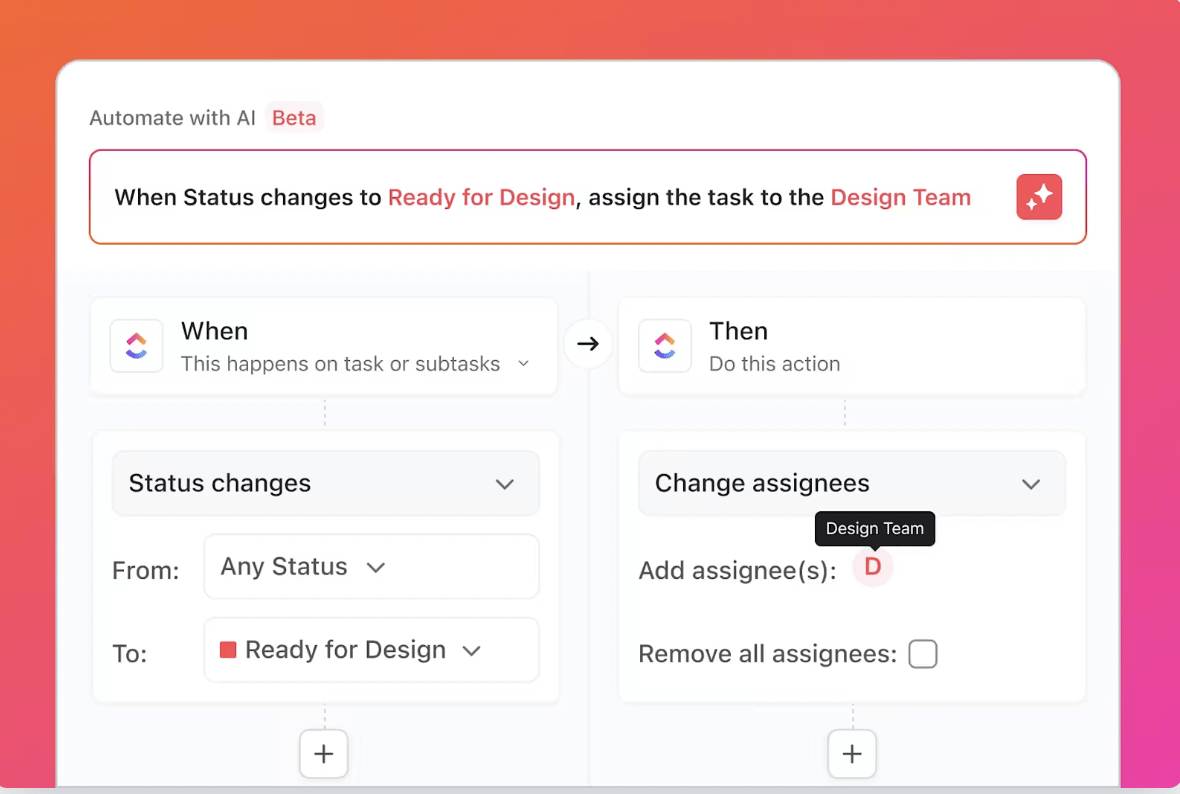
They follow a simple logic:
🔍 Did You Know? ClickUp has built-in Sprint Automations for teams who want to use ClickUp for software development. If you’re on the Business Plan or higher, you can take it even further. You can auto-create your next sprint the moment the current one closes, move all unfinished Tasks forward, and set older sprints to auto-archive to keep your workspace clean.
ClickApps are optional features that admins can activate or deactivate in your Workspace.
Whether you’re using ClickUp for personal use or managing a growing team, this keeps your setup focused, avoids clutter, and lets workflows scale seamlessly as your needs evolve.
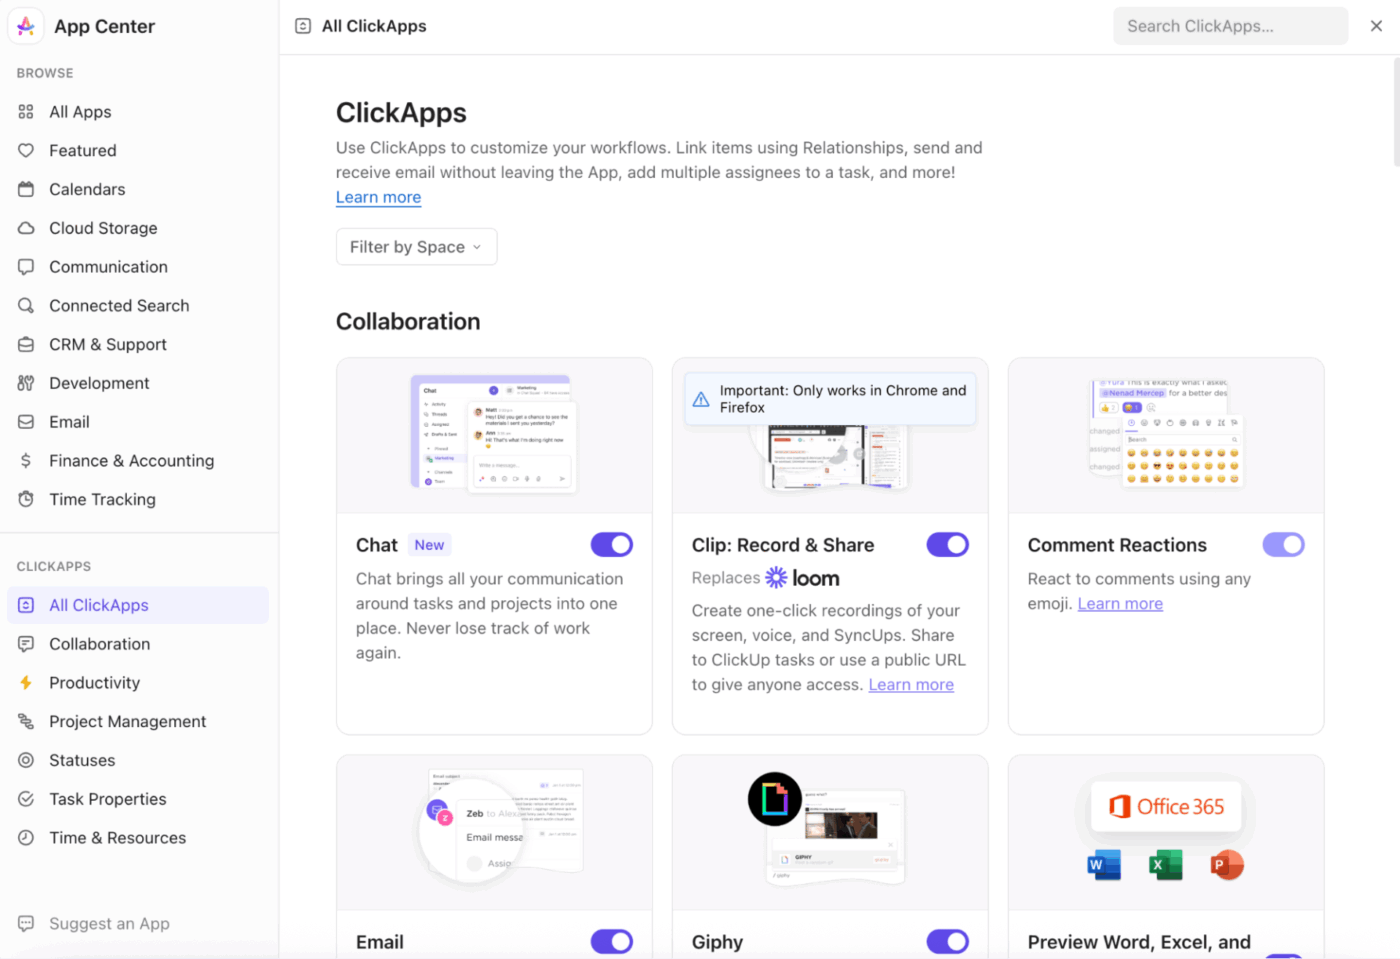
Examples of ClickApps you can enable:
📖 Also Read: How to Draw While You are Screen Recording
ClickUp Custom Fields are flexible, user-defined categories that let teams capture and organize specific data unique to their workflows, beyond the standard Task properties. They help you track, filter, and report on important project details unique to your workflow or team.
Custom Fields can live inside a specific List or Folder, Space, or your entire Workspace (global Custom Fields).
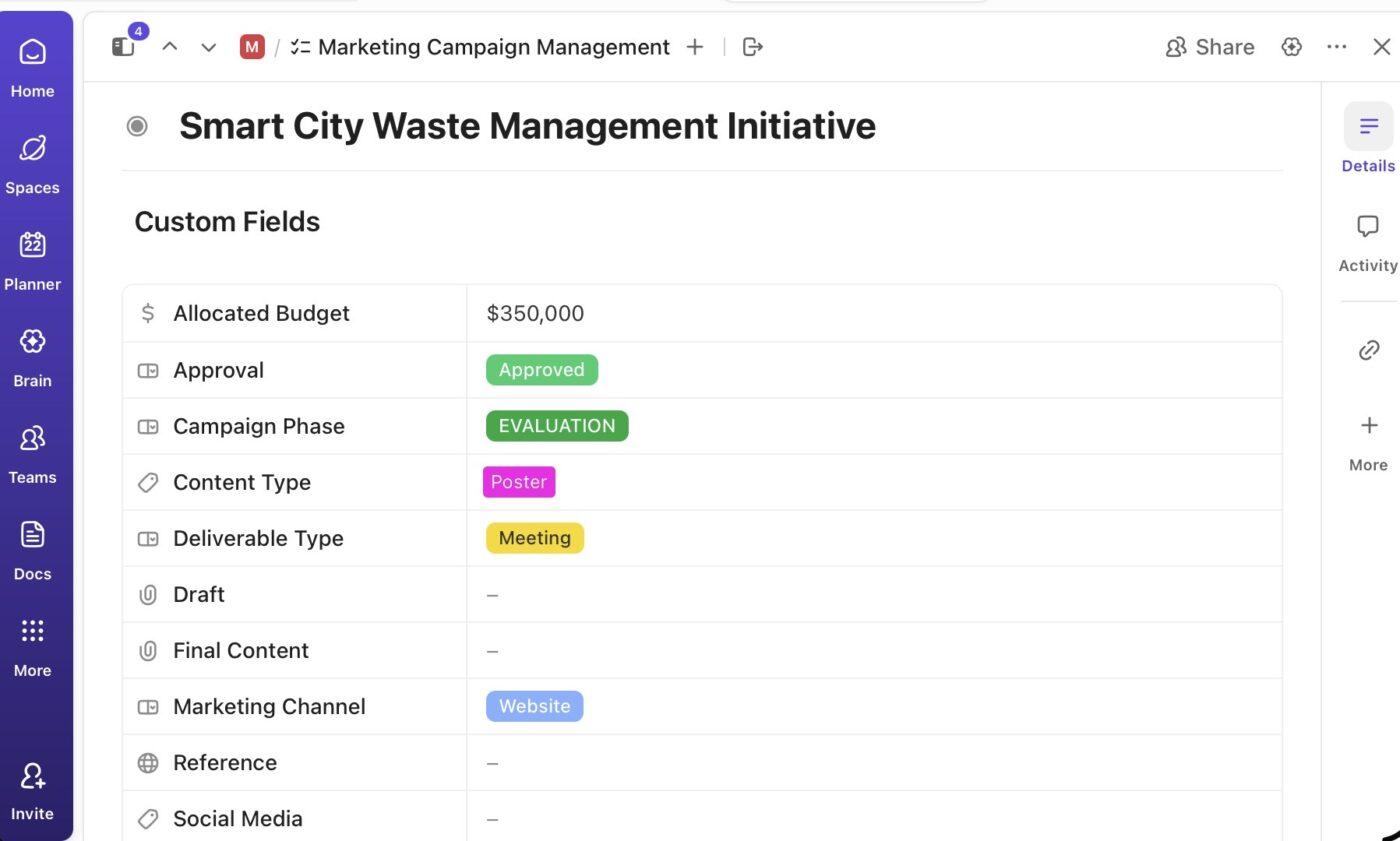
Some available field types include:
Here’s what you can do with Custom Fields:
ClickUp Relationships enable you to connect tasks, allowing you to reference related work, track dependencies, or surface data from other items. They add contextual intelligence to your workspace, especially for large or interconnected projects.
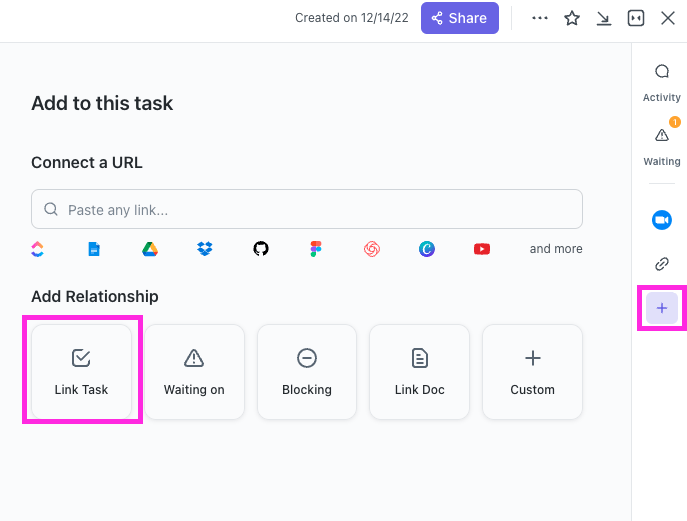
Here are the types of relationships:
1. Dependency Relationships: Ideal for project plans, engineering workflows, and sequential work. It contains two types:
2. Linked Tasks: Simple references between related Tasks. You can use this for cross-functional work, shared resources, or parent/parallel efforts
3. Custom Relationships: Offer the most control and allow you to structure connections in two ways:
ClickUp Templates act as reusable blueprints for setting up work. So instead of rebuilding structures, Tasks, or Docs from scratch, you can create a template in ClickUp or choose one from the library and start immediately. They help teams maintain consistency, reduce setup time, and standardize workflows across projects and departments.
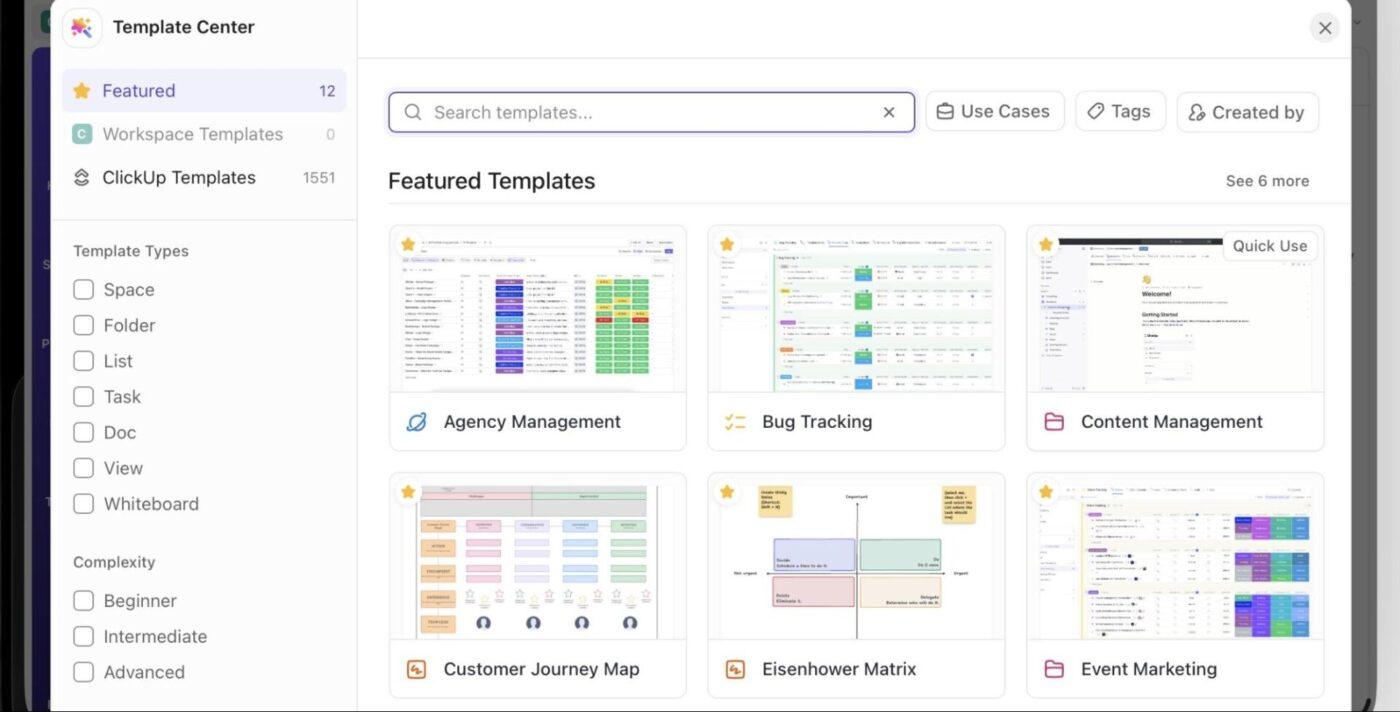
The best part is that ClickUp supports templates for almost every part of your workspace:
⚡ Template Archive: The ClickUp Project Management Template gives you a complete, pre-built Space organized by project phase. It helps you visualize resources, assign and prioritize Tasks, and manage work across multiple views, such as List and Board. With custom statuses, you always know what’s open, in progress, or done at a glance.
This section breaks down all the collaboration and management features that help teams stay aligned without switching apps.
Let’s start with ClickUp’s core communication tools.
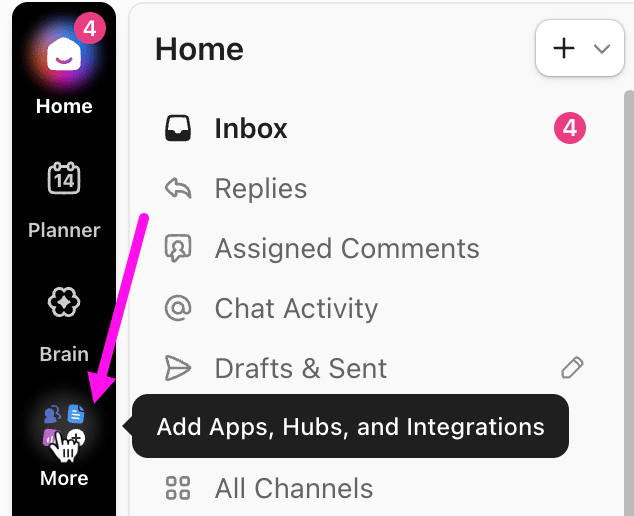
The ClickUp Inbox is your personal notification center within ClickUp. It collects updates, notifications, reminders, and important activities from across your workspace. Available to everyone (including guests), it’s unique to you.
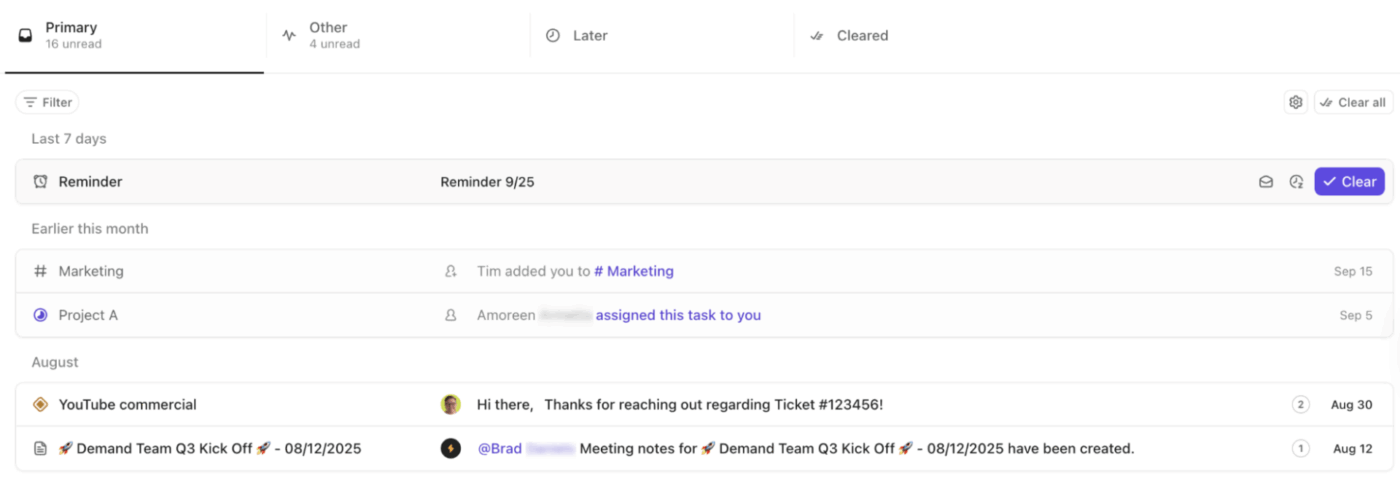
Here’s what you can do with the built-in inbox:
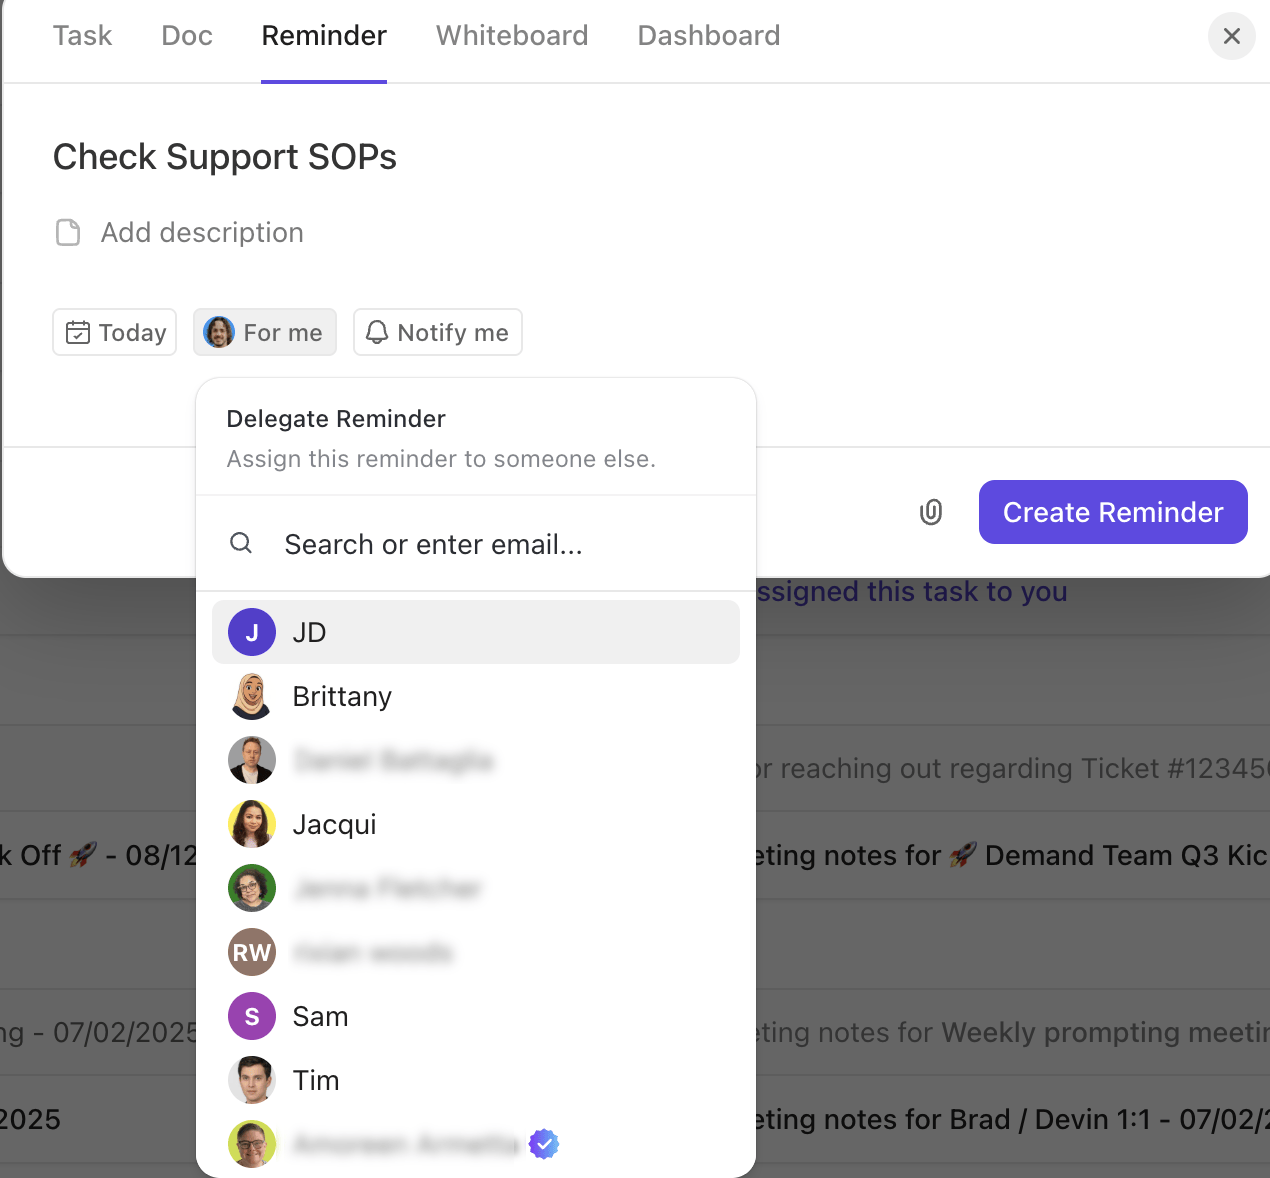
ClickUp Reminders act as your personal to-dos, keeping small Tasks from being missed. They’re lightweight, fast, and accessible from almost anywhere; you can create them from the toolbar, My Tasks, Tasks, comments, Chat, or AI Command Bar.
Add necessary details to your Reminder, like a description, due date, and attachments. You can also delegate Reminders to teammates or adjust their notification settings.
ClickUp Chat is a real-time messaging tool that gives teams a dedicated space for conversations. It supports both Channels and Direct Messages, so you can talk to the whole team or keep things private.
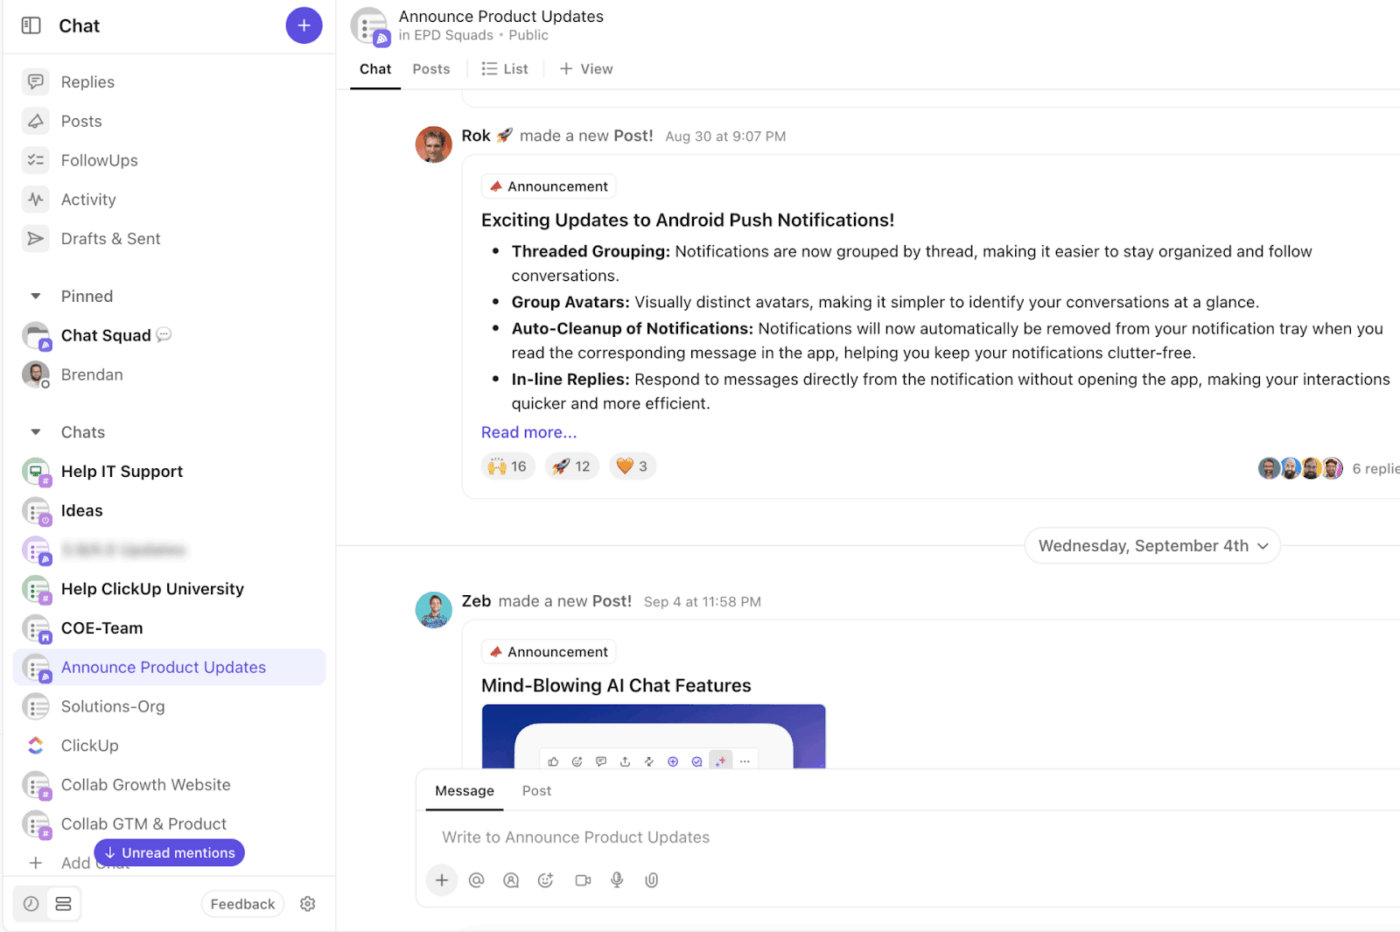
Here are some of its features:
Here’s why you should pick ClickUp Chat:
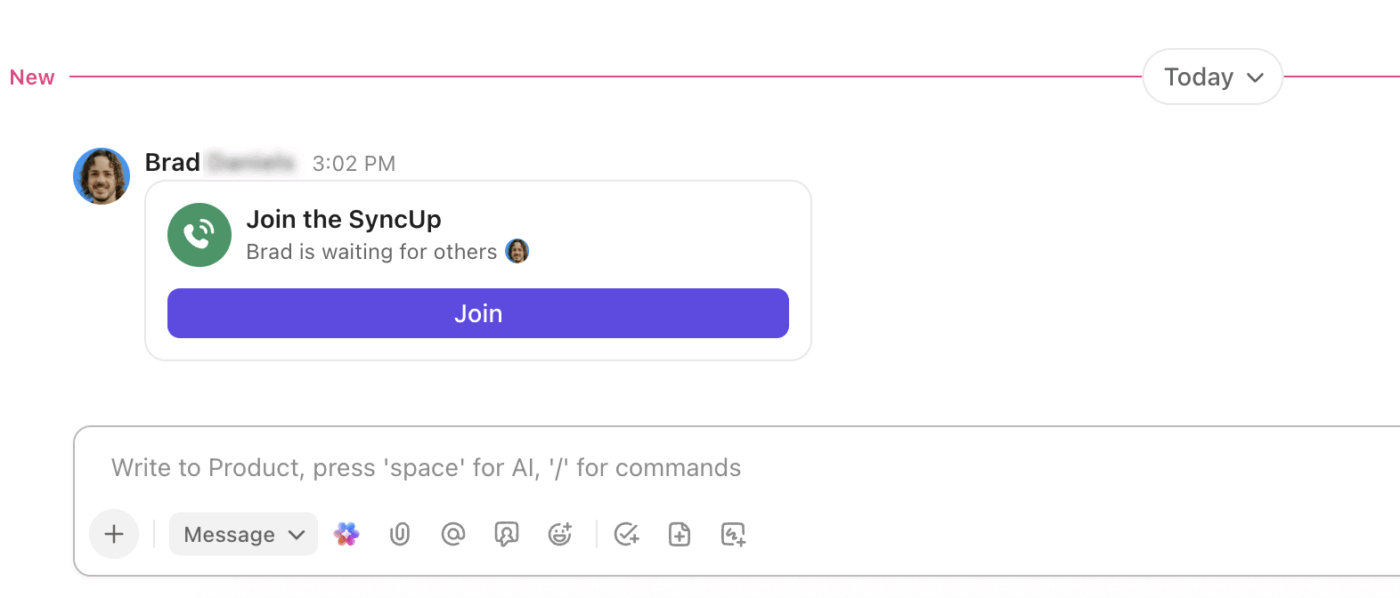
🚀 ClickUp Advantage: Built right into Chat, ClickUp SyncUps let you hop onto quick voice and video meetings. You can start a SyncUp in your workspace, share your screen, and link Tasks to it for focused discussions. You can also record meetings and get AI-generated transcriptions and auto-summaries.
For moments when real-time conversations aren’t needed, ClickUp Clips let you share context just as effectively, on your own time.
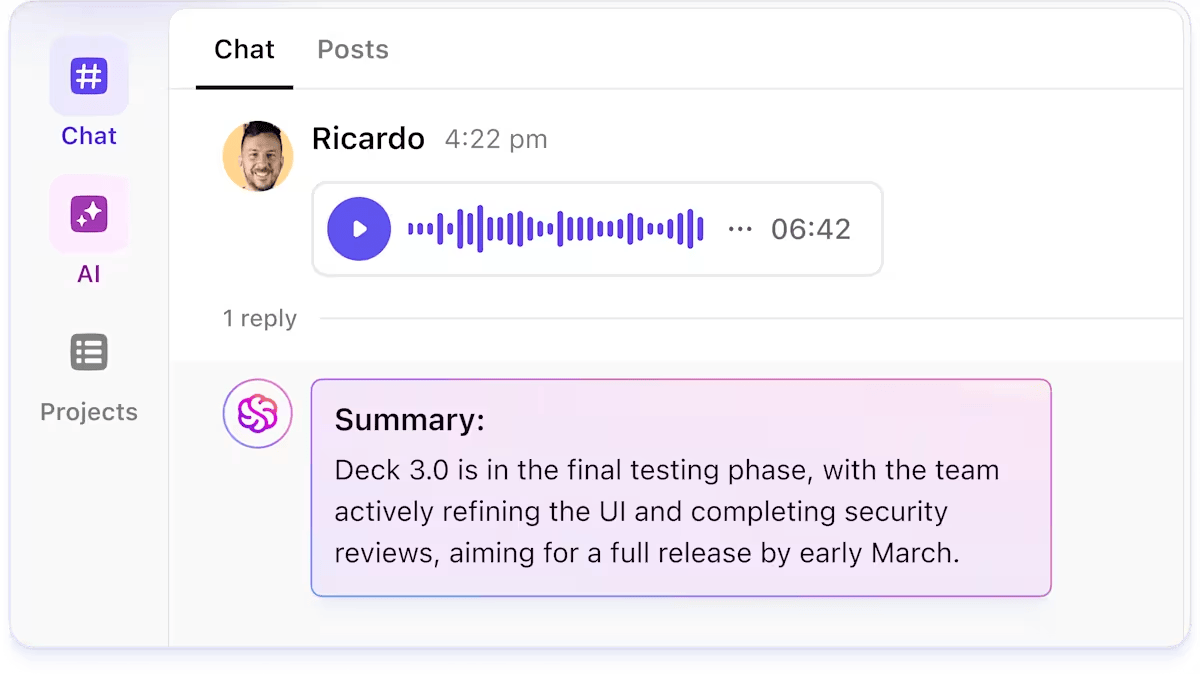
Clips let you record your screen, your microphone, or both, making it perfect for async updates, feedback, training, or quick explanations. All recordings are organized in the Clips Hub, making them searchable and easy to share.
You can also add timestamped comments on Clips directly for precise feedback and share them using public links.
🔍 Did you know? SyncUps and Clips work hand-in-hand inside ClickUp. Every SyncUp recording automatically becomes a Clip and shows up in your Clips Hub. This means all your communication, live or async, lives in one space, with transcripts and AI summaries ready when you need them.
ClickUp Comments are messages you can leave on Tasks, Docs, attachments, and other items for collaboration, feedback, questions, approvals, and general discussion. They support rich text, file attachments, emojis, and can be threaded for focused conversations.
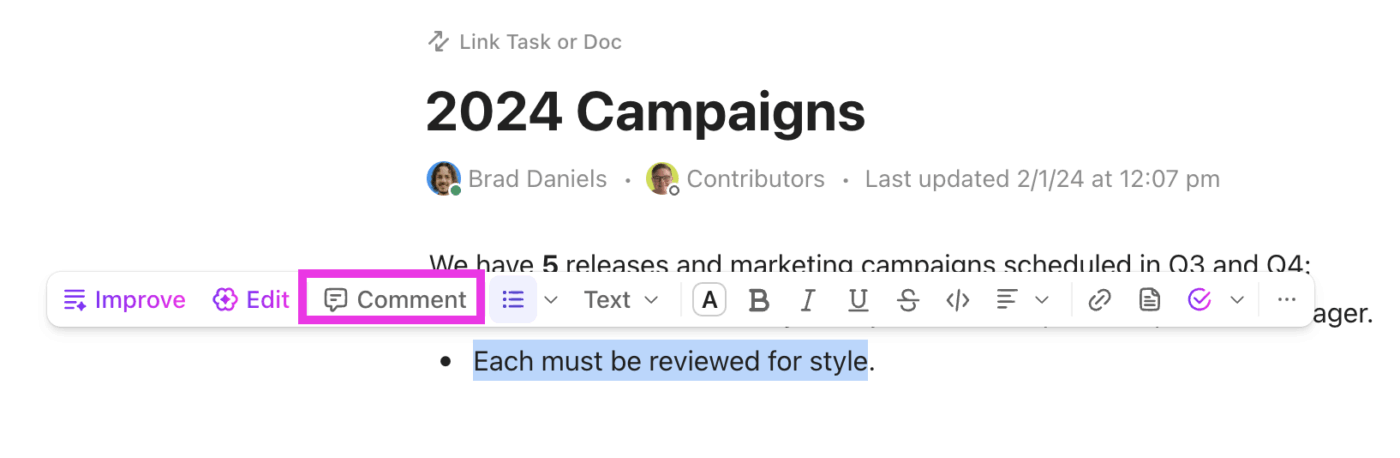
You can create Tasks or Subtasks directly from comments, save them for later, turn them into reminders, use AI to summarize threads or generate replies, and even record Clips and attach them directly within comments.
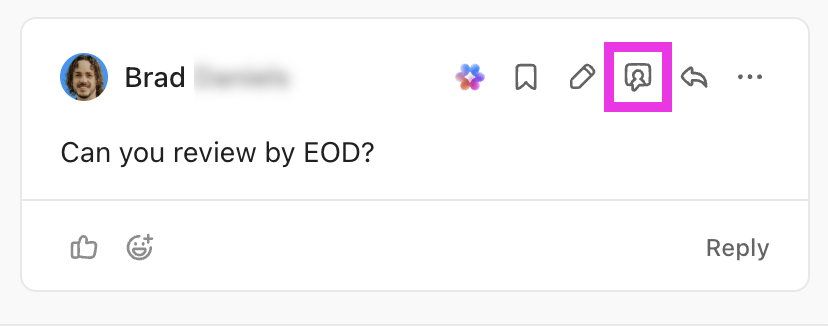
ClickUp Assign Comments takes things a step further by turning any comment into a clear, actionable item. When you assign a comment to a specific person, they’ll be notified immediately. If someone tries to close the task, they will be notified of any unresolved comments.
💡 Pro Tip: Tag a user, Team, or item (like a Task or Doc) using @mentions. It notifies the right people and helps bring context into conversations.
Some special ones include:
Below are the core organizational elements every ClickUp workspace relies on.
ClickUp Custom Statuses define the exact steps work must pass through before it’s considered complete. They replace one-size-fits-all workflows with stages that reflect how your team operates.

Here’s what you can do:
ClickUp Task Tags give you lightweight, flexible categorization that layers on top of your main structure. They act like metadata, perfect for labeling Tasks by theme, campaign, department, client, sprint, or status nuance that doesn’t need to become a formal Status.
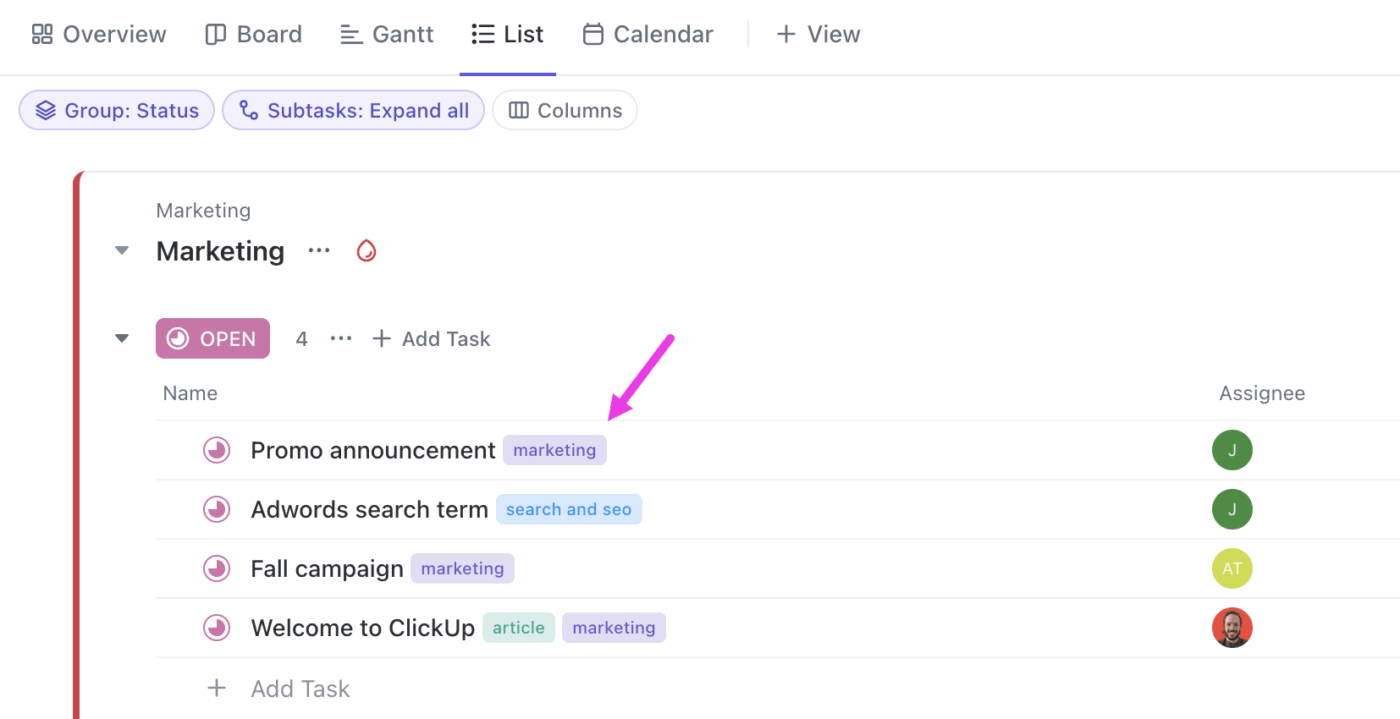
Create colorful, reusable Tags at the Space level, apply several to the same Task, and quickly search using them. You can also filter, group, and sort your work across List, Board, and Table views using these labels.
Here’s what Ansh Prabhakar, Business Process Improvement Analyst, Airbnb, had to say about ClickUp:
ClickUp has a lot to offer in one place, such as project management, brainstorming options, task management, project planning, documentation management, etc. It has definitely made life comparatively easier as it’s easy to use, UI is well designed, and collaboration within the team and with other teams is easier. We were able to manage work better, track and report work easily, and based on progress daily huddles, future planning was easy.
ClickUp Task Priorities adds a clear signal of urgency to Tasks. They help teams understand what matters most right now, without needing to read through descriptions or comments.

Priority levels in ClickUp include Urgent (red), High (yellow), Normal (blue), and Low (grey). Filter, sort, or group Tasks by priority in any view and trigger automations based on them. You can also use Priority Breakdown and Priority Over Time cards in Dashboards.
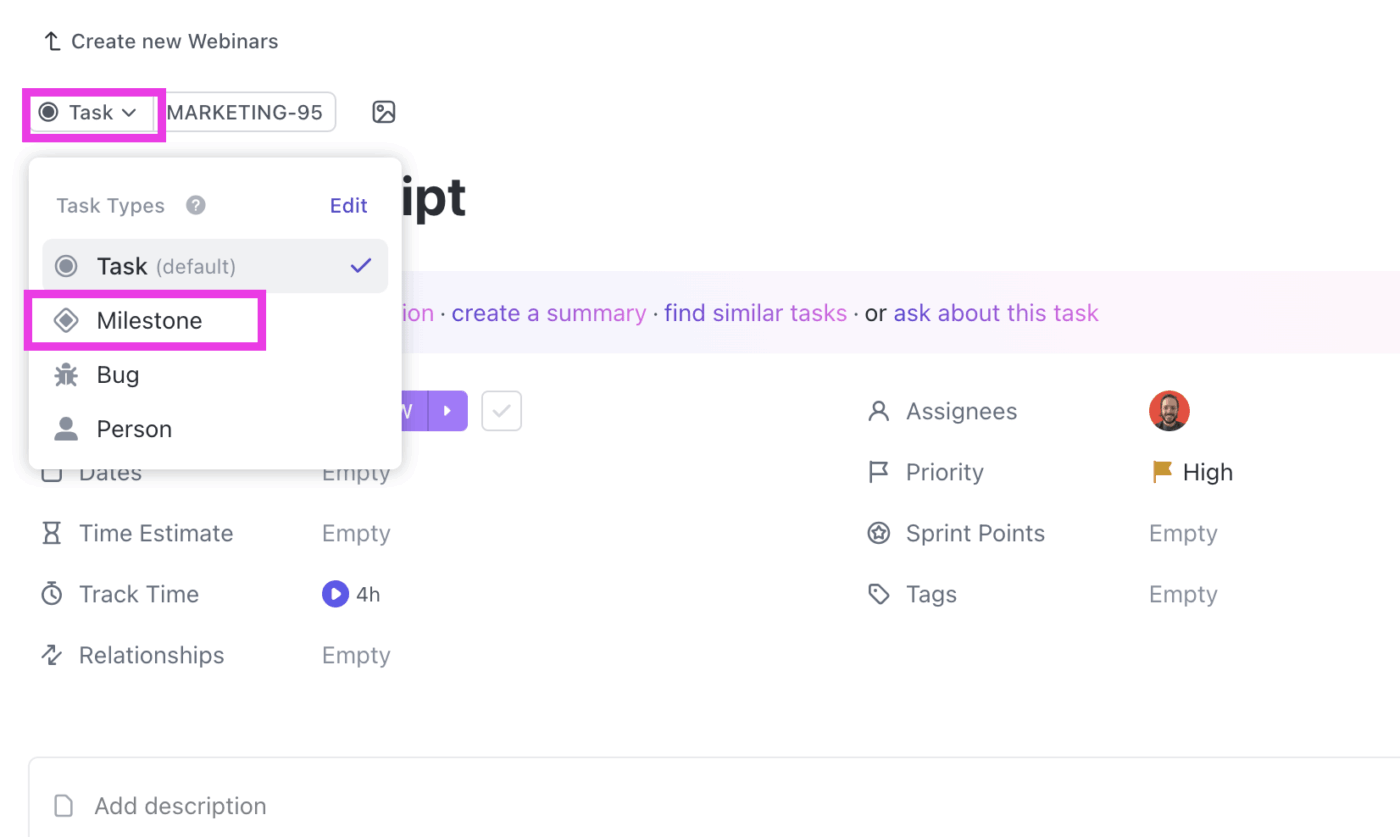
ClickUp Milestones represent major checkpoints in a project, such as release dates, launch days, critical events, or stage and project completions. They’re a custom task type that helps teams track whether they’re on schedule for big outcomes.
ClickUp Dependencies define how Tasks relate to one another, specifically which Tasks must finish before others can start. They prevent scheduling conflicts, keep timelines realistic, and help teams understand what is stuck or blocked.
Dependency types in ClickUp include:
Some advanced features include:
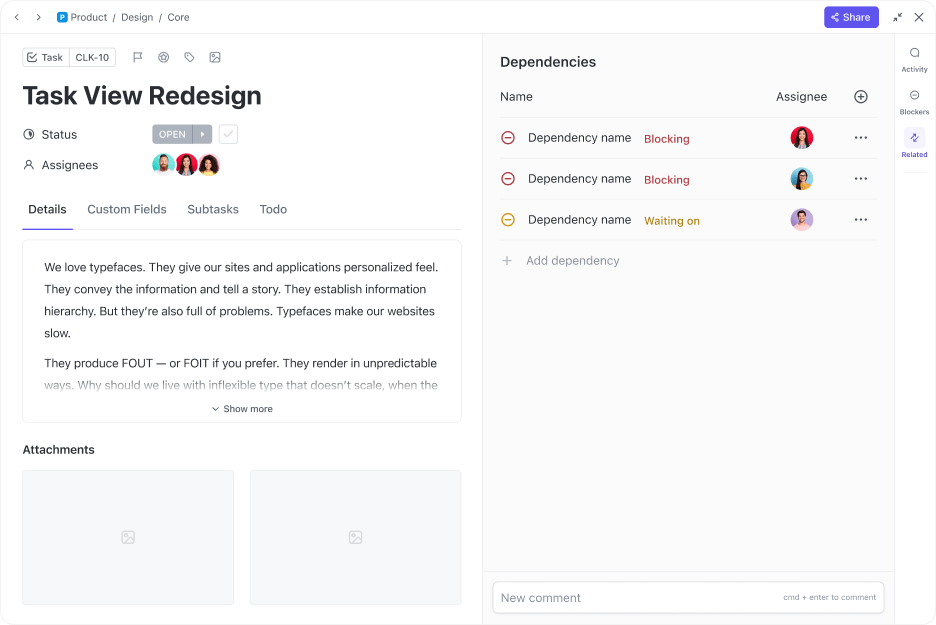
💡 Pro Tip: The best way to visualize Dependencies in ClickUp is through Gantt View. It lets you see how tasks connect across your entire project, adding visibility to blockers and bottlenecks.
ClickUp Permissions define the exact actions a user can take on any item or location in ClickUp. They can be applied at multiple levels, such as Workspace, Space, Folder, List, or individual Tasks and Docs.
Here’s how Permissions help:
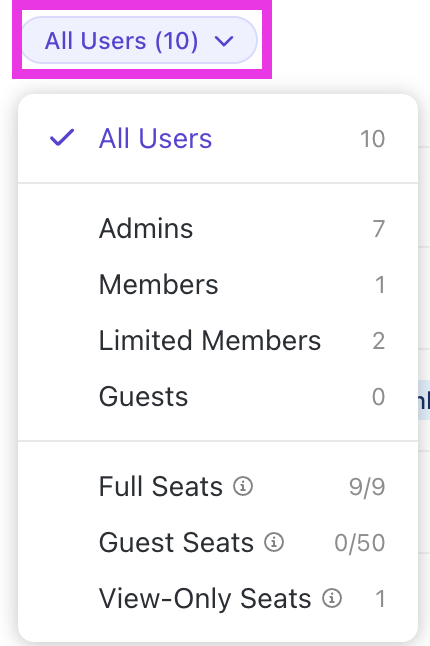
User-level permissions include:
💡 Pro Tip: You can also add Guests in ClickUp. These are external collaborators such as clients, contractors, or vendors, who only get access to items you explicitly share. They don’t see your full Workspace, making it a safe option for external work.
Guest types include:
Teams in ClickUp are shared user groups you can assign work to, mention in comments, or add as followers, making it easy to collaborate with entire departments or project squads at once.
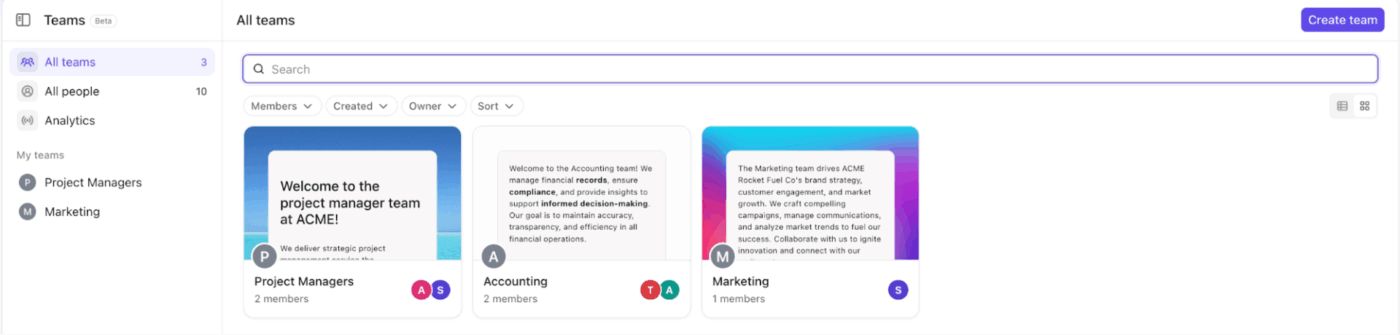
Furthermore, the Teams Hub gives you a centralized place to see every team in your Workspace, manage members, and review their work.
Workspace owners and admins can create Teams, add members, set unique icons, and control permissions.
💡 Pro Tip: Here’s how to create a Team in a few quick steps:
Now that we’ve covered access controls, let’s move into the tools that help you save valuable time.
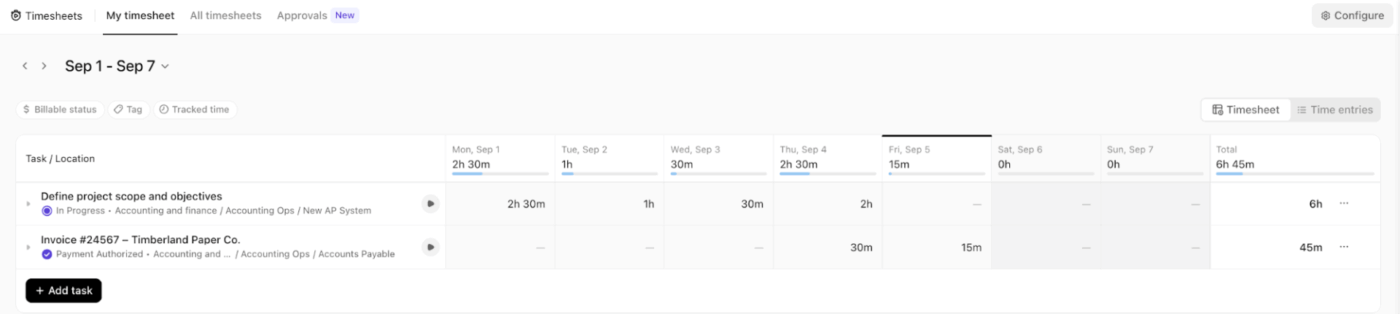
ClickUp Time Tracking is a built-in feature that allows you to log, track, and report time spent on Tasks directly within your workflow. It helps you monitor productivity, manage billable hours, and analyze how time is allocated across different activities.
You can add notes, labels, billable flags, and rollup totals to your time entries so every log is clear, categorized, and ready for accurate reporting.
It lets you:
🔍 Did You Know? ClickUp Timesheets aggregates the time tracked by users (either manually or with timers) and presents it in an organized table for reporting, approvals, and analysis.
Here you can:
ClickUp Recurring Tasks automatically regenerate Tasks on a schedule you define (daily, weekly, monthly, yearly, or fully custom) so repeatable work happens without manual setup. They use due dates as the anchor, create the next instance either instantly or on schedule, and let you choose whether to update the same Tasks or generate a new one each time.
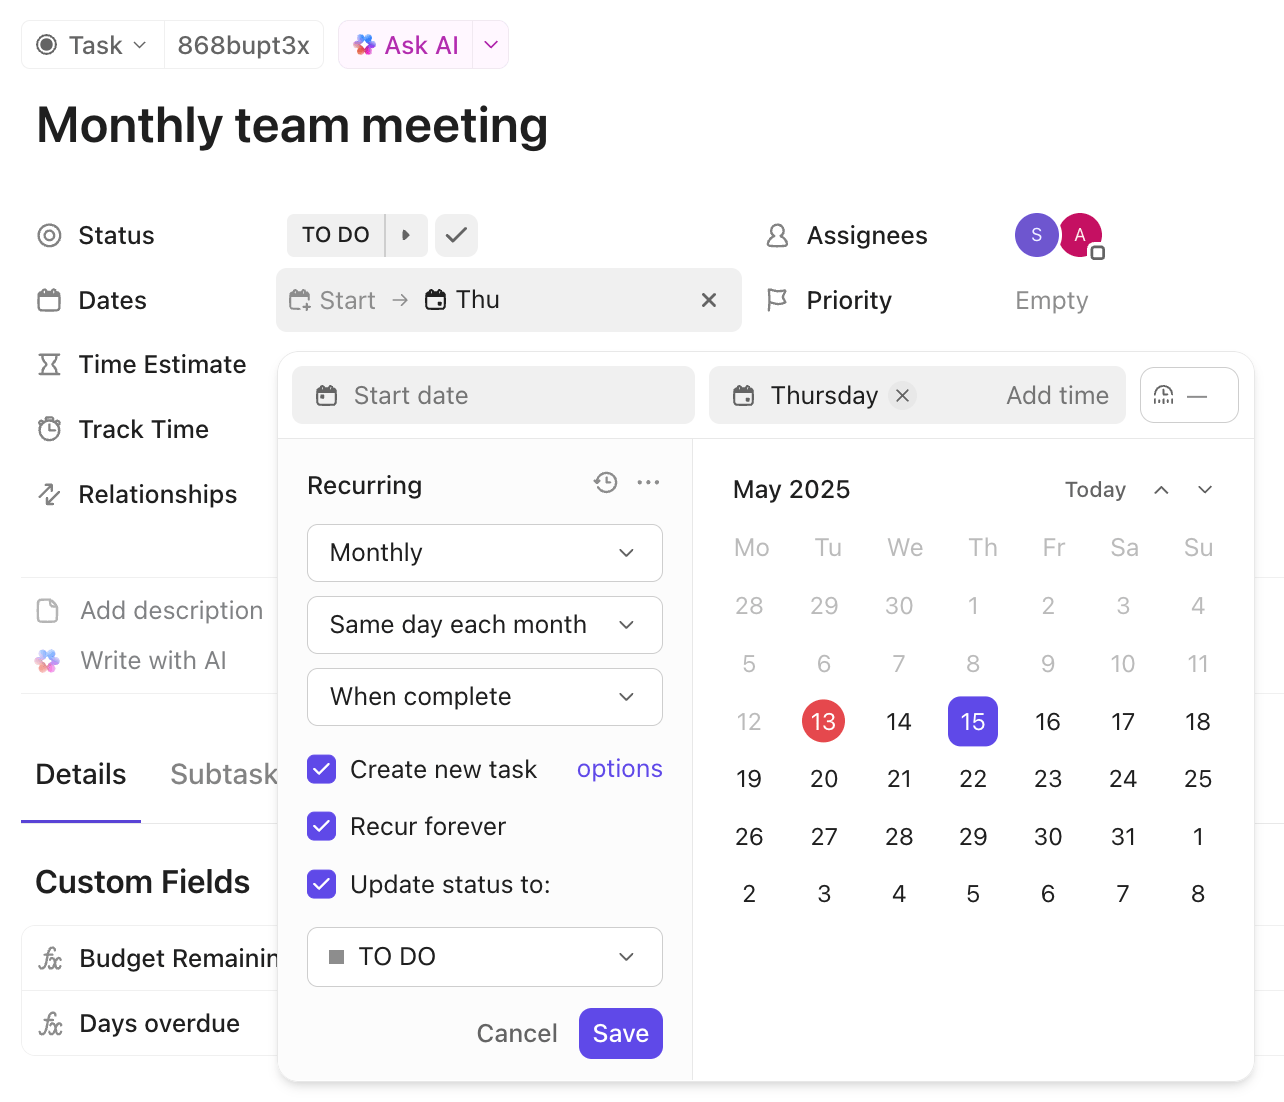
Use recurring tasks to:
ClickUp’s Bulk Actions or Multi-Tasks Toolbar lets you update multiple Tasks at once. This is perfect for cleanup, reorganizing, or managing large projects.

Here’s what you can bulk-edit:
In ClickUp, you can share locations and items using public links without giving full access to your Workspace. Instead of adding others as members or guests, you can simply generate a link and let them view what you want them to see.
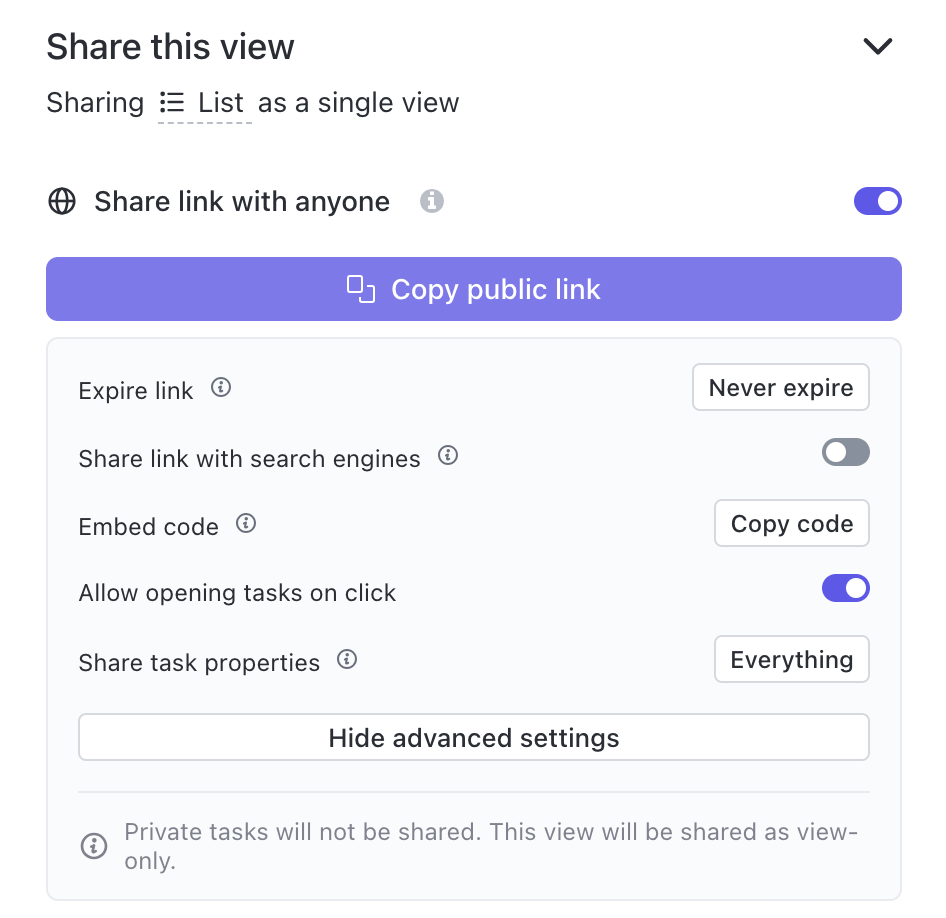
Most Workspace items can be shared publicly. People accessing the link don’t need a ClickUp account, and everything is view-only by default.
| Shareable | Unshareable |
|---|---|
| Tasks | Private Spaces, Folders, or Lists |
| Docs, wikis, and pages | Any Chat threads at those locations |
| Whiteboards | |
| Form views Views like List, Board, Calendar, Timeline, Gantt, and Table (depending on the plan) | |
| Entire ‘All Spaces’ (Everything level) on Business plans and above |
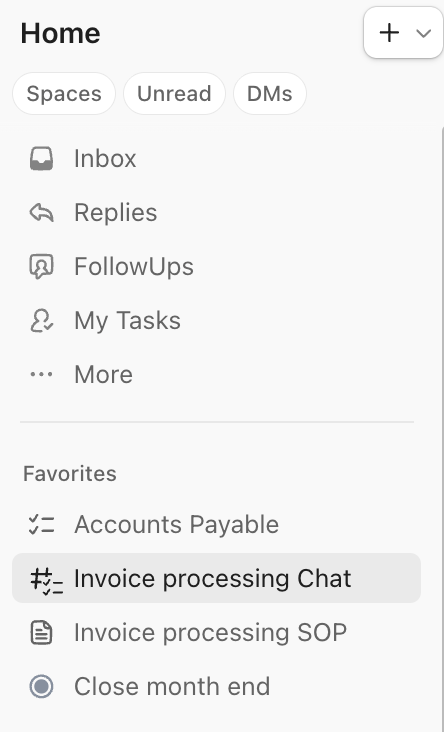
Favorites in ClickUp give you a quick way to jump into the work you open every day, such as your go-to Lists, key Docs, high-priority Tasks, active Chats, or dashboards you monitor nonstop. Favorites are available to everyone on all plans (even guests) and are completely personal.
Now that you’ve seen the basics, let’s level up. ⬆️
Here are some powerful updates and advanced features that make ClickUp even more useful in your everyday work.
Most teams today are juggling different AI tools: one for writing, one for search, one for project updates, one for meeting notes, one for image generation, and more.
That AI sprawl slows teams down.
ClickUp’s Brain is your intelligent assistant that brings all these capabilities into one place, so you’re not bouncing between disconnected apps just to get simple work done. And because it’s embedded in your workspace, it understands your work, surfaces real answers, and takes action.
Here’s how to use BraiGPT for optimized workflows:
ClickUp Brain keeps projects moving, summarizes activity, highlights risks, and handles repetitive updates for you.
It helps you:
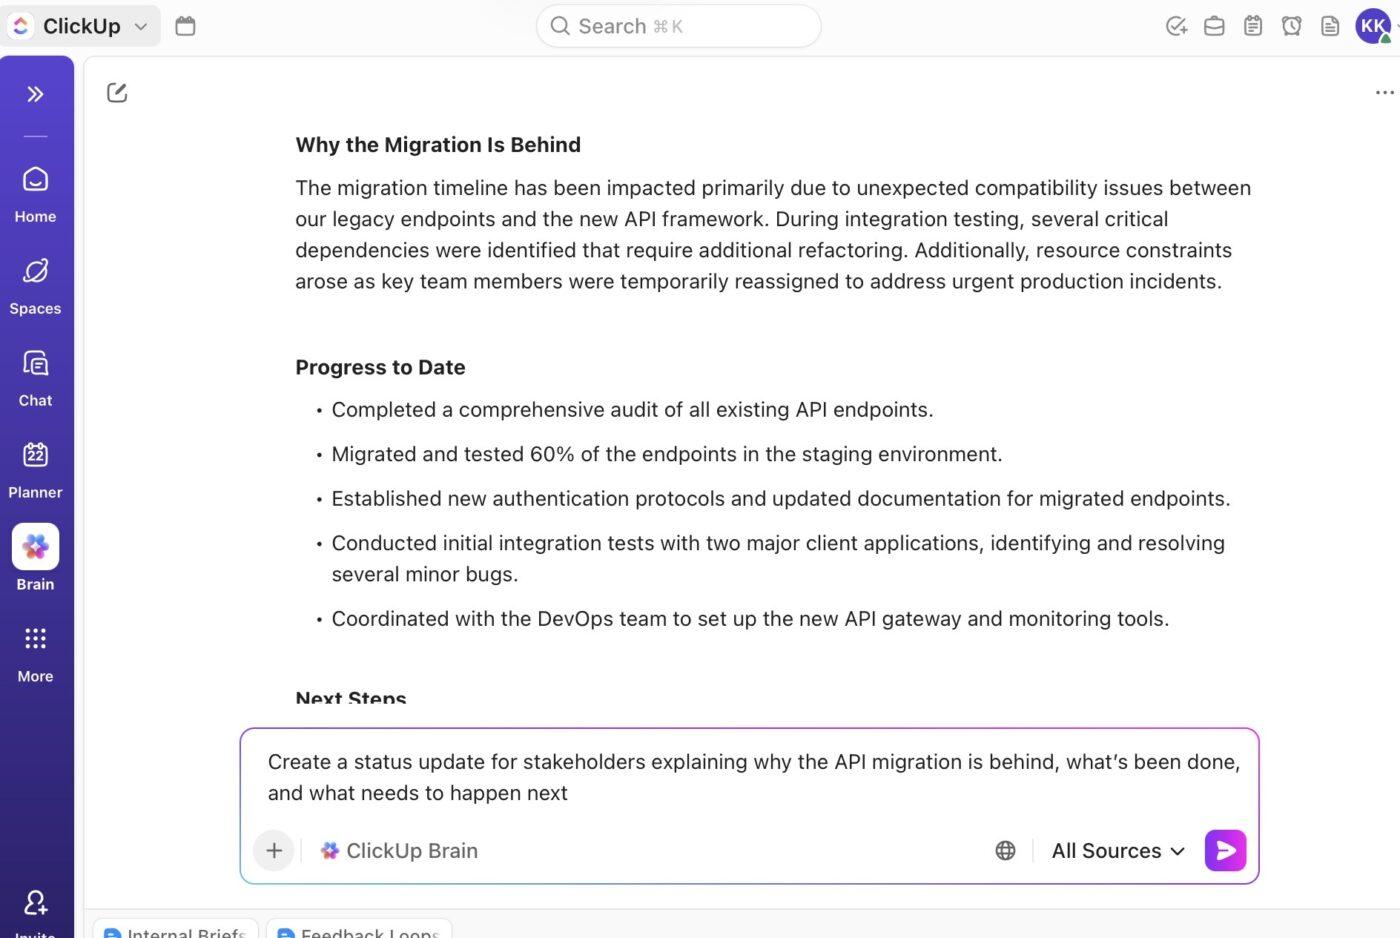
Suppose your launch sprint is slipping. ClickUp Brain flags three Tasks untouched for 7 days, summarizes the sprint in seconds, and tells you exactly what’s blocking progress. It suggests next steps, updates assignees automatically, and even creates a ‘Fix API Latency’ Task when you ask it to.
📌 Example Prompts:
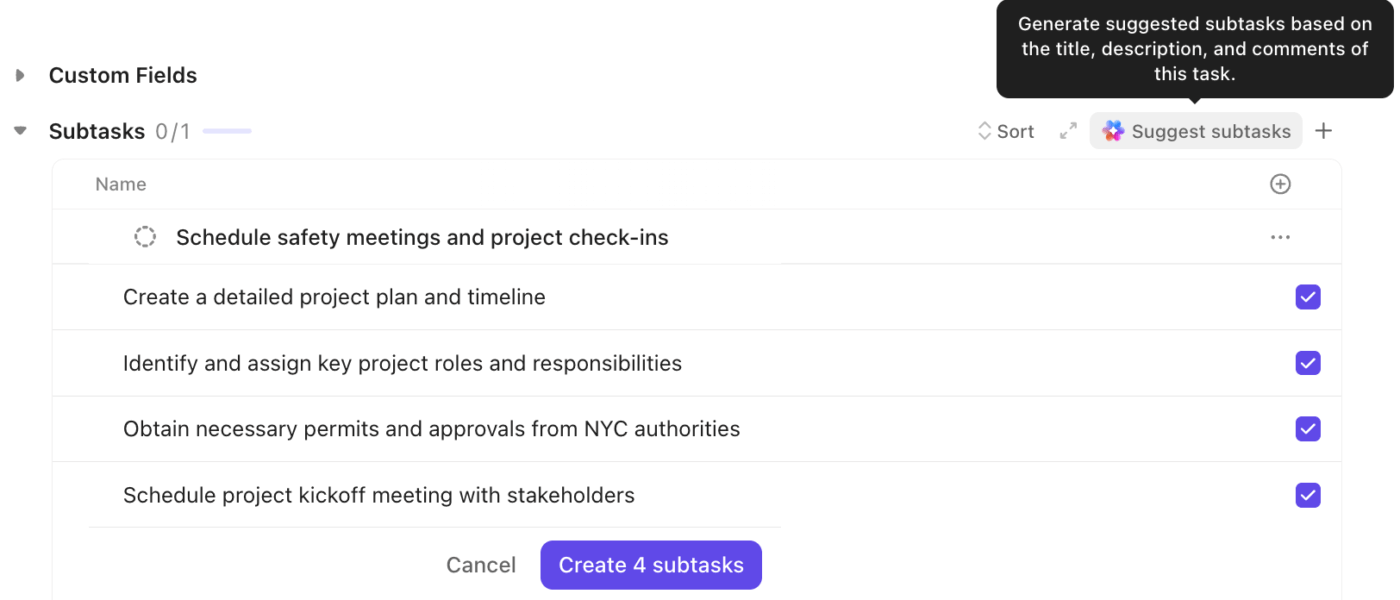
🔍 Did You Know: You can create Subtasks with ClickUp Brain and turn messy feedback or long comments into structured Subtasks. It analyzes the content and creates clean, titled Subtasks you can assign or track.
Just hover over the comment, click the Brain icon, and choose Create Subtasks.
ClickUp Brain acts like your workspace-wide knowledge engine that connects your organization’s people, work, and information.
It lets you:

📌 Example Prompts:
ClickUp Brain acts as a built-in writing assistant for drafting, editing, summarizing, and improving content. Here’s what you can do with it:
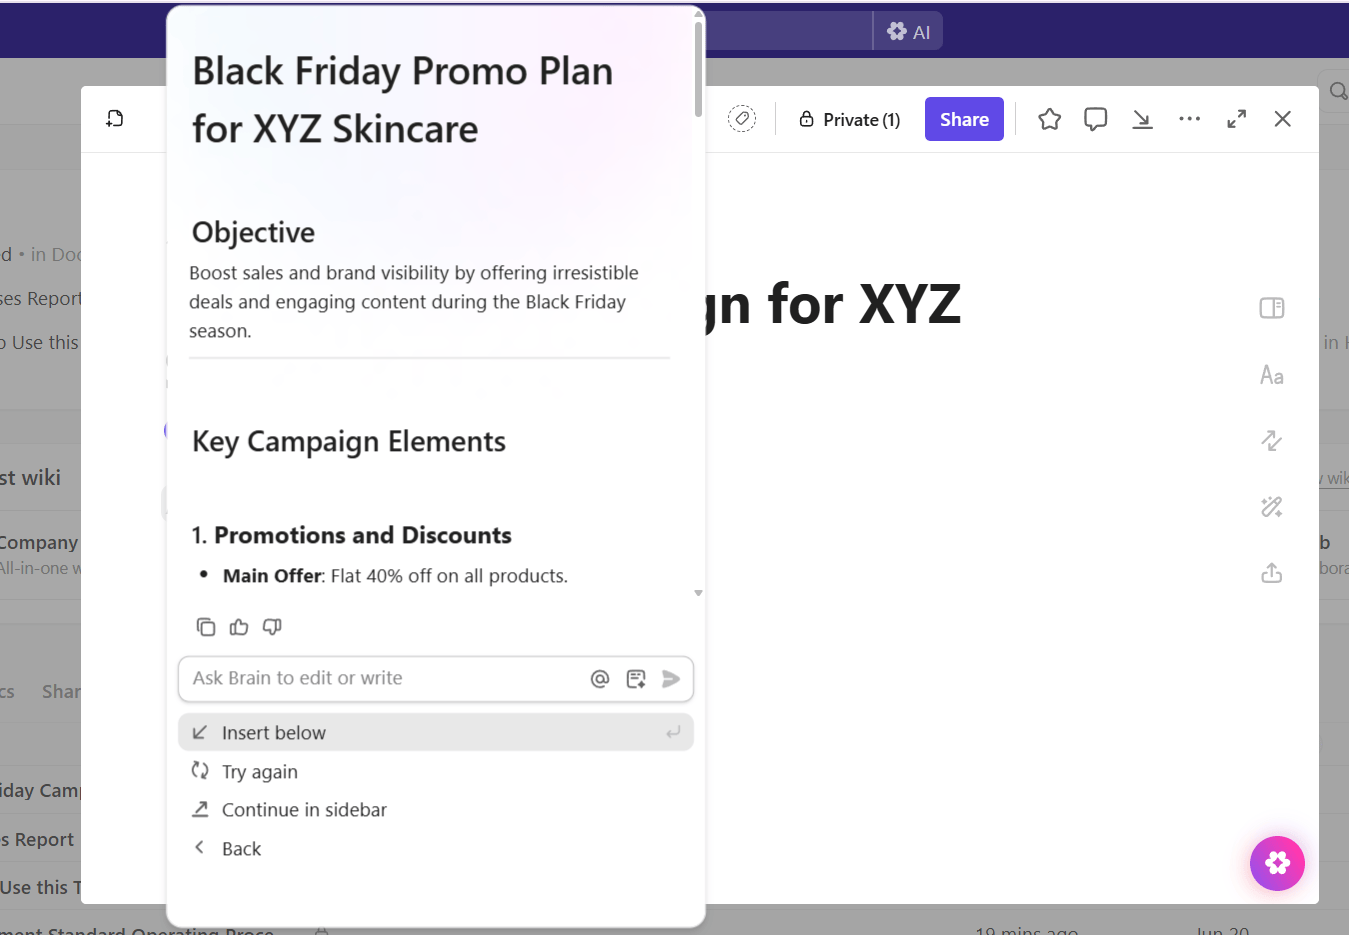
📌 Example Prompts:
You can also generate images with Brain to create or edit visuals directly inside ClickUp Whiteboards. It’s made for quick, contextual image creation during brainstorming, planning, or documenting work.
Here’s what you can do:
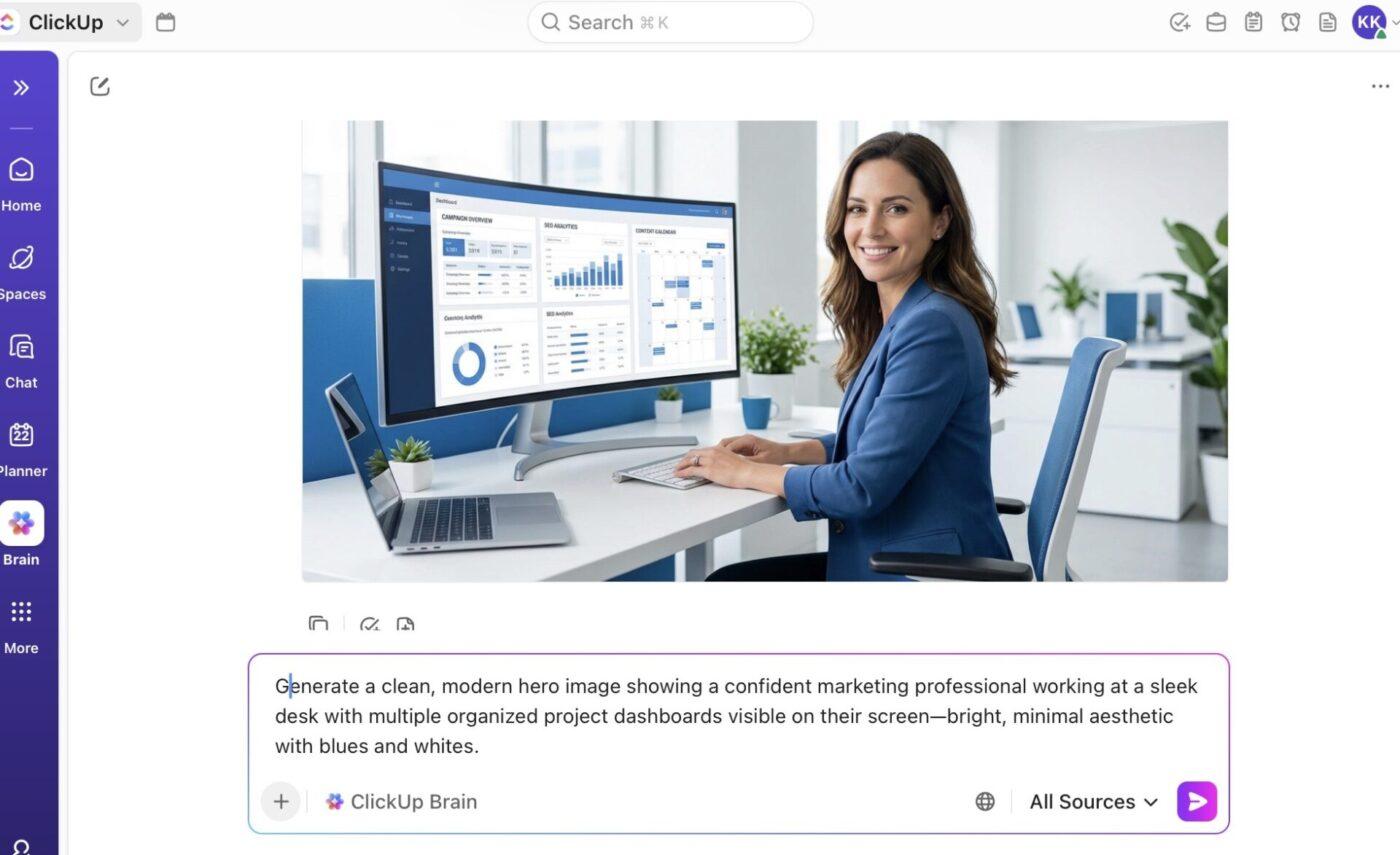
📌 Try these prompts:
The ClickUp AI Enterprise Search is a unified search engine that scans your entire workspace and all your connected apps from one place, giving you real answers, not just links. It pulls information from Tasks, Docs, chats, files, meetings, and external tools while respecting permissions and keeping your data fully secure.
Additionally, you don’t have to be worried about data security. ClickUp offers enterprise-grade protection with GDPR, SOC 2, HIPAA compliance, no third-party data training, and zero retention policies.
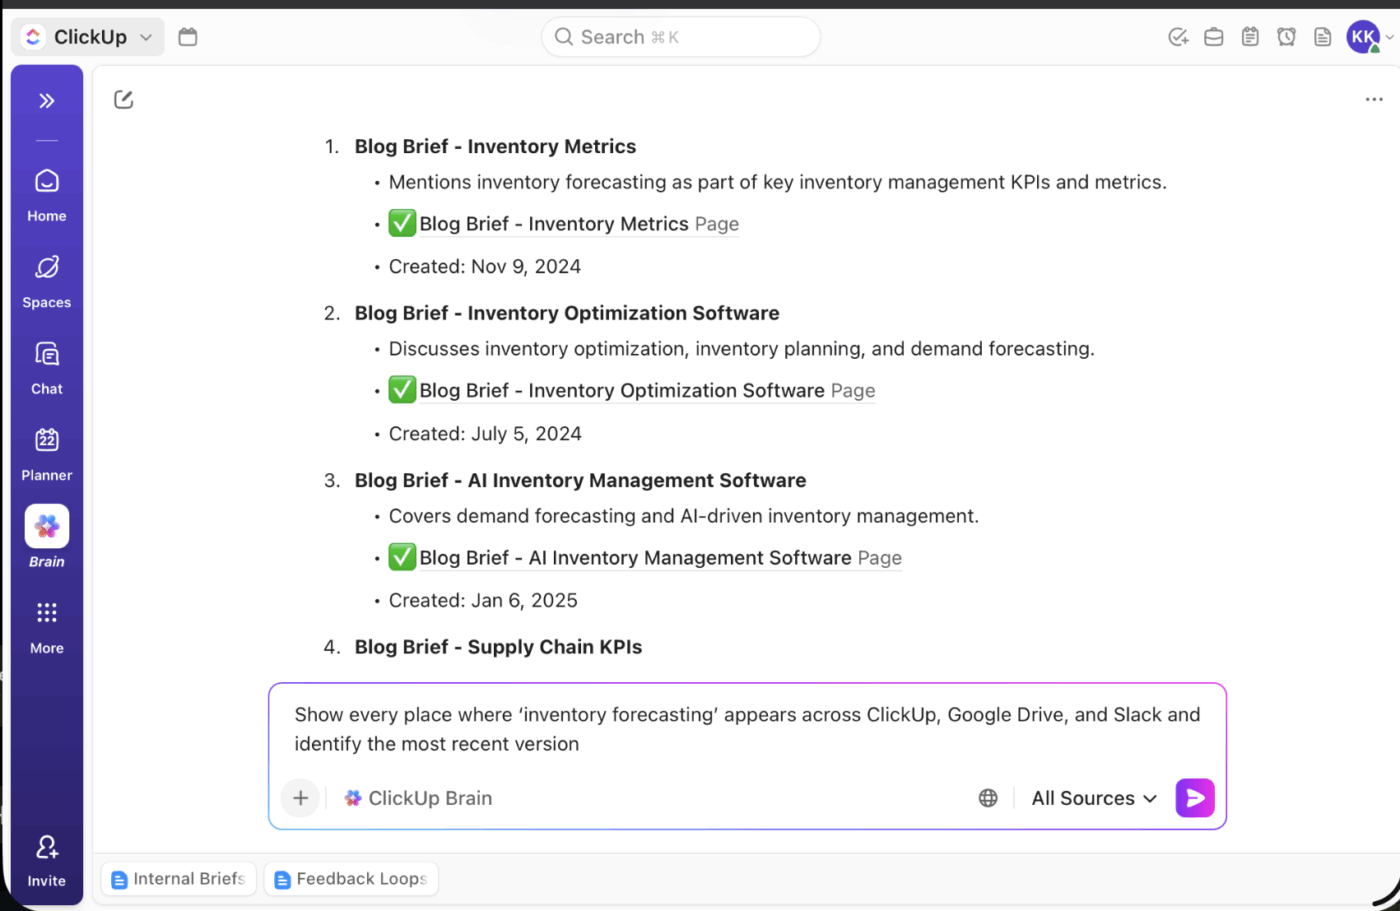
📌 Try these prompts:
ClickUp Brain MAX is the next-generation AI super-app that pulls all your tools, data, and workflows under one roof. This desktop-based, standalone offering from ClickUp is built to solve work sprawl by giving you a single, unified hub for search, automation, content creation, and deep insights.
Here’s how it helps:
Brain MAX is designed with large teams and organizations in mind, supporting enterprise-grade security and privacy, as well as LLM-agnostic flexibility.
Here are some of its other benefits:
Talk-to-Text in ClickUp Brain MAX is a voice-to-action tool that turns your speech into written content. It helps capture notes, draft long-form content, or quickly log updates before they slip away.
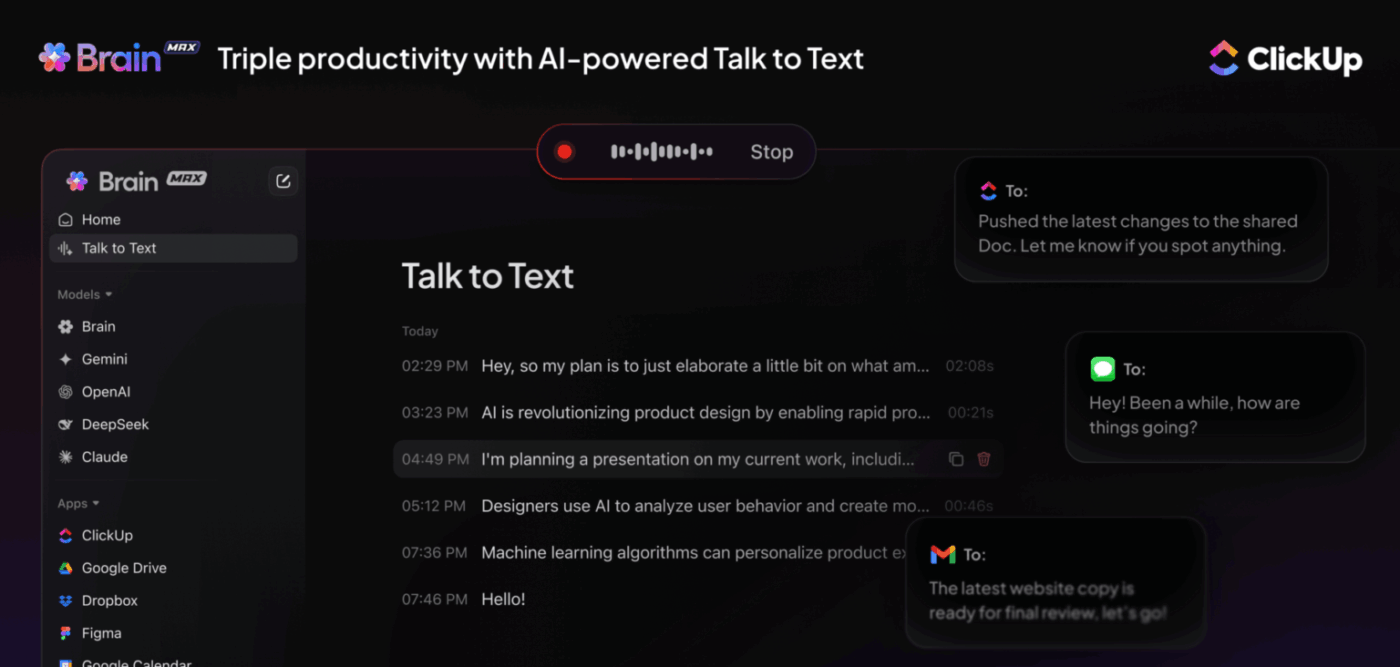
Here’s how it helps:
💡 Pro Tip: Start recording anywhere using any of these triggers:
A floating bar indicates that you’re recording. Brain MAX captures your voice in real-time so your spoken ideas instantly appear wherever your cursor is or in its search bar.
📮 ClickUp Insight: Over 60% of our survey respondents spend more than an hour a day typing, and 36.75% regularly feel discomfort or pain in their hands.
Typing fatigue isn’t just an annoying side effect of our work habits. It’s a productivity killer.
But it’s easily fixable. Brain MAX’s Talk-to-Text is your shortcut to a healthier workday.
Dictate updates, brainstorm ideas, or meeting notes hands-free, and give your wrists (and your focus) a break.
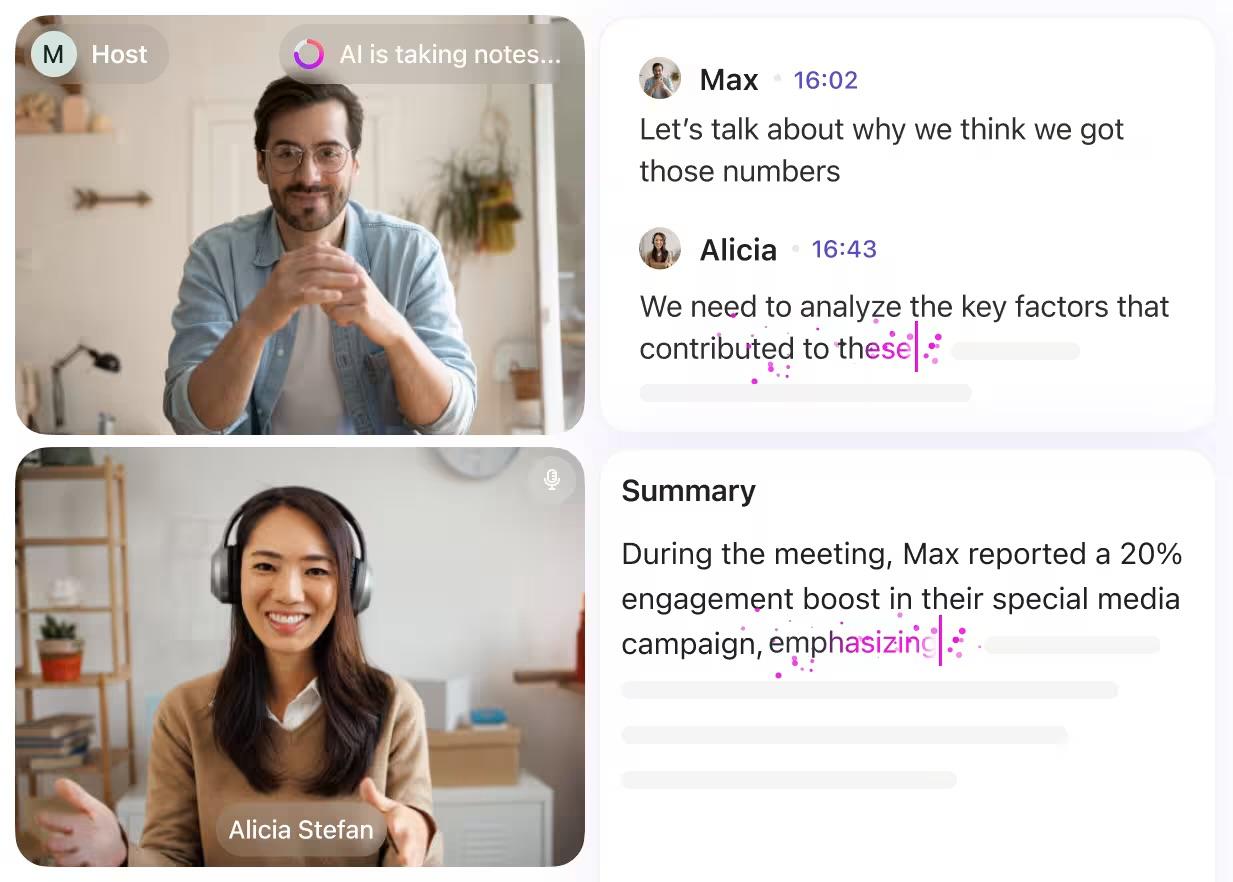
Let ClickUp AI Notetaker join your Zoom, Google Meet, or Teams calls automatically, listen in, and build a clean, structured Doc for you afterward.
You can:
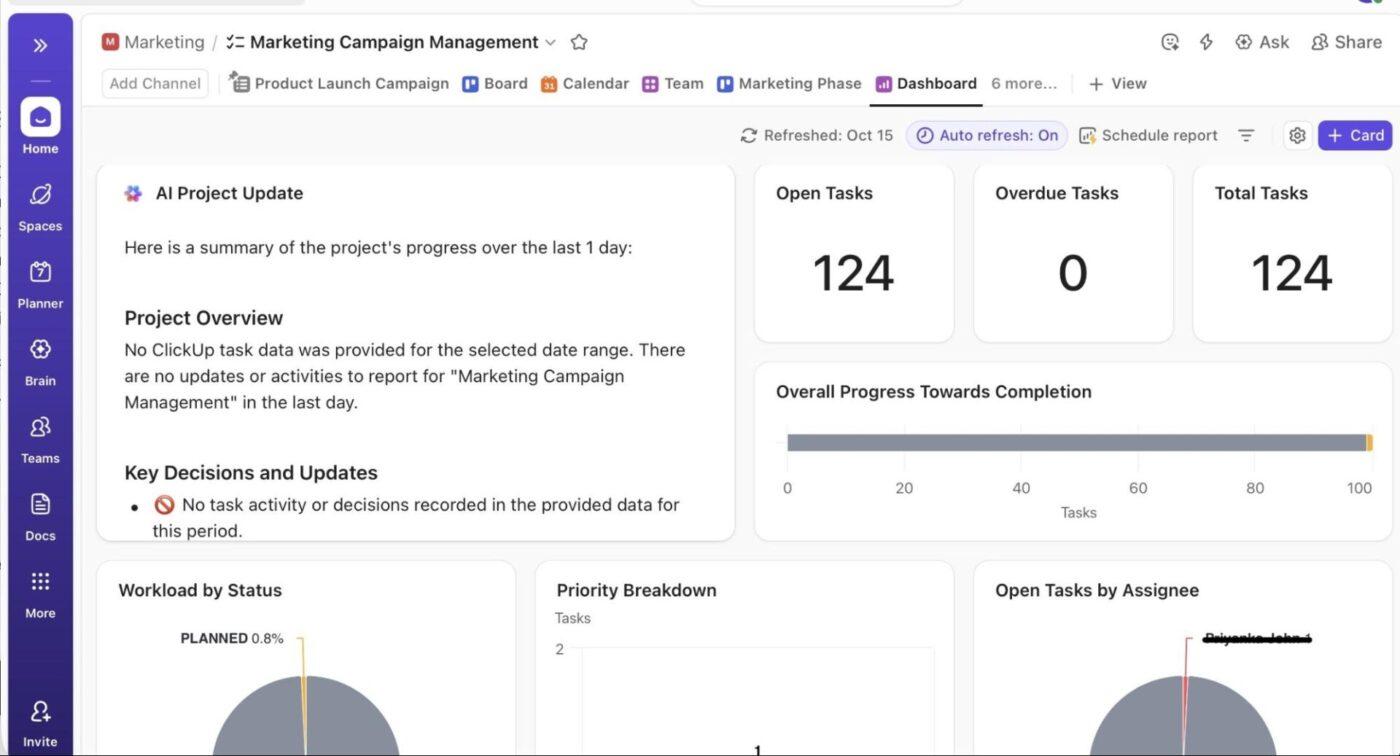
ClickUp’s AI Cards let you add live, auto-generated insights to your Dashboard. They pull real data from your Workspace to give you summaries, status updates, and quick reports.
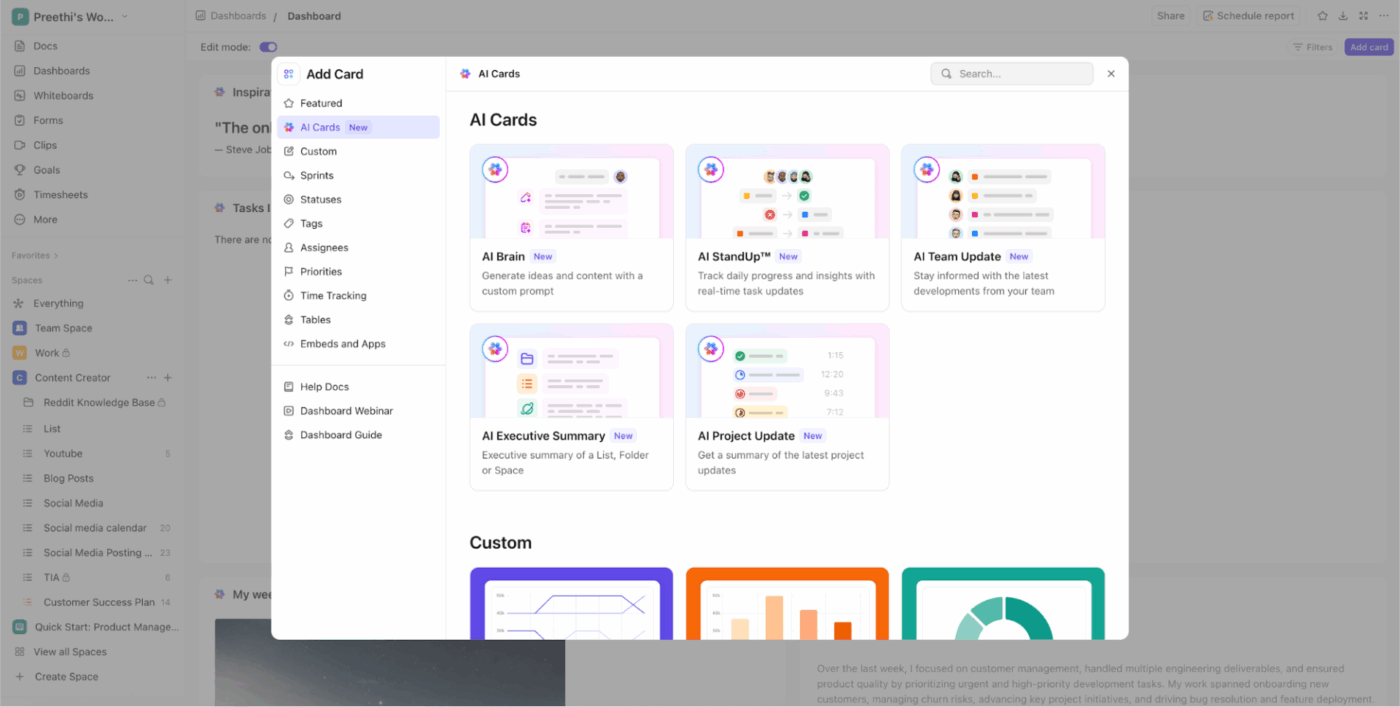
These cards are divided into prebuilt cards (with set functions) and custom cards (where you can define your own prompts):
1. Prebuilt AI Cards
Here are the main prebuilt AI cards available in ClickUp:
2. Custom AI Cards
ClickUp AI Agents are no-code coworkers that handle repetitive, predictable, or time-sensitive work for you.
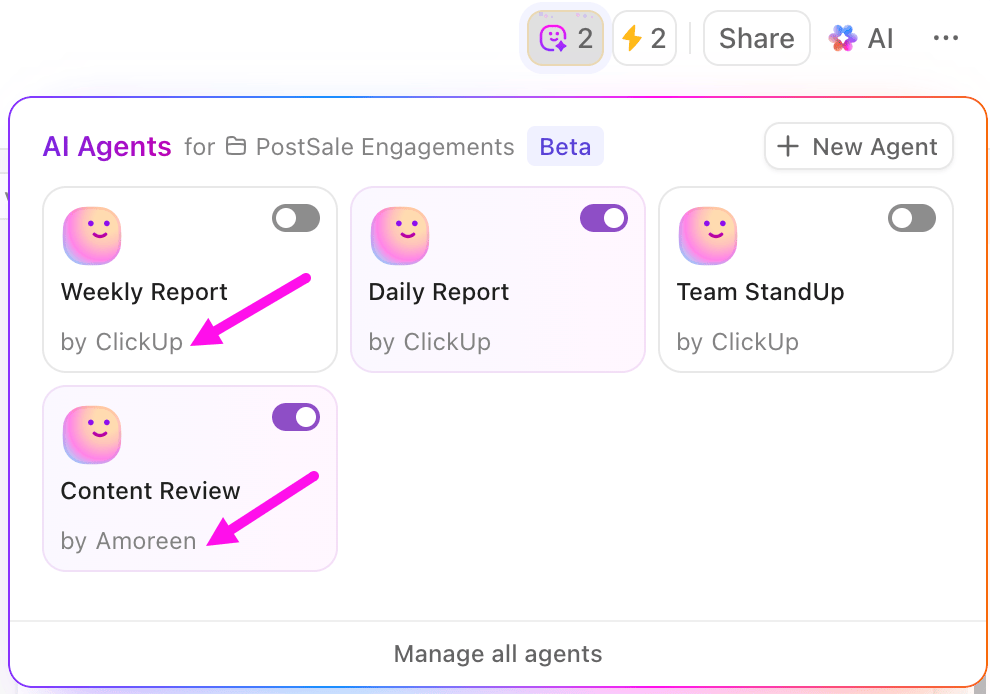
Prebuilt AI Agents are ready-made, easy-to-use agents designed for common workflows. They respond to specific triggers and perform actions like posting updates, reports, or answers.
📌 Examples of Prebuilt Agents:
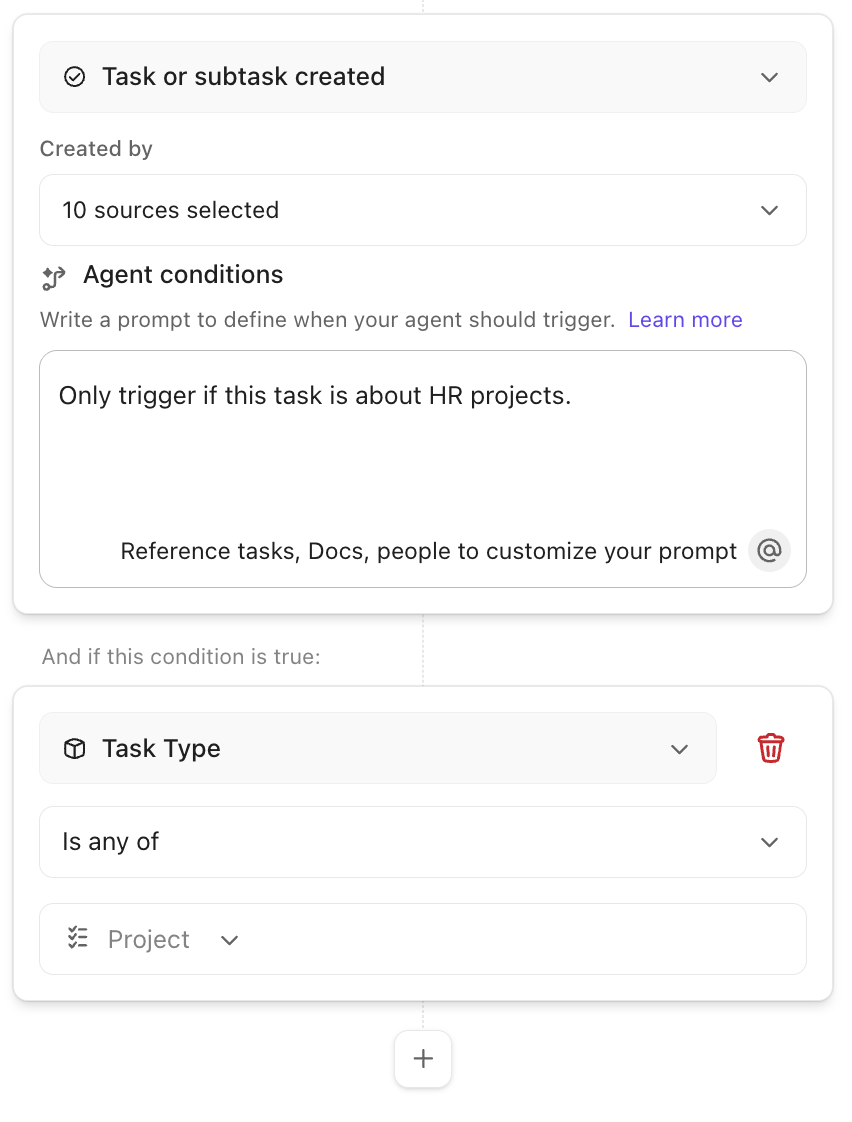
On the other hand, Custom AI Agents are fully configurable and built using a no-code builder. They allow you to define your own triggers, conditions, actions, instructions, and knowledge sources, making them highly flexible for unique workflows.
They let you:
Build your own agent:
Forget about repetitive tasks like manually assigning Tasks, setting priorities, filling fields, or blocking time on your calendar. The AI Autopilot Bundle does the heavy lifting for you. Once enabled for your Workspace, every member gets unlimited access to its features.
Let’s walk through different parts of your bundle so you can see how they fit into your day. ⌚
AI Assign helps you stop guessing who should take on what. Once you define the logic, whether it’s based on task type, keywords in the description, workload, or your own custom criteria, it steps in to assign Tasks to the right person automatically.
Turn to either of these two ways:
1. Using AI Assign
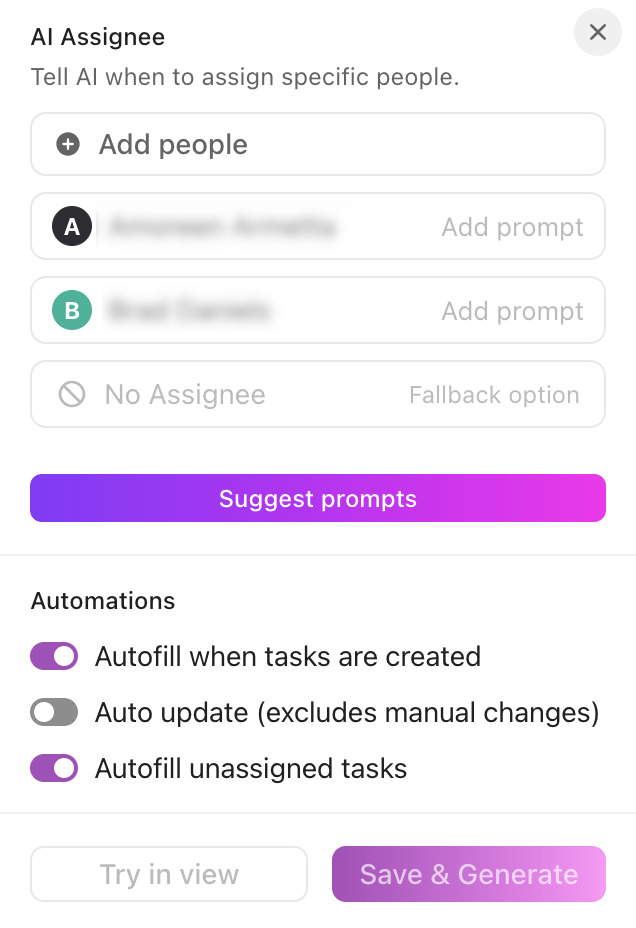
2. Using the Brain Assistant
The AI creates Tasks, fills in owners, and organizes everything based on your prompt.
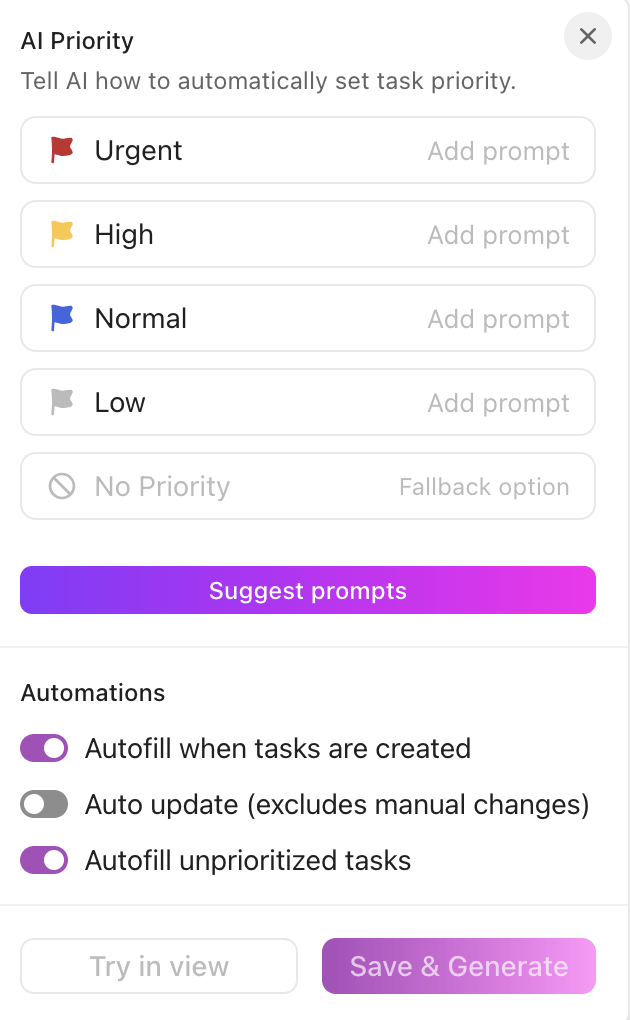
AI Prioritize automatically assigns the right priority to every Task based on the logic you define. You can set it up directly from the Priority column or through Autopilot Agents.
Here’s a step-by-step guide:
Method #1: Setting up AI Prioritize from the Priority column
AI Fields in ClickUp automatically interpret, summarize, categorize, or translate Task information based on prompts you define. Unlike traditional Custom Fields that simply store data, AI Fields continuously generate insights using context.
Use them to eliminate repetitive updates, standardize Task information, and surface insights directly inside your views.
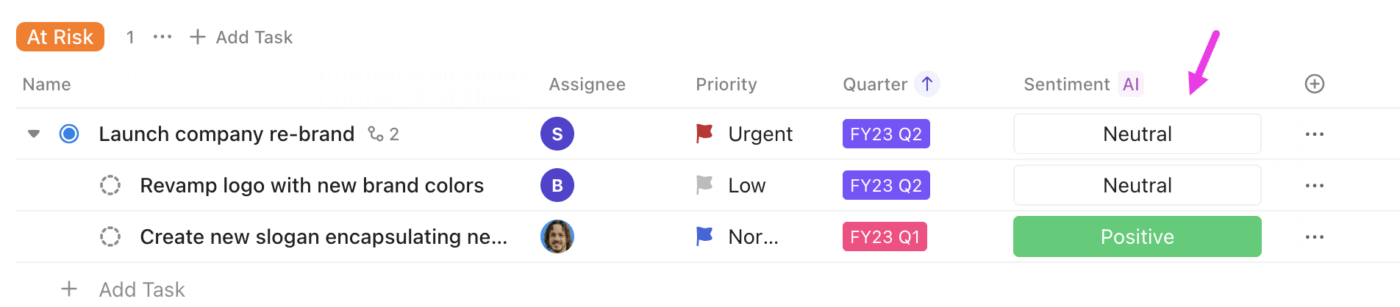
AI Fields can be added within Short Text, Long Text, and Dropdown Custom Fields.
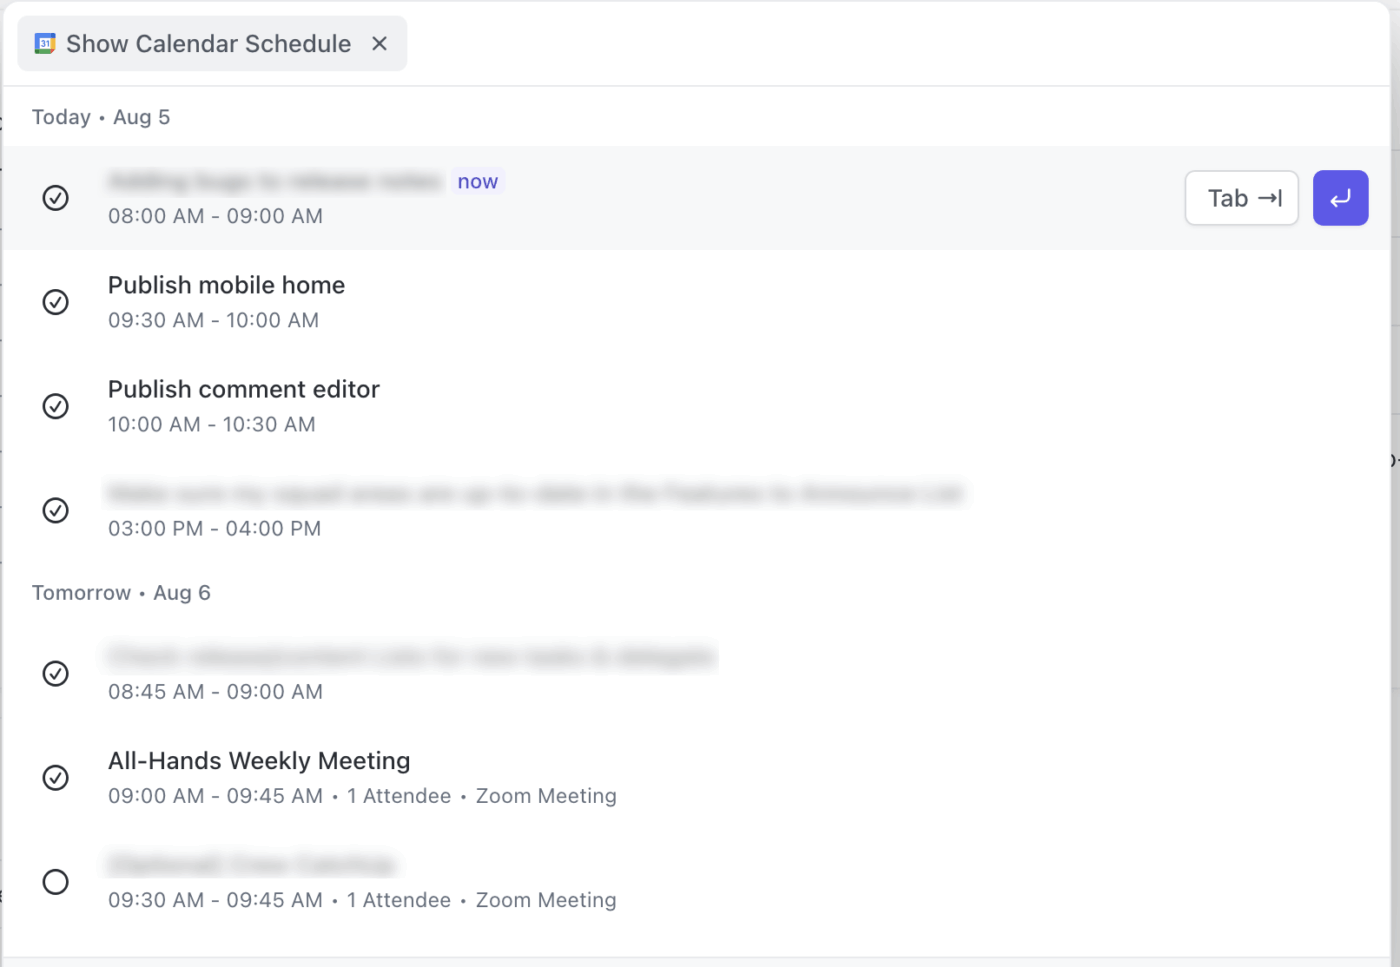
The AI helps you turn an overwhelming task list into a focused, realistic daily plan. ClickUp Brain automatically analyzes your Tasks, priorities, deadlines, and work habits to build a time-blocked project schedule that adapts as your day changes.
Here’s how you can deal with change management using ClickUp:
With Calendar Integrations, your team gets a unified view of Tasks and events, so everything you plan in ClickUp matches what shows up on connected calendars.
You’ll see events appear right inside ClickUp’s Calendar view, and you can open, join, or edit them without jumping back and forth.
When you update a Task’s dates, it reflects in your Google Calendar and Outlook calendar automatically. And if you prefer steering everything with natural language, you can use ClickUp Brain to create or update events just by typing a quick prompt.
ClickUp’s time tracking integrations connect with popular tools so you can log hours, analyze workloads, and sync timesheets without changing your team’s existing workflow.
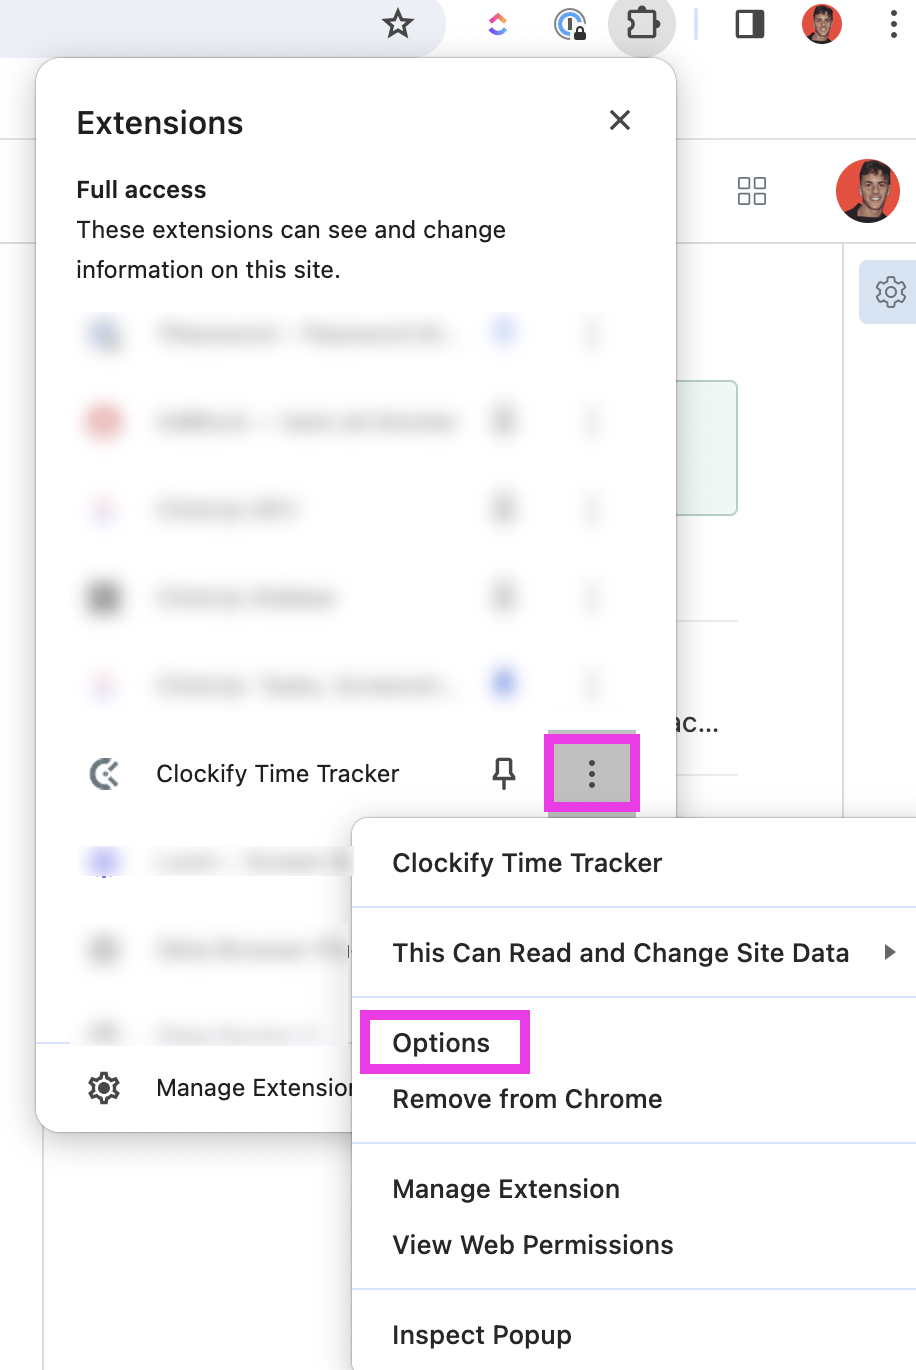
Here are some popular integrations:
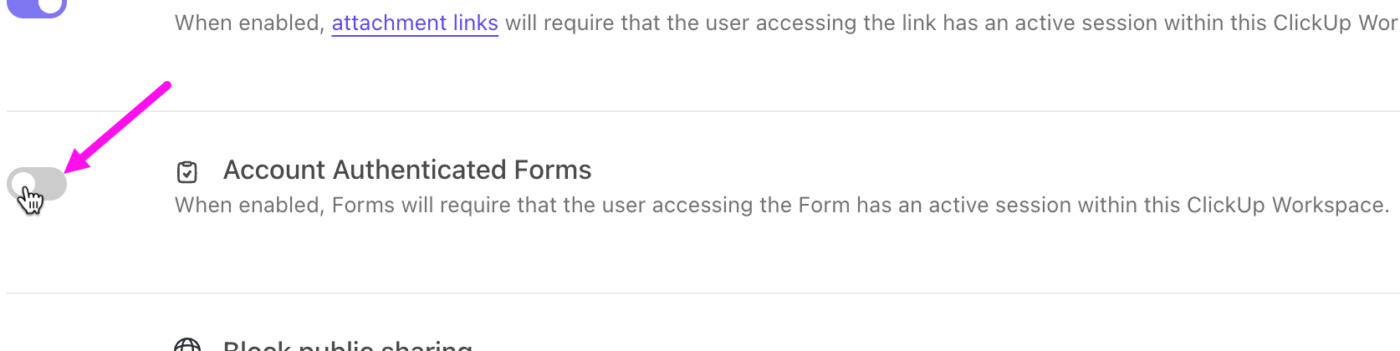
With ClickUp’s Workspace Authenticated Forms enabled, only people who have joined your Workspace and are signed into their ClickUp account can access your Forms. This keeps internal workflows secure and ensures sensitive requests, submissions, and data stay within your organization.
ClickUp’s Global Navigation is the vertical bar on the left side of ClickUp that keeps all your core tools in reach. It gives you quick access to the essentials such as your notifications, AI Command Bar, settings, and the ‘Create’ button.
For enterprise teams, finding the right information fast is everything. The ClickUp Enterprise AI Command Bar pulls data from anywhere, and you can instantly jump to what you need.
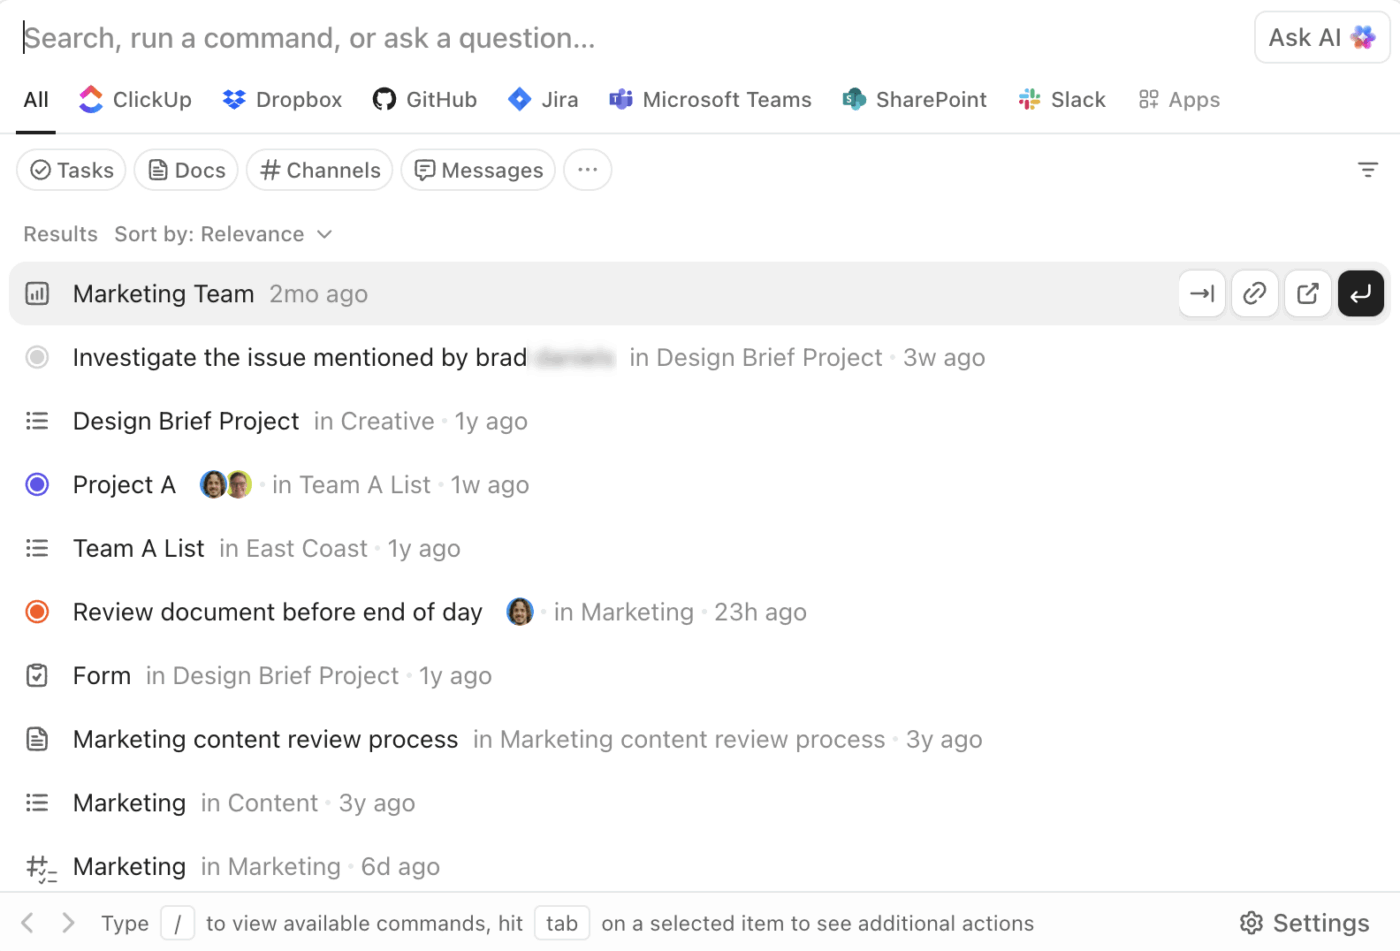
Start typing, and you can search Tasks, Docs, Lists, Spaces, people, files, comments, and even content from connected apps like Dropbox or Box.
With keyboard shortcuts, connected search, and cross-workspace visibility, the AI Command Bar becomes the fastest way to move around your growing ClickUp environment.
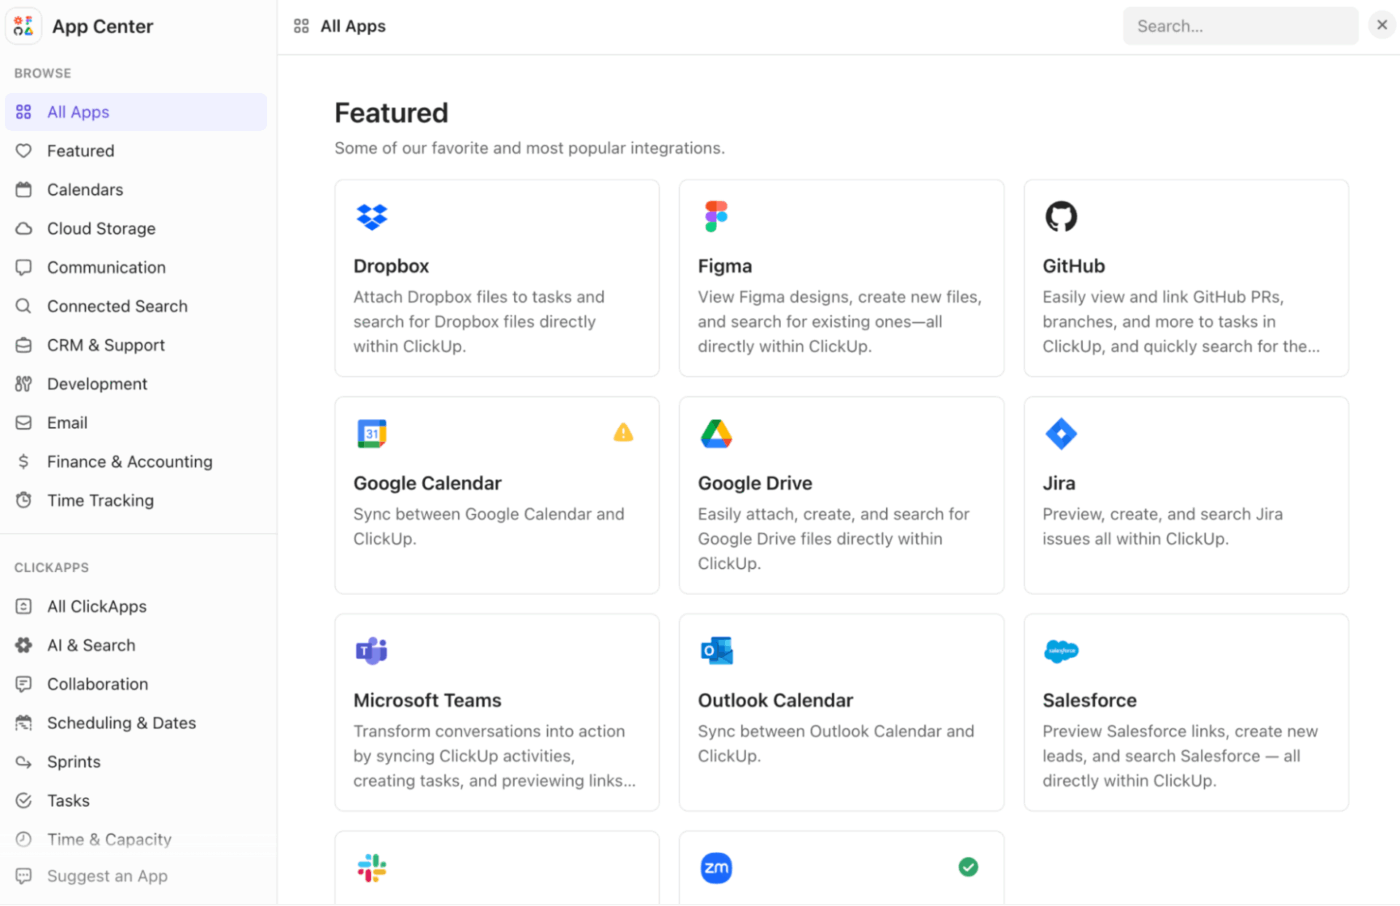
As your tech stack expands, ClickUp’s App Center becomes the single place to manage all your integrations. It’s where you connect tools like Slack, GitHub, Google Drive, Salesforce, or Figma, bringing your team’s files, conversations, and workflows closer to the work they support.
You can manage personal connections, workspace-level integrations, and even enable Connected Search, which allows your ClickUp search results to include files from your external apps. Admins can review, disconnect, or re-authenticate Workspace connections directly from here, making it easy to keep your environment clean and secure.
ClickUp’s AI Organizational Chart gives your entire company a clear picture of who reports to whom and how teams are structured. It’s especially helpful for onboarding new hires, coordinating cross-department projects, and aligning roles and responsibilities.
Think of this guide as a blueprint you can plug directly into your team’s day-to-day operations. You can treat it like an internal handbook, one you can reference, adapt, and share across your organization.
Here are some tips. 📚
Create a central Doc in ClickUp that explains how your team uses each AI feature. Map each feature to a real scenario in your operations.
For instance:
Once your glossary of complex concepts and SOPs is ready, outline how AI fits into your processes.
This step helps you operationalize AI instead of treating it as an add-on.
Use this checklist to onboard teammates and new hires quickly, so everyone can ramp up on your AI setup without extra training.
This ensures every user experiences the core features before diving deeper.
ClickUp Brain evolves weekly, sometimes daily. Make it a habit to evaluate new updates and decide if your workflow benefits from change.
Keeping your system fresh ensures your team always benefits from the latest improvements.
Now that you’re at the end of this ClickUp terms and features guide, it’s safe to say that you have a pretty good grasp of what the platform is. From Views and Workspaces to AI-powered Automations, and everything in between, we’ve got you covered.
This guide is like a playbook for building a smarter, more unified workflow. Whether you’re just getting started or optimizing for scale, you know what each part of ClickUp means and how to use it.
The real win? As your team grows, you’ll be unlocking new ways to work better, faster, and more collaboratively.
Sign up to ClickUp for free and start building a workspace that works exactly the way you do. ✅
A Space is a high-level container for organizing workflows, teams, or major departments (like Marketing or Engineering) in a ClickUp Workspace. Whereas a Folder lives inside a Space and is used to group related Lists (but it doesn’t directly hold Tasks themselves).
Yes, you can rename and even add your own ClickUp Task Statuses at the Space, Folder, or List level. Also, Space owners and admins can reorder or change status settings from settings.
You don’t have to use all the Views. You can pick and stick with whichever suits your workflow best.
ClickApps are modular features that you can turn on or off at the Workspace or Space level. They let you customize which features you want to use (e.g., Automations, Nested Subtasks, Sprints, etc.), so you can tailor your workspace to your team’s needs.

Preethi Anchan
Max 16min read

Christopher Day
Max 8min read

Jacqui Myslinski
Max 13min read

© 2026 ClickUp


