Sorry, there were no results found for “”
Sorry, there were no results found for “”
Sorry, there were no results found for “”
Gartner research shows that poor data quality costs organizations an average of $12.9 million per year. Whether you are a team of one or one thousand, that cost is driven by the same thing: fragmentation.
When your customer history lives in one tool, and your daily work lives in another, you’re constantly fighting to find the context you need to move a deal forward.
Your CRM should be the foundation of where your work actually happens.
This guide walks you through how to build a high-performing CRM in ClickUp. Bring your data and tasks together to end the “app-switching tax” and unify your relationships. 📈
A CRM (customer relationship management) system is a tool that stores contact details, tracks interactions, and manages deals through your sales pipeline. It gives your team a shared view of every customer relationship so follow-ups, ownership, and deal progress stay visible.
In practice, the best CRM doesn’t just store customer information—it helps your team know what to do next and where that work lives.
In simple words, a CRM helps you answer questions like:
- What needs to happen next?
- Who is this customer?
- Where did this lead come from?
- What was the last conversation?
- What stage is the deal in?
📮 ClickUp Insight: 35% of respondents switched from spreadsheets to another tool and stayed with it, and another 25% are actively considering switching.
That level of movement suggests teams aren’t tied to spreadsheets as much as they’re tied to familiarity. Many seem to be looking for systems that offer more support as work becomes more complex.
ClickUp gives teams a way to make that transition without losing momentum. The platform includes ready-made templates for project tracking, CRM, inventory, time management, and hundreds of other use cases, allowing teams to start with a structured approach instead of recreating them from scratch.
Views like List, Table, Board, and Gantt feel familiar to spreadsheet users, while Automations, AI assistance, and integrated, no-code Dashboards help teams grow beyond manual updates.
Many CRM tools are good at storing contacts and tracking deal stages. But for growing teams, the bigger challenge is what happens around the deal: internal handoffs, meeting notes, proposals, onboarding tasks, client delivery, renewals, and reporting.
When that context lives in separate tools, your CRM becomes a record of the relationship—but not the place where the relationship actually moves forward.
ClickUp solves that by bringing customer data, tasks, docs, dashboards, chat, and AI into one workspace. That means your CRM can sit next to the work required to win, onboard, and retain customers—instead of operating as a disconnected system.
Customer data in spreadsheets, emails, and outdated CRM is a common issue for sales teams. Deal info lives in one tool, tasks in another, and nothing connects the two.
Deal info lives in one system, tasks in another, and the customer context gets lost in the gaps.
ClickUp helps you build a CRM that goes beyond pipeline tracking. Its flexible Hierarchy—Spaces, Folders, Lists, and task-level customization—lets you create a system for leads, accounts, deals, follow-ups, onboarding, and reporting in one place.
And because ClickUp combines AI, automations, docs, dashboards, and work management in the same workspace, your CRM can become a real operating system for customer-facing work—not just a database.
Here’s how to set it up, step by step. 🛠️
Head to the ClickUp Template Center (accessible from your Workspace avatar or by typing /Template anywhere in ClickUp), search for CRM, and apply the ClickUp CRM Template to a Space or Folder.
The ClickUp CRM Template gives you a fast starting point for organizing contacts, deals, stages, and follow-up work—without building your system from scratch.
It features a folder structure that aligns with your pipeline stages, along with ClickUp Views such as List, Board, and Table. Plus, it comes with pre-loaded Custom Fields to help you keep track of deal value, contact details, lead source, and priority. Everything is set up to reflect a real sales workflow from day one.
From there, you can customize it to match your process in the steps that follow.
👀 Did You Know? After closing out 2025 at $112.91 billion, the global Customer Relationship Management market is projected to reach $126.17 billion this year. And by 2034, the industry is expected to nearly triple to a staggering $320.99 billion, maintaining a steady annual growth rate (CAGR) of 12.4%.
A CRM becomes much more useful when you can clearly see your data.
ClickUp Views let you organize the same CRM data in different ways depending on what you need to see. To add a view, click the Views Bar at the top of any Space, Folder, or List and select the view you want.
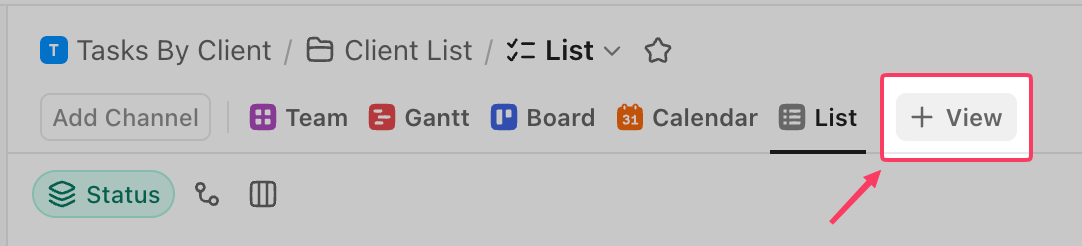
Here are the four views most useful for your CRM system:
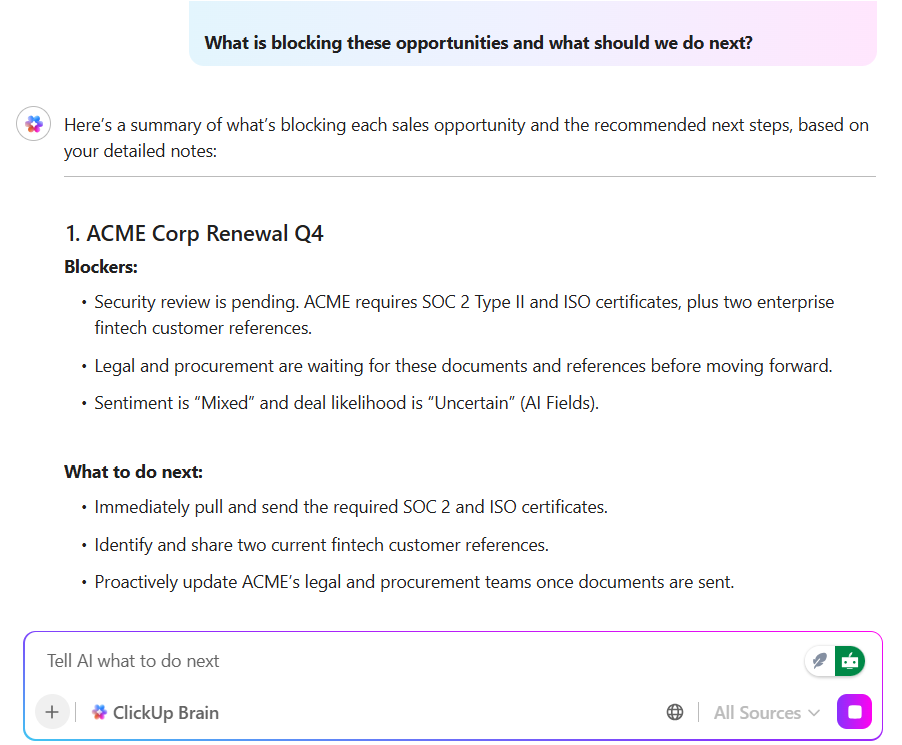
💡 Pro Tip: Before a big call, don’t waste 20 minutes digging through months of comment threads and old docs to figure out where a deal stands.
Just ask ClickUp Brain to summarize the entire relationship history for you. It’ll pull the key pain points, last interaction, and next steps in seconds. You get to walk into your pitch with full context and zero prep-work stress.
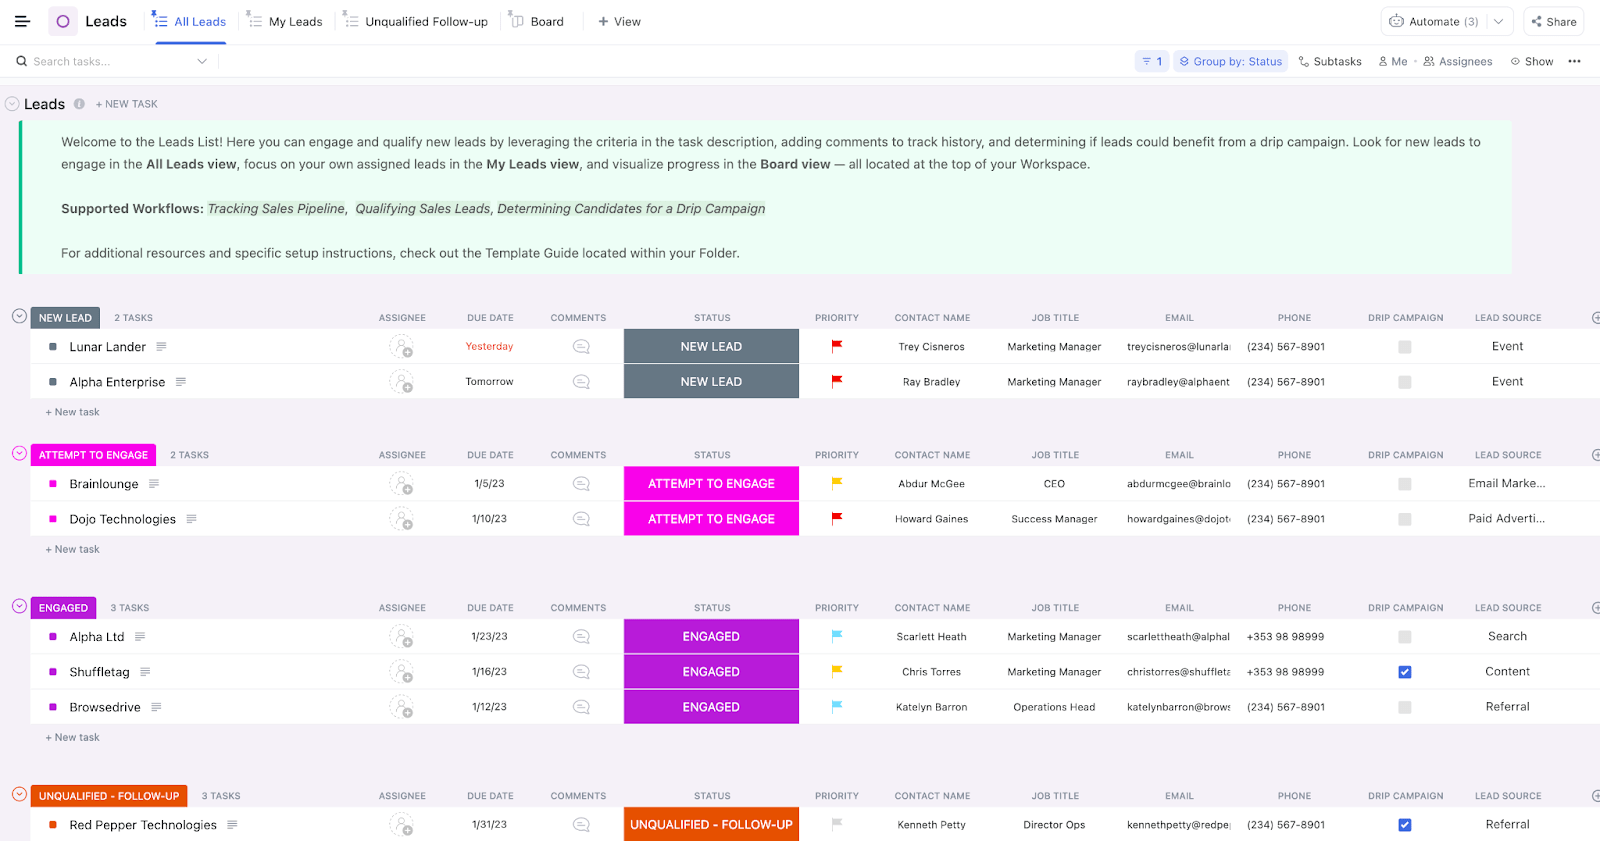
A simple task list with only names offers little value. Without structured data, reps can’t filter by lead source, sort by deal value, or track recent contacts.
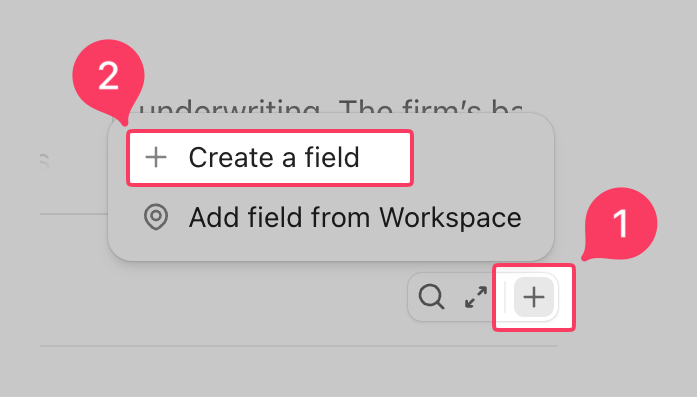
ClickUp Custom Fields turn a simple task list into a searchable, filterable contact database. Each field stores a specific data point directly on the task record.
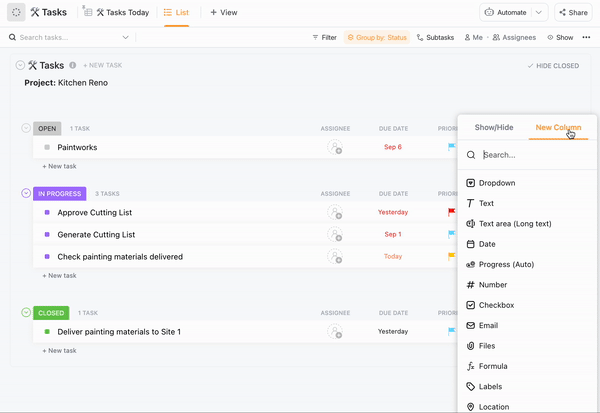
To add a Custom Field, click the + icon above any List or Table View column, choose a field type, and name it. You can add as many fields as your process requires, and they apply consistently across every record in that List or Folder.
Here are the field types that matter most for CRM tracking:
| Field type | Best used for |
|---|---|
| Storing contact email addresses directly on the record | |
| Phone | Logging phone numbers so reps don’t hunt through contacts |
| Dropdown | Categorizing by lead source, industry, deal stage, or region |
| Currency | Tracking deal value and sorting pipeline by revenue potential |
| Date | Capturing last-contacted dates, follow-up deadlines, and renewal windows |
| Labels | Tagging contacts with multiple attributes for cross-segment filtering |
| Text | Adding freeform notes like a contact’s preferred communication style |
| Number | Tracking headcount, contract length, or any other numeric data point |
🤖 Setting up Custom Fields is how you organize your data, but becoming AI Native is how you put that data to work.
But Pat Henderson from path8 Productions shows you don’t need to be a tech expert to build a “self-answering” business.
Using the ClickUp Agent Builder, Pat turned his internal documents and data into a private, reliable AI Agent. Instead of Pat spending his day answering questions about project status or system procedures, his team just “DMs” the agent.
Why this works for growing teams:
Watch this clip to see how path8 went AI-native without any previous AI expertise:
Default task statuses like “Open” and “Closed” don’t mean much in a sales context.
ClickUp Custom Statuses let you replace those defaults with pipeline stages that align with your actual sales process. Each status becomes a column in your Board View, so when a rep updates a deal’s status, the card automatically moves across the board.
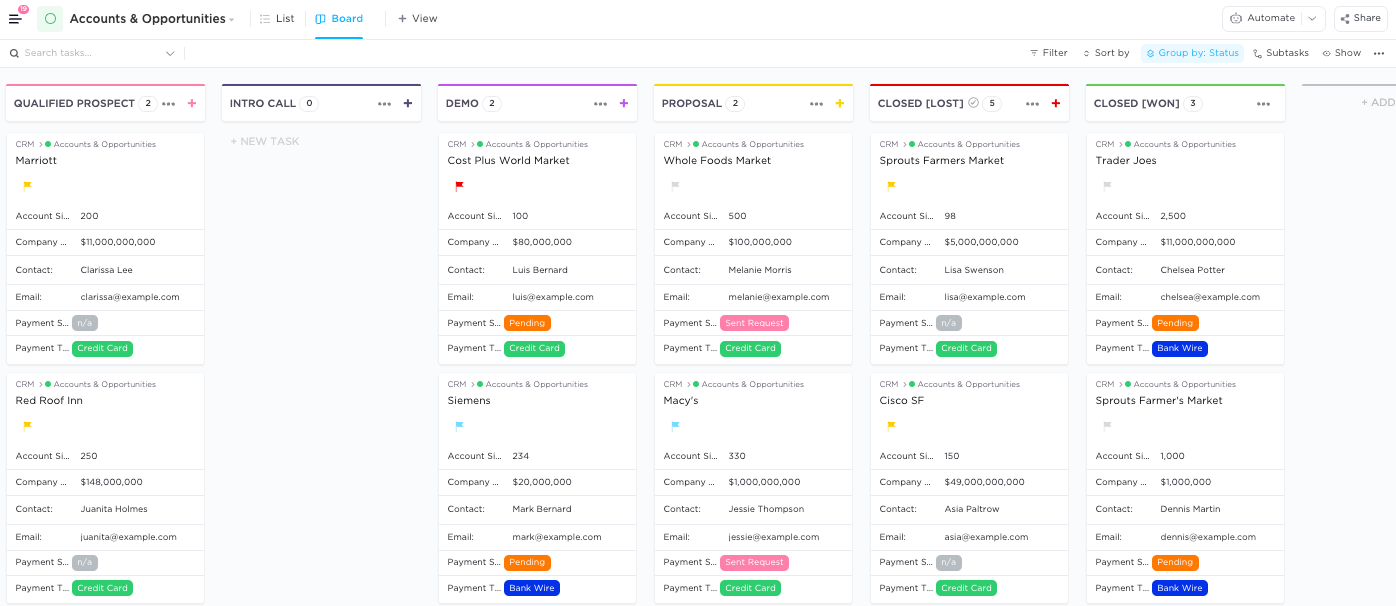
To set them up, go to your Space or Folder settings, open the Statuses tab, and add your stages.
Here’s a starting structure that covers most B2B sales processes:
| Status | Meaning |
|---|---|
| New Lead | Contact has entered the pipeline but hasn’t been qualified yet |
| Qualified | Lead meets your criteria and is worth pursuing |
| Proposal Sent | A quote or proposal has been shared and is under review |
| Negotiation | Both sides are actively working toward an agreement |
| Closed Won | Deal is signed and complete |
| Closed Lost | Deal didn’t move forward, with a reason logged for review |
A few things worth doing once your statuses are in place:
Five to seven stages cover most pipelines well. If you find yourself adding more, it’s usually a sign that two stages are doing the same job and can be merged.
Disconnected records slow reps down. Without clear links between contacts, companies, and deals, piecing together history before a call means digging through multiple tabs and tools.
ClickUp Relationships solves this by linking your tasks to others across your Workspace. Every link is two-way, so if you connect a deal to a contact, the contact’s record automatically reflects the connection.

To add a Relationship, open any task, scroll to the Relationships section, and search for the task you want to link. The most common connections worth setting up:
👀 Did You Know? The earliest evidence of a “CRM” comes from Mesopotamia (modern-day Iraq). Merchants used clay tablets to record economic and social interactions, essentially creating the first customer database in 5000 BCE.
Customer Story: Wallester
Wallester needed a clearer view of customer relationships across lead generation, onboarding, and ongoing service. With ClickUp, the team brought that journey into a single connected workspace, rather than splitting it across disconnected systems.
ClickUp gave us a clear view of the entire customer journey. From lead generation to client onboarding and ongoing support, everything is connected. We can see where each client stands and respond faster – it’s improved both speed and service quality.
With the structure in place, start creating records. Each task represents one contact or one deal. Many teams use separate Lists for Contacts and Deals, connected via Relationships from the previous step.
When you create a ClickUp Task, fill in your Custom Fields (company name, email, deal value) and assign a team member.
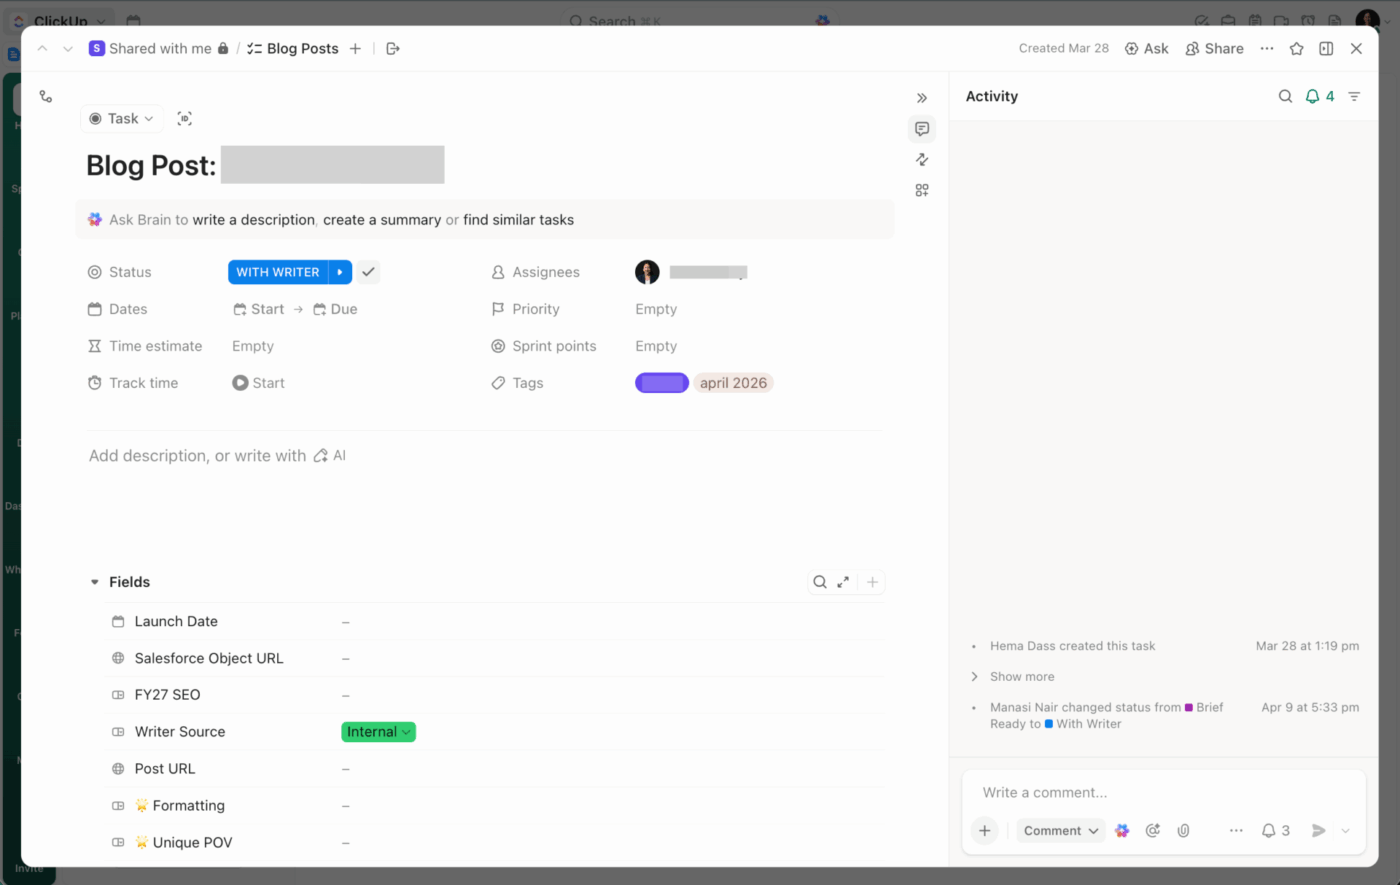
Set a due date for the next follow-up and add notes or attachments in the task description. Track multi-step processes, such as onboarding calls or contract reviews, with ClickUp Checklists in each task.
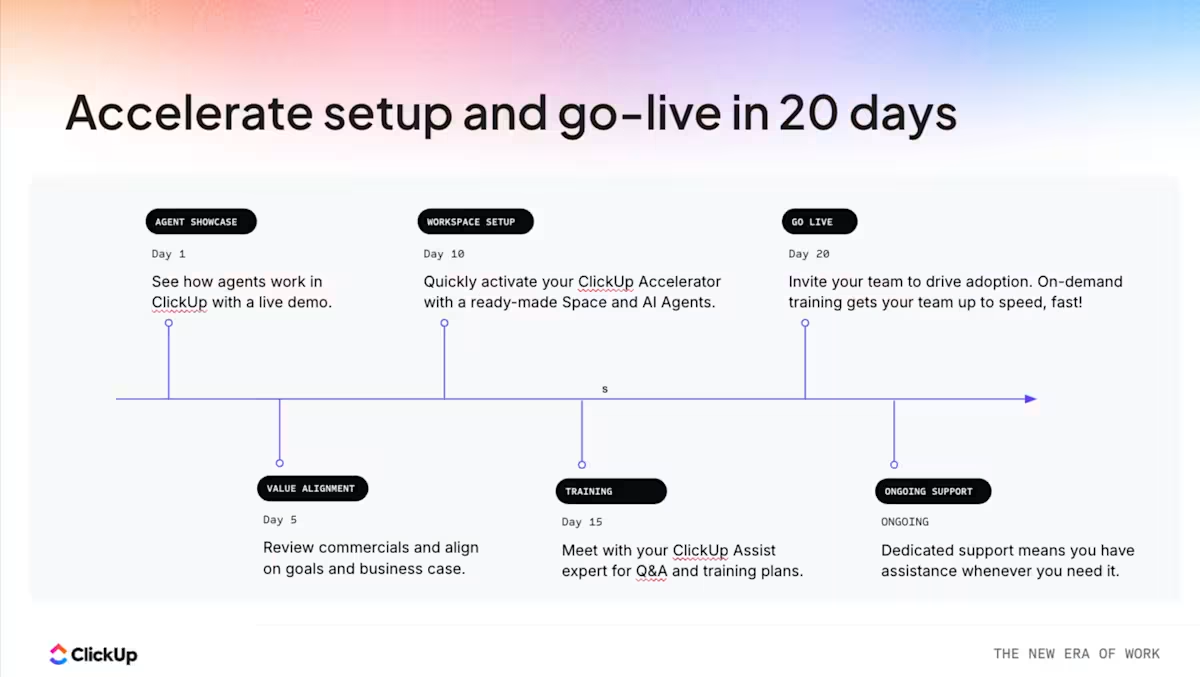
⚡️ Manually creating tasks and filling out fields is a good way to learn the setup. But if you’re leading a department that needs to move at light speed, you need ClickUp Accelerator. It’s a turnkey, enterprise-grade suite that consolidates 20+ disconnected tools into one converged AI workspace.
Plus, you can be live in just 20 days.
Your CRM is built. But without day-to-day habits around it, deals still slip through the cracks.
Here’s how to keep your pipeline running smoothly after setup.
Use ClickUp Integrations to connect and keep all your sales activities under one roof.
Easily connect Everhour, Outlook, Slack, Zendesk, and thousands of other tools using native integrations. It’s simple and helps everything work together smoothly.

Manually assigning deals, sending reminders, and applying checklists eats into selling time. According to CRM research, businesses implementing CRM see an average 29% increase in sales revenue.
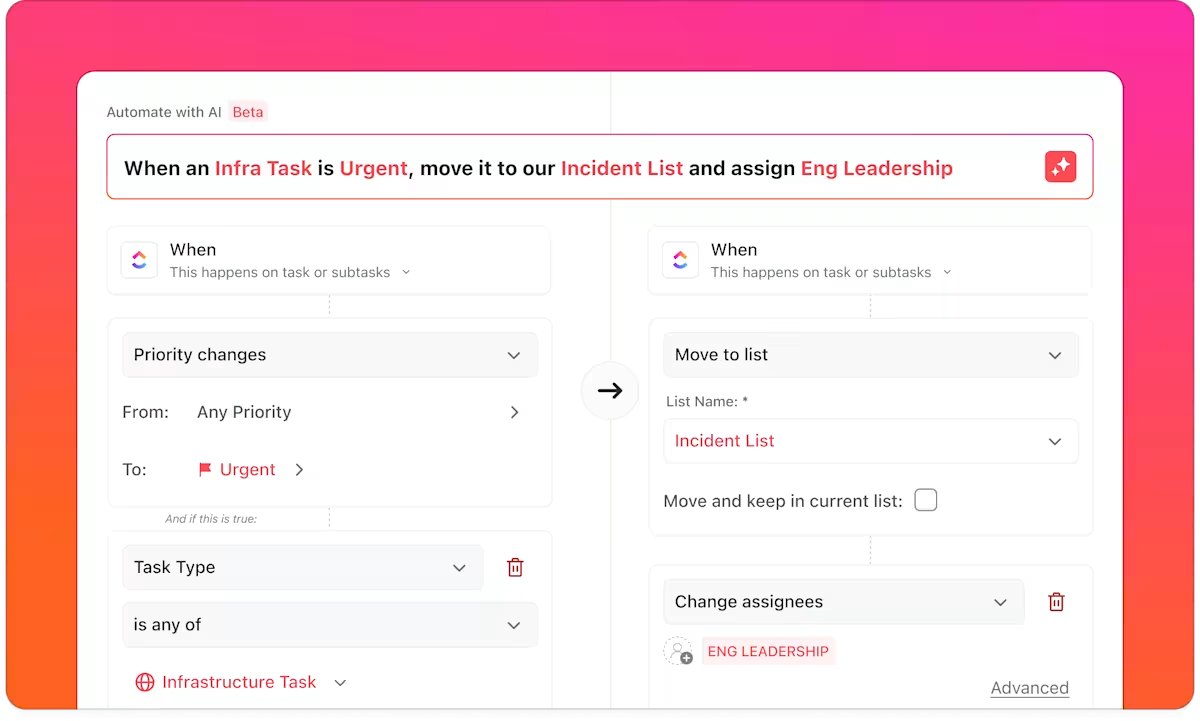
Eliminate that busywork with ClickUp Automations—trigger-and-action rules you set without code. Click the lightning bolt icon in any Space, Folder, or List, choose your trigger, and define the action.

For instance:
💡 Pro Tip: Building automated workflows used to mean stringing together confusing “if/then” triggers and mapping endless fields. Now, you can just tell ClickUp Brain what you want in plain English. Type, “When a deal status changes to Closed Won, create a kickoff task and assign it to the onboarding team,” and ClickUp AI creates the automation.
Use ClickUp Dashboards for CRM reporting
Track pipeline health in real time by building a ClickUp Dashboard. In it, you can layer visual widgets for further customization.
Add widgets like:
Filter each widget by your CRM Folder to keep the data focused.
")
🎥 Beyond internal pipeline tracking, you can also create client-facing dashboards to share project progress, deliverables, and key metrics with customers. Watch this step-by-step tutorial to see how to build custom client dashboards in ClickUp:
Deals don’t wait for you to get back to your desk. Update deal statuses after a meeting, add notes, or check pipeline Dashboards from anywhere using the ClickUp Mobile App on iOS or Android. Stay informed about task changes and upcoming follow-ups with push notifications so nothing stalls while you’re away.
Your CRM doesn’t have to be a separate, expensive platform. The core requirements (structured contact data, a visual pipeline, automated follow-ups, and reporting) can all live inside the workspace where your team manages projects and communicates.
As your team grows, you add new fields, automations, and views without migrating to a different tool. Your CRM can live right where your team already works.
Get started for free with ClickUp. Set up your CRM in minutes. ✨
Yes. ClickUp can replace a dedicated CRM tool, and you can run the full pipeline inside your workspace with CRM workflows, Custom Fields, and dashboards. On top of that, ClickUp Brain and AI Agents can help draft updates, summarize account context, and automate follow-ups.
You can import contacts and deals via CSV upload directly into a ClickUp List. ClickUp maps your spreadsheet columns to Custom Fields so your data structure carries over. For ongoing sync from another CRM, use a Zapier or Make connection to keep records updated automatically.
HubSpot and Salesforce are purpose-built CRMs with deep sales and marketing automation. ClickUp is a converged workspace where CRM lives alongside project management, docs, and team communication. Your sales data isn’t isolated from the rest of your work. Dedicated CRMs focus on sales features; ClickUp cuts out tool sprawl by centralizing everything.
Sales teams, agencies, startups, and ops teams that already use ClickUp for project management get the most value. They avoid adding another tool and keep customer data connected to delivery workflows.

Praburam Srinivasan
Max 19min read
Praburam Srinivasan
Max 31min read

Preethi Anchan
Max 16min read

© 2026 ClickUp