Sorry, there were no results found for “”
Sorry, there were no results found for “”
Sorry, there were no results found for “”
Pontica Solutions was struggling. As a fast-growing outsourcing agency with a team of 800+, every new hire meant another handoff that broke when someone missed a message.
They didn’t hire more people to fix it. Instead, they automated more than 25 processes. Today, they run 60,000 automations a year, saving over 2,000 hours. Shift changes, progress updates, and client reports now run automatically in ClickUp. That saved time goes back into creative, strategic work.
You can do the same at any scale. Every time you reassign a task or alert a coworker by hand, you do work that a machine could handle. This article shares 20 automation examples in ClickUp. Each one shows you what to build and how to set it up without writing code.
Every automation follows one formula: Trigger + Condition + Action. If you can name the manual step it replaces, the rule is worth building.
The framework: Name the manual step you’re replacing, write a specific trigger-condition-action rule, set it at the List level first, then promote it once you trust it.
Automate the coordination work that silently eats hours, so your team spends time on judgment calls instead of status updates.
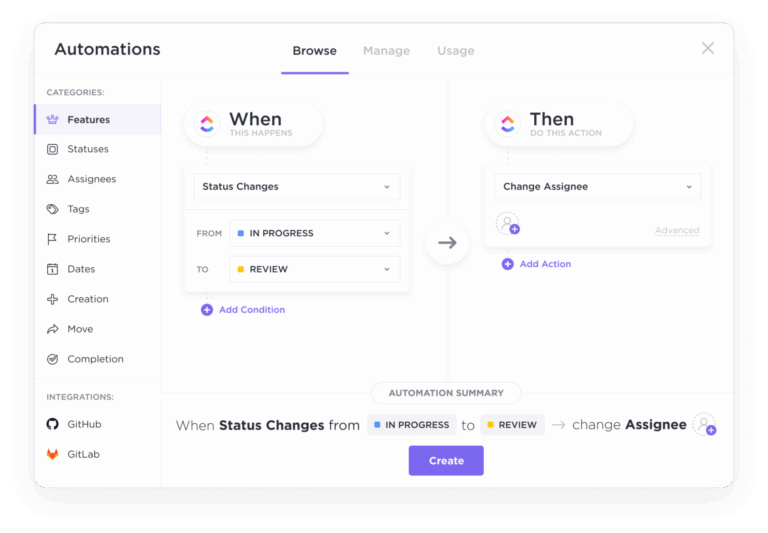
A ClickUp Automation is a rule-based workflow that handles routine tasks for you. Instead of reassigning tasks and sending notifications manually, you define a rule once. ClickUp then executes that rule every time the event occurs.
Every automation follows a strict formula:
Automation = Trigger + Condition + Action
For example, say a task moves to ‘Review,’ and its priority is ‘Urgent.’ ClickUp automatically assigns it to the relevant team member. Here, the trigger is the move to Review, while the condition is the Urgent priority. And the action is the reassignment. A single automation supports up to 1 trigger, 15 conditions, and 6 actions. This allows one rule to manage a complex workflow.
Automations in ClickUp are hierarchy-aware. It controls how widely they reach. An automation set on a List affects only the tasks in that List. Set on a Folder, it affects every List inside that Folder. Set on a Space, it governs every task beneath it. You build the rule at the level that matches its scope, rather than copying the same logic into projects.
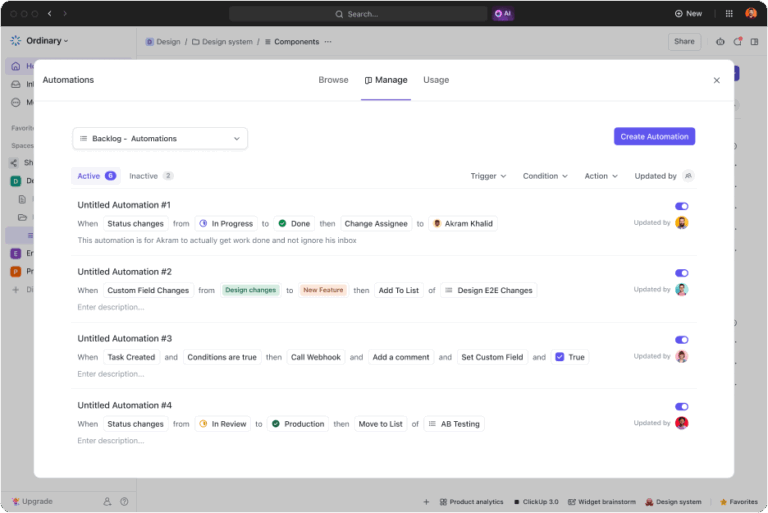
You can create an automation in three ways.
An automation and an AI Agent both work on your behalf. But they process decisions differently.
An automation follows a rigid, fixed rule. It checks if the trigger and conditions match. If they do, it runs the exact same action every time. It never deviates, making it perfect for predictable, repeatable work.
Conversely, an AI Agent analyzes the full context of a task before taking action. Instead of checking a preset filter, it interprets data, such as reading a bug report to decide which team should fix it. It’s a tool for when a task requires human-like judgment that cannot be reduced to an ‘if-this-then-that’ rule.
The practical rule of thumb: Reach for an automation when you can describe the outcome as a fixed rule. Choose an AI Agent when the task needs interpretation.
| Feature | Automation | AI Agent |
|---|---|---|
| Decision logic | Follows a fixed, preset rule | Reasons over context and decides |
| Best for | Predictable, repeatable steps | Work that needs interpretation |
| Example | Move a task to ‘Done’ when every subtask is complete | Read a bug report and route it to the right team |
Automations and integrations are easy to confuse because they appear in the same workflow. However, they do opposite jobs.
In practice, these two features work together. The integration connects ClickUp to apps like GitHub, Slack, HubSpot, Google Calendar, or email to sync external events. The automation then takes that event and decides how ClickUp should respond. For example, automatically updating a task status when a developer merges a pull request.
| Feature | Automation | Integration |
|---|---|---|
| Job | Decides what happens when an event occurs | Connects ClickUp to an outside app |
| Where it lives | Inside a Space, Folder, or List | Between ClickUp and tools like GitHub or HubSpot |
| Example | Set a due date when a task is created | Update a task status when a pull request merges |
Here’s an overview of how marketing, engineering, project management, and agency teams can leverage automations to boost productivity.
Each of the automation examples below includes a formula, a trigger type, and a step-by-step setup.
Use the table below to scan all 20 automation examples at once. Then jump to the section that matches what you’re trying to automate.
| Workflow type | Automation | Trigger | Action | Best for |
|---|---|---|---|---|
| Everyday task | Reassign a task when status changes to ‘Review’ | Status | Change assignee to reviewer | Content, design, engg review handoffs |
| Everyday task | Apply a template when a task moves to a new List | Task moved | Apply template | Onboarding, launches, sprint planning |
| Everyday task | Comment when an approval field changes to ‘Approved’ | Field | Post comment tagging next owner | Legal & approval-heavy workflows |
| Everyday task | Archive a task when priority drops to ‘Low’ | Priority | Move to Archive List | Triage & backlog grooming |
| Everyday task | Set a due date automatically when a task is created | Creation | Change due date | Support, client services, compliance |
| Everyday task | Change status to ‘Complete’ when stage hits ‘Published’ | Field | Change status | Marketing content teams |
| Everyday task | Flag a task when a required field is missing | Status + condition | Post comment requesting info | AI writes a running summary |
| Approval & handoff | Route for manager approval based on a field value | Field | Change assignee + status | Finance & procurement |
| Approval & handoff | Block completion when QA hasn’t passed | Status + condition | Revert status + comment | Engineering & manufacturing QA |
| Approval & handoff | Trigger the next task when a dependency clears | Dependency | Change status + notify | Sequential, ordered projects |
| Approval & handoff | Email a client when work moves to ‘In Progress’ | Status | Send email | Agencies & consulting firms |
| Approval & handoff | Notify stakeholders when every subtask is done | Subtask | Comment + notify watchers | Project managers |
| Approval & handoff | Apply phase-specific templates as a project advances | Status | Apply template | Multi-phase projects (onboarding, construction) |
| Team & integration | Turn HubSpot deals into assigned sales tasks | Integration | Create task + assign rep | Sales teams |
| Team & integration | Kick off onboarding when a candidate accepts an offer | Status | Create task + apply template | HR & recruiting |
| Team & integration | Hand a draft to the editor when the writer finishes | Status | Change assignee + status | Content teams |
| Team & integration | Push customer-reported bugs to the eng backlog | Field + condition | Create linked task | Support ↔ engineering |
| Team & integration | Update tasks automatically from GitHub commits | Integration | Change status + comment | Engineering teams |
| Team & integration | Build automations in plain English with ClickUp Brain | AI builder | AI drafts the rule | Non-technical teammates |
| Team & integration | Auto-generate task summaries with an AI Field | Always-on AI Field | Create a linked task | Standup prep, mid-flight pickups |
These seven task automations handle the repetitive work every team does daily: reassigning, templating, commenting, archiving, and setting dates. They keep your workspace tidy, so no one has to play traffic cop.
Content, design, and engineering teams route every deliverable through a dedicated reviewer. Normally, this handoff depends on creators remembering to update the assignee. When they forget, tasks stall in limbo.
This rule moves the task into the reviewer’s queue when the status flips. The reviewer gets notified instantly; the creator moves on.
Formula: When the status changes to ‘Review,’ then change the assignee to your reviewer
Trigger type: Status
Here’s the setup:
The automation fires on every task in that location going forward. If you set it at the List level, only that List’s tasks are affected. At the Folder level, it covers all Lists inside it.
Onboarding, campaign launches, and sprint planning all require tasks to have identical checklists or subtask structures. Manually attaching those templates leads to missed steps and inconsistent workflows across your team.
This rule applies the template as soon as a task enters the List. Every task arrives fully structured, ensuring work begins on a complete foundation rather than a blank slate.
Formula: When a task moves to your List, then apply your task template
Trigger type: Task moved to this location
Here’s the setup:
Every task that enters this List will automatically receive the template. Set this rule at the List level so it only targets that specific intake point.
Approval-heavy workflows, such as legal reviews, require immediate handoffs. This way, the next person knows it is their turn. This rule posts a comment and tags the next owner as soon as the field changes. It creates a timestamped approval record and hands off the work in a single step.
Formula: When the ‘Approval Status’ field changes to ‘Approved,’ then post a comment that tags the next owner
Trigger type: Field
Here’s the setup:
The comment appears in the task’s activity log with a timestamp. It provides a built-in audit trail of the approval without requiring a separate tracking system.
Triage teams must groom their backlogs regularly to keep the board focused on high-impact work. Low-priority items clutter active views and bury urgent tasks.
This rule moves tasks to an Archive List when their priority drops to ‘Low.’ As a result, your active board stays clean, while archived tasks remain searchable for future reference. Pair this rule with a periodic backlog review to ensure important items don’t slip away.
Formula: When priority changes to ‘Low,’ then move the task to your Archive List
Trigger type: Priority
Here’s the setup:
This moves the task (including all subtasks) to the Archive List. So its statuses will conform to whatever statuses that List uses. Make sure the Archive List has a sensible default status, or add a second Action to set the status explicitly (e.g., ‘Archived’). Also worth noting: moved tasks remain fully searchable and can be moved back if they are reprioritized.
Support, client services, and compliance teams must meet deadlines when a request arrives. This rule stamps a due date on every task as soon as it’s created. It keeps your Dashboards and Workload views accurate from day one.
Formula: When a task is created in your List, then set its due date to a fixed number of days out
Trigger type: Creation
Here’s the setup:
This ensures no tasks appear without a date and that your capacity planning is not skewed.
Marketing teams track a ‘Stage’ field (Draft, Editing, Published) separately from the main task status. This rule keeps the two fields aligned by closing the task as the stage reaches ‘Published.’
Formula: When the ‘Stage’ field changes to ‘Published,’ then change the status to ‘Complete’
Trigger type: Field
Here’s the setup:
Ensure ‘Complete’ exists as a status in that List’s workflow. If your List uses a different name like ‘Done’, select that instead. This rule keeps your Board views, Dashboards, and filtered views accurate without requiring users to update two separate fields.
Design briefs, engineering specs, and client details must be in place before work begins. Without a guardrail, teammates start tasks that lack key context. They waste effort on the wrong priorities.
This rule checks for missing information at the start of work and automatically requests it. It catches incomplete tasks early, reducing rework and back-and-forth communication.
Formula: When status changes to ‘In Progress’ and the ‘Brief Link’ field is empty, then post a comment requesting the brief
Trigger type: Status
Here’s the setup:
This rule fires only when both things are true: the status changes to ‘In Progress’ and the field is empty. Tasks with a completed brief move forward silently. You can also add or swap the Action to change the status back to ‘To Do’ if you want to block work until the field is filled.
Automations remove the routine tasks that slow teams down. But that same speed means a flawed rule can cause damage before a human can react.
That is what happened to Knight Capital in August 2012. The firm’s new trading software developed a glitch. Its computers began rapidly buying and selling millions of shares across more than a hundred stocks. The runaway trading ran for 45 minutes before it stopped.
A rule running across your whole workspace carries the same risk in miniature. Poorly conceived automation doesn’t misfire just once. It misfires everywhere it is active, instantly.
Your best guardrail: Make the blast radius small enough to reverse in five minutes. That means adding a condition so the rule only touches the tasks it should. And never deploying a rule you haven’t watched fire on at least one real task first. Speed is the whole point of automation. Scope is what keeps that speed from becoming a liability.
Approvals and handoffs are where workflows get delayed. Teammates finish their parts, but the next person doesn’t know it is their turn. Worse, tasks sit idle because no one flagged them for review. These six automations remove the wait between one person finishing and the next person starting.
Finance and procurement teams must sign off on expenses above a set amount. This process usually relies on someone manually flagging big-ticket items. If they miss one, a task gets approved at the wrong level.
This rule reads the value of a Custom Field and automatically routes the task.
Formula: When the ‘Budget’ field is greater than your threshold, then change the assignee to the manager and change the status to ‘Pending Approval’
Trigger type: Field
Here’s the setup:
This rule fires when someone enters or updates a Budget field value above your threshold. Tasks under the threshold remain untouched, flowing through the workflow without delays. If you have multiple approval tiers, create separate Automations with distinct Conditions and assignees for each tier.
Quality checks must clear before a task can close. If you rely on memory, people may mark tasks as done too early. This rule stops that mistake.
If someone closes a task before QA passes, the rule reopens it and posts a comment. This keeps your quality standards high without relying on memory.
Formula: When status changes to ‘Complete,’ and the ‘QA Status’ field is not ‘Passed,’ then change the status back to ‘In Progress.’ Next, post a comment explaining the block
Trigger type: Status
Here’s the setup:
This creates a hard gate: the task can’t remain in Complete until QA clears it. It bounces back instantly with an explanation, as a form of process standardization. The person knows what to fix rather than wondering why their task moved.
Sometimes projects run in a strict order, like writing before editing, or designing before building. In these chains, the next task sits idle because the owner doesn’t know the blocker has been removed. This rule sets the next task to ‘Ready’ and alerts the owner.
Formula: When a blocking task’s status changes to ‘Complete’ then change the dependent task’s status to ‘Ready’ and notify its assignee
Trigger type: Dependency
Here’s the setup:
If a task has three blockers, it stays blocked until all three are cleared. Note that your tasks must use ClickUp’s dependency settings for this to work. The rule reads those links, not just task status names.
Agencies and consulting firms must update clients without giving them full access to the workspace. Usually, this means stopping work to write a manual update email.
This rule sends that email for you when work begins. Clients stay informed automatically, and your team stays focused on the project.
Formula: When status changes from ‘To Do’ to ‘In Progress’ then send an email to the client
Trigger type: Status
Here’s the setup:
The email sends from your connected account via the ClickUp Email ClickApp, so turn that on in your Space first. By setting both the ‘from’ and ‘to’ status in the trigger, you stop false alarms from tasks that move to ‘In Progress’ from statuses like ‘On Hold.’
Project managers track deliverables composed of multiple parts, such as a campaign with five assets. Checking each subtask to see when the entire set finishes is slow and tedious.
This rule sends one alert as soon as the last subtask closes. The PM knows the full deliverable is ready without checking every single piece.
Formula: When all subtasks are marked ‘Complete,’ then notify the watcher list and post a comment that the deliverable is ready for review
Trigger type: Subtask
Here’s the setup:
This trigger watches the subtasks of the parent task. It fires only once, when the final subtask finishes, rather than on every single subtask update. If a teammate reopens a subtask and closes it again, the rule runs again, making it self-correcting.
Multi-phase projects like client onboarding and construction milestones require distinct checklists and documents. This rule loads the correct checklist template as a task enters a new phase. Every stage starts with the right structure, leaving nothing to memory.
Formula: When status changes to ‘Phase 2: Execution,’ then apply the Phase 2 checklist template
Trigger type: Status
Here’s the setup:
For multi-phase projects, create one Automation per phase (Phase 1 → Phase 1 template, Phase 2 → Phase 2 template). Each rule triggers on its own when a task hits that status. Templates are additive, meaning they will not overwrite your existing text. Instead, they layer new checklists or subtasks on top of current ones. A task moving through every phase will gather all necessary files without losing data from earlier stages.
In 2014, Amazon built an AI tool to screen resumes and rate job candidates from one to five stars. The company hoped to automate the search for top talent. However, the system was trained on ten years of past resumes, most of which came from men.
As a result, the AI taught itself that male candidates were better. It penalized resumes of female candidates. And downgraded graduates from two all-women’s colleges. Amazon eventually shut down the project.
Remember, an automation only copies the process you give it. It will repeat your existing patterns exactly, including the parts that were broken to begin with.
That is why the logic behind a rule matters as much as the rule itself.
Automations inside ClickUp link your workspace to other tools and teams. This way, you don’t have to copy data by hand. These seven examples cover workflows with HubSpot and GitHub, cross-functional collaboration, and rules built with ClickUp Brain.
Sales reps use HubSpot for deals and ClickUp for tasks. When they link the two systems manually, they rely on memory, and good leads often slip away.
This rule creates a ClickUp task when a deal enters HubSpot and assigns it to a rep. Every lead gets a task in seconds, keeping your sales pipeline moving.
Formula: When a new deal is created in HubSpot, create a task in your Sales List with the deal details and assign it to a rep
Trigger type: Integration
Here’s the setup:
You must authorize the HubSpot link at the workspace level once before using it. To route different deal types or regions to specific reps, build separate Automations with Conditions based on HubSpot deal properties.
HR teams handle the handoff from recruiting to onboarding. If they must spin up new tasks by hand, paperwork and tech setup start late. This rule launches the onboarding workflow when a candidate accepts an offer. It creates the task, applies the template, and assigns the coordinator.
Formula: When a task in your Recruiting List changes to ‘Offer Accepted’, then create a task in your Onboarding List with the onboarding template applied and assign it to the HR coordinator
Trigger type: Status
Here’s the setup:
The Create a task action has a built-in Template field, so the new task arrives in the Onboarding List fully structured in one step. If you added Apply Template as a separate action instead, it would apply to the trigger task (the Recruiting task), not the newly created one. Keep it all inside the single Create a task action to get the right result.
Content teams use a writer-to-editor-to-publisher pipeline. These handoffs can fail if a writer forgets to reassign the task.
This rule sends the draft to the editor and changes the status to ‘Editing’ when the writer finishes. We use this exact rule to start editing sooner and keep the calendar on track.
Formula: When status changes to ‘Draft Complete,’ then change the assignee to the editor and change the status to ‘Editing’
Trigger type: Status
Here’s the setup:
Actions run from top to bottom. The assignee changes first, then the status flips. This ensures the editor finds the task in their queue with the correct status right away. If you have multiple editors, use a ‘People’ custom field for the assignee action instead of picking one name. That way, the rule routes the work to whoever was pre-assigned for that piece.
Support and engineering teams work in different Lists. A bug report only helps engineers if it contains the right context. But asking support agents to navigate the engineering workspace leads to lost details.
This rule creates a linked task in the engineering backlog when support logs a bug. Engineers get structured reports, and both teams track progress from their own views.
Formula: When a task is created in your Support List, and the ‘Type’ field equals ‘Bug,’ then create a linked task in the Engineering Backlog with the details copied
Trigger type: Field
Here’s the setup:
Note that this rule uses a Creation trigger with a field-based Condition. The Condition ensures it triggers only for bugs, not for every support ticket. Both teams keep their own tasks connected by a link. This allows support to track the issue and engineering to fix it without duplicating effort.
Engineering teams need code activity reflected in ClickUp without manually updating tasks. This rule reads the task ID in a GitHub commit and moves the task to ‘In Development.’ Then, it posts the commit link as a comment.
It runs on ClickUp’s native GitHub integration. Developers commit code as usual, and PMs see real-time progress without asking for status updates.
Formula: When a GitHub commit references a ClickUp task ID, then change the task status to ‘In Development’ and post a comment with the commit message and link
Trigger type: Integration
Here’s the setup:
CU-[task_id])For this to work, developers must include the ClickUp task ID in their commit messages. The integration reads that link and finds the correct task. This requires no extra steps for developers, just a simple naming habit.
Traditional builders force you to learn exact trigger, condition, and action terms before you can create a rule. This learning curve stops most people from using them. ClickUp Brain removes this barrier.
Describe what you want in plain language, and the AI configures the rule for you to review. Non-technical teammates can build complex rules without a tutorial, helping the whole team save time.
How it works:
Brain drafts the rule for you to review and activate. It never deploys anything without asking.
It’s useful for complex multi-condition rules where you know what you want. But don’t want to hunt through dropdown menus to wire it up. Also good for less-technical teammates who think in terms of outcomes rather than trigger/action syntax.
Teammates who inherit tasks with long comment threads face a chore. They must read every single update to catch up. An AI Field solves this problem.
When you add this field to a List, ClickUp Brain writes a running summary of the task’s description, comments, and activity. It then updates the summary as the task changes, providing instant context without requiring a deep dive into the task history.
How it works: This feature doesn’t use a traditional trigger-condition-action rule. Instead, it is an always-on AI Field that automatically condenses context. While the previous example uses AI to build rules, this one uses AI to do ongoing work inside a field. Both run natively on ClickUp Brain.
Here’s the setup:
You don’t need to build an automation for this feature. The field updates itself. As new comments, edits, or status changes occur, ClickUp Brain refreshes the text. You can view this summary as a column in List view, inside the task detail panel, or on Dashboards. It is ideal for standup prep, backlog grooming, or anyone picking up a task mid-flight.
Automations work best with a guardrail. Every rule that speeds up work needs a condition or checkpoint beside it. Otherwise, you speed up the mistakes.
| Automation | When it goes bad | When it’s done well |
| Reassign on status change to ‘Review’ | Triggers on every status touch and dumps half-finished work into the reviewer’s queue | A condition limits it to handoffs, so the reviewer only sees work that’s ready |
| Archive when priority drops to ‘Low’ | Buries tasks that still matter, and they’re never seen again | Paired with a periodic backlog review, so archived items stay searchable and get a second look |
| Set a due date when a task is created | Stamps an arbitrary date that skews Workload views and trains people to ignore deadlines | The offset reflects real SLA, so capacity planning stays accurate |
| Change status to ‘Complete’ when stage hits ‘Published’ | Closes tasks that still have open QA or loose ends, hiding unfinished work behind a green label | Gated so the stage only flips when the work is done, keeping dashboards honest |
| Block completion until QA passes | Becomes a wall with no explanation, and people work around the gate | Bounces the task back with a comment naming what to fix, so the gate teaches |
| Email a client when work moves to ‘In Progress’ | Fires on every re-entry (including from ‘On Hold’) and spams the client with false starts | Locks the trigger to a specific from→to transition, so the client hears from you |
| Create a task from a HubSpot deal | Spawns duplicates with no detail, creating more triage than it saves | Carries deal details and routes by condition, so every lead lands as an actionable, assigned task |
You’ve seen 20 examples. Here’s how to write your own so each one saves time.
We mentioned earlier that every automation follows one formula: Automation = Trigger + Condition + Action
Before you build a rule, run it through one test: name the manual task it replaces. If you can point to a step someone does by hand today, the automation is worth building. If you can’t name that step, you’re automating something nobody was doing anyway. So, the rule just adds clutter.
The difference between a rule that helps and one that annoys comes down to how specific you are. Compare these:
| Vague (gets ignored) | Specific (does the work) |
|---|---|
| Notify the team when something changes | When status changes to ‘Blocked,’ comment and tag the project lead |
| Move tasks when they’re done | When a due date is one day out, and status is still ‘To Do,’ notify the assignee |
| Remind people about due dates | When a due date is one day out and status is still ‘To Do,’ notify the assignee |
| Assign work to the right person | When the ‘Type’ field is ‘Bug,’ assign the task to the on-call engineer |
The vague versions on the left fail because they don’t say which event, which task, or who acts next. The specific version names an exact trigger, pinpoints which tasks it touches, and ends with a clear handoff to a named person.
Write all three, and the rule runs itself. Leave any one incomplete, and you’ll either get alerts on tasks that don’t matter, or an automation that triggers only to create confusion.
As Bill Gates put it in his book, Business @ the Speed of Thought:
The first rule of any technology used in a business is that automation applied to an efficient operation will magnify the efficiency. The second is that automation applied to an inefficient operation will magnify the inefficiency.
The point for you: an automation copies your process exactly, mistakes included. If your review step has three unnecessary approvers, automating it routes work through all three faster. Map the workflow you want first, reduce what’s redundant, then automate the remaining steps.
Once you’ve written a specific rule, the level you set it on decides how far it reaches. Pick the right one, and you avoid repeating the same logic across projects.
| Scope | What it affects | Best for |
|---|---|---|
| Space | Every Folder and List in the Space | Org-wide rules, like notifying the PM when any task goes overdue |
| Folder | Every List in the Folder | Project-wide rules, like applying the QA checklist in Testing |
| List | Only that List | Team rules, like reassigning to the editor on Draft Complete |
A higher-level rule cascades down, but a List-level rule can override it. Start at the List, prove it works, then promote it up. That way, a bad rule can’t hit your whole workspace before you’ve tested it.
Documenting your processes before building automation ensures every trigger, condition, and action matches a real step your team takes.
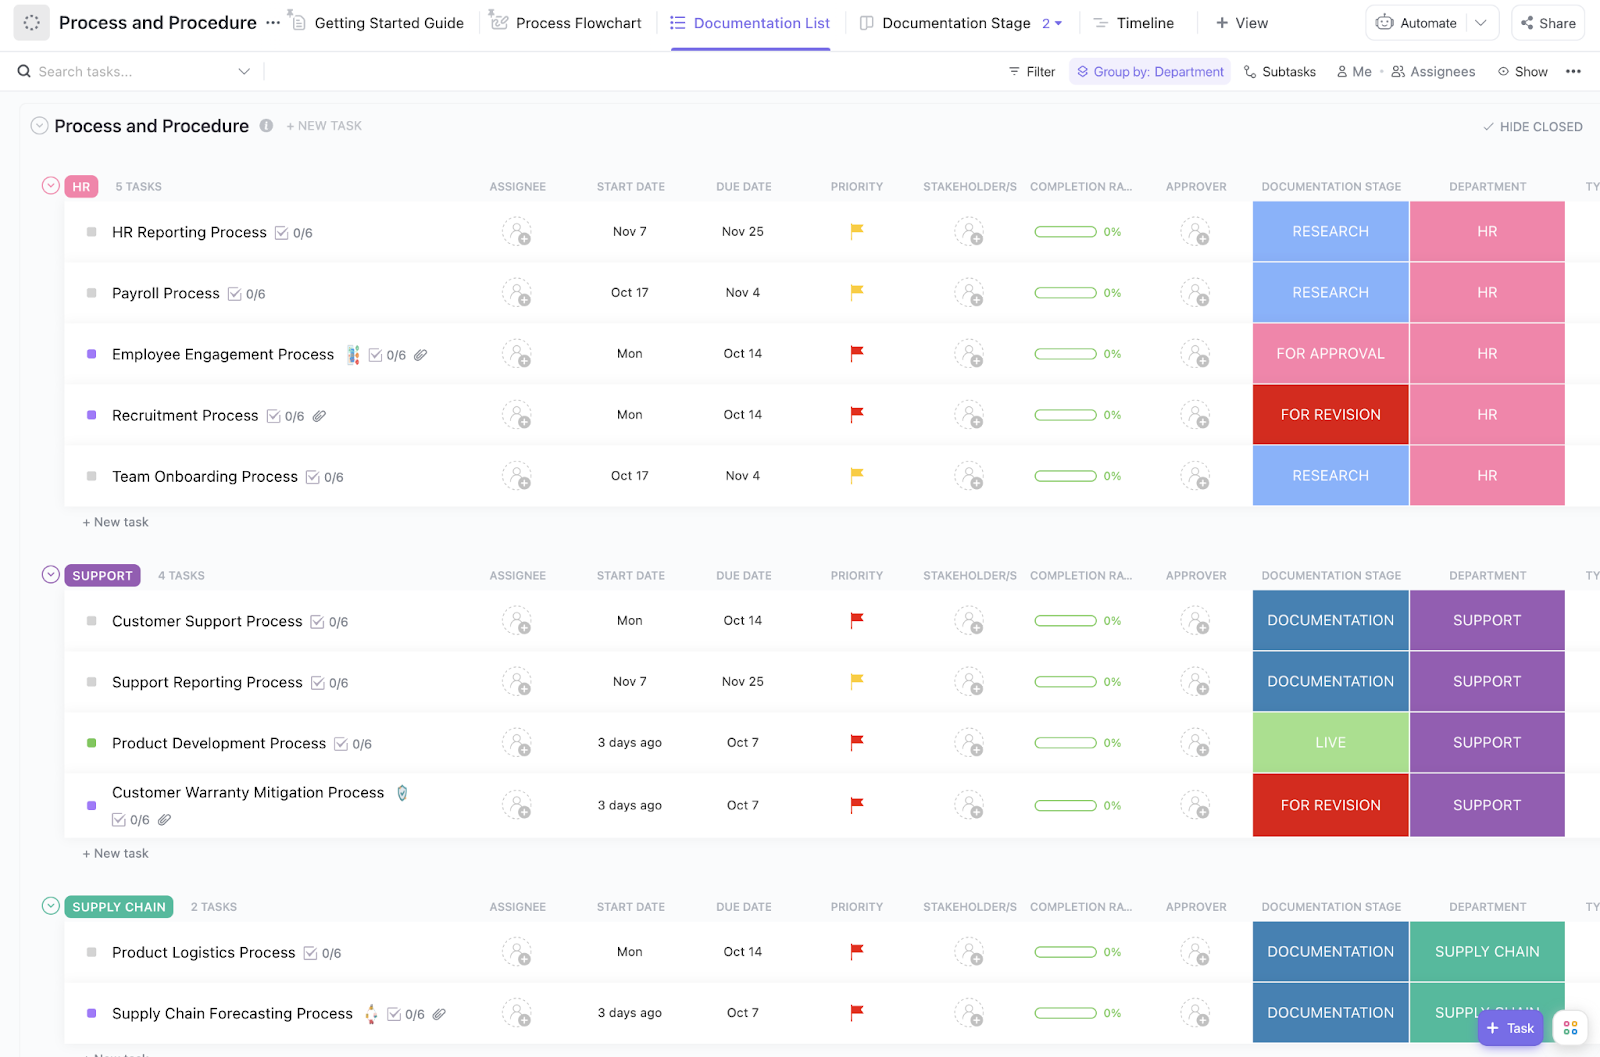
The ClickUp Process and Procedures Template helps you break each workflow into clear, ordered stages with assigned owners. You can pinpoint where an automation should run and who should receive the handoff.
The 20 examples above show what to automate. ClickUp gives you the system to build those rules and track their impact. It connects your workflows to real outcomes, all in one workspace.
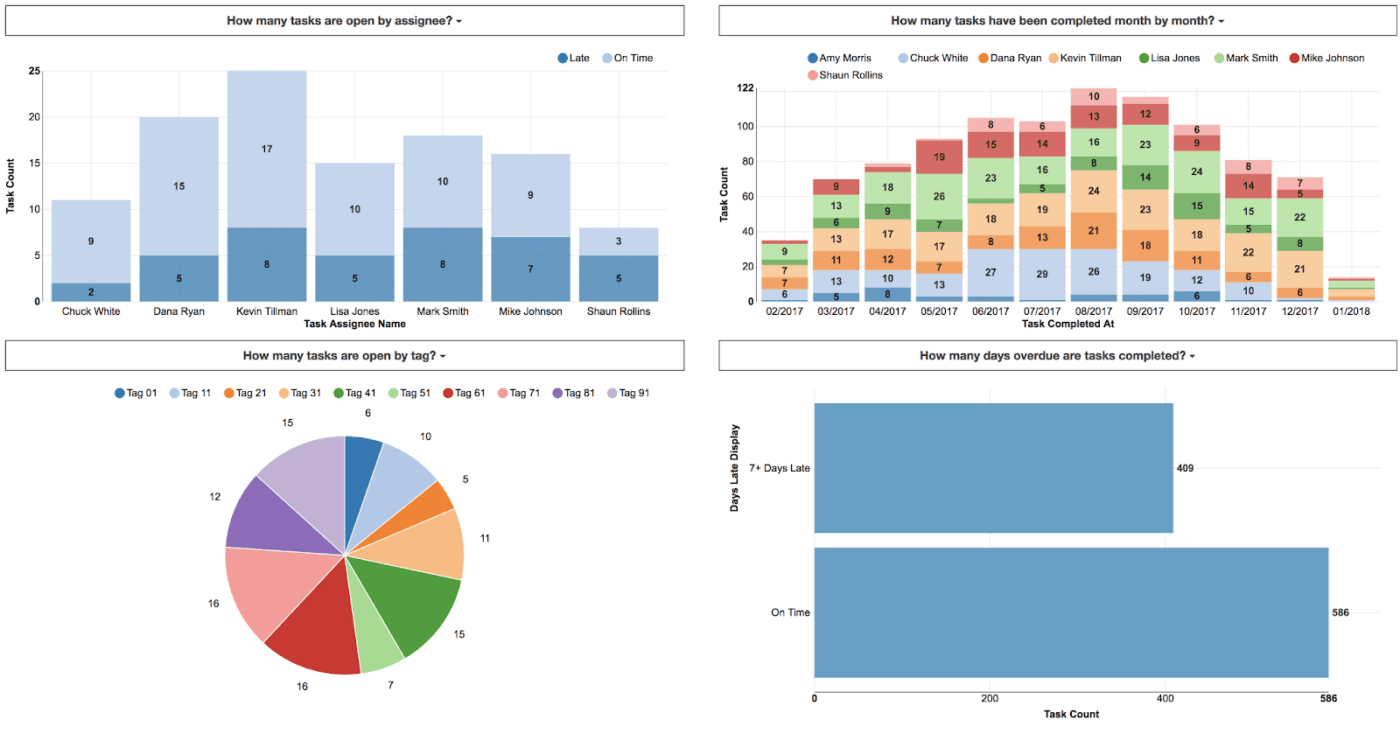
Every automation saves time you can’t see unless you measure it. ClickUp Dashboards pull data directly from active tasks to show what’s changing.
Use a Calculation Card to aggregate time logged before and after a rule went live. Add a Status chart to see how quickly tasks move through handoff stages. The data auto-refreshes, so you don’t have to build a slide deck every Friday to prove your automations are working.
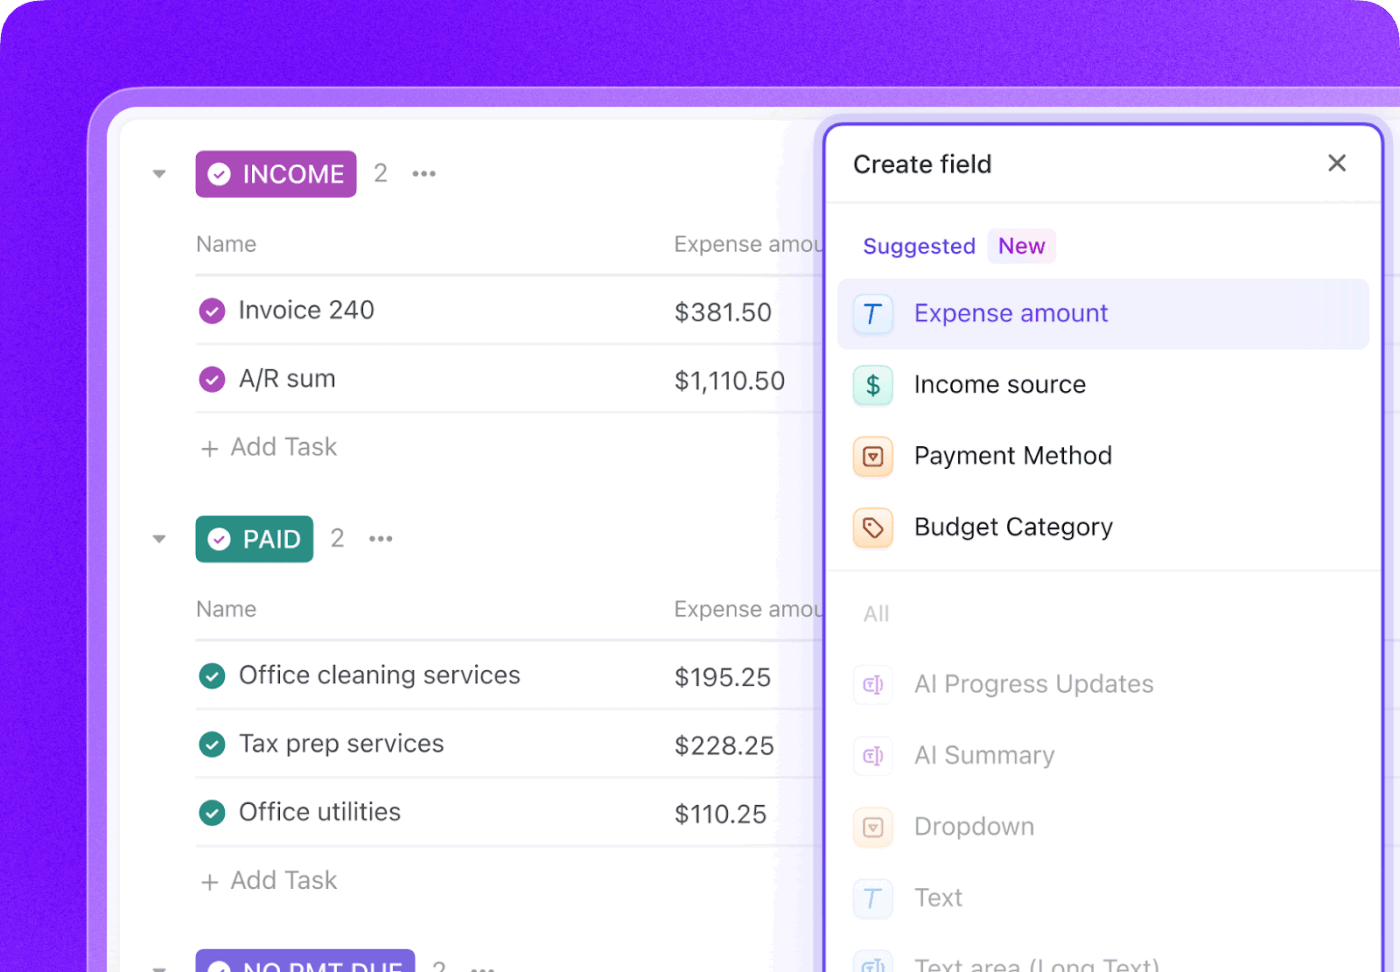
An automation is only as precise as the data it reads. Custom Fields store structured values, like dropdowns, numbers, and labels, directly on tasks.
When you set a trigger to fire on ‘Budget greater than $5,000’ or a condition that checks ‘QA Status is not Passed,’ those values come from Custom Fields. The data stays live because the people doing the work update it as they go.
You don’t need to memorize trigger-condition-action syntax. Describe what you want in plain language, and Brain drafts the rule. Beyond building, Brain can surface automation opportunities by answering questions like ‘Which workflows still have manual handoffs?’ directly from your workspace data.
And when a workflow needs more than a fixed rule, Super Agents in ClickUp pick up where automations leave off. They reason over context, interpret task details, and take action with human-like judgment. This way, automations handle the predictable work while agents handle the rest.
Quick note: ClickUp’s native automations are built for workflows that live inside your workspace. If your stack depends on syncing dozens of external apps with complex data transfers, pair ClickUp with a dedicated integration platform like Make or Zapier.
Each automation here replaces a manual step. It fixes a forgotten handoff, a missed alert, or a stale task field. That is where you find the real value. You don’t need to automate everything. Instead, focus on the invisible coordination work that eats your team’s hours every week.
The pattern is simple. Pick one handoff that breaks down regularly. Build the rule at the List level. Watch it run on real tasks. Once you trust it, move it to the Folder or Space level. Then, pick the next one.
Teams that treat automations as a living system build workspaces that get smarter over time. The 20 examples above are not theoretical. They map to workflows real teams use daily, and every single one is available in ClickUp.
Get started with ClickUp for free.
Automations only fire on actions that happen after you create the rule. They don’t change tasks that are already in the List. If you need to apply the logic to older tasks, you must trigger the event manually or use a bulk action. Testing a new rule on a fresh task is the safest way to confirm it works as you expect.
The most common reasons are an unmet condition, a trigger that doesn’t match the event, or an action that conflicts with your List statuses. Check that the status or field names in your rule exactly match the ones in that List. For example, a rule referencing ‘Done’ will not fire in a List that only uses ‘Complete.’ You can also check the automation’s activity log to see if it ran and what it did.
Yes, an action from one automation can trip the trigger of another. This allows you to chain rules across Lists or stages. This is a powerful feature, but you must monitor it closely. Poorly planned chains can create endless loops or bad results. So build and test each rule on its own before you connect them.
Automation permissions depend on a user’s role and their access to the specific Space, Folder, or List. Guests can’t create automations. Members need edit access to the location to build or change rules. To keep rules consistent across a team, have an admin set them at the Folder or Space level so individuals can’t change them.
Yes, you can turn an automation off and back on without losing its setup. This is helpful during busy periods, audits, or troubleshooting. Pausing a rule is much smarter than deleting it when you’re testing for bugs. Review your active rules often and pause any that you no longer need.
No, automations don’t have an undo button. An action executes immediately, such as moving 50 tasks to another List. If a rule misfires, you must reverse the changes by hand or build a new rule to fix it. This is why scope discipline matters. Test at the List level first, so a bad rule only affects a few tasks.
Yes, automations are available on every plan, including Free Forever, which includes 5 active automations and 100 actions per month. The Unlimited plan raises that to 500 active automations and 1,000 monthly actions, and Business offers unlimited active automations with 10,000 actions per month. Each time a rule runs counts as one action, and your limit resets on the 1st of every month (Pacific Time). You can buy more actions on higher plans if you run out.

Manasi Nair
Max 25min read

Pavitra M
Max 19min read

Praburam Srinivasan
Max 22min read

© 2026 ClickUp