
If you’re someone with a non-coding background like me, the acronym API probably sounds intimidating.
Black, empty coding consoles. Programming languages that might as well be Klingon. 👽
They’re daunting for the 99% of us that don’t know Javascript or how to drink one.
That’s until you realize that Application Programming Interfaces (yeah, we’ll stick with API from here on) simply make apps talk to one another.
All of those integrations that make our lives easier; from task notifications in Slack to due dates popping up in your calendar are made possible by APIs that tell our favorite apps how to play nice with one another.
And there’s good news! The ClickUp API website makes it easier to search and navigate the entire process. But for the quick run down, follow the steps below!
What Can You Do With the ClickUp API?
ClickUp allows you to work seamlessly with your team across any number of tools. In order to make it the best project management tool on the market, we’ve built over 1,000 integrations to allow you to sync your processes and workflows with your favorite apps just for this reason.
But what if you wanted to create your own app to read information from ClickUp, send information from outside ClickUp, and update automatically based on those changes?
Enter the ClickUp API.
We’ve added a new API Docs section with articles about our public API and a Reference section with endpoints, parameters, accurate code examples, and the ability to try using our endpoints from your web browser.

Additionally, ClickUp’s API allows you to build applications and scripts to integrate ClickUp’s functionality into third-party apps. With the right commands (or calls), you essentially instruct any program on how to pull, view, and update your Workspace data from anywhere.
You could automate processes even further from outside ClickUp, add tasks on the fly, post attachments from other apps, track time, or send yourself randomly-generated comments of self-love. 💜
How to Get Started With the ClickUp API
Even if you’ve never used an API before (you actually do, every day), you can start using one in very little time! All it takes is an API key to authenticate requests (kind of like a password) and our API site to understand what you need to send valid requests. You can use the Try It feature on our API site to make requests right from your web browser.
Follow these three steps to start using the ClickUp API.
1. Get Authentication for Your Requests
Before you can submit a request to use the ClickUp API, you have to authenticate it. For those using the ClickUp API for personal use, simply use your personal API token.
On the flip side, if you’re building an app or integration for others to use, start with ClickUp’s OAuth flow. This will allow users in ClickUp to authorize specific Workspaces just for your app.
- The personal API token is found within the user settings under Settings > My Apps (*recommended for beginners)
- OAuth application is within the team settings under Workspace Settings > Integrations > API

Whatever option you use to authenticate, know that users (or yourself) will only have access and permission to the information they can access in ClickUp. Additionally, the token is required in the Authorization header for your API request.
2. Test the API Within Your Web Bowser
First, try using the ClickUp API with your specific ClickUp account and Workspaces. You could also use a mock server to view generic information. You have the option to copy an example request in different coding languages.
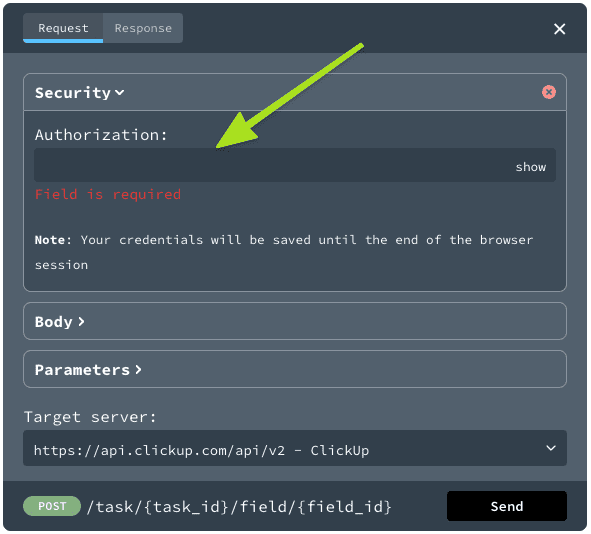
Simply navigate to any endpoint page, click the Try It on the top right, and within the security section, enter (or paste) your generated API key.

From here you can enter the request body and parameters (as seen above), and select your target server. You can choose from two target servers:
- ClickUp: (https://api.clickup.com/v2)
- Mock Server: (https://{mock-server-id}.remockly.com)
3. Download the Postman Collection
It’s easy to use ClickUp’s API by downloading and importing all the ClickUp API endpoints into Postman. This app allows you to test the APIs and ensure they’re successfully communicating with you!
Get started by:
- Downloading the latest version of ClickUp’s Postman collection
- Import that collection into your own Postman workspace
- Create your first request to the ClickUp API

4. Create an App With a Personal API Key
If you are using the API for personal use, you can grant access using a personal API token.
You can find this token in your user settings, under the Apps section. At the top of the page, you have the option to generate a personal token. These tokens will always begin with pk_.

If your token is ever compromised, you can regenerate it. However, be aware that any applications that were using the old token will lose access once it has been regenerated.
To find your token, follow these steps:
- Navigate to your personal Settings
- Click Apps in the left sidebar
- Click Generate to create your API token
- Click Copy to copy the key to your clipboard

Get more information on how to create your API using OAuth in our ClickUp API docs.
5. Start Creating API Requests
Boom! 👊
You’ve created your app, now it’s time to tell it what to do. You may now use your Personal or OAuth2 access tokens in the Authorization header of your API requests.
Check out the ClickUp 2.0 API website to learn more about:
- A new API Docs section (including articles about the ClickUp public API)
- Authentication
- Rate Limiting
- Error Handling
- All Endpoints
- FAQs
Good luck! And don’t forget to reach out to our team if you have any questions about ClickUp’s API or our other helpful integrations.


