


Still downloading templates?
There’s an easier way. Try a free AI Agent in ClickUp that actually does the work for you—set up in minutes, save hours every week.
Sorry, there were no results found for “”
Sorry, there were no results found for “”
Sorry, there were no results found for “”
There’s a reason we remember 987-654-3210 better than 9876543210. It’s called chunking, a mental shortcut that helps free up working memory by grouping information into manageable bits.
The same logic applies to tasks. A broad to-do like ‘Launch new feature’ may make sense in your head, but unless it’s broken into subtasks, your team starts with no clear direction.
In this blog post, we’ll explore how to generate subtasks from a task title with ClickUp.
Big, vague tasks can feel overwhelming, hard to start, and even harder to delegate. That’s where subtasks come in.
Here’s why breaking tasks into subtasks makes a real difference:
🧠 Fun Fact: According to cognitive science research, people naturally decompose complex goals into smaller subtasks to reduce the mental burden of planning while still achieving high performance.
Manually breaking down every task into categories can feel like a task in itself. Here are some challenges you might face:
💡 Pro Tip: Using mind maps or diagrams is a great way to break down your tasks into manageable subtasks. Start by visually anchoring your main task in the center and branch out to major components or milestones. Start off easily with ClickUp Mind Maps!
ClickUp is the world’s first Converged AI Workspace that combines project management, documents, and team communication, all in one platform—accelerated by next-generation AI automation and search.
Its core feature, ClickUp Tasks, lets you break down work into manageable subtasks.
🧠 Fun Fact: In 2025, ClickUp’s users created over 3.6 billion tasks! 🤯
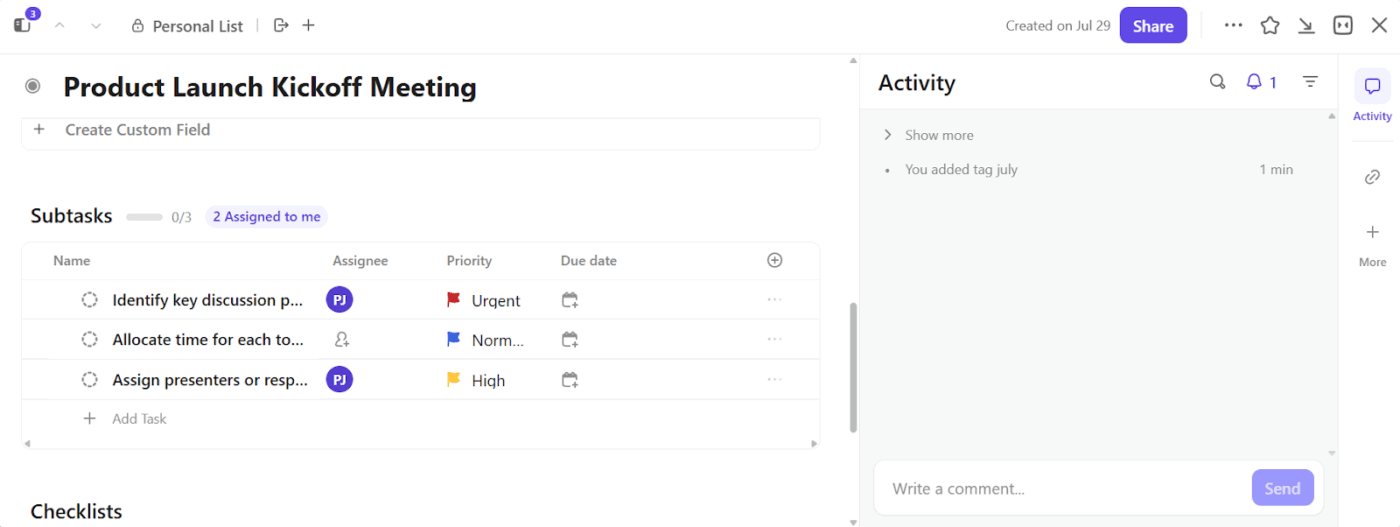
Each task serves as a container for everything that needs to be done, and includes owners, deadlines, attachments, discussions, and Subtasks in ClickUp. This checklist provides structure, ownership, and visibility to every phase of your work, particularly when handling recurring workflows.
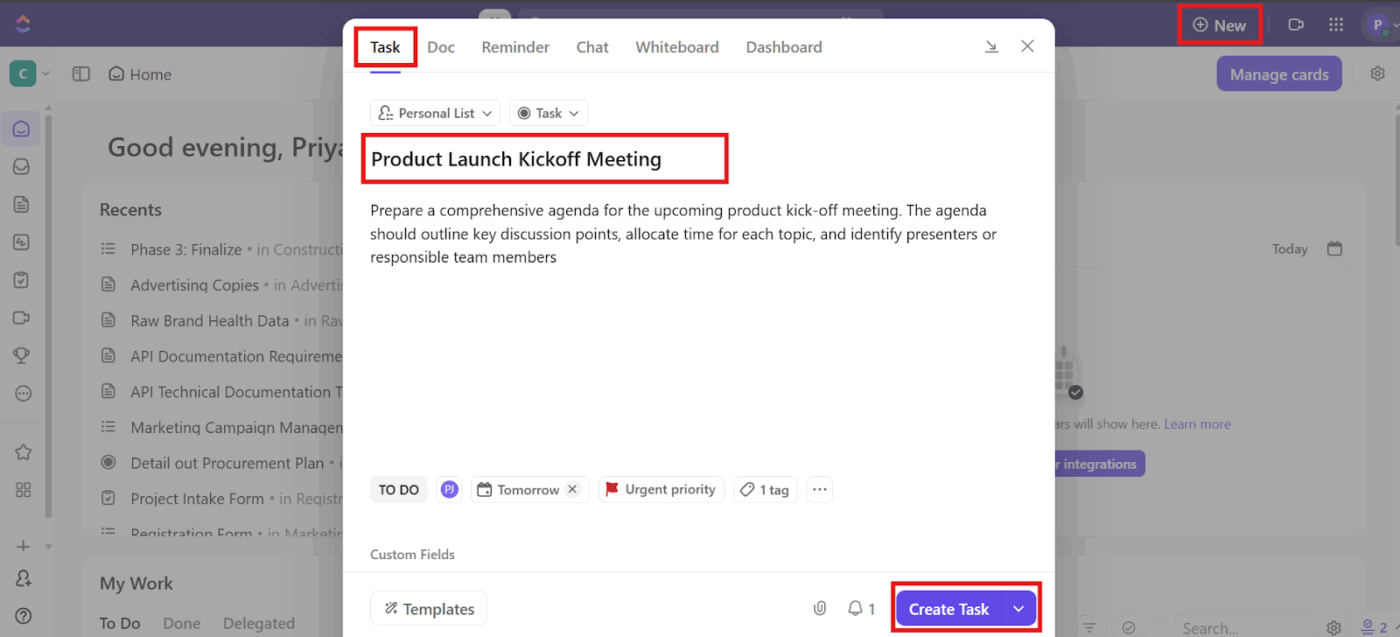
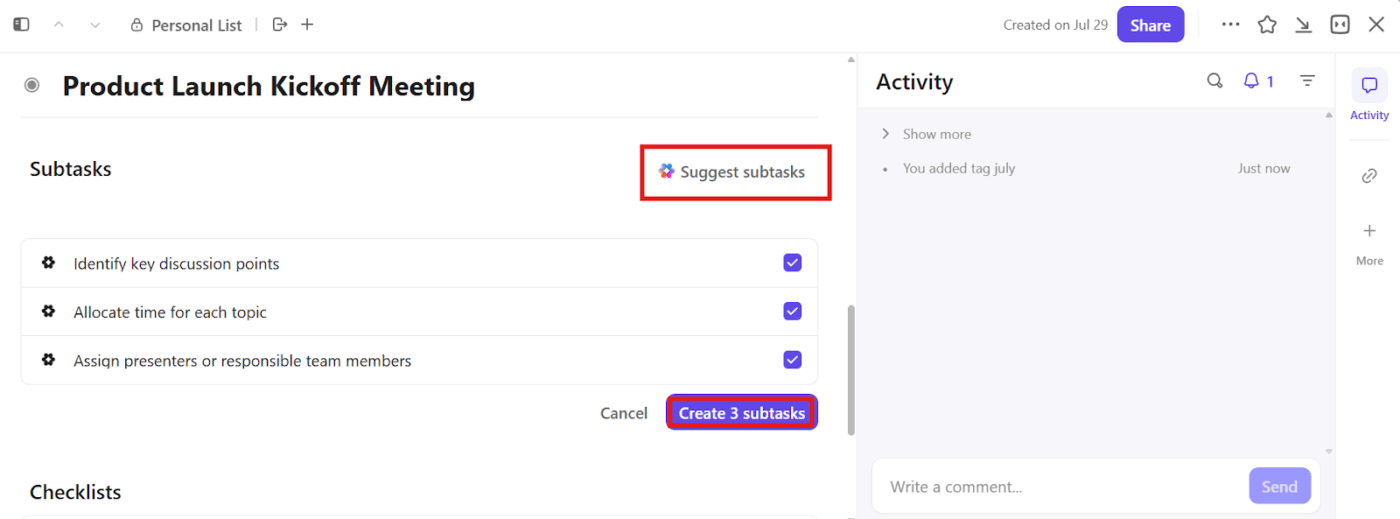
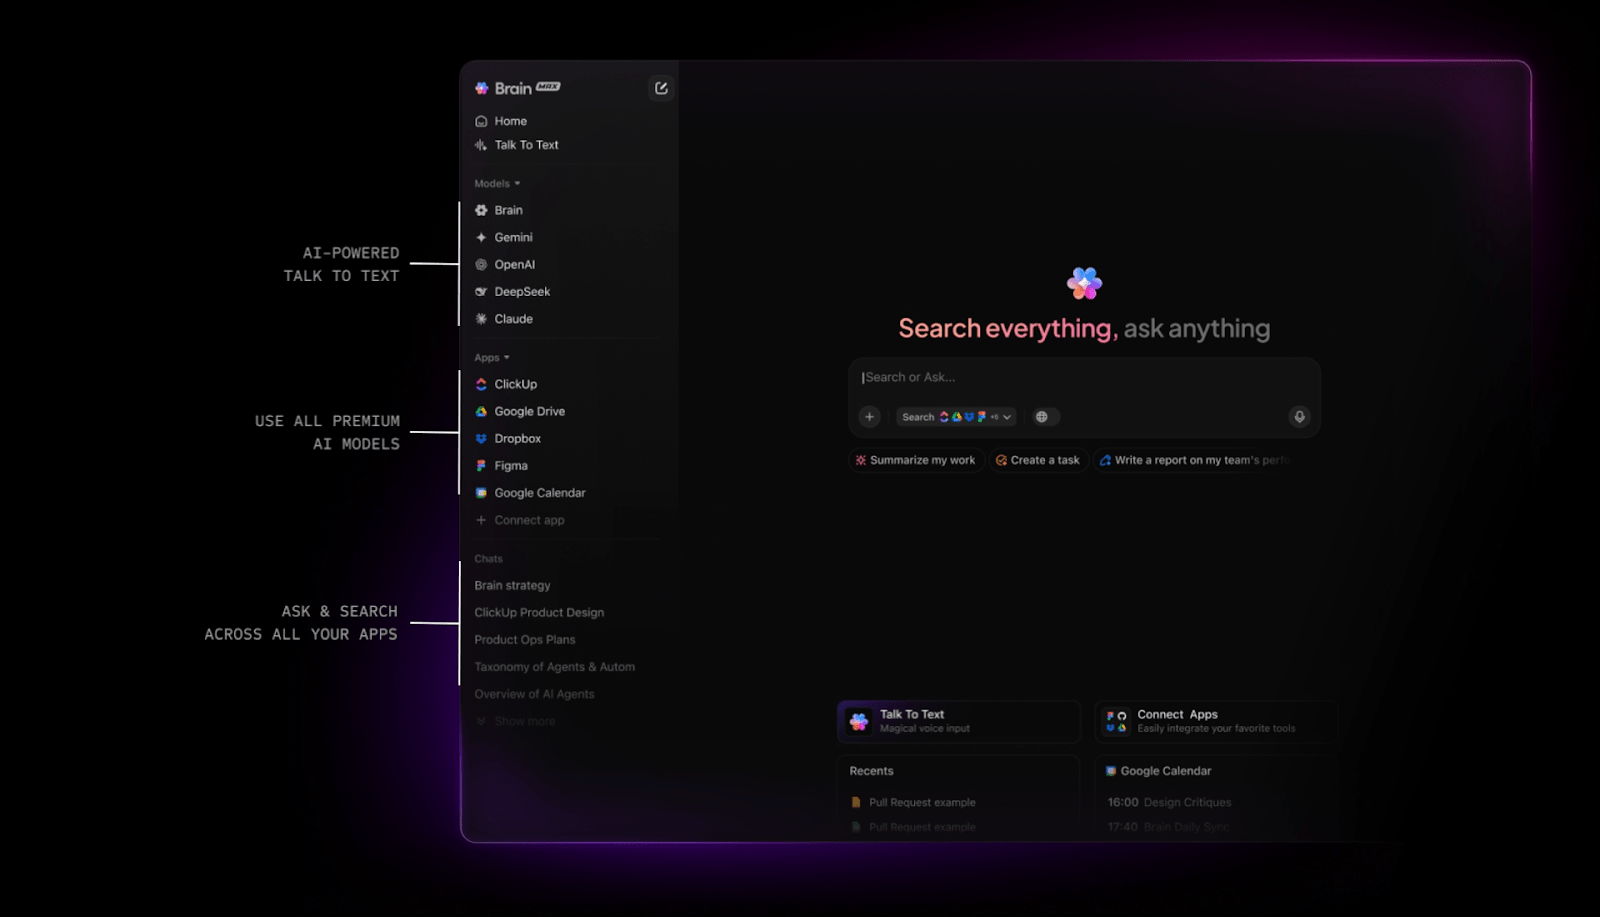
And no, you don’t need to manually turn every task into a mini-project. ClickUp Brain, the powerful Contextual AI assistant, can help.
Here’s the step-by-step process on how to generate subtasks from tasks within this task management software:
As the world’s most complete and context-aware work AI, ClickUp Brain understands context from your ClickUp workspace, analyzes your task title or description, and instantly suggests relevant subtasks. It helps you organize work, reduce oversights, and keep momentum high without missing a beat.
🚀 ClickUp Advantage: Want the benefits of AI without opening yet another tab?
ClickUp Brain MAX is your AI companion app that unifies search, automation, and context across all your work apps, so you can find what you need, generate updates, or automate tasks right from your desktop.
You can also:
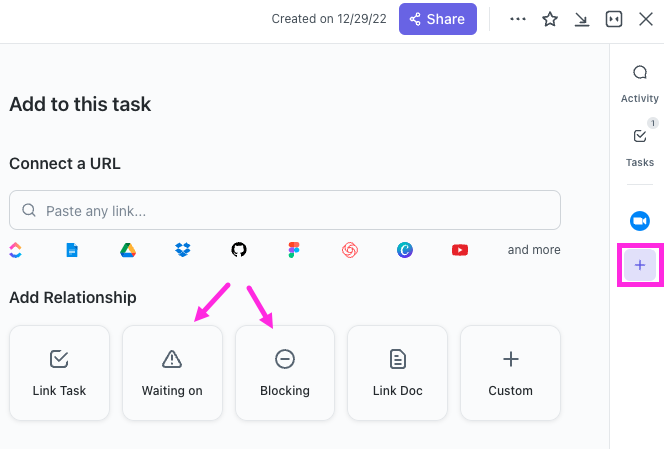
Once you’ve laid out your subtasks, it’s time to bring some order to them.
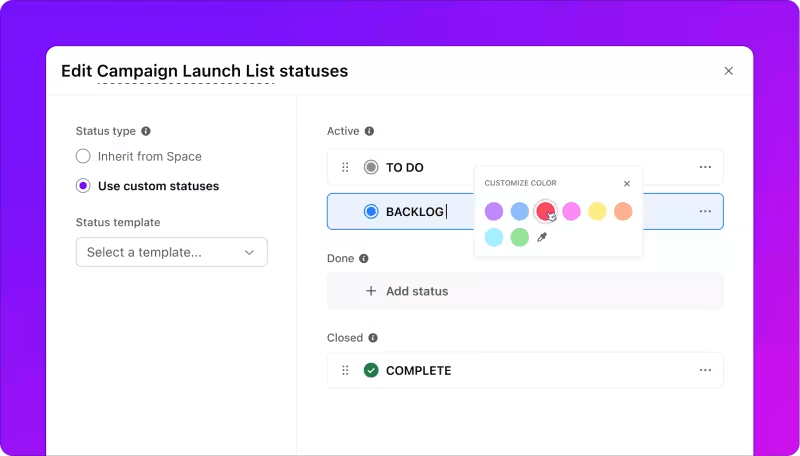
With ClickUp Custom Statuses, you can assign specific progress stages to each subtask so everyone knows exactly where things stand. Use ClickUp Dependencies to control the flow, ensuring that one step doesn’t start until another is completed.

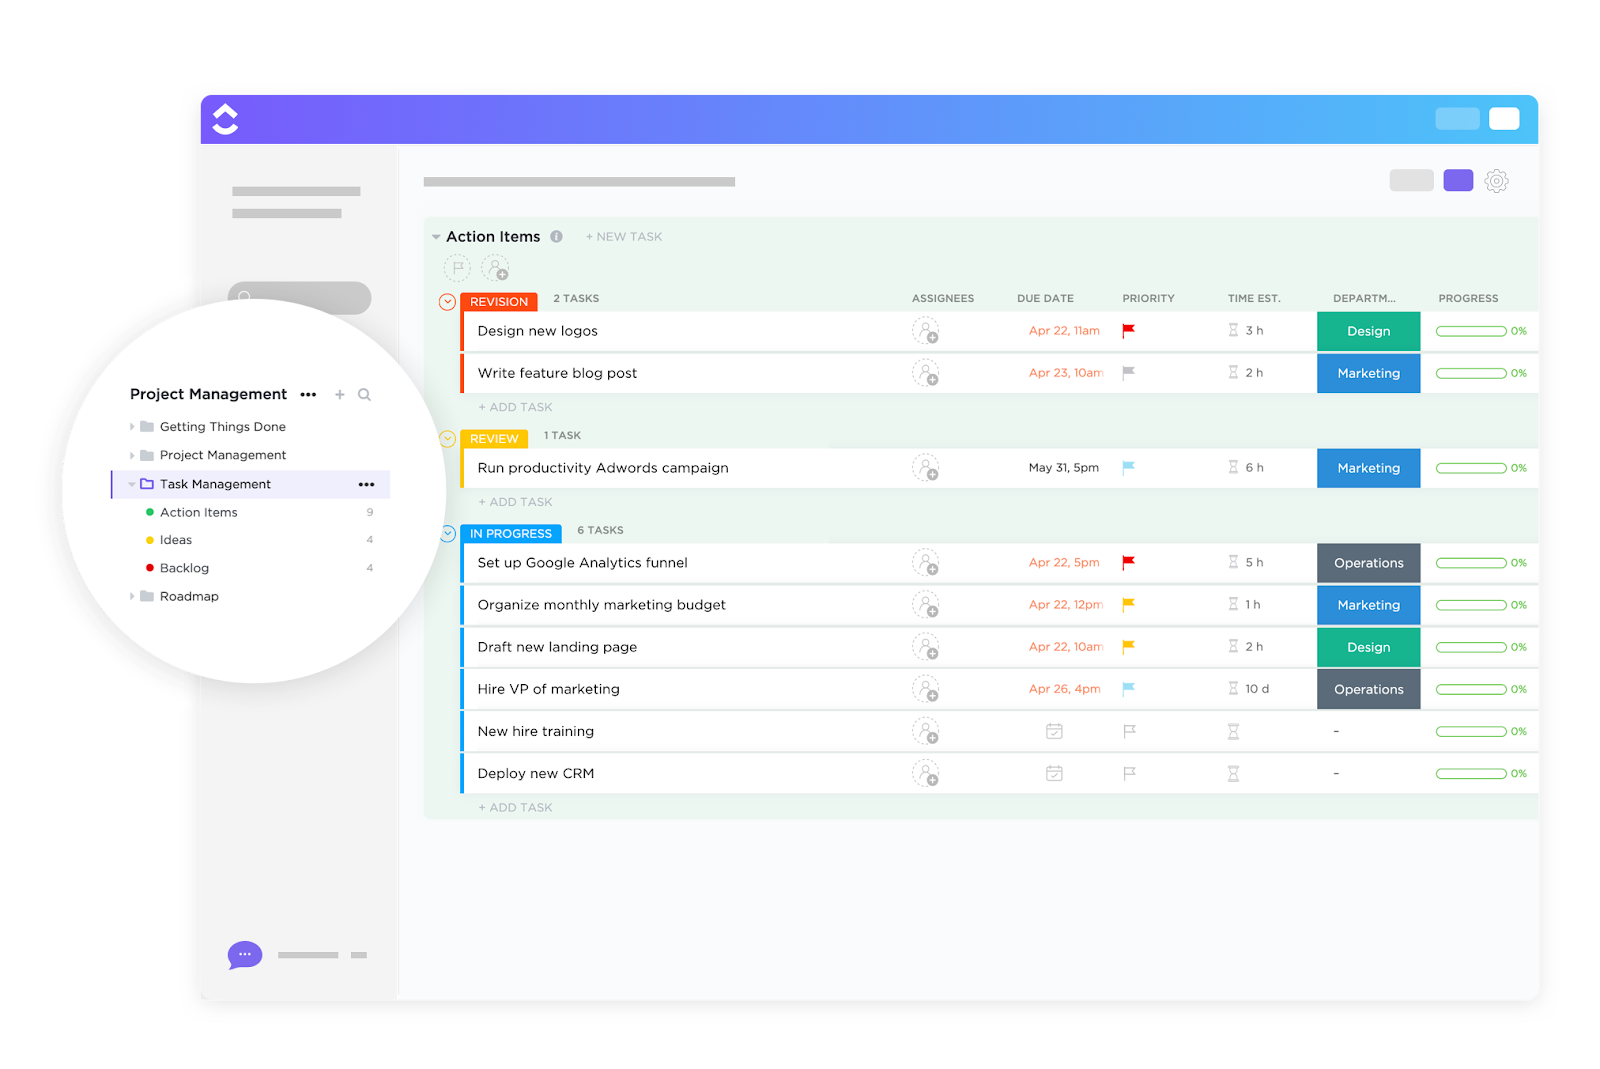
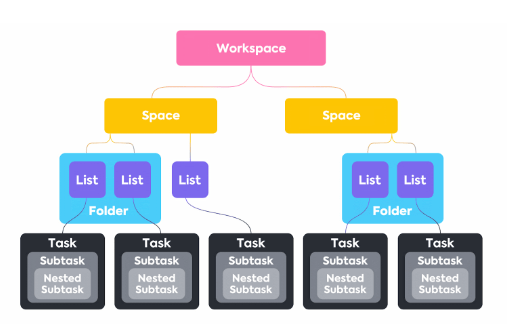
As your projects grow, so do the moving parts. ClickUp’s Project Hierarchy, from Workspace to Folder, List, Task, Subtask, and Checklist, helps with visual task management.
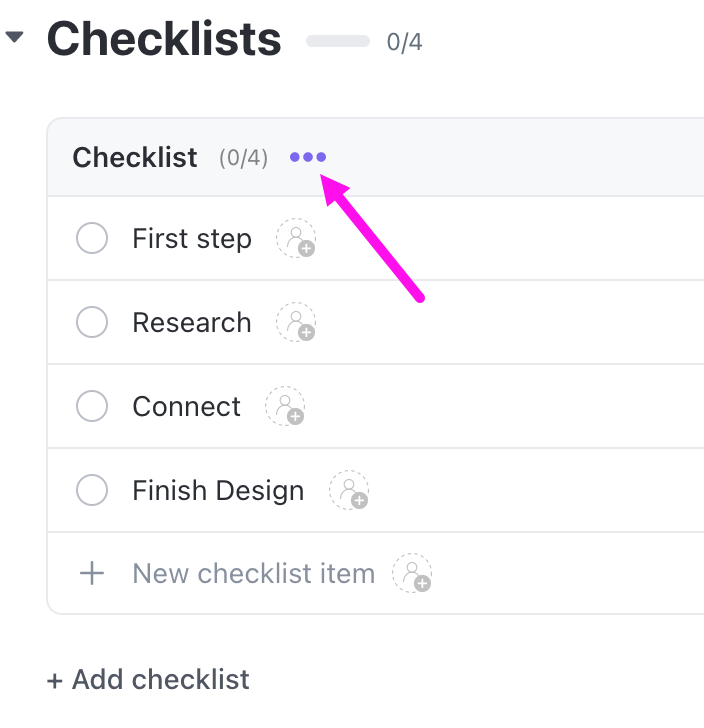
ClickUp Task Checklists enable you to track smaller tasks within a task. You can nest checklist items, assign them to teammates, drag and drop to reorder, and even use checklist templates to save time on recurring workflows.
📮 ClickUp Insight: 64% of employees occasionally or frequently work outside their scheduled hours, with 24% logging extra hours most days! That’s not flexibility—that’s never-ending work. 😵💫
ClickUp Tasks help you break big goals into smaller, manageable steps, so you always know what to tackle next—without the overwhelm. Just ask ClickUp’s AI to generate subtasks, add checklists, and map dependencies to stay organized and in control. Meanwhile, ClickUp Automations streamline routine work by handling updates, assignments, and reminders—so you can spend less time on busy work and more time on what matters. 🚀
💫 Real Results: Pigment improved team communication efficiency by 20% with ClickUp—keeping teams better connected and aligned.
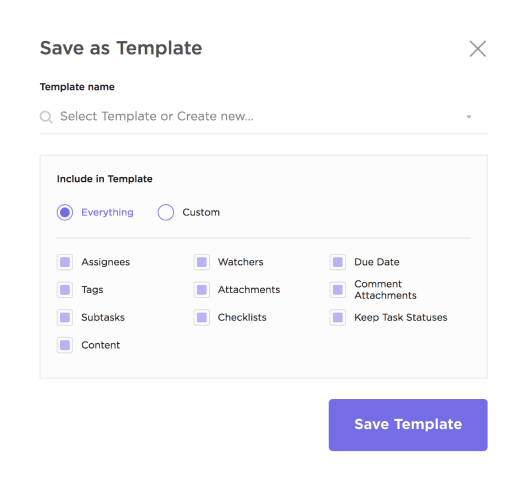
Task templates in ClickUp are reusable blueprints that save your task’s structure, including subtasks, checklists, Custom Fields, assignees, and more. They’re ideal for repeatable workflows, such as onboarding, blog post creation, sprint planning, or QA checklists.
Follow these steps to set up a template you can reuse across projects:
And if you don’t want to build a task list template from scratch, you can use the ClickUp Task Management Template.
It gives you a ready-to-use starting point with pre-built default views and Lists to organize action items, ideas, and backlog tasks in one place. Here’s how this task management template helps you:
🧠 Fun Fact: According to neuroscience, complex behavior change requires both motivation (the will) and cognitive skills (the way). When you generate subtasks, you’re helping your brain by lowering the cognitive load.
Need more helpful tips on tracking and managing tasks? Here’s a quick video explainer for you!
Once your task templates are ready, why not let ClickUp automatically add them?
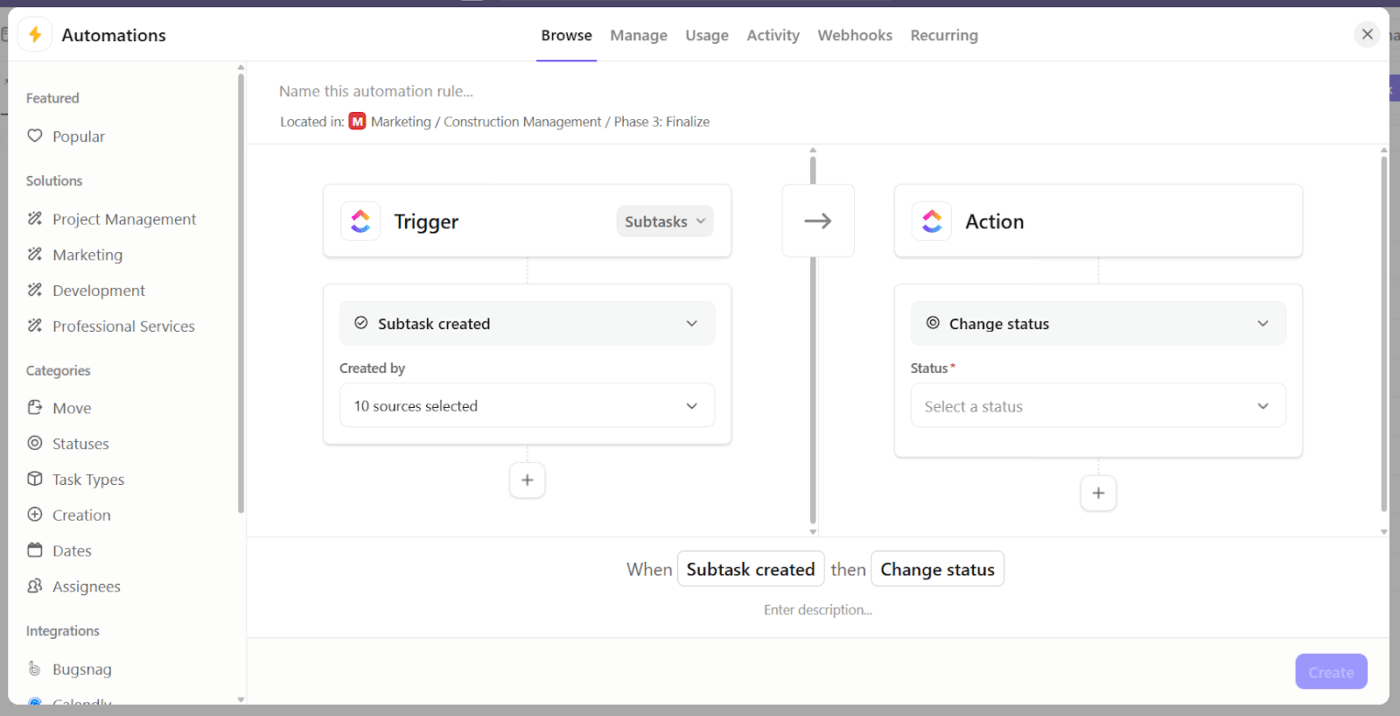
With ClickUp Automations, you can trigger subtasks as soon as a task is created, moved to a specific list, or contains specific keywords in its title.
📌 For example, if a task title includes ‘Onboarding,’ Automations can instantly apply your onboarding template to the task with all subtasks, due dates, and assignees. Even if your task titles vary, such as ‘New hire: Jamie’ or ‘Sprint QA – July,’ it can detect keywords (based on your rules) and auto-apply the right template with all predefined subtasks in place.

🚀 ClickUp Advantage: You can also take task automation to the next level with ClickUp AI Agents. These AI tools make decisions based on real-time updates to your workspace and your specific instructions. You can start instantly with prebuilt agents or create your own custom agents using a no-code builder.
Now that you know how to generate subtasks using Automations, let’s explore some specific, real-world scenarios where it’s useful:
Every new client requires a reliable and repeatable process, but the steps can vary slightly based on the service type or tier. Here are the suggested subtasks:
📖 Also Read: Free Project Communication Plan Templates
Producing content involves multiple stages, and brainstorming is only the beginning. Here are some examples of subtasks for content marketing professionals:
🔍 Did You Know? Missing a deadline, no matter how small the delay, can make work look worse, even if there’s no quality change. People subconsciously associate lateness with lower competence and reliability. Creating subtasks can help prevent this by making progress (and bottlenecks) visible before it’s too late.
From feature requests to bug fixes, product work follows a natural lifecycle. Here are some subtask examples:
🔍 Did You Know? Intrusive notifications (like flashing alerts or audio pings) do hijack your task focus, especially in high-stress environments. But here’s the twist: people respond more slowly when they’re already handling an audio task, like a call, than when they’re reading or watching. That’s why designing interruption-friendly systems matters.
Support teams thrive on speed and consistency. With auto-generated subtasks, you can ensure that every issue, big or small, receives the right triage and troubleshooting steps every time. Here are some examples:
🧠 Fun Fact: You’re more likely to start with the easiest task, even if it’s not the smartest move. This is called the ‘smaller tasks trap.’ Our brains love quick wins, so we gravitate toward smaller, less demanding to-dos. However, here’s the catch: individuals who rely less on rational thinking tend to fall for this trap more frequently, ultimately harming their overall productivity in the long run.
📮 ClickUp Insight: 48% of our survey respondents say finishing 10 small tasks is more satisfying than making progress on one big one.
That dopamine hit? It feels real (almost). Chasing micro-wins all day seems productive on the surface, but it’s really procrastination in disguise.
Working with intention is the antidote here. Let ClickUp’s Calendar automatically schedule protected blocks for deep work, while still leaving space for quick wins. You can configure Automations to auto-sort tasks into preferred categories. For example, “10x tasks” for your high-impact projects, plus “daily wins” or “weekly wins” for those essential or admin tasks that keep work moving forward.
Here are some highly effective best practices to manage multiple projects and make your auto-generated subtasks genuinely useful, scalable, and ready for execution.
📌 Example: For a blog post task, subtasks should match your handoff rhythm: Write draft → Review draft → Add visuals → Publish, unlike a generic ‘Write → Edit → Done’ workflow
📌 Example: ‘Review draft for accuracy’ instead of just ‘Review’
📌 Example: Your design team working on a new feature rollout can break down subtasks based on how work progresses. So, wireframes get Monday, high-fidelity mockups are due on Wednesday, and team feedback and revisions are expected on Friday
📌 Example: ‘Assign to content writer’ instead of ‘Assign to Zac.’ Your automation can later match it to the right person by role
📌 Example: Have a subtask called ‘Prepare for launch’ and include checklist items like ‘Confirm messaging,’ ‘Verify assets,’ and ‘Check URLs’
The first ten minutes of any task often determine how smoothly the rest of it goes. However, when you’re juggling multiple projects or managing a team, it becomes repetitive labor.
ClickUp’s powerful task hierarchy can help here. Structure your projects from the top down, so you can map exactly how work gets done across teams, tools, and timelines in the same view. Then, let ClickUp Brain take over. It can instantly break complex tasks into subtasks, suggest timeframes, and even generate action plans. Then, you can add or delete tasks as needed.
Pair that with ClickUp Automations to trigger the right actions at just the right moments, and you’ve got a system that expands with you.
So, what are you waiting for? Sign up to ClickUp for free today! ✅

© 2026 ClickUp

There’s an easier way. Try a free AI Agent in ClickUp that actually does the work for you—set up in minutes, save hours every week.