


Still downloading templates?
There’s an easier way. Try a free AI Agent in ClickUp that actually does the work for you—set up in minutes, save hours every week.
Sorry, there were no results found for “”
Sorry, there were no results found for “”
Sorry, there were no results found for “”

Clients don’t ask for much; they just need clarity, updates, easy access to information, and a way to reach you when needed. But these simple needs often turn into constant emails, scattered files, and status meetings that go in circles, building frustration on both ends.
A well-structured client portal centralizes everything so clients always know where to go for updates, documents, and communication.
In this blog post, we’ll explore how to create a client portal in ClickUp, the everything app for work!
PS: We’ll look at some ready-to-use templates to get you up and running in no time. 💁
Follow these steps to create client portals using ClickUp:
Step #1: Set up a dedicated client space digitally
Step #2: Centralize client information with ClickUp Docs
Step #3: Organize client tasks and projects
Step #4: Improve client communication with ClickUp Chat
Step #5: Build a client dashboard for real-time data study with ClickUp Dashboards
Step #6: Automate repetitive workflows with ClickUp Automations
Step #7: Integrate external apps for better functionality with ClickUp Integrations
A client portal is a secure, centralized space where organizations and clients can collaborate, access documents, track project progress, and communicate effectively.
Systemized client portals avoid scattered emails and prevent miscommunication, and ClickUp makes it easy to set up portals that fit your workflow.
No more worrying about sensitive information ending up in the wrong hands. With customizable permissions in ClickUp, you can decide precisely what clients see and access, keeping things transparent without oversharing.
From task tracking to automated updates, the platform offers customizable options to manage multiple clients.
💡 Pro Tip: Implementing a client portal can present challenges like low client adoption. To overcome this, communicate the portal’s benefits, offer incentives for early adopters, and provide thorough training to ensure clients are comfortable and engaged with the new system.
Use ClickUp’s Quick Start Client Services Template to build a clear, organized portal for your clients. Share timelines, updates, and docs without messy email threads—everything stays in one place, updated in real time. Try it for free today!
Entities like agencies, consultants, freelancers, law firms, and financial service providers use client portals to share information without relying on endless emails.
Here are some professions that use such portals for better client project management: ⚒️
Setting up a client portal using ClickUp CRM might sound complicated, but it’s actually straightforward. Whether you need a simple space for file sharing or a fully interactive hub with tasks, updates, and automation, the platform allows you to build a portal that works for you and your clients.
Here’s a step-by-step guide to building an effective portal. 👀
Create a dedicated ClickUp Workspace to keep all client-related information organized and accessible.
Sign into ClickUp and create a new Workspace titled ‘Sample Client Portal’ with a Folder for each client within your existing workspace.
You can then import client information or projects into ClickUp in a few simple steps.
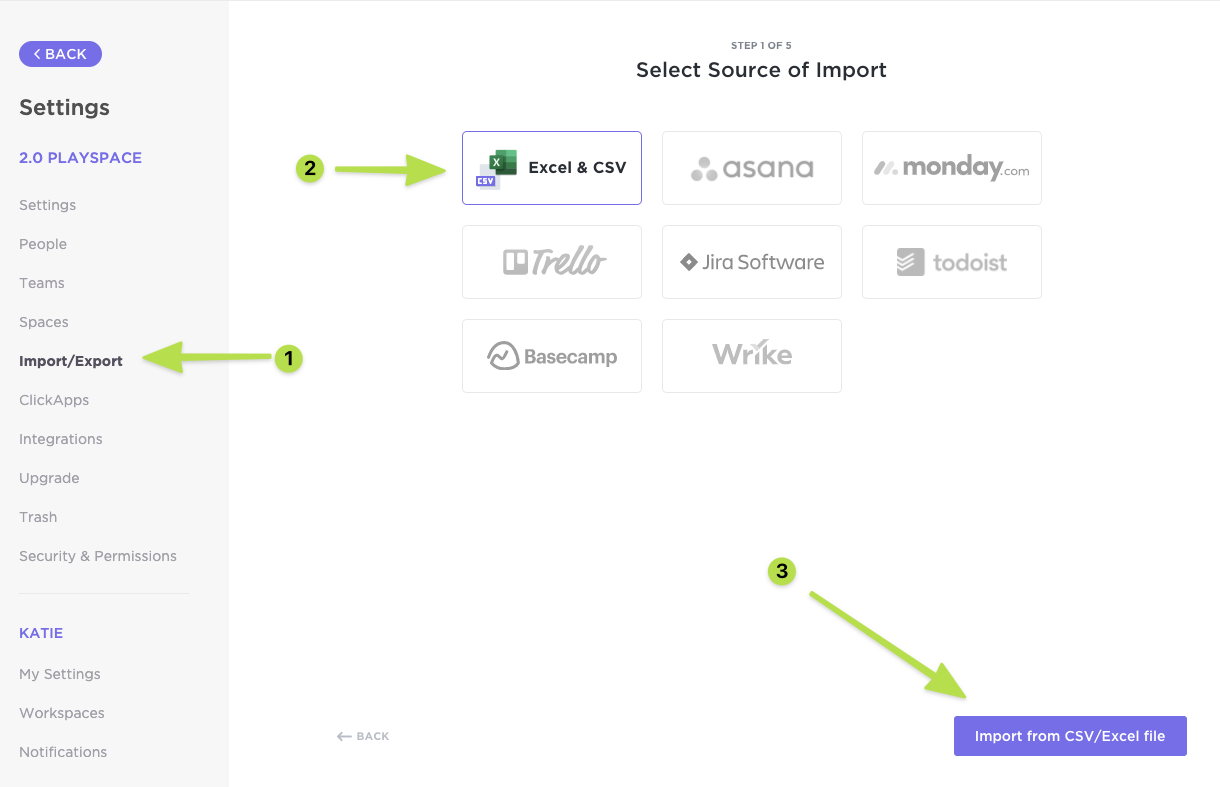
Make sure that the data is mapped to specific Custom Fields within ClickUp so the project information appears neatly formatted and ready to roll.
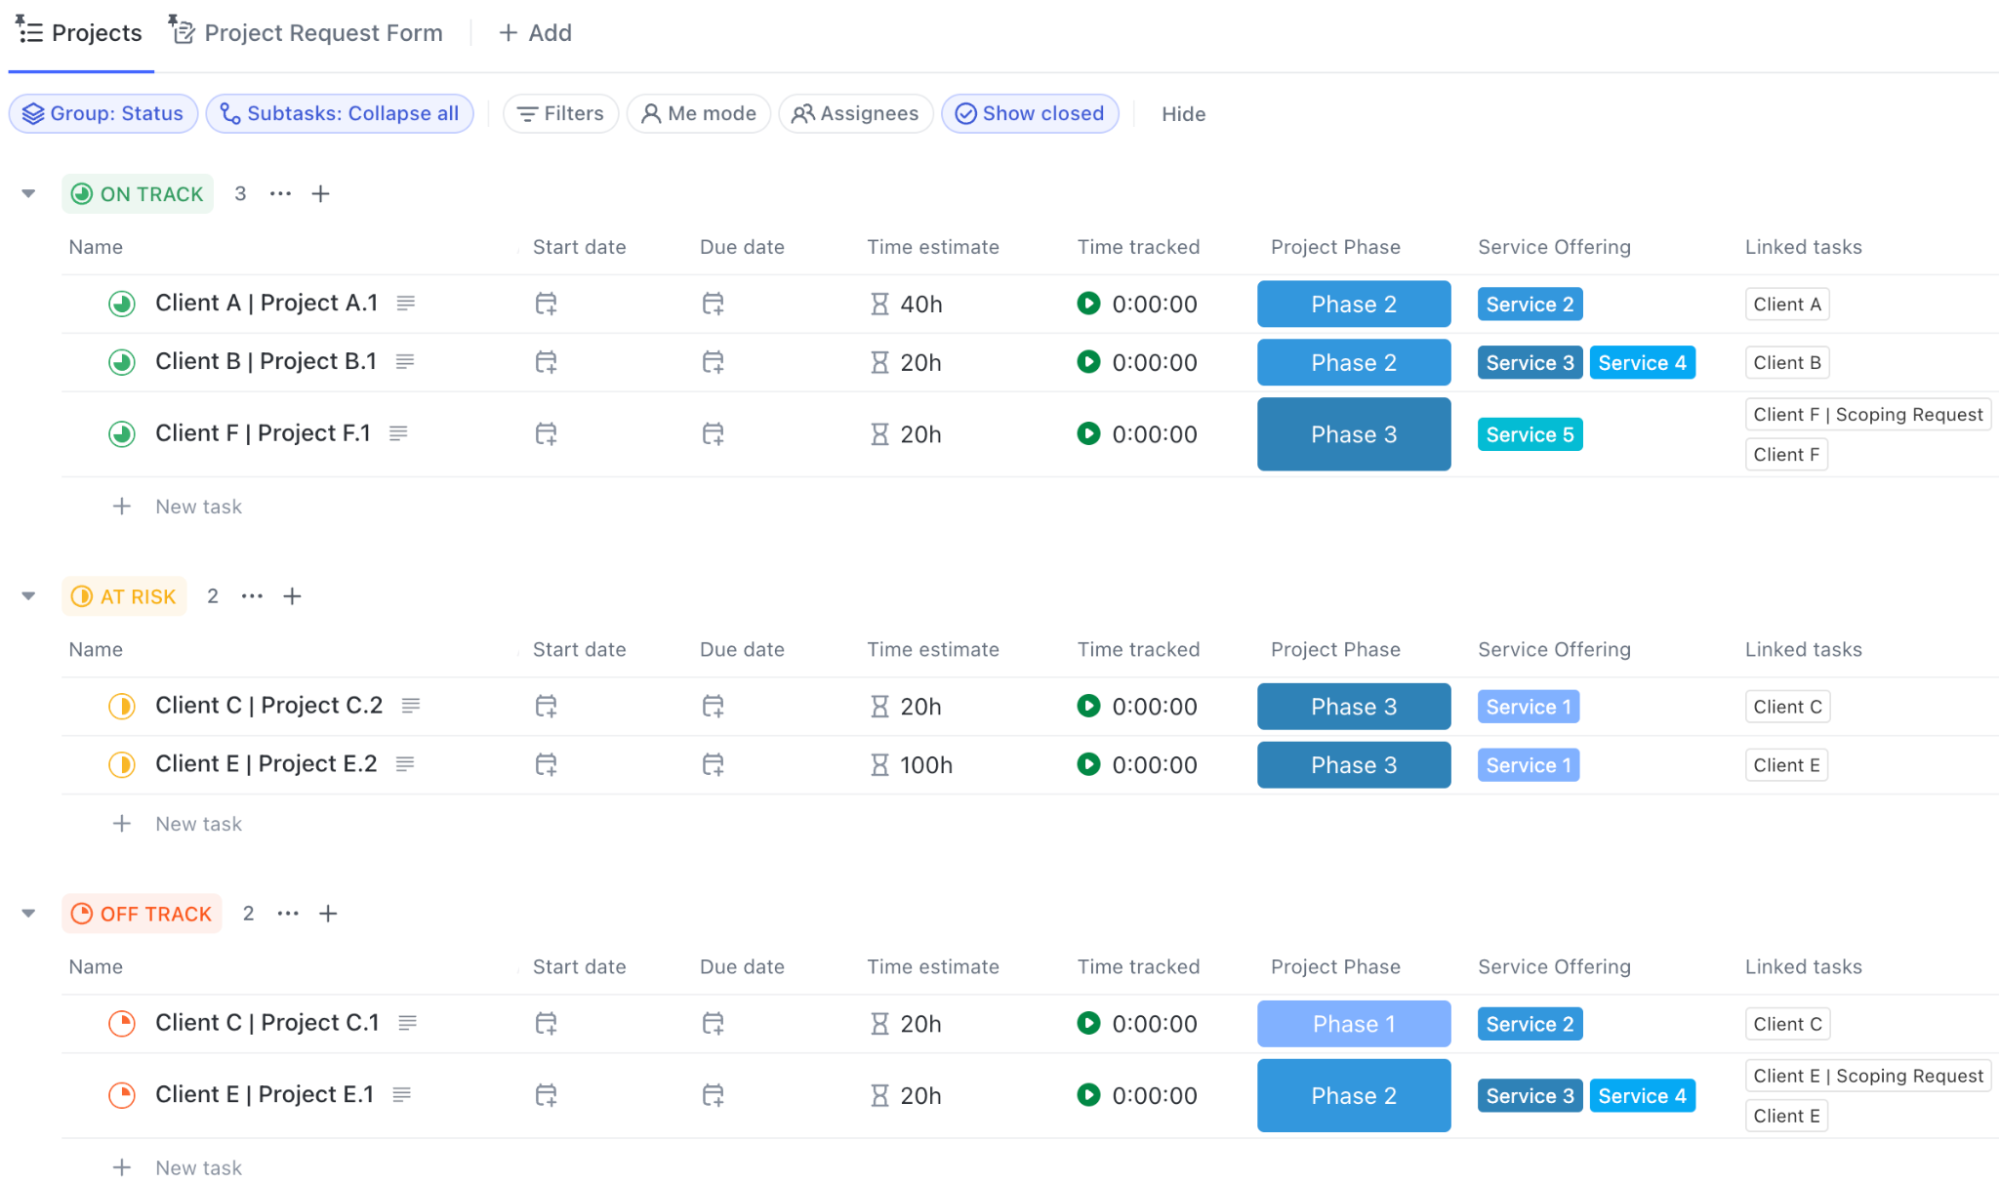
Once the project data is ready in ClickUp, you or your clients can use Custom Views, such as the List View, to help make the information scannable.

On the other hand, ClickUp Custom Statuses allows you to mark the client project lifecycle, such as ‘Pending,’ ‘In Progress,’ ‘Review,’ and ‘Completed.’ Consider setting permissions from the get-go to control what clients can view and edit. This ensures they only access relevant tasks and documents.
🤝 Friendly Reminder: Implement two-factor authentication (2FA) and single sign-on (SSO) to ensure secure access to sensitive information. This builds trust with clients regarding data protection.
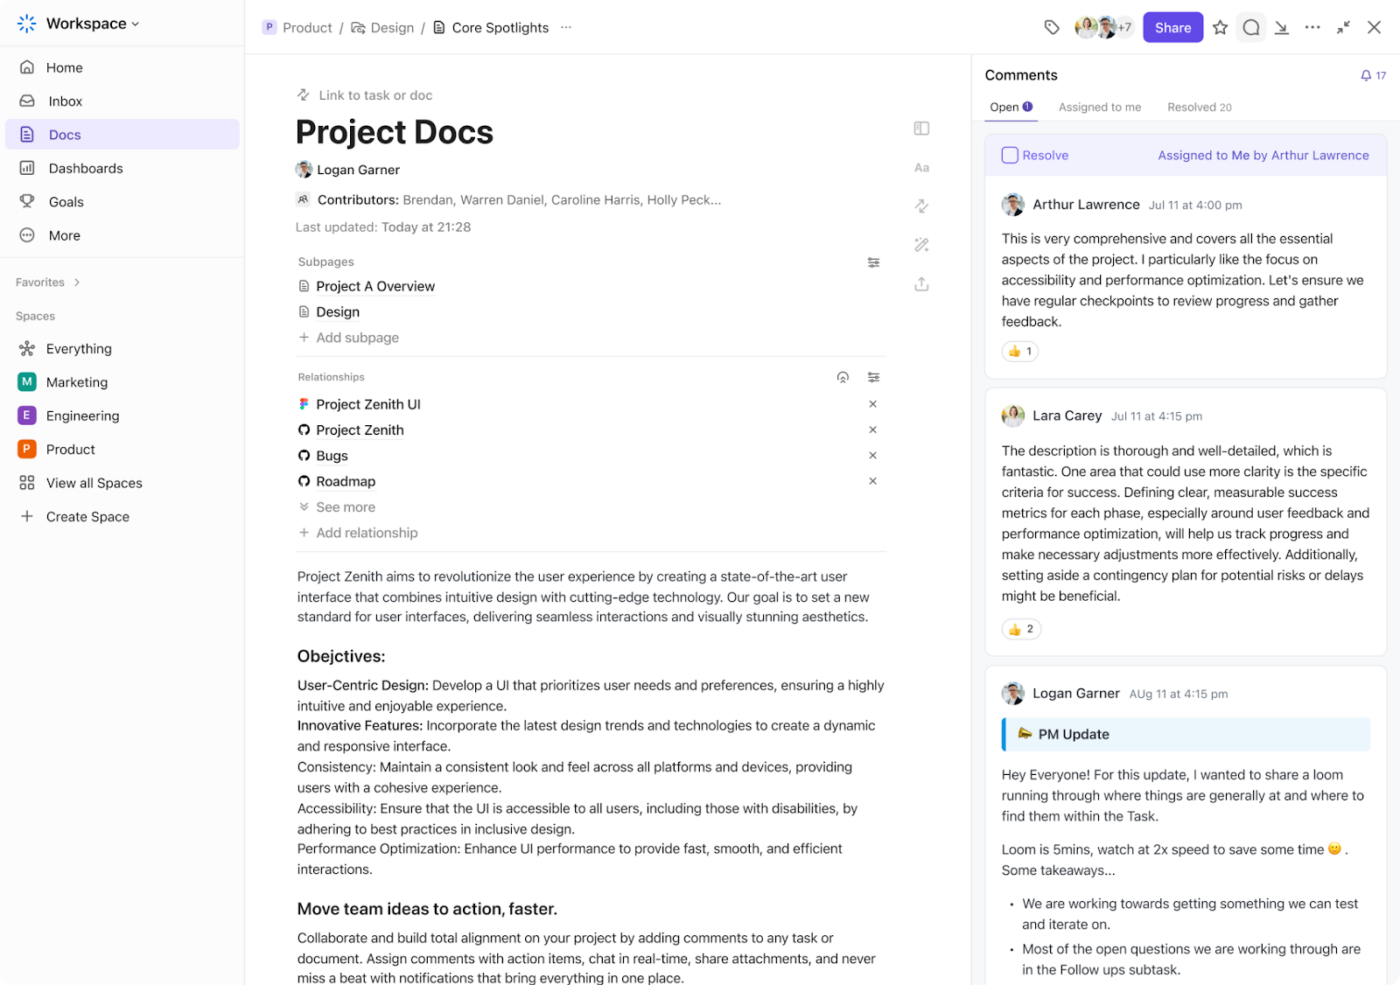
Every client portal needs a structured knowledge base where clients can access essential resources like guidelines and reports. Add a Doc View on the top, next to the overview, and store all the essential documents there.

Simply use the Slash commands within Doc view to create or embed documentation using ClickUp Docs. It acts as an interactive hub for storing client contracts, proposals, FAQs, and policies in one place. You can also build project roadmaps or onboarding guides for easy reference.
From embedding multimedia content and links with its rich formatting options to adding relevant project-specific tasks, Docs centralizes your database. Plus, you can use Doc Relationships to link client-related documents across tasks and projects for quick navigation.
Managing client work can get messy fast—different projects, shifting priorities, and a never-ending list of tasks. Create ClickUp Tasks to create a flexible structure for organizing internal tasks, projects, and assignments.

Create specific tasks for different client projects with priority flags, assignees, and task descriptions to allocate resources easily. Each task also has subtasks and checklists to help you break it down into actionable steps.
For instance, a digital agency can set up task checklists like ‘Website Development’ with subtasks such as ‘Design Approval,’ ‘Content Upload,’ and ‘Final Testing.’ You can also enable task dependencies for sequential execution. This saves you hours from delays and preventable bottlenecks in project workflows.
💡 Pro Tip: Incorporate your company’s brand colors within the client portal for a cohesive brand identity. Plus, use high contrast between text and background colors to enhance readability. You can use calming colors like blues or greens for backgrounds to create a sense of trust and professionalism.

A great portal makes communication effortless. Incorporate ClickUp Chat, available on the left-hand sidebar, to keep conversations flowing without getting lost in endless email threads.
Create dedicated channels for projects, drop quick updates, have real-time discussions, and use threaded comments to keep everything tied to the right tasks. With built-in notifications, no one misses a thing. It’s simple, seamless, and less chaotic.
Here are some other ways you can use ClickUp Chat:
📖 Also Read: Best B2B CRM Software for Sales Teams
Want to collaborate better with your clients? Use ClickUp Whiteboards! See how. 👇🏼
💡 Pro Tip: Add a ClickUp Form View to your client portal to make project intake processes much more structured and easy to track.
Clients love clarity.
Giving them access to a personalized client dashboard means they can check key metrics anytime—no waiting, no back-and-forth emails, just the needed info.

ClickUp Dashboards gives your clients a front-row seat to their projects. Create a custom interface with charts and on-demand metrics to let them check updates whenever needed. Choose from 50+ custom widgets to display project completion percentages and progress reports on active tasks or deadlines.
Want to make it feel more personalized? Add their logo, tweak the colors, and arrange cards in a way that makes sense for them. You can also add time-tracking cards to log billable hours and share timesheets with clients accurately.
For example, a consulting firm can set up a dashboard displaying project milestones, client invoices, and engagement analytics in one place.
🤝 Friendly Reminder: Use relevant images or icons to guide users through the portal, making your client portal project management software visually appealing and functional.
Think of all the time (and money) wasted on repeating the same tasks over and over—assigning work, sending reminders, and chasing invoices. It adds up fast. With the right workflow in place, you can automate all of that.
ClickUp Automations lets you automate your workflows, set up triggers and actions, and manage repetitive tasks like client onboarding, follow-ups, and sending project updates.
For instance, you can automate the entire client onboarding process. When a new client is added to the workspace, ClickUp will automatically create a ‘Client onboarding’ list, assign the tasks to the onboarding specialist, set due dates, and change task statuses.
I came across ClickUp when I was looking for a Customer Portal; little did I know that it would become our Virtual Office because it could do so much more. It replaced multiple other softwares and costs and is customizable to each of our teams process types. I use it personally and professionally, and I have been assisting others in the same. ClickUp for Life!
ClickUp’s third-party integrations allow you to connect your client portal with commonly used tools for a smoother experience. This lets you sync your client’s preferred software while underscoring your concern for their preferences.
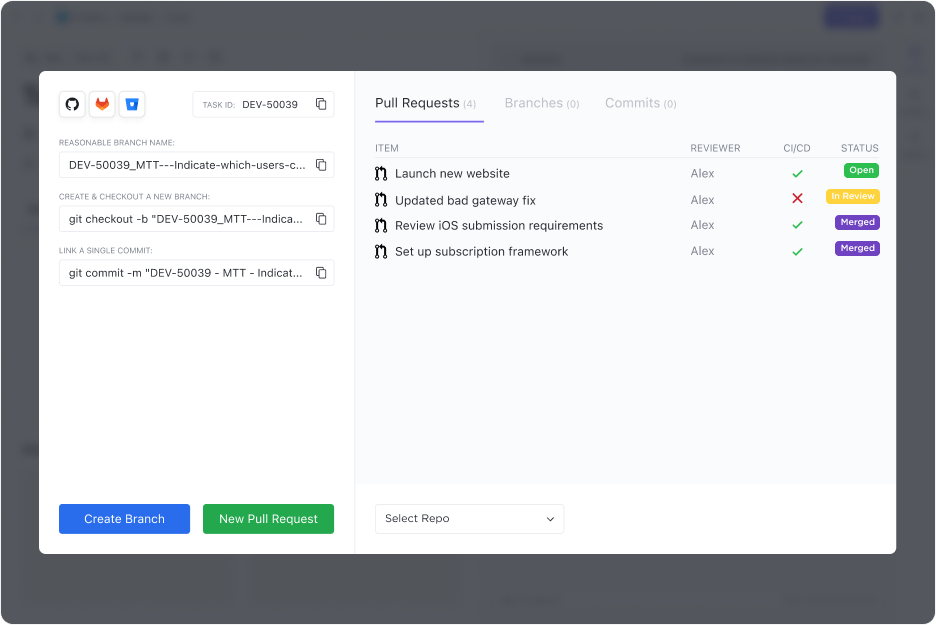
You can use ClickUp Integrations to integrate with other tools like:
For example, a legal firm can integrate Google Drive to store client contracts and conversations, automatically linking them to corresponding tasks in ClickUp.
📮ClickUp Insight: 92% of workers use inconsistent methods to track action items, which results in missed decisions and delayed execution.
Whether you’re sending follow-up notes or using spreadsheets, the process is often scattered and inefficient. ClickUp’s Task Management Solution ensures seamless conversion of conversations into tasks—so your team can act fast and stay aligned.
ClickUp’s client portal templates streamline client communication and project management. Customizable and user-friendly, these templates provide a centralized space for clients to access project details, timelines, and tasks.
Let’s look at some you can use. 📝
The ClickUp Quick Start Client Services Template streamlines your client management processes effectively. Its comprehensive approach to client account management lets you scope requests and track project progress seamlessly.
The template includes an example project, providing practical reference to help you quickly visualize how to apply each feature in real-life situations.
Plus, the team wiki promotes smooth knowledge sharing. This user-friendly template focuses on key elements that deliver great results and is ideal for improving client services without the hassle of complex setups.
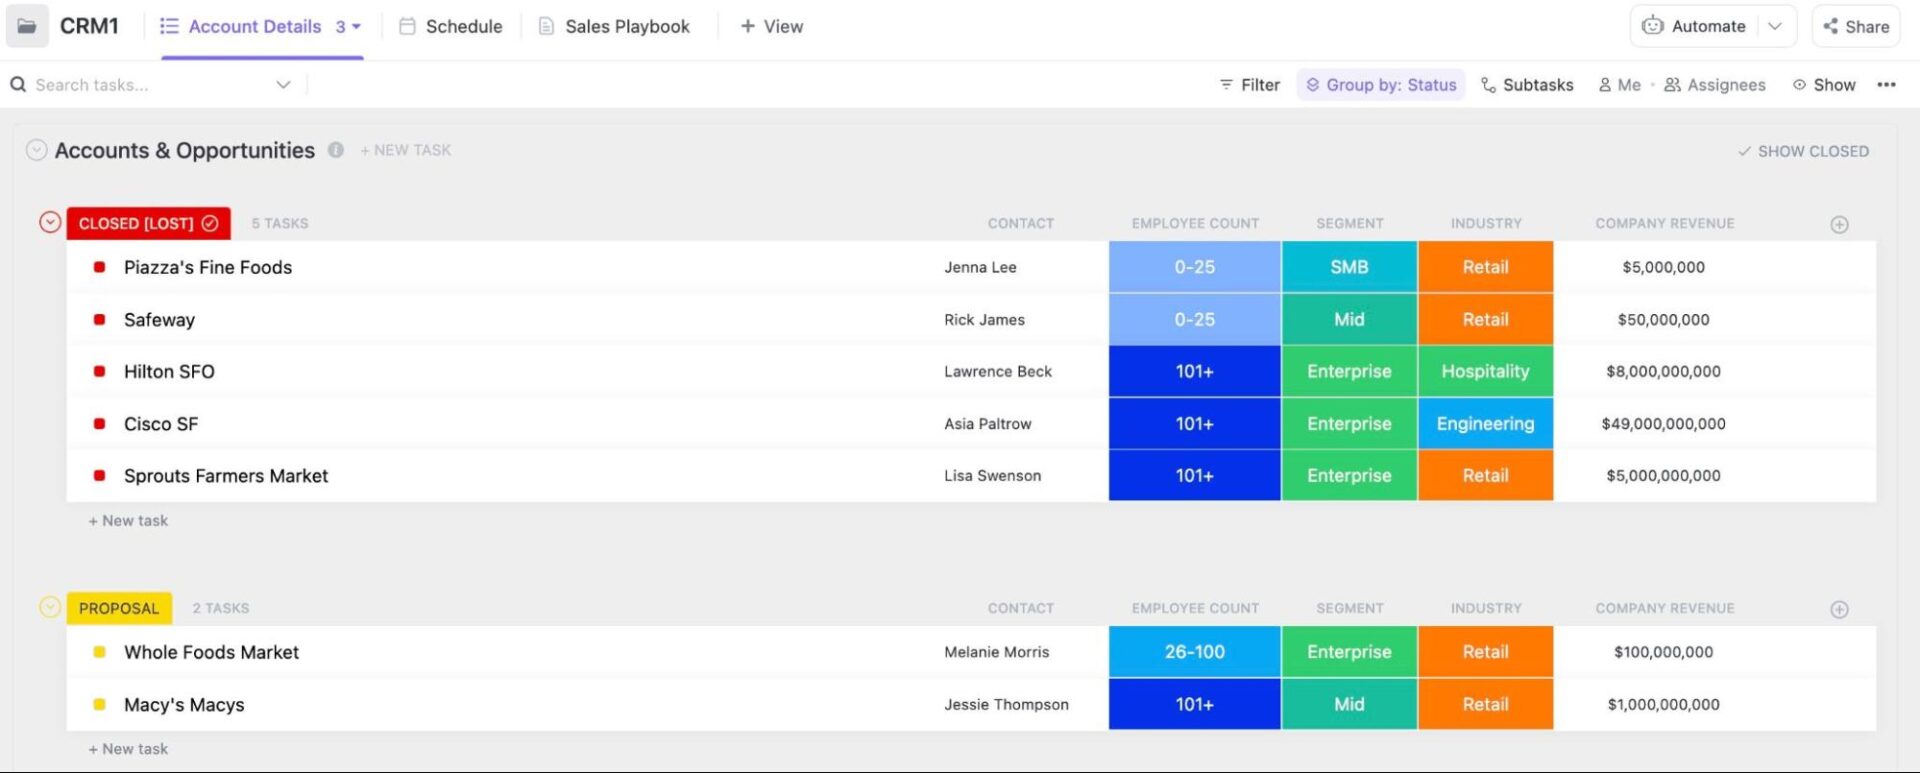
The ClickUp CRM Template enhances customer relationship management, providing an organized way to manage leads and nurture client relationships.
Whether you’re a startup or an established company, this template provides a structured yet flexible way to track client interactions, sales progress, completed deliverables, and follow-ups without the hassle of scattered spreadsheets or disconnected tools.
Organize lists of prospective and existing clients and monitor your campaign launch pipelines through flexible chart views. The CRM template also lets you track customer relationships through metrics like satisfaction scores, renewed contracts, and resolved queries.
The ClickUp Client Success Collaboration Template tracks your journey from ideation, execution, and performance reviews to client retention measures.
You can add cards and subtasks within tasks to jot down notes at different stages of collaboration, like during onboarding, monthly check-ins, post-contract signing, and more.
Monitor client acquisition and renewal ratios and inform your teams about areas of improvement when dealing with specific clients. You can also add forms to collect client data during different project phases and create guides for better project understanding.
⚙️ Bonus: Access additional client management templates to get a headstart in creating a feature-packed client portal.
Besides continuous optimization, an effective client portal includes digitized customer management strategies and limitless customization.
Here are some best practices to create an effective client portal:
⚙️ Bonus: Discover some tried-and-tested secrets to keep track of clients effortlessly.
A well-designed client portal promotes transparency and better client engagement. Tools like ClickUp, the everything app for work, provide the ultimate flexibility to create a tailored, high-performing central hub for many clients.
Its features, like ClickUp Docs for knowledge management, custom Dashboards for KPI monitoring, and Chat for internal and external communication, ensure everything stays on track.
You also get pre-built templates to maintain customer relationships with ease.
Sign up to ClickUp for free today. ✅

© 2026 ClickUp

There’s an easier way. Try a free AI Agent in ClickUp that actually does the work for you—set up in minutes, save hours every week.