How To Show Capacity Planning in Excel: Steps & Templates

Sorry, there were no results found for “”
Sorry, there were no results found for “”
Sorry, there were no results found for “”

As a project manager, understanding how much work your team can handle is a top priority.
This helps project managers tailor future plans, determine whether their team can take on new projects, and identify if they need to bring new team members on board. 🚢
Scoping the limits of your resources is challenging at best without capacity planning. This process allows valuable insights into the capabilities of your workforce, tools, and the entire organization. Knowing what you have to work with ensures your team is always on the right track and can complete pending projects within deadlines.
Although it may sound complicated, visualizing capacity planning can be easy if you have the right tools for the job, and Excel is one of them.
In this article, we’ll teach you how to show capacity planning in Excel and provide a few capacity planning templates that lend a helping hand.
Capacity planning is the process of determining the resources required to successfully execute a project. When we say resources, we mean workforce, available time, equipment and tools, and the necessary budget.

It’s an important process in many industries, from tech to medicine. Look at hospitality—restaurants always have more people working during summers and holidays.
They know more customers are coming in during specific periods, so they need to brace themselves in terms of staff and necessary supplies to keep the place running smoothly. 🥘
This is precisely what project managers do—they look at the past to understand the present and prepare for the future.
Excel doesn’t offer advanced features for resource capacity planning, but its options are often more than enough to understand your team’s current bandwidth and plan accordingly.
Here, we’ll show you how to use Excel to determine whether your team needs more people to function efficiently and complete all projects. We used the simplest example to describe what you must do to become an Excel capacity planning master. 👑
Once you understand the basics, you can expand your scope and plan for multiple projects, positions, and/or skills.

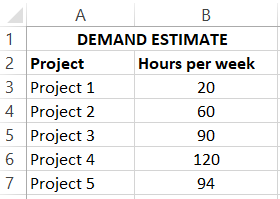
The first step is creating a table to show how many hours per week your team needs to spend on every project.
Open Excel and write “Demand Estimate” in the A1 cell—that will be the table’s name. Next, write “Project” in the A2 cell and “Hours per week” in the B2 cell. List your projects under the “Project” column.
Under “Hours per week,” write the number of hours needed on a particular project.

Create another table to display how many employees you have and how many hours they can work per week.
Write “Capacity overview” in the D1 cell. Type “Number of employees” in the D2 cell, “Hours per week” in the E2 cell, and “Utilization rate” in the F2 cell.
Utilization rate represents the percentage of your employees’ hours spent on billable work. For example, your employees may have an eight-hour workday, but that certainly doesn’t mean they will be productive 100% of the time. They must take lunch or toilet breaks or run non-work-related errands. Your employees also take vacations and planned leaves, which is also factored into the total utilization rate.
Even when your employees are working at full capacity, not everything they do counts as billable work. One example is administrative tasks, which need to be done, but might not be relevant to your ongoing projects.
In our example, we have 10 employees who work 40 hours per week on average and have an 80% utilization rate.

The first two steps are all about entering data, and this one focuses on analyzing the inputted data and turning it into information. This is the step where Excel does its magic and shows whether your team is good as it is or needs more people on board.
Write “Capacity planning” in the H1 cell (that’s the table’s name). Like in the previous step, you can place the table wherever you want, but it’s important to follow the instructions carefully to prevent using the wrong cells for formulas.
Bonus: Get a head start with these capacity planning templates in Excel!
In the H2 cell, write “Total project demand.” This cell represents the hours your team and your project managers needs to invest in all projects combined. Instead of launching the calculator and adding the numbers manually, you’ll use Excel’s superpowers. 🦸
Double-click on the H3 field and press the Fx icon on the left of the Formula Bar. Choose “SUM” and select the cell range which should be included in the results. In our case, those are cells from B3 to B7, and the result is 384.
Now you need to display how many hours your team works per week. You’ll get this by multiplying the number of employees by their weekly working hours.
You can let Excel do the work for you and use a formula. Start by writing “Potential capacity” in I2, double-click the I3 cell, and press the Fx button on the left of the Formula Bar. Under “Search for a function,” enter “Product,” and double-click the function.
Select the D3 and E3 cells, and Excel will display the result in I3. In our case, that’s 400.
Let’s move on to the third column. Write “Effective capacity” in J2 and use a formula to calculate it. This cell will indicate how many hours of billable work your team can actually put in. You’ll get the results if you multiply the three numbers from our previous table (in our case, cells D3, E3, and F3). The result is 320.

This is the final and the most complex step, after which you’ll find out whether your team lacks resources (in this case, workforce). You’ll calculate it using a unique formula.
First, add a new column to your capacity planning table from the previous step and name it “Resource deficiency.”
Now, it’s time to use one of the functions Excel is renowned for, and that is IF. You’ll set a condition that will automatically display if you need more employees on your team. Not only that, but Excel will even show how many more employees you need!
In our example, the formula looks like this: “=IF(H3>J3,(H3-J3)/(E3*F3))”. Looks complex? Let’s explain it in more detail! 🤓
First, you’re focusing on whether the total project demand is higher than the team’s effective capacity (expressed in hours). In an ideal world, these two numbers would be close to equal. But you’re running a dynamic team that tackles different projects—some are complex and require more work.
Regardless of the project’s scope, if the number of hours per week necessary to tackle all projects is higher than the team’s effective capacity, it indicates you need more team members on board.
Suppose the total project demand exceeds your team’s effective capacity. In that case, you need to calculate how many employees you need, bringing us to the second part of our formula.
You’ll first identify the difference between total project demand and effective capacity (H3-J3). Then you’ll multiply the number of working hours for every employee by the utilization rate (E13*F13).
Since there’s a chance you won’t get an even number and you can’t exactly hire 7.55 people, you’ll need to round up the number, and you should always use the higher one (in this case, that’s 8).
In our example, we’re missing precisely two people in our team to ensure smooth sailing for all projects. ⛵
If you want to know more about Excel and its functions, here are some additional pieces of wisdom. 🤓
Excel capacity planning can provide valuable insights into your team’s workloads and help you prepare for future projects. However, capacity planning isn’t Excel’s strongest suit. Here’s why Excel may not be the best option for capacity planning:
Excel can be a good option for simpler capacity planning templates, but it has limitations. It doesn’t encourage collaboration between team members, and it’s one-dimensional—you can’t use different perspectives to approach the same problem and get valuable insights.
That’s where ClickUp comes in. It offers everything you need for a streamlined capacity planning process, including ready-made templates.
They provide the framework for capacity planning and save time while emphasizing teamwork and ensuring fair workloads. Remember that these templates can’t be used in Excel and aren’t a part of the Office suite.
Increasing the team’s productivity is every project manager’s dream. But you can’t just dump more projects on your team if they can’t tackle them. This will not only trigger chaos but also affect the employees’ motivation and likely cause burnout. 🔥
To boost the team’s efficiency, you must first dig deeper into their workloads, analyze them, and use the insights to prepare for the future. In other words, you need to do some capacity planning, and the ClickUp Employee Workload Template can be the perfect tool. 🪛
What can this template do for you?
Start with the template’s Tasks View tab. Here, you’ll create a list of tasks your team must handle in the upcoming period. Add assignees, set deadlines and priorities, and determine which team is responsible for completing which assignment.
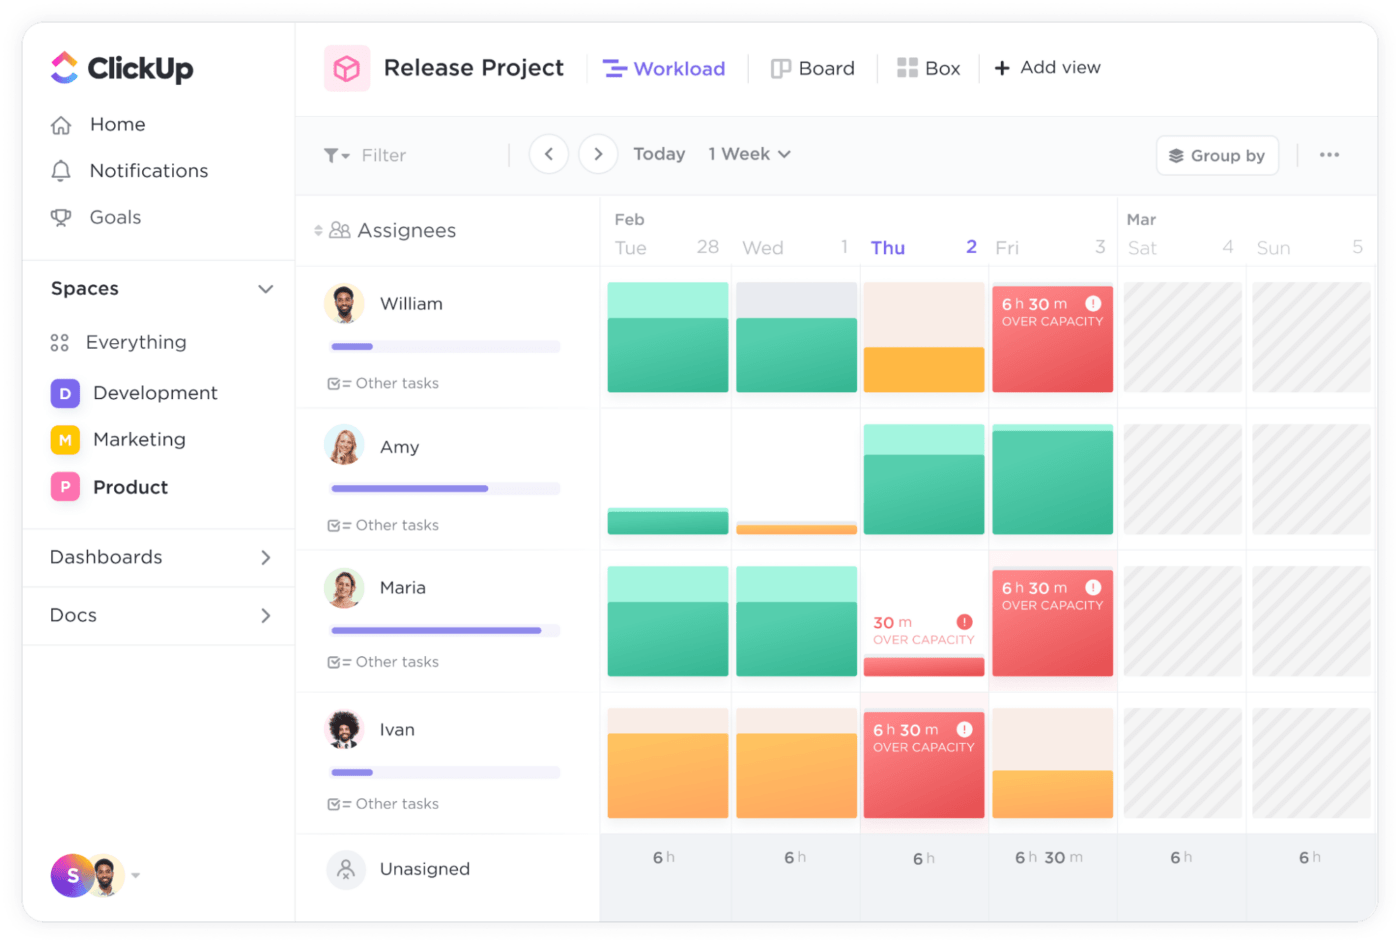
The Individual Workload View allows a calendar-like outline of tasks for each of your team members. You’ll see how many hours they need to complete the assigned tasks with respect to their daily capacity. This view helps you understand if your team members are overworked or have free time on their hands.
The Team Workload View separates the workloads by teams and shows how much time each of them has scheduled every week. This is particularly helpful for companies with multiple teams in the same department—it helps ensure the workload is distributed evenly.
Finally, you have the Team Board View, where all tasks are sorted by teams.
Do you want to allocate your resources like a pro and plan and accommodate the company’s growth? And how do reducing project resource expenses and optimizing team performance sound? All of this is possible with the ClickUp Resource Planning Template!
This template offers multiple views that streamline resource planning. Let’s see what these views are and explain their purposes:
| View | Purpose |
| Project Coordinators Workload | Listing project coordinators and their deliverables based on the teams they’re managing to monitor capacity |
| Team Workload | Listing project coordinators and their tasks, only this time, the tasks are associated with specific clients |
| Project Coordinators | Providing an overview of project coordinators and the tasks in the form of a Kanban board |
| Clients | Displaying details for every project (start and due dates, allocated budgets and actual costs, project coordinators’ names, and more), sorted by clients |
| Activity Gantt | Overviewing the timelines for all tasks to prevent overlaps and ensure evenly distributed workloads |
| Timeline | Grouping tasks by clients and color-coding their status in a calendar form |
| Board | Sorting tasks based on their status in a Kanban board |
Combine all these views, and you get a comprehensive project capacity planning template within teams and departments.
Allocating and managing resources can be challenging and downright unsuccessful if you’re not using the right tools. The ClickUp Resource Allocation Template is a shortcut that helps you analyze and understand available resources today to plan for tomorrow.
Here’s why this template can be a powerful weapon in your arsenal:
Like other the other ClickUp resource capacity planning template, this one gives you the luxury of multiple views. With the Team Workload and Team Lead Workload views, you get detailed insight into the workload of each of your team members. Filter the workloads based on dates, status, priority, assignees, and milestones and get the desired information in a few clicks. This is especially useful for PMs with larger teams.
The template also offers two List Views—By Clients and By Projects. Use them to group your tasks based on the client/project and review due dates, priorities, total budget, and other details.
Lastly, you have the Delivery Process View, a Kanban board displaying your projects and their stages.
The capacity planning templates we’ve discussed are only the tip of the ClickUp project management iceberg. 🧊
For example, use the Pulse ClickApp to gain valuable insight into your team’s activity during a workday. It lets you see who’s online at what time and what they’re working on.
Another valuable capacity planning feature is ClickUp Docs. You can use it to outline a project’s scope and identify capacity requirements. Once you create a doc, you can attach it to the project and return to it anytime if you need to make changes.
Want to reap the benefits of capacity planning without wasting hours on building charts and creating formulas in Excel? With multiple views, easy-to-use templates, and detailed instructions, ClickUp puts you behind the steering wheel and allows easy insight into your team’s capacity at any time! 💪
© 2026 ClickUp