


Still downloading templates?
There’s an easier way. Try a free AI Agent in ClickUp that actually does the work for you—set up in minutes, save hours every week.
Sorry, there were no results found for “”
Sorry, there were no results found for “”
Sorry, there were no results found for “”

Whether you’re handling IT support, HR requests, internal issues, or customer complaints, you need a ticketing system to track, prioritize, and resolve tasks.
It converts incoming requests into trackable, assignable items with clear ownership, deadlines, and communication history.
Traditional ticketing systems force you into rigid workflows. However, ClickUp gives your support and operations teams the flexibility to build their own desk ticketing system.
As a support or operations manager, you get visibility into:
In the sections below, we’ll walk you through exactly how to set up ClickUp for ticket management, covering everything from intake forms to automation flows to SLA dashboards.
Every team deals with incoming requests, ranging from customers to those within the organization.
IT gets access and hardware queries. HR fields questions about policies, onboarding, and benefits. Support teams respond to customer issues. Admin and operations juggle facilities and resource requests.
Without a help desk ticketing system, these requests arrive through scattered channels: emails, spreadsheets, Slack DMs, or walk-up conversations. There’s no consistent way to assign, prioritize, or follow up.
As the world’s first converged AI workspace, ClickUp brings all your workflows together. Think of it as your desk ticketing system that fits the way your team works, solving the problem of work sprawl and disconnected workflows.
Work sprawl happens when teams are forced to juggle too many disconnected apps—constantly switching tabs, updating multiple systems, and losing focus along the way. The irony is, most companies try to solve this by adding even more software, which only makes things worse.
ClickUp takes a different approach: everything—tasks, conversations, docs, and even AI—is unified in one place, built on a single foundation. This convergence means less time lost to context switching and more clarity for your team, so you can finally eliminate the chaos of work sprawl and move faster together.
Here’s why ClickUp stands out as the best ticketing software system. You can:
Forget switching between different project management software, communication tools, spreadsheets, verbal follow-ups, and more. Everything from intake to resolution lives in a single, searchable workspace.
Here’s how you can configure ClickUp as your desk ticketing system to match your workflows.
To turn ClickUp into a functional and efficient help desk system, you need to build a workspace structure that reflects how your team handles requests.

Create a dedicated Space like ‘IT Support’, ‘HR Help Desk’, or ‘Client Requests’ to keep all support tickets centralized.
Within that Space, create Folders to separate ticket categories or team responsibilities.
🎯 Example: An IT team might use Folders like ‘Hardware Issues’, ‘Software Access’, and ‘Network Requests’, while an HR team might have ‘Time Off Requests’, ‘Onboarding’, and ‘Policy Inquiries’. Use this hierarchy to keep your help desk organized and easy to navigate.
Inside each Folder, create Lists that represent workflows, request types, or priority levels. For example, a ‘Hardware Issues’ Folder might include Lists like ‘Input devices’, ‘In Progress’, and ‘Output devices’.
You must have this structure in place so that every ticket has a folder where it resides. That you can track and you can report on all incoming requests.
🛠️ Toolkit: Running an efficient help desk requires reliable tech and a ticket tracking system. ClickUp’s Help Desk Ticket Template has everything you need to ensure customer feedback is logged quickly, prioritized, and addressed in a timely manner.
What’s inside:
Use this help desk template to increase your response rate, reduce churn, track tasks accurately, and improve cross-departmental communication.
The next step is setting up a consistent and user-friendly way to collect requests within the help desk ticketing system.
With ClickUp Forms, you can standardize how customer data is submitted. It ensures each ticket arrives with the right details.

Within any List you’ve designated for ticket intake, simply add a Form View. From there, you can create forms tailored to your team’s unique needs. You can include fields like ‘Request Type’, ‘Urgency Level’, ‘Department’, and a detailed description box to collect specific details from your customers.
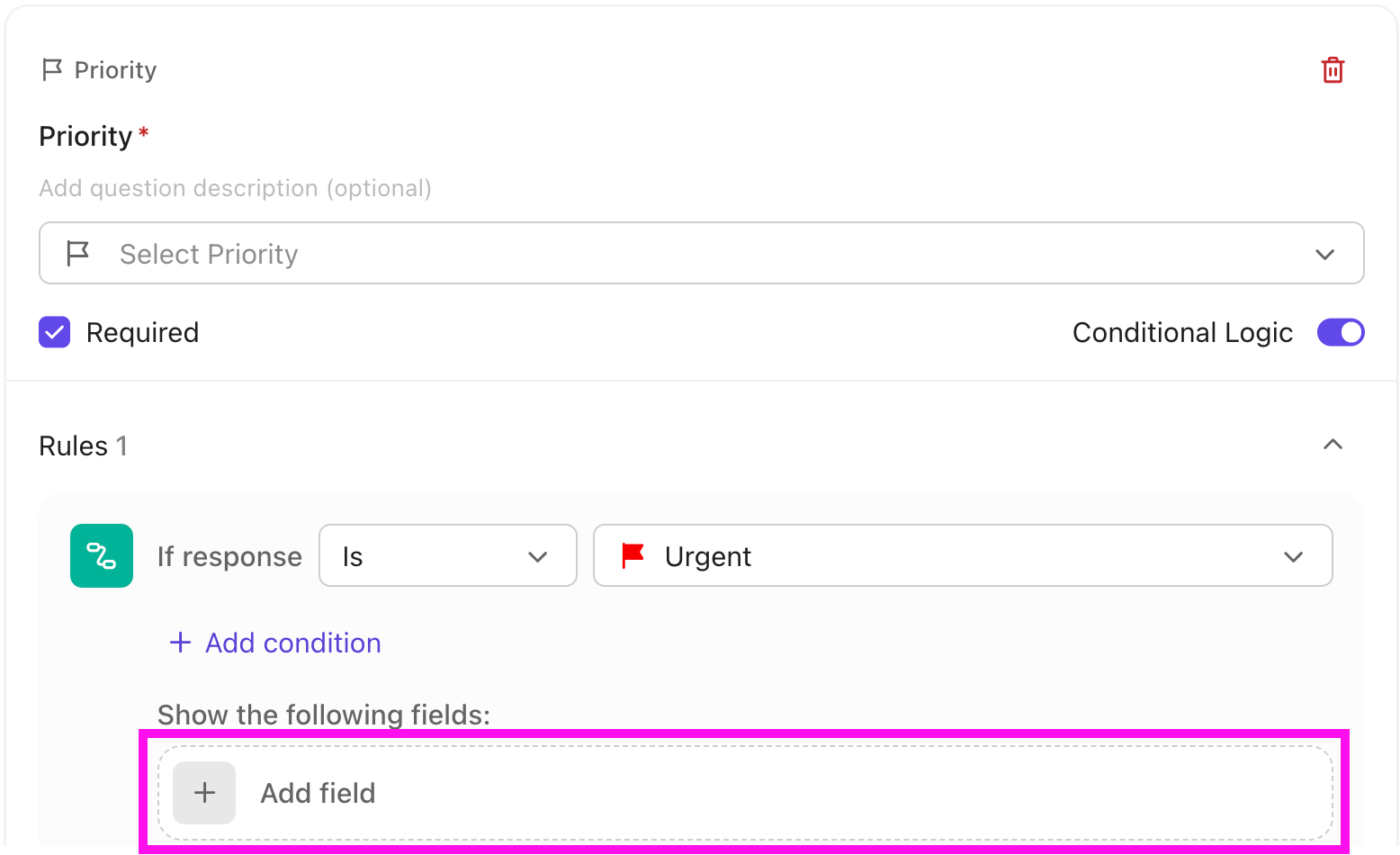
💡 Pro Tip: Customize your ClickUp Forms with conditional logic, so that certain fields appear only when relevant. For example, if a user selects ‘Technical Issue’ as the request type, additional fields like ‘Device Type’ or ‘Error Message’ can appear automatically. This keeps the form simple and focused for the user while ensuring your support team collects all necessary details to resolve tickets efficiently.
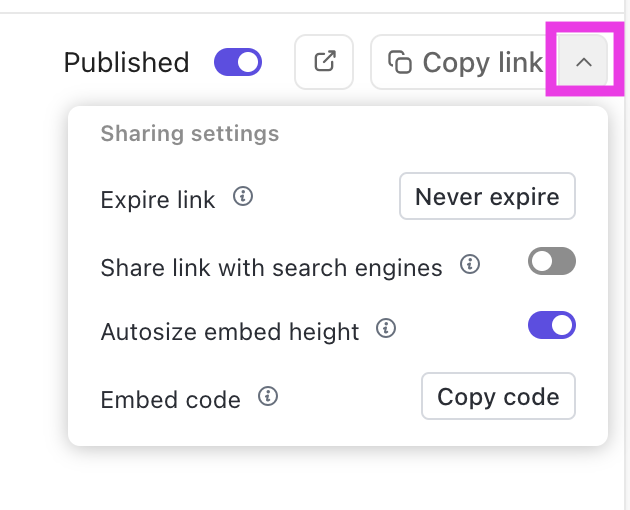
You can share the ClickUp Form using a public link or embed it on an internal resource.
📮 ClickUp Insight: Low-performing teams are 4 times more likely to juggle 15+ tools, while high-performing teams maintain efficiency by limiting their toolkit to 9 or fewer platforms.
But how about using one platform?
As the everything app for work, ClickUp brings your tasks, projects, docs, wikis, chat, and calls under a single platform, complete with AI-powered workflows.
Ready to work smarter? ClickUp works for every team, makes work visible, and allows you to focus on what matters while AI handles the rest.
When support or operations teams handle dozens (or hundreds) of tickets a day, even small actions like assigning tasks, updating statuses, or notifying teammates can become a time sink.
To start with, you have a built-in AI assistant in ClickUp, ClickUp Brain, to supercharge your ticketing workflows. More than just surfacing ticket details or summarizing conversations, ClickUp Brain acts as your team’s AI-powered problem solver.
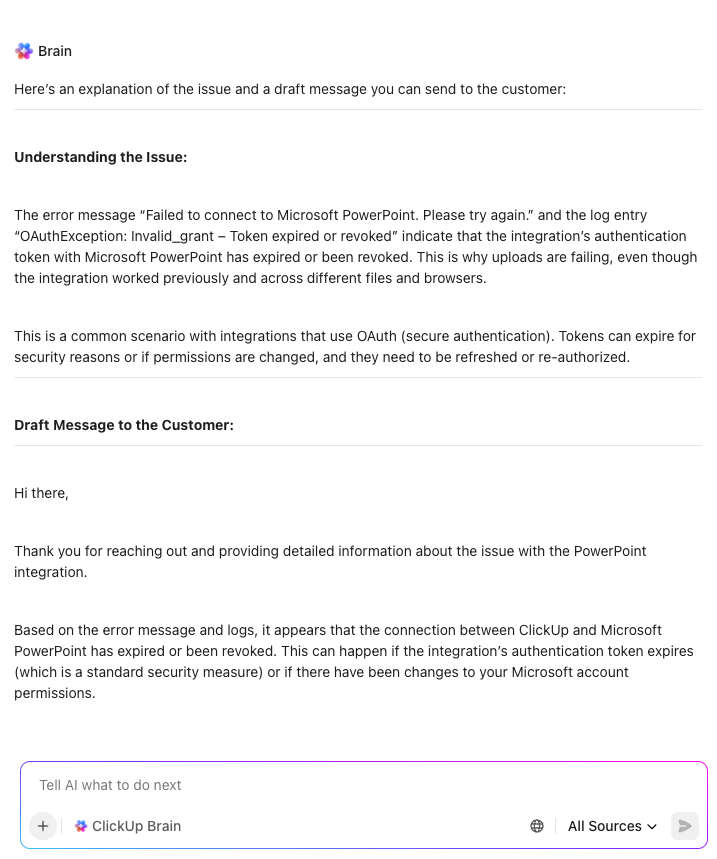
It can help debug basic code snippets shared in tickets, review requirements or customer requests for clarity, and even assist your team in drafting professional email responses—right inside your workflow. Need to spot trends in support requests, answer questions about a ticket, or quickly pull up key context from across tasks and docs? ClickUp Brain does it all, so your team can resolve issues faster, communicate more clearly, and stay focused on what matters most.
Next, ClickUp Automations and AI agents remove operational friction. These automation capabilities work by connecting three key elements: Triggers, Conditions, and Actions.
⏯️ Get started in minutes:
Or you can have an Agent run the workflow for you. See here:
You can start building workflows that handle the most common and repetitive parts of ticket management processes for you.
For example, you can choose from the following automation options:
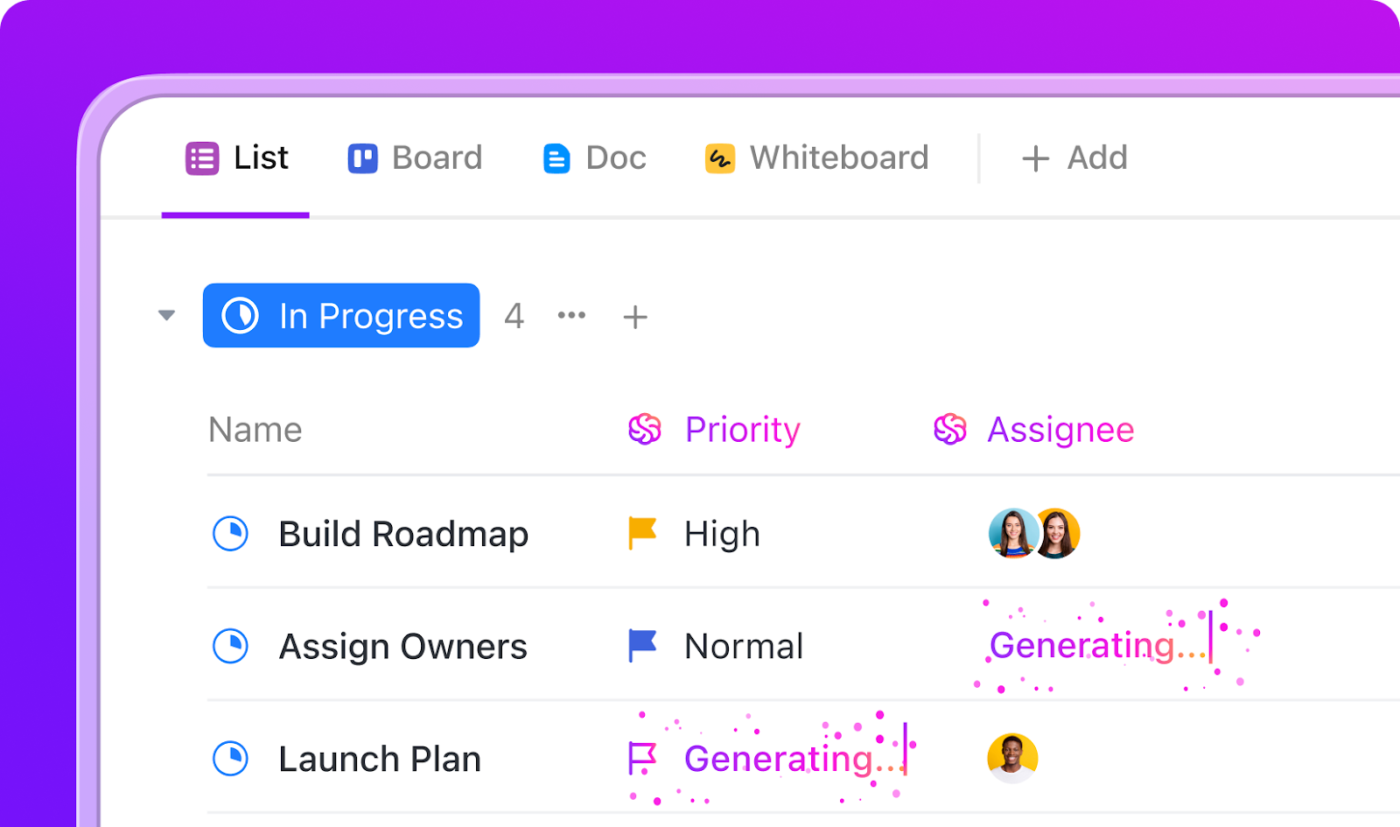
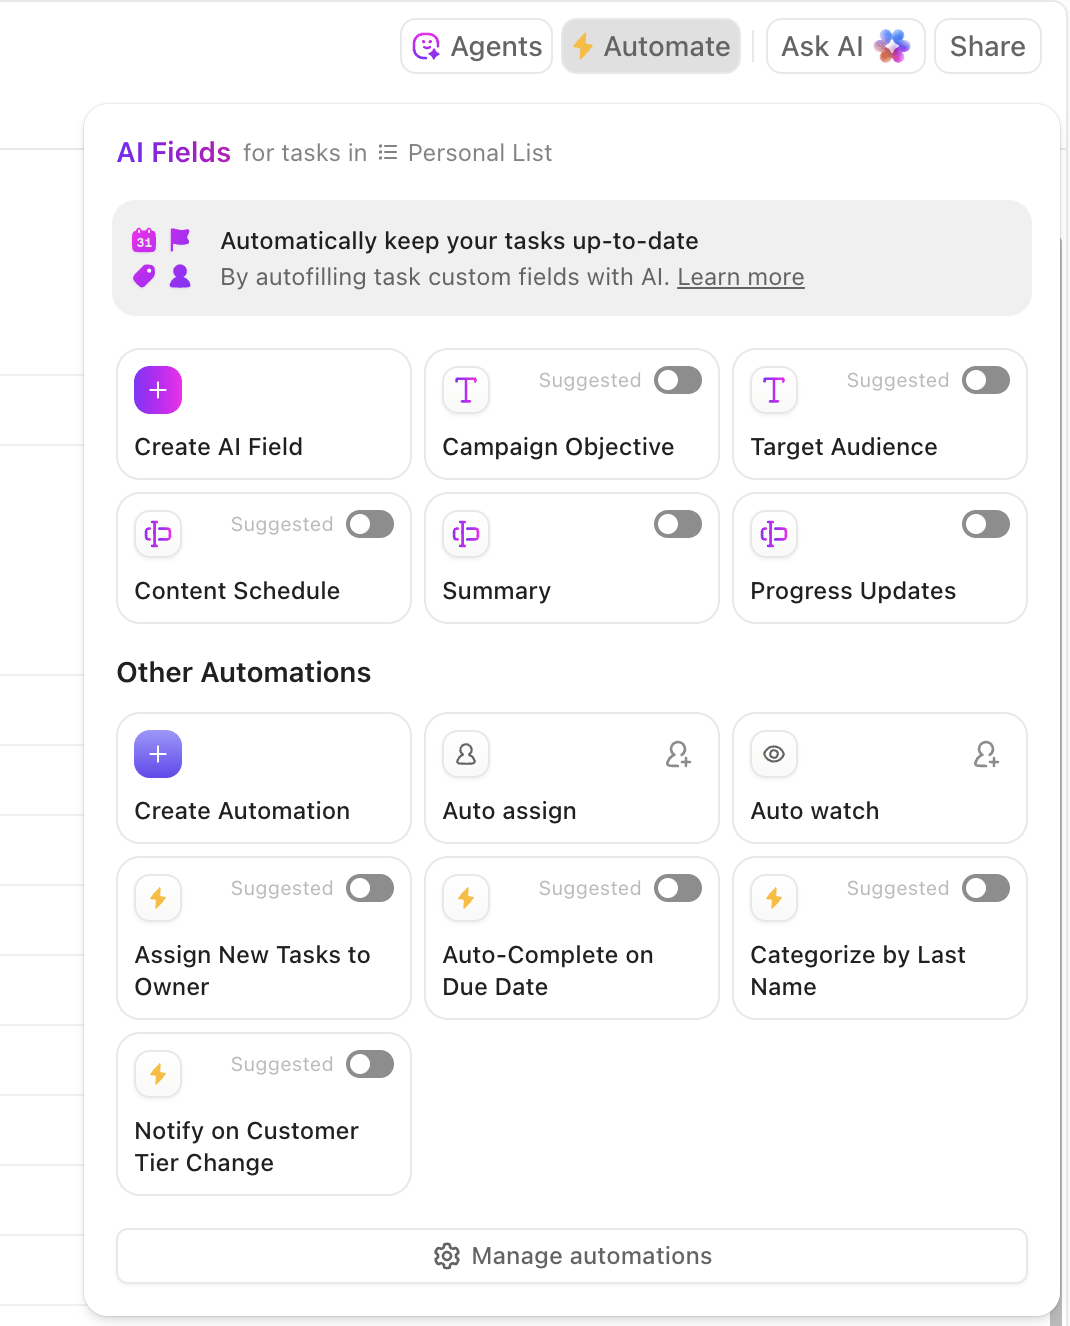
Imagine never having to dig through endless ticket details or chase down the latest updates—AI Fields in ClickUp do the heavy lifting for you. With just a glance, you get instant summaries, real-time progress updates, and even a list of action items pulled straight from each ticket. Need to translate a ticket or quickly sort issues by type or urgency? AI Fields handle that too, making it easy to prioritize and route tickets to the right people.
While automations handle auto-assigning tickets based on your rules, you can always manually assign them using ClickUp Tasks to team members with greater control. The Assignees field inside each task lets you assign one or multiple people, ideal for collaboration or passing off responsibilities.
You can also set clear due dates on tasks to keep deadlines visible or delegate to ensure your team doesn’t miss important follow-ups. For more complex tickets, ClickUp Tasks allows you to create subtasks or checklists.
🎯 Example: If a ticket involves troubleshooting a software bug that requires input from both a developer and a QA tester, you can assign the task to both team members. Set a due date, say ‘June 30th’ for the bug report. Add a checklist with steps like ‘Identify bug’, ‘Develop fix’, and ‘Test solution’ to ensure you’ve covered all critical tasks.
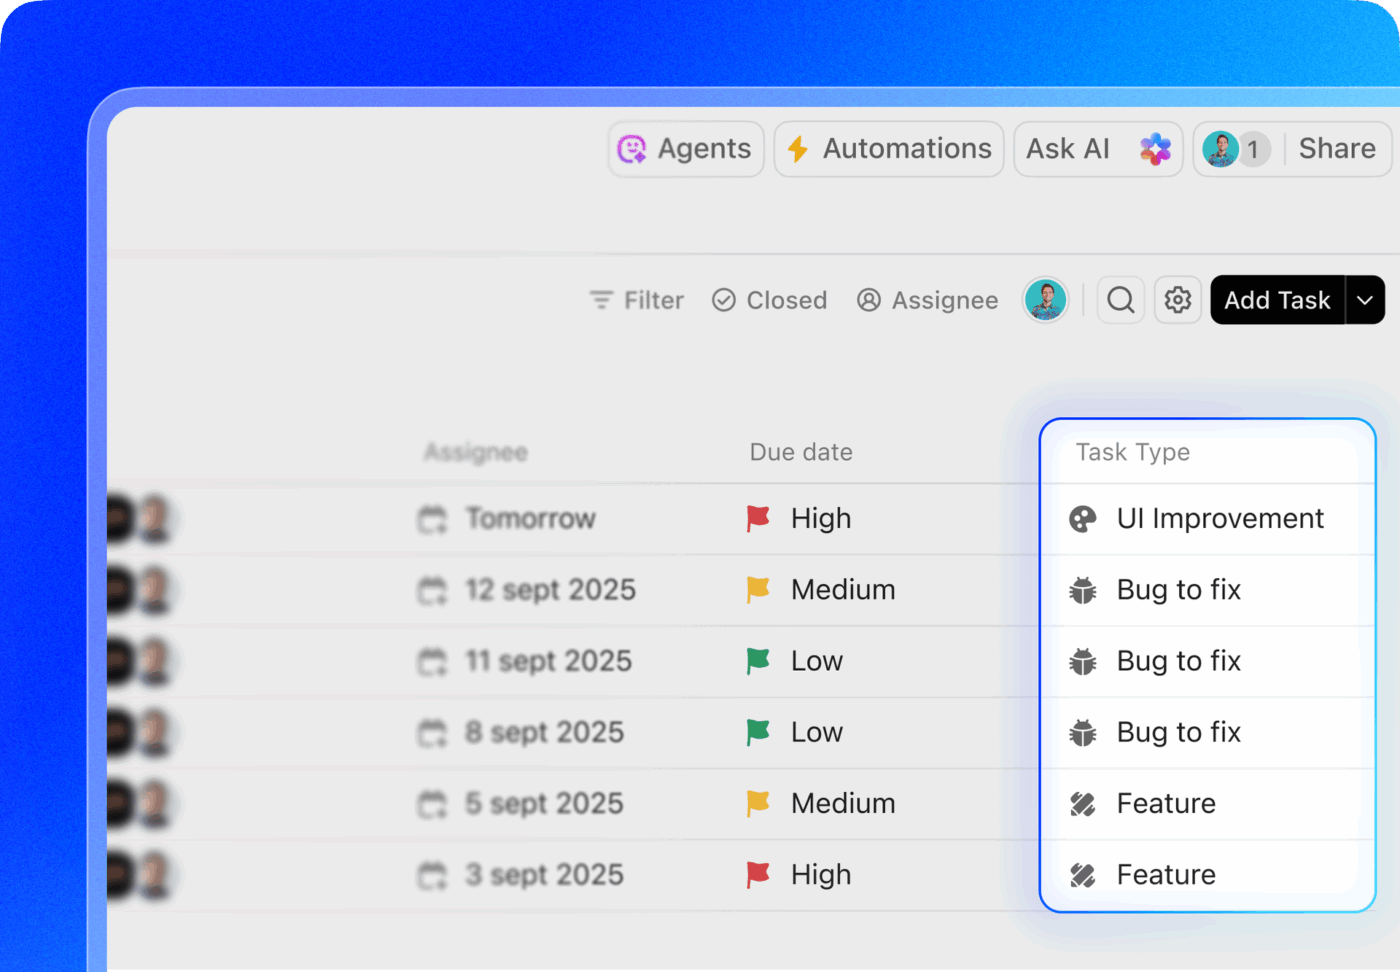
Then, with ClickUp Custom Task Statuses, you can define each stage of a ticket’s journey, so it’s always clear what’s happening and who’s responsible.
A common status flow might look like this:
You can create and customize statuses at the Space, Folder, or List level, so different teams (e.g., IT, Customer Support, Billing) can run their own workflows within the same workspace.
When you need to adjust the order, simply drag and drop using the handles to the left to move statuses up or down and fine-tune your ticket flow as needed.
💡 Pro Tip: Use ClickUp’s Board View to get a clear, drag-and-drop visual of your ticket statuses. This lets you quickly see which tickets are New, In Progress, Waiting on Customer, or Closed, and easily move them across stages by dragging cards between columns. It’s a simple way to keep your support team aligned and spot bottlenecks before they become critical.
With ClickUp’s collaboration tools and capabilities, your team can directly communicate within each ticket and keep conversations organized and easy to follow.
⏩ Quick Hack: For real-time updates and discussions outside individual tasks, use ClickUp Chat. It’s perfect for reviewing incoming requests, discussing tricky issues, and aligning on priorities without needing to jump into Slack or email.
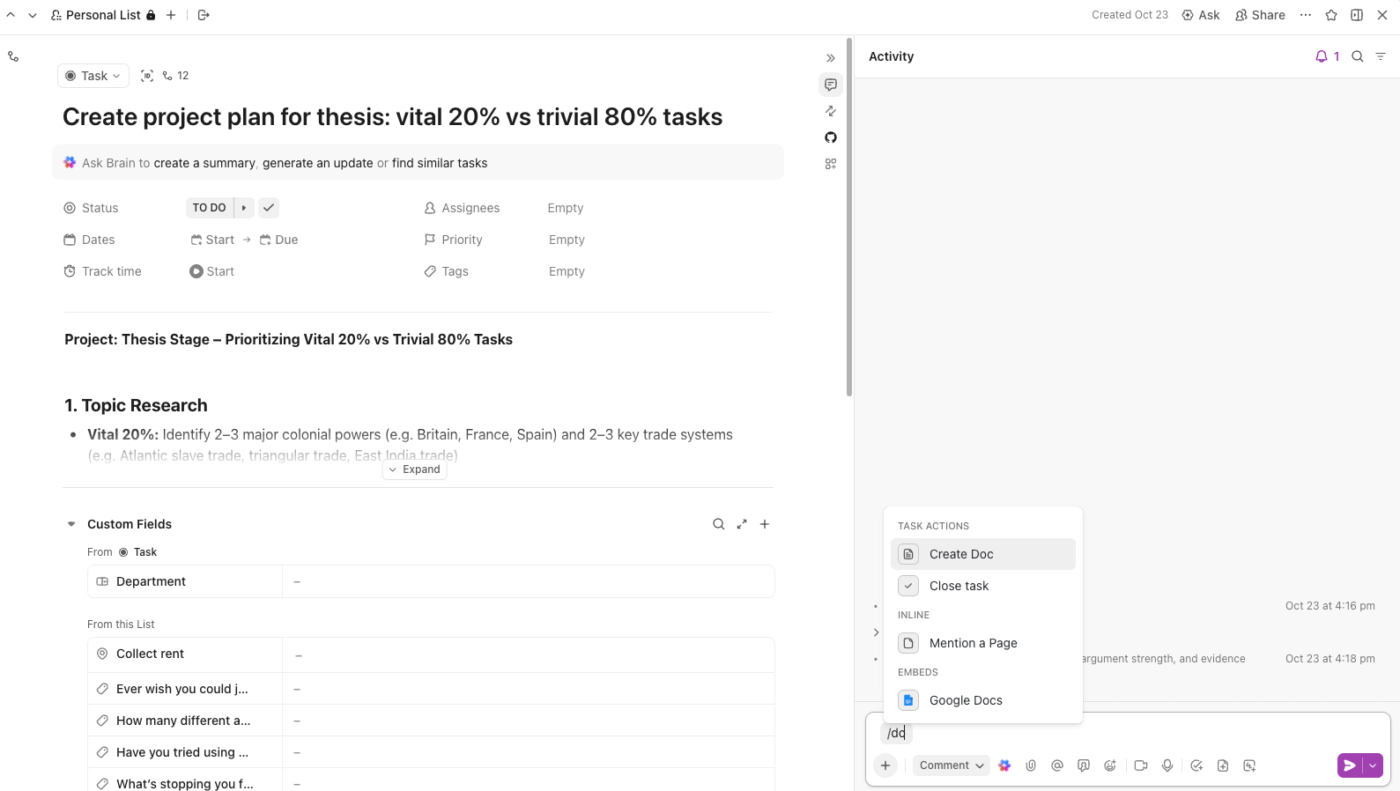
What’s more, you want the desk ticketing system to have the right resources for anyone to solve support issues. For example, consider linking the right ClickUp Doc directly to the new task using the Relationships feature.
Open the ticket, go to the Relationships section on the right, click the +, and select Doc. From there, you can link any existing ClickUp Doc like a troubleshooting guide, FAQ, or internal process doc.
It’s a simple way to skip the scrolling and help your team get straight to the info they need.
💡 Pro Tip: After resolving a ticket, take a minute to update or link the related Doc with any new details you uncovered. That way, the next time a similar issue comes in, your team isn’t starting from scratch. Over time, this gets built as a more useful knowledge management system without any extra effort.
Finally, you need clear, actionable data to understand and monitor the performance of your support team. With ClickUp Dashboards, you can do all this in real time. For example, you can set up a Task List card filtered to highlight support tickets stuck in ‘In Progress’ for over 48 hours.
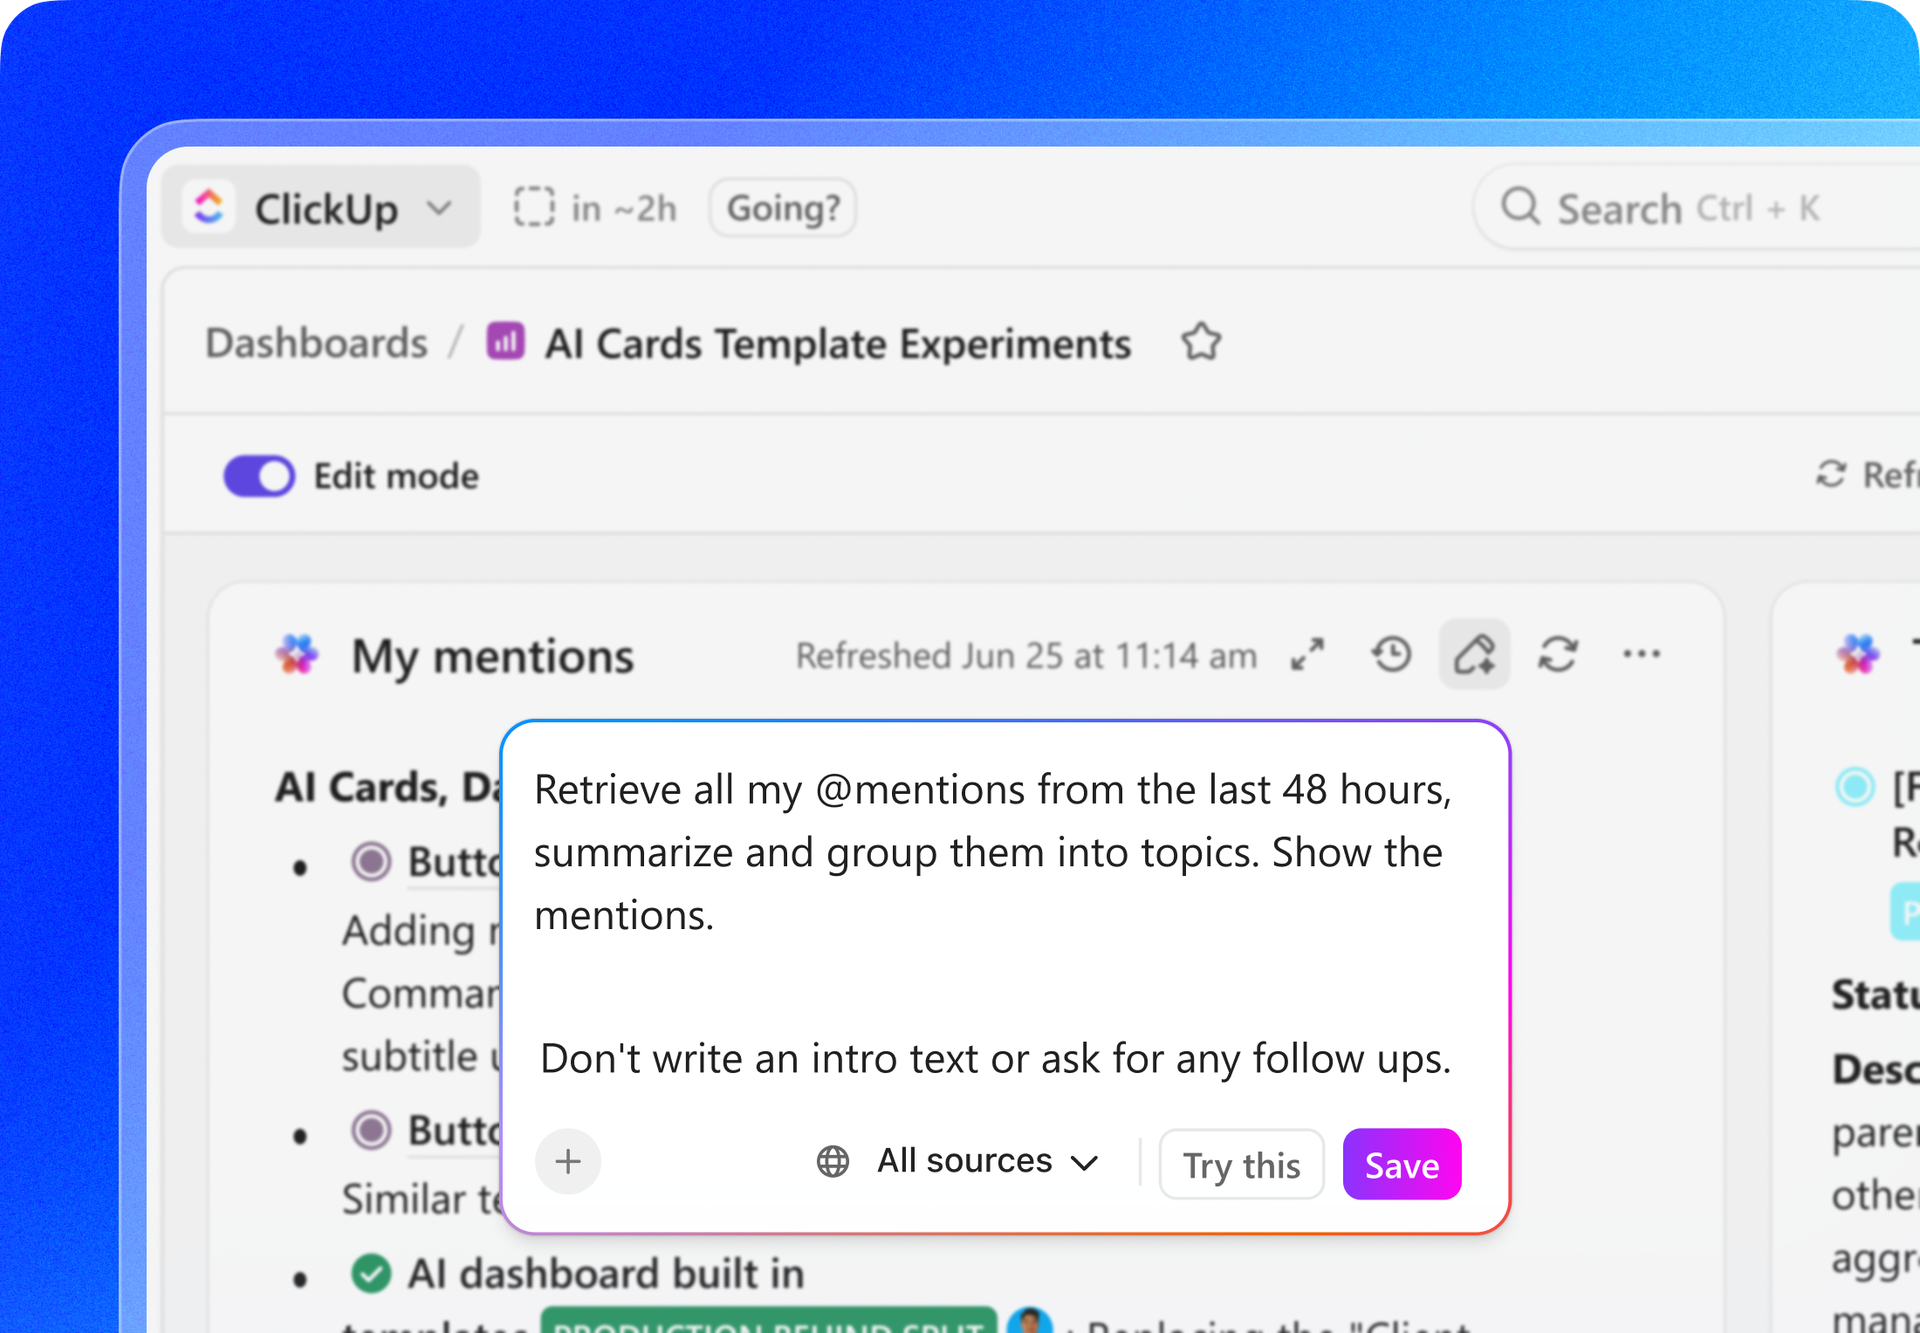
Done for you: Must-have cards for your ticketing dashboard

None of this works without proper Custom Fields. By adding details to support tickets with Custom Fields like Root Cause (dropdown), Escalation Level (label), and First Response SLA (date), you build the structure that powers these insights.
With your Dashboard set up, you’ll answer critical questions like:
Made In Cookware is a fast-growing DTC brand delivering professional-grade cookware to home chefs. As demand surged, so did the volume of support tickets, and their existing tools couldn’t keep up.
The challenges included tool bloat, fragmented workflows, and cross-departmental teams struggling to stay aligned.
We were on Airtable, Monday, Trello, Notion… it was a mess. Nothing was working.
Recognizing the need for a centralized platform to streamline operations, Kris chose ClickUp to transform how Made In Cookware worked across teams.
ClickUp features that helped:
After we finished the ClickUp evaluation, we really didn’t want to do any more. We realized this is great, and we don’t need to look at anything else.
The impact:
Here are some best practices to use ClickUp as your ticketing system:

ClickUp’s flexibility allows teams to build both simple and sophisticated ticketing systems without needing third-party tools. Here’s how teams can use ClickUp to solve real-world challenges and streamline service delivery:
Issue: Say your project management lead’s laptop stopped working 2 days before a critical review.
Instead of sending email threads to the IT team or contacting them via Slack, you can use ClickUp for IT teams to collect, triage, and resolve support tickets centrally.
Here’s how ClickUp helps:
Issue: From onboarding new hires to handling quick policy questions, the HR team deals with a dozen things at any given time.
ClickUp, as an HR ticketing system simplifies your employee management workflows.
Here’s how:
Issue: Facility requests tend to pop up at the worst times. Something breaks, something leaks, or something just doesn’t work the way it should.
ClickUp offers facilities teams the tools to manage everything from maintenance tickets to recurring building tasks in one organized place.
Here’s how:
Issue: Customer support today is more about tracking bugs, answering “how do I” questions, spotting roadblocks, and making every customer feel heard and valued.
ClickUp fits teams like these who juggle multiple roles and need a system flexible enough to keep up with how they actually work.
Here’s how support teams use ClickUp as their help desk ticketing system:
Issue: Legal teams handle different kinds of requests, such as NDAs, contract redlines, policy approvals, or privacy reviews. These tickets often involve multiple stakeholders, sensitive timelines, and documents that need to move through the right hands correctly.
How legal teams work smart inside ClickUp:
By now, we hope you’re convinced to let go of multiple tools for customer satisfaction and issue resolution.
ClickUp can double as your help desk ticketing system and project management software, a perfect solution for your IT, support, HR, ops, and other teams.
From structured intake with Forms to smart automations, custom workflows, and real-time reporting, ClickUp gives you everything you need to manage tickets and requests efficiently.
Sign up on ClickUp for free and start using it as your help desk ticketing system.

© 2026 ClickUp

There’s an easier way. Try a free AI Agent in ClickUp that actually does the work for you—set up in minutes, save hours every week.