
Let’s face it—most of us forget a new coworker’s name minutes after hearing it. As the business expands and welcomes fresh faces, it gets harder to keep track of everyone.
With an org chart by your side, you don’t need to keep everything in your head! 🤯
Org charts are a simple yet effective way to understand who does what within an organization. They also couldn’t be easier to make. Widely used, multi-purpose programs, including the good old Microsoft Word, provide this option.
In this article, we’ll explain how to create an org chart in Word in five simple steps. We’ll also introduce you to alternatives such as ClickUp that can save time and revolutionize your chart-making game! 🙌
How To Create an Org Chart in Word (With Templates)
What is an Org Chart?
An organizational chart, or org chart in short, is a diagram depicting the structure of an organization, including the hierarchy of roles and their relationships. It can be broad, covering a company’s entire workforce, or focusing on specific departments and teams.
Organizational charts can have many uses, such as:
- Analyzing the structure for reorganization and strategic planning
- Identifying skills gaps
- Project management and work allocation
- Understanding each employee’s position relative to others
- Figuring out who to reach out to for specific issues
- Onboarding new employees
There is no right or wrong way to make and use org charts. They generally consist of shapes representing people and arrows symbolizing their connections.
The shapes, typically circles or rectangles, often contain the name, title, image, and contact information. You can always customize the appearance of the chart and the displayed information to accurately represent your organizational structure.
The Most Common Types of Org Charts
Organizational charts can take on many forms. Check out some of the most notable ones below:
- Hierarchical: By far the most common chart type, it has a triangular shape. It features the highest-level individuals at the top, with C-suite executives, managers, and all other employees represented in a descending order
- Flat: Also known as a “horizontal org chart,” it places all employees on the same level, indicating power equality. It’s commonly used in startups and small companies where all individuals play crucial roles and make decisions independently
- Matrix: More suitable choice for companies with complex structures. It sorts employees by different criteria, such as department or skillset. Most notably, it allows you to depict cross-functional relationships between employees working on several projects or in multiple teams simultaneously
- Divisional: Intended for large organizations with many divisions operating independently. For instance, these divisions can be based on location, market, or product type. Structure-wise, it’s similar to the classic org chart
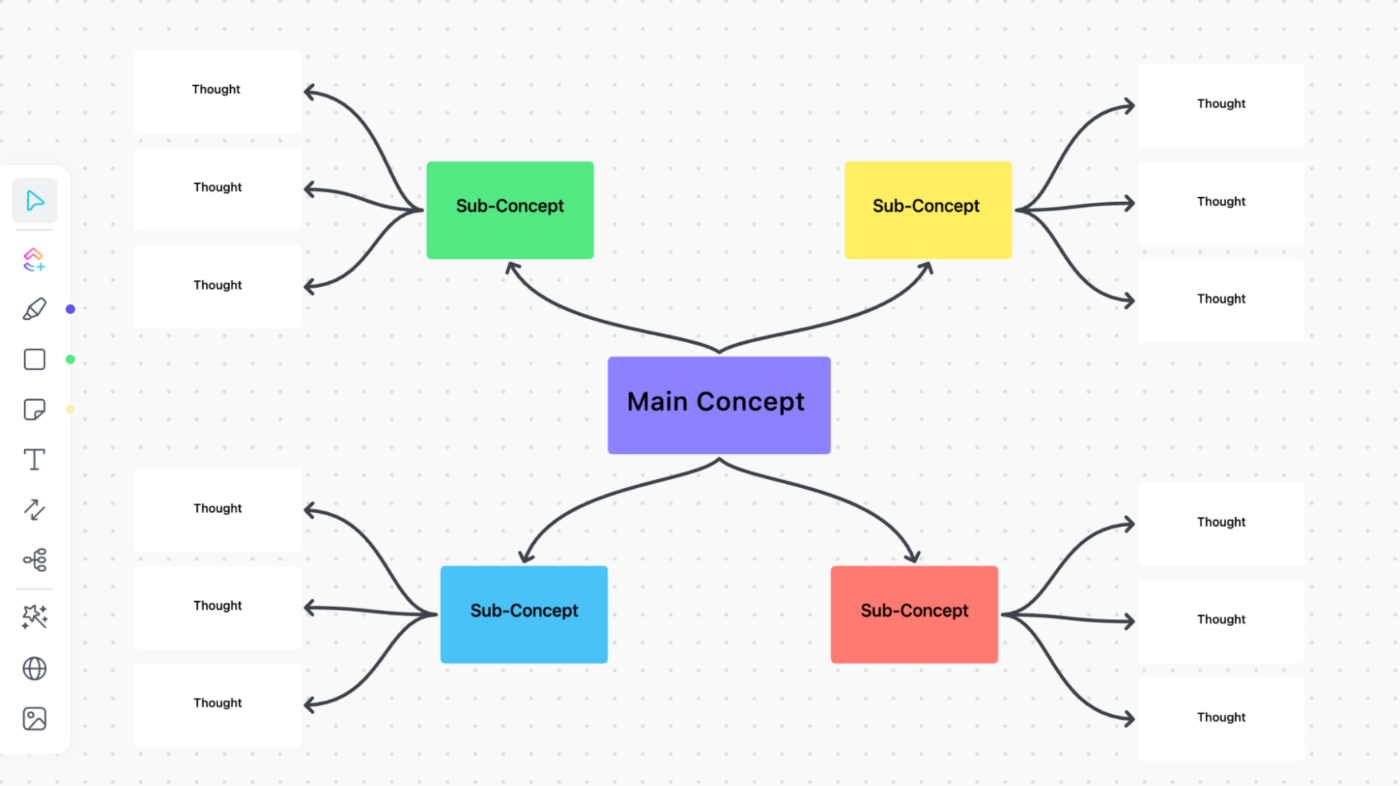
- Network: Allows you to depict your organization’s internal and external structures. External branches can include vendors, contractors, partners, or any other stakeholders. With its multi-branch decentralized configuration, it resembles a concept map
How to Make an Org Chart in Microsoft Word in 5 Steps
Although primarily a text editing program, Microsoft Word offers some basic drawing and diagramming tools to create a simple organizational chart.
Below, we’ll explain the easiest way to create an org chart in Word step-by-step. The process is more or less the same with other Office suite programs, so you can repeat these steps in Excel and PowerPoint.
Keep in mind that this tutorial applies only to versions 2010 and up. So to get started, open Word and create a new blank document, then proceed with the following steps.
Step 1: Insert a SmartArt graphic
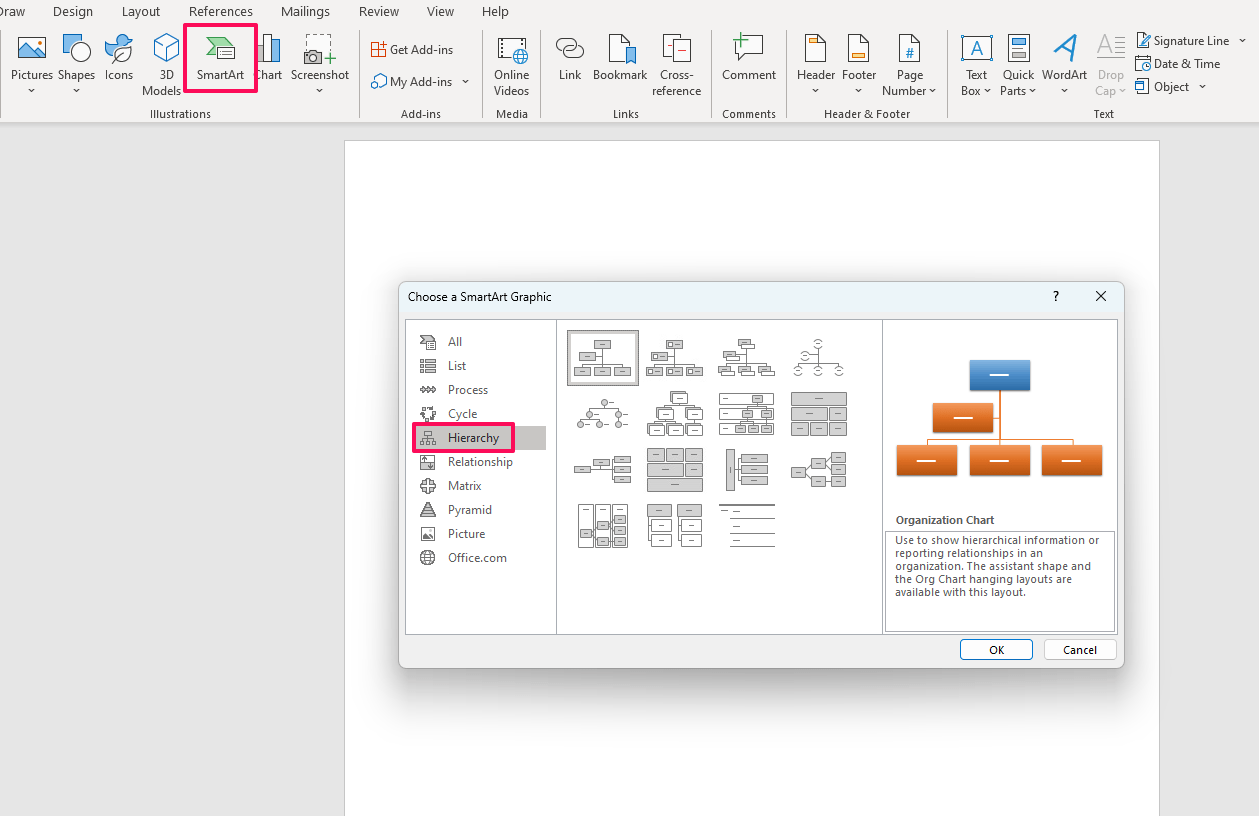
Go to the Insert tab, then select the SmartArt option to open the template selection panel. Org charts are located in the Hierarchy folder. You can choose between 15 pre-built templates, including:
- Picture org chart
- Name and title org chart
- Horizontal org chart
- Labeled hierarchy chart
For demonstration purposes, we’ll go with the default organizational chart option. After pressing OK, the chart will appear on the page.
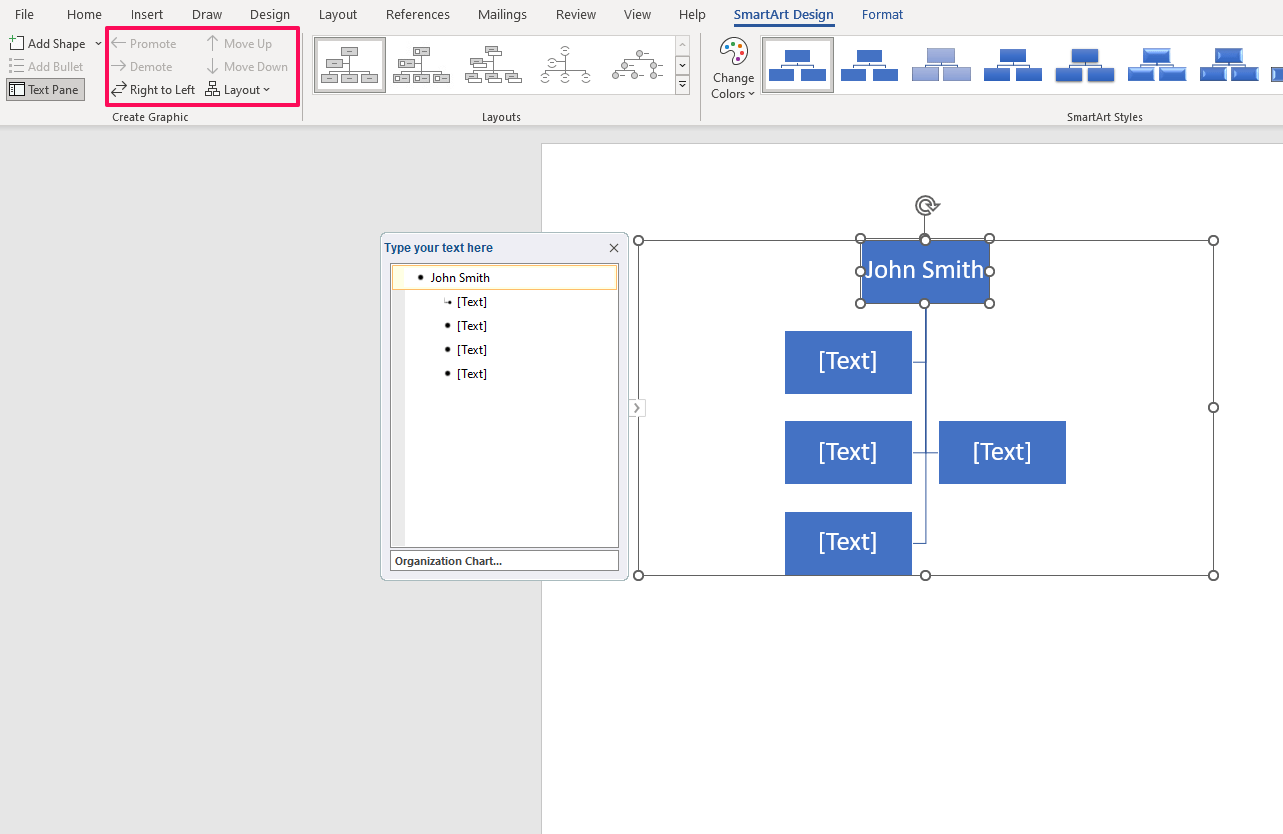
Step 2: Edit the text
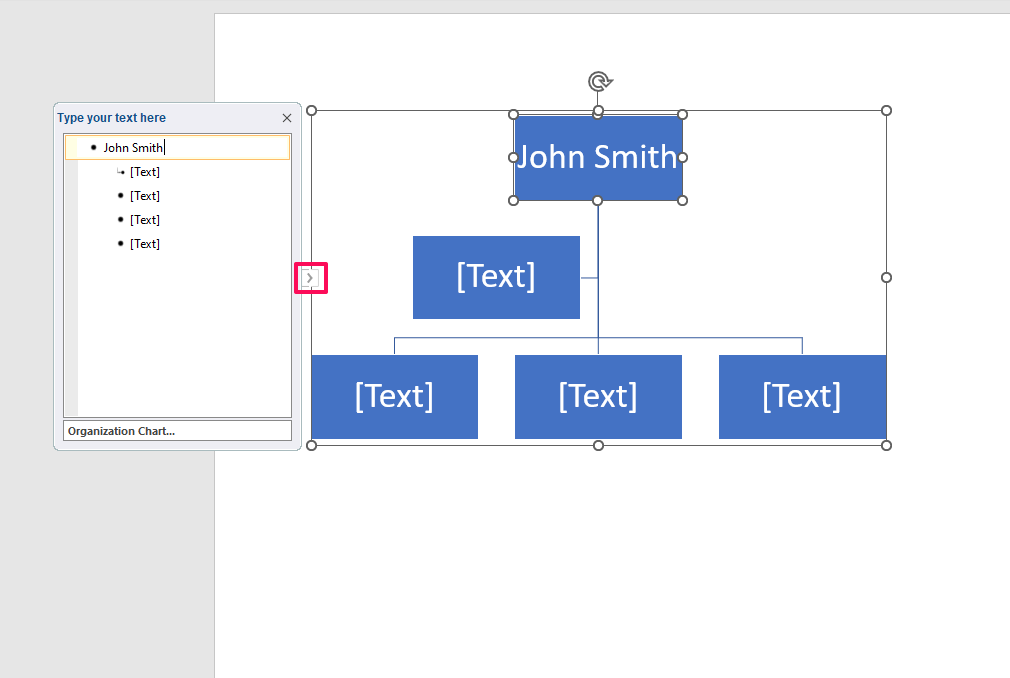
Click on the node or the adjacent list item in the Text pane to start writing the names and other employee information. Collapse and expand the pane by clicking on the small arrow on the left edge of the organizational chart selection box in Microsoft Word.
Step 3: Add, remove, and reposition nodes
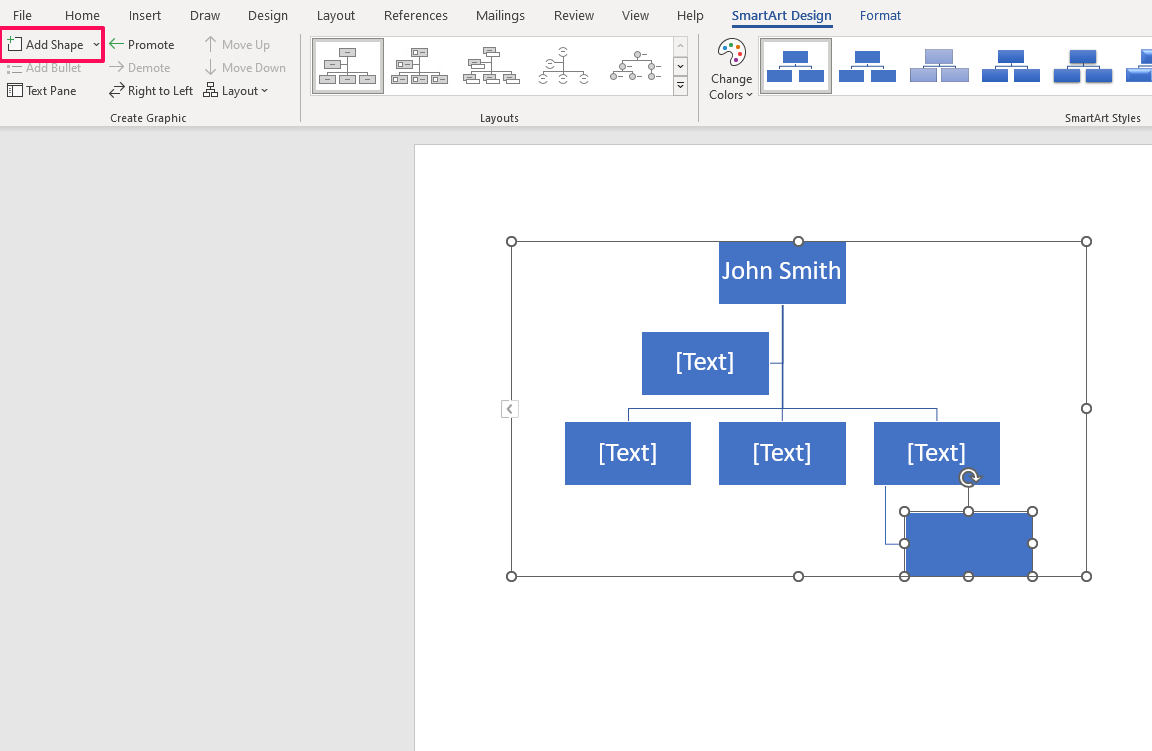
To insert more nodes, select one of the existing ones and click on the Add shape option in the SmartArt Design tab. Choose the appropriate option from the dropdown menu and insert the new shape below, above, or on either side of the selected node. There’s also a specific option for assistants.
Removing a node is simple. You only need to select it and press the Delete key for your organizational chart layout.
Reposition a node by selecting it and choosing one of the options from the Create Graphic group (Promote, Demote, Move Up, Move Down). To change the way the nodes are displayed, click on the Layout dropdown menu, selecting one of the four options:
- Standard
- Left Hanging
- Right Hanging
- Both
Keep in mind that you need to select the topmost node from the diagram first to enable this option on the dynamic org chart. You can also change your mind about the template and select a different one from the top panel.
Be careful, as changing templates could alter your established hierarchy in your organizational chart.
Step 4: Customize the appearance
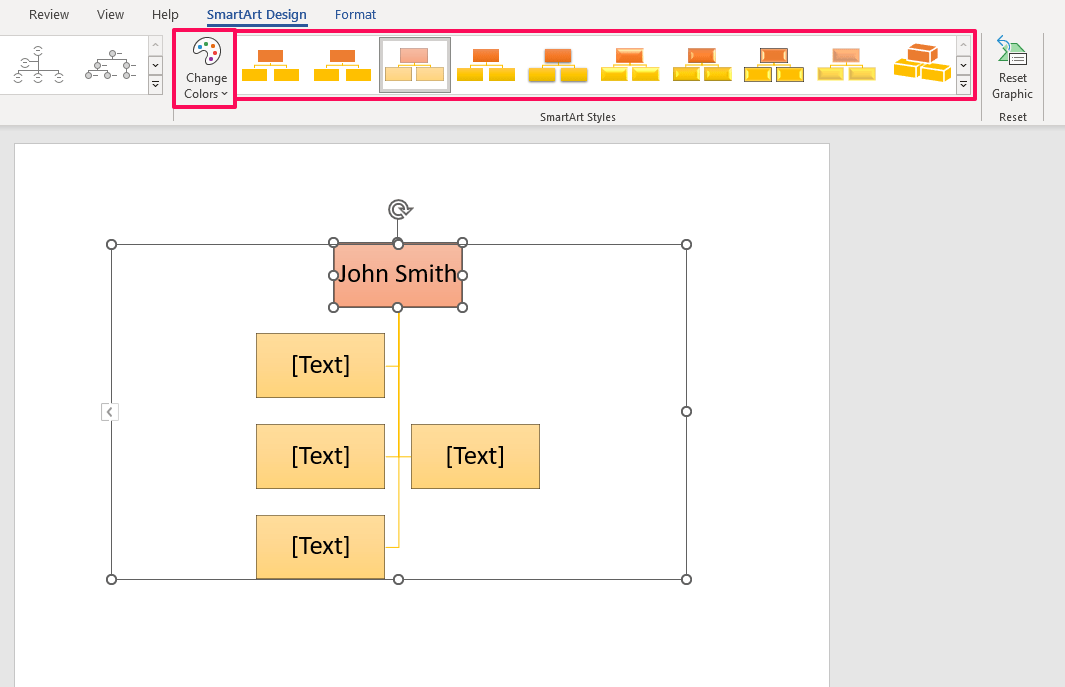
Select a new color scheme for the diagram from the Change Colors dropdown menu. To give nodes a fresh look, pick one of the provided SmartArt Styles from the panel. Edit the organizational chart layout by moving a new shape in the doc.
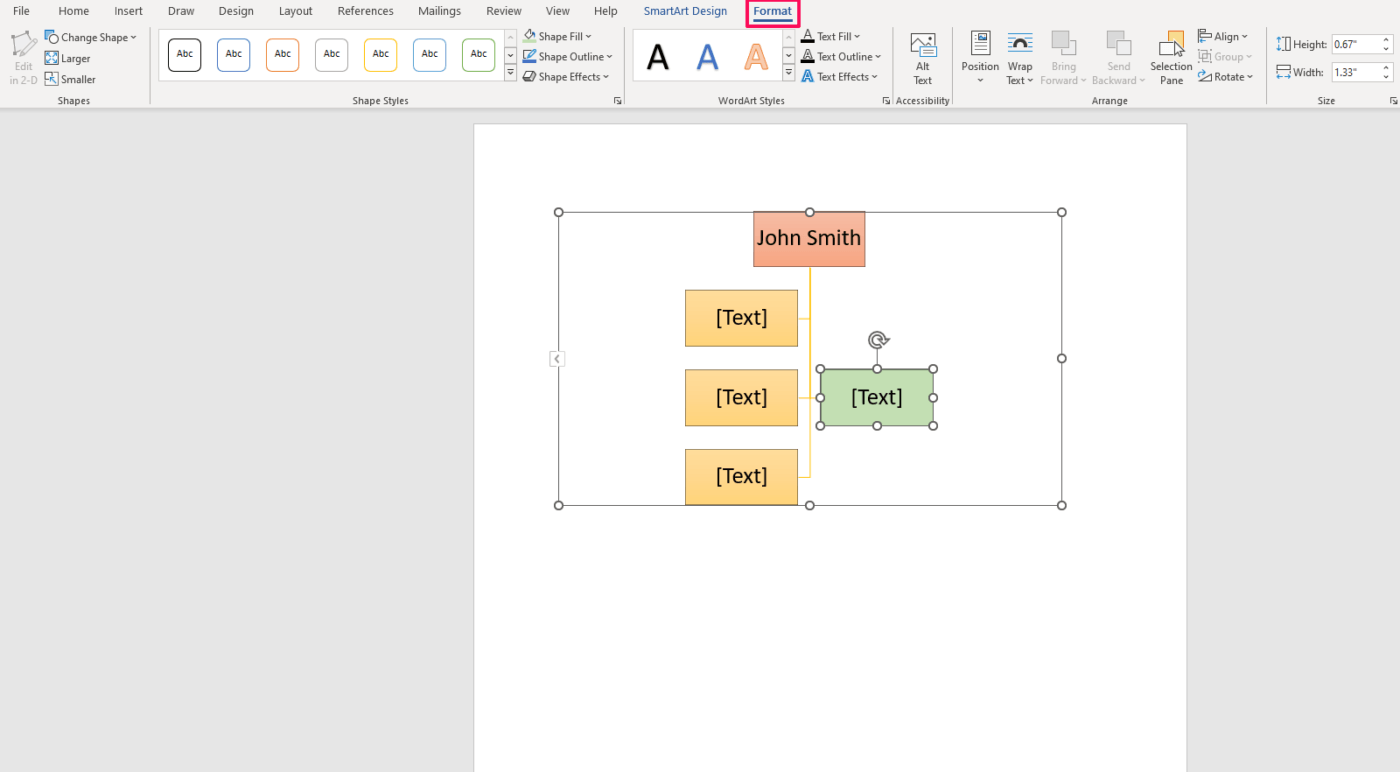
To alter each node individually, go to the Format tab. In it, you can find a wide range of customization options. Manually change the fill and outline, and add effects to a new shape and text. There are also many preset styles and org chart template options to choose from.
Step 5: Save, share, and print
Once you’ve completed your organizational chart in Word, go to File and save the document on your device. In the same tab, you can:
- Export the file to another format, such as PDF
- Print it (and then distribute it in paper form)
- Upload the file to a cloud
- Share it via email, present it online, or post it on a blog
Related Resources
- How to create an org chart in Excel
- How to create an org chart in Google Sheets
- How to make a mind map in Word
- How to make a calendar in Word
- How to make a timeline in Word
- How to create a fillable form in Word
- How to make a flowchart in Word
- How to create a Gantt chart in Word
- How to create a mind map in Google Docs
3 Alternatives for Org Chart Templates in Word
Instead of conjuring an org chart in Word from scratch, use a ClickUp template to save time and effort. These three templates give you a headstart in building functional and aesthetically pleasing organizational diagrams. 🏃
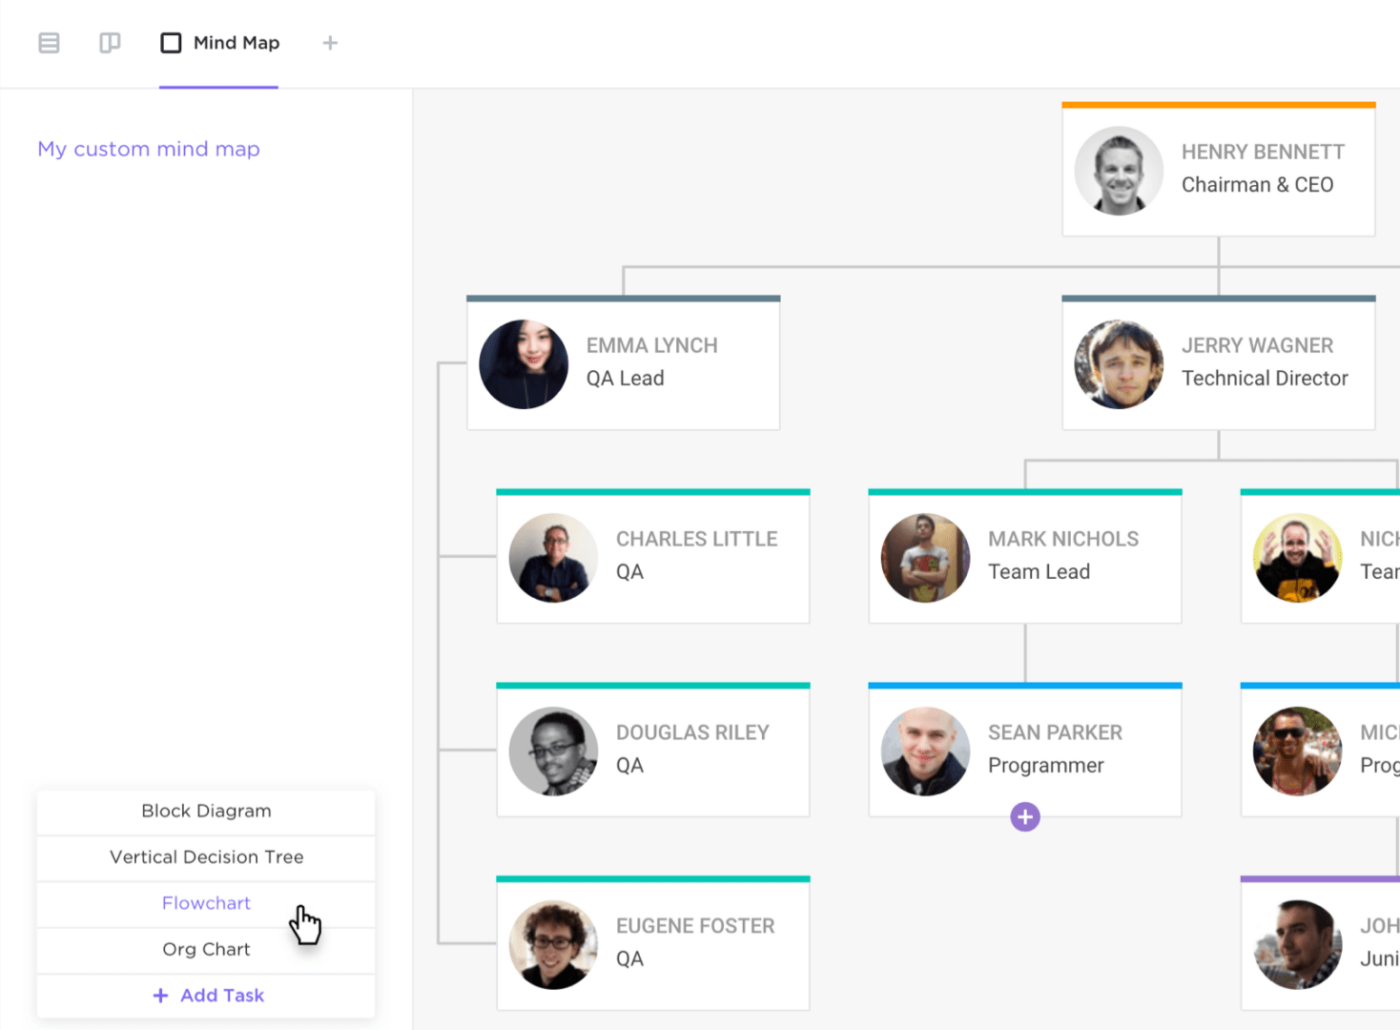
1. ClickUp Organizational Chart Template
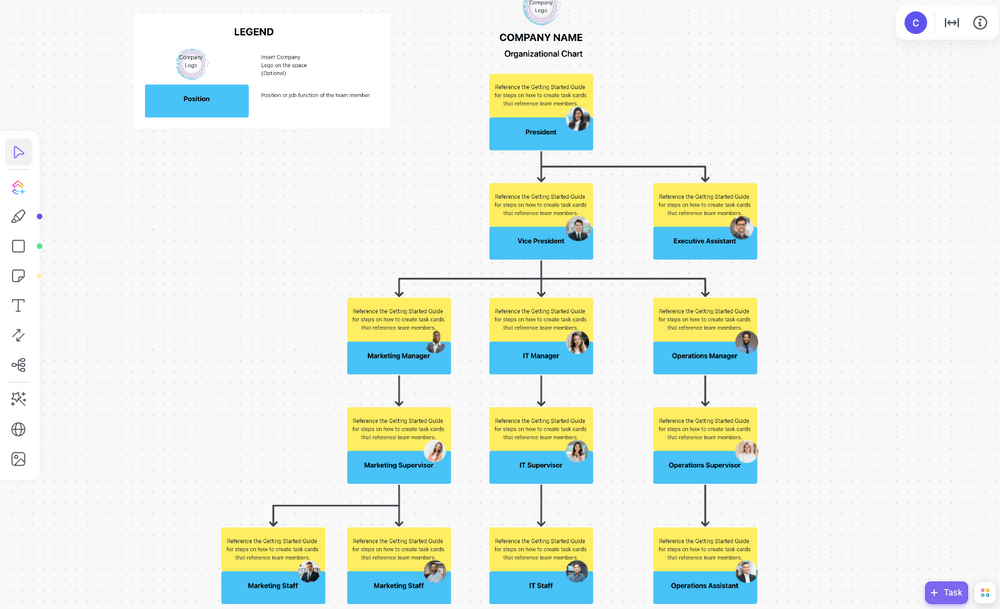
The ClickUp Organizational Chart Template is a simple and practical way to keep a record of all your team members or employees. It’s easy to use and scale up, with intuitive features that take no time to master.
Each node allows you to write down the employee’s name (yellow rectangle) and title (blue rectangle). Add each person’s photo in the small circle on the right for easier identification. At the top, insert your logo and company name to reflect your branding.
After running the template, replace the decoy text with actual information. To add more nodes, duplicate existing ones (Ctrl+Del or right-click and Duplicate). Add connectors by selecting the option from the menu on the left, then dragging and dropping from one node to another.
This template is in Whiteboard View, meaning you can get as creative as necessary. Change the layout, add more sections like contact info, introduce a new color scheme, and embed documents, videos, and website cards to take your org chart to the next level. 🎚️
Unlike an org chart in Word, which often feels clunky and requires a lot of manual data entry, ClickUp does half the work for you. It’s flexible and lets you manipulate all the elements (text pane or organizational structure of lines) effortlessly without worrying about messing up the whole thing.
2. ClickUp Staff Roster Template

The ClickUp Staff Roster Template may not look like your typical org chart in Word, but it serves the same purpose. It gives you unlimited space to monitor your workers and their responsibilities. You can also stay on top of their schedules, workload, salary, and other important information.
It’s a versatile workflow template consisting of various views, such as:
- Staff Roster List View: A master list of your employees and their key info
- Weekly Calendar View: A view for scheduling and planning
- Staff Payout Board View: Kanban-style board to assist you with payroll management
- Work Progress Team View: A breakdown of tasks and their progress
Start by entering all the staff’s names in List View. In the predefined or custom fields, input their contact details, department, hourly rate, overtime hours, satisfaction levels, and any other info you need at a glance. Group them by department, manager, or other criteria relevant to your organizational structure.
Assign work in Calendar View, track the progress of each task in Team View, and monitor payments in Board View. As with any other ClickUp template, feel free to customize and add views to tailor the template and make it your own.
Feeling overwhelmed with all the features? You can always return to the Getting Started Guide doc and refresh your knowledge. 📚
3. ClickUp Team Photo Directory Template

Use the ClickUp Team Photo Directory Template to showcase your staff and their good looks. Perfect for remote teams, this template helps your employees get to know their colleagues within their team or company. It’s an easy way to introduce them and foster a sense of camaraderie. 🤝
Unlike a traditional org chart, this template doesn’t follow the hierarchy within your company. On the other hand, it gives you more room to include additional information, such as your employees’ contact details or even a short, creative bio.
You can specify the hierarchy with connectors if needed, as the template is in Whiteboard View and thus highly adaptable. Instead of making a hierarchy, consider grouping photos in team or department clusters to provide structure.
New employees might benefit from other types of photos as well. Use the template as an opportunity to introduce them to different company locations, office spaces, equipment, or another element of your business.
Limitations of Creating an Org Chart in Word
Although an acceptable last-minute solution, Word is far from ideal for making org charts. Learn about its critical shortcomings below:
1. Offers limited functionality
Word is primarily a text-processing program. Compared to specialized org chart software, it falls short in terms of features and customization options. If you need a small and basic org chart, Word will get the job done. But if you want a good-looking interactive chart to depict complex organizational structures and relationships, you’ll have to look elsewhere.
2. Charts are difficult to scale
Word provides limited space to work with—you’re confined to a single A4 page. To scale your diagram up, you’ll have to find workarounds. While that may work for teams and small organizations, enterprises will have a hard time adjusting.
3. Time-consuming
Formatting an org chart in Word is manual, repetitive, and tedious. You must worry about aligning shapes, adjusting sizes, and arranging connectors. Again, this may not be an issue for small and casual charts, but creating elaborate ones requires a more intuitive and efficient approach.
4. Doesn’t support collaboration
Although it does have version control, Word doesn’t allow real-time communication and collaboration. It may be difficult to track changes or receive immediate feedback. Because of that, creating an org chart in Word may not be as efficient as with apps like ClickUp.
Create Better Org Charts in ClickUp!
Creating an org chart, mind map, or flowchart can be a walk in the park with ClickUp’s powerful Whiteboard capabilities. 🚶
Spoiler alert: the process entails only 3 simple steps!
Remember, you can always count on the free ClickUp Organizational Chart Template to guide you through the journey of visualizing your organization’s structure.
Step 1: Add a new Whiteboard View
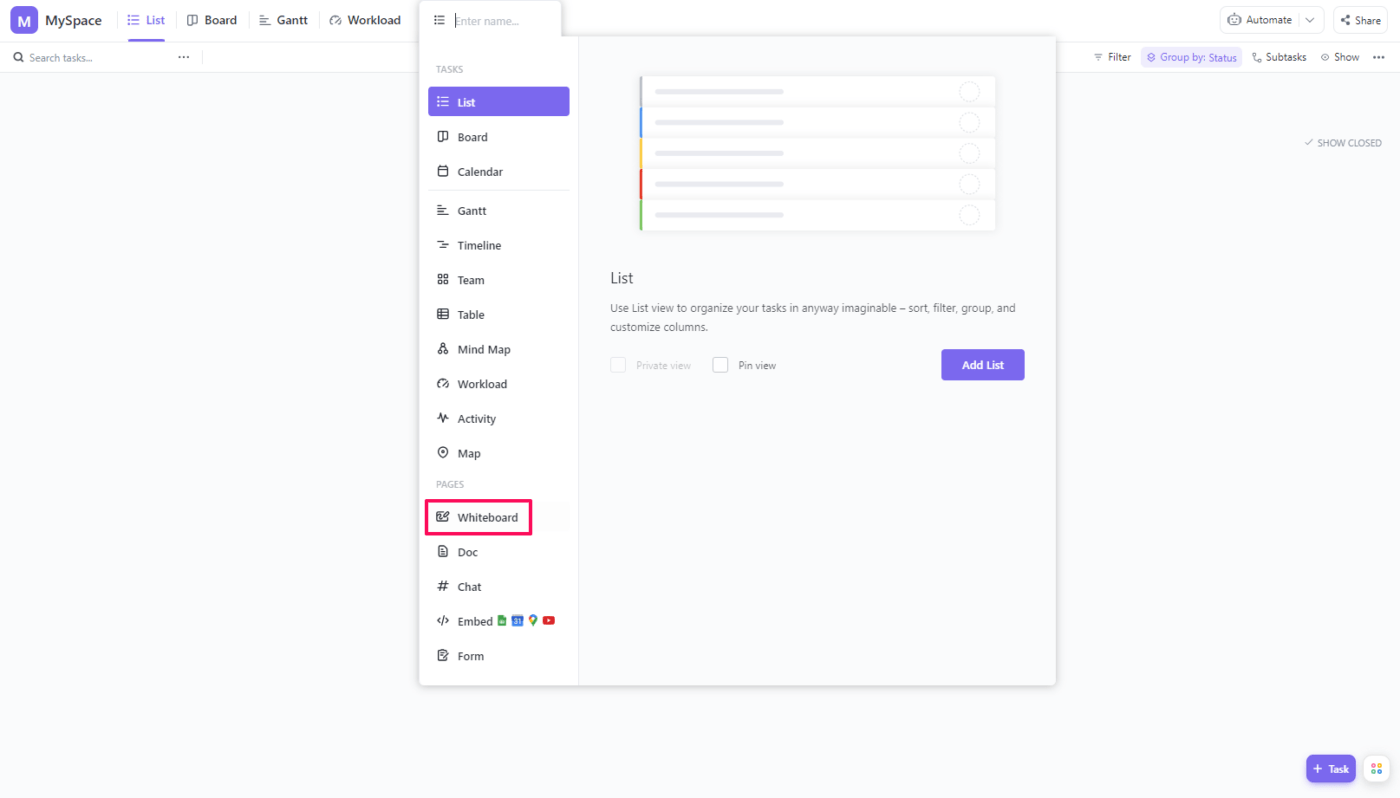
In the workspace folder of your choice, add a new Whiteboard View. The option is located next to the default Workload View. Select the Whiteboard from the dropdown menu.
Step 2: Create the structure
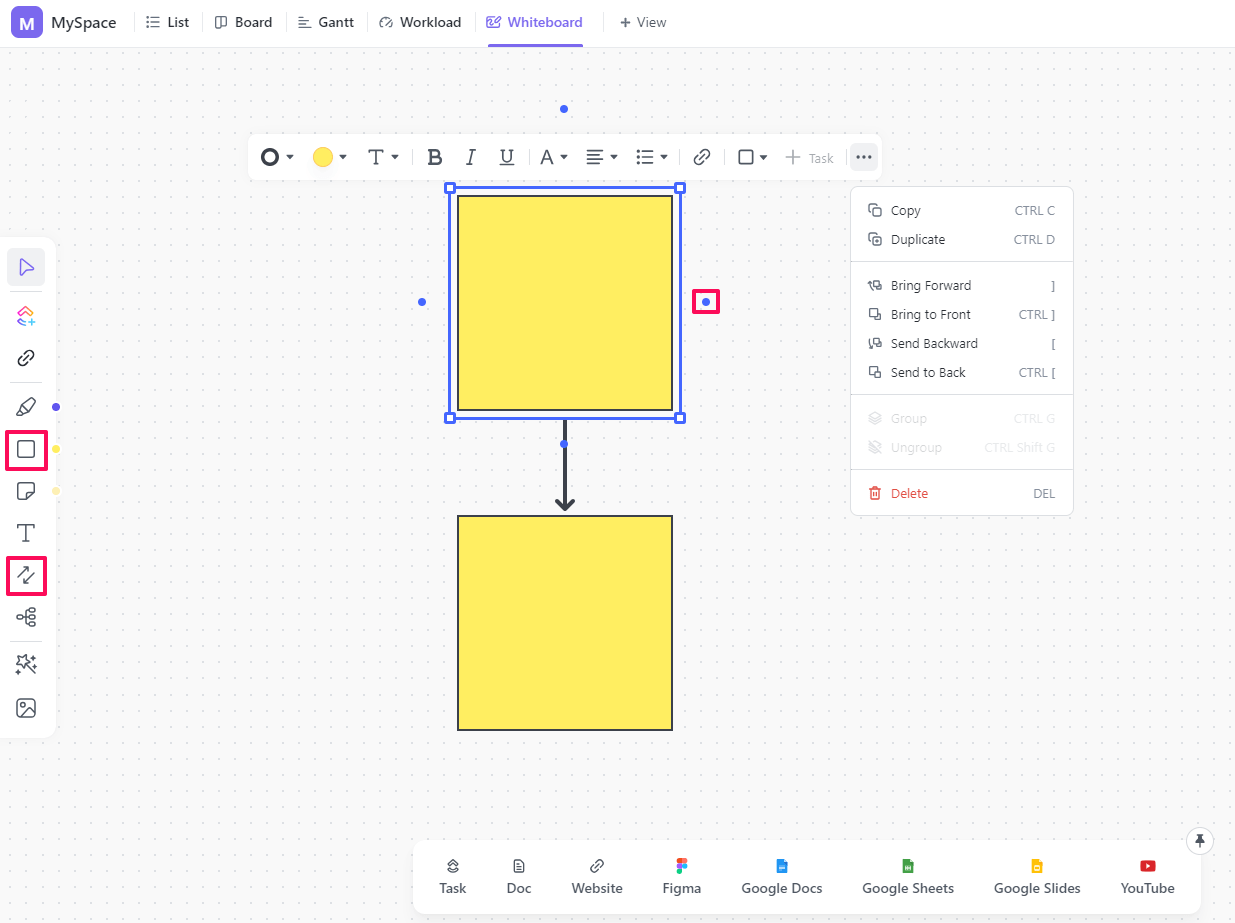
Choose the shape you want from the menu on the left. We recommend using rectangles as they provide the most space for adding text. Click on the board to place the shape.
The editing menu will pop up above the shape. It gives you access to options such as:
- Changing the shape’s outline and fill
- Converting the shape
- Sending the shape forward or backward
- Inserting a link
- Adding text and changing its color, position, and formatting
- Turning the shape into an interactive ClickUp Task if the text is present

Add all the shapes, from those depicting the highest-ranking positions to the lowest ones. Do so by duplicating the existing forms and adding connectors separately. Alternatively, you can click on the blue dots surrounding the shape to insert a new one along with the connecting arrow.
Click and drag shapes to rearrange them. Here’s a pro tip: hold Space on your keyboard and the left mouse click to move within the Whiteboard org chart template.
Step 3: Add the text and photos
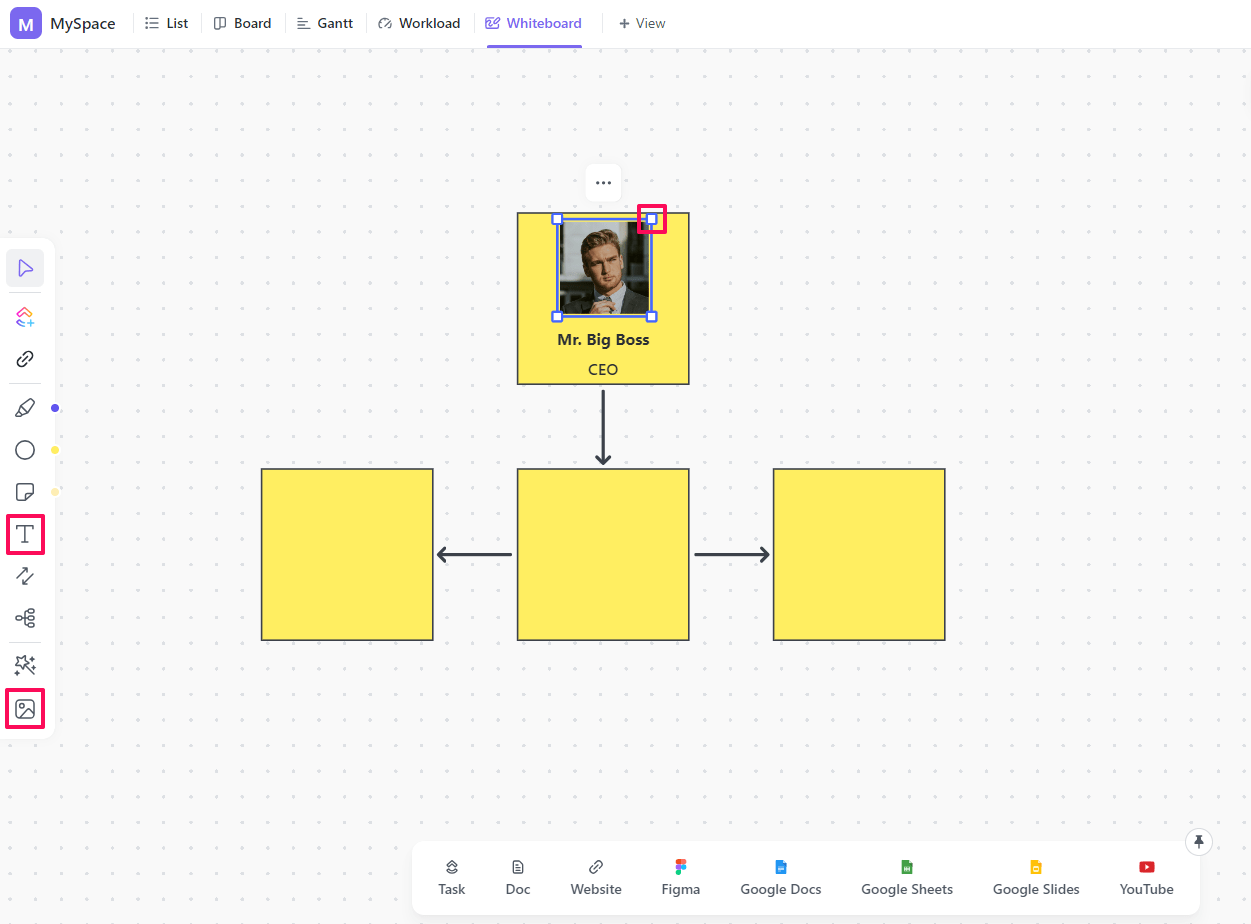
Choose the text box option from the menu and place it on the board as you would with a shape. Enter the copy you want into the text pane, change its formatting, and position the box inside the shape. 🔠
Upload the images and use the dots on their edges to resize them to fit within the shape. 🖼️
You can spice things up by changing the colors to indicate different seniority levels or departments or adding a text pane with different-sized headers. 🎨
Repeat until you’ve covered all the people within the organization and visualized their relationships. And voilà—you have yourself a gorgeous org chart!
Making an Org Chart in Word—Final Thoughts
Microsoft Word can provide an easy fix if you need a simple org chart quickly. In any other case, it’s better to go with a tool offering more specialized features and flexibility, like ClickUp or another org chart template or mapping software.
Such a tool gives you more space, offers useful features you actually need, and allows you to navigate it intuitively to reach your ultimate goal—create org charts quickly and effortlessly. 🛠️


Everything you need to stay organized and get work done.

Recent Articles
10 Free Concept Map Templates in Google Docs & ClickUp 
10 Free Concept Map Templates in Google Docs & ClickUp
18 Brainstorming Techniques To Spark Creative Ideas 
18 Brainstorming Techniques To Spark Creative Ideas
