Sorry, there were no results found for “”
Sorry, there were no results found for “”
Sorry, there were no results found for “”
Flowcharts are designed to produce actionable information for any workflow, process, or decision-making procedure. Yet, we spend most of our time creating abandoned flowcharts instead of using them as interactive workflow diagrams.
If you’re strapped for time and want to get the ideas circling in your head down quickly, use ClickUp Whiteboards to add content to the pre-built Flow Chart.
You’ll have a flowchart ready in half the time it takes to build one in Microsoft Word!
1. How do you create a flowchart in Microsoft Word?ortant?
You can build flowcharts using either SmartArt graphics or basic shapes—pasting a process list into SmartArt for quicker setup or manually inserting and formatting shapes for full customization.
2. What’s the fastest way to make a flowchart in Word?
Using SmartArt is quicker than building from scratch, but both methods require manual formatting, alignment, and multiple menu clicks.
3. What limits Word as a flowchart-building tool?
Word is time-consuming, lacks templates, offers no real-time collaboration, and struggles with scalability as processes become more complex.
4. How does ClickUp simplify flowchart creation?
ClickUp Whiteboards let teams create, edit, and collaborate on flowcharts in real time, using a drag-and-drop canvas and ready-made templates.
5. What makes ClickUp better for modern flowchart workflows?
It supports instant collaboration, templates like the Swimlane Flowchart, task linking, and easy exporting—turning flowcharts into actionable workflows.
This section introduces the two methods for building flowcharts in Word—SmartArt graphics and manual shape construction. It emphasizes preparing a step-by-step process list before building. Both methods rely heavily on manual setup and formatting.
In this tutorial, we use Microsoft Excel for Mac Version 16.60. The steps and features may look different if you’re on another version.
Making flowcharts in Word = 😩
Use this free ClickUp’s Swimlane Flowchart Template for clean, easy flowcharts—no formatting headaches.
There are two ways to create a flowchart in Word (and we’ll cover them both)!
1. Using a pre-built SmartArt process graphic
2. Building a flowchart illustration in Word from scratch
Before you start adding your content and shapes, write out your process in a list from start to finish. This will help you move faster later through the build process because you’ll already have the exact number of steps and placeholders.
Unless you’re using a whiteboard tool like ClickUp, please don’t attempt to coordinate the steps and build your flowchart symbols at the same time! You’ll be lost in the menu bar correcting mistakes. Microsoft Word is not built to work at the speed of thought.
Here’s what a simple process list would look like to submit a team offsite request:
1. Manager submits Offsite Request Form (start)
2. Operations Coordinator reviews Offsite Form (process)
3. SVP of Operations approves the Offsite Request Form (process)
4. Operations Coordinator opens a project (end)
Because you’ve outlined each step of the process, you’re off to a great start! If you prefer using a pre-built SmartArt graphic, follow the next steps below.
Bonus: Learn how to draw in Word!
You insert a SmartArt process graphic, paste your process into the text pane, and format colors, layouts, and shapes using the SmartArt Design tab. This method is faster than manual drawing but still limited in customization and collaboration.
First, change the page layout to give more room left to right for the flowchart. Go to the Layout tab > Orientation > and select Landscape.
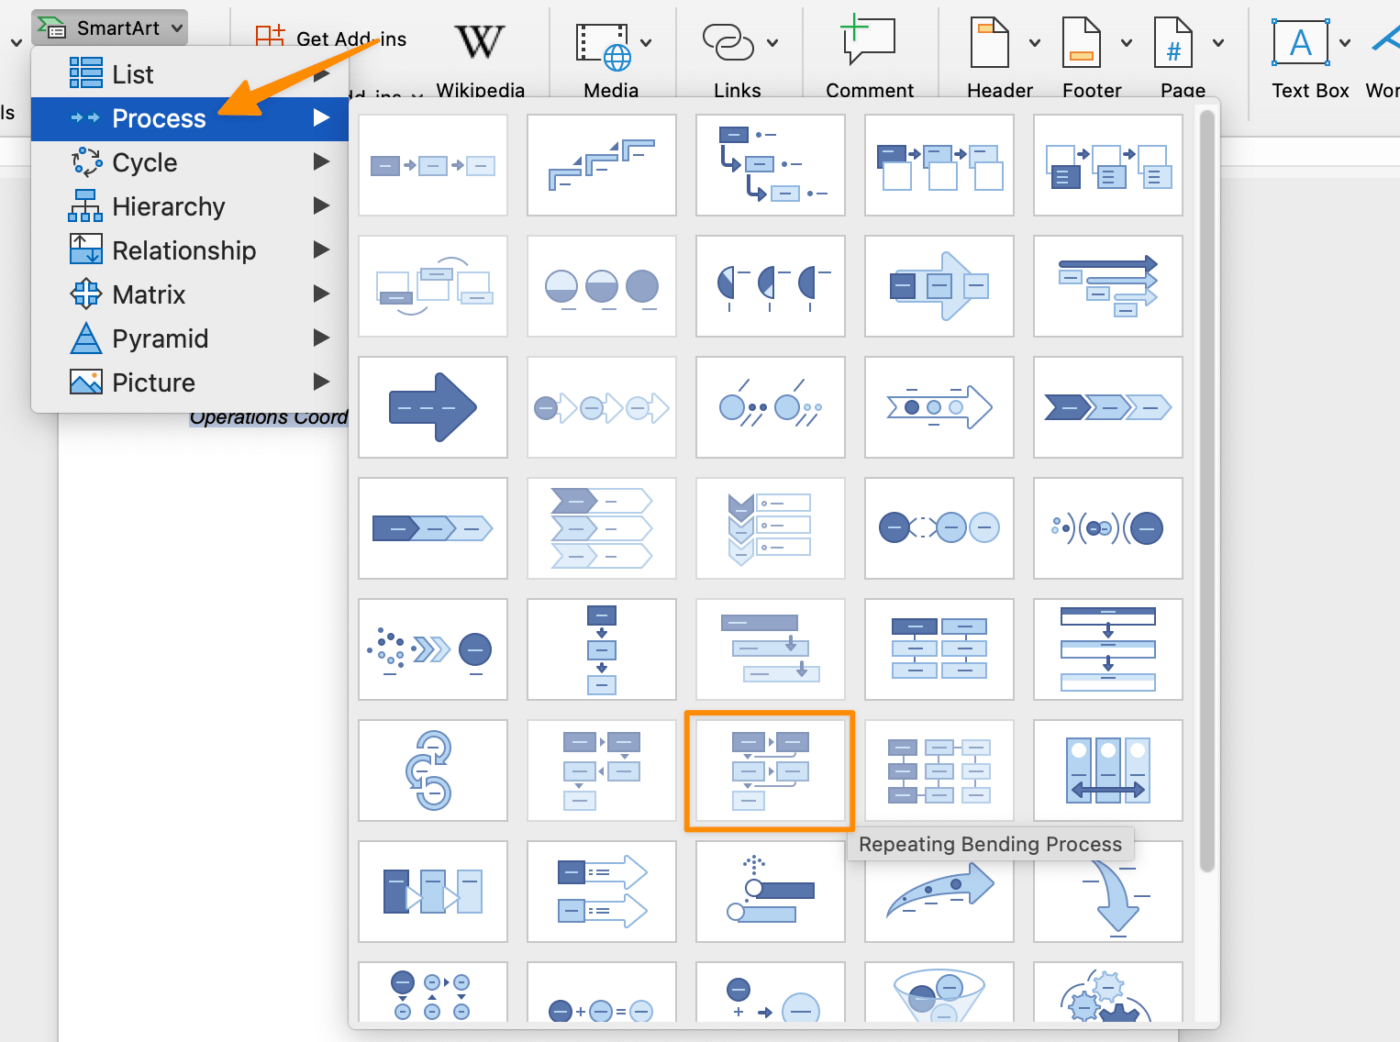
Then, copy your process list and go to the Insert tab > SmartArt > Process, and select the chart of your choice. (Our example is using the Repeating Bending Process process chart.)
After you click on the process chart, it will appear in your Word document. Paste the process list you copied into the Text Pane window. If you don’t see the Text Pane window, make sure the SmartArt graphic is highlighted. Then go to the SmartArt Design tab at the top and click Text Pane at the far left.
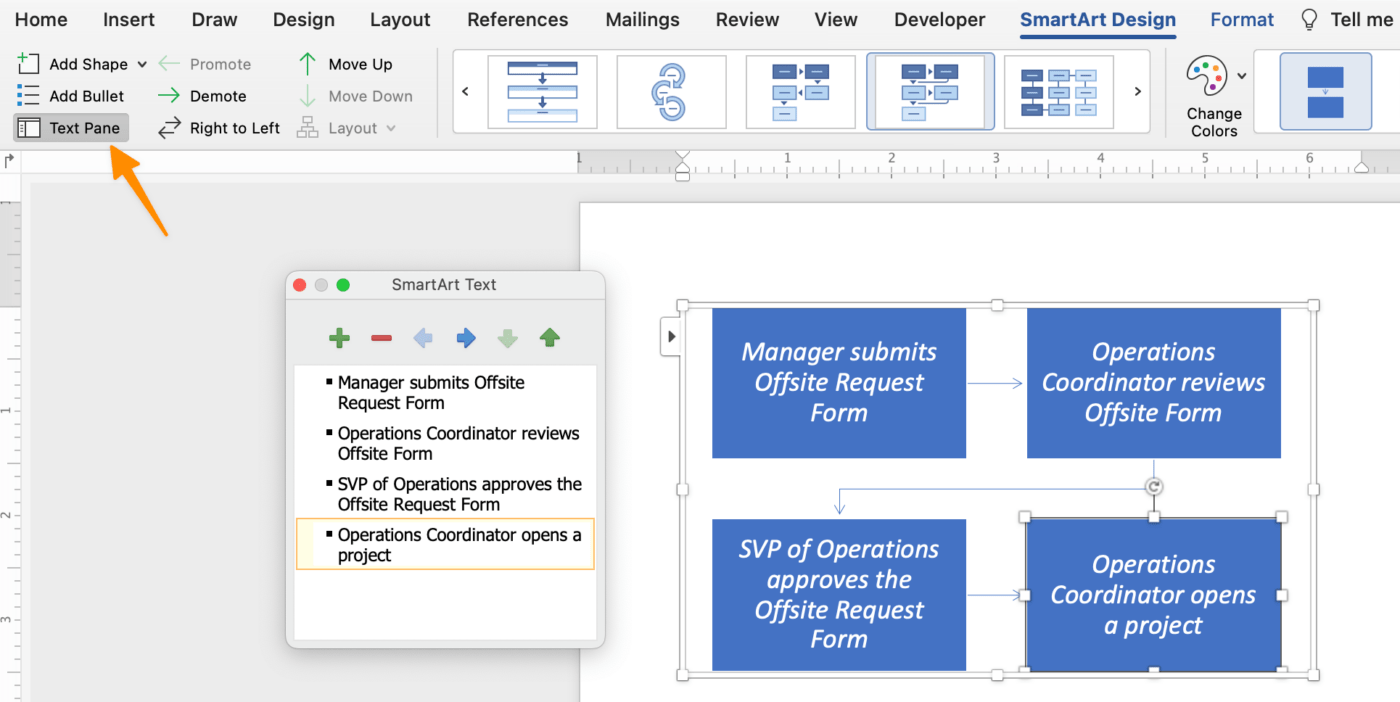
Use the SmartArt Design tab to change the color, update the flowchart symbol styles, and add more shapes to complete your graphic! If the SmartArt Design tab isn’t showing on your menu bar, double-check the flowchart is highlighted.
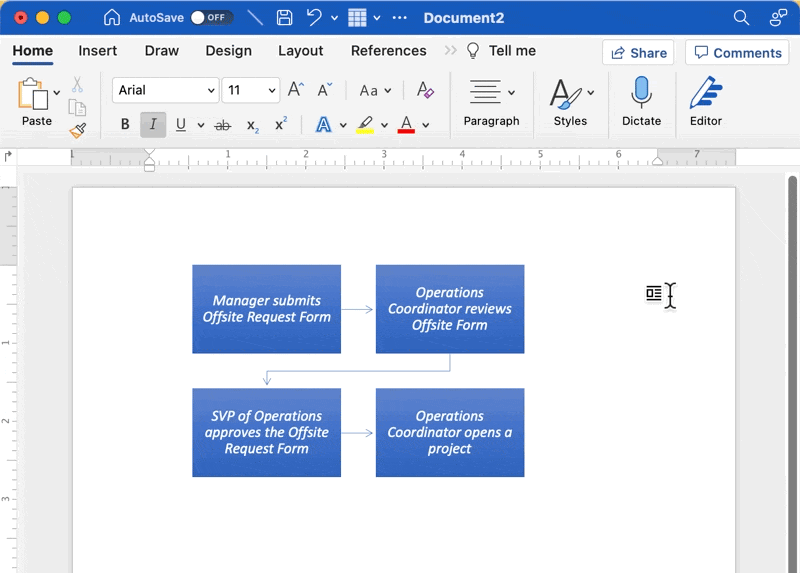
And that’s how you build a flowchart with SmartArt!
You insert individual flowchart shapes, format and duplicate them, add text, and connect each step with arrows. This gives more visual control than SmartArt but requires many repetitive actions and precise alignment.
Go to the Insert tab > Shapes > Flowchart > select a shape > click anywhere in your document to add.
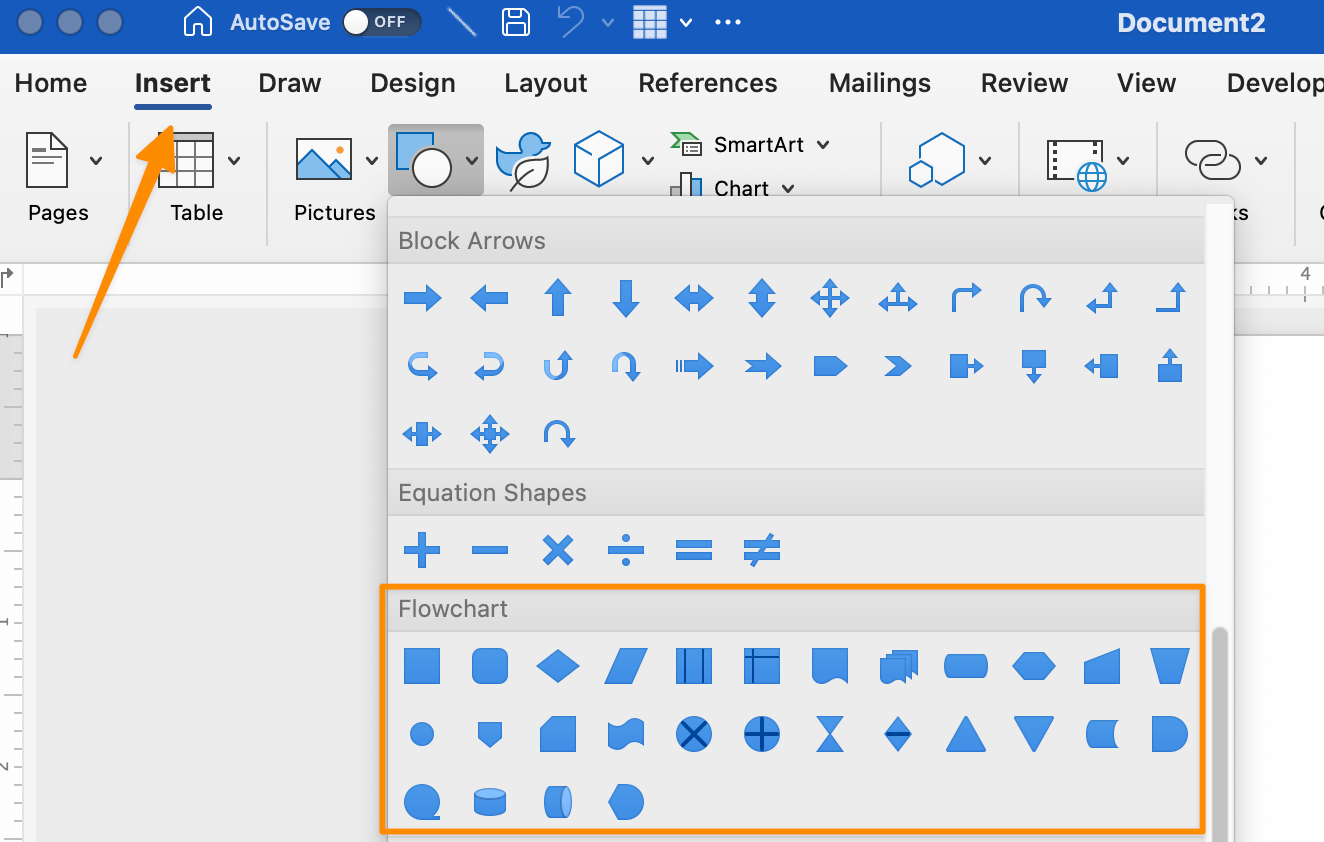
Tip: Here’s a quick table of the different flowchart symbols to use for powerful visualization:
| Shape Styles | Functions | How to Add |
|---|---|---|
| Oval | Terminal: the start point and end point of a flowchart | Insert tab > Shapes > Flowchart > Terminator |
| Rectangle | Process: represents a single step in the process | Insert tab > Shapes > Flowchart > Process |
| Diamond | Decision: represents a decision action | Insert tab > Shapes > Flowchart > Decision |
| Arrow | Arrow: shows the relationship by connecting shapes | Insert tab > Shapes > Flowchart > Arrow |
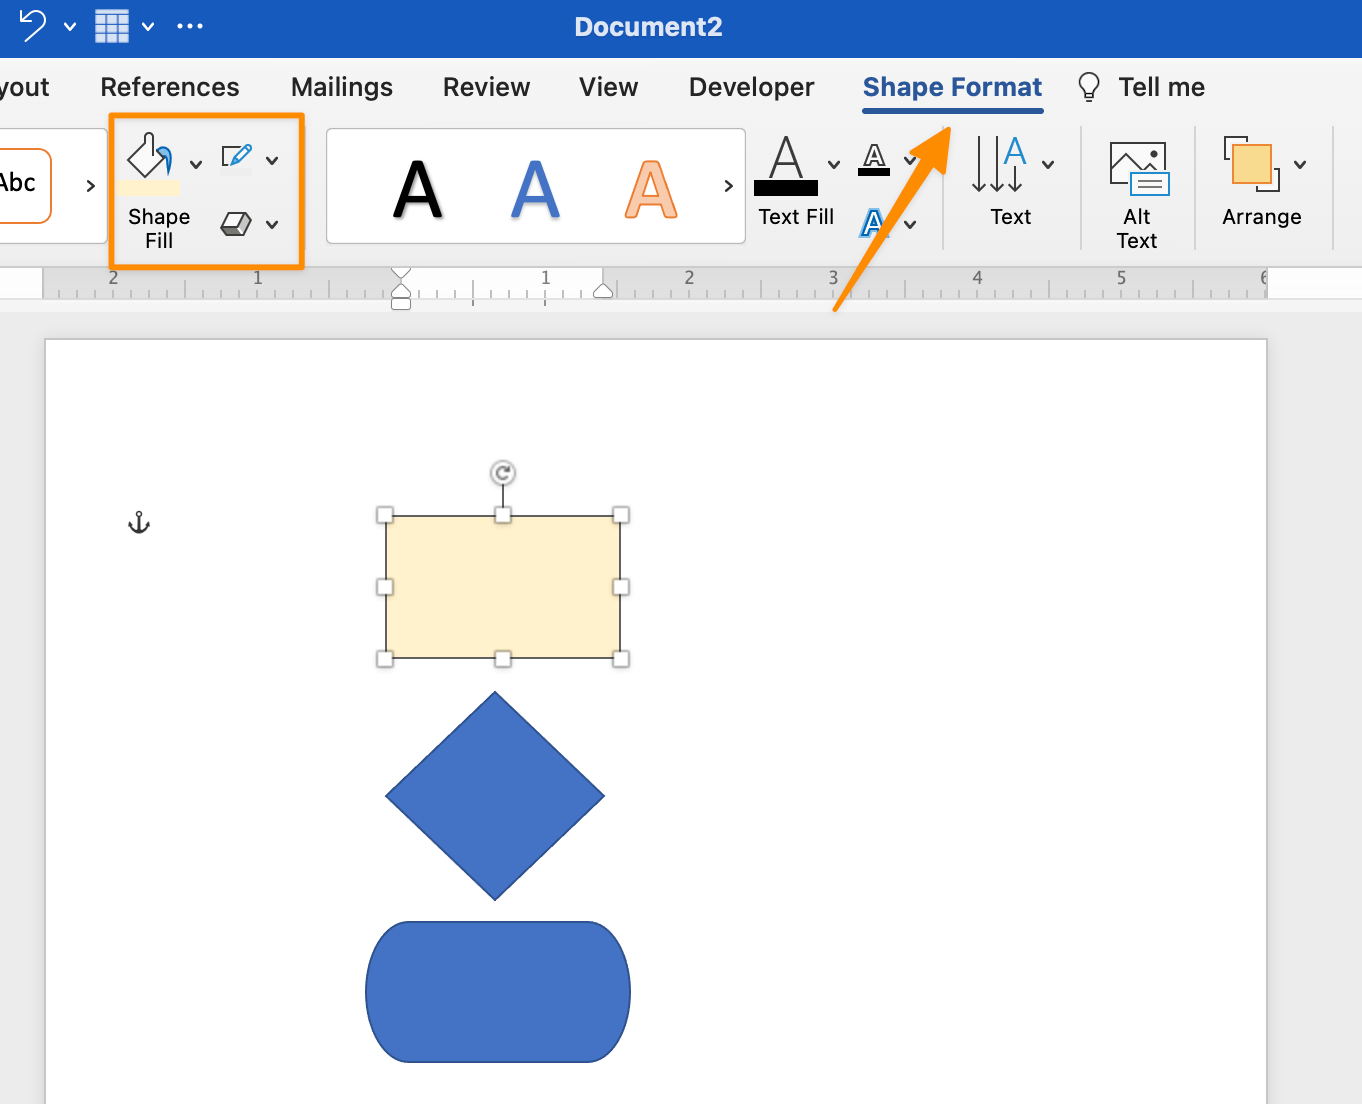
Typically, editing the shape’s color and size happens at the end. But because it takes multiple clicks to add shapes in Word, you should format your ideal shapes and use the copy and paste feature to duplicate them.
Go to the Shape Format tab, and the menu bar will adjust to show all the changes you can make to the shapes. Once you have your perfect shape, copy and paste it as many times as you need!
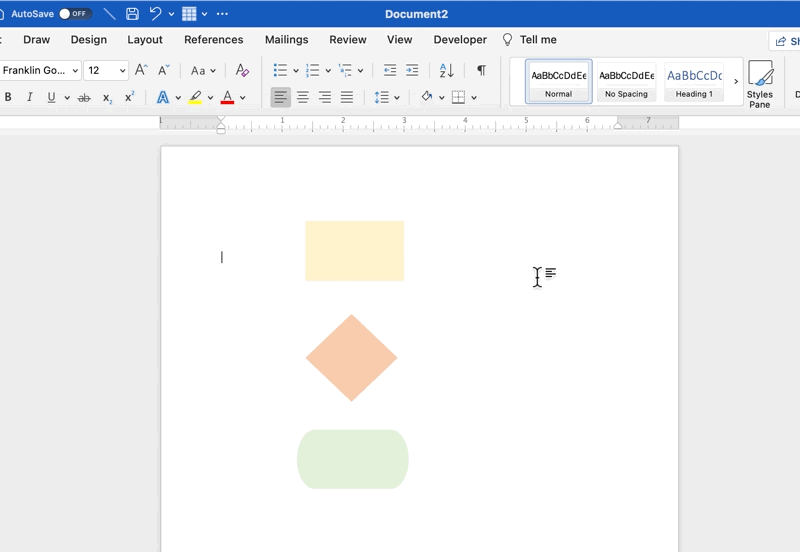
We want to add text inside the shapes, so let’s make them bigger! Select one of the shapes > hold the Command or Shift key > select the other shapes > go to a shape’s corner and drag to expand. Click on a shape and begin typing in each step until all the shapes are filled with text.
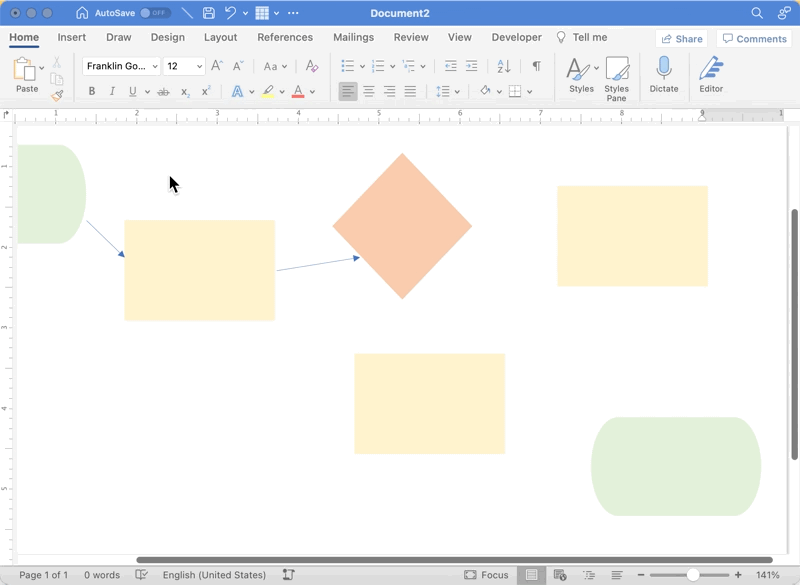
We’re almost there! With your shapes in place, it’s time to connect the sequence of events. Go to the Insert tab > Shapes > Lines > and click the Arrow.
Tip: You can customize the arrow’s shape and color under the Shape Format tab! Make sure the arrow is selected first to make any changes. Then, copy and paste the arrow to add it again for your other process steps.
Whew. All that work inside Microsoft Word didn’t leave much time and energy for what comes after the flowchart—taking action towards progress.
If you’re looking to upgrade your flowchart tools and software for a powerful visual platform to create, test, edit, and collaborate with your team, try ClickUp!
While Microsoft Word is a robust software capable of creating compelling text documents, its efficiency wanes significantly when it comes to creating flowcharts. Here are some key limitations you might face when creating a flowchart in Word:
But, there is a silver lining. With ClickUp, these limitations can be overcome. ClickUp is a comprehensive productivity platform designed for modern, dynamic teams. Let’s dive into how you can create customizable flowcharts in just a few clicks with ClickUp!
ClickUp Whiteboards let teams create flowcharts on a zoomable canvas with ready-made templates, real-time collaboration, and direct task linking. This turns static diagrams into live, actionable workflows instead of documentation that gets ignored.
No code or design experience required!
The majority of your time spent in Word is formatting. And while formatting is important for visual balance and presentation, it won’t matter if no one—including you—uses the flowchart to move the needle in the process or project.
Microsoft Word is a powerful software program for creating almost anything. But it’s just not efficient in a modern workplace where remote and in-office collaboration has its challenges and benefits.
📮ClickUp Insight: Approximately 92% of knowledge workers are at risk of losing important decisions due to scattered documentation, with just 8% using project management tools to track action items.
How do you get ahead without a unified system for converting ideas into actions? ClickUp Whiteboards don’t just provide your team a place to brainstorm. With ClickUp, you can instantly link your tasks and docs to these discussions in one place—ensuring nothing falls through the cracks.
And chances are, your team members won’t volunteer their time to co-create a flowchart in Word. The software has too many options and steps to achieve one purpose.
What your tasks and team members need is an all-in-one productivity platform to organize ideas and work.
A suite of designer-approved flowchart templates to boost productivity and collaboration.
A zoomable canvas to bring ideas and views to life.
If you’ve ever been curious about whiteboard software or ClickUp, we hope you take advantage of our free Whiteboards and test drive the platform with your next project or idea!

ClickUp Whiteboards will be your favorite drawing canvas to rapidly develop flowcharts and frameworks. All the shapes you need are semi-customized to relieve you from creating each object from the ground up. Use Whiteboards for presentations, team brainstorming workshops, or solo projects!
With Whiteboards, you also have the option to save your flowchart as an image and drop it into a document or email. It’s easy! Here’s how it works:
1. Create your flowchart in a ClickUp Whiteboard
2. Right-click the image
3. Select Save Image As
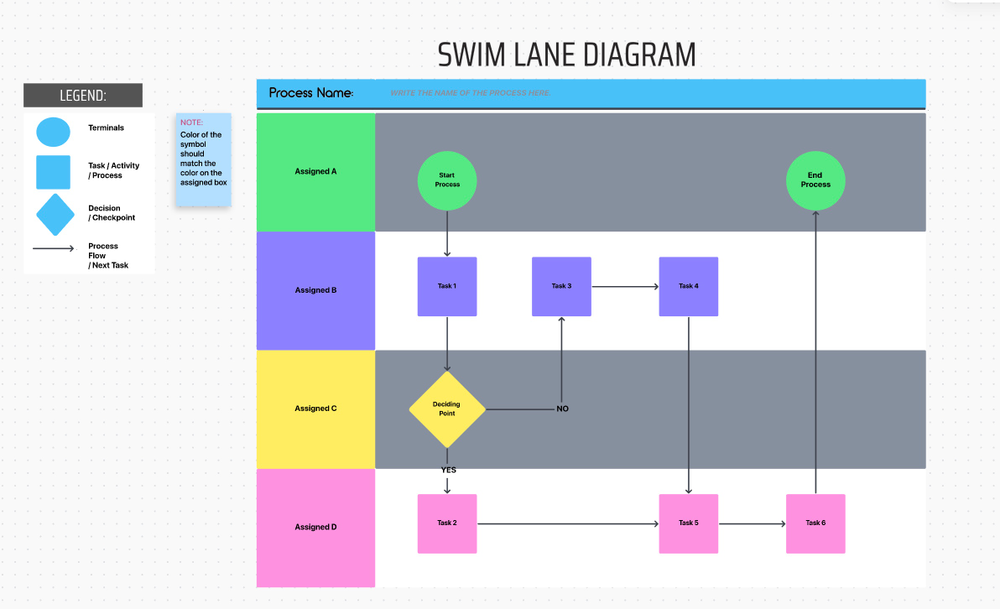
Looking for a swimlane flowchart? Try ClickUp’s Swimlane Flowchart Template to create a visual of each step in a process and the individuals or departments involved!
Drop it into your file, and you’re good to go! If you want to see Whiteboards in action, check out our guide below!

Praburam Srinivasan
Max 25min read

Sudarshan Somanathan
Max 22min read

Sean Hardy
Max 26min read

© 2026 ClickUp