


Still downloading templates?
There’s an easier way. Try a free AI Agent in ClickUp that actually does the work for you—set up in minutes, save hours every week.
Sorry, there were no results found for “”
Sorry, there were no results found for “”
Sorry, there were no results found for “”

Do you ever feel like your digital space is turning into a scrapyard?
You might have files in Google Docs, your desktop folders, Dropbox, OneDrive, or even in apps like Notion. And let’s not forget about those random PDFs, Post-it notes, and paper notebooks lying around.
The root cause of this clutter is an overcomplicated approach to note-taking and project organization.
To address this, Tiago Forte created the PARA Method, a system designed to organize all kinds of digital information in a simple, flexible way. Although Forte built it to manage his knowledge and work at his consulting job, this technique can be easily applied to multiple use cases.
What makes PARA so effective is that it helps you manage information with ease and can drastically improve your productivity. In this blog, we will learn how to use the PARA method for digital organization, its limitations, and tools that can help you declutter quickly.
Ready to Marie Kondo your way through digital clutter? Let’s go.
PARA stands for Projects, Areas, Resources, and Archives—the four main categories that can encompass all types of information you come across in work and personal life.
The goal is to offer a system that facilitates task completion without adding extra complexity. It helps you identify what needs to be done and the resources you have available to accomplish it.
PARA is a universal framework that works across any platform and can fit any type of user. That’s why this method works for anyone, no matter their field or profession.
The system organizes everything into four categories:
Forte breaks it down further with real-life PARA method examples:
This technique stands on several key principles that make it an effective work management and goal-setting system:
✅ Principle 1. Actionability
The primary principle of the PARA method is to organize information based on its actionability. Projects demand immediate action, while Areas require ongoing attention. Resources are for reference, and Archives hold useful information.
✅ Principle 2. Simplicity
PARA is intentionally simple, consisting of only four categories to prevent overengineering and cognitive overload. You can easily adapt the system to your needs.
✅ Principle 3. Dynamic information flow
Information within the PARA system is not static; it flows between categories as projects evolve or areas of responsibility change. For example, completed projects can move to Archives, while new projects may emerge from ongoing Areas.
✅ Principle 4. Just-in-time organization
Forte advocates for “just-in-time organization,” where you organize your information as you work rather than scheduling specific times for organization tasks.
✅ Principle 5. Focus on outcomes
The PARA method encourages you to define clear project outcomes, treating goals as hypotheses that can be tested and learned from rather than rigid forecasts.
Ultimately, the PARA system provides a structured, flexible, and practical approach to organizing digital information that anyone can benefit from.
The PARA method creates a system that helps you focus on what matters while keeping everything else in order. Let’s break down how you can start with PARA, step by step, and explore how this method fits into different aspects of personal and team productivity.
The great news is that you can apply this method across all the tools you’re currently using. Here’s how you can do that:
Begin by identifying all your tasks, responsibilities, and resources. Next, place each of them into one of the PARA categories—Projects, Areas, Resources, or Archives. Any upcoming tasks with deadlines should go into Projects, ongoing responsibilities should go into Areas, and things you want to reference later should go into Resources or Archives.
Start with your Projects. List all your current, actionable tasks under this category. The key here is that a Project is something with a clear goal and deadline, like ‘Submit design proposal by Friday.’
It’s important to keep your Areas of Responsibility up to date, as these represent long-term commitments like health, finances, or career growth. Your Resources, on the other hand, should include ongoing topics of interest, such as online courses, industry trends, or new hobbies.
Move finished Projects and outdated Resources to the Archive. This will keep your active categories clutter-free and allow you to track your progress over time.
One of the fundamental concepts in the PARA system is the difference between Active and Passive Channels.
When using the PARA system, it’s crucial to define clear, actionable goals for your Projects and Areas of Responsibility. Without clear goals, tasks can pile up and become a source of stress rather than productivity.
For example, setting a goal like ‘Complete website redesign by next month’ gives structure to your Projects category. Meanwhile, goals like ‘Maintain fitness routine’ or ‘Improve financial health’ guide your Areas of Responsibility.
Setting goals also encourages a mindset of constant progress and helps prioritize tasks to align with your long-term objectives.
The beauty of PARA is that it can grow with you and your needs. As goals shift or life circumstances change, PARA can be adjusted, making it a scalable system for managing both small tasks and extensive, ongoing commitments.
PARA isn’t just a personal system—it can also improve team collaboration. When everyone on a team understands the categories of Projects, Areas, Resources, and Archives, it’s easier to share and organize collective knowledge. Teams can quickly identify what’s active and what’s archived, avoiding miscommunication and keeping everyone on the same page.
Using PARA within a team can also streamline project management.
Team members can allocate shared tasks under Projects, ensuring each task aligns with the team’s goals and deadlines. By creating shared Resources, a team has a collective pool of knowledge that’s easily accessible to everyone, whether it’s research, templates, or references.
In any project, having a flexible yet organized structure can be the difference between success and chaos. It’s not about sticking to strict hierarchies or predefined roles but rather creating a dynamic framework that can adapt to changing needs and unexpected challenges.
A solid organizational system keeps communication flowing, enhances overall efficiency, and ensures every team member’s efforts are aligned with the project’s goals. This is where organizational tools like ClickUp come into the picture!
Here’s how the PARA system works flawlessly with ClickUp to help you improve your work processes and maximize output.

ClickUp Whiteboards are the ideal space to map your project’s workflow visually. With numerous daily planners and productivity templates to jump-start your creativity alongside the team, Whiteboards are designed to help you capture and share your ideas the moment inspiration strikes.
With ClickUp, you get access to a library of 1000+ readymade templates, that make organizing digital information super-easy. Let’s explore them together.
Especially during the initial phases of your project, resources such as the ClickUp Personal Productivity Template can offer the structure and support you need to stay organized and manage your tasks effectively.
By using the Personal Productivity Template, you can:
Plus, with ClickUp’s ability to transform any note or shape on the Whiteboard into an actionable task, you can instantly incorporate new ideas into your workflow, ensuring nothing gets left behind.

ClickUp Tasks are essential for ensuring your project runs smoothly. By assigning tasks, setting deadlines, and tracking progress, you can keep your entire team aligned with the project’s objectives.
This makes it one of the best organization apps for managing complex projects.
Here’s how its key features support better project organization:
For instance, if you’re overseeing a software development project, ClickUp makes it easy to assign tasks like Fix V2.1 Bugs or Write UX Copy. Developers can track their progress with a Board view, while writers can keep things simple with a List view. You can set dependencies so writing begins only after the development, ensuring everything flows as it should.
With these features, ClickUp tasks make it easy to stay organized at work and enhance team collaboration.

The ClickUp Goals feature helps you stay focused on KPIs and important objectives. Whether you’re managing a work schedule app or tracking the effectiveness of a project, ClickUp allows you to define measurable goals and monitor them in real-time.
Here’s how ClickUp Goals can boost your productivity:
Templates with pre-designed sections can keep you organized, help you plan your days, and enhance your focus. These three ClickUp templates will transform you into an organizational pro.
One of the best productivity hacks to boost your organizational skills is to create a detailed plan of your tasks. A great tool for this is the ClickUp Daily Planner Template, which is straightforward yet effective.
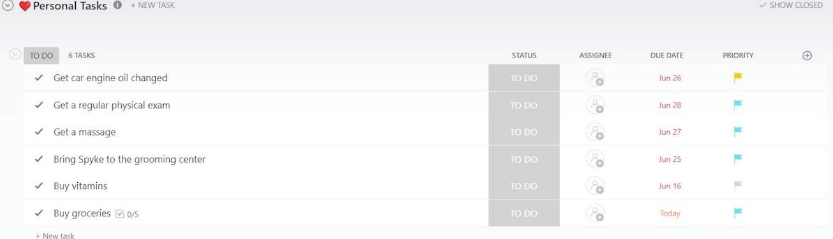
This template is designed to help you focus on your personal goals right from the start. It features an All Tasks view that organizes your tasks into two main sections: Habit Tracker and Personal Tasks. However, one of the best things about ClickUp templates is their flexibility, so you can quickly adapt them to include other categories if needed.
You can also use Custom Fields, like Status, Assignee, Due Date, and Priority, to add essential details to your tasks. This will help you manage your workflows more confidently.
The ClickUp Board view lets you see your tasks arranged on a Kanban board for a more visual approach. Meanwhile, the ClickUp Calendar view is perfect for planning your timelines and schedules.
If you want to keep track of recurring events, the ClickUp Organizing Schedule List Template is perfect. It helps you organize everything, ensuring that no event is overlooked.
Here are some of the key benefits of using this template:
Looking to get a clearer picture of your tasks and timelines? The ClickUp Simple Work Plan Template is a fantastic starting point for crafting detailed schedules, organizing your workload, and collaborating seamlessly with your team.
This template includes two handy views: the Project Plan and the Project Gantt. In the Project Plan view, you can list all your tasks and add essential details using Custom Fields. You’ll find fields like Assignee, Start and Due Dates, Priority, Project Phase, Project Progress, and Comments by default.
Then, there’s the Project Gantt view, which transforms the task list from the previous view into a visual Gantt chart. This makes it easy to grasp timelines and avoid overlapping tasks, ultimately enhancing overall organization.
No matter what’s causing your digital clutter, ClickUp is here to help! With integrations for over 1,000 apps, 15+ views, process mapping options, and time management tools, it empowers you to stay organized and on track.
ClickUp has facilitated productivity and reduced stress for me and my team
Implementing the PARA system can feel overwhelming at first, especially when it comes to understanding the differences between its four components. It’s easy to mix them up, but don’t worry—it’s a common issue. With a little clarity, you’ll find it much easier to apply the system smoothly to your day-to-day tasks.
The confusion between Projects and Areas tends to be one of the most frequent challenges people face.
A Project is something with a clear deadline or an outcome you’re actively working toward. It’s temporary, specific, and has an end date. For example, launching a website or writing a report would fall under a project.
An Area, on the other hand, is more like an ongoing responsibility or commitment. It doesn’t have an end date, and it represents the different areas of your life or work that you need to maintain consistently. Think of things like personal finance, health, or client relationships. These aren’t goals to complete but areas you want to manage and grow over time.
To avoid confusing the two, a good rule of thumb is to ask yourself, ‘’Does this have a specific deadline or outcome, or is it an ongoing effort?’’
Projects should always have clear steps leading to completion, while Areas are broader and more long-term.
Another challenge can arise when distinguishing between Areas and Resources.
While Areas represent ongoing responsibilities, Resources are simply what you refer to when working on either Projects or Areas. Resources could be articles, notes, research, or templates.
The key difference is that Resources support your Projects and Areas, but they are not active in themselves. They’re more like future reference material.
If you’re ever unsure whether something belongs in Areas or Resources, consider whether you’re actively maintaining it (Area) or simply storing it for later use (Resource).
One of the primary advantages of PARA in digital life management is clarity. By dividing your digital assets into Projects, Areas, Resources, and Archives, you’re no longer sifting through endless project folders or apps trying to find something.
Beyond clarity, the PARA system also promotes efficiency. For example, storing your current Projects separately from ongoing responsibilities in Areas means you won’t accidentally waste time on something that’s not urgent. Resources provide a go-to space for reference material, while Archives ensure that past projects or unused information don’t clutter your system.
Finally, PARA encourages flexibility. Digital life changes constantly—new projects come in, others are completed, new information becomes relevant, and old data fades into the background.
The PARA system allows you to adapt quickly by moving items between categories as they change, making your organization method dynamic and future-proof.
Let’s break this down into a real-world scenario.
While the PARA system is a fantastic organizational tool, it does come with some potential drawbacks.
Categorizing all of your digital files, tasks, and projects can feel overwhelming, especially if you’re already in a state of digital clutter. To tackle this, start small. Focus on one folder, inbox, or category at a time. Set aside short, dedicated time blocks to implement PARA rather than attempting it all at once.
Some people might be tempted to split their projects or resources into too many subcategories, making the system harder to maintain. The key here is simplicity. Keep the number of categories manageable, and only create subfolders or subcategories when it’s necessary.
It’s easy to slip back into old habits, such as saving items in the wrong places or forgetting to update your system. To avoid this, schedule regular reviews of your PARA system, whether it’s once a week or once a month.
If you want to make positive and long-term changes to your digital organization and productivity, the PARA system is an excellent place to start.
By categorizing everything into Projects, Areas, Resources, and Archives, you’ll not only improve your organizational skills but also gain control over how you manage your work and life.
You can take your PARA implementation to the next level by pairing it with project management tools like ClickUp! ClickUp’s intuitive design makes it easy to visualize your workflow, prioritize tasks, and align your projects with your bigger goals. Plus, its productivity hacks ensure you’re always working smarter, not harder.
Give ClickUp’s free version a try and discover why everyone is raving about this user-friendly platform!

© 2026 ClickUp

There’s an easier way. Try a free AI Agent in ClickUp that actually does the work for you—set up in minutes, save hours every week.