QA Checklist Featured Image

How to Create and Implement a QA Checklist

Start using ClickUp today

  • Manage all your work in one place
  • Collaborate with your team
  • Use ClickUp for FREE—forever

Your team is about to launch a new e-commerce website that promises a seamless shopping experience with innovative features and a user-friendly, responsive design throughout. However, without a solid QA checklist, you risk facing issues like broken links, slow page loads, or payment gateway failures—problems that can frustrate and drive users away.

A well-structured quality assurance checklist ensures you avoid these pitfalls by verifying that all website features work as expected across different devices and browsers and testing page load times and responsiveness to ensure a smooth user experience. It also helps check that all interactive elements, like forms and buttons, function correctly.

Without it, you risk the chaos of scrambling to fix problems post-launch, which can be costly and damaging to your company’s credibility. This article will show you how to craft a comprehensive QA checklist that protects your project from these risks and sets the stage for a successful, smooth launch.

Summarize this article with AI ClickUp Brain not only saves you precious time by instantly summarizing articles, it also leverages AI to connect your tasks, docs, people, and more, streamlining your workflow like never before.
ClickUp Brain
Avatar of person using AI Summarize this article for me please

Complete Website QA Checklist

A detailed website Quality Assurance (QA) checklist is your guide to catching and fixing issues before they impact your users. In this section, we’ll break down each step of a comprehensive website QA checklist, providing clear instructions to help you cover all critical areas within website QA testing.

Here’s the checklist at a glance:

TL;DR checklist for the website testing process

Stage 1: Preparation

  • Analyze requirements for clarity and completeness
  • Create test data reflecting real-world scenarios, including edge cases

Stage 2: Training and roles

  • Assess testers’ skills and provide targeted training
  • Develop a clear RACI matrix for team roles

Stage 3: QA plan

  • Incorporate risk assessment in the QA plan
  • Define KPIs for testing effectiveness

Stage 4: Test environment setup

  • Implement version control for test environments
  • Secure sensitive data in compliance with regulations

Stage 5: Test execution

  • Prioritize test cases by risk and impact
  • Automate repetitive test cases where possible

Stage 6: Functional testing

  • Test across browsers and devices for consistent UX
  • Include accessibility testing with users who have disabilities

Stage 7: Performance testing

  • Simulate real-world user loads to find bottlenecks
  • Test system limits for scalability issues

Stage 8: Usability testing

  • Evaluate UI for intuitiveness and aesthetics
  • Test UX from the target audience’s perspective

Stage 9: Security testing

  • Check infrastructure, applications, and network for weaknesses
  • Perform simulated attacks and ensure compliance with data protection laws

Stage 10: Content and SEO review

  • Check all content for completeness and accuracy
  • Ensure all on-page SEO elements are taken care of

Stage 11: Maintenance

  • Run regression tests after changes
  • Conduct ongoing usability feedback collection

Stage 12: Bug handling

  • Use a defect-tracking system for bug lifecycle management
  • Prioritize and retest fixed bugs

Stage 13: Test report generation

  • Create detailed test reports with execution results and coverage
  • Analyze results for trends and areas of improvement

Stage 1: Preparation

Before starting with the QA process, make sure to define the scope of testing and identify the target devices and browsers. You’ll be required to set up a staging environment and ensure all features are complete and ready for testing. Finally, create a backup of the current state before testing to prevent the loss of valuable data.

  • Beyond understanding functionalities, target audience, and performance expectations, analyze the requirements for potential ambiguities, conflicts, or missing information. This proactive approach prevents misunderstandings later in the cycle
  • When creating test data, consider real-world data patterns and edge cases. For instance, for a user registration form, include valid, invalid, and boundary value data (e.g., maximum character limits, special characters, etc.)
  • Involve stakeholders in test data creation to ensure it aligns with real-world scenarios, including positive, negative, and boundary value testing

Stage 2: Training and roles

Did you know? Clearly defined roles can significantly reduce rework and improve overall project efficiency. About 80% of project managers believe that project portfolio management, which includes defining roles, is a critical factor in influencing business success.

  • Conduct a thorough assessment of testers’ skills to identify training needs. Tailor training to specific project requirements, emphasizing tools, methodologies, and domain knowledge
  • Create a clear RACI (Responsible, Accountable, Consulted, Informed) matrix to avoid confusion and ensure accountability. Regular communication and collaboration between teams are essential

Stage 3: QA plan

  • Incorporate a risk assessment into the quality assurance plan to identify potential challenges and mitigation strategies. This helps prioritize the testing phase and allocate resources effectively for comprehensive testing
  • Define key performance indicators (KPIs) to measure testing effectiveness, such as defect density, test case coverage, and test execution efficiency

💡 Pro Tip: Review and update the QA plan regularly as the project evolves to ensure it remains aligned with project goals.

Stage 4: Test environment setup

  • Implement a version control system for test environments to track changes and facilitate rollbacks if needed
  • Ensure sensitive data is handled securely in the test environment to comply with data protection regulations
  • Consider using virtualization or cloud-based environments for faster setup and scalability

Stage 5: Test execution

  • Prioritize test cases based on risk, criticality, and business impact. This helps focus performance testing efforts on high-value areas
  • Identify opportunities to automate repetitive test cases to improve efficiency and test coverage
  • Use exploratory testing in addition to scripted test cases to uncover unexpected issues

Stage 6: Functional and compatibility testing

Parts of functional testing include checking all links (internal, external, and anchor) and identifying and fixing broken links. You should also test input forms for validation and data submission. 

Verify that error messages are displayed correctly and that the search functionality is returning correct or expected results. Most importantly, confirm if user authentication works (login/logout).

Test on various browsers and mobile devices to ensure consistent user experience. Consider using browser compatibility testing tools to accelerate the process. 

Involve users with disabilities in the testing process to get valuable feedback and ensure compliance with accessibility standards.

💡 Pro Tip: Conduct usability testing alongside functional testing to identify potential usability issues early in the cycle.

Stage 7: Performance testing

Did you know that up to 74% of your visitors might leave your site if it takes more than five seconds to load? 

As part of performance testing, the team should religiously check loading times for each page. Optimize images and multimedia content to ensure faster loading times.

Simulate real-world user loads and perform stress tests to identify performance bottlenecks and optimize system resources. Push the system beyond its limits to assess its breaking point and uncover potential scalability issues.

Use performance monitoring tools to track key performance metrics and identify performance regressions.

Stage 8: Usability testing

Evaluate the software’s user interface for intuitiveness, user-friendliness, and visual aesthetics. Ensure the UI elements are well-organized, consistent, and aesthetically pleasing: 

  • Ensure consistency in fonts, colors, and layout
  • Check for text readability and content alignment
  • Validate hover states and clickable elements
  • Review models, pop-ups, and notifications

Assess the user experience from the perspective of the target audience. Identify any usability issues that might hinder users from accomplishing their goals on the website.

💡 Pro Tip: Conduct usability testing with a diverse group of participants to gain a broader perspective. Remember to include accessibility testing for users with special needs, including compliance with the Web Content Accessibility Guidelines (WCAG). 

Stage 9: Security testing

Start with the basics. Check for SSL certificate validity. Test for SQL injection vulnerabilities.

Verify secure data transmission (HTTPS) and conduct password security checks.

Then, move on to advanced testing that includes:

  • Identifying potential weaknesses in the infrastructure, applications, and network to prevent unauthorized access and data breaches
  • Simulating real-world attacks to uncover vulnerabilities and assess resilience against malicious threats
  • Ensuring compliance with relevant data protection regulations (e.g., GDPR, CCPA) to safeguard user data
  • Verifying that your code adheres to secure coding standards to minimize vulnerabilities
  • Testing the effectiveness of user authentication and authorization mechanisms to prevent unauthorized access

Stage 10: Content and Search Engine Optimization (SEO) review

Involve your content and SEO experts in this step to:

  • Proofread text for spelling and grammar errors
  • Verify all images and videos load properly
  • Check for placeholder content that needs replacement
  • Ensure meta titles and descriptions are optimized
  • Check for proper use of header tags (H1, H2, etc.)
  • Validate sitemap.xml and robots.txt files
  • Test page URLs for proper structure and readability

Stage 11: Maintenance

  • Execute a subset of test cases to ensure that new changes or bug fixes haven’t introduced unintended side effects
  • Perform a quick sanity check to verify the core functionalities of the website after each build or deployment
  • Conduct ongoing usability testing to gather feedback on the website’s user experience and identify areas for improvement

💡 Pro Tip: Implement a continuous testing framework to automate regression and smoke tests for faster feedback.

Stage 12: Bug handling

  • Use a robust defect tracking system to document and track reported bugs throughout their lifecycle
  • Prioritize bugs based on their severity and impact on the website’s functionality and user experience
  • Retest fixed bugs to ensure they have been resolved correctly and haven’t introduced new issues

💡 Pro Tip:  Use a clear and consistent defect reporting format to facilitate efficient communication, data validation, and tracking.

Stage 13: Test report generation

  • Create detailed test reports summarizing test execution results, defect details, and overall test coverage
  • Thoroughly analyze test results to identify trends, patterns, and areas for improvement in the testing process
  • Share test reports with stakeholders to increase transparency and build confidence in the product

Here’s a sample quality assurance checklist to help you get started:

Test area Checklist Items
RequirementsComplete and unambiguous?
Test DataCovers positive, negative, and boundary values?
Test CasesAligned with requirements?
Test EnvironmentDoes it match the production environment?
Functional TestingAll core functionalities tested?
Performance TestingMeets performance requirements?
Usability TestingUser-friendly interface?
Security TestingVulnerabilities identified and addressed?
Bug TrackingDefects logged, tracked, and resolved?
Test ReportsComprehensive and informative?
Summarize this article with AI ClickUp Brain not only saves you precious time by instantly summarizing articles, it also leverages AI to connect your tasks, docs, people, and more, streamlining your workflow like never before.
ClickUp Brain
Avatar of person using AI Summarize this article for me please

Creating a QA Checklist and Managing the Overall QA Process with ClickUp

Does the checklist above overwhelm you despite having a more-than-competent development and testing team? It’s completely natural—after all, there’s so much to think of and plan for. 

But you don’t have to do it alone. The right tools can simplify the process to such an extent that it feels almost entirely automated.

Do we hear you asking which tools?

The answer is ClickUp, a versatile project management tool that helps you stay on top of QA checklists, streamlining your entire QA process (and other cross-functional workflows) in one place. 

ClickUp Task Checklists

ClickUp Task Checklists are powerful tools for creating and managing QA checklists, providing a structured and efficient way to ensure quality assurance in projects.

ClickUp Task Checklists feature
Create elaborate quality assurance checklists with the ClickUp Task Checklists feature

Here’s how you can use this future for maximum utility:

  • Create detailed checklists with subtasks and nested checklists to break down QA processes into manageable steps. For QA, you can create a main checklist item like ‘Test Functionality’ and add subtasks such as ‘Unit Testing’ and ‘User Acceptance Testing’
  • Assign specific checklist items to team members and set due dates to ensure accountability and timely completion. For example, you can assign a ‘Review Code’ to a developer with a due date to ensure the code is reviewed before the release deadline
  • Set dependencies between checklist items to ensure tasks are completed in the correct order. Make ‘Deploy to Staging’ dependent on the completion of ‘Integration Testing’ to ensure testing is done before deployment
  • Add custom fields to checklist items to capture additional information such as priority, status, or type of QA test. Use a custom field to mark the priority of each QA task, helping the team focus on high-priority items first
  • Add comments and attach files to checklist items for detailed instructions and documentation. Attach your test script and add comments with specific testing instructions to the ‘Functional Testing’ checklist item
  • Track the progress of checklist completion in real time. Monitor the overall progress of the QA process through the checklist completion percentage
ClickUp Task Checklists
Add an assignee to action items on your QA team checklist that require an action by a specific team member on ClickUp Task Checklists

Here’s an example scenario. Let’s say you’re managing the quality assurance process for a software release. 

Your ClickUp Task Checklist might look like this:

Create QA Plan

  • Define scope and objectives
  • Assign QA roles and responsibilities

Pre-Testing Checklist

  • Review requirements
  • Set up a test environment
  • Prepare test data

Testing Checklist

  • Unit Testing
    • Assign to developer
    • Attach test scripts
  • Integration Testing
    • Set dependencies
    • Add a custom field for priority
  • User Acceptance Testing
    • Invite stakeholders
    • Collect feedback

Post-Testing Checklist

  • Document test results
  • Report bugs and issues
  • Retest resolved issues

ClickUp Brain

You can even use ClickUp Brain’s AI capabilities to brainstorm the possible tasks and subtasks in your checklist. Simply prompt it using natural language commands (as in the image below) and then modify/edit the generated checklist to suit your workflow.

ClickUp Brain
Generate full-fledged checklists in ClickUp in seconds with ClickUp Brain

ClickUp’s Software Team Project Management platform

What’s more? 

ClickUp’s Software Team Project Management platform simplifies the entire development lifecycle by bringing cross-functional teamwork, tools, and knowledge into one hub. 

With features like AI-powered tools for fast-tracking plans, flexible, agile workflows, clear visual roadmaps, and streamlined bug tracking, ClickUp helps software teams plan, build, and ship products faster and more efficiently—all within a single platform.

ClickUp Software Team Project Management Software
Move faster with flexible workflows on ClickUp Software Team Project Management Software

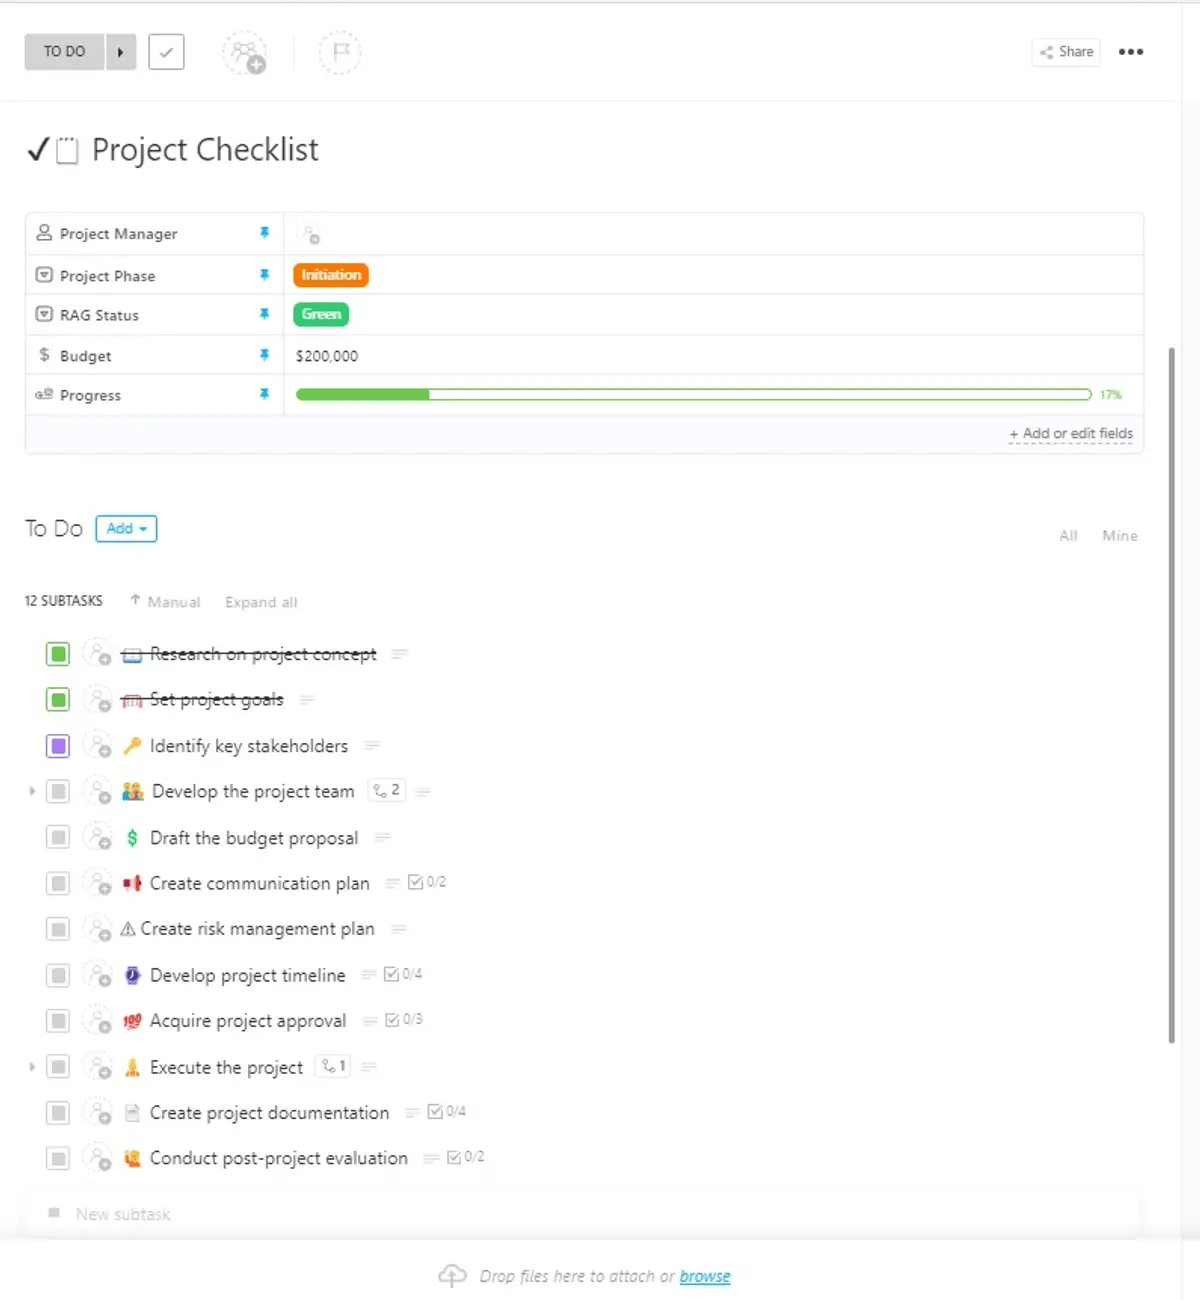
You can also use the ClickUp Project Checklist Template and customize it to meet your QA checklist requirements instead of writing down a checklist from scratch. 

Create detailed lists of all necessary QA tasks with the ClickUp Project Checklist Template

The template provides a structured approach to organizing QA tasks, ensuring nothing is overlooked. You can tailor the checklist to fit the specific needs of your QA process, including various stages and criteria.

Each item on the checklist can be treated as a task, allowing for detailed tracking and management. Teams can collaborate seamlessly, with each member able to update the checklist and track progress.

Here’s how to use this template:

  • Use custom fields to differentiate between critical and non-critical QA tasks, allowing for prioritization
  • Create dependencies to avoid starting a QA task before its prerequisite tasks are completed
  • Attach test cases, bug reports, or reference documents to QA tasks for easy access
  • Use time-tracking data to optimize resource allocation and improve future QA processes
Summarize this article with AI ClickUp Brain not only saves you precious time by instantly summarizing articles, it also leverages AI to connect your tasks, docs, people, and more, streamlining your workflow like never before.
ClickUp Brain
Avatar of person using AI Summarize this article for me please

Using ClickUp as a Tool for Bug Tracking and Project Tracking when Streamlining QA Checklists

ClickUp Board View
Visualize your work and improve project management with the Board view in ClickUp

ClickUp’s customizable platform, collaboration features, and real-time reporting streamline bug tracking and issue management:

  • Tailored workflows: Build custom processes with flexible features like Custom Fields, task statuses, and ClickApps
  • Enhanced teamwork: Collaborate effectively with digital Whiteboards, Docs, comments, and real-time chat
  • Clear overviews: Create custom Dashboards for a bird’s-eye view of your QA process
  • Agile-friendly: Use ClickUp’s Board view for bug bashes, task management, and sprint planning
  • Efficient bug intake: Streamline bug reporting with custom Forms for software teams
  • Ready-to-use checklist templates: Leverage pre-built templates for bug tracking and issue resolution
Drive cross-functional collaboration with ClickUp Bug and Issue Tracking Template

For example, the ClickUp Bug and Issue Tracking Template provides a comprehensive solution for managing, reporting, and tracking tasks for software teams. This template helps project teams manage progress, mitigate risks, and optimize resources. 

It’s a centralized hub for bug and issue resolution, fostering collaboration between departments to ensure consistent communication, timely resolution, and enhanced project visibility. Use this template to simplify the creation of bug queues, reports, sprint notes, and product briefs.

Develop a custom test plan document for each project using the ClickUp Test Case Template

Similarly, the ClickUp Test Case Template provides a structured and organized way to manage and track test cases.

Here’s how it helps your quality assurance team:

  • Allows QA teams to organize test cases systematically, ensuring that each test case is well-documented and easily accessible
  • Let QA teams streamline creating, assigning, and tracking test cases. This reduces the time spent on administrative tasks and allows more focus on actual testing activities
  • Helps maintain a clear traceability matrix, linking test cases to their respective requirements and ensuring that the test cases cover all requirements. This is crucial for ensuring the completeness of testing

Quick tips

  • Start by setting up the ClickUp Test Case Template within your ClickUp workspace. Customize the template to fit your specific testing needs by adding custom fields, checklists, and task dependencies
  • Use the template to create and document each test case, including all relevant details such as test steps, expected results, and actual results. Ensure that each test case is linked to the corresponding requirement
  • Once testing is complete, review the results and analyze the data using the reporting and dashboard features. Identify any issues or gaps in testing and take corrective actions as necessary

The ClickUp Test Report Template is another great tool to help you streamline your testing processes. 

Summarize the results of the test conducted on your website, software, or any product using the ClickUp Test Report Template

Here’s how this template benefits QA teams:

  • Provides a single place to store all test reports, making it easy for team members to access, review, and update test data
  • Facilitates better communication between QA teams and other stakeholders by providing clear and detailed test reports that can be shared easily
  • Integrates seamlessly with ClickUp’s task management and bug tracking features, ensuring that bugs found during testing are tracked and resolved efficiently
  • Ensures comprehensive test coverage by providing a structured format for documenting test cases, results, and observations

Quick tips

  • Customize fields to match the specific needs of your project. Include fields like test case ID, description, expected result, actual result, status, and severity
  • Use the template to document each test case, including detailed steps, expected results, and any necessary setup or teardown procedures
  • During test execution, update the test cases with actual results, notes, and any defects found. Link defects to the relevant test cases for easy tracking
  • Apply different views to monitor test progress. For instance, use the Board view to move test cases through different stages (e.g., To Do, In Progress, Completed)
  • Encourage team members to use comments and mentions to discuss test cases and defects, ensuring that everyone stays informed and issues are resolved quickly

Finally, the ClickUp Test Management Template is essential for software development teams to ensure their product is reliable and release-ready. 

Use the ClickUp Test Management Template to manage a few manual tests or an extensive automated system

This template simplifies test management by allowing you to track progress, manage test schedules, monitor results, and collaborate on bugs and feature requests. 

Summarize this article with AI ClickUp Brain not only saves you precious time by instantly summarizing articles, it also leverages AI to connect your tasks, docs, people, and more, streamlining your workflow like never before.
ClickUp Brain
Avatar of person using AI Summarize this article for me please

Ensuring Software Quality and User Satisfaction

By following a comprehensive, well-structured QA checklist and using the right tools, QA teams can enhance efficiency, improve collaboration, and deliver high-quality products. Such a checklist is a living document that should be continuously reviewed and updated to adapt to evolving project requirements.

ClickUp’s versatile features and pre-built checklist templates make this process easier and more efficient. 

Try ClickUp for yourself and seamlessly conduct quality assurance testing!

Questions? Comments? Visit our Help Center for support.

Sign up for FREE and start using ClickUp in seconds!
Please enter valid email address