


Still downloading templates?
There’s an easier way. Try a free AI Agent in ClickUp that actually does the work for you—set up in minutes, save hours every week.
Sorry, there were no results found for “”
Sorry, there were no results found for “”
Sorry, there were no results found for “”
Your team spans continents, time zones, and cultures, yet you must collaborate as if you’re all in the same room. This is the reality for many modern workplaces.
🔎 Did You Know? 95% of tech workers believe remote roles are possible and productive. Employers worldwide are now embracing this shift.
However, remote teams face challenges like staying connected and making quick decisions. Online meeting tools like Microsoft Teams offer video calls, chat, file sharing, and integrations to simplify workflows.
This article will show you how to use Microsoft Teams for meetings, from scheduling to managing participants.
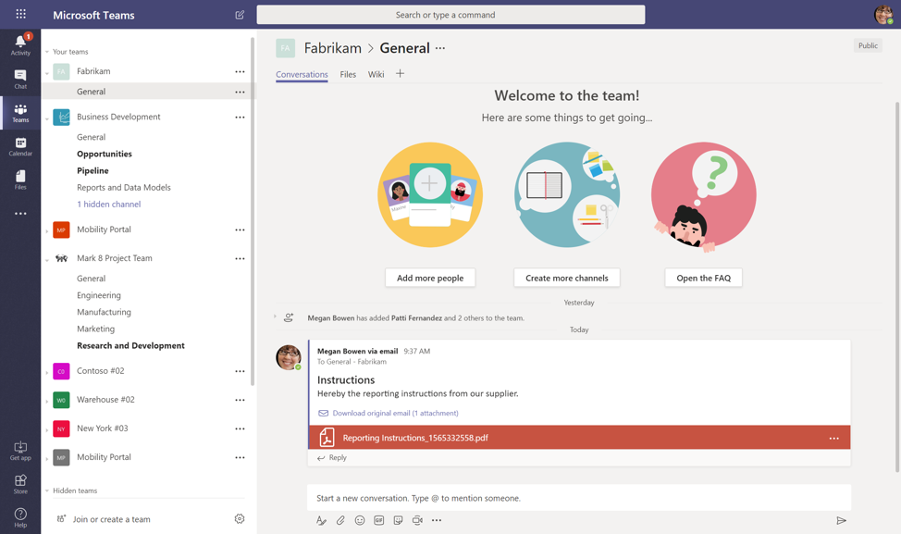
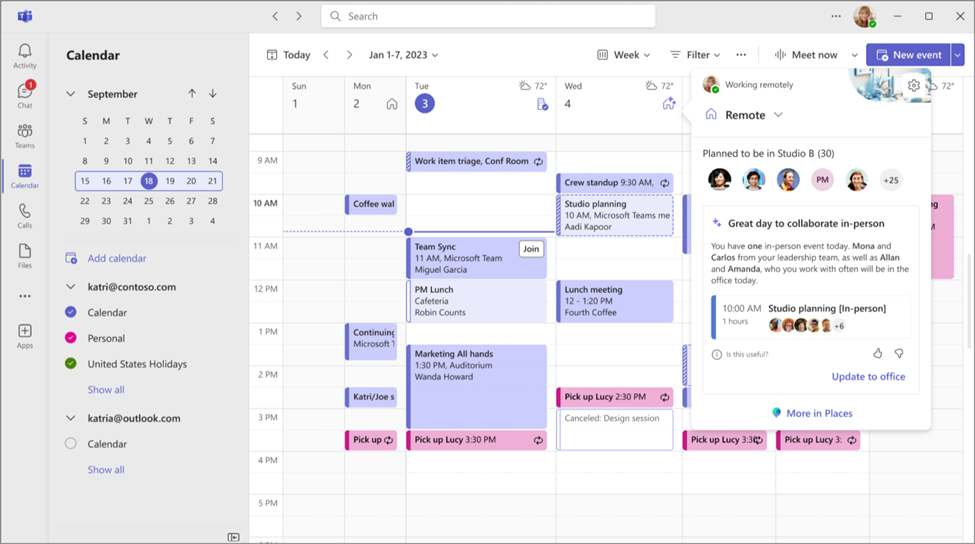
Creating a new online meeting in Microsoft Teams is quick and straightforward. You can do it through the Chat or Calendar features. The Chat option allows you to schedule a meeting directly within an ongoing conversation.
Alternatively, the Calendar feature provides a more comprehensive view, enabling you to easily schedule and manage video meetings across your team.
Starting a successful online meeting in Microsoft Teams requires proper preparation and appropriate virtual meeting etiquette.
Here are a few tips to help you organize and execute effective meetings in Teams.
Sounds like a lot of work? ClickUp, the everything app for work, simplifies managing pre-meeting checklists for efficient meeting preparation.
With ClickUp Tasks, you can create dedicated lists to centralize tasks like gathering materials, distributing agendas, and assigning action items. Assign tasks to team members, set deadlines, and use Custom Fields to prioritize.

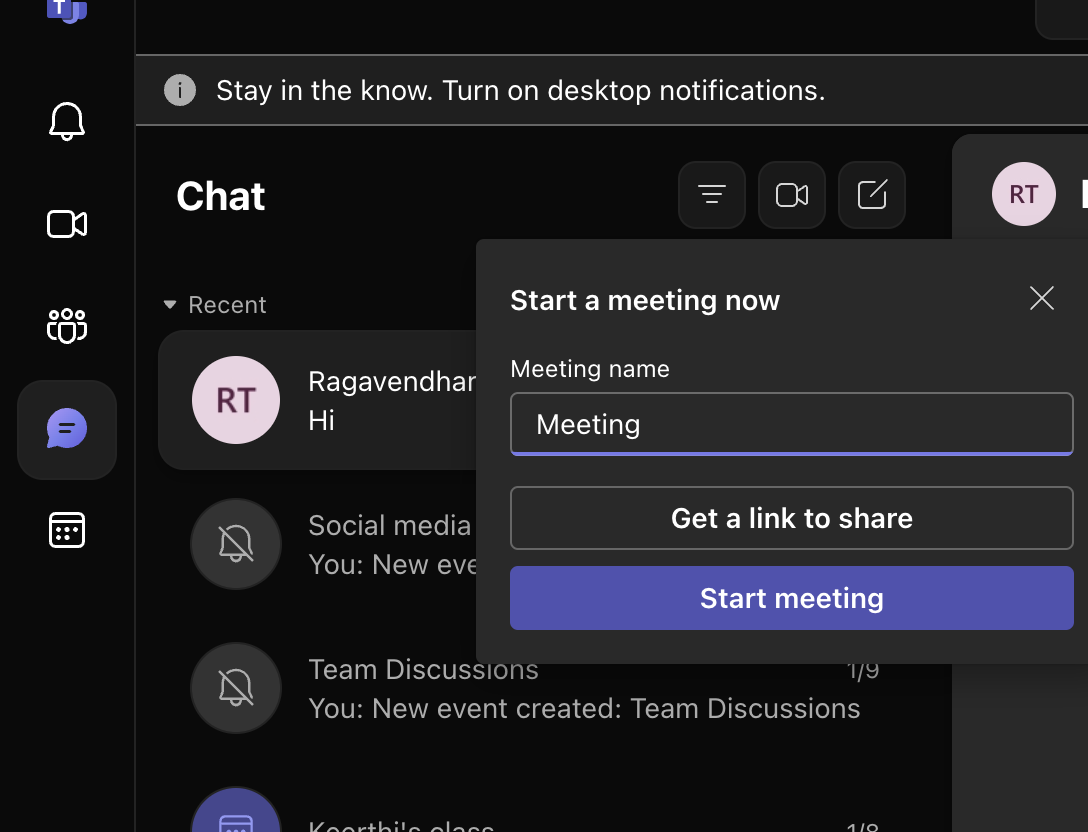
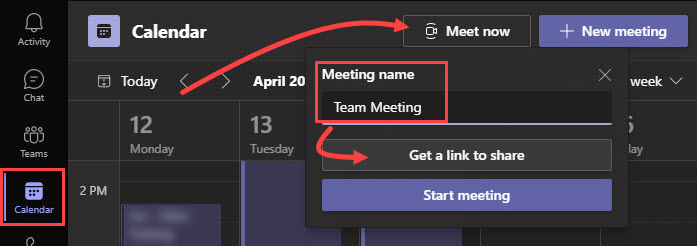
In a physical office, spontaneous meetings often spark the best ideas. Microsoft Teams replicates this with the Meet Now feature, enabling instant meetings for quick and efficient team collaboration.
Here are the different ways you can start an immediate meeting in Microsoft Teams:

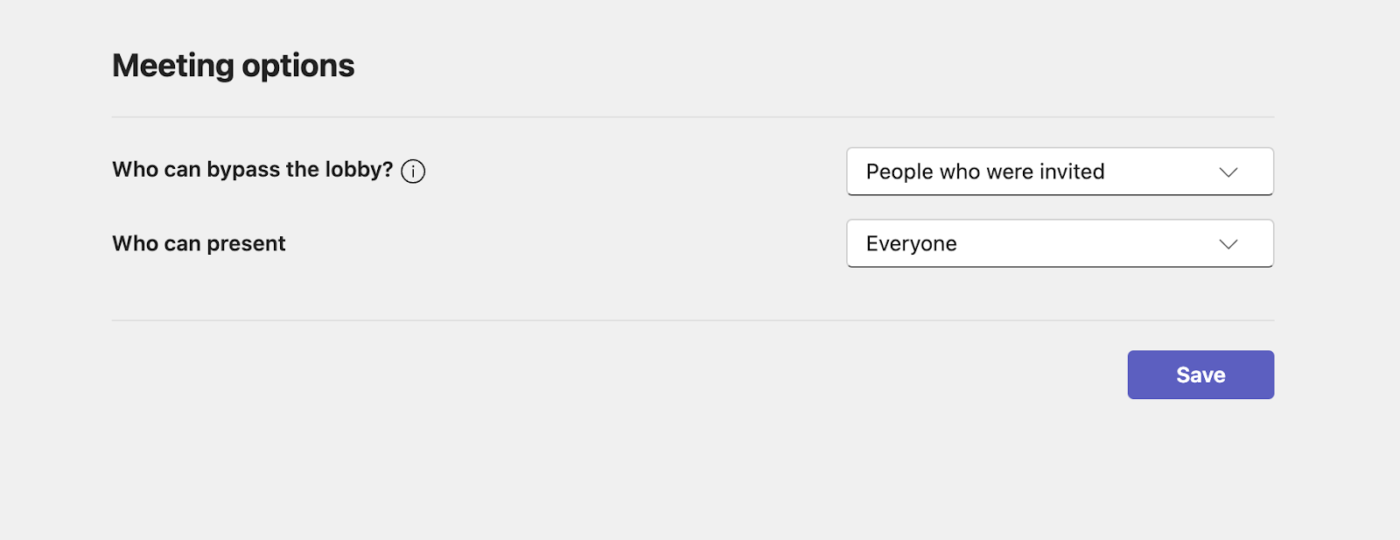
Once the meeting is set, you can customize these meeting settings.


🔎 Did You Know? 70% of remote workers find virtual meetings less stressful, and 67% believe they can be just as productive as in-person meetings.
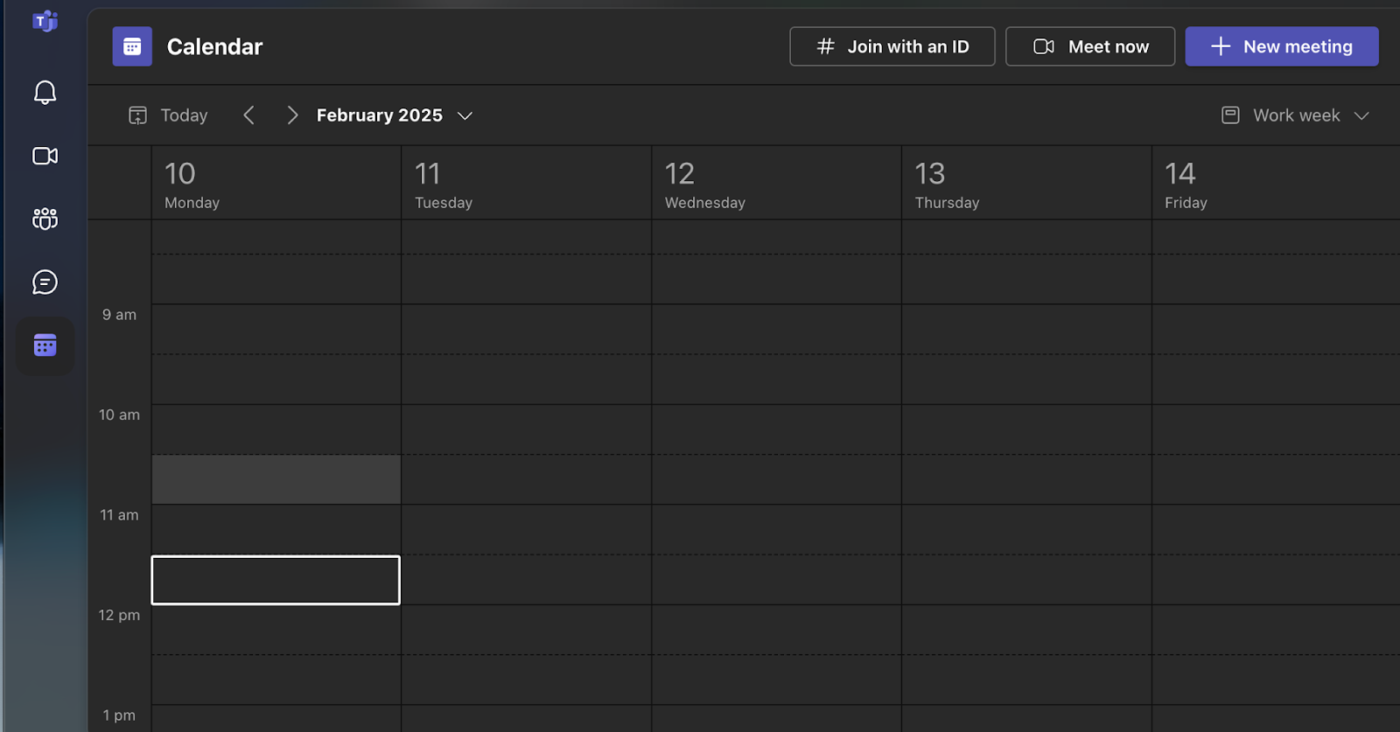
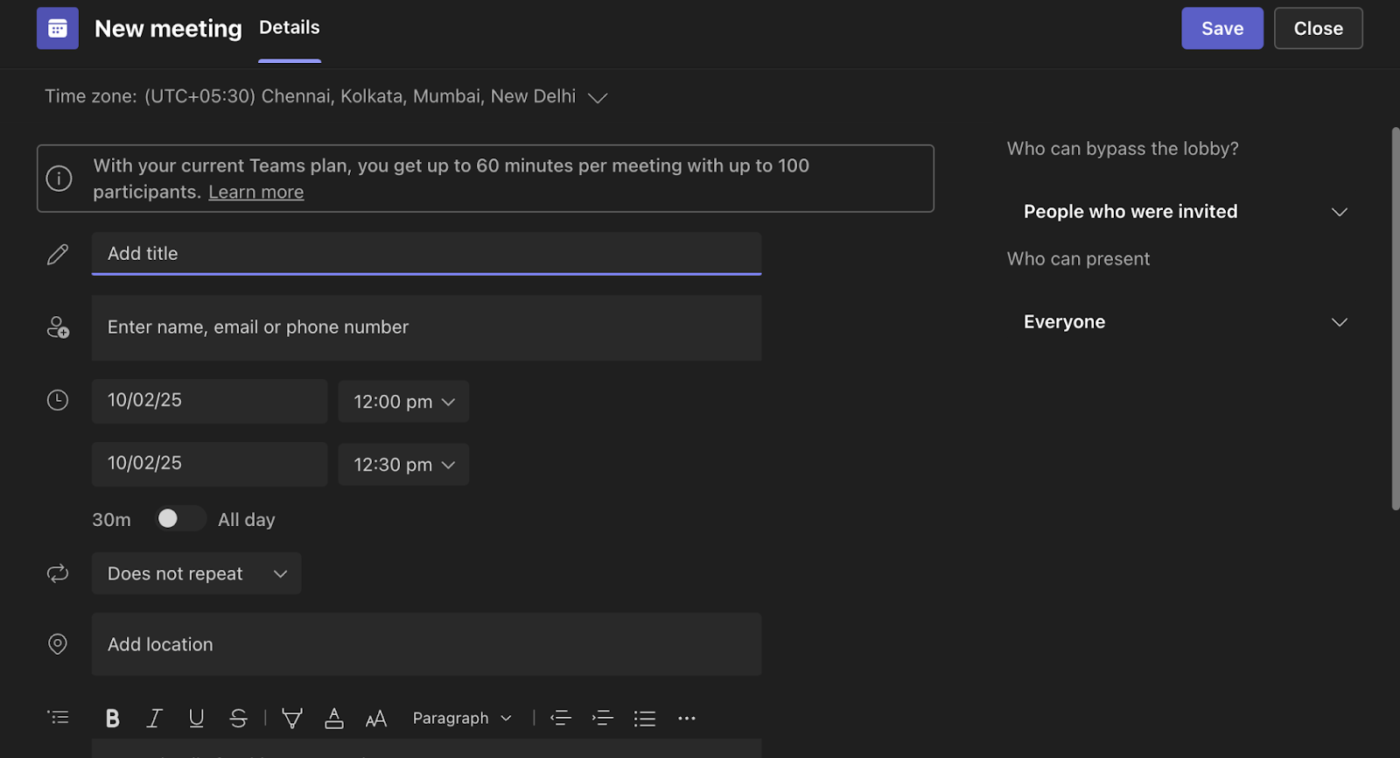
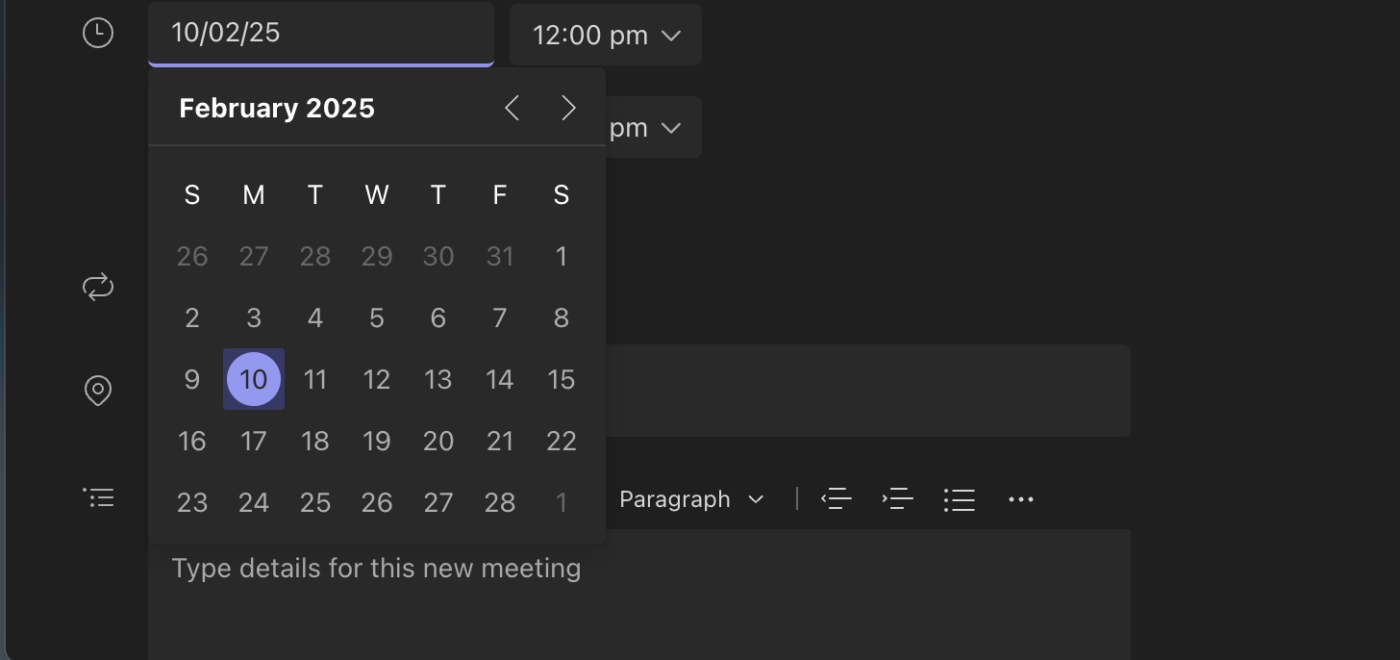
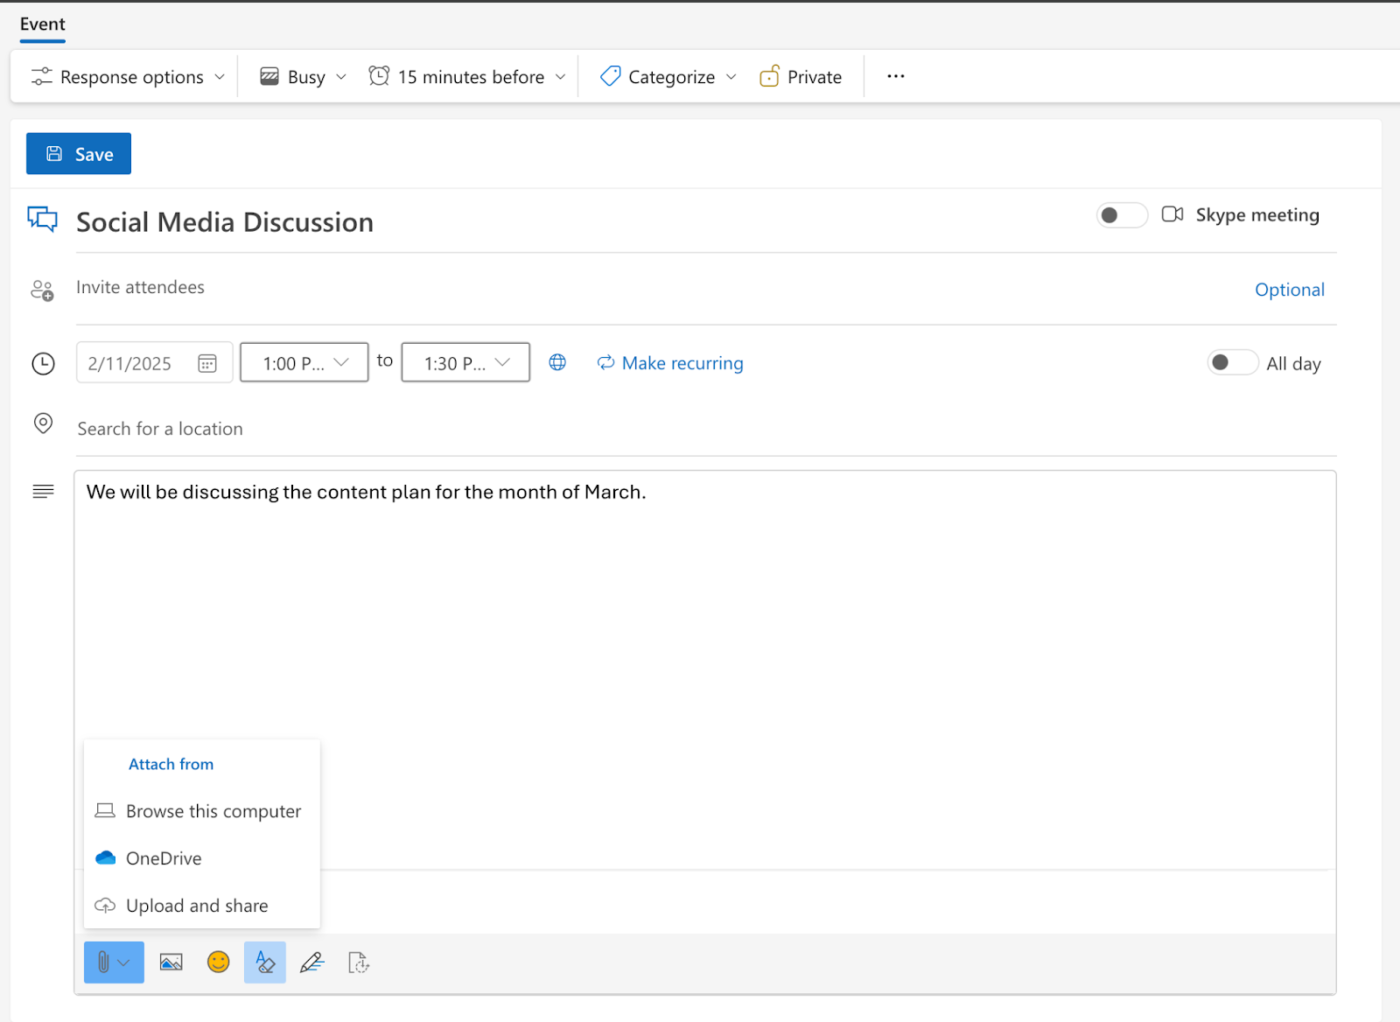
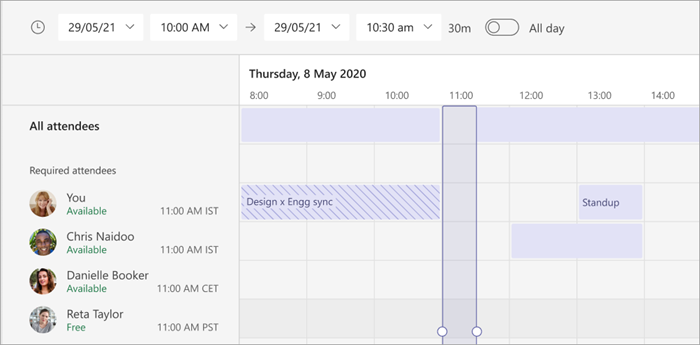
Scheduling a meeting in Microsoft Teams is simple and can be done directly from the app.
To schedule a meeting in Microsoft Teams:

You can also schedule a meeting from a chat by:
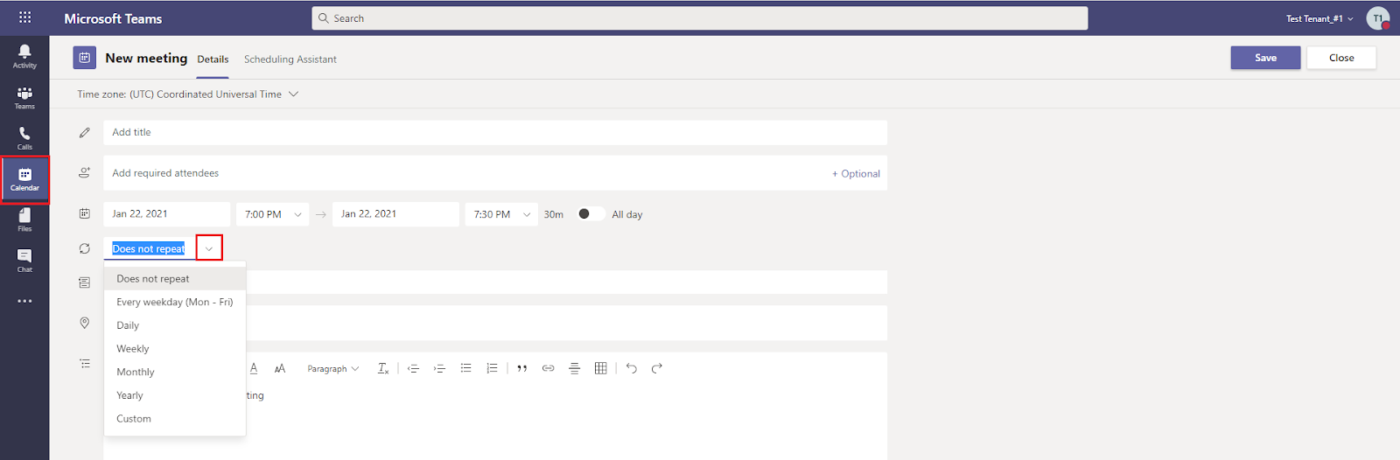
Recurring meetings in Microsoft Teams are convenient for regularly scheduled events. Participants join a team meeting using the same meeting link and details each time. You can customize daily, weekly, or monthly recurrence options or create a custom schedule. Additionally, meetings can be set in a channel, enabling all channel members to participate.
To set up a recurring meeting in Microsoft Teams:

Whether you’re modifying meeting options or simply changing the time, Teams offers a range of features to customize your video meetings to fit your needs.
Meeting policies in Microsoft Teams allow you to control features available to participants, such as:
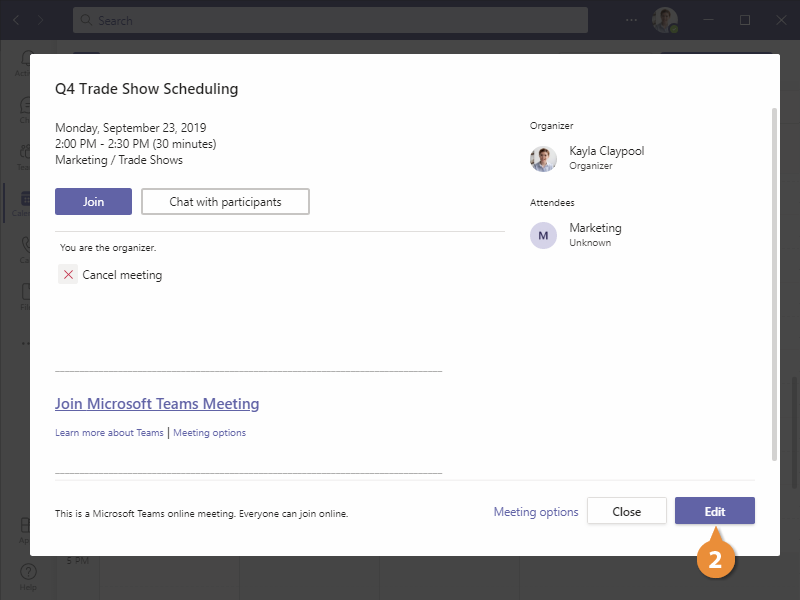
In the Teams app, tap Calendar and select a meeting to view its details. If you’re the organizer, tap Edit to make changes.
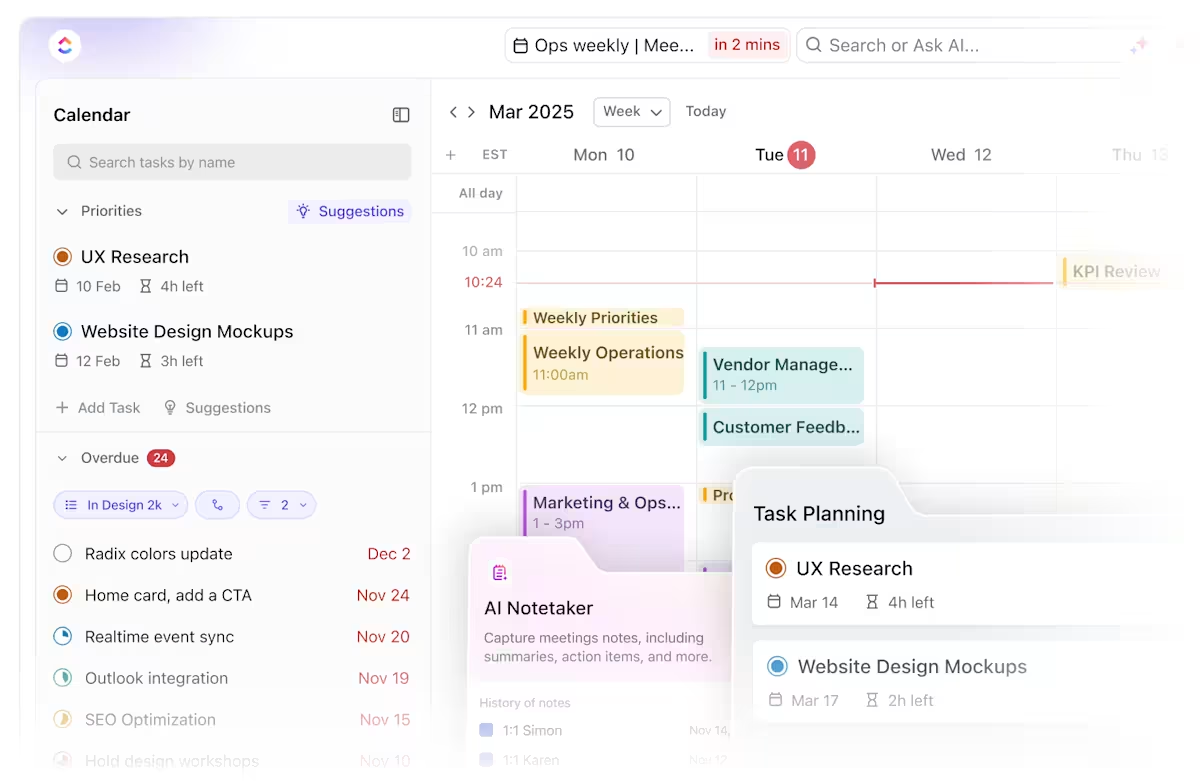
ClickUp Calendar is an AI-powered tool that adjusts to your priorities and seamlessly integrates with your workspace. It displays all tasks, events, and reminders in one place, automatically time-blocking high-priority tasks and integrating with external calendars like Google Calendar.
You can also use the ClickUp Calendar view to organize and manage your meeting schedule. It allows you to schedule and track meetings and customize your calendar to fit your team’s needs.
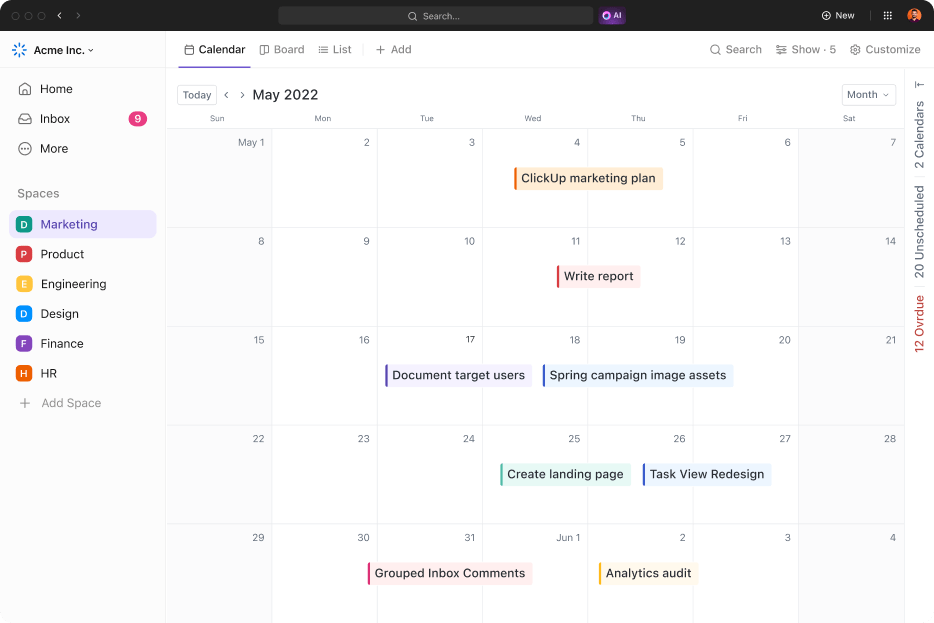
With Calendar View, you can:
👀 Did You Know? Due to its virtual format, the 2021 AAPOS annual meeting saved approximately 1,282 metric tonnes of CO₂ emissions, which equates to the annual emissions from about 264 passenger vehicles.
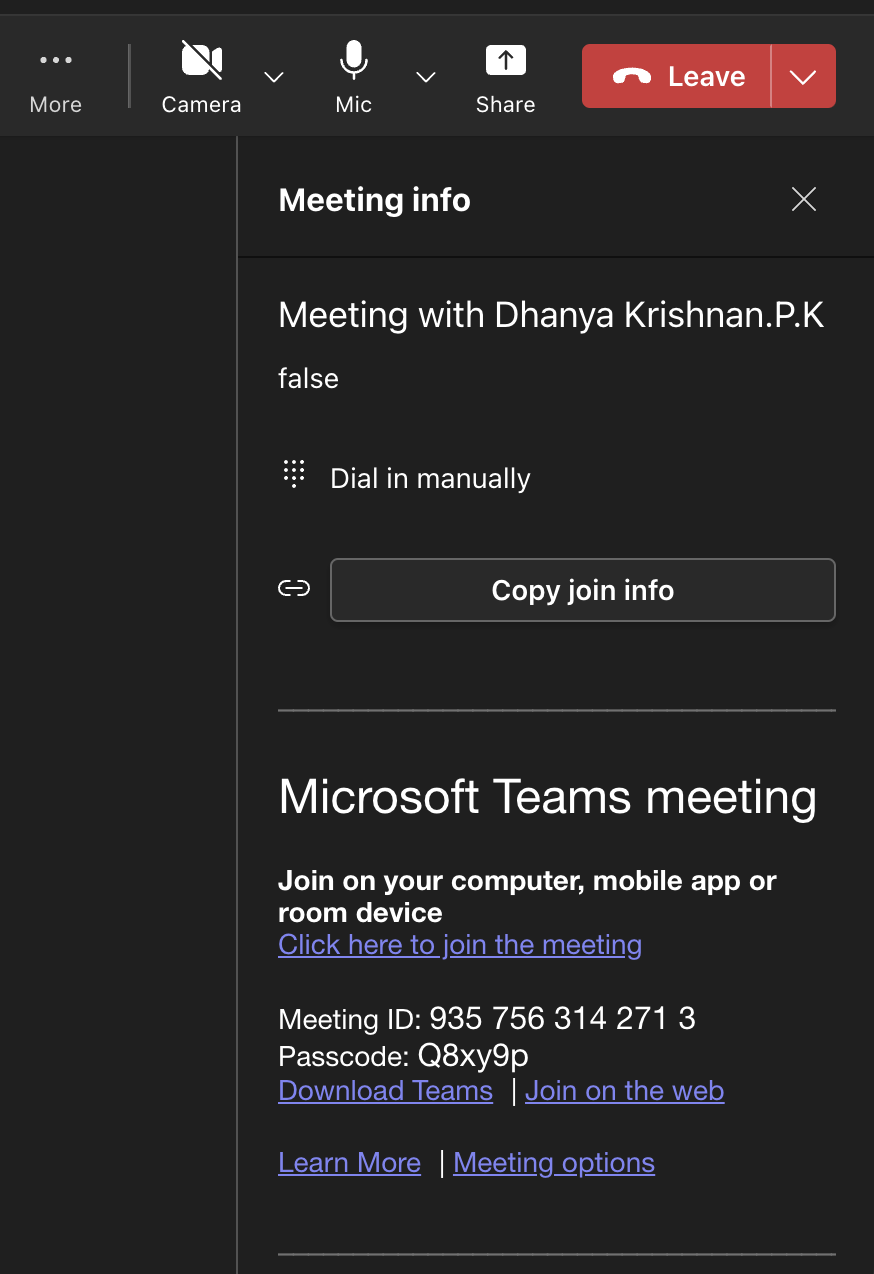
Whether you’re organizing a spontaneous meeting or need to send out an invitation link in advance, Microsoft Teams provides a simple process for generating and sharing the link with participants.
To create and share a Microsoft Teams meeting link:
💡Pro Tip: A Microsoft Teams hack is to easily get meeting transcriptions in Microsoft Teams by uploading your recording to Stream, choosing the language in the video details, and then downloading the transcript.
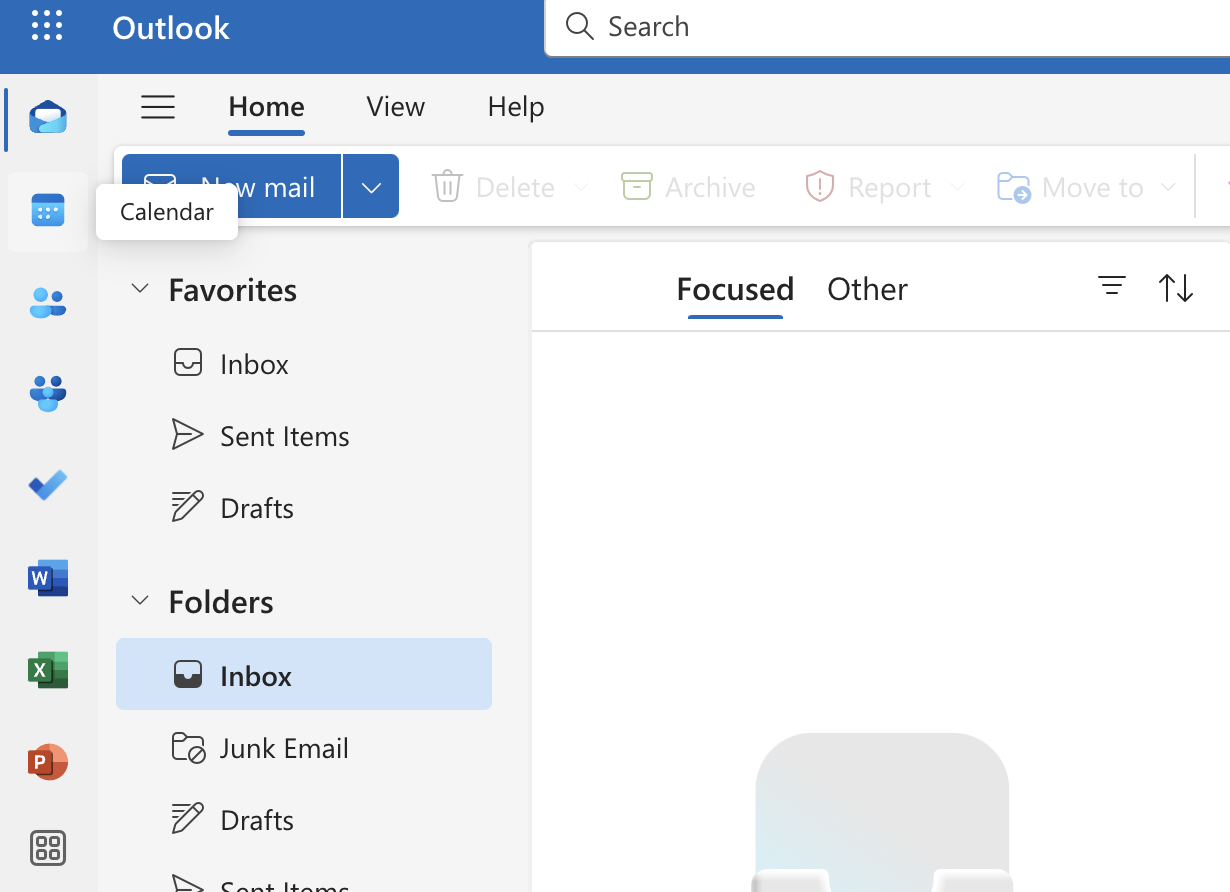
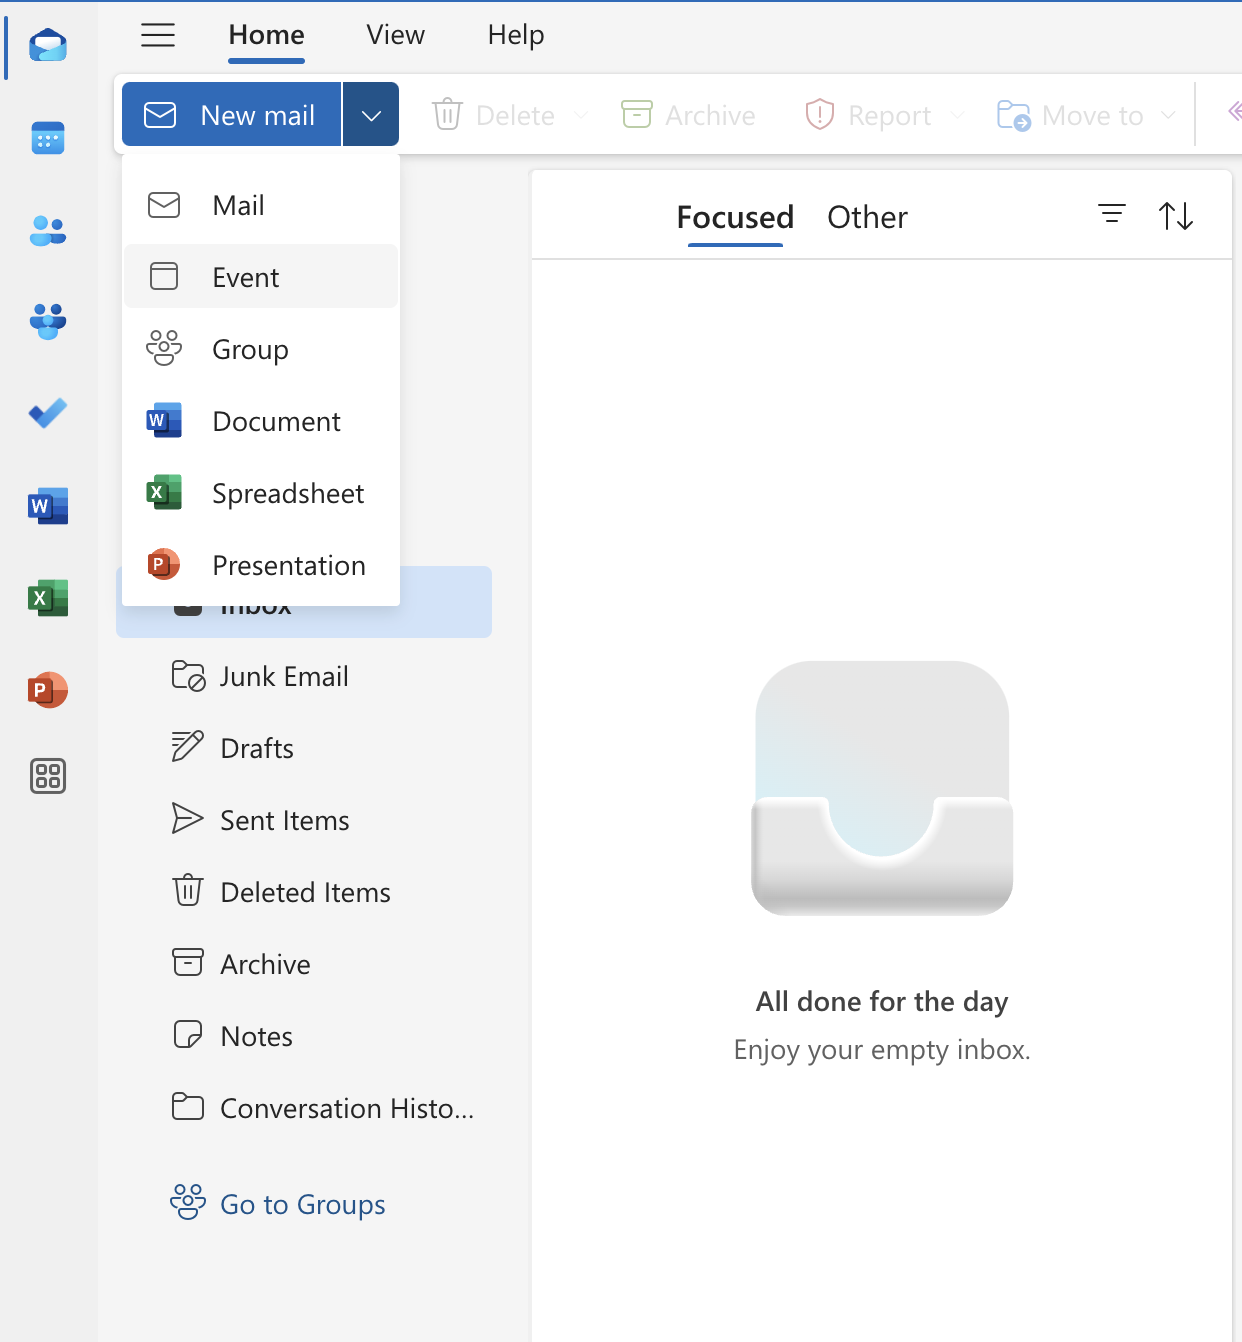
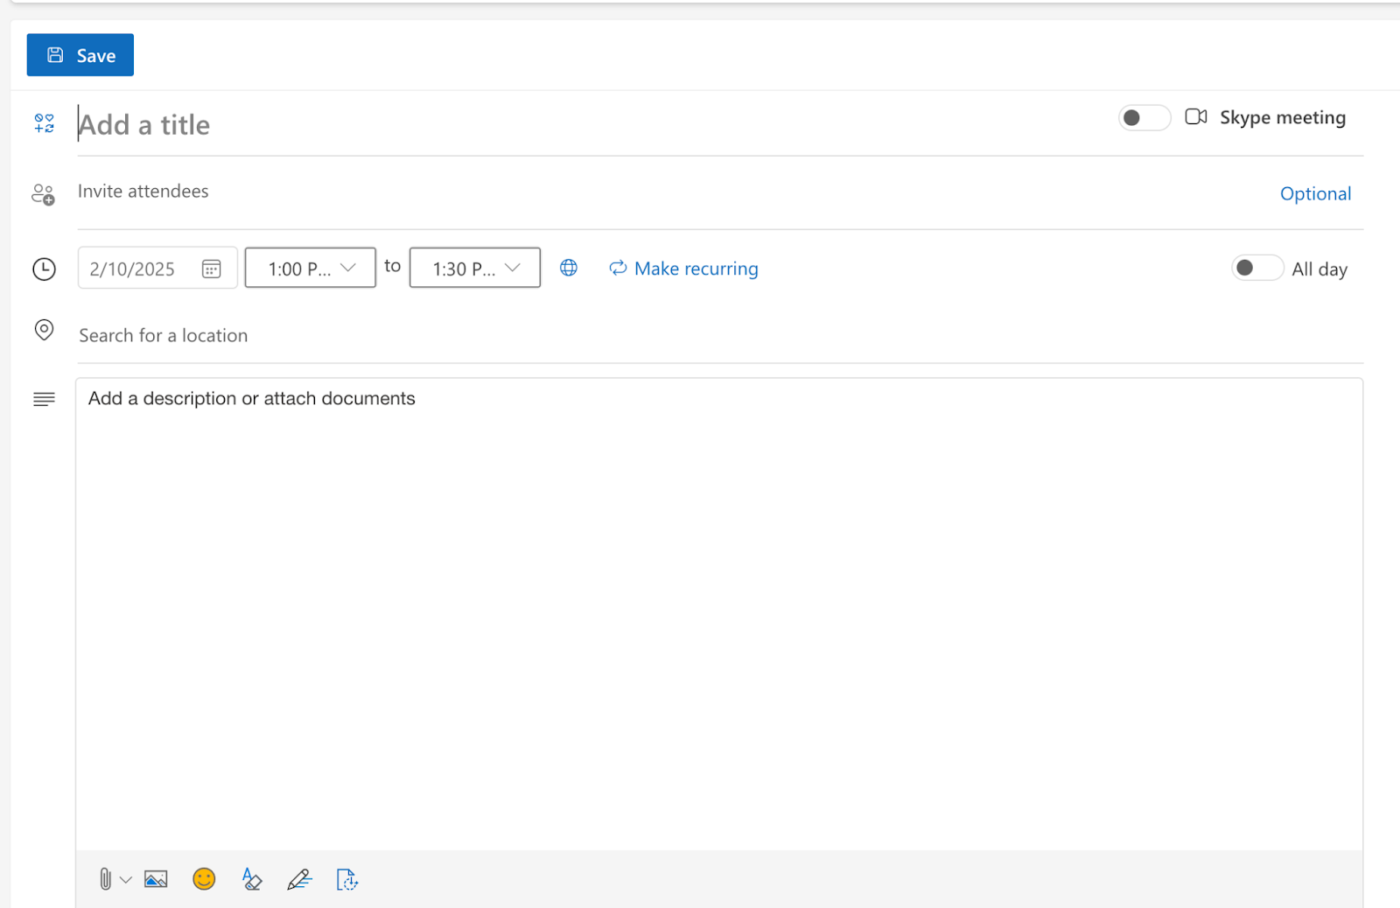
Microsoft Teams integrates with Microsoft Outlook through an add-in, allowing you to create new Teams meetings directly from Outlook. You can view, accept, and join Microsoft Teams meetings from either app.
Once scheduled, the meeting will automatically appear in your calendars in both Microsoft Teams and Outlook, and you’ll have access to the join the meeting link, call-in number, and audio conferencing ID.
To schedule a Microsoft Teams meeting from Outlook:
Integrating ClickUp with Outlook centralizes your workflow by keeping conversations and tasks in one place. You can send and receive emails directly from tasks, ensuring all communication stays connected to relevant work. Email replies are displayed as separate or threaded comments, making it easy to follow conversations.
Also Read: Best Team Collaboration Software Tools
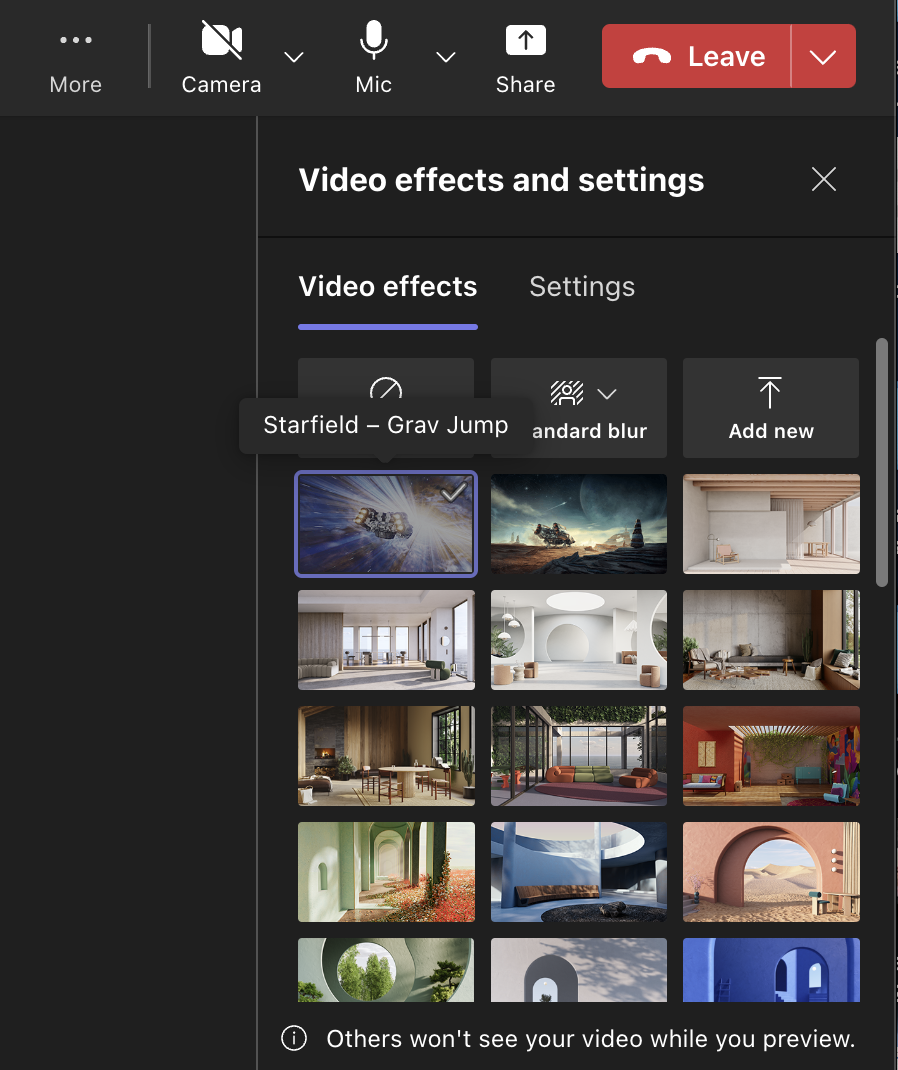
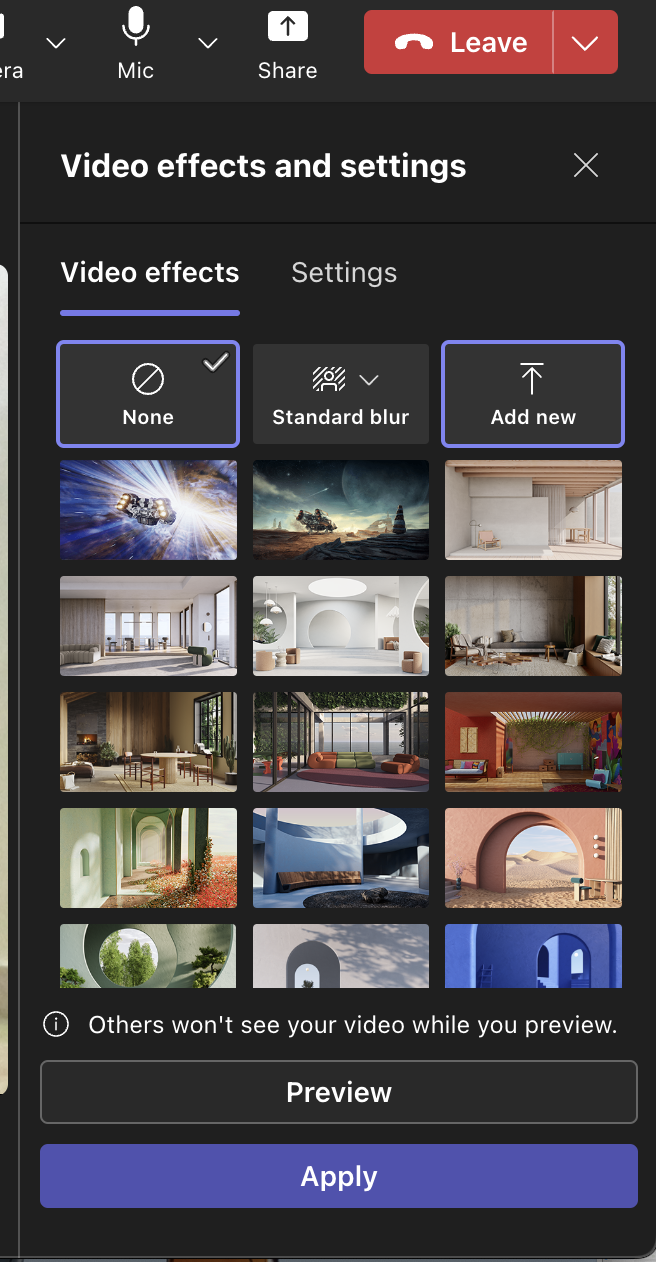
Customizing your online meeting background in Microsoft Teams helps reduce distractions by covering up clutter or any visual interruptions in your environment, allowing participants to stay focused.
It’s a great way to express your personality and showcase your unique style during meetings.
To change your virtual backgrounds in Microsoft Teams:
Using ClickUp Docs to share best practices for background settings is a great way to keep everyone on the same page. You can create a document that covers all the essentials, like how to frame your camera, the best lighting tips, ways to reduce noise, and choosing professional backgrounds to keep distractions at bay.
Plus, the collaborative feature lets you get input from others so you can refine your ideas before finalizing them
🧠 Fun Fact: Town hall meetings have been around since the colonial days of the U.S. when politicians would gather to chat about new laws, debate issues, and maybe even protest—kind of like a lively book club, but with more wigs and fewer snacks!
You’re all set for a crucial marketing meeting on Microsoft Teams, ready to brainstorm the next big campaign. But as you look around, you realize your lead designer and the social media strategist are missing!
They didn’t get the invite, and now you’re left with half the team. Don’t panic! Adding members to your MS Teams meetings is super easy.
To invite people to a Microsoft Teams meeting:
📮ClickUp Insight: Nearly 35% of knowledge workers refer to Monday as the least productive day of the week. Accumulated emails, messages, and newer priorities that emerge during Monday standups, could all potentially contribute to this.
But what if you could converge all those Monday updates, tasks, meetings, and emails under a single platform and tackle them all in one go on ClickUp?
If you’ve started a meeting without adding a participant or need to include someone on the fly, you can do that, too.
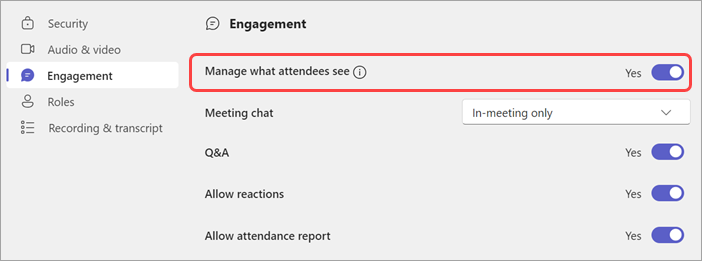
Managing attendee roles in Microsoft Teams meetings is crucial for maintaining control over the online meeting dynamics and ensuring a productive environment. To manage what attendees can see:

ClickUp Automations simplifies the management of invitations and follow-ups, ensuring your team stays informed about upcoming events.
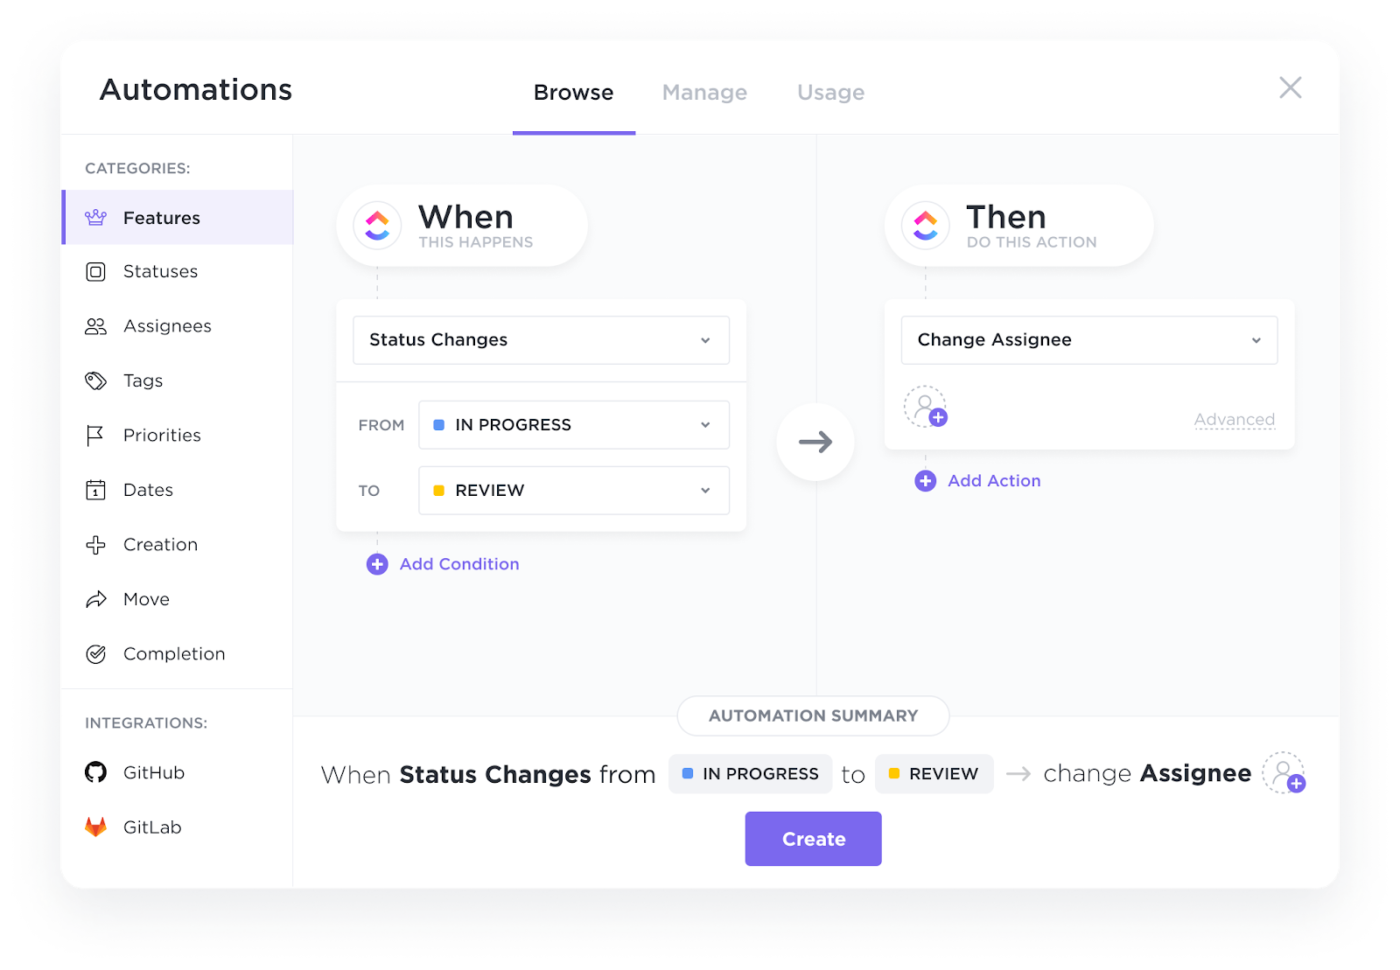
With Automations, you can:
Microsoft Teams provides several viewing options for meetings, including:
ClickUp Dashboards provide a powerful way to monitor team participation in meetings by offering comprehensive tracking and organization tools.
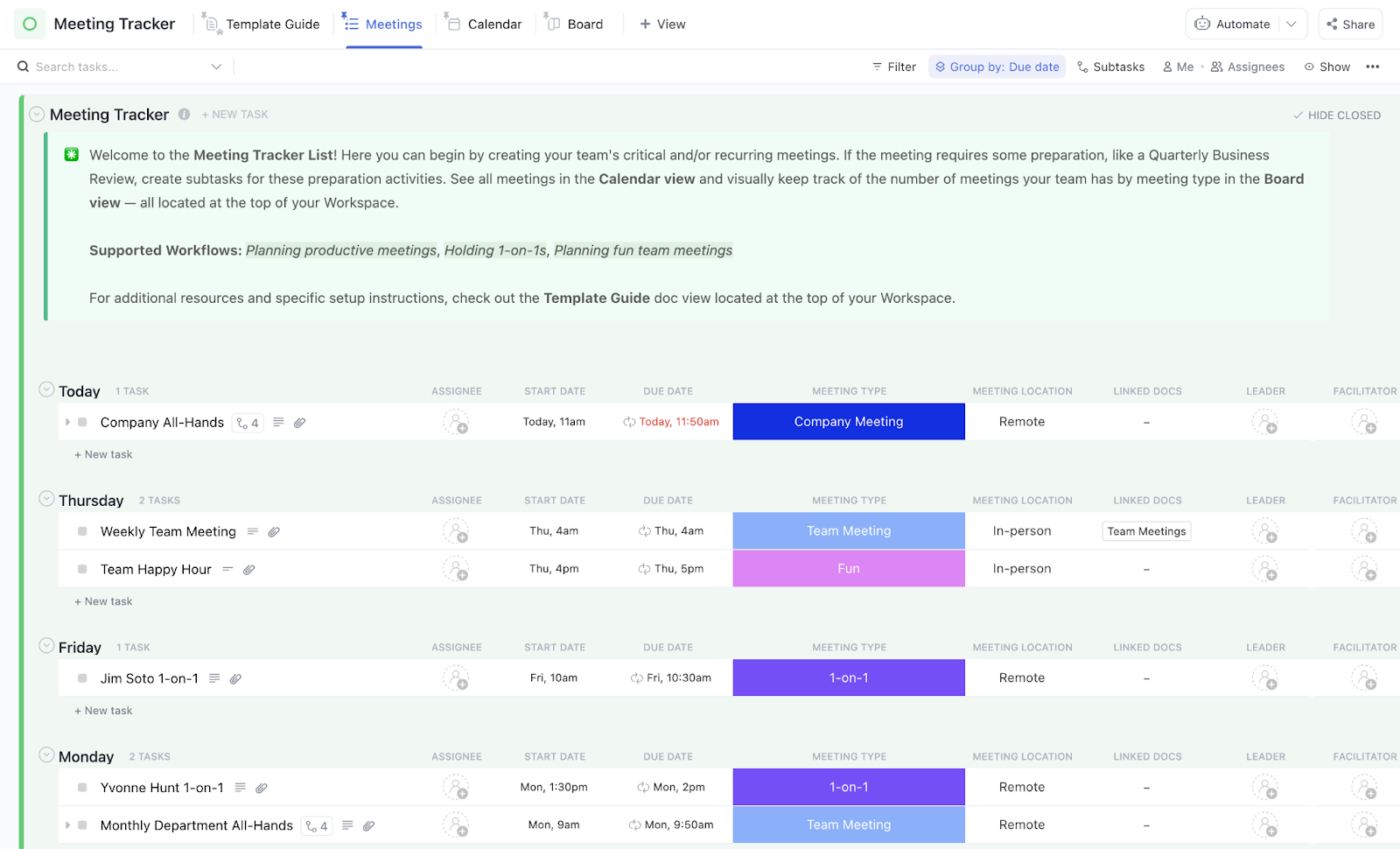
Using the Meeting Tracker Template, you can record key meeting details such as the date, time, location, attendees, and topics discussed.
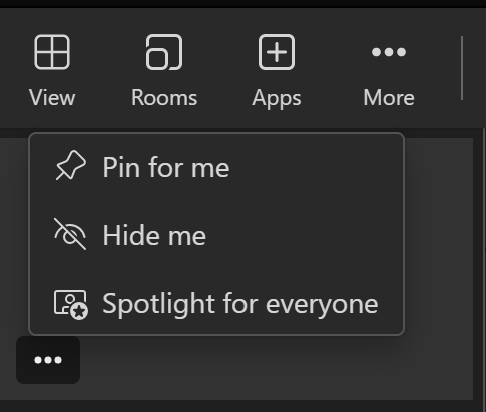
In Microsoft Teams meetings, you can pin a video feed to keep it visible for yourself or spotlight a video feed for all participants:
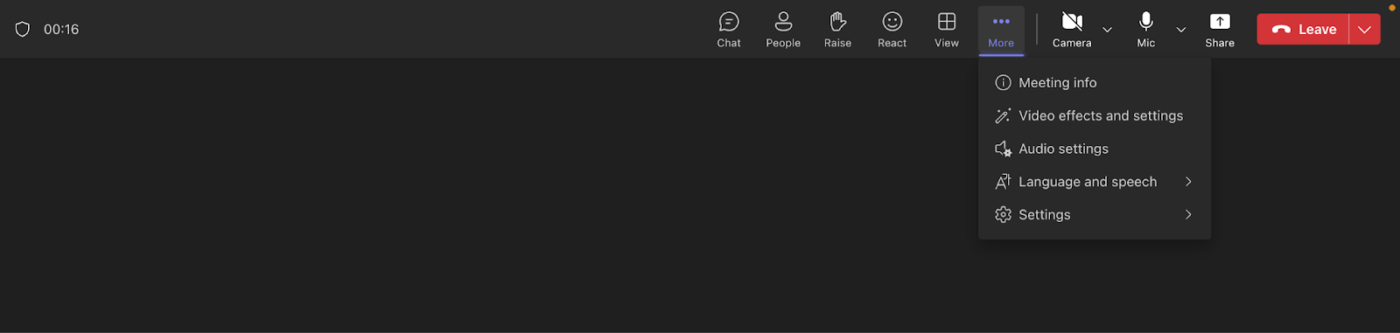
Microsoft Teams offers several customization options to enhance your video meeting experience. From adjusting video frames to managing bandwidth, the meeting settings can help improve visual clarity and meeting efficiency.
Here are some of them:
Sometimes, you’re in the middle of a lively Microsoft Teams meeting, and things are getting chaotic. People are sharing their screens, chatting in the sidebar, and trying to manage their audio, all while keeping the conversation flowing.
Microsoft Teams offers a range of in-meeting controls that make it easy to manage everything from video settings to participant roles. You can:
Breakout rooms in Microsoft Teams enable participants to collaborate in smaller groups during a meeting, making them ideal for tutorials, group sessions, or collaborative activities.
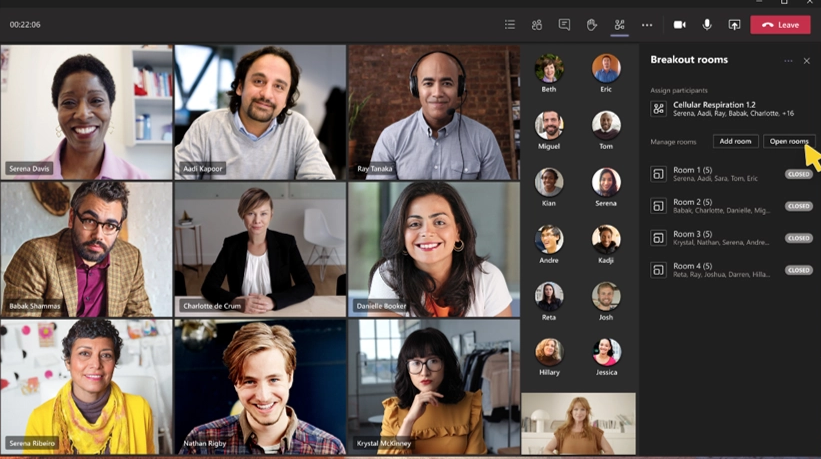
To use breakout rooms in Microsoft Teams:
Are unproductive meetings wasting your time?
A Level 10 meeting keeps discussions focused, aligns your team, and drives accountability. Try setting a strict 90-minute limit and using ClickUp templates to keep discussions on track. From tracking KPIs to resolving team issues efficiently, ClickUp helps you run meetings that actually move the needle.
ClickUp is the all-in-one work app, that simplifies managing pre-meeting checklists for efficient meeting preparation. Let’s explore its features.
ClickUp Docs provides more powerful storing and sharing capabilities, making it easy for teams to create, organize, and collaborate on documents in one central place.
With Docs, you can:
ClickUp Brain offers effortless transcription capabilities, making capturing and documenting important discussions during meetings easy.
Brain helps you with::
Meet ClickUp AI Notetaker, your new best friend for meetings! Unlike traditional notetakers, which often leave you scrambling to jot down important points, ClickUp lets you focus on the conversation at hand. It captures everything that matters—from action items to key decisions—so you can stay engaged without worrying about missing anything.
After every call, you get a clear and structured summary of what was discussed. What really sets ClickUp AI Notetaker apart is how it seamlessly integrates with the rest of your work in ClickUp. Instead of just recording a meeting and letting the insights gather dust, you walk away with actionable notes that empower your team to dive right into their tasks.
ClickUp Comments allows you to assign comments to specific tasks, making it easier to keep track of conversations and ensure accountability. You can also resolve comments to indicate you have addressed them and reassign comments to different team members if needed.
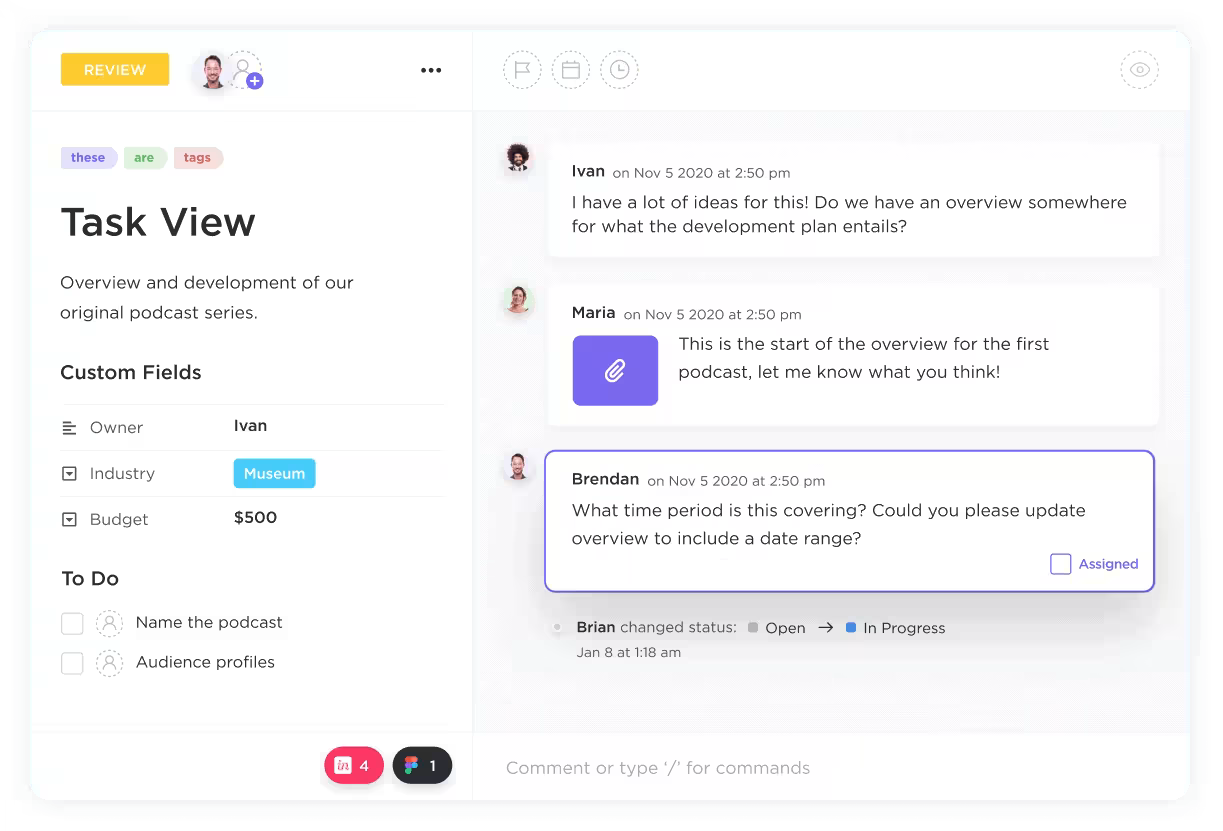
Additionally, discussion threads help you organize post-meeting conversations by initiating threaded discussions within comments, facilitating clarity and collaboration.
Imagine managing tasks while chatting with your team in real time—all in one place!
Let’s examine how you can enhance your team communication using ClickUp integration with Microsoft Teams to keep everyone connected and productive.

Here’s a summary of the ClickUp and MS Teams integration:
Although Microsoft Teams boasts various features, it has some limitations, such as a limited number of channels, rigid permission settings, and unreliable notifications and message delivery.
ClickUp Meetings is a Microsoft Teams alternative that can transform your team’s collaboration and communication. With everything centralized in one place, you can schedule meetings, share agendas, and take notes effortlessly. Assign actionable tasks with clear ownership and deadlines to guarantee follow-through on decisions.
Our customer Marcos Vinícius Costa de Carvalho, Business Analytics Analyst, ACE, has to say this about using ClickUp meetings.
We use it to help and accelerate our daily meetings from our Scrum ritual. It helps me out getting to know the progress of my sprint, the progress of my tasks and to keep an organized backlog for all of my errands.
ClickUp Chat makes communication easy by integrating team conversations and tasks into one seamless workspace. You can convert messages into tasks—manually or with AI—and use Follow-Ups to ensure no action items are missed.
Chats also sync tasks and updates in real time, enabling you to view statuses, make updates, and collaborate without leaving the chat.
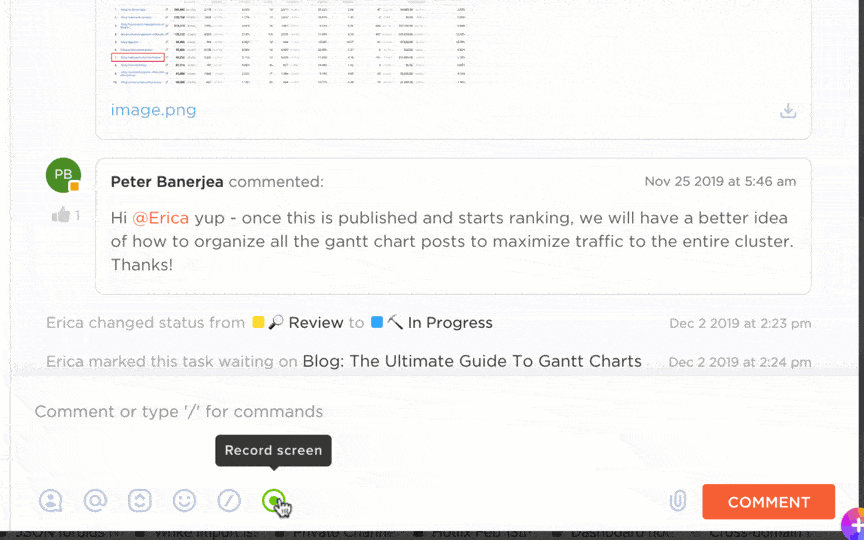
ClickUp provides free screen recording with ClickUp Clips, which allows you to record your screen directly without third-party apps. This makes it easy to share video instructions with your team.
ClickUp integrates with Slack and Zoom. You can customize notifications, create tasks from Slack, and manage Zoom meetings directly within ClickUp.
Further, the ClickUp Meeting Minutes Template reduces the effort and time involved in creating and managing meeting minutes.
This template includes sections for:
Microsoft Teams is a robust platform for effective virtual meetings.
Integrating ClickUp with Microsoft Teams allows you to easily transition from meeting discussions to task management, ensuring tasks are captured and followed up on efficiently.
You can create tasks directly from Teams chats, track progress, and stay organized without leaving the platform.
Sign up for ClickUp today and see the difference.

© 2026 ClickUp

There’s an easier way. Try a free AI Agent in ClickUp that actually does the work for you—set up in minutes, save hours every week.