


Still downloading templates?
There’s an easier way. Try a free AI Agent in ClickUp that actually does the work for you—set up in minutes, save hours every week.
Sorry, there were no results found for “”
Sorry, there were no results found for “”
Sorry, there were no results found for “”

You’re handling multiple projects, deadlines are looming, and data is coming at you from all directions. And every time you think you have it under control, a new batch of data emerges, affecting your analysis.
But what if all the data you need could be collected in one place, automatically organized, and ready for action?
ClickUp Forms eliminates data collection inconsistencies. With Custom Fields, automated workflows, and real-time updates, you’ll move beyond gathering data to optimizing it.
Let’s explore how to create Forms in ClickUp and streamline your data collection process! 🎯
ClickUp Forms is a feature within the ClickUp project management platform that allows users to create customizable forms for data collection.
Each form submission can automatically generate a task with customized details, such as assignees, due date, priority level, and attachments, laying the foundation for efficient workflow automation.
The form builder offers a user-friendly, drag-and-drop interface, letting you add custom field types like text boxes, number fields, date pickers, dropdown menus, and checkboxes to record data exactly as you need it.
A good form builder should be flexible enough to adapt as your project evolves—and that’s precisely what ClickUp Forms deliver. From product feedback and IT requests to sales leads or creative projects, ClickUp Forms adapt to any workflow.
And because they integrate directly with your tasks in ClickUp, everything stays organized, from submission to execution.
Why’s that an advantage, you ask?
Work today is broken. 60% of our time is spent sharing, searching for, and updating information across different tools. Our projects, documentation, and communication are scattered across disconnected tools that drain productivity.
ClickUp solves this problem with the everything app for work that combines projects, knowledge, and chat in one place—all powered by the world’s most cohesive work AI.
Today, over 2 million teams use ClickUp to work faster with more efficient workflows, centralized knowledge, and focus-driven chat that eliminates distractions and unlocks organizational productivity. 🚀
On that note, here are some of the top benefits of ClickUp Forms:
💡 Pro Tip: Companies that actively prioritize and act on customer feedback often see increased customer loyalty. When customers feel their opinions matter, they are more likely to return.
Looking to improve engagement and boost response rates for your forms? Forms in ClickUp are the perfect tool to refine your process.
You can create a Form from the Views Bar, Forms Hub, and the Sidebar. When people submit a Form, a submission task is created in the location selected when the Form was created.
Here’s a step-by-step guide to creating forms in ClickUp.
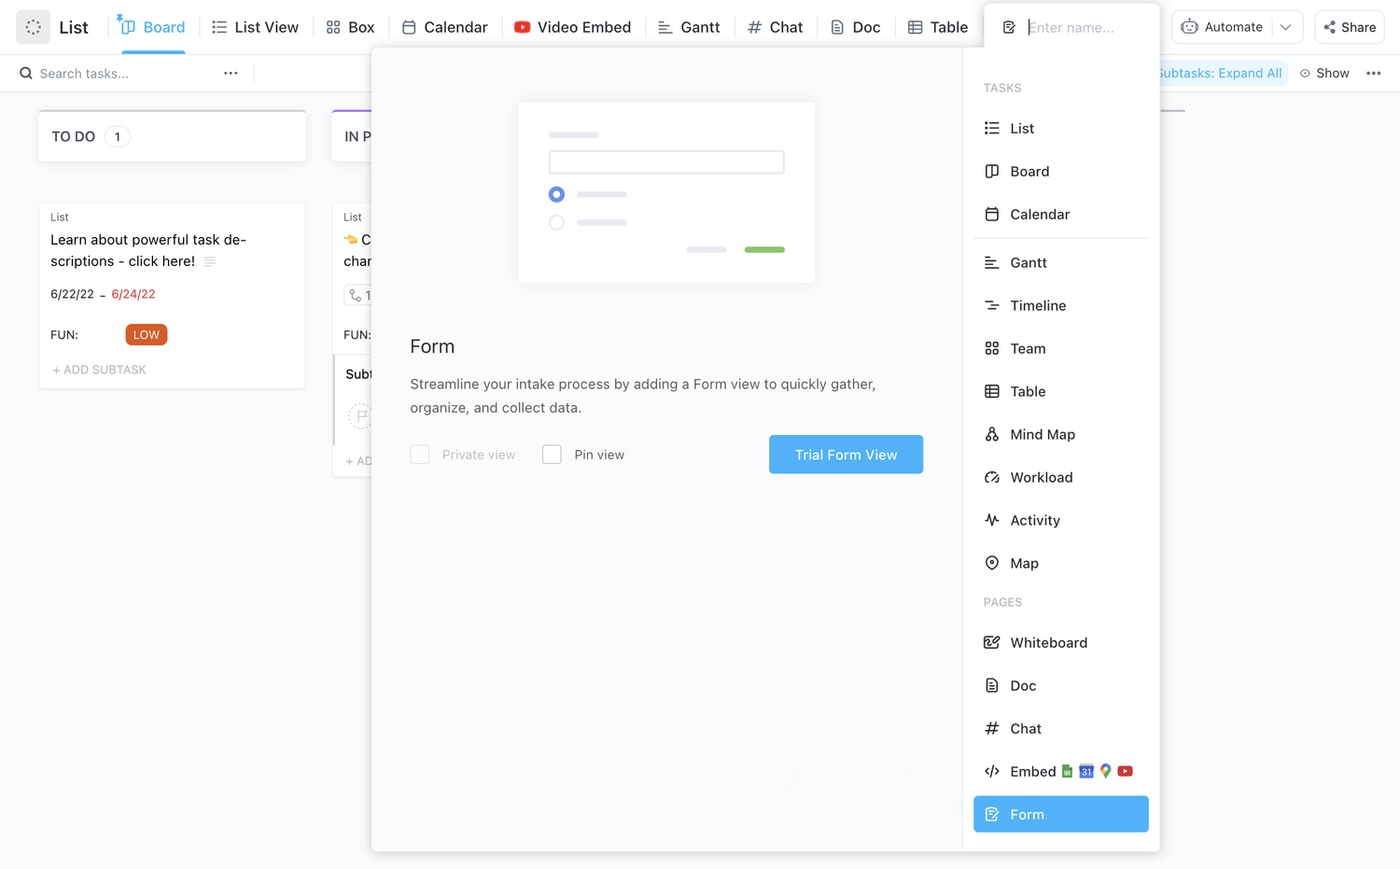
Forms are also called ClickUp’s Form view because they can be created in the Views Bar.
A Form view created in the Views Bar can be accessed from its location’s Views Bar or Forms Hub.
To create a Form this way:
⚙️ Bonus: Discover the power of ClickUp Forms for software teams to understand its versatility for different use cases.
Another way to create a Form View is from the Sidebar.
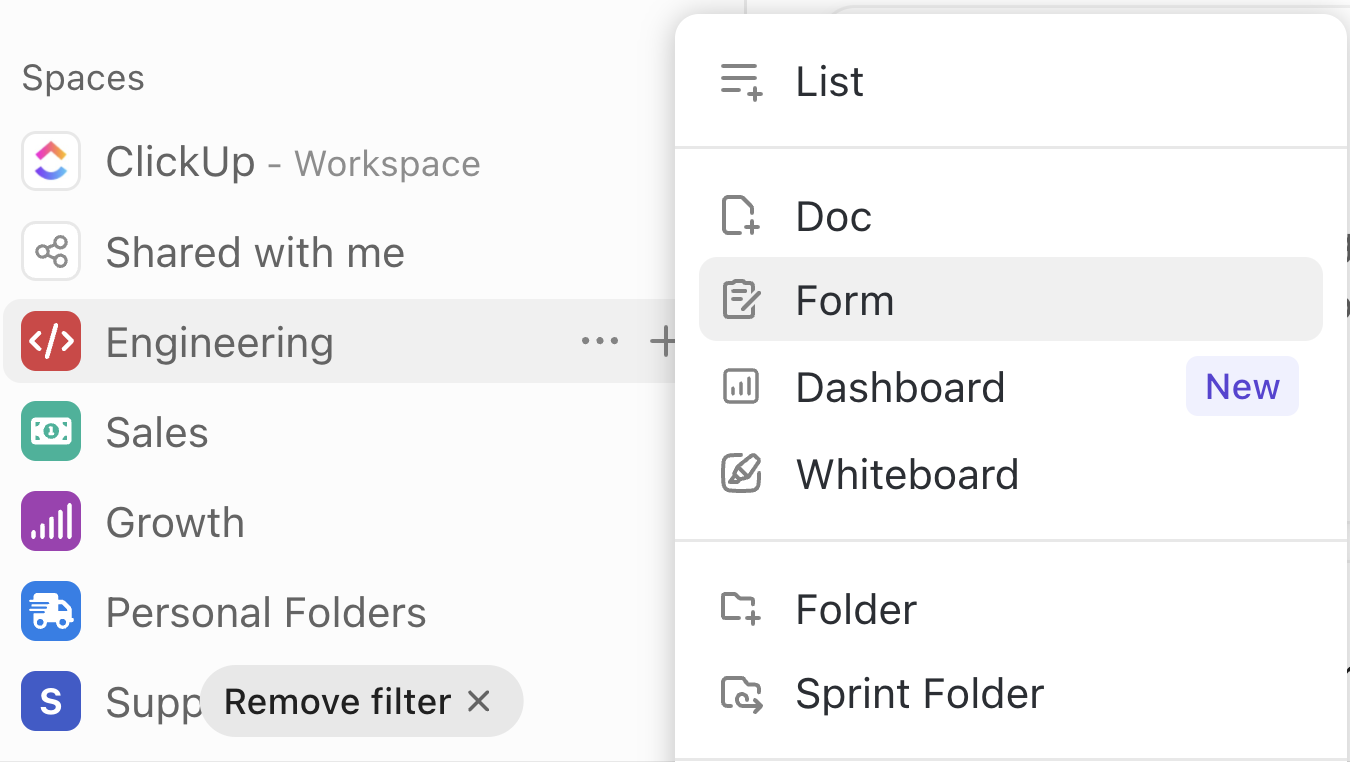
💡 Pro Tip: Wish you could organize, search, and create Forms from one centralized location? Try the Forms Hub in ClickUp. It’s easy to locate within your ClickUp Sidebar. If you don’t see it, click More. Select Forms. And click the pin icon to never lose it again!
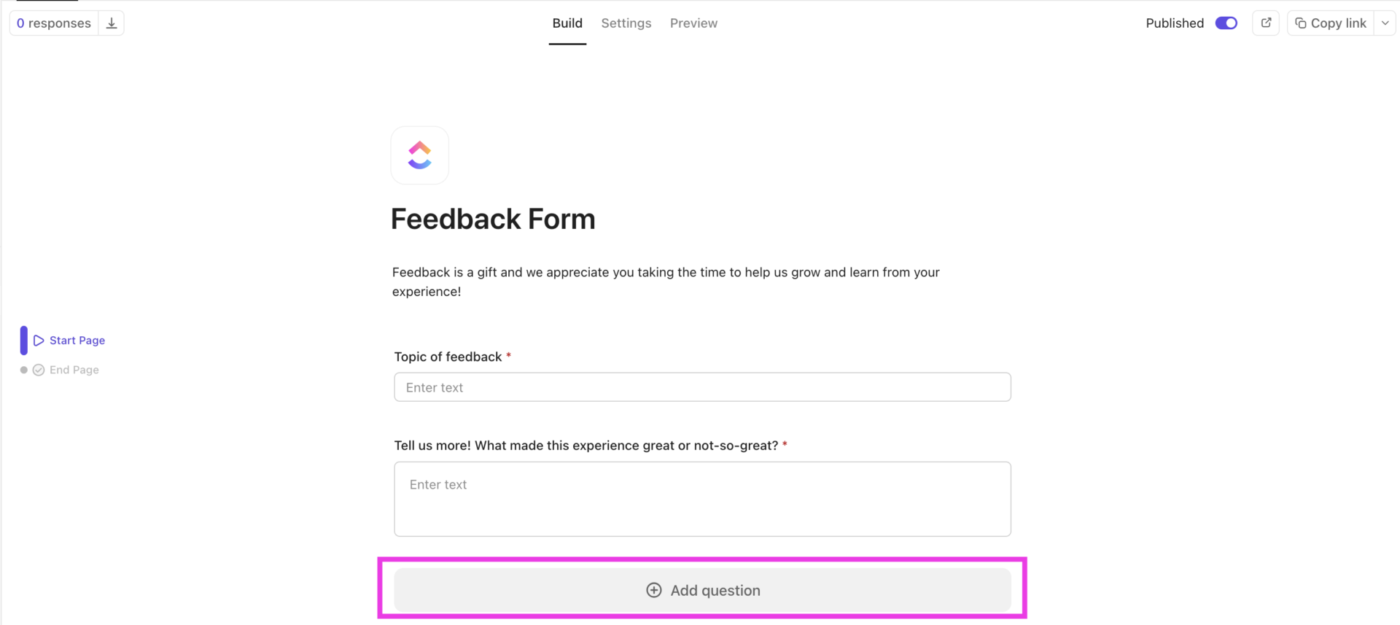
Once you add the Form View, start designing it using ClickUp’s drag-and-drop editor.
At the top of every ClickUp Form, you’ll see three modes:
In the Build mode, begin by adding:
You can rename fields by clicking on their titles. This will only change the form’s public view, not the internal field names. Conditional logic shows or hides fields based on previous responses, keeping the form dynamic.

To add more questions, simply click the Add question button at the bottom of the form. You can also hover between existing questions to add new questions in the right order.
💡 Pro Tip: Make Forms more contextual! Add clear instructions, descriptive text, and visual elements in line with your questions using informational blocks and question descriptions in ClickUp Forms.
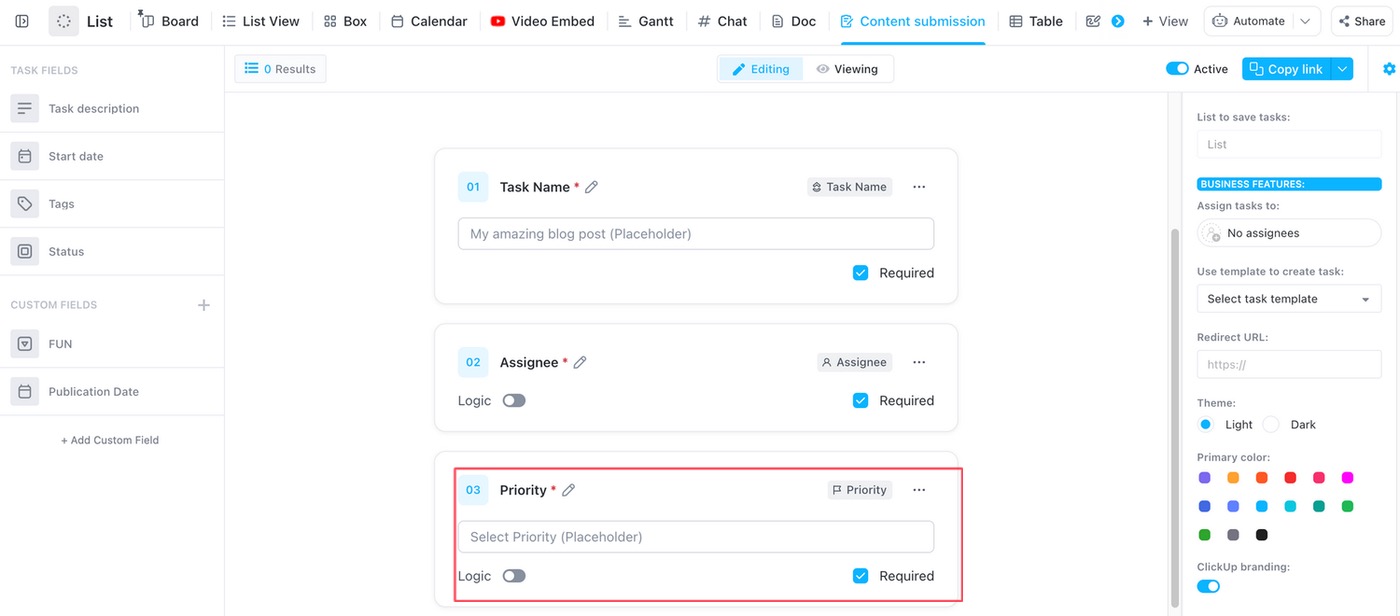
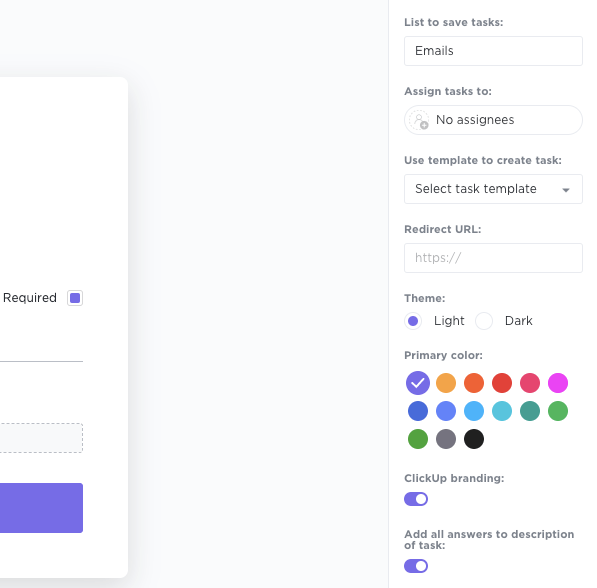
Ensure you handle form responses efficiently and configure submission settings. You can choose where tasks are created and, if needed, update the List where form responses appear as tasks. Additional customization options include:
🔍 Did You Know? You can tailor your feedback surveys to specific objectives and different formats. These include customer satisfaction score (CSAT), net promoter score (NPS), and customer effort score (CES).
Make your form look professional and aligned with your brand. Here’s how:
Once your form is ready, it’s time to distribute it and collect responses. You can easily share the form by copying and pasting the link into an email or any other communication tool your team uses.
If you want to make it even more accessible, select the Embed Code option to copy the form code and embed it directly on your website or your intranet software.

💡 Pro Tip: To keep things secure, don’t forget to enable reCAPTCHA to prevent spam submissions from sneaking in!
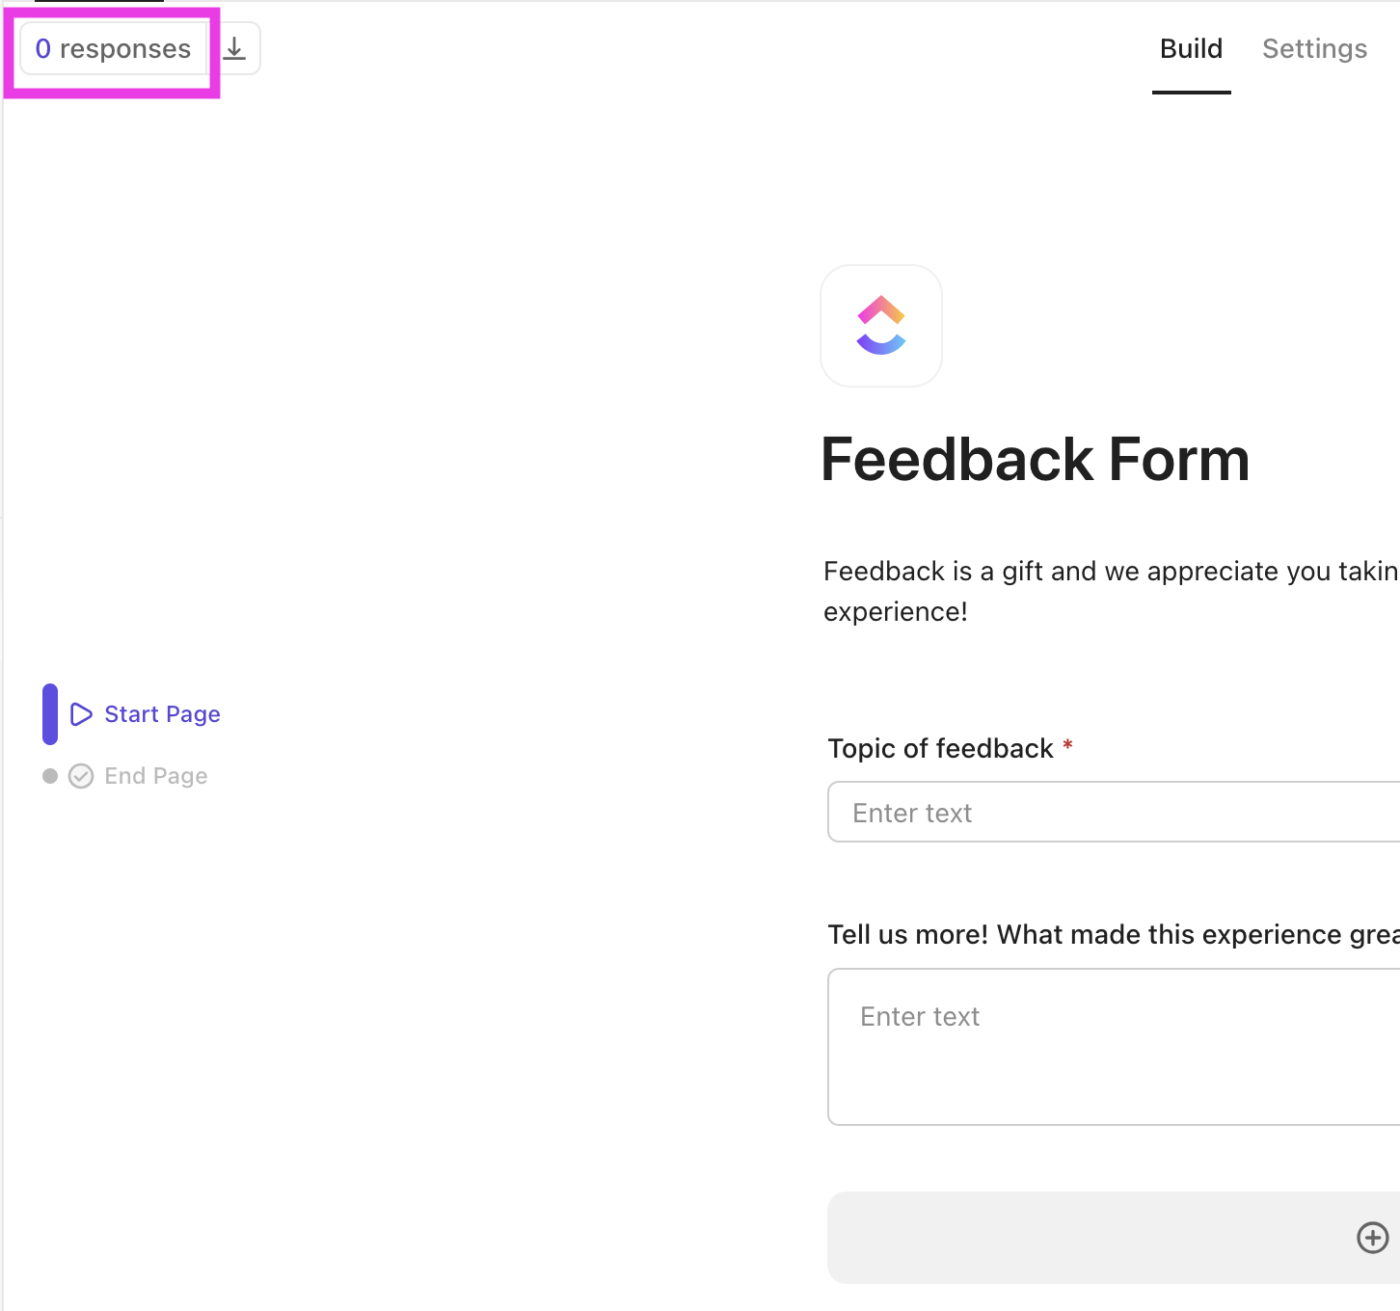
Every time someone submits a response, ClickUp automatically creates a new task, making tracking and managing all responses easy. To view these tasks, just click the Responses button in the top-left corner of your Form View.
📮ClickUp Insight: 92% of workers use inconsistent methods to track action items, which results in missed decisions and delayed execution. Whether you’re sending follow-up notes or using spreadsheets, the process is often scattered and inefficient.
ClickUp’s Task Management Solution ensures seamless conversion of conversations (and form responses!) into tasks—so your team can act fast and stay aligned.
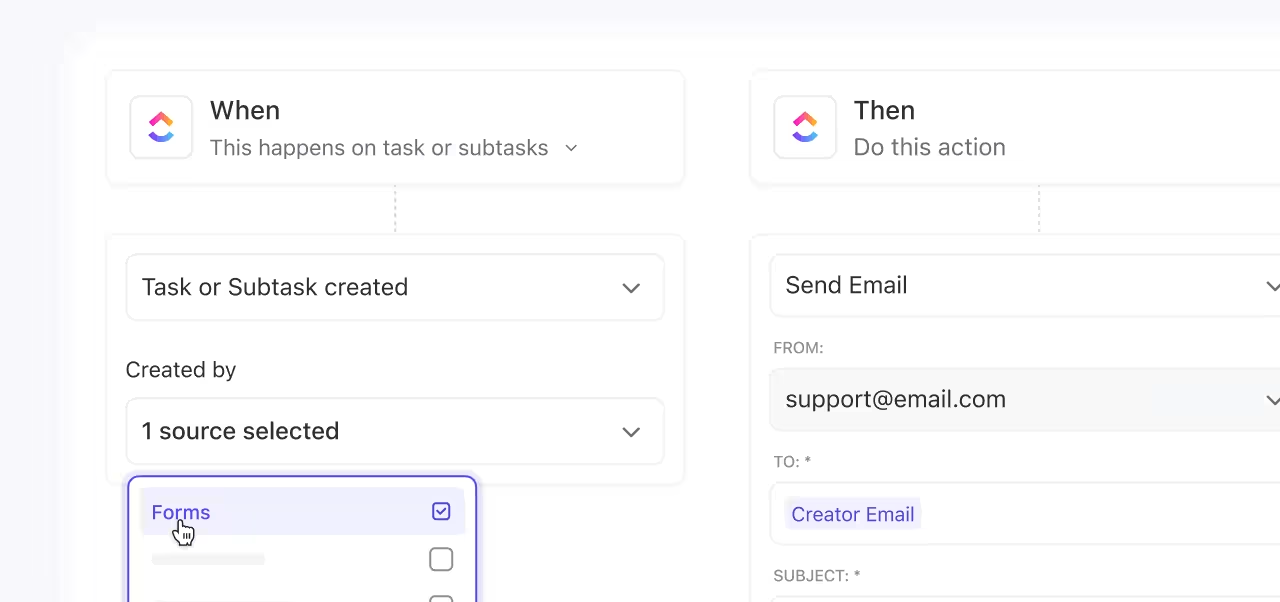
Want to save time? You can set up ClickUp Automations to automatically assign tasks to the right team members based on form responses. Plus, sorting and filtering responses based on task status, assignee, or priority levels helps keep everything organized and on track.
That’s it! With ClickUp Forms, you can quickly collect data, streamline requests, and ensure no submission gets lost in the shuffle.
Our teams have used forms and templates to standardize some workflows. We’ve also used the built-in automation to ease some workflows, especially where custom fields are capturing information that can help determine who should be assigned to a task. Finally, we’ve also used the email integration and API features to automatically generate tasks when some platforms are alerting or showing possible performance issues.
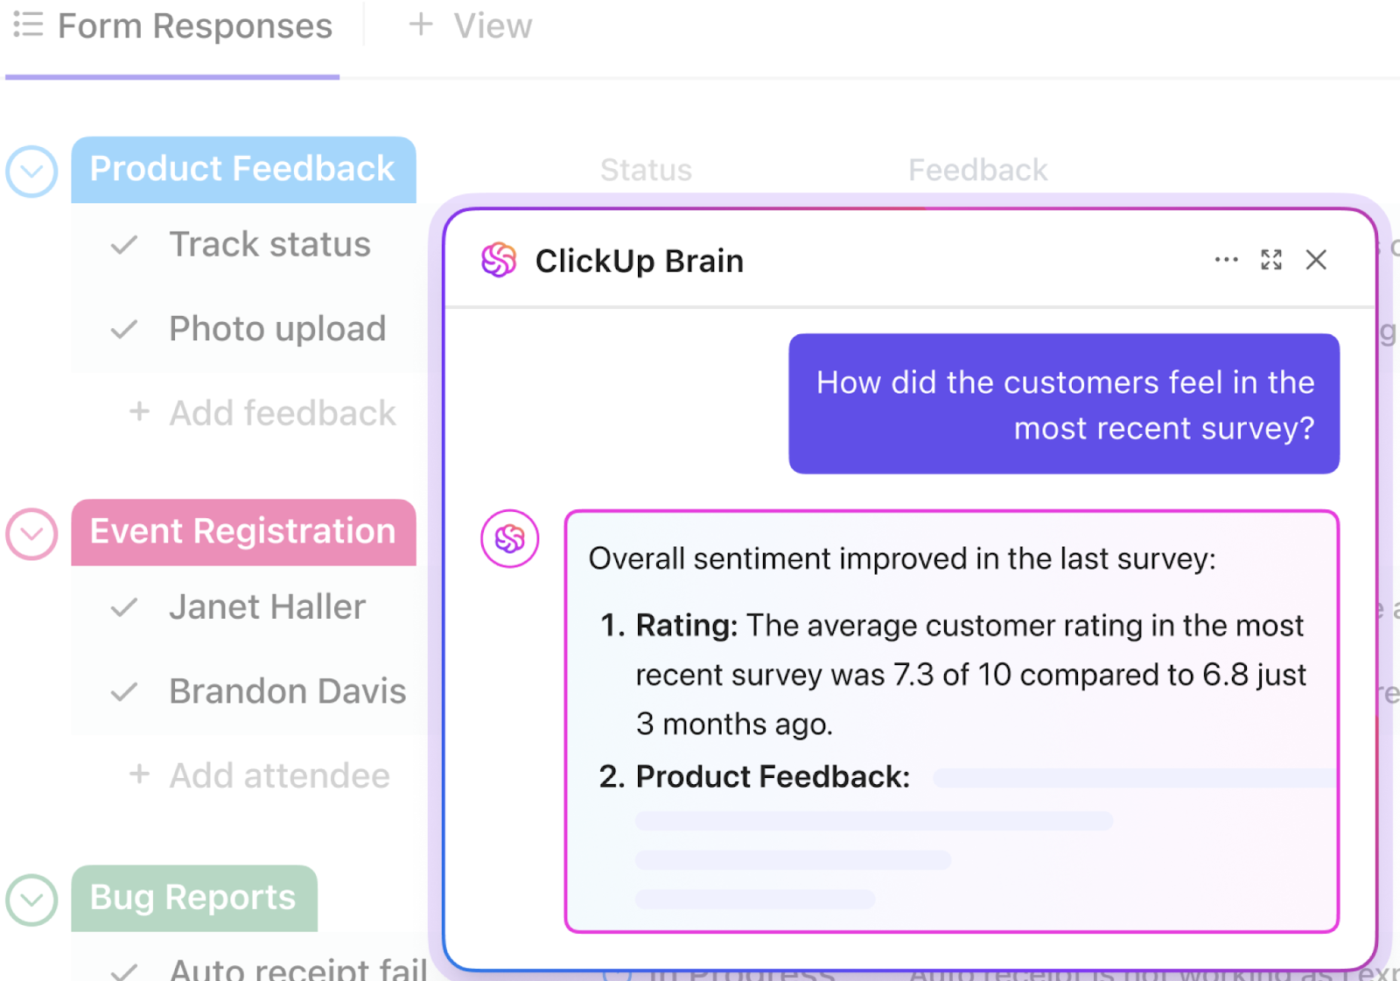
ClickUp offers powerful ways to analyze form submission data in real time:
1. ClickUp Brain
To use ClickUp’s native AI, ClickUp Brain, for analysis:
2. ClickUp Dashboards
Create Dashboards to get a high-level overview of your form submission data. By converting form submissions into Dashboards, you can visualize the data effectively.
You can use ClickUp Forms for various purposes, such as gathering feedback, managing requests, conducting surveys, or collecting data for tasks and projects.
But imagine the time and effort required to build every form from scratch.
To make your life easier, ClickUp offers pre-built form templates tailored for different use cases. This ensures you skip the tedious setup and get started instantly.
Here are some templates to standardize data collection and implement data responses. 📄
Managing membership applications can be overwhelming, especially when juggling new sign-ups and active members. Instead of manually creating forms for every new applicant, the ClickUp Membership Form Template provides a ready-to-use format for member details.
With built-in tracking, it’s easy to monitor each application’s progress, follow up on pending approvals, and send automated welcome emails. You can also tailor the form to capture specific details like membership tiers, renewal preferences, or special requests.
📌 Practical use cases: Gym membership applications, professional association sign-ups, or club membership renewals.
Planning an event, big or small, can quickly become stressful; it’s easy to feel buried in details. The ClickUp Event Registration Form Template simplifies this process, helping you create an effective event registration form in minutes.
It captures important attendee details, including their name, contact info, dietary preferences, and session choices. Plus, it offers real-time tracking to keep you on top of registration numbers and adjust your plans as needed.
📌 Practical use cases: Conference registrations, workshop sign-ups, or corporate event RSVPs.
🧠 Fun Fact: Web forms were introduced with HTML in the mid-1990s, revolutionizing online data collection.
Managing service or project requests may feel like sifting through a never-ending pile of emails—but not when you have the ClickUp Request Form Template. It collects all the necessary details upfront, reducing back-and-forth communication.
You can categorize requests by urgency, type, or complexity, making prioritization effortless. Built-in approval workflows allow quick decision-making, while file uploads provide context to each request.
📌 Practical use cases: IT support tickets, creative project submissions, or office equipment requests.
💡 Pro Tip: Customize your project request forms with form fields for budget, deadlines, and priority to capture all essential details upfront—minimizing back-and-forth and speeding up approvals!
Here’s a helpful explainer video to set up your intake process using ClickUp Forms👇🏽
Hiring shouldn’t feel like drowning in resumes and endless follow-ups. The ClickUp Job Application Form Template helps you go beyond basic details, allowing applicants to upload resumes, portfolios, and certifications directly.
You can also customize it with screening questions on availability, salary expectations, or must-have skills, ensuring you gather relevant information upfront. When a candidate applies, ClickUp turns it into a task in your hiring pipeline, ensuring clear visibility and eliminating delays in the recruitment process.
📌 Practical use cases: Full-time job applications, freelance contractor submissions, or internship recruitment.
Managing customer inquiries, feedback, and concerns is easier with the ClickUp Customer Contact Form Template.
It lets you track customer inquiries, collect customer data for research and surveys, and organize contact information for marketing campaigns or follow-ups. The template seamlessly integrates a CRM view to centralize all customer interactions as well.
Automated reminders help your team stay on top of responses, ensuring timely and professional communication. At the same time, ClickUp Dashboards track recurring issues, monitor response times, and gain insights to improve customer service.
📌 Practical use cases: Customer support inquiries, product feedback submissions, or sales inquiries.
One of the aspects that makes ClickUp unique is its ability to enhance your existing tech stack with seamless integrations.
ClickUp’s 1000+ Integrations connect your workflows across multiple platforms, making collaboration smoother and more efficient. When it comes to ClickUp Forms, these integrations boost automation, streamline data flow, and eliminate manual work.
Here are some key integrations that make ClickUp Forms even more powerful. 🛠️
🔍 Did You Know? Incorporating visual elements like icons or images into feedback forms can enhance engagement. This approach makes it easier for customers to navigate the survey and express their feelings quickly.
Creating forms in ClickUp is a breeze, but making them effective? That’s all about strategy. Here are some pro tips to boost productivity with ClickUp Forms. ⛏️
Instead of bombarding users with unnecessary follow-up questions, use conditional logic in Form View to tailor the form. Show only relevant questions based on previous answers.
For instance, if an employee selects ‘IT Support’ in a help request form, only show them questions related to technical issues, not HR support. This makes forms smoother and more efficient, saving everyone time.
Form overload is real. Don’t fall into the trap of asking every question under the sun; only include questions that matter. For example, if the applicant’s college degree isn’t essential to the job, skip it, and focus on the relevant work experience instead.
Shorter forms = higher response rates and easier data analysis. Here are some questions to ask yourself to narrow down your form:
🧠 Fun Fact: The earliest known data collection dates back over 5,000 years, with ancient Sumerians recording harvests and taxes on clay tablets.
Even if your form looks perfect, testing it is crucial.
Send it to a test group from your target audience (not your team) and gather feedback. This will give you real insights and help refine your form to make it more user-friendly. After all, the best designs come from real-world input.
We all know how overwhelming it is to constantly chase down data—tracking project requests, managing feedback, or collecting team updates.
ClickUp, the everything app for work, provides the perfect solution to streamline your data collection and eliminate chaos. Switch from paper forms to ClickUp Forms—save time, reduce errors, and keep everything neatly organized in one place.
No more digging through stacks of paperwork or sifting through scattered emails. Forms in ClickUp ensure you’ve got everything in check without the chaos.
Create your first form by signing up to ClickUp for free today! ✅

© 2026 ClickUp

There’s an easier way. Try a free AI Agent in ClickUp that actually does the work for you—set up in minutes, save hours every week.