Think back to last week: can you say, with confidence, exactly how many hours you spent on meetings versus focused work? For most, the answer is a “sort of” followed by a deep dive into calendars and emails.
This guesswork is costly. Inaccurate logs lead to missed billing, blown budgets, and lost productivity. In fact, 94% of workers agree that better time management is the key to getting more done.
An Excel timesheet is your first step toward clarity. It’s a simple, reliable way to track hours without the complexity of expensive software.
In this blog, you will learn how to build an Excel time tracking sheet, use key formulas, and grab ready-to-use templates for different schedules.
- Why Use Excel for Time Tracking?
- How to Track Time in Excel
- 5 Free Excel Time Tracking Templates
- Useful Excel Formulas for Time Tracking
- Excel Time Tracking Examples
- Common Excel Time Tracking Mistakes to Avoid
- Pros and Cons of Excel for Time Tracking
- Best Excel Alternatives for Time Tracking
- When Excel Hits Its Limits, Let Clickup Clock In
Why Use Excel for Time Tracking?
Excel is often the first place people start logging their hours because it is familiar. You already know how to type into cells, format columns, and save a file. Therefore, turning that into a simple time tracking system feels like a small step, not a whole new tool.
Here is where Excel time tracking works well:
- You want a basic way to record hours worked without needing new software
- Your team already uses spreadsheets for budgets, reports, or planning
- You prefer to control every column, label, and formula in your time-tracking spreadsheet
You can also shape an Excel timesheet around different real-life scenarios:
- Billable work
- Add columns for client, project, billable hours, hourly rate, and total costs
- Filter by client to see how much time you spent and how much to invoice
- Shift management and attendance
- Track employee time with start time, end time, and lunch breaks on each row
- Add separate columns for regular hours and overtime hours so payroll stays accurate
- Project budgeting and planning
- Log hours against different projects or tasks to see where most time is spent
- Compare planned vs. actual total hours to refine estimates for future work
Used this way, Excel gives you a flexible, low-cost way to track time data before you decide if you need something more automated.
📮ClickUp Insight: A typical knowledge worker has to connect with 6 people on average to get work done. This involves reaching out to six core connections on a daily basis to gather essential context, align on priorities, and move projects forward.
A centralized platform like ClickUp, with Enterprise Search and AI Knowledge Manager, tackles this difficulty by making context instantly available at your fingertips.
How to Track Time in Excel
You can build a simple weekly Excel timesheet in a few minutes. Here is a step-by-step guide to turn a blank Excel spreadsheet into a basic time-tracking system for one person or one role.
Step 1: Set up your timesheet layout
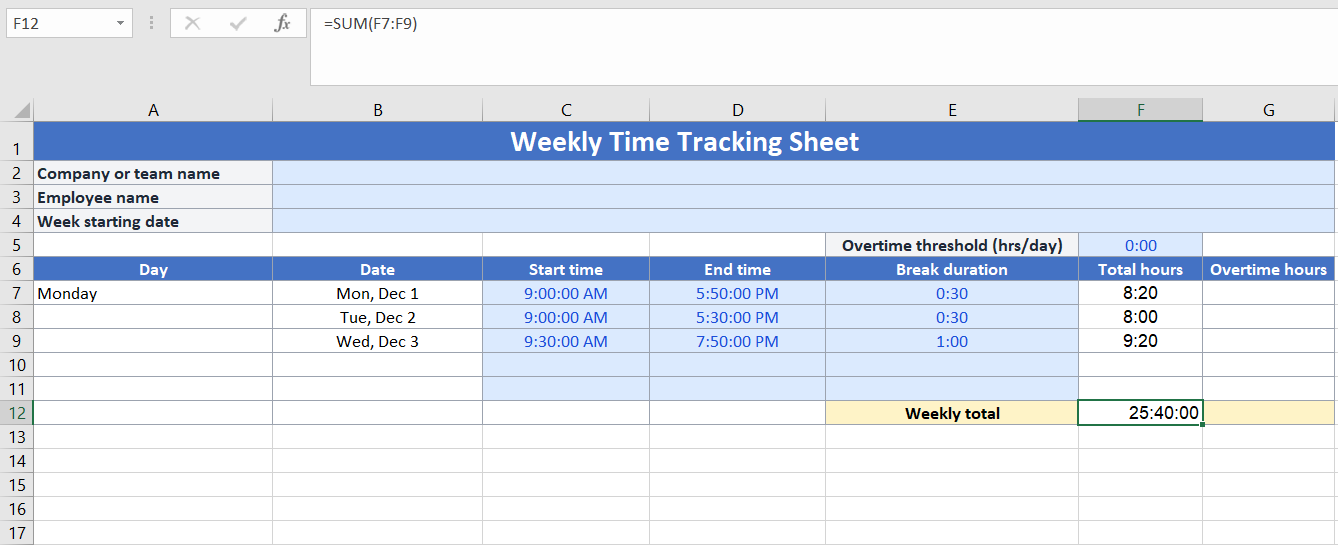
Open a new Excel file and decide how many days you want to track time for, such as a 5-day or 7-day week.
Create a simple header row with:
- Company or team name
- Employee name
- Week starting date
Then add column headings for your time tracking spreadsheet:
- Day
- Date
- Start time
- End time
- Break duration
- Total hours
- Overtime hours (optional)
Step 2: Format your time columns
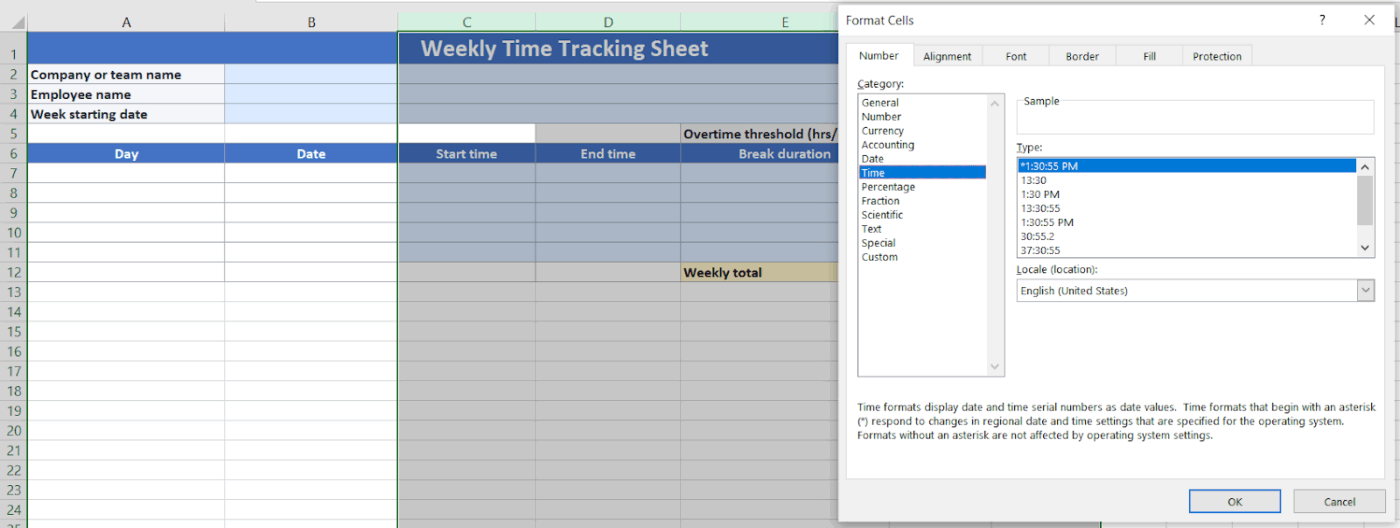
Excel needs the right time format so it can calculate hours worked correctly.
- Highlight the Start time, End time, Break duration, Total hours, and Overtime hours columns
- Right-click and select “Format cells”
- Choose Time and pick the time format you prefer, such as 13:30 for 24-hour time
This helps Excel treat your entries as Excel time values instead of plain text.
Step 3: Add a few sample rows

Before you fill out the full sheet, test it for one day.
In the first row beneath your headings:
- Add a day name, such as Monday
- Enter the date
- Type a Start time, such as 9:00
- Type an End time, such as 17:30
- Add a Break duration, such as 0:30 for a 30-minute lunch break
Step 4: Add a formula to calculate daily hours
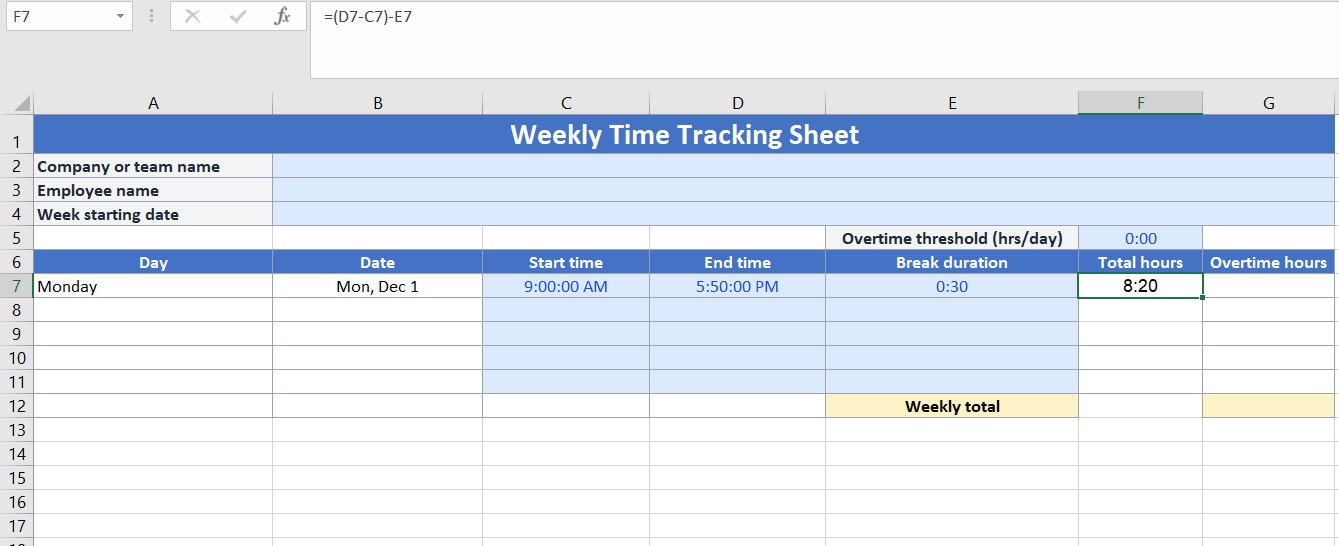
Now tell Excel how to calculate total hours for that day.
In the first Total hours cell, enter a formula like:
=(D7-C7)-E7
Where:
- E7 is the Start time
- D7 is the End time
- E7 is the Break duration
If your end time can cross midnight, you can adjust the formula to:
=MOD(D7-C7,1)-E7
This lets you track time for night shifts without breaking the calculation.
Step 5: Copy formulas down and test
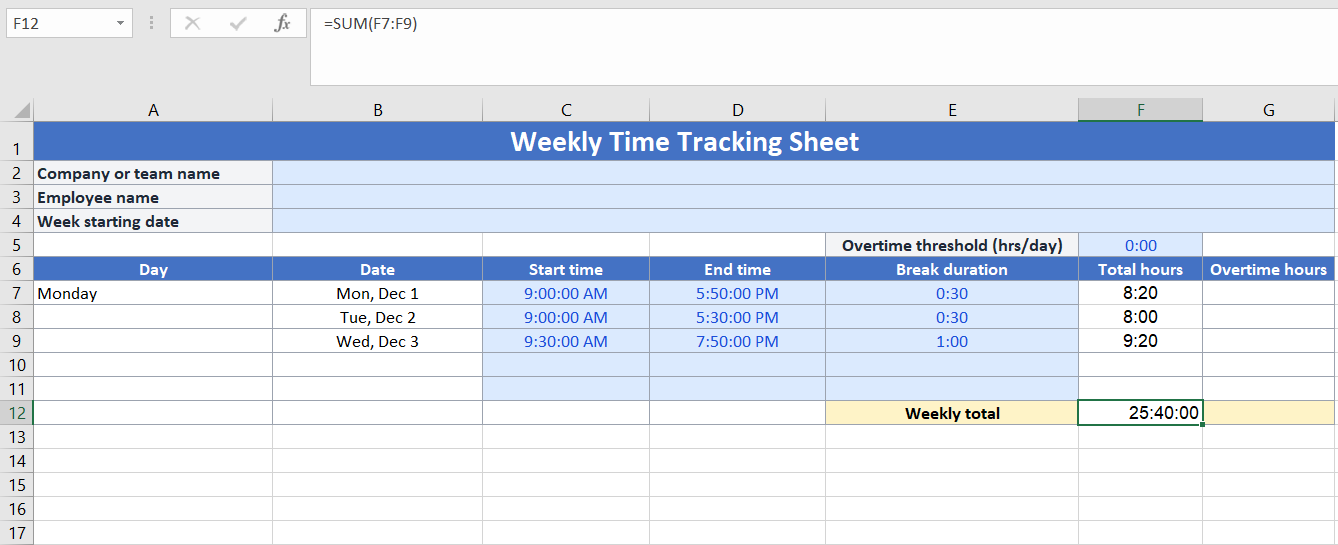
Once the first row works:
- Copy the Total hours formula down for all the rows in your weekly timesheet
- If you track overtime hours, add a rule such as =MAX(0,H8-8/24), where H8 is Total hours and 8 represents a standard 8-hour day
At the bottom of the column, add a simple SUM formula to calculate totals for the week:
=SUM(F7:F11)
You now have a basic time tracking setup in Excel that calculates total hours for the week from your daily time entries.
5 Free Excel Time Tracking Templates
Ready to skip the blank sheet and start with something that already works? Here are some free Excel timesheet templates you can use as a starting point, then tweak for your team and clients.
1. Time Sheet Template with Breaks by Vertex42
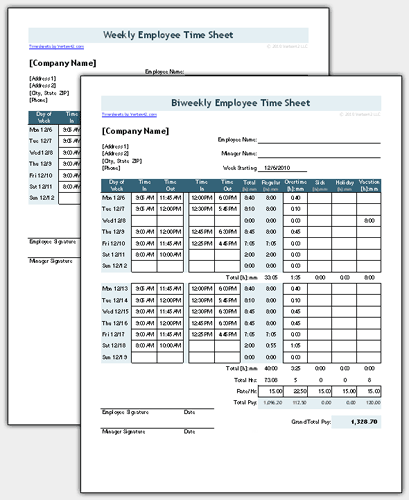
When you are tracking hourly work for payroll, you need more than a rough daily total. You need a clear record of start and end times, breaks, and overtime hours that you can share with finance without extra explanations.
The Time Sheet Template with Breaks from Vertex42 gives you a ready-made weekly and biweekly Excel timesheet in one workbook. It lets you enter clock-in and clock-out times, log up to two breaks per day, and automatically calculate daily and weekly totals in either hh: mm or decimal format.
🌻 Here’s why you’ll like this template:
- Record clock-in, clock-out, and break time on one line per day
- Switch between weekly and biweekly sheets inside the same file
- Track overtime hours automatically based on your rules
- Choose between decimal or standard time format without rewriting formulas
✨ Ideal for: Small teams that track employee time against standard shifts and need an effortless handoff to payroll.
2. Microsoft Excel Timesheet Template
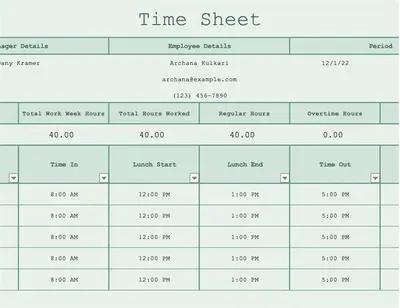
If your team already works in Microsoft 365, the Microsoft Excel Timesheet Template is a straightforward Excel worksheet you can start using right away. You can save it on OneDrive, share one master copy, and keep everyone’s logging time in the same file instead of emailing versions back and forth.
This template focuses on the basics: record daily work time, account for lunch or breaks, and let the built-in calculations total hours for you.
It’s also customizable, so you can tweak labels or add fields (like department or project) without rebuilding the sheet from scratch.
🌻 Here’s why you’ll like this template:
- Enter the time worked for each day in a simple weekly layout
- Account for lunch or break time so totals stay accurate
- Calculate daily and weekly totals automatically using built-in formulas
- Store and share the workbook via Microsoft 365 so everyone edits the same version
✨ Ideal for: Teams that already use Microsoft 365 and want a clean, no-frills Excel timesheet worksheet for weekly time entry.
3. Excel Biweekly Timesheet Template By Smartsheet
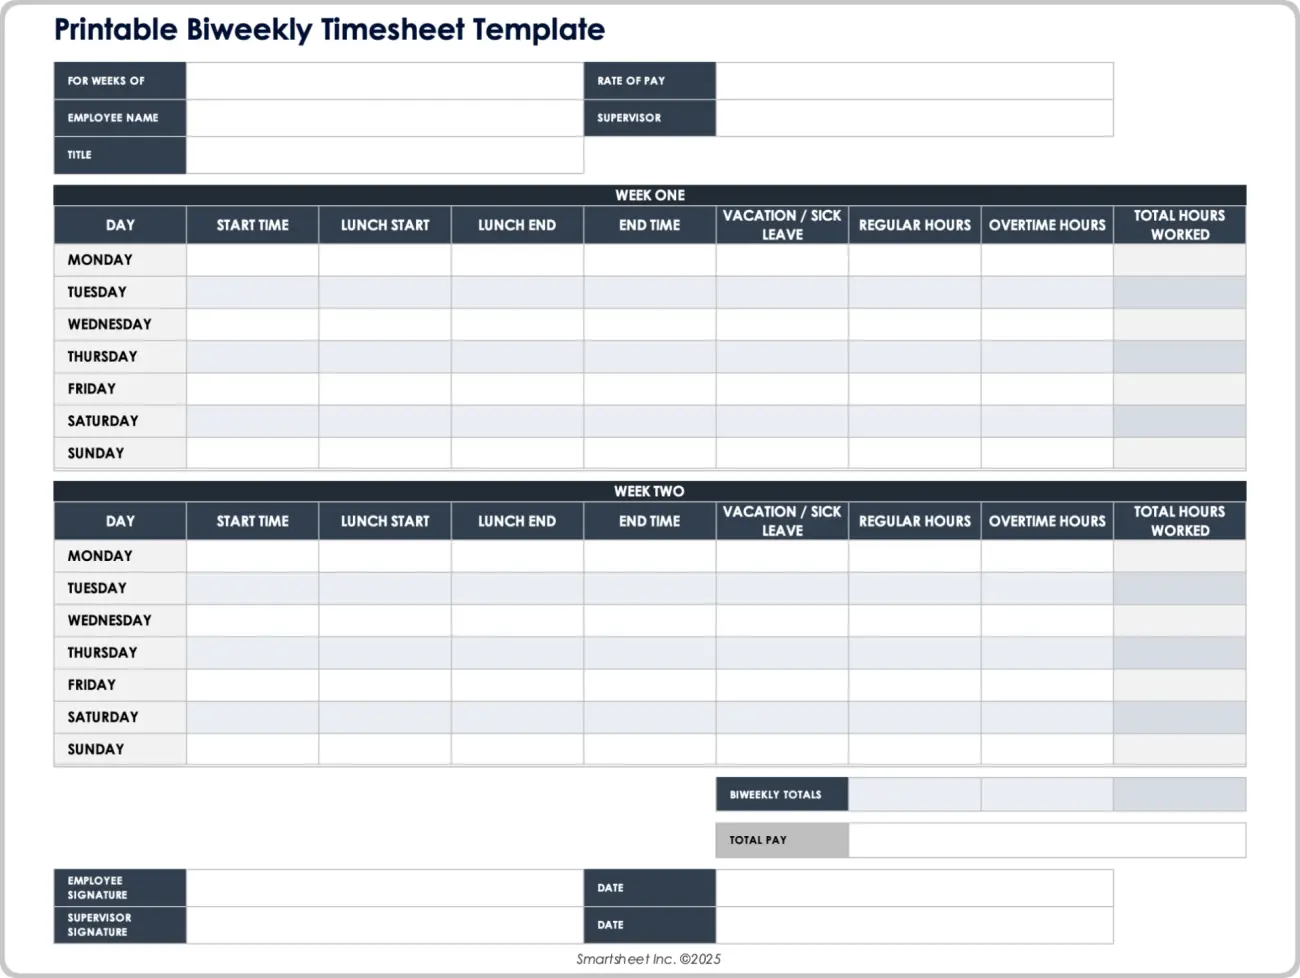
Two-week pay cycles are common, but building a neat biweekly sheet from scratch can be fiddly. You want each day lined up, totals for the first and second week, and a clean summary for approvals.
Smartsheet’s Excel Biweekly Timesheet Template is designed exactly for that. It lets you log daily hours across a 14-day period, split regular and overtime hours, and roll everything into clear totals at the bottom.
It is handy for teams who need a simple audit trail that feeds into payroll or invoicing.
🌻 Here’s why you’ll like this template:
- Capture 14 days of work in one view for biweekly pay periods
- Separate regular hours and overtime hours for easier payroll processing
- Use built-in totals for each week and for the full period
- Add signatures or approval fields at the bottom if you need sign-off
✨ Ideal for: Agencies, contractors, or teams that work on biweekly pay cycles and need tidy records for each period.
4. Monthly Timesheet Excel Template By Resource Guru
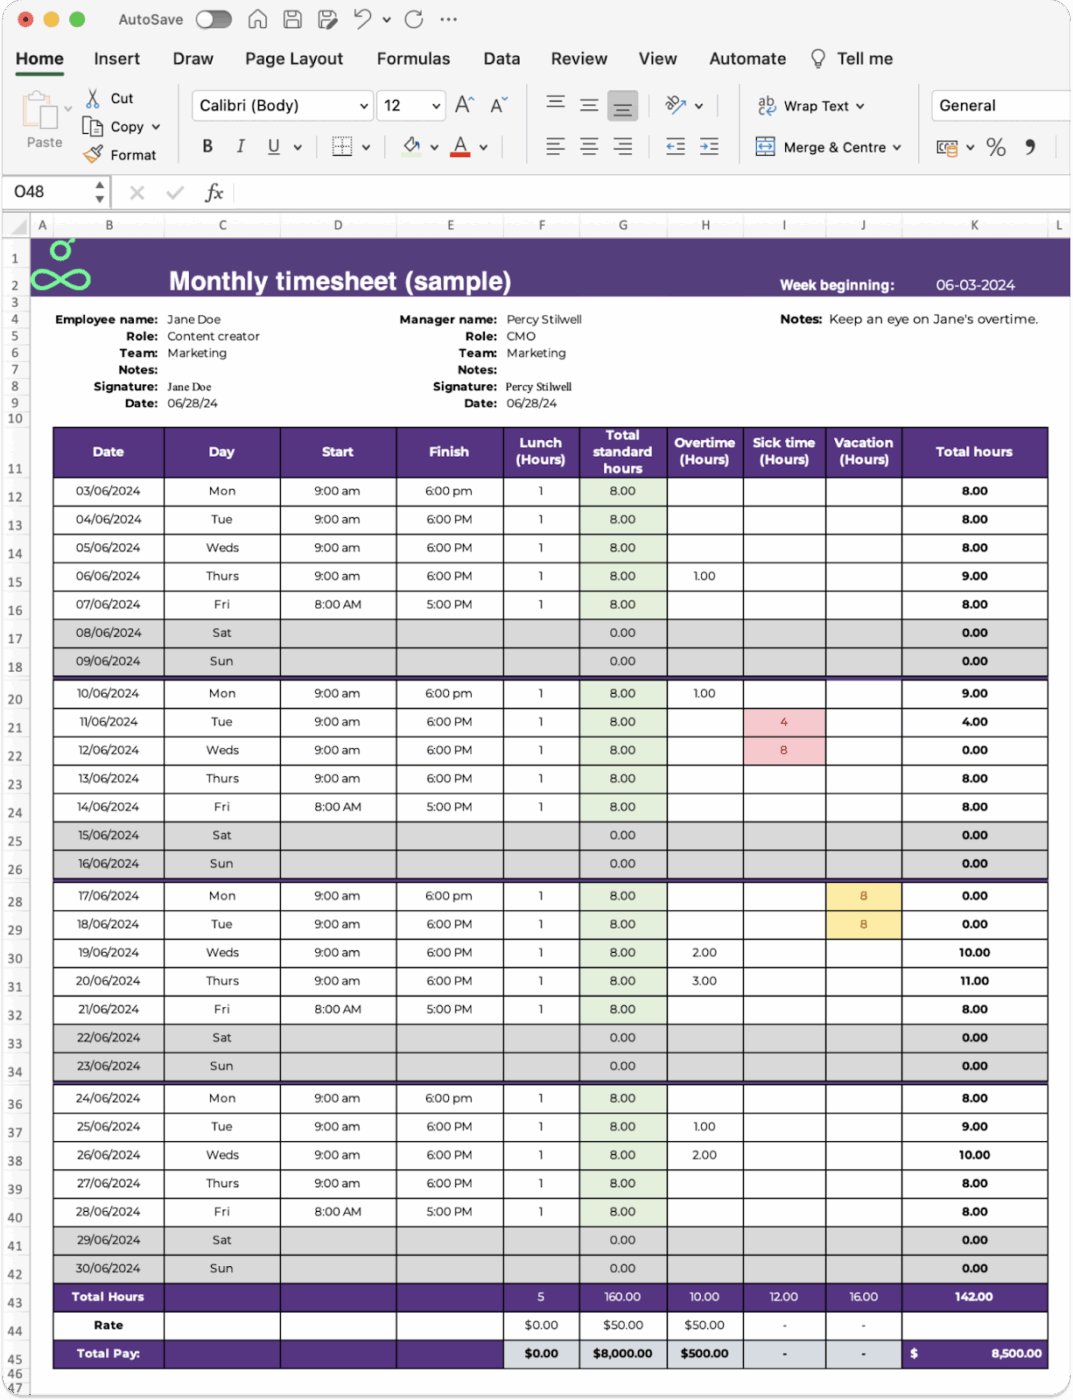
Monthly timesheets are useful when you want a big-picture view of hours worked, holidays, and project load over longer periods. They make it easier to spot busy weeks and plan staffing.
Resource Guru offers a Monthly Timesheet Excel Template built for this purpose. It helps employees log their time day by day while meeting project requirements, and it keeps everything on one page so managers can quickly scan for patterns or issues.
🌻 Here’s why you’ll like this template:
- Track an entire month of hours on a single sheet
- Capture daily work hours alongside project or client details
- Review patterns in workload and overtime at a glance
- Export or share the file with managers for approvals
✨ Ideal for: Teams that review hours on a monthly basis and want a simple overview for capacity and project planning.
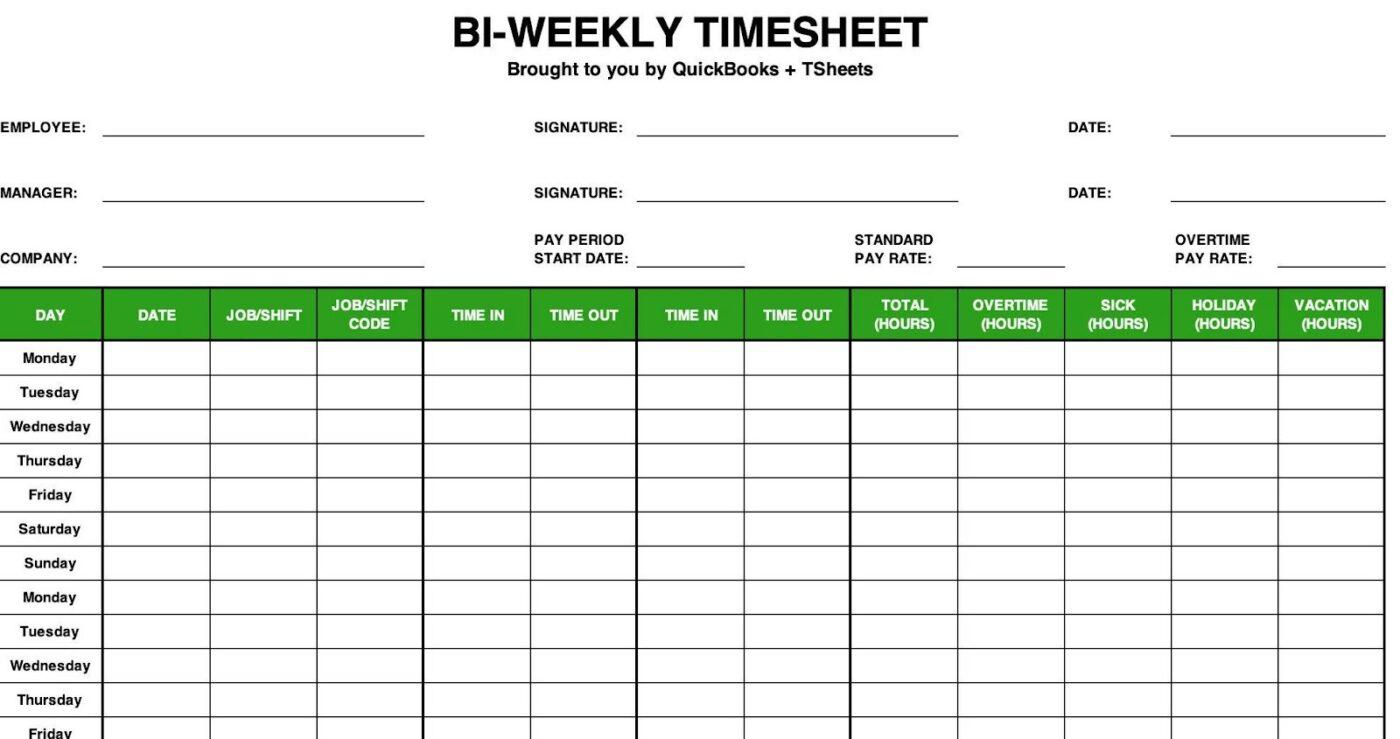
5. Bi-weekly timesheet template by QuickBooks
If you pay people every two weeks, a weekly sheet can feel cramped, and two separate files become a hassle.
This Bi-weekly Timesheet Template by QuickBooks gives you a full 14-day view in one place, so you can see the whole pay period without stitching together multiple Excel files.
The template is typically laid out with employee and pay period details at the top, followed by two weeks of daily rows. Each day has space for start time, end time, breaks, regular hours, and overtime, with totals for each week and the full period.
There is usually room for signatures or approvals as well, which makes it easier to pass the sheet to payroll without extra formatting.
🌻 Here’s why you’ll like this template:
- Track 14 days of work for one employee on a single biweekly sheet
- Separate regular hours and overtime hours so payroll can review quickly
- Use built-in totals to see hours for each week and the full pay period
- Save, print, or reuse the same layout for each new pay cycle
✨ Ideal for: Small businesses and teams that run payroll on a biweekly schedule and want a structured, Excel-friendly timesheet.
Useful Excel Formulas for Time Tracking
Formulas turn a basic Excel timesheet into something you can trust. They reduce manual input, cut human error, and help you calculate totals automatically instead of reaching for a calculator after every week.
Practical Excel formulas to know
Below are some essential formulas that can help you through your Excel time-tracking journey:
1. Total daily hours
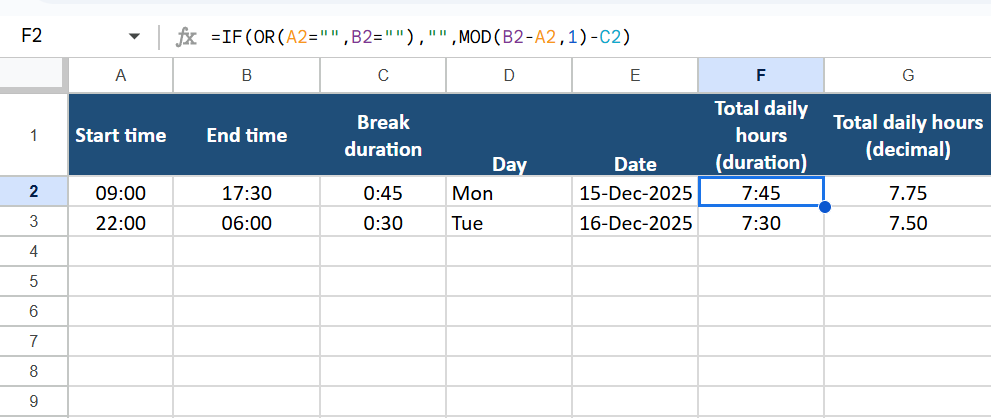
If your sheet has:
- Start time in A2
- End time in B2
- Break duration in C2
You can calculate daily hours worked in F2 with:
=(B2-A2)-C2
If people work night shifts that cross midnight, use:
=MOD(B2-A2,1)-C2
Remember to format cells in the Total daily hours column as Time or Number, depending on how you want to display data.
2. Weekly overtime
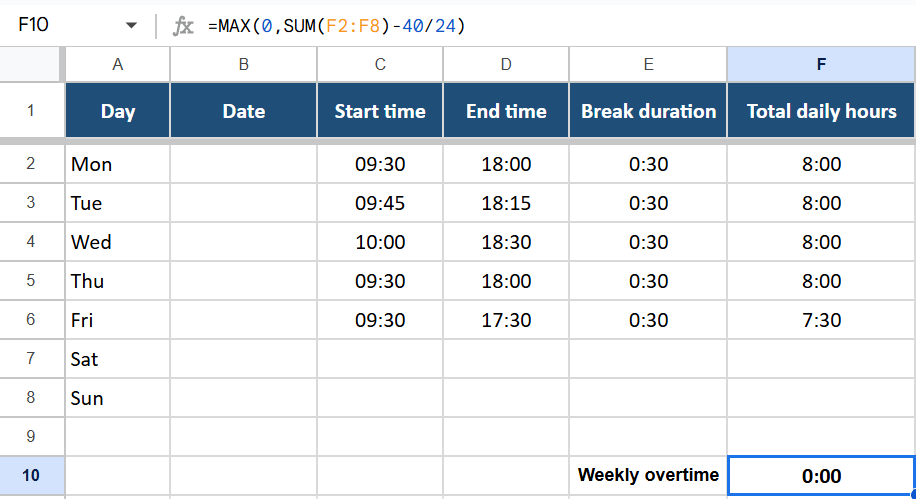
For a weekly timesheet where normal work hours are 40 per week and daily hours are in F2:F8, use:
=MAX(0,SUM(F2:F8)-40/24)
This gives you overtime hours as a time value. If you are using decimal hours in G2:G8 instead, the overtime formula becomes:
=MAX(0,SUM(G2:G8)-40)
3. Billable vs non-billable split

Say you track time entries in rows, with:
- Hours worked in F2:F100
- A Category column in G2:G100, where you select Billable or Non-billable from a dropdown
You can split totals like this:
=SUMIF(G2:G100,”Billable”,F2:F100)
=SUMIF(G2:G100,”Non-billable”,F2:F100)
This is useful when you want to compare billable hours with internal work or admin time.
4. Time rounding
If you pay your bill in 15-minute blocks, you can round time entries to the nearest quarter hour. With a duration in F2, use:
=MROUND(F2,”0:15″)

To always round up to the next 15 minutes (for example, for billing rules), use this:
=CEILING(F2,”0:15″)

This keeps your Excel time tracking consistent, instead of handling every minute as a separate value.
5. Conditional formatting for missing entries
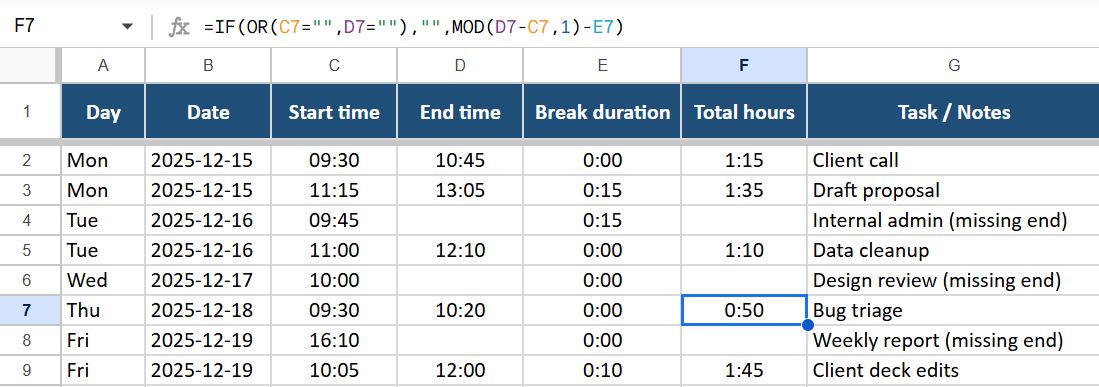
You can apply a simple formula to highlight rows where an end time has been omitted.
- Select your data rows, for example, C2:F50
- Go to Home → Conditional Formatting → New Rule → Use a formula to determine which cells to format
- Use a formula like:
=AND($C2<>””,$D2=””) - Choose a fill color
Any row with a start time but no end time will now light up, so you can quickly correct missing entries before calculating total hours.
Examples:
Here are a few quick combinations that often show up in real timesheet template files:
- Calculate total weekly hours
- =SUM(F2:F8) to roll all daily hours into one weekly total
- Calculate costs from hours worked
- If decimal hours are in G2 and hourly rate is in H2, use =G2*H2
- Sum that column to get the total costs for the week or project
- Show all the rows with overtime
- Add a helper column with =F2>8/24 to flag days over 8 hours
- Filter that column to see only overtime entries
Once these formulas are in place, your Excel time tracking sheet behaves much more like an automated timesheet, without changing tools.
Excel Time Tracking Examples
It is easier to design your own Excel timesheet when you see how it works in real situations. Here are four simple setups you can recreate in an Excel spreadsheet and then capture as screenshots for your guide or internal docs.
1. Freelancer billing multiple clients
Freelancers often split their week across different clients, projects, and hourly rates. A focused time-tracking spreadsheet helps keep that billable work organized.

Set up columns such as:
- Date
- Client
- Project
- Task description
- Start time
- End time
- Break
- Hours worked
- Billable hours
- Hourly rate
- Amount
Use formulas to calculate hours worked for each row and multiply hours by the hourly rate for the Amount column. A total row at the bottom can also show total hours and total billable hours for each client or month.
2. Employee weekly attendance log
Small teams can use Excel time tracking to keep a simple weekly log of employee time and attendance.
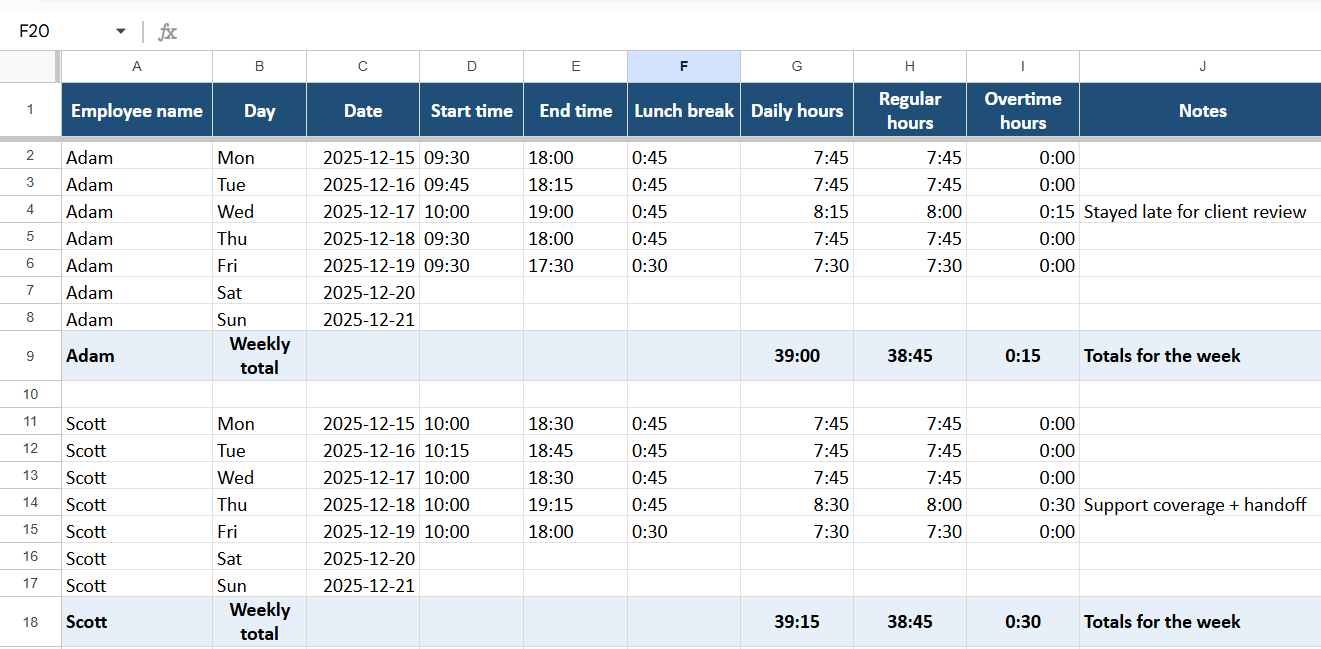
Your layout might include:
- Employee name
- Day and date
- Start time
- End time
- Lunch breaks
- Regular hours
- Overtime hours
- Notes
Daily hours come from a start time and end time formula, and you can add a weekly total hours row for each person. This provides managers with a quick view of work hours without needing a separate tool.
👀 Fun Fact: Every date in Excel is actually a serial number, with January 1, 1900, as day 1. This quirky system allows for easy date calculations but can sometimes confuse new users!
3. Project time allocation example
When several employees work on different projects, a project-focused sheet helps you see where time actually goes across the team.
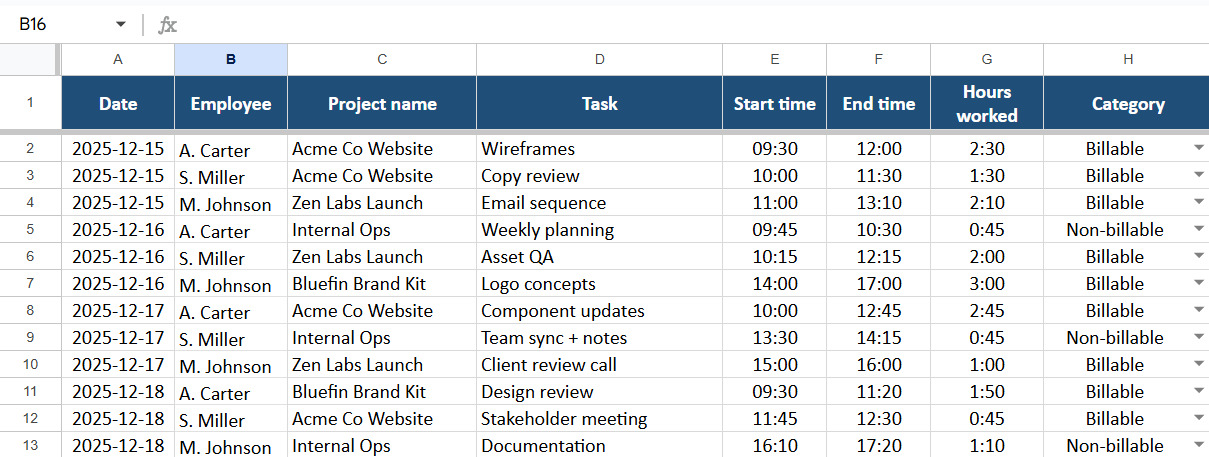
Try columns like:
- Date
- Employee
- Project name
- Task
- Start time
- End time
- Hours worked
- Billable or non-billable category
From there, you can use SUMIF formulas to calculate total hours by project, employee, or billable category. It becomes much easier to compare estimated vs. actual hours and understand which projects take the most time.
4. Shift scheduling and tracking
For shift-based work, one sheet can hold both the schedule and the actual time entries, so you can compare what was planned with what happened.

Include:
- Employee name
- Role or location
- Scheduled start time
- Scheduled end time
- Actual start time
- Actual end time
- Variance between scheduled and actual
- Notes for shift swaps, late arrivals, or early finishes
You can use formulas to calculate variance and total hours for each shift. A simple conditional format can highlight large gaps, which helps with staffing and payroll decisions.
Common Excel Time Tracking Mistakes to Avoid
Excel can handle a lot of time-tracking work, but a few small mistakes can quietly break your numbers. Here are common issues to watch for when you set up an Excel timesheet.
- Mixing different time formats in the same column, so some cells use hh: mm and others use text or decimal numbers
- Typing over formulas when you add hours worked, instead of locking formula cells and only allowing data entry where needed
- Forgetting to format cells as Time, which makes Excel treat time entries as plain text and stops it from calculating total hours correctly
- Copying formulas down without updating ranges, so weekly totals only include part of the data
- Relying on manual input for overtime hours instead of letting formulas separate regular hours and overtime hours
- Keeping separate versions of the same time tracking spreadsheet for each pay period, which makes it harder to check historical time data later
- Letting anyone edit any cell, increasing the risk of accidental changes to your header row, rate table, or key formulas
Catching these issues early keeps your time tracking accurate and saves time during payroll processing or client invoicing.
Pros and Cons of Excel for Time Tracking
Excel sits in a sweet spot between “scribble it in a notebook” and “set up a full-time tracking system.” It is flexible, affordable, and already installed on most work laptops. That said, it also depends heavily on manual input, which is where trouble starts.
Benefits of using Excel for time tracking
- Start quickly with a simple time-tracking spreadsheet that mirrors how your team already works
- Customize columns for projects, clients, tasks, and notes instead of forcing your data into a rigid template
- Track time for different use cases in one file, from billable hours to shift schedules and project work hours
- Use built-in formulas to calculate total hours, overtime hours, and costs without extra tools
- Share files easily with small teams by saving them in a shared drive or cloud folder
- Work offline when you need to track time in locations with poor internet
Excel works especially well for freelancers, small teams, or business owners who want a straightforward way to track employee time without introducing a new app.
👀 Fun Fact: Studies have shown that 88% of spreadsheets contain errors, with an average error rate of 1-5% per cell. Manual entry in Excel timesheets can easily lead to costly mistakes.
Limitations of using Excel for time tracking
The same flexibility that makes Excel attractive can also create risk as you scale.
- Relies on manual input for time entries, which increases the chance of human error
- Makes it easy for people to overwrite formulas or header cells and break calculations
- Struggles with version control when multiple users save different copies of the same file
- Offers limited protection against accidental changes unless you lock ranges and protect sheets
- Becomes time-consuming to maintain when you track time for many employees or multiple projects
Manual systems like spreadsheets and paper timesheets are also more error-prone. One recent report found that over half of companies still use spreadsheets for tracking time, and those relying on paper or spreadsheets face a higher risk of payroll mistakes and compliance issues.
📖 Also Read: Top Microsoft Excel Alternatives
Excel vs. other time tracking software
Dedicated time tracking software is built specifically to track time, not just store data. That usually means:
- One-click timers instead of typing start time and end time into cells
- Automated timesheets that pull time data from timers, calendars, or integrated tools
- Centralized employee time tracking for many people, locations, and schedules
- Built-in reports for projects, clients, and billable vs. non-billable hours
- Web, desktop, and mobile apps that let employees track time wherever they work
Excel is still a solid choice when you are starting out, have a small team, or prefer full control over your layout. However, when managing many employees, complex schedules, or detailed project budgets, specialized time tracking tools or apps often provide better accuracy and audit trails. They also require less administrative work than using an Excel spreadsheet alone.
Best Excel Alternatives for Time Tracking
Work sprawl creeps in when time lives everywhere at once. A few hours are in one Excel timesheet, some are in emails, others are in chat messages or calendar events, and no one is fully sure which version is current.
Over time, that sprawl piles up as duplicate files, manual updates, and mismatched totals that you have to clean up at the end of every week or month.
This is where a connected workspace like ClickUp helps. Instead of treating time tracking as a separate spreadsheet, it integrates it next to your tasks, projects, and docs. You log hours where the work actually happens, which cuts down on copying data into different tools and makes it easier to see the full context behind every time entry.
There are plenty of Excel alternatives for time tracking, from focused time tracking apps to full project management platforms. Tools like Toggl, Harvest, Clockify, or Hubstaff are popular when you want a dedicated time tracker, and ClickUp is one of the options worth considering if you prefer time tracking inside a broader workspace.
Next, we will see how these tools improve spreadsheets and fit your team’s workflow.
1. ClickUp
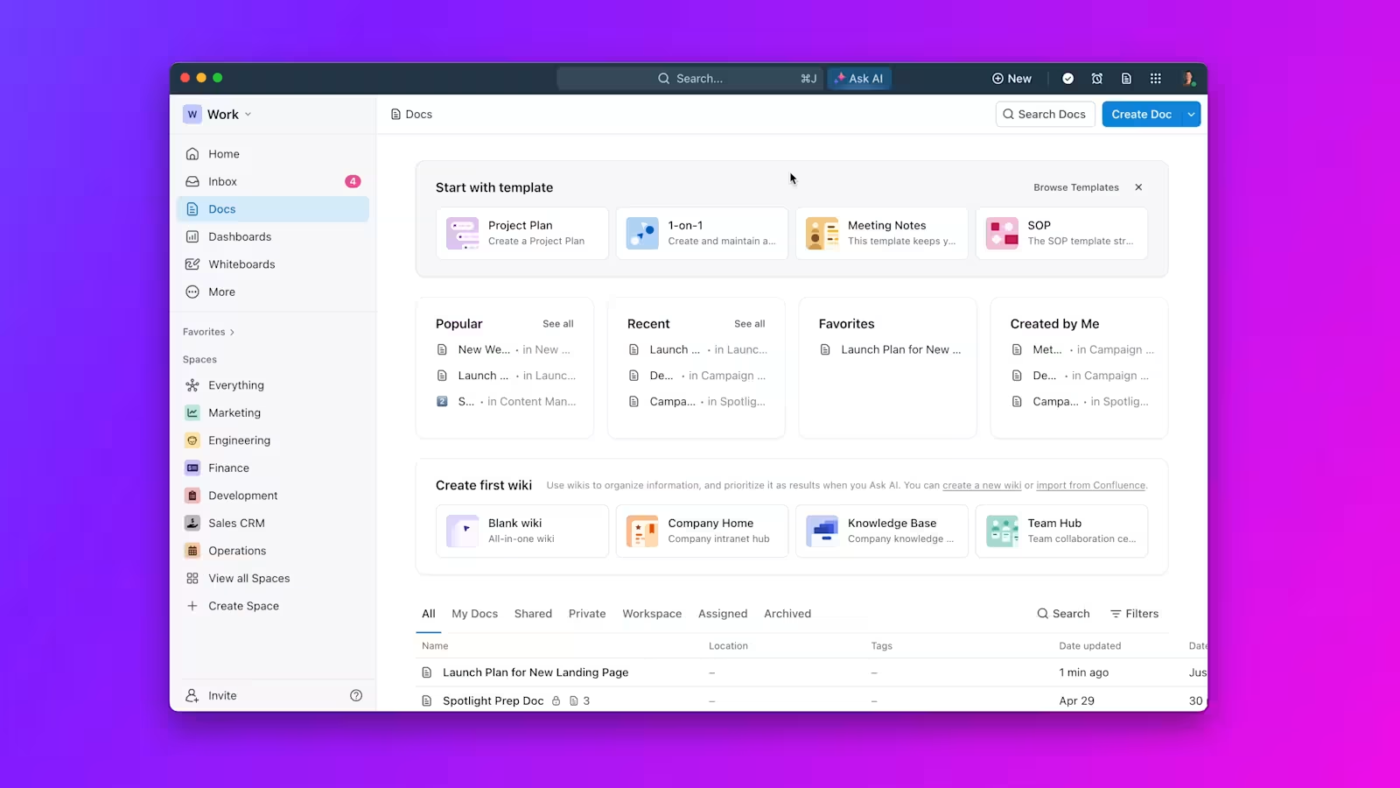
ClickUp is a converged AI workspace where tasks, docs, chat, and time tracking sit together. Instead of logging hours in a separate Excel timesheet, you see what was done, who did it, and how long it took in the same place, which makes your time data much easier to use.
If you’re moving from solo spreadsheets to a shared workspace, it helps to see how your team can actually work together inside ClickUp.
This short video walks through how teams collaborate, share context, and keep time tracking connected to their tasks in ClickUp.
Built-in time tracking with timers with ClickUp Project Time Tracking
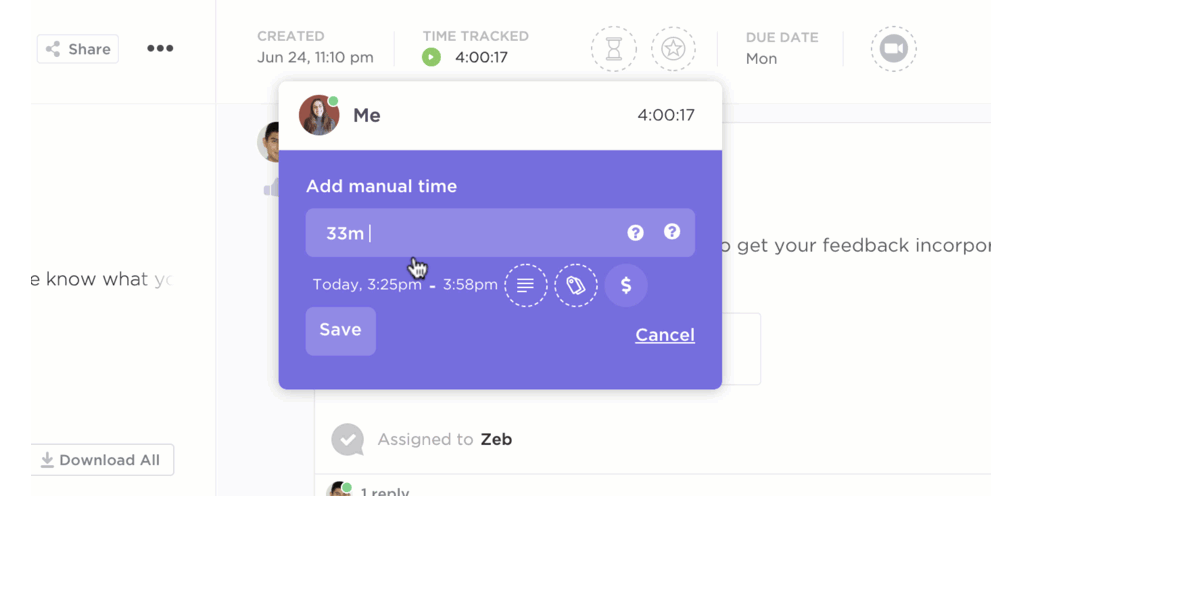
Trying to remember at the end of the day when you started a task is how “rough guesses” sneak into your timesheet. At that point, the figures no longer align with your actual work, and time tracking turns into an additional chore rather than a habitual practice.
With ClickUp Project Time Tracking, you can start and stop a timer directly from any task, use a global timer, or track time from your desktop, mobile, or browser with the free Chrome extension.
If you forget to run the timer, you can add time entries retroactively, adjust them later, and even sync time from tools like Toggl or Harvest so everything rolls up into one place.
Notes, labels, and billable flags on each entry add context, giving you a more accurate picture than manual entries in Excel alone.
Since time entries live within the task, reporting and auditing become much easier than using spreadsheets; you can instantly view the task’s timeline and filter reports by client, project, or status.
💡 Pro Tip: If you’re shifting from Excel to ClickUp, start by enabling time tracking on just one or two key lists (like “Client Projects” or “Support Tickets”) instead of the whole workspace. Ask everyone to track time only on those tasks for a couple of weeks, then use a simple dashboard widget to compare estimated vs. actual hours. You achieve quick wins without overwhelming the team.
Timesheets, reports, and workload view with ClickUp

When everyone is sending screenshots of spreadsheets at the end of the week, approvals slow down, and small mistakes slip through. Someone forgets to attach their file, someone else edits the wrong version, and managers end up chasing people for corrections instead of actually reviewing the work.
ClickUp Timesheets Hub helps by pulling all tracked time into one place so you can review, filter, submit, and approve timesheets in a single view.
Instead of juggling attachments and manual edits, you work from one organized hub for the whole team.
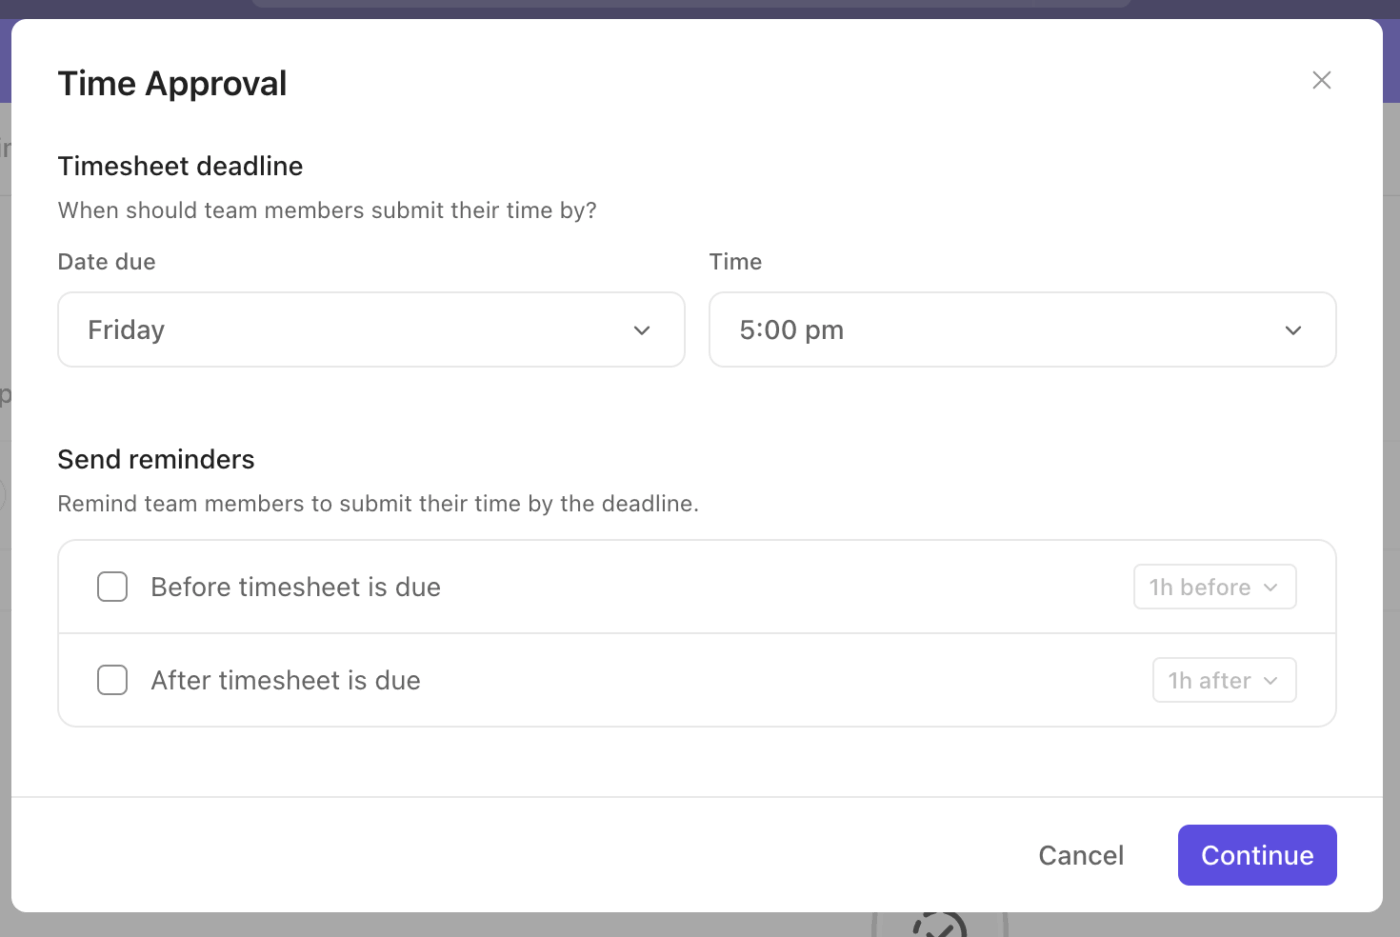
With ClickUp Timesheets Approvals, team members submit their time for a period, and managers review and approve it in one place instead of over email.
Turn data and time records into visual reports with ClickUp Dashboards
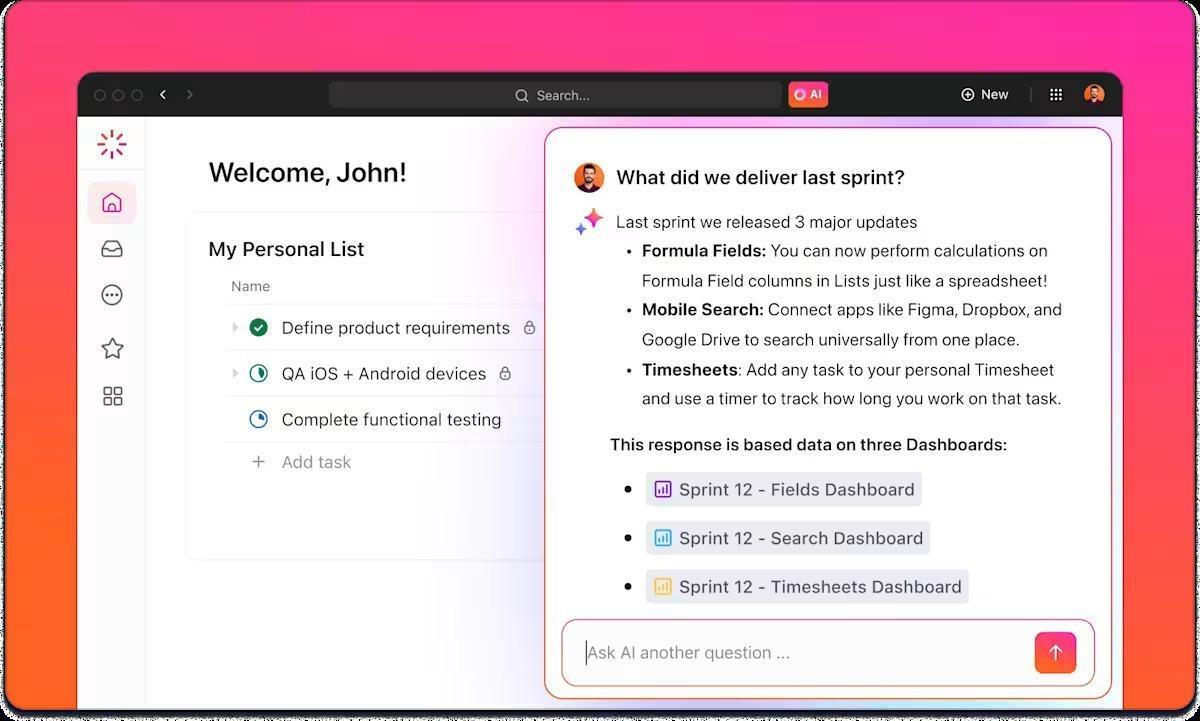
Raw time-tracking spreadsheets with hundreds of rows make it difficult to spot patterns and identify projects or clients that consume the most time.
ClickUp Dashboards visualize data so you can see which projects consume the most hours, how much time goes into billable work, and whether certain clients or tasks regularly run over budget.
Slice those reports by user, project, or time, then share them with stakeholders without exporting and reformatting data every time.
Integrations + AI summaries
Spreading your time data across calendars, spreadsheets, and various apps can make updating a central sheet tedious work. You spend more time copying, pasting, and fixing imports than actually looking at trends.
ClickUp connects with tools like calendars and external time tracking apps, so more of your time entries land in one place without extra data entry. That gives you a cleaner base to work from before you even think about reporting.
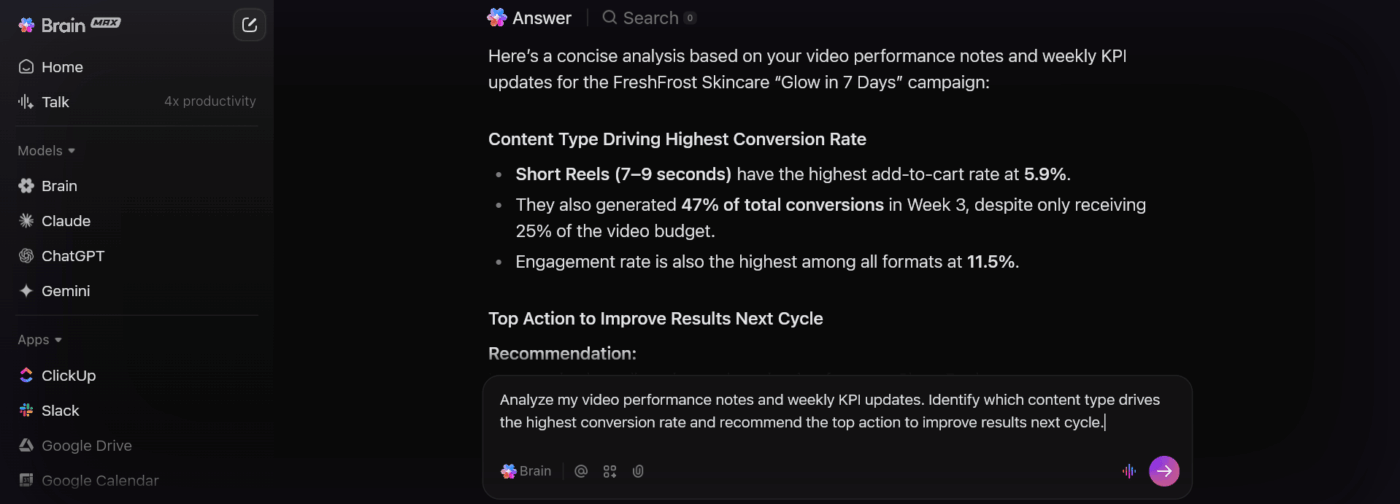
ClickUp Brain, the integrated AI assistant, sits on top of that workspace and helps you make sense of it. Instead of scrolling through long lists of tasks and time entries, you can ask for summaries of what the team worked on, how a sprint went, or what is blocking progress.
ClickUp Brain can turn recent work and time data into quick recaps you can share with stakeholders, which is a big step up from reading through every row in an Excel timesheet.
💡 Pro tip: Once your team is tracking time in ClickUp, ask ClickUp Brain to “summarize last week’s billable work by client” or “recap where the design team spent most of their time.” Instead of reading through every task and timesheet, you get a quick narrative you can paste into an update or share in a standup doc.
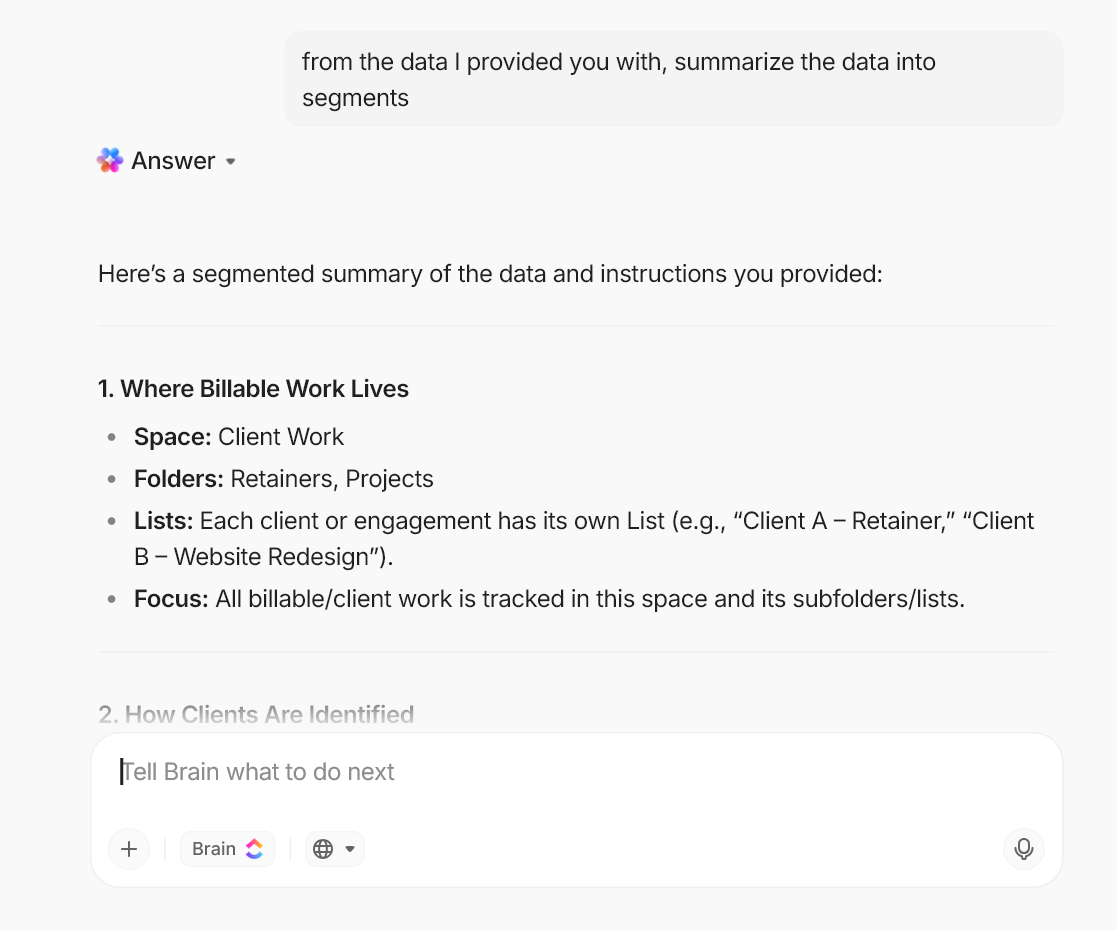
For deeper automation, ClickUp BrainGPT and AI Agents can go a step further. They can help you monitor workloads, surface patterns in how time is being spent, or answer questions about recent activity across projects, using the data already inside your workspace.
That kind of always-on support is difficult to build or maintain when your time tracking lives in separate Excel files.
ClickUp best features
- Centralize tasks, time entries, and docs so project work and hours tracked live in one place instead of separate spreadsheets
- Use ClickUp Project Time Tracking, Timesheets Hub, and Dashboards to track time, review submissions, and monitor project hours in real time
- Visualize workload with Workload and Team Views in the Teams Hub so you can spot capacity issues and rebalance assignments before burnout
- Turn recurring time tracking routines (like weekly timesheet reminders or approvals) into scheduled workflows instead of manual follow-ups with ClickUp Automations
ClickUp limitations
- The broad feature set can feel complex at first, so teams may need time to design the right spaces, views, and reports for time tracking
ClickUp pricing
ClickUp ratings and reviews
- G2: 4.7/5 (10,650+ reviews)
- Capterra: 4.6/5 (4,500+ reviews)
📮ClickUp Insight: Context-switching is silently eating away at your team’s productivity. Our research shows that 42% of disruptions at work come from juggling platforms, managing emails, and jumping between meetings. What if you could eliminate these costly interruptions?
ClickUp unites your workflows (and chat) under a single, streamlined platform. Launch and manage your tasks from across chat, docs, whiteboards, and more—while AI-powered features keep the context connected, searchable, and manageable!
2. Toggl Track
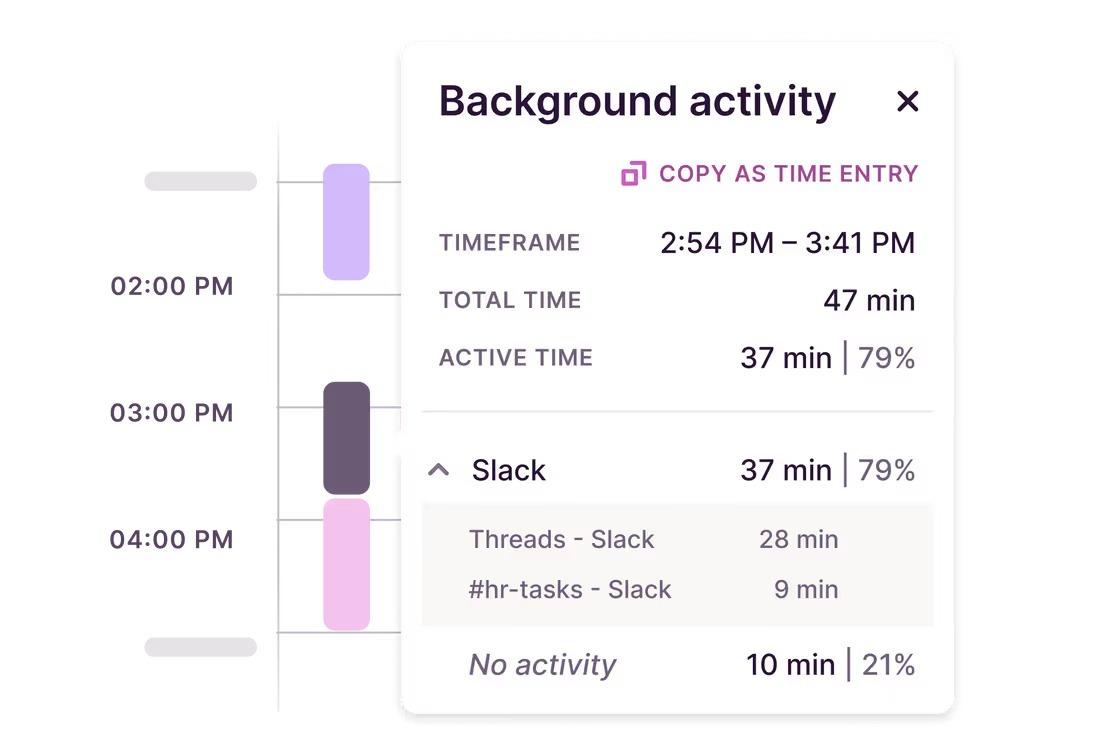
Toggl Track is a straightforward time-tracking tool built for people who prefer timers over spreadsheets.
You create projects and clients, hit start when you begin a task, and let the app keep running in the background while you work. That removes a lot of the guesswork that comes with filling out an Excel timesheet at the end of the day.
It works across web, desktop, and mobile, with a browser extension that follows you into tools like Gmail, Jira, or Asana. That makes it easier to track time in context and then review everything in reports, rather than digging through rows and formulas in a time-tracking spreadsheet.
Toggl Track best features
- Start one-click timers from the web, desktop, mobile, or browser extensions
- Organize time entries by client, project, and tags for easier reporting
- Mark hours as billable or non-billable and generate client-ready summaries
- Export reports to share with stakeholders or plug into your billing process
Toggl Track limitations
- Adds complexity as you introduce more projects, tags, and workspaces
- Offers the most useful admin controls and reporting options only on paid plans
Toggl Track pricing
- Free
- Starter: $10/month per user
- Premium: $20/month per user
- Enterprise: Custom pricing
Toggl Track ratings and reviews
- G2: 4.6/5 (1,500+ reviews)
- Capterra: 4.7/5 (2,500+ reviews)
3. Harvest
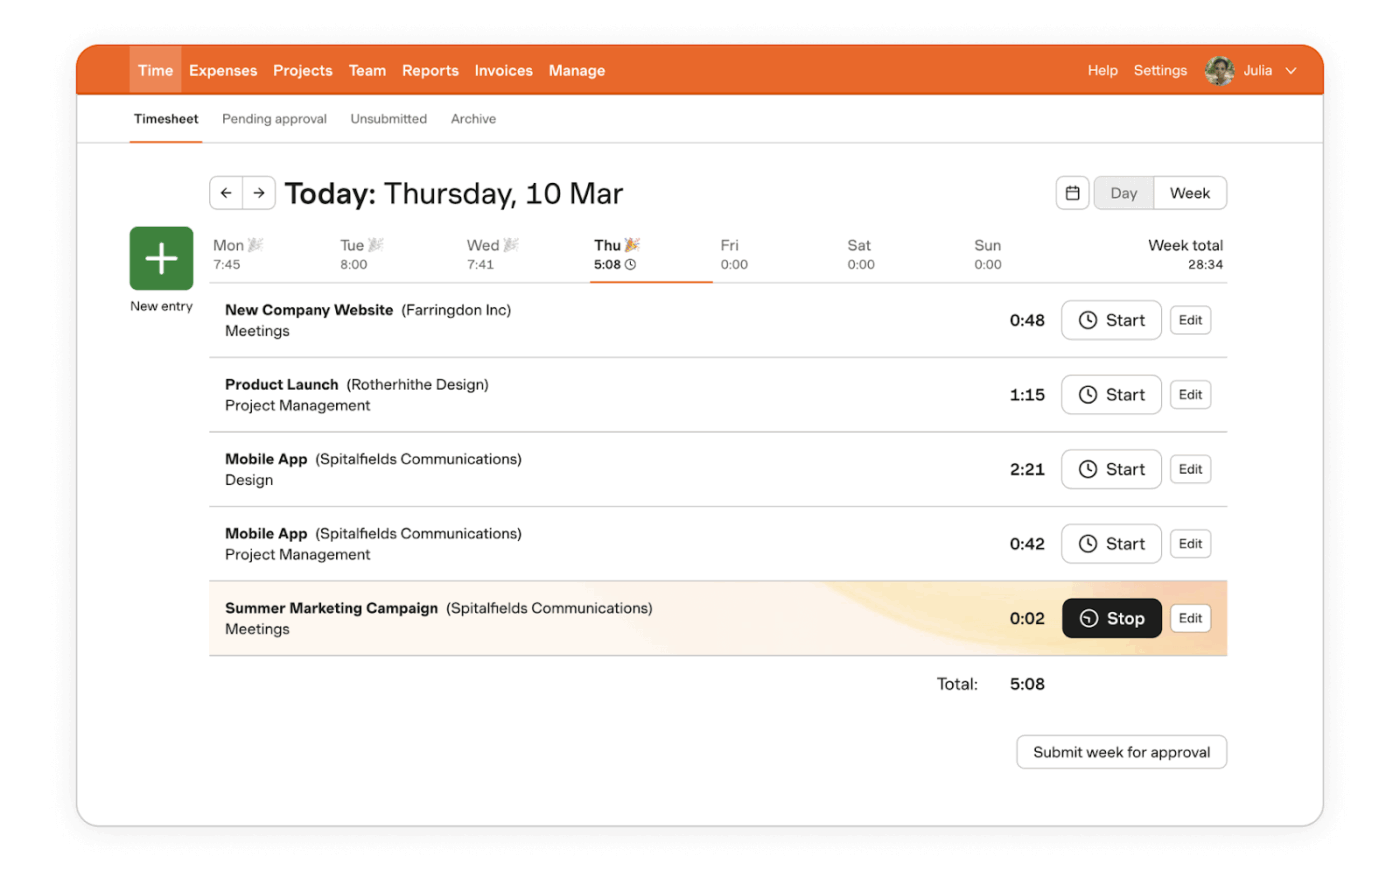
Harvest is a good fit if you want time tracking and invoicing together rather than juggling spreadsheets and a separate tool for billing.
You can track time across projects and clients, log expenses, and then turn that data into branded invoices without exporting rows from Excel first.
It is designed for agencies, consultants, and service teams that live on billable hours. Timers, timesheets, and reports help you see how much time a project is burning through, whether you are still within budget, and which clients or tasks are the most profitable, all in one place.
Harvest best features
- Track time with timers or daily timesheets across projects and clients
- Turn hours into branded invoices and accept online payments through integrations
- Monitor project budgets, team capacity, as well as billable vs. non-billable work with reports
- Log expenses alongside time so you see total project costs, not just hours
Harvest limitations
- Focus on billable client work, which can feel heavy if you only need basic internal time tracking
- Larger teams with complex workflows may outgrow its project management side and want deeper planning features
Harvest pricing
- Free
- Pro: $13.75/month per user
- Premium: $17.50/month per user
Harvest ratings and reviews
- G2: 4.3/5 (800+ reviews)
- Capterra: 4.6/5 (600+ reviews)
📖 Also Read: Harvest vs Toggl: Comparison (Features, Pricing)
4. Clockify
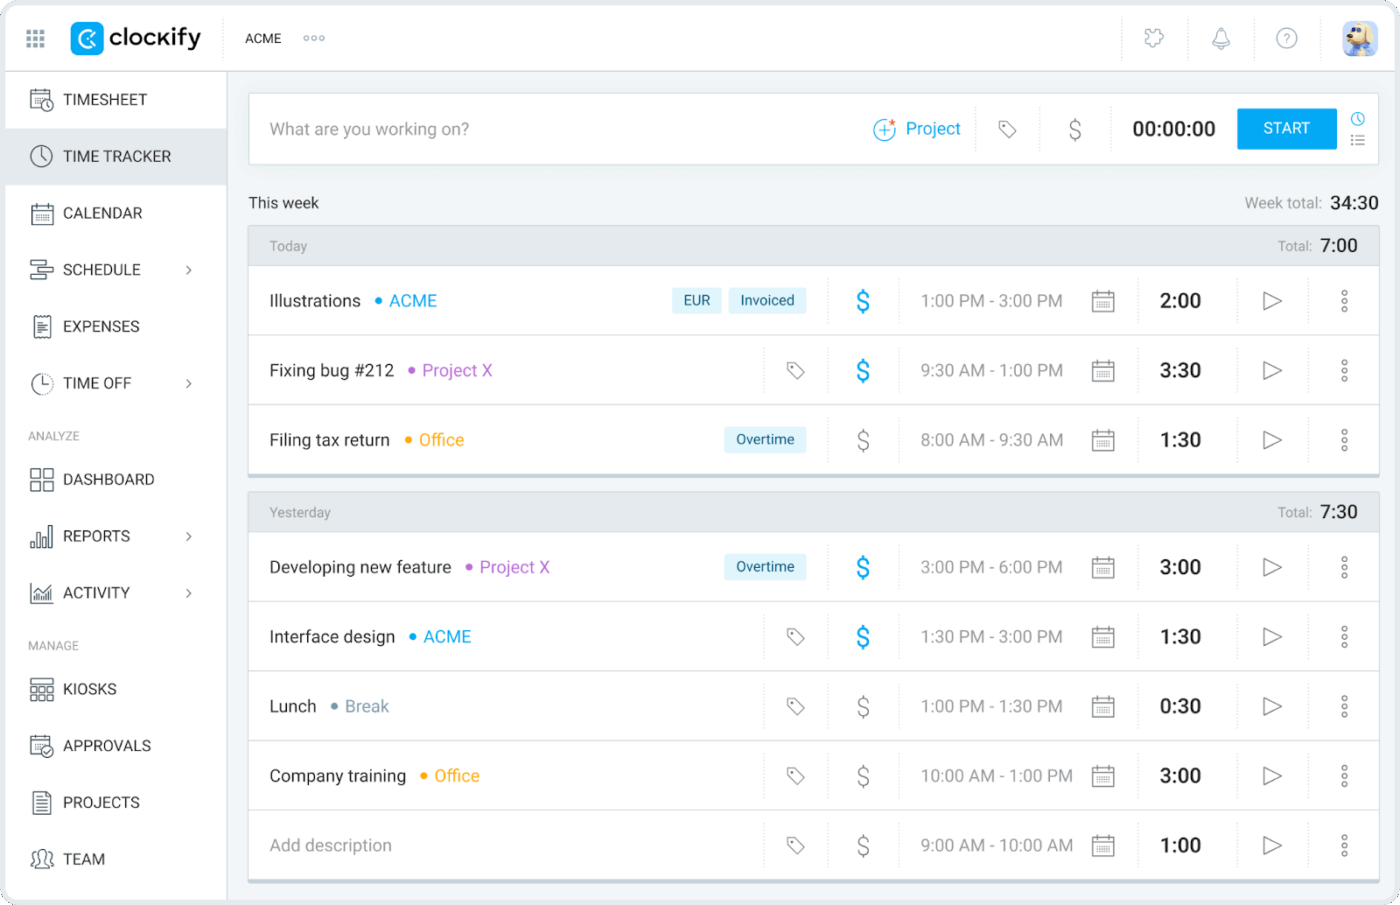
Clockify works well if you’re outgrowing Excel but still want something simple and flexible.
You can track employee time across different projects and clients, record attendance, and pull reports without building any formulas yourself. It is especially handy for small teams that want to move beyond static timesheets but are not ready for a full project management suite.
It supports multiple ways to track time: live timers, manual time entry, weekly timesheets, and even a kiosk mode for shared devices. Teams can capture hours in the way that suits them and then review total hours, billable hours, and overtime in one place instead of across several spreadsheets.
Clockify best features
- Track time with timers, manual entry, or weekly timesheets
- Organize hours by client, project, and task for clearer reporting
- Mark entries as billable or non-billable and review billable totals
- Use basic reporting and exports to share data with clients or payroll
Clockify limitations
- Adds complexity as you turn on more settings and features for a large team
- Keeps some advanced approvals, forecasting, and admin features behind paid tiers
Clockify pricing
- Free
- Basic: $4.99/month per user
- Standard: $6.99/month per user
- Pro: $9.99/month per user
- Enterprise: $14.99/month per user
- cake.com|bundle: $15.99/month per user
Clockify ratings and reviews
- G2: 4.5/5 (100+ reviews)
- Capterra: 4.8/5 (9000+ reviews)
5. Hubstaff
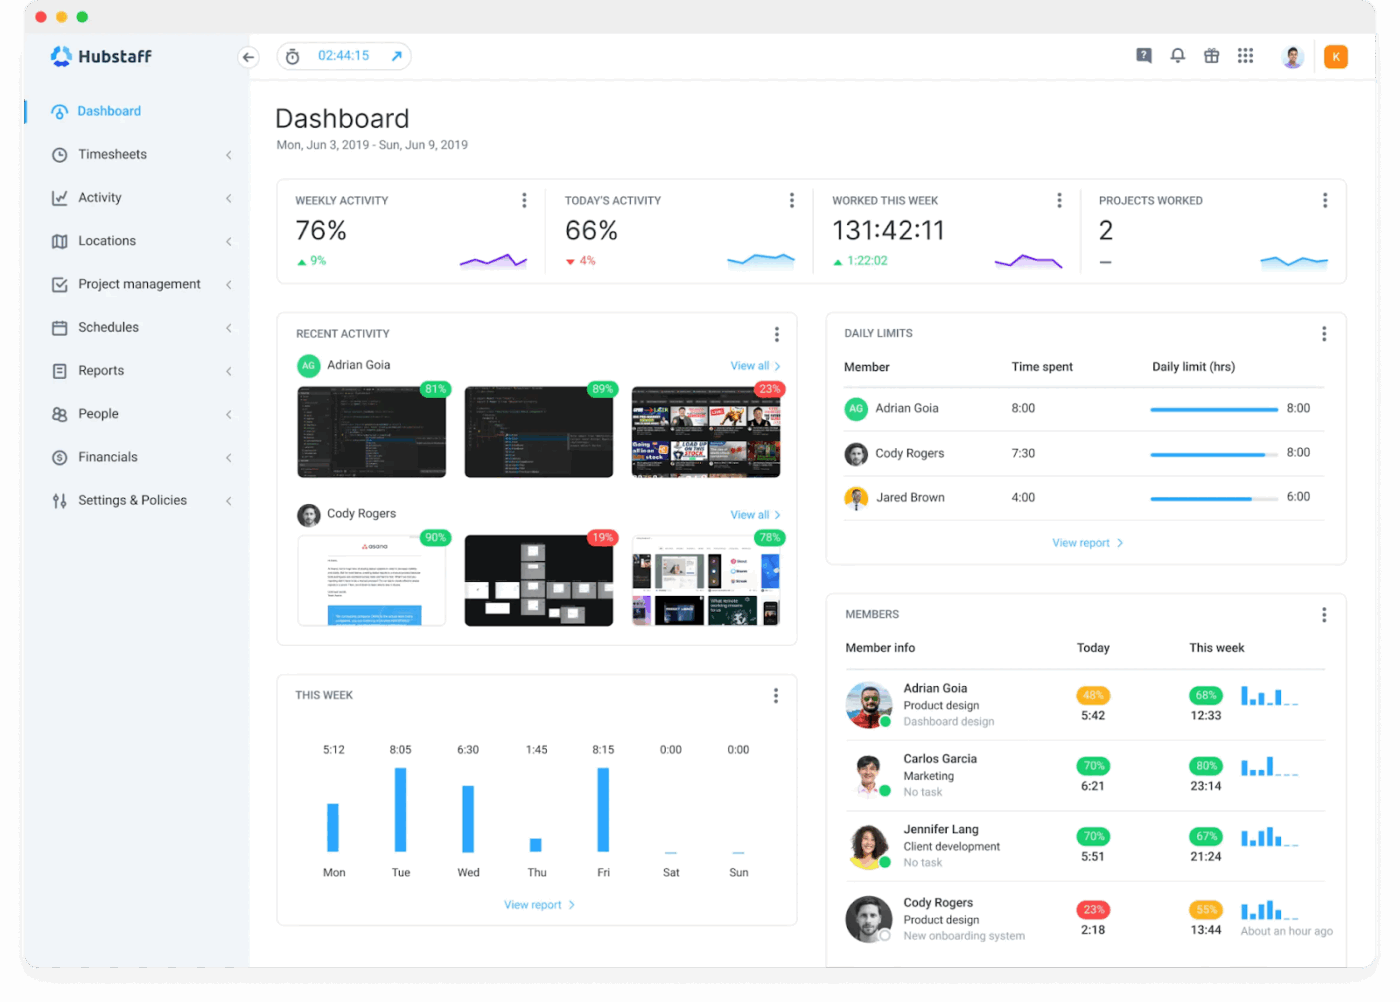
Hubstaff is built for teams that need to track time and proof of work together, especially remote, field, or hybrid teams.
Instead of just logging hours, it can capture activity levels, optional screenshots, and GPS data so managers see when and where work happened.
If you’re currently using Excel to track hours for mobile teams or field staff, Hubstaff can remove many manual follow-ups. People clock in on web, desktop, or mobile, and their time entries automatically link to projects, tasks, and locations, so you are not chasing timesheets or trying to clean up messy spreadsheets at the end of the week.
Hubstaff best features
- Track time with web, desktop, and mobile apps, including GPS-based time clocks for field teams
- Capture optional screenshots and app and URL usage to give managers more context around work time
- Use built-in scheduling, attendance, and PTO tracking for shift-based teams
- Connect tracked time to payroll, invoicing, and budgeting so you can pay teams and bill clients from the same data
Hubstaff limitations
- Monitoring features like screenshots and activity tracking may feel intrusive for some teams
- Pricing can add up as you scale to large teams that only need light time tracking
Hubstaff pricing
- Starter: $7/month per user
- Grow: $9/month per user
- Team: $12/month per user
- Enterprise: $25/month per user (billed annually)
Hubstaff ratings and reviews
- G2: 4.5/5 (1500+ reviews)
- Capterra: 4.6/5 (1500+ reviews)
When Excel Hits Its Limits, Let Clickup Clock In
Excel is a wonderful way to stop guessing where your time goes. With a simple monthly timesheet template, you can log employee hours, note the break start time, and calculate total time spent on a monthly basis.
Especially once you set cells to the correct format automatically instead of wrestling with a different numeric system in every column. That alone is a big upgrade from memory-based tracking for most employees.
But as soon as you add more people, more projects, and more approvals, those sheets start to multiply. What begins as a user-friendly setup slowly turns into a maze of versions that employees spend too much time updating and checking. That is when work sprawl shows up, and time tracking quietly turns into admin.
ClickUp gives you the next step. Track time on tasks, review it in timesheets, turn it into live reports, and balance workloads in one place, so your system can grow with your team instead of holding it back.
Sign up for ClickUp and build a time-tracking setup that finally keeps up with your work.
Frequently Asked Questions (FAQ)
Not exactly. Excel doesn’t have a dedicated time-tracking tool, but you can build your own Excel timesheet with time-formatted cells and formulas to calculate hours worked. If you ever outgrow that setup, ClickUp adds built-in timers and timesheets without needing formulas.
Enter start time, end time, and break duration, then use a formula like =(End time – Start time) – Break and format the result as Time. You can use SUM at the bottom of the column to get total hours for the week and move to ClickUp when you want those hours tied directly to tasks and reports.
Yes, Excel works well for simple small business timesheets with a few employees and straightforward schedules. As your team, projects, or approval needs grow, a workspace like ClickUp can handle time tracking, reviews, and reporting in one place while Excel stays as a backup or archive.


