

Merging cells in Google Sheets is a simple yet powerful tool that can help you organize your spreadsheets and customize your tables. This handy function enhances your spreadsheets’ visual appeal and clarity.
Whether you’re creating a prominent header for a report, combining data for better readability, or simply trying to make your document look more polished, merging two or more cells can help you achieve that. It’s commonly used to create titles that span multiple columns or group related information together.
In this article, we’ll walk you through the steps required to merge cells effectively and offer tips on avoiding potential pitfalls.
How to Merge Cells in Google Sheets
Step-by-Step Guide to Merging Cells in Google Sheets
There are two primary methods for merging selected cells in Google Sheets:
Method 1: Merging cells using the toolbar
The most straightforward way to merge or unmerge cells in Google Sheets is through the toolbar, which is intuitive and user-friendly.
Here’s a step-by-step guide:
- Select the cells you want to merge: Highlight the multiple cells you want to merge by clicking and dragging over them

- Locate the merge symbol on the toolbar: At the top of your Google Sheets interface, you’ll find a toolbar with various options. Look for the ‘Merge cells’ icon, which resembles two squares merging into one

- Choose the type of merge: Click the arrow next to the ‘Merge cells’ button to see the dropdown menu options. You can choose ‘Merge all,’ ‘Merge vertically,’ or ‘Merge horizontally’ based on your needs. Note that only the value in the top leftmost cell will stay. To unmerge cells, select the same icon and select the ‘Unmerge’ option

- Click on your desired merge option: Once selected, the cells will merge according to the chosen method, and your data will remain in one merged cell or be merged across multiple cells.

Method 2: Merging cells using the format option
The ‘Format’ tab can be a quick alternative to merging cells in the way we described above.
Here’s how to use it:
- Highlight: Just like the toolbar method, select the range of cells you want to merge by clicking and dragging across them

- Format: After selecting the cells, click ‘Format’ under the Sheets title to open the drop-down menu
- Click on ‘Merge cells’: Scroll down the menu until you see the ‘Merge cells’ option

- Choose your preferred merging option: Just like the toolbar method, you can choose between merging all cells, merging horizontally, or merging vertically

Types of Cell Merges Available
In Google Sheets, there are three main types of merges available, each serving a specific function depending on the structure of your data:
Merge all

‘Merge all’ is the most comprehensive merge option. It merges all the cells you select into one large cell, removing the borders between them. This option is useful when creating large headers or titles spanning several rows and columns. Again, remember that if the cells are populated, you will only retain the value in the top leftmost cell.

Use this when combining multiple rows and columns into one unified block, like creating a large title or label for a section in your sheet.
Also Read: How to Merge Cells in Google Sheets
Merge horizontally

‘Merge horizontally’ merges cells across a single row, but it does not affect the vertical arrangement of the columns. This is particularly useful when you want to span data across several columns but keep the rows intact.

This option is commonly used for headers that extend across multiple columns but are on the same row. For example, merging the cells in a single row creates a unified title spanning various columns in a dashboard.
Merge vertically

‘Merge vertically’ merges cells down a column while leaving the horizontal structure intact. It combines data cells vertically, creating a longer cell that spans multiple rows.

This merge is handy when creating a label or text field that extends down through multiple rows, such as a label spanning a column for a vertical data section.
Common Issues and Limitations with Merging Cells in Google Sheets
Merging cells in Google Sheets comes with a few caveats and limitations:
- Data loss: Since only the data in the top-left cell is retained, you stand to lose any other data in the merged cells
- Sorting limitations: Merged cells can cause issues when sorting data, as Google Sheets doesn’t handle sorting well with merged cells. The program may return errors or prevent sorting entirely
- Filtering limitations: Filters may not work as expected with merged cells, making it challenging to organize and manipulate data within the spreadsheet
- Breaks in format: Merging cells may cause formatting issues when applying consistent formatting across the entire sheet. Unmerged cells next to merged cells may not align correctly
One way to overcome these limitations is to correct all the errors manually. However, that, too, can be time-consuming and not 100% accurate.
Another way is to explore alternatives to Google Sheets and database software that offer broader functionalities. ClickUp is one such option.
Using ClickUp’s Table View for Managing Spreadsheet Data
ClickUp’s Table View allows you to visualize and manage your tasks in a table format. It’s a great way to get a clear overview of your work and quickly see important details like task status, due dates, assignees, and Custom Fields.

Benefits of ClickUp Table View:
- Customize columns with specific data types, such as tasks, due dates, or custom drop-downs
- Integrate spreadsheet data directly into task management workflows. For example, you can assign tasks, set priorities, and track project progress directly from your table
- Use ClickUp Comments, file sharing, and ClickUp @mentions to make it easier to work with your team on the same dataset

Due to these advantages, some users have replaced Google Sheets and Excel reporting with ClickUp.
Going beyond basic spreadsheets, the feature helps overcome the limitations of cell merging. Here’s how:
- The Table View doesn’t rely on merged cells for visual grouping. Instead, you can use subtasks or custom fields to create hierarchical relationships between tasks within the table. This approach is more flexible and avoids the formatting issues that can arise with merged cells in Google Sheets
- It allows you to create custom columns to display specific task details relevant to your project, such as priority, status, or assignee. This provides a more comprehensive view of your tasks
- The Table View enables you to filter and sort tasks based on various criteria, making it easier to identify specific information and prioritize your workload
ClickUp also offers prebuilt spreadsheet templates to speed up your data visualization further in a spreadsheet format.
The ClickUp Spreadsheet Template, for example, offers an easy way to document critical information.

Originally designed to collect customer data, the template is adaptable to several unique needs. It can be used to collaborate with multiple teams to manage data and automate workflows.
The template seamlessly integrates with ClickUp Tasks, enabling you to track tasks, visualize data in multiple views, and customize statuses.
💡Quick tips:
- Use integrations to centralize data from various sources
- Apply automations to streamline updates and task completion
- Customize views for better team alignment
Another option is the ClickUp Editable Spreadsheet Template. It is designed to help you create, manage, and store financial records organizationally. However, like other database templates, it can also be adapted to suit varying project requirements.
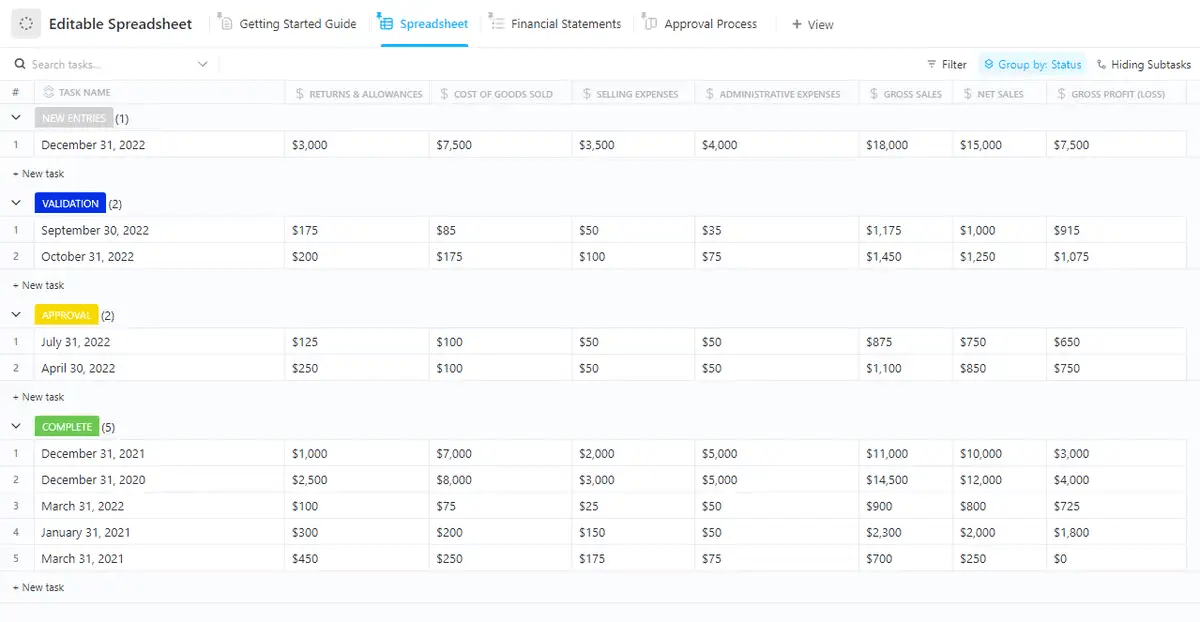
While Google Sheets is widely recognized for its simplicity and accessibility, the ClickUp Editable Spreadsheet Template embeds spreadsheet functionalities directly into a task management platform. This enables enhanced collaboration, project alignment, and real-time updates within a single workspace.
The benefits of this template are summarized below:
- Allows teams to manage tasks and projects alongside their data. This tight integration helps simplify workflows by eliminating the need to switch between multiple apps for task management and data analysis
- Multiple users can work simultaneously on a document. However, it goes further by tying those edits directly into tasks and project updates, ensuring that every change is part of the larger project framework. This eliminates data silos and allows for better collaboration across departments
- Benefits from ClickUp’s Automation capabilities include allowing you to trigger actions based on certain conditions. For example, you can automatically update task statuses or create new tasks when data changes, making it more versatile than Google Sheets in process automation
- Offers built-in features like dashboards and charts tied to the spreadsheet. This provides real-time insights into your data, making it easier to track KPIs, financial data, or any other critical project metrics
Consolidate Spreadsheet Data with ClickUp
Merging cells in the Google Sheets app is a simple yet effective tool for improving spreadsheet layouts and consolidating data. Whether you’re using it for headers, combining data, or designing templates, it’s an essential feature that can significantly improve your Google Sheets output.
However, for more complex and collaborative projects, ClickUp offers spreadsheet software features such as its Table View, which offers advanced functionalities and integrations that surpass what traditional Google or Excel spreadsheets offer.
Try ClickUp today and manage your data better!

Everything you need to stay organized and get work done.
