How to Create a Calendar in Google Sheets
Sorry, there were no results found for “”
Sorry, there were no results found for “”
Sorry, there were no results found for “”

Keeping track of dates and deadlines is tough—especially when your ‘system’ happens to be a mix of sticky notes, last-minute calendar invites, and a mental list you swear you won’t forget (but totally will). Yes, we’ve been there ourselves.
Is there a better way to organize schedules? 🤔
Good news: there is!
Google Sheets lets you build a calendar that fits your needs—whether it’s a project plan, content schedule, or just one for remembering those pesky bills.
In this blog post, we’ll walk you through how to build a Google Sheets calendar step by step. And if that works for you, great—but there’s a much faster, smarter way to do that with ClickUp. Stick around to see the difference.
Making a calendar schedule on Google Sheets provides you with room for flexibility and customization. Let’s look at why Google Sheets is a useful choice for calendar management.
Don’t want to spend hours trying to build the perfect calendar in Google Sheets? ClickUp’s free Calendar Planner template is a better bet! No need to fuss with formatting cells, formulas, or color-coding from scratch. Just plug in your tasks and go.
🧠 Fun Fact: Google Sheets was introduced as part of Google Docs & Spreadsheets on June 6, 2006. It became a standalone product under Google Drive in 2012.
Here’s a detailed guide to help you build your own functional and customizable Google Sheets calendar. 👇
To get started, open Google Drive and sign in with your Google account.
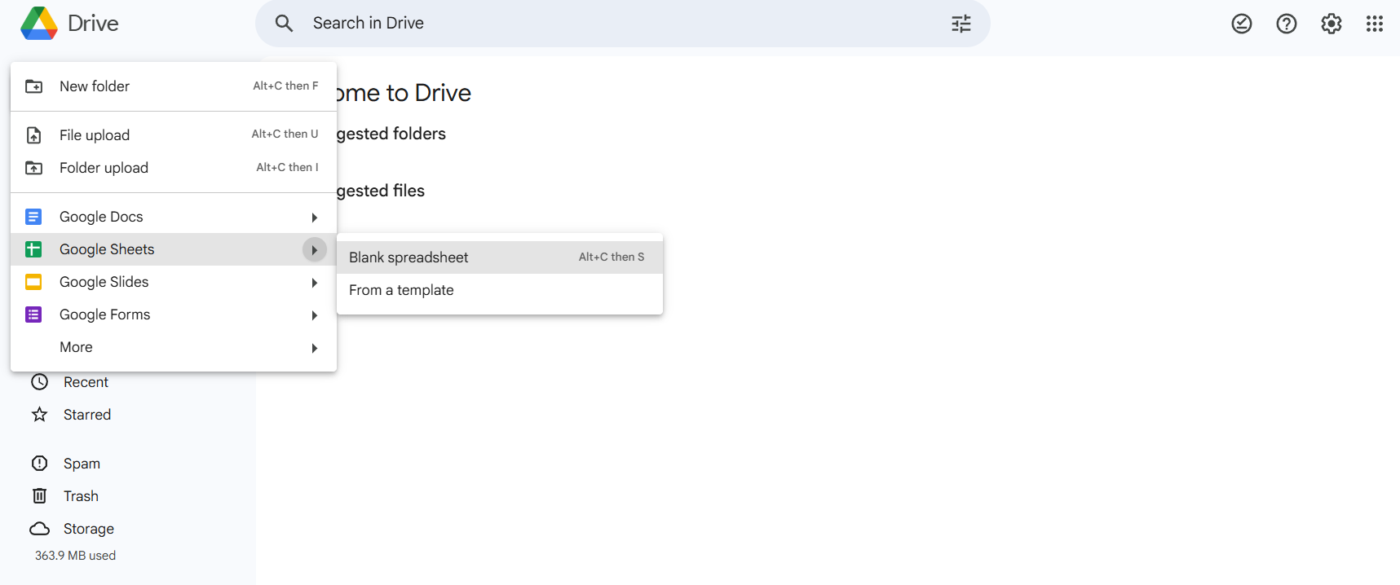
Once you’re in, click the +New button on the left sidebar. Hover over the Google Sheets option, then select Blank spreadsheet to create a new calendar from scratch.
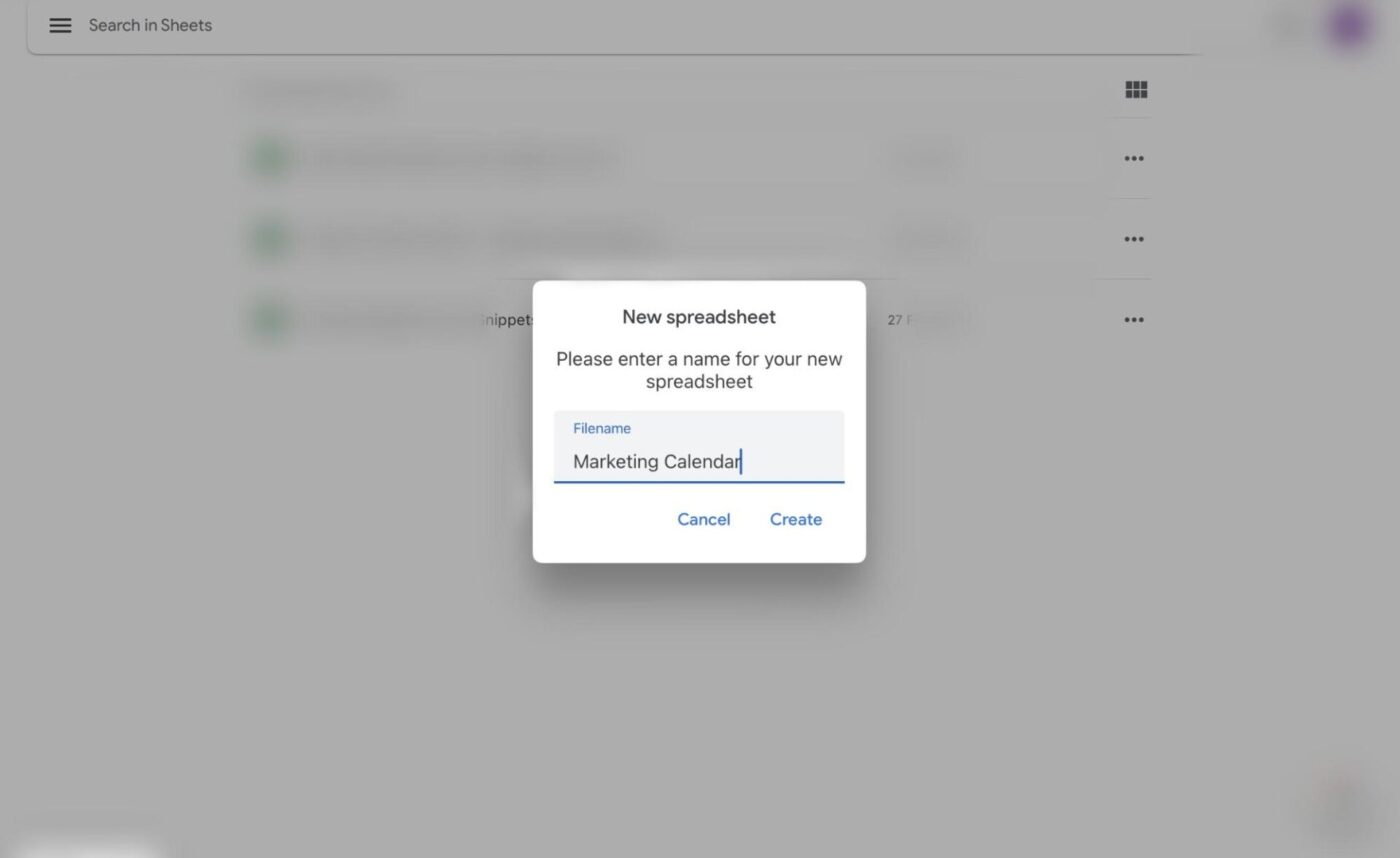
A fresh spreadsheet will open. Rename it by clicking Untitled spreadsheet in the top-left corner and entering a new title, such as, ‘Marketing Calendar.’
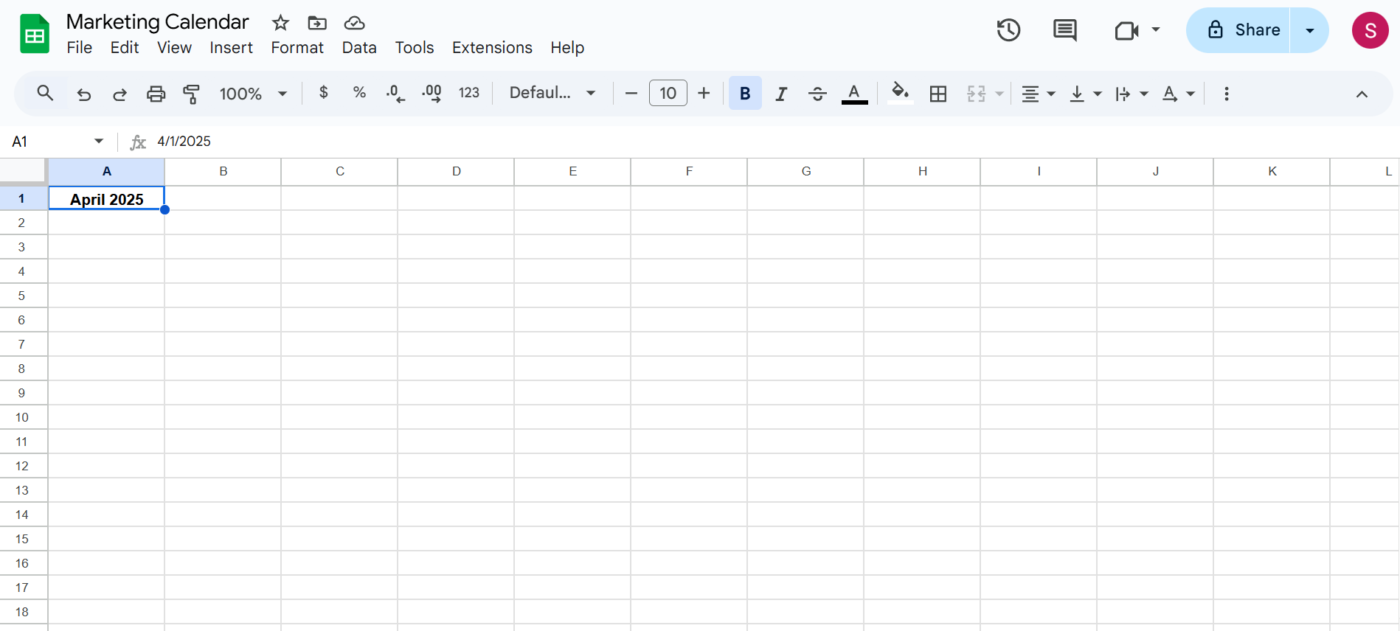
Click into cell A1 and type the month and year—for example, April 2025. Format this cell to make it stand out by increasing the font size and applying bold styling.
Next, highlight cells A1 to G1 (seven columns for the seven days of the week). Click the Merge cells button in the toolbar to combine them into one.
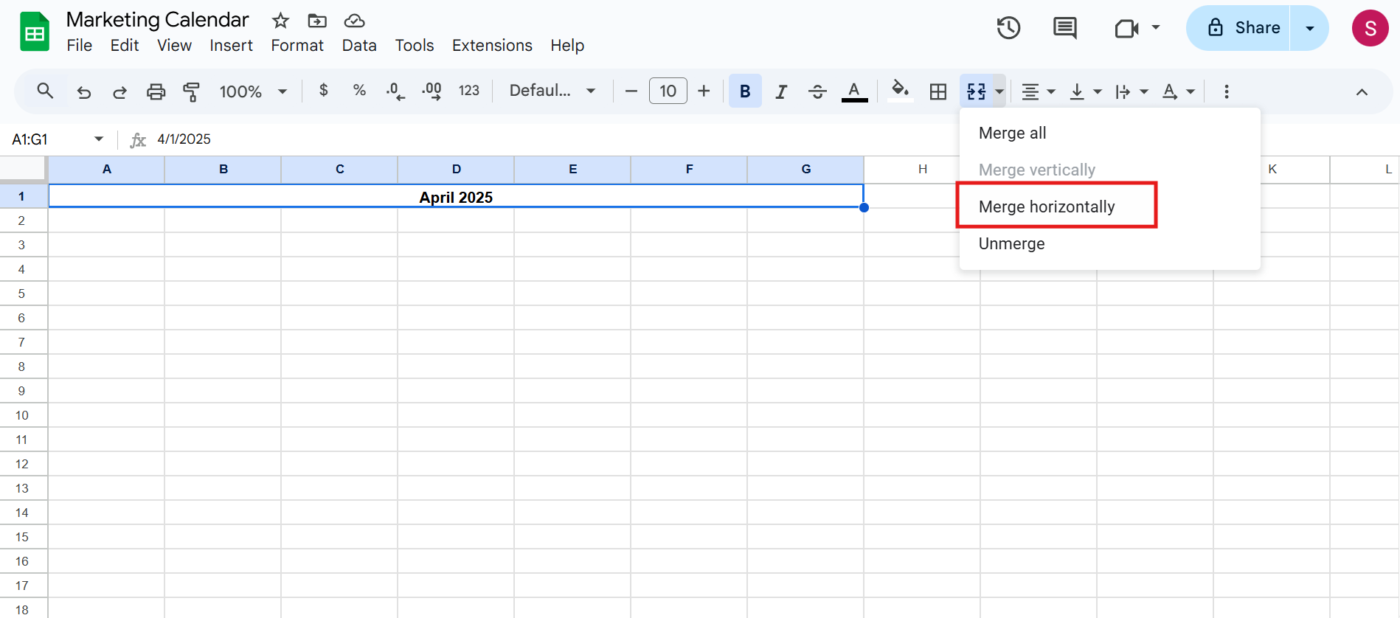
With the merged cell still selected, click the Horizontal align button and choose Center to align your month title properly.
🔍 Did You Know? Initially, Google Sheets had a 400,000-cell limit, but it has since expanded to 10 million cells, making it more powerful for handling large datasets.
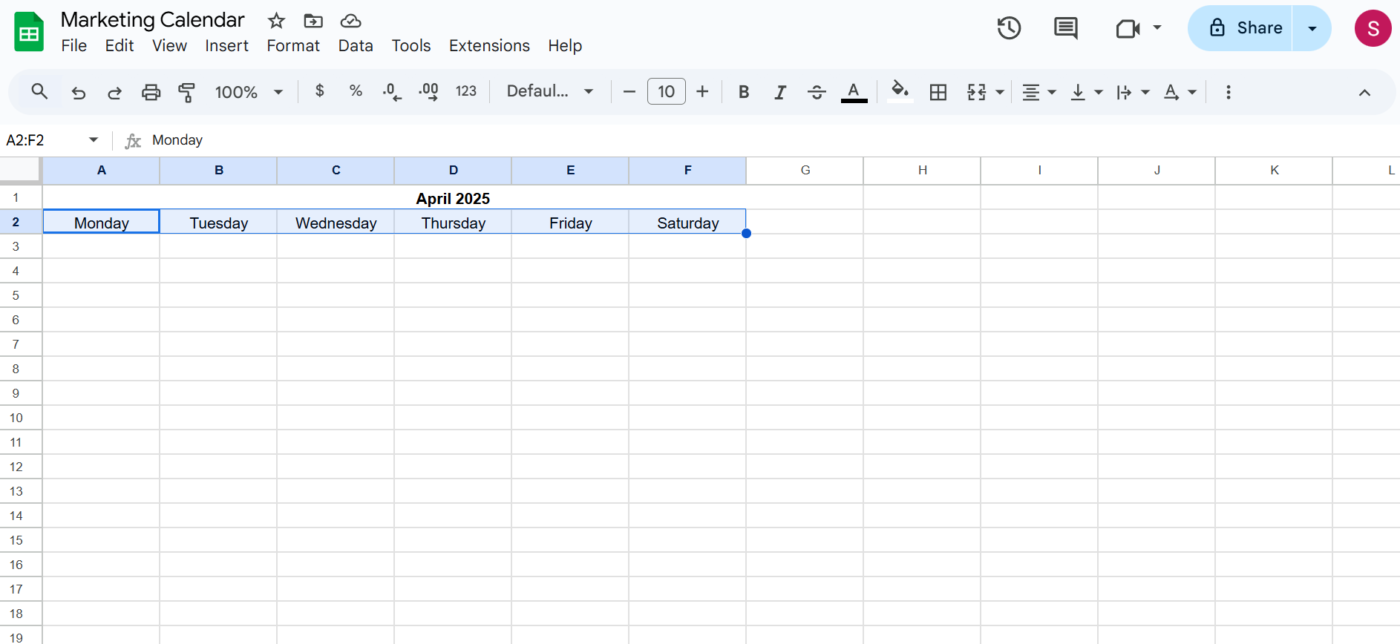
In cells A2 through G2, add the days of the week: Sunday, Monday, Tuesday, Wednesday, Thursday, Friday, and Saturday.
💡 Pro Tip: To save time, type Sunday in cell A2, then click and drag the fill handle (the small square at the bottom-right corner of the cell) across to G2. This will auto-fill the rest of the days for you.
🔍 Did You Know? Letting employees have a say in their schedules makes a real difference. Research found that digital scheduling tools improve well-being and work-life balance, making jobs feel more manageable.
Find the correct starting column by checking which day of the week the 1st of the month falls on. For example, if April 1, 2025, is a Tuesday, it should go under column C.
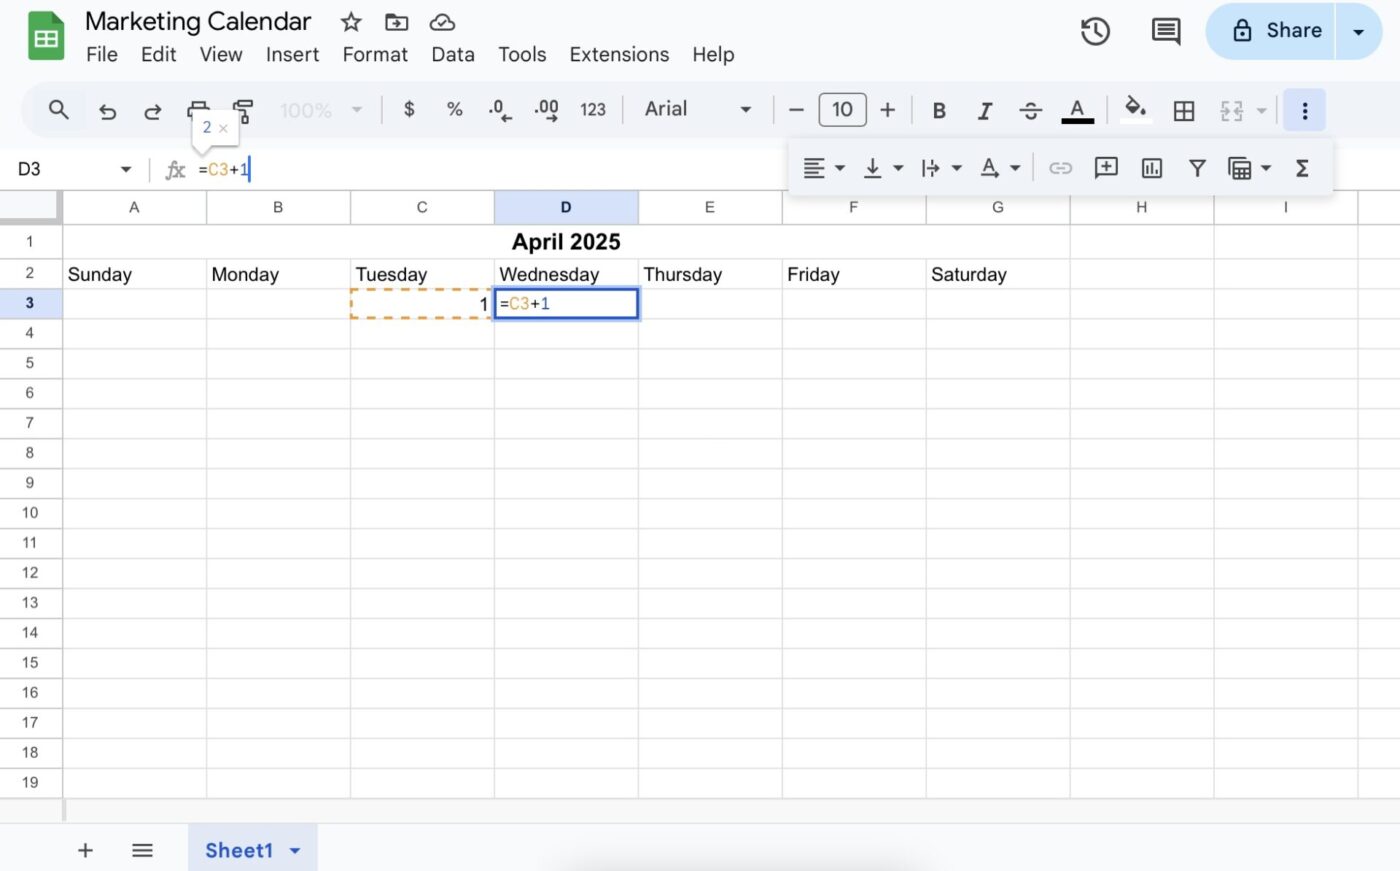
In the correct column of row 3, type 1 to mark the start of the month. In the next cell to the right, enter =C3+1 to generate the 2nd of the month. Then, drag the fill handle across to auto-fill the rest of the row and complete the first week.
Move to the next row and continue entering dates, always starting in the first column of each new week.
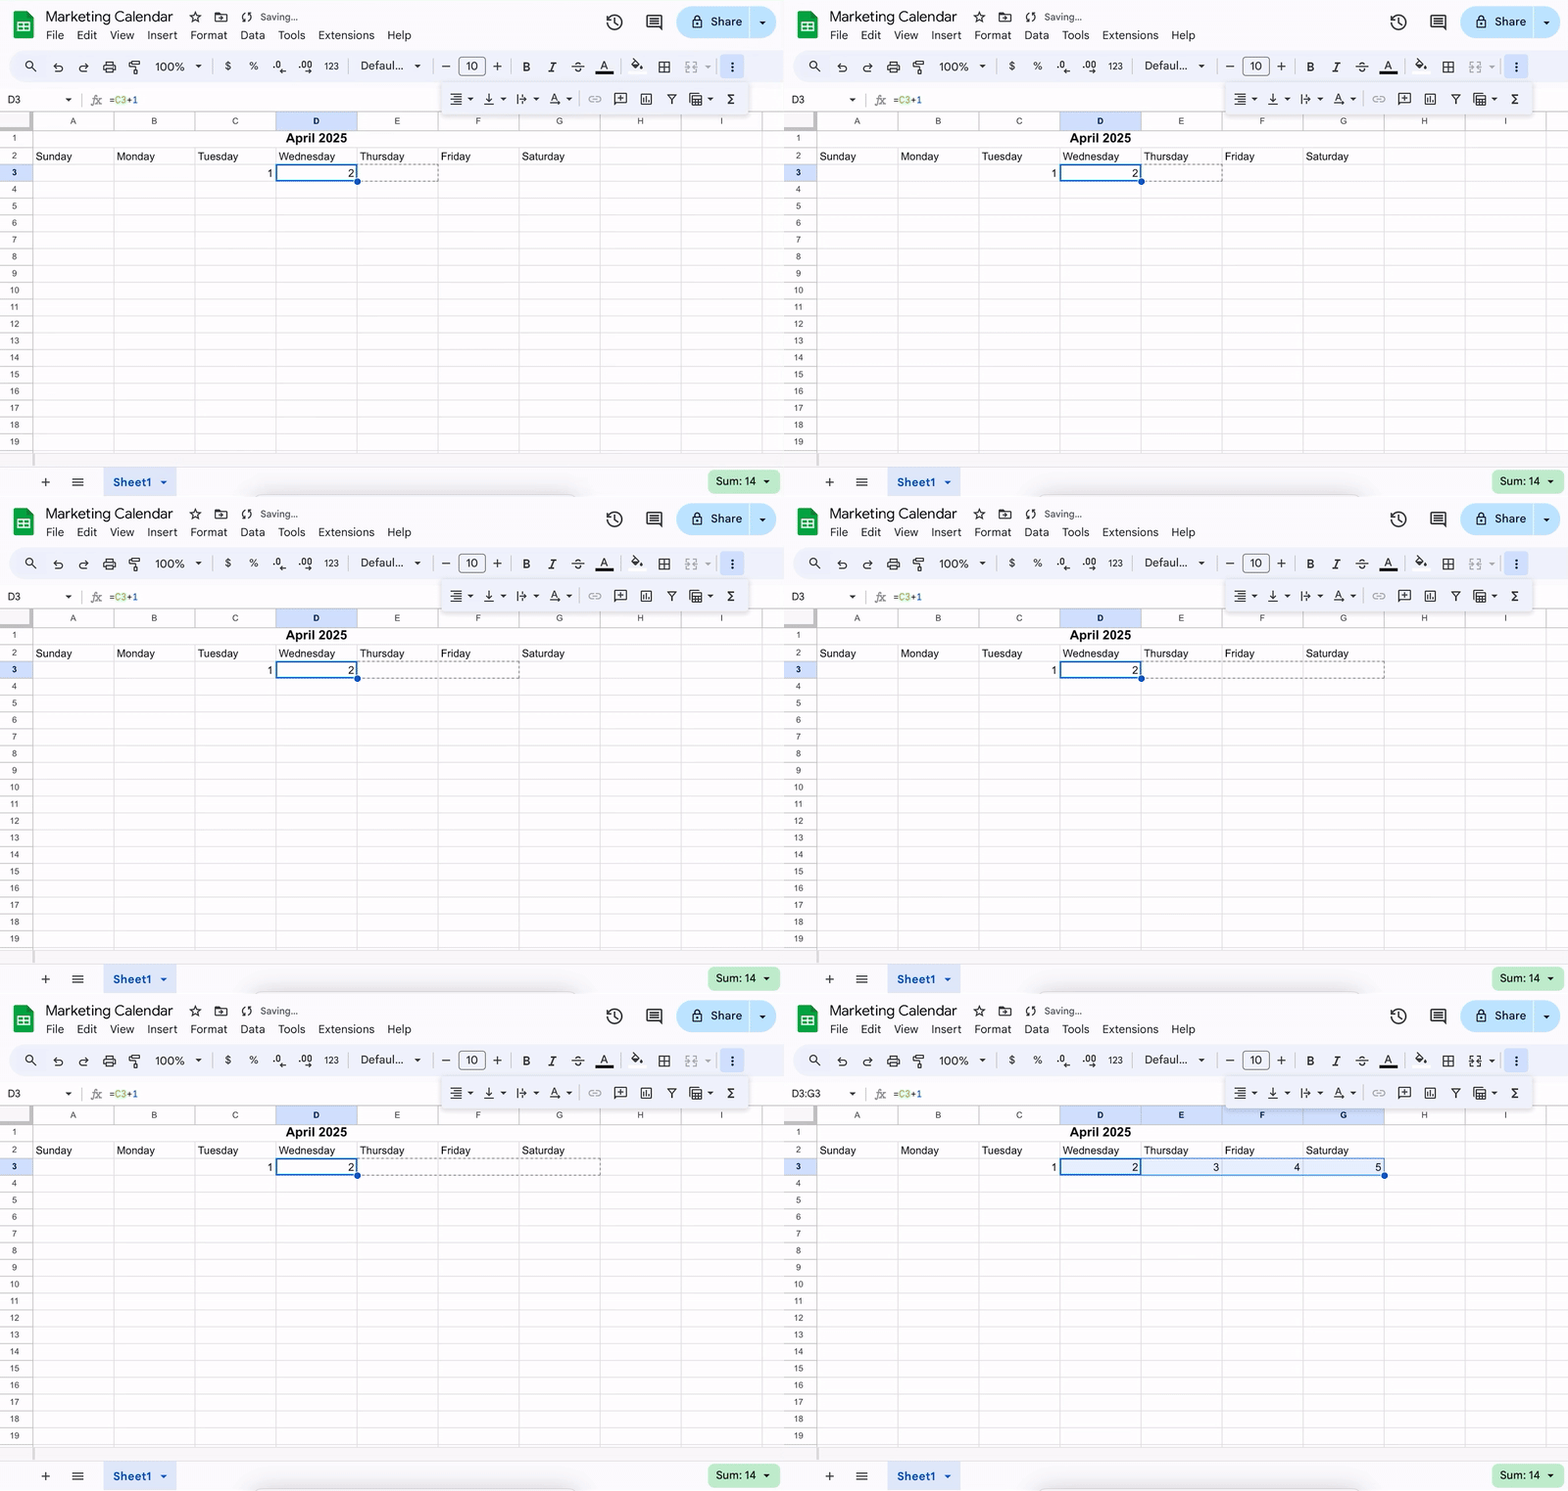
Repeat this for each row, ensuring dates continue sequentially.
🧠 Fun Fact: Planning out workdays helps with productivity, but strict scheduling for fun activities can actually backfire. A study found that people enjoy hobbies and leisure time less when scheduled too rigidly. Blocking off time for relaxation still helps, but leaving room for spontaneity makes it feel more enjoyable.
You can add spacing between weeks by right-clicking on the row number and selecting Insert 1 row above. You can also resize the row height to make space for events—just click and drag the row borders.
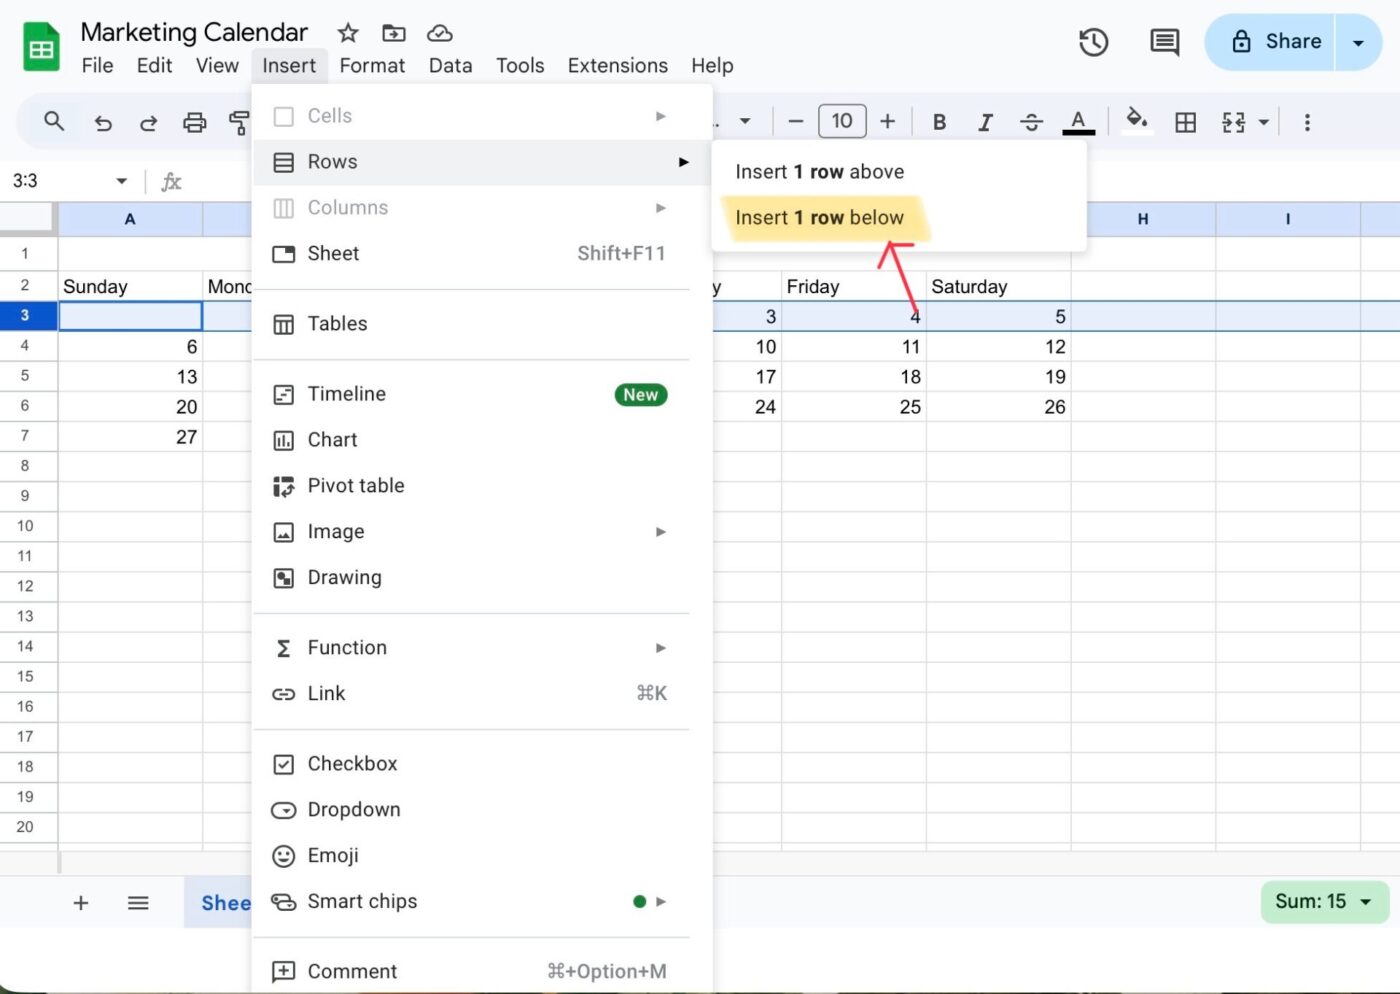
Select the entire calendar area to adjust the font size, change cell colors, and format text for better readability.

💡 Pro Tip: Use color-coding for different types of events—like blue for meetings, green for deadlines, and red for holidays. Highlight the entire calendar range. Use the border tool to add borders around each cell, clearly delineating individual dates.
At the bottom of the sheet, right-click on the current sheet tab and select Duplicate.

Rename the new sheet by right-clicking the tab and choosing Rename. Name it after the next month, e.g., ‘May’
Next, update the header in cell A1 to reflect the new month and year. Then, adjust the calendar dates based on the new month’s starting day and number of days, following the same steps you used earlier.
🔍 Did You Know? Unstable work schedules create stress, while consistent shifts lead to higher job satisfaction and better performance. Researchers found that knowing when work starts and ends helps employees balance responsibilities, leading to improved productivity.
Click into any cell under a date to add a daily checklist or event details like meetings and appointments.
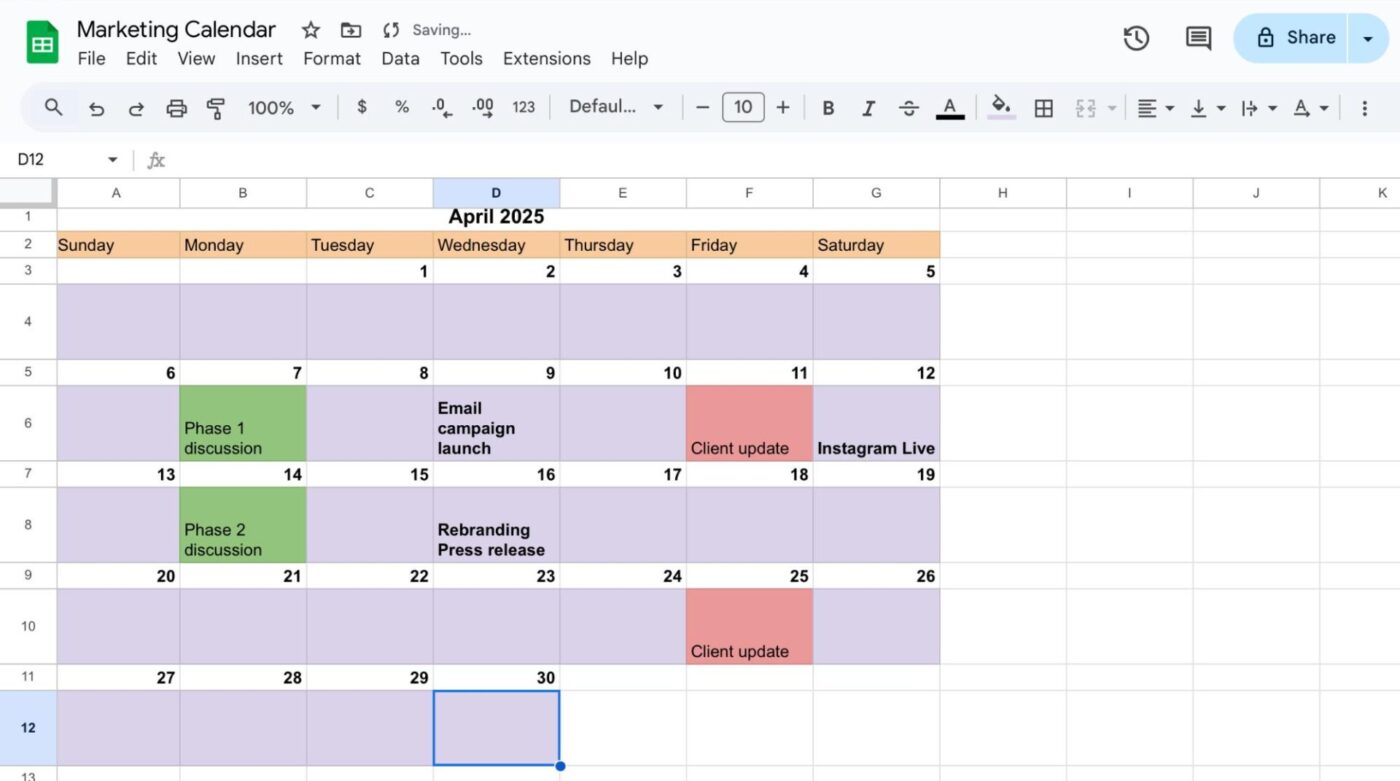
To type multiple lines in a single cell, press Alt + Enter (on Windows) or Option + Enter (on Mac). Turn on text wrapping to ensure all your event details stay visible within the cell, no matter what you add.
🧠 Fun Fact: While most of the world follows the Gregorian calendar, some countries use different systems. For example, Ethiopia followed a 13-month calendar, and China uses a lunisolar calendar for traditional holidays.
Google Sheets automatically saves changes, but you must ensure the document is named appropriately for easy identification. Here’s how:
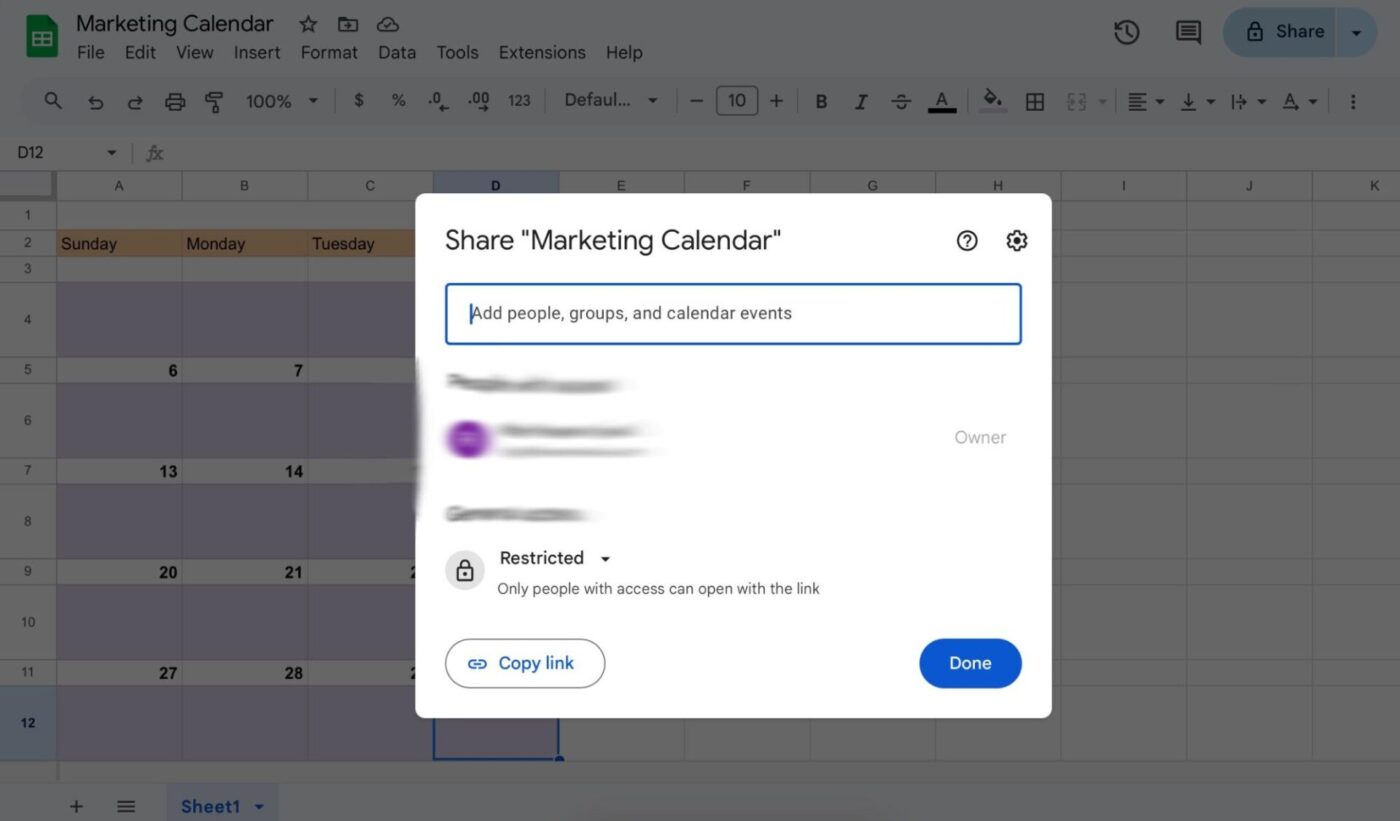
Feel free to get creative—add conditional formatting, set up monthly views, or include content planning columns to suit your needs. You can also create dropdown menus for event categories using data validation, which helps keep your event types consistent and easy to manage.
To get a head start, explore Google Calendar templates to see if a preset calendar format fits your needs.
🔍 Did You Know? The ISO 8601 international calendar standard sets Monday as the first day of the week, unlike the traditional U.S. calendar, which starts on Sunday.
While Google Sheets can function as a basic online calendar, it demands significant manual effort and lacks the sophisticated features found in dedicated scheduling tools.
Let’s explore some reasons why you’d consider looking for a Google Sheets alternative.
🧠 Fun Fact: A study found that people who use digital assistants for scheduling feel more productive and engaged at work. Features like automation and AI recommendations make planning smoother and more efficient.
Struggling to manage multiple calendars? We’ve collected our best tips for you in this video:
Creating a calendar in Google Sheets can be a rewarding DIY project for some. It offers a basic framework for scheduling events. However, it quickly becomes a static tool, relying heavily on manual updates.
ClickUp, on the other hand, is the everything app for work that unites your tasks, docs, conversations, and events in one tool. As a calendar and meeting management software tool, it brings your schedule to life with dynamic task management, automated workflows, real-time collaboration, and AI-powered support—all in one place.
Here’s what a ClickUp user shared on G2:
ClickUp Brain really is a time-saver. The built-in AI can now summarize lengthy threads, draft docs, and even transcribe voice clips right inside a task, which lets my team cut down on context-switching and chase fewer add-on tools.
New calendar & Gantt upgrades make planning less painful. The March 2025 refresh merged tasks, docs, chats, and meetings into a single calendar view and added AI-powered time blocking; Gantt charts load noticeably faster and keep the zoom level persistent.
| Feature | Google Sheets | ClickUp |
|---|---|---|
| Ease of setup | Manual setup required (build table, format cells, add formulas) | Pre-built Calendar Planner template + AI scheduling suggestions |
| Calendar View | ❌ No native calendar view—must create one using formulas or add-ons | ✅ Native Calendar View with day, week, month, and timeline modes |
| AI calendar assistance | ❌ Not available | ✅ AI auto-suggests meeting times, reschedules conflicts, and prioritizes tasks based on workload |
| Meeting management tools | ❌ Not available | ✅ AI can auto-generate agendas, summarize meetings, assign action items, and link notes to tasks |
| Drag-and-drop scheduling | ❌ Not supported | ✅ Intuitive drag-and-drop rescheduling in real time |
| Recurring tasks | Must be manually duplicated or scripted | Built-in recurring task and event scheduling |
| Automations | Requires Google Apps Script or third-party add-ons | Built-in automations for reminders, follow-ups, and status changes |
| Task details & context | Limited—must link to other tabs or docs | Full task context: attachments, subtasks, chat, docs, and meeting notes attach easily to events |
| AI summaries & suggestions | ❌ Not supported | ✅ AI summarizes meetings, recommends next steps, and highlights blockers |
| Notifications & reminders | Must be custom-built | Smart reminders and AI-prioritized alerts across devices |
| Integrations | Seamless with Google Workspace | Works with Google Calendar, Zoom, Slack, Outlook, and more |
| Mobile experience | Functional but not optimized for scheduling | Mobile app with full AI and calendar access on the go |
Here are some features that turn ClickUp into a powerful alternative to static calendars. 📆

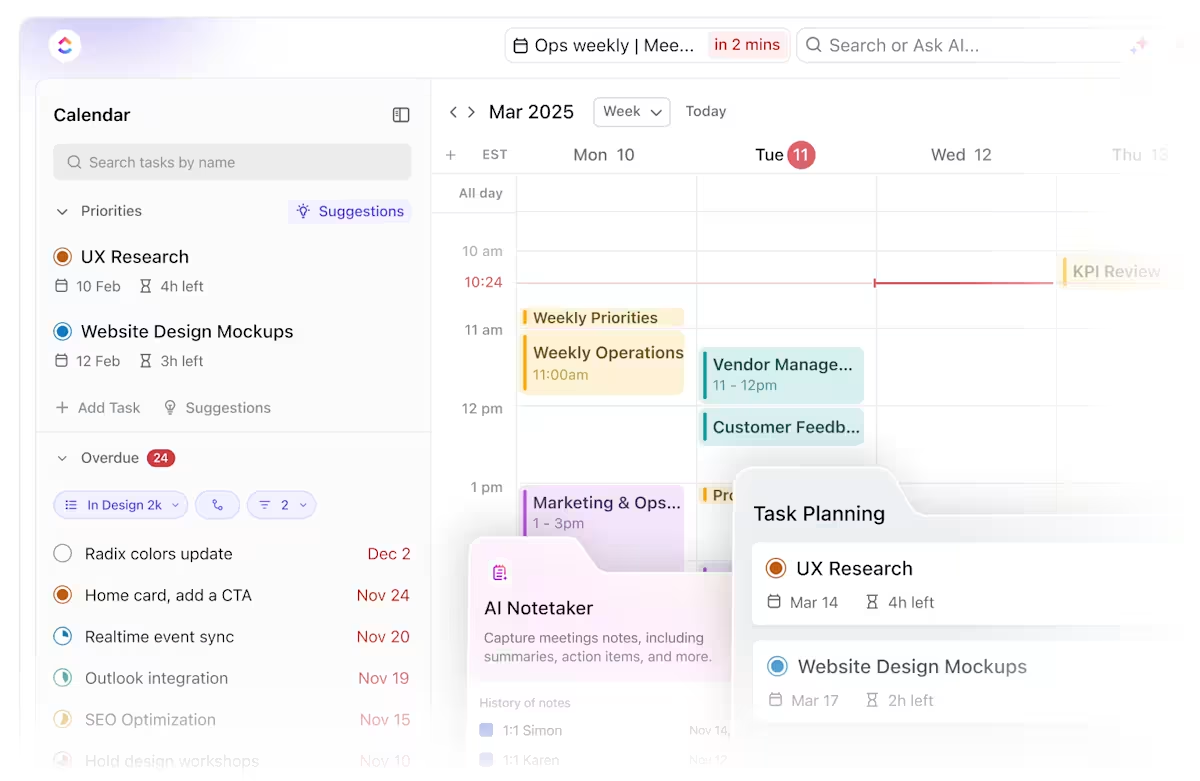
ClickUp’s AI Calendar is designed to schedule both your meetings and your actual work, so you’re not bouncing between apps or chasing overdue tasks. This way, you’re not stuck formatting rows in a spreadsheet or color-coding your own events since ClickUp takes care of the busywork for you.
Say you have a website update due this week, a client presentation to prepare, and three team check-ins.
ClickUp Brain, the integrated AI assistant, helps auto-schedule your priority tasks, block focus time around meetings, and suggests shifting flexible work when something urgent pops up. Your day updates on its own, keeping you focused without needing to rearrange everything. 🧠
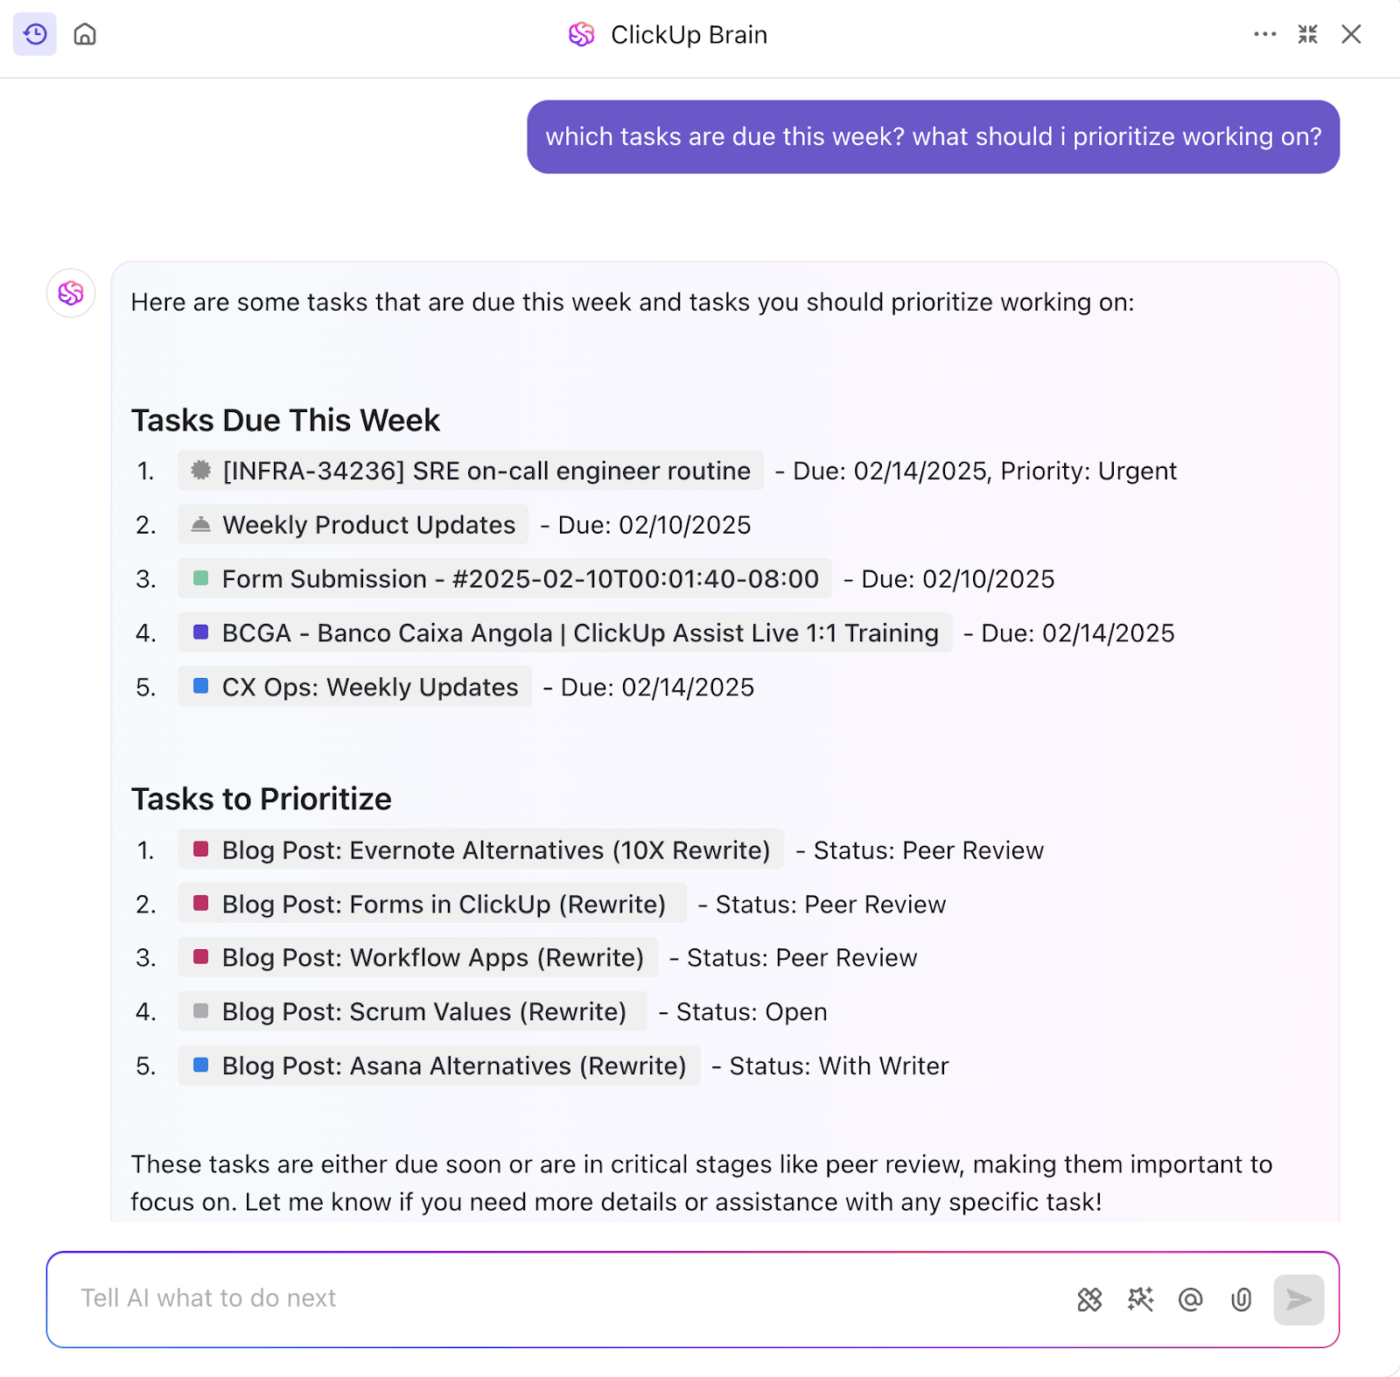
Joining calls? You can do it right from the AI calendar.
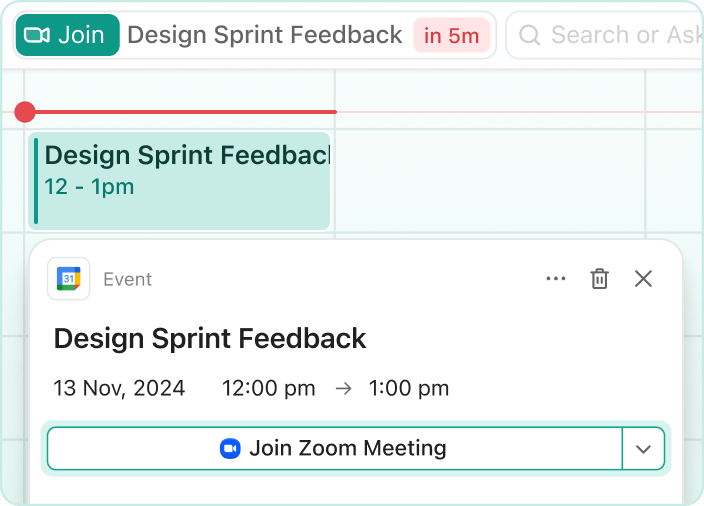
Calendar events pull in your Zoom, Google Meet, and Teams links so you never have to hunt through emails again. And with ClickUp’s AI Notetaker, your meeting notes get turned into searchable transcripts and linked action items without manual transcription and task assignments.
So instead of asking, ‘Wait, what were we supposed to do after that meeting?’ you’ll already have the answers ready to go.
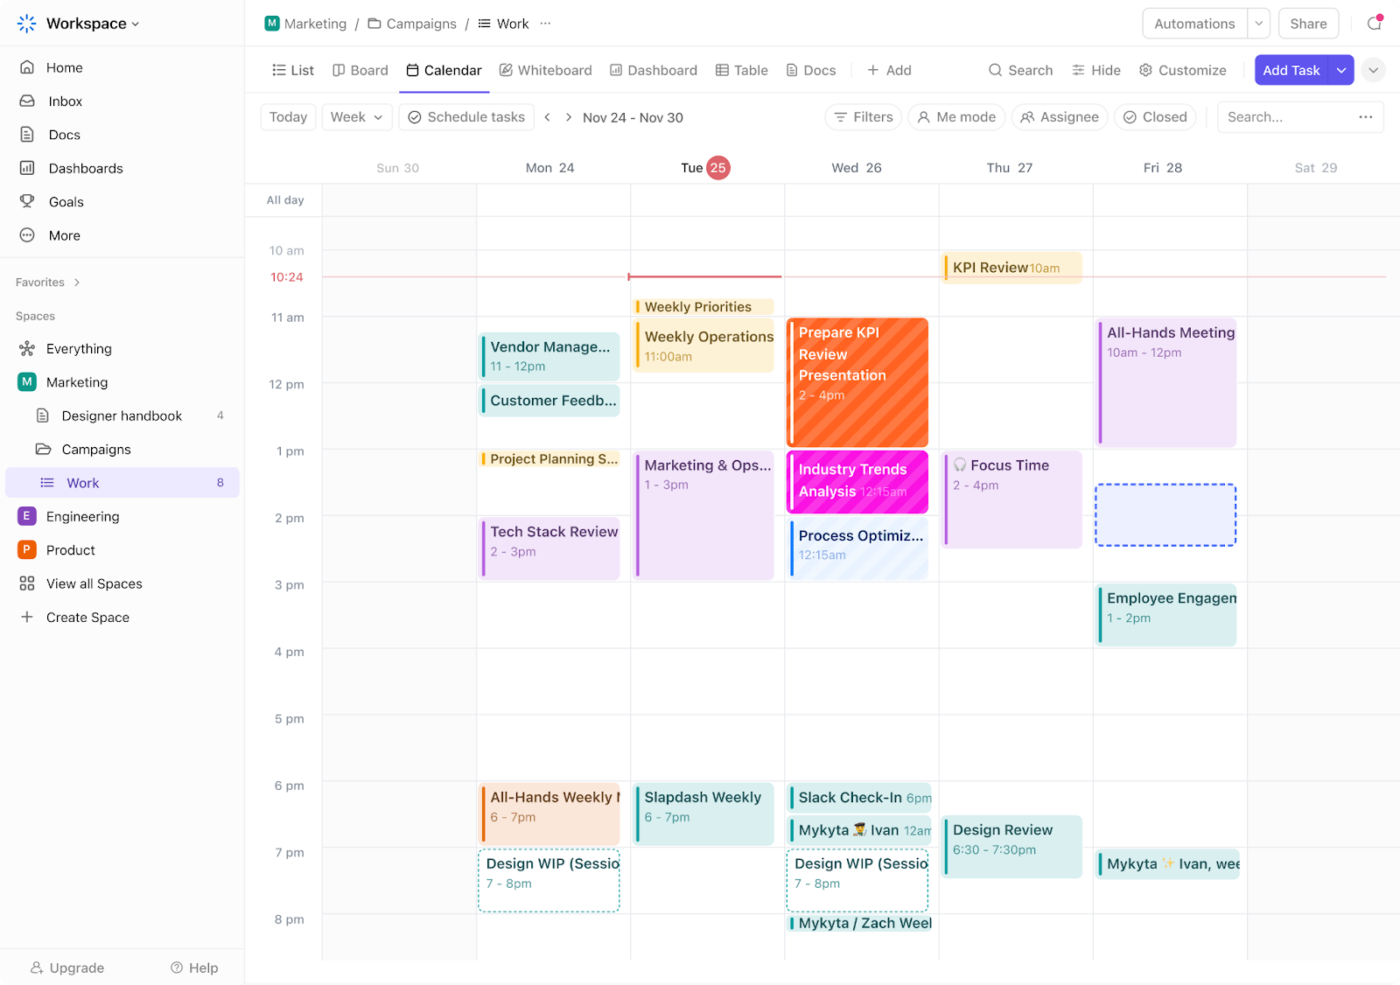
But that’s not all! ClickUp’s Calendar View gives you complete control over how you visualize your schedule. You can switch between daily, weekly, and monthly views or customize your layout with filters to focus on key tasks and priorities.
If you’re working with clients or external teams, Calendar View makes collaboration seamless with:
You can also display ClickUp Tasks directly in your calendar. Add start and due dates to tasks, and they’ll appear alongside your events—giving you a complete picture of your day. And thanks to two-way sync, any updates made in ClickUp or your external calendar will reflect in both places automatically.
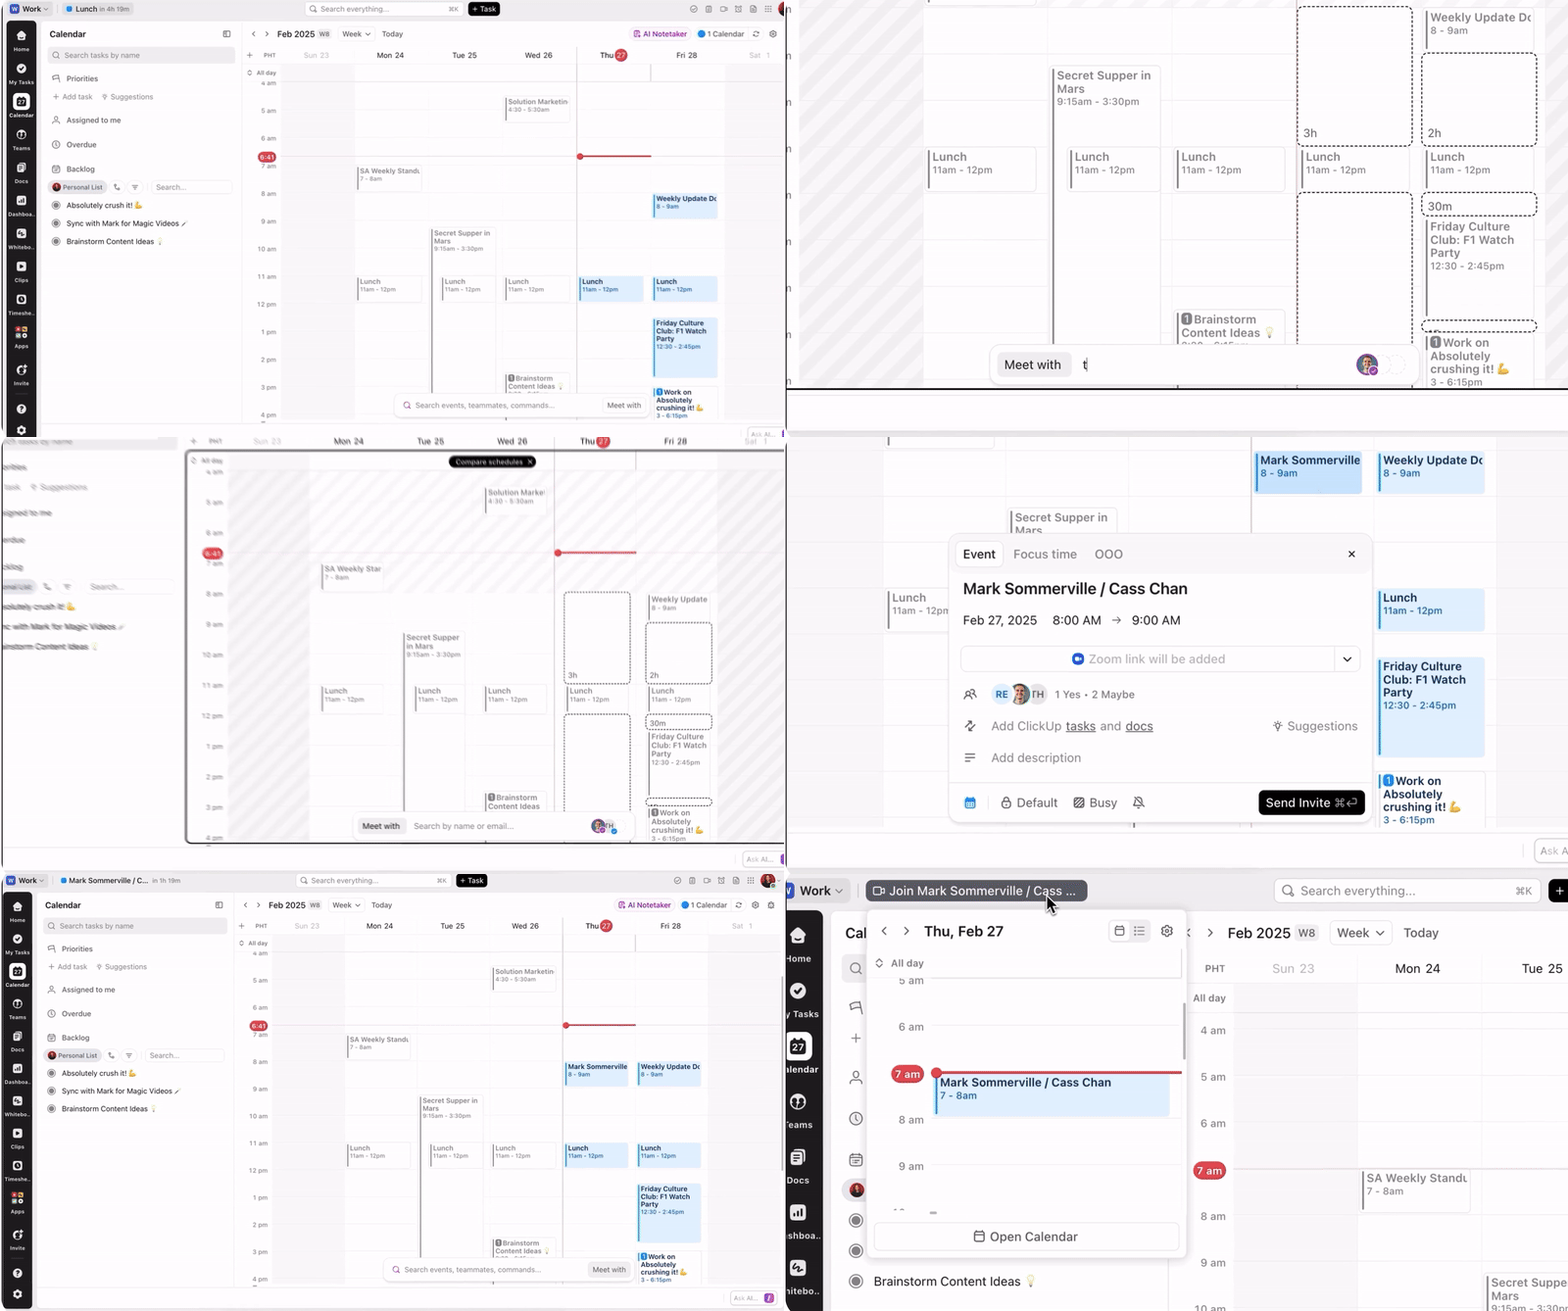
Effective collaboration starts with a shared space where everyone can stay aligned. ClickUp makes this easy by integrating your calendar with ClickUp Chat.
Collaborate real-time or async in DMs and group chat channels and keep conversations connected to your tasks and projects for complete context. Want to get into an impromptu call? Try a SyncUp within ClickUp Chat. 📞
Need to plan a meeting and check a teammate’s schedule? Tap their name in Chat to see their calendar and priorities. Found a free slot? Book a meeting right from within Chat.
Meeting booked? ClickUp updates everyone’s calendar automatically! Could it get any better? 🤩
To simplify time management, ClickUp also offers a variety of schedule templates tailored to different needs.
ClickUp Calendar Planner Template
The ClickUp Calendar Planner Template helps you and your team stay organized by centralizing all your schedules in one place. With this calendar template, you can:
📮ClickUp Insight: 92% of knowledge workers rely on personalized time management strategies to stay productive. However, many workflow tools still lack built-in features that support real prioritization, leaving teams to rely on manual workarounds and guesswork.
ClickUp helps you move beyond that with built-in scheduling, time tracking, and AI-powered calendar suggestions. It even recommends focus windows based on your task list and calendar, so your schedule works with you—not against you.
Need a place to start? Choose from ready-to-use weekly and monthly calendar templates to build a time management system that fits the way you work.
While a Google Sheets calendar offers basic scheduling capabilities, ClickUp provides a comprehensive, integrated, and intelligent solution that addresses the multifaceted challenges of modern calendar management.
ClickUp Calendar gives you one place to plan, track, and collaborate without jumping between tools. See your tasks, deadlines, and priorities come together in Calendar View, stay aligned with your team through ClickUp Chat, and keep every meeting actionable with the AI Notetaker capturing transcripts and assigning the next steps automatically.
Sign up for ClickUp today!
© 2026 ClickUp