


Still downloading templates?
There’s an easier way. Try a free AI Agent in ClickUp that actually does the work for you—set up in minutes, save hours every week.
Sorry, there were no results found for “”
Sorry, there were no results found for “”
Sorry, there were no results found for “”

Spreadsheets are familiar. They’re flexible. And they work—until they don’t.
As teams grow, sheets get messy fast. Sales leads go stale unless everyone remembers to update them. Inventories don’t auto-update in real time. Project managers spend hours chasing updates, color-coding cells, and resending files every time something changes.
Spreadsheets also can’t handle reminders, live dashboards, task links, or deadline alerts by themselves.
What if there were an easier way? What if you could turn a spreadsheet into a live workspace with real-time updates, clear owners, deadlines, reminders, and automations?
ClickUp can help you do that. ClickUp even maps your spreadsheet columns to the right Custom Fields for you, so setup is quick.
This guide shows you how to import a spreadsheet into ClickUp—step by step.
A spreadsheet stores data, but it doesn’t support data workflows. As a result, teams waste hours fixing files instead of doing meaningful work.
In fact, according to Harvard Business Review, we spend 61% of our time updating, searching, and managing information across scattered systems.
🧠 Did You Know? Today, we often think of Excel when we hear the word “spreadsheet,” but the term originally referred to large sheets of paper divided into rows and columns for manual calculations.
In fact, the first spreadsheet program, VisiCalc, was released in 1979 and is often credited with making personal computers popular for business use.
Migrating to ClickUp can feel huge, but as one of the smartest Excel alternatives, the benefits are worth it:

Note: Feature availability and limits vary by plan. Businesses on Enterprise Plans have more Automations and advanced webhook and integration features.
Here’s a video on how automating workflows in ClickUp can save you 5+ hours every week!
Some automation examples you can apply:
| Use-case | Trigger | Action |
| Status updates | When the task status changes to ‘In Progress’ | Assign the task and set the due date 3 days later |
| Due date reminders | When a task is due in 1 day | Send a reminder to the assignee |
| Marking completion date | When the status changes to ‘Done’ | Set the ‘Completed On’ field to today’s date |
| Task handoffs | When a task moves to ‘Review’ | Unassign the current assignee and assign to the reviewer |
Reminder: Some features mentioned—like Gantt charts, Dashboards, or advanced Custom Fields—are subject to plan-based restrictions. Feature availability and limits vary by plan.
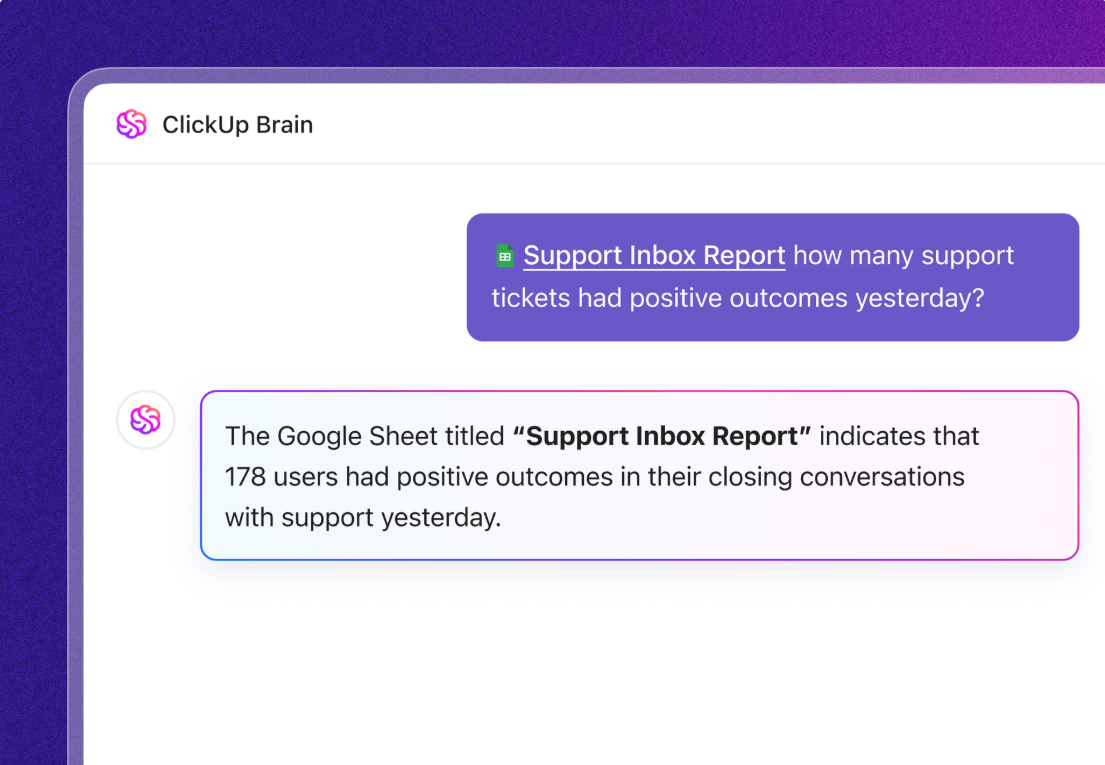
📮 ClickUp Insight: 88% of our survey respondents use AI for their personal tasks, yet over 50% shy away from using it at work. The three main barriers? Lack of seamless integration, knowledge gaps, or security concerns.
But what if AI is built into your workspace and is already secure? ClickUp Brain, ClickUp’s built-in AI assistant, makes this a reality. It understands prompts in plain language, solving all three AI adoption concerns while connecting your chat, tasks, docs, and knowledge across the workspace. Find answers and insights with a single click!
Search for the spreadsheet you need on your current platform. Then, follow our guide to seamlessly bring your work into ClickUp—no manual copy-pasting required!
Before uploading your file, ensure it is properly prepared for import.
Here’s what to check:
ClickUp’s Spreadsheets Importer accepts a variety of formats, including:
📌 Remember This: If your data is currently in a Google Sheets database, export it to an Excel or CSV file first, since ClickUp’s import tool can’t pull directly from a live Google Sheets link.
The task name is the only required field for ClickUp to create tasks. If you don’t have this column in your Excel file, add one. Otherwise, ClickUp will display an error during import and prompt you to map the correct column or cancel the import to correct the file.
A header row is the first row of your spreadsheet that labels each column. Without clear headers, ClickUp won’t know where to place the data.
✅ How to prep headers:
ClickUp accepts many common date formats (like MM/DD/YYYY or DD/MM/YYYY, with or without time), but stick to one format in your sheet for consistency. And, if you include times, you can use a 24-hour or 12-hour clock with AM/PM.
If ClickUp doesn’t recognize a date during import, it will mark it as invalid (you can fix it later), but it’s better to get it right up front.
| ✅ Good | ❌ Bad |
| 12/31/2025 | Dec 31st, 2025 |
| 31/12/2025 | Tuesday, 31 Dec 25 |
| 15:30 | 3.30 afternoon |
If your spreadsheet represents parent tasks in each row and you have subtasks listed in cells, ClickUp can create those as actual subtasks under that task.
✅ How to set up subtasks:
For example:
| Task | Subtasks |
| Build Homepage | Design wireframe, Draft copy, Review with team |
If you use columns like Status or Priority with a set list of values, standardize the wording to avoid confusion. Consistent labels help ClickUp match your spreadsheet columns to its fields without creating extra options you didn’t intend.
| ✅ | ❌ | Reason |
| Status: To Do, In Progress, Done | Status: Complete, Completed, Done | Avoids duplicates—“Complete” and “Completed” will be treated as different statuses in ClickUp |
| Priority: 1, 2, 3, 4 | Priority: High, Medium, Low, Urgent | Keeps priorities consistent with ClickUp’s built-in numeric levels (1 = Urgent, 2 = High, 3 = Normal, 4 = Low) |
Here’s what a clean, import-ready spreadsheet looks like:

🧠 Remember to:
📚 Read More: Best Free Database Software
With your file prepped and ready, let’s move on to using ClickUp’s import tool to bring this data in:
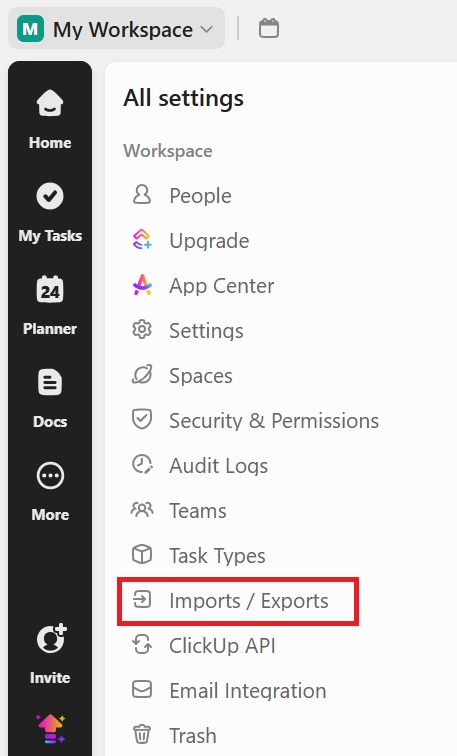
1. Click your Workspace avatar in the upper-left corner and select Settings from the dropdown menu.

2. In the Settings menu, find and click on Imports/Exports in the left sidebar. This brings you to ClickUp’s import center.
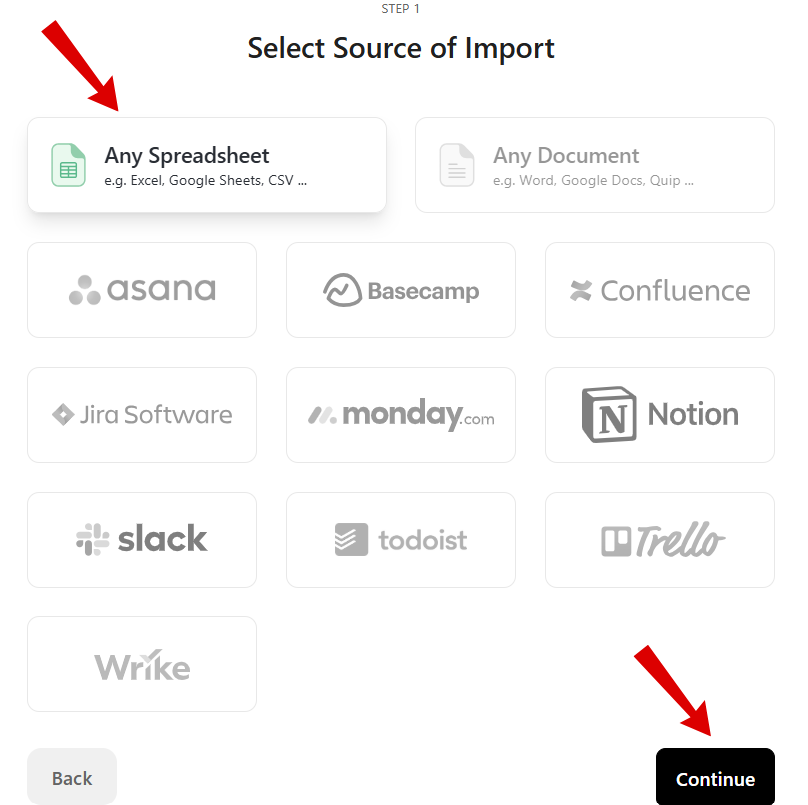
3. Next, click the Start Import button.

4. On the Select Source of Import page, choose Any Spreadsheet from the options, and then click Continue.
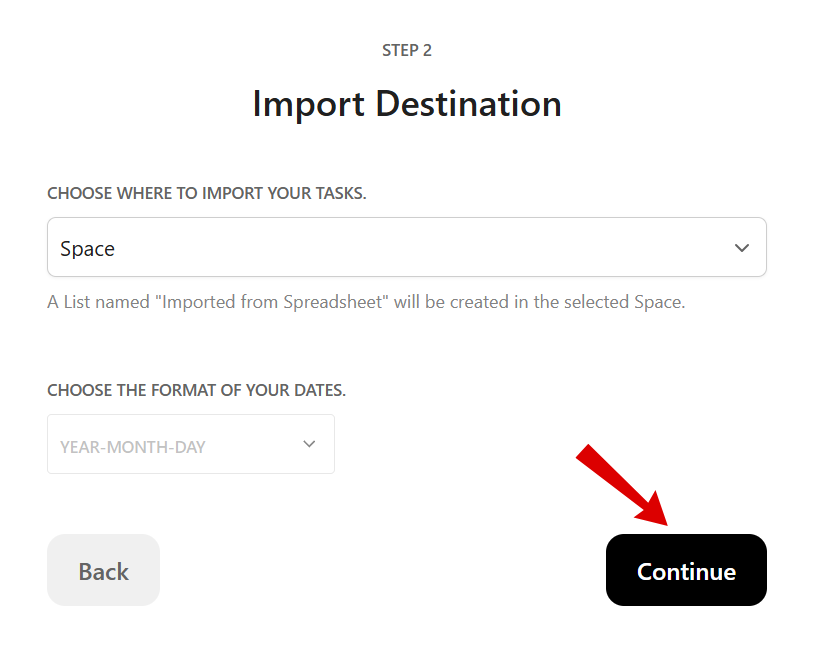
5. On the Import Destination screen, choose a Space, Folder, or List for the import. Also, select the format of your dates. Then, click Continue.
6. A new window called Spreadsheet Importer will appear in the Space you choose. Simply drag and drop your spreadsheet file, upload it from your computer, or type in data manually if needed.

When you drop in the file, ClickUp will start processing it. For large files, this could take a moment.
7. After a successful upload, you’ll be directed to the Map fields page.
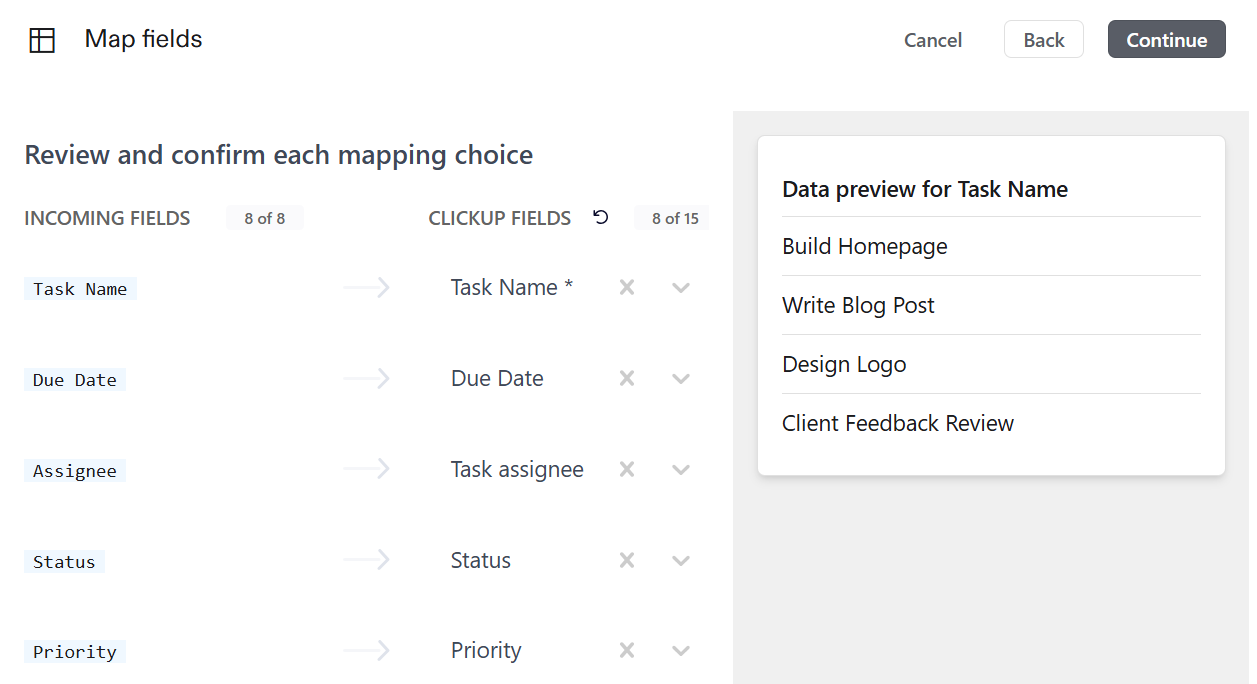
ClickUp’s AI-enhanced mapping algorithm analyzes your spreadsheet and automatically matches each column to the right ClickUp field:
💡 Pro Tip: If someone in your Workspace has imported a similar sheet before, this AI system remembers those mappings, so future imports are even faster and more accurate. It’s a smart way to reduce repetitive work while keeping your task fields consistent.
8. Double-check these matches and adjust any that don’t look right before you continue.
Once everything looks good, click Continue.

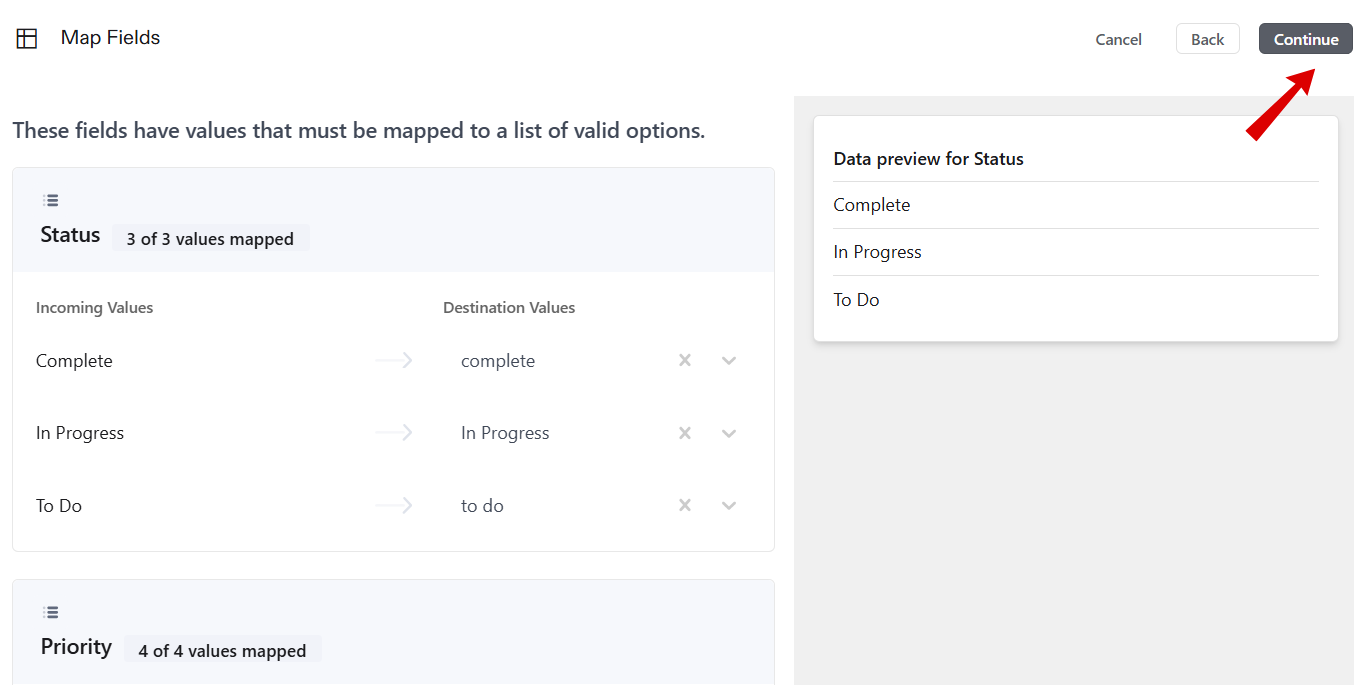
9. Next, check if the values in certain columns match the task fields in your Space.
In the Destination Values column, click the dropdown for each value and pick which existing value it should match. For example, if your sheet says In review, but your Space has In progress instead, select In progress.
Other options you can choose from:
| Keep this value as is | Keeps the value unchanged. ClickUp imports it exactly as shown in your spreadsheet. |
| Do not import | Skips this value. It won’t be included in your tasks. If the value is invalid (e.g., an unknown assignee email), it will appear with an error on the final page. |
Once done, hit Continue.
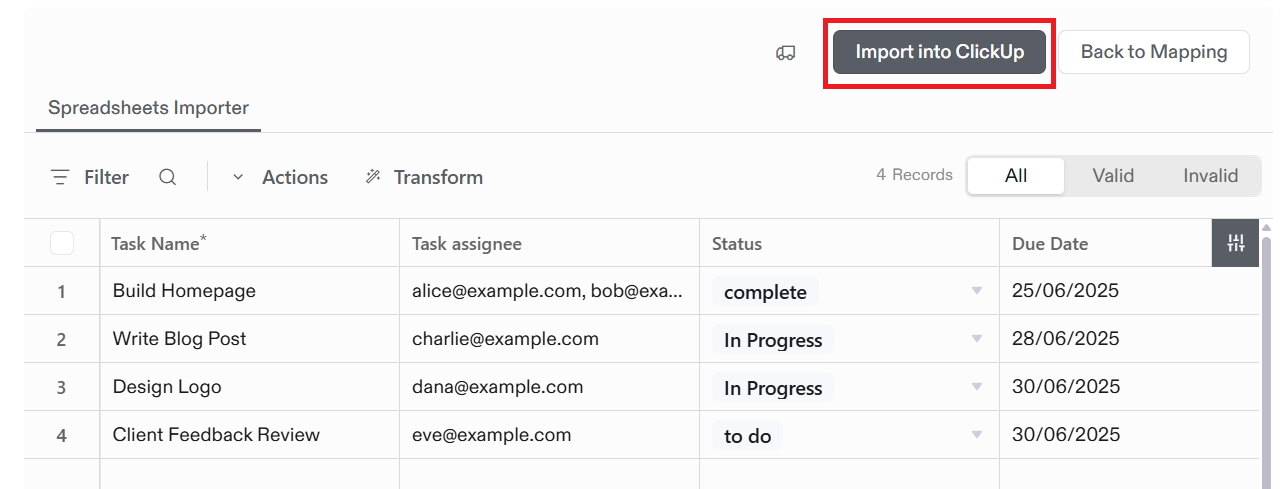
10. Before finalizing the import, you get a spreadsheet-like view to see all the tasks (rows) and the columns you mapped. At the top, you can also use filters to view All, Valid, or Invalid entries.
If ClickUp finds issues, they’ll be highlighted:
You can also edit cells right here before importing. Simply double-click a cell to choose a new value or fix incorrect information.
Finally, click Import into ClickUp.
11. If you selected Add as new custom field when reviewing the field-mapping options, you’ll land on the Custom Fields Mapping page. Click the Data Type dropdown next to each field and select the appropriate ClickUp Custom Field type.

Finally, click Complete.
Congratulations! Your spreadsheet now lives in ClickUp! 🙌
12. To view it, navigate to the selected Space and open the Imported from Spreadsheet List in the left sidebar. You can right-click the List to rename it into something more descriptive, like Q4 Project Plan.

💡 Pro Tip: ClickUp intelligently flags empty or inconsistent columns and suggests skipping them so your import stays clean. So, if you don’t see a column you imported, click the + button at the top-right of your columns > Add Existing Fields > and choose the one you want to display.
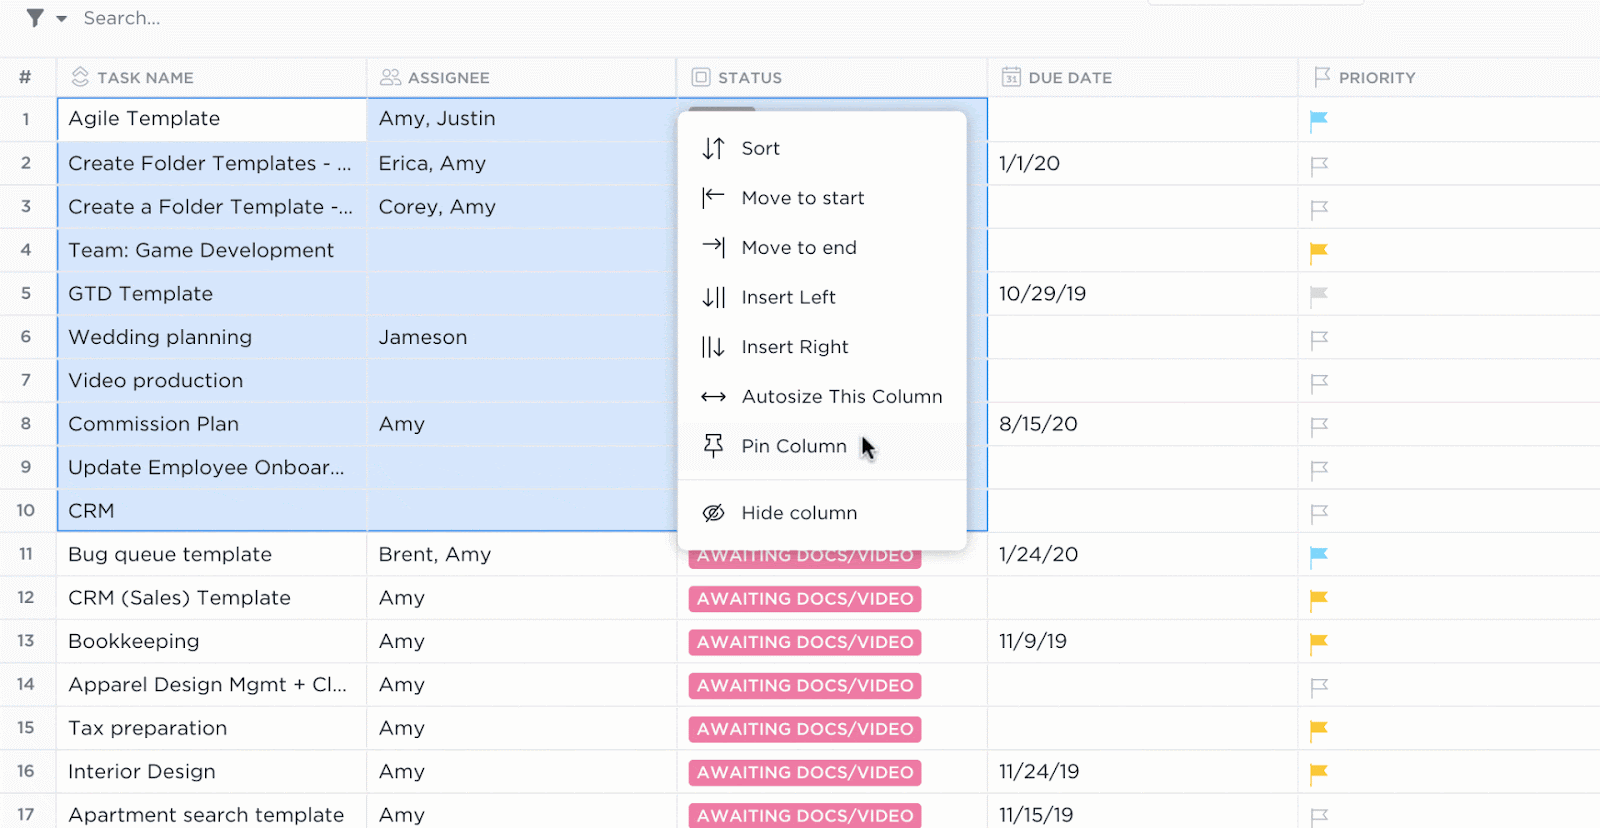
ClickUp gives you multiple ways to view your data. If you prefer the classic grid layout but with extra functionality, the ClickUp Table View is your go-to. You can:

Further, keep important information visible by pinning columns, and hide what you don’t need to reduce clutter. Also, set up advanced filters (e.g., “Show only tasks due next week and assigned to me”) and save those views.
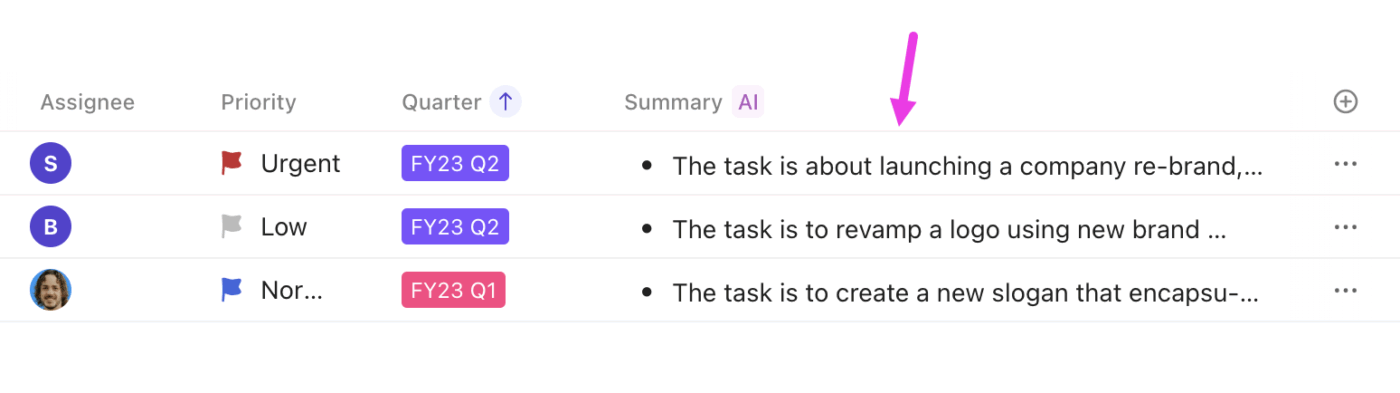
Once your data lives in ClickUp, use ClickUp Brain to make your data work even smarter. Here are a few examples of how it helps:
❗ Problem: Your spreadsheet has task titles like “Q3 plan,” “Fix login,” or “Marketing updates”, but no real context.
✅ What ClickUp does: ClickUp Brain understands the title, infers the intent, and expands these vague titles into full descriptions or action steps.

❗ Problem: You imported 100+ tasks. But without workflow automation, you’re stuck managing statuses, updates, and assignees manually.
✅ What ClickUp does: ClickUp Brain suggests automations based on the data patterns it sees (status values, due dates, dependencies, etc.).

❗ Problem: You imported 200 short customer feedback tickets like “App crashes on login.” Now you’re stuck manually tagging each as a bug, feature request, or general comment and assigning sentiment. It’s slow, tedious, and easy to miss important issues.
✅ What ClickUp does: ClickUp AI Fields can automatically:
After that, you can select all “Bug” tickets and assign them to your dev team. Or, prioritize all “Negative” feedback as High.
Here’s a quick primer on everything you can do with AI Fields:
Import not going smoothly? Here are common issues you might face on your first try and how to fix them fast:
| Import issues | Problem | How to solve |
| “Task name required” error | You hit Import and get a red error for task names. This means that ClickUp couldn’t detect a proper title column for tasks, or the auto-mapping feature guessed incorrectly. | Before import: If your file doesn’t have task names, click Cancel in the upper-right, add a task name column to your spreadsheet, and start a new import. After import: If the names are already in your file but weren’t mapped, go to the Map Fields page, find the column with task names, and map it to Task Name under ClickUp Fields. |
| Statuses didn’t map correctly | Your spreadsheet included status values like “In Progress”, “Waiting on Client”, or “Completed”, but all tasks were imported as “To Do”. This means ClickUp didn’t match your Custom Statuses during import and defaulted everything to the first status in your workflow (i.e., “To Do”). | ClickUp does not auto-create new statuses from the spreadsheet. So, add any missing custom statuses to your Space. And when ClickUp prompts you to map field values, manually match each spreadsheet status to an existing ClickUp status. |
| Large spreadsheet import freezes or times out | The import might struggle if your file is extremely large (thousands of rows and columns), or your browser could slow down during the process. | Split large sheets into smaller files and import in batches—you can merge them later. Close heavy browser tabs to free up memory. If it fails repeatedly at a certain point, look at that row of data for a problematic cell or formula causing an issue. |
🧩 Fun Fact: Spreadsheets are one of the most widely misused tools in business, often serving as CRMs, to-do lists, or databases, even though they weren’t designed for those jobs.
So, what were spreadsheets originally designed for?
Spreadsheets were created to perform calculations and organize numerical data, especially for tasks like financial modeling, accounting, budgeting, and forecasting. Their strength lies in using formulas, functions, and data visualization to crunch numbers, not managing workflows, tracking tasks, or storing large volumes of relational data.
No matter what kind of spreadsheet you’re working with, importing it into ClickUp can help you manage it better.
Here’s what that looks like in real workflows:
A project management spreadsheet includes rows for each task and columns for task name, assignee, due date, status, dependencies, and comments. Some teams also have a Gantt-style timeline with color-coded cells or formulas to calculate delays.
After importing to ClickUp:
✅ Convert each row into a task with fields for assignee, due date, status, and comments
✅ Set automatic reminders, dependencies, and task triggers to avoid delays
✅ Use the Gantt Chart View to see timelines and dependencies at a glance
A CRM spreadsheet contains rows of leads or clients and columns for contact info, deal stage, value, etc.
After importing to ClickUp:
✅ Visualize the pipeline with a drag-and-drop Board View by stage
✅ Set automations: when a lead is marked “Closed,” trigger onboarding or follow-up tasks
✅ Use ClickUp AI to analyze notes or comments on a lead and summarize the sentiment or key action items
An editorial planning spreadsheet typically includes columns for content title, publish date, author, status (draft, under review, or published), and possibly the channel or persona. Perhaps it’s even color-coded by content type.
After importing to ClickUp:
✅ Switch to the Calendar View to see what’s publishing when and on which channel
✅ Add automation to notify editors when a draft is ready for review
✅ Use ClickUp Brain to turn short titles into detailed briefs or outlines, and generate checklist steps for each piece
This could be a list of products with SKUs, quantities, locations, and suppliers, or an IT asset list of equipment assigned to employees. Spreadsheets can list these out and perform some basic stock level calculations, but they’re not ideal for real-time tracking or alerts.
After importing to ClickUp:
✅ Build Dashboards showing inventory by condition, location, or value
✅ Set reminders for warranty expirations, maintenance, or license renewals
✅ Set up smart automations: When Quantity < 5 → Assign to Purchasing → Change status to ‘Reorder Needed’
✅ Tag items by type (laptop, software, equipment, etc.) for fast filtering
HR teams often use spreadsheets to track various aspects, such as job applicants, interviews, or employee onboarding processes. For instance, you might have a recruiting spreadsheet that lists candidates, their application dates, current interview stages, interviewers, and other relevant details. Or you can have an onboarding checklist spreadsheet for each new hire.
After importing to ClickUp:
✅ Use a Board View grouped by stage (e.g., New → Phone Screen → Interview → Offer → Hired).
✅ Keep everything—resumes, portfolios, notes, feedback—in the candidate’s task
✅ Use ClickUp Brain to summarize interview notes and draft follow-up emails
📚 Read More: Best Data Visualization Tools for Projects
As you migrate from spreadsheets to ClickUp, follow these tips to get the most out of your new setup:
ClickUp has a hierarchy: Workspace > Space > Folder > List > Task.
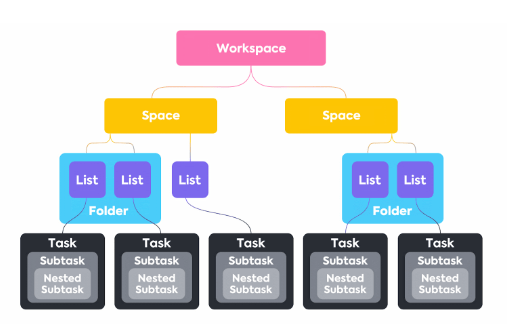
So, plan where your spreadsheet should live. For instance, if you have separate spreadsheets for each project, you might create a Space called Projects with a Folder per project, and import each spreadsheet as a List in the respective Folder.
Spreadsheet templates standardize your data structure. When your columns are consistent, ClickUp can auto-map fields more accurately.
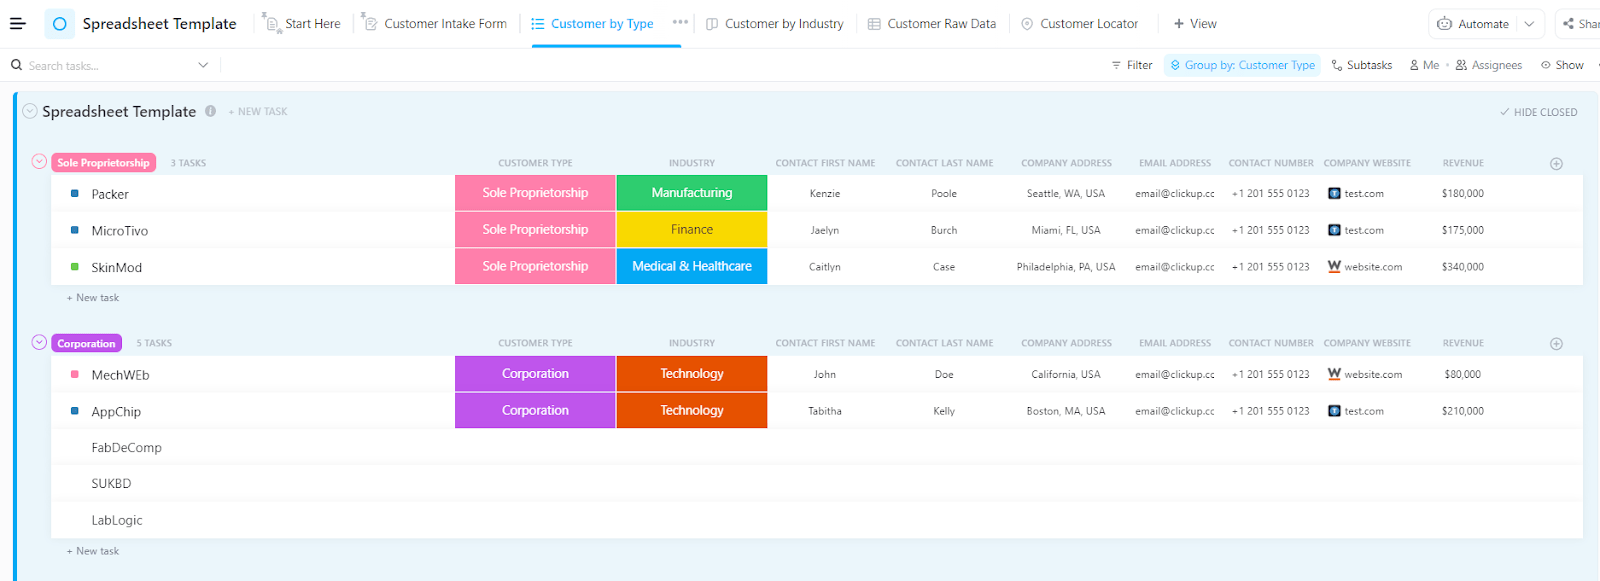
The ClickUp Spreadsheet Template is built to help you collect, organize, and manage customer information. It’s easy to adapt and ideal for businesses of all sizes, whether you’re just starting out or already managing a large customer base.
Simply enter basic information like customer type, website, contact, and industry into each row, and get a workspace where:
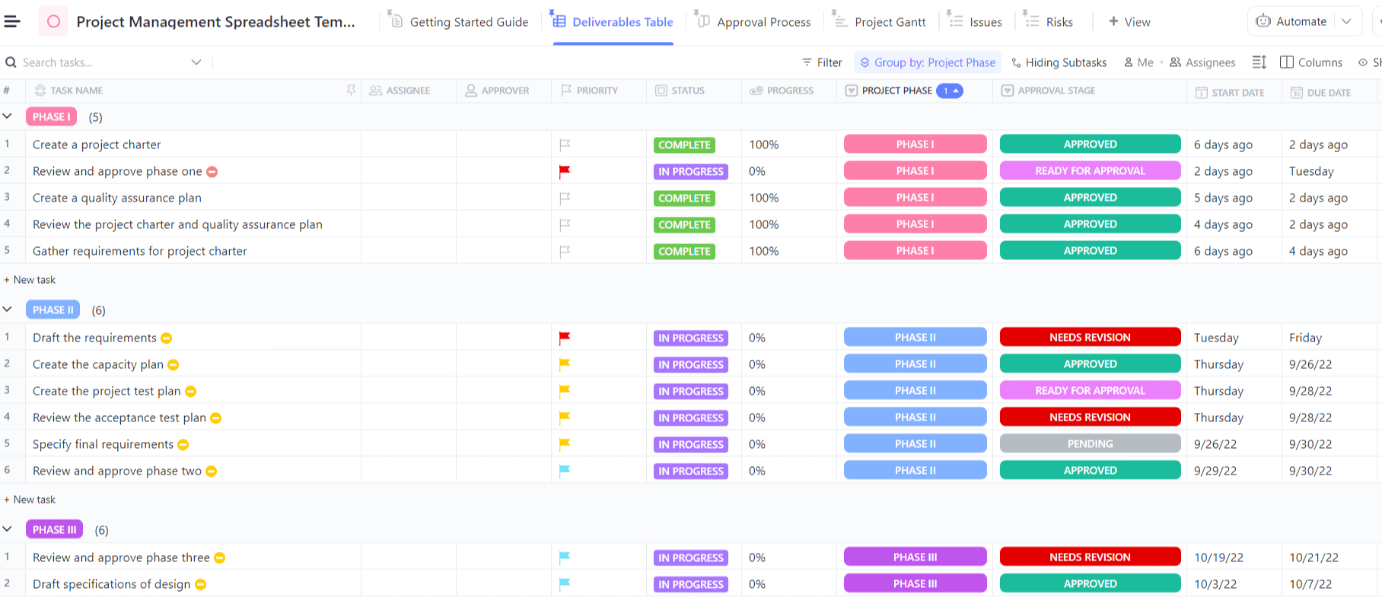
Further, the ClickUp Project Management Spreadsheet Template helps you manage small to large cross-functional projects from start to finish. Each project gets its own row in the template. Here, you can track progress across phases and set start and end dates for each stage.
You can also see project timelines using Gantt or Calendar views to plan ahead and spot scheduling conflicts before they become delays. Plus, stakeholders can view progress instantly without needing separate reports or manual updates.
Spreadsheets are great for performing quick calculations. Or maintaining simple lists. But when it comes to managing complex projects, dynamic workflows, or collaborative data, they often turn into bottlenecks.
By importing your spreadsheet into ClickUp, you get a single source of truth where everyone can collaborate.
You can visualize your data in ways a spreadsheet never allowed, whether it’s through a simple Board View or a custom Dashboard card. You also get to automate the boring stuff and focus on what matters—executing tasks efficiently, meeting deadlines each time, and keeping your team aligned without micromanaging.
Ready to ditch the endless grids and step into a more organized and automated way of managing your database? Sign up for ClickUp today! 🙌

© 2026 ClickUp

There’s an easier way. Try a free AI Agent in ClickUp that actually does the work for you—set up in minutes, save hours every week.