


Still downloading templates?
There’s an easier way. Try a free AI Agent in ClickUp that actually does the work for you—set up in minutes, save hours every week.
Sorry, there were no results found for “”
Sorry, there were no results found for “”
Sorry, there were no results found for “”

Sticky notes everywhere. A notebook full of scribbles. A hundred tabs open.
When ideas pile up, a graphic organizer can help bring order. But who has the time to learn a whole new tool?
Luckily, Google Docs lets you create one with just a few clicks. It features a clean, visual layout that helps you make sense of your thoughts.
In this blog post, we’ll break down how to make a graphic organizer on Google Docs. ⚒️
A graphic organizer is a visual tool that helps individuals organize ideas, information, or concepts clearly and in a structured manner.
It takes various forms, including charts, diagrams, and maps, each serving specific purposes depending on the context in which they’re used. You break down a big idea into smaller chunks and connect them with lines, shapes, or arrows.
Here are some common types of graphic organizers. 📊
Want a shortcut to create your graphic organizer? ClickUp’s Simple Mind Map Template is a great starting point. This template lets you visually map out ideas, tasks, or workflows directly within ClickUp—no extra tools needed. Easily drag and drop nodes, connect related concepts, and organize your thoughts in a flexible, interactive workspace.
Perfect for brainstorming, project planning, or outlining content, ClickUp’s mind map template helps you turn complex ideas into clear, actionable plans—all in one place. Need more ammo? Check out more graphic organizer templates here.
You might think you need fancy design software to create a graphic organizer. But Google Docs gets the job done quickly and for free. It’s accessible, easy to use, and lets you create a simple visual organizer.
Here are the benefits of using Google Docs:
🧠 Fun Fact: The first known mind map dates back to philosopher Porphyry of Tyros in the 3rd Century, who used branching diagrams to organize Aristotle’s ideas visually. Today, creating mind maps is a go-to method for visual thinkers.
Google Docs offers many ways to design clear and engaging graphic organizers. If you’re outlining ideas, mapping concepts, or structuring a project, consider these three simple methods.
Tables are a quick and easy way to create a graphic organizer, especially for comparisons, categories, or lists.
Here’s how to do it:
Head over to Google Docs and start a new document by clicking the + Blank option.
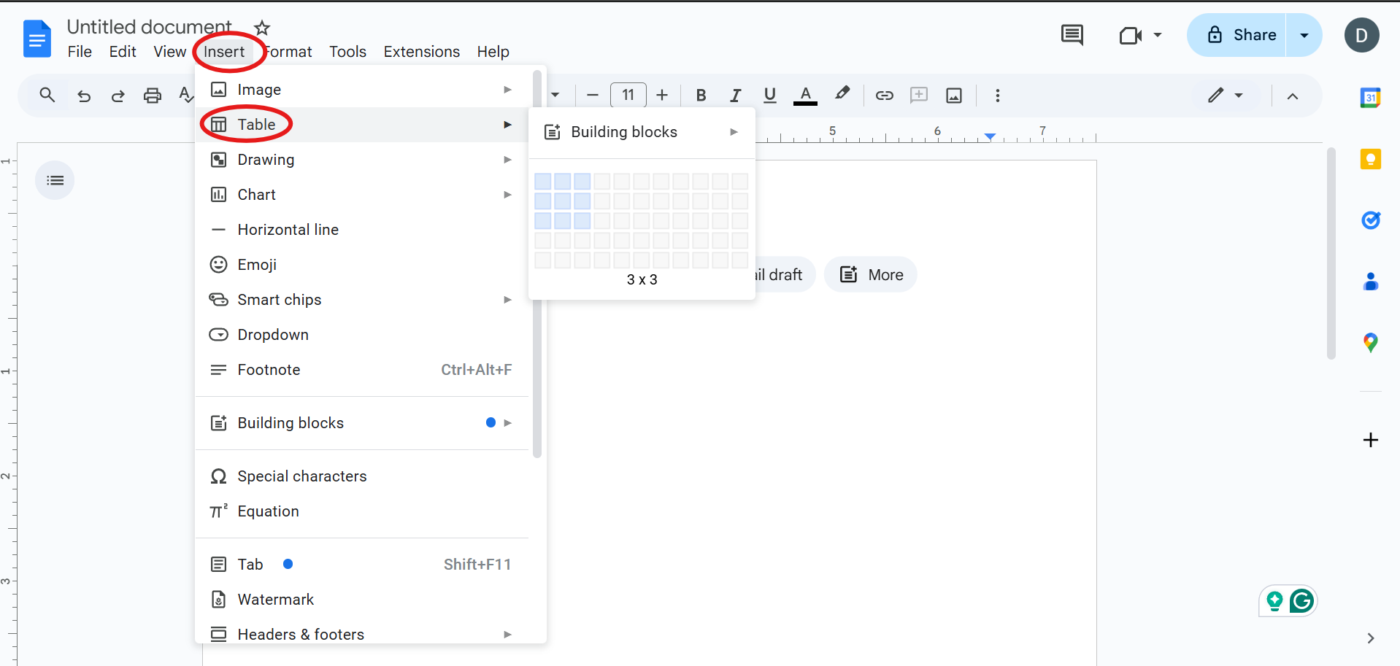
In the top menu, click Insert > Table. A grid will pop up—drag your cursor over it to select the number of rows and columns you need.
For a simple organizer, a 2×2 or 3×3 table works great.
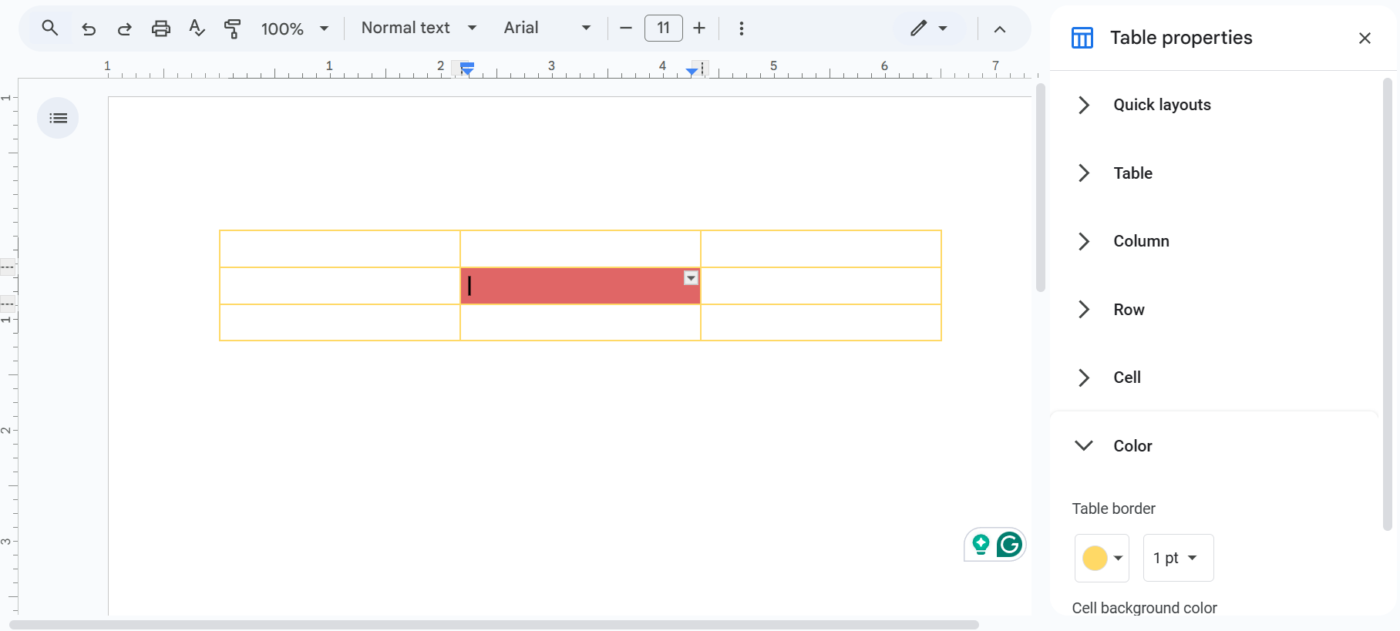
Need bigger cells? Just click and drag the edges of your table. Want to change the background color? Right-click inside a cell, select Table properties, and tweak the color under the Cell background color option.
You can also adjust text alignment and border styles for a cleaner look.
Click inside each cell and start typing. Use bold text or colors to highlight relevant details. If you need more space, right-click a cell and select Insert row above/below or Insert column left/right.
Next, review your table, tweak the formatting, and ensure everything is readable.
Once you’re happy with it, your graphic organizer is ready to go.

🔍 Did You Know? Many successful entrepreneurs use vision or idea boards as part of their planning process. Studies suggest that visualizing goals through images and diagrams can improve motivation and focus.
If you need more flexibility, like connecting ideas with arrows or drawing shapes, the Drawing tool in Google Docs is your go-to.
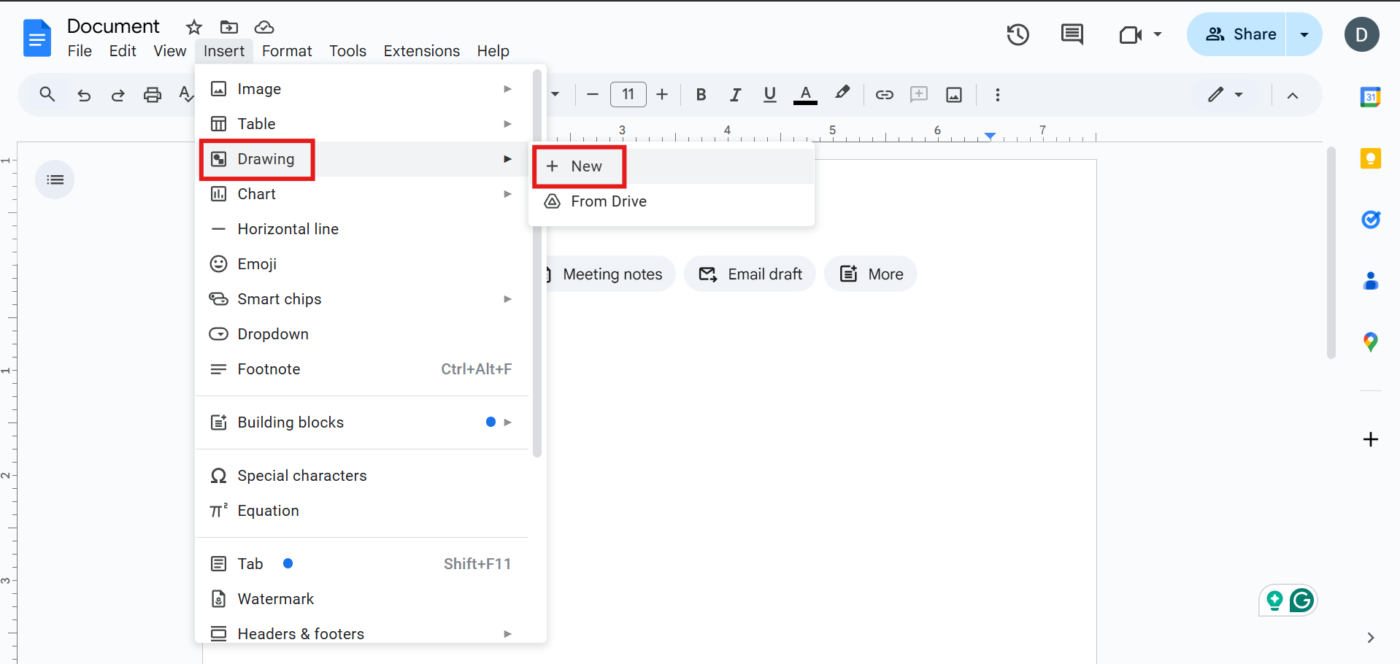
Click Insert > Drawing > New in the Menu bar to open the built-in editor. A blank canvas will pop up.
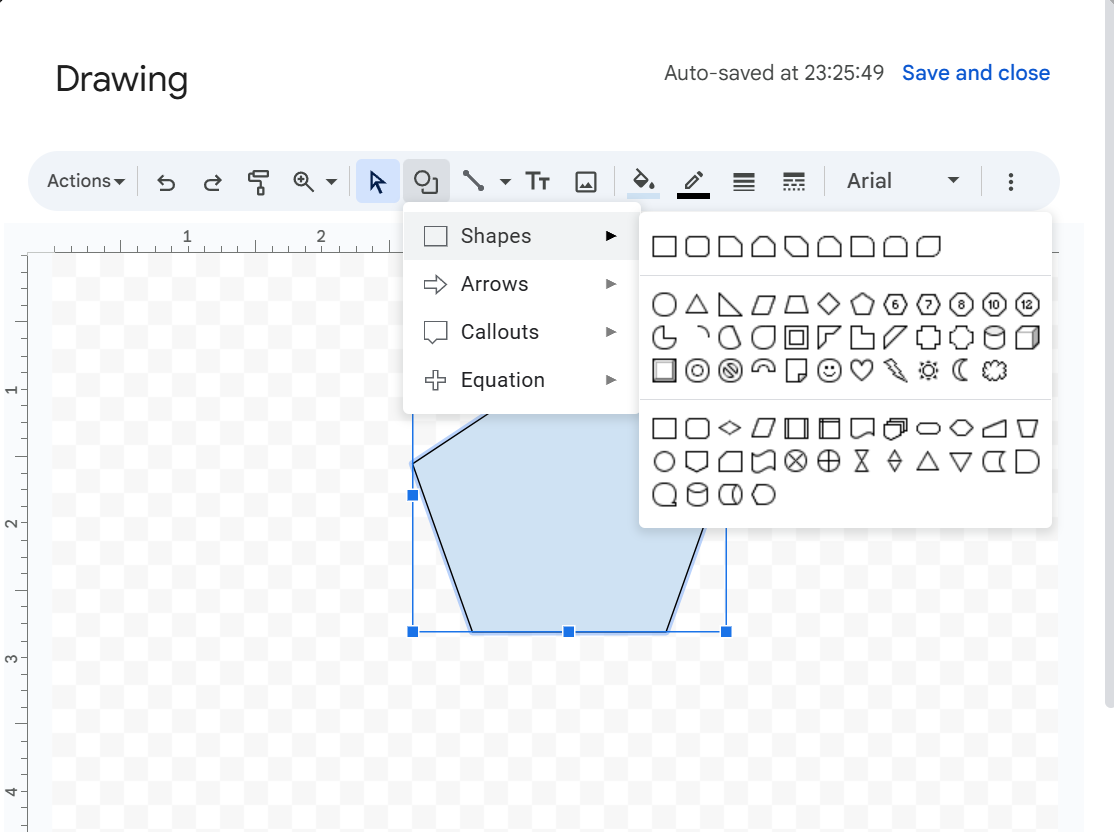
Tap on the Shape icon (a circle and square) and choose Shapes. Select rectangles, circles, or other shapes that best fit your organizer. Click and drag to draw each shape onto the canvas.
🧠 Fun Fact: Different shapes in a flowchart have specific meanings. Ovals represent start and end points, rectangles indicate processes, diamonds show decision points, and arrows connect the steps. This universal system makes flowcharts easy to read across industries.
Click on the Line tool and choose Arrows to connect your shapes. Drag from one shape to another to show relationships between concepts.
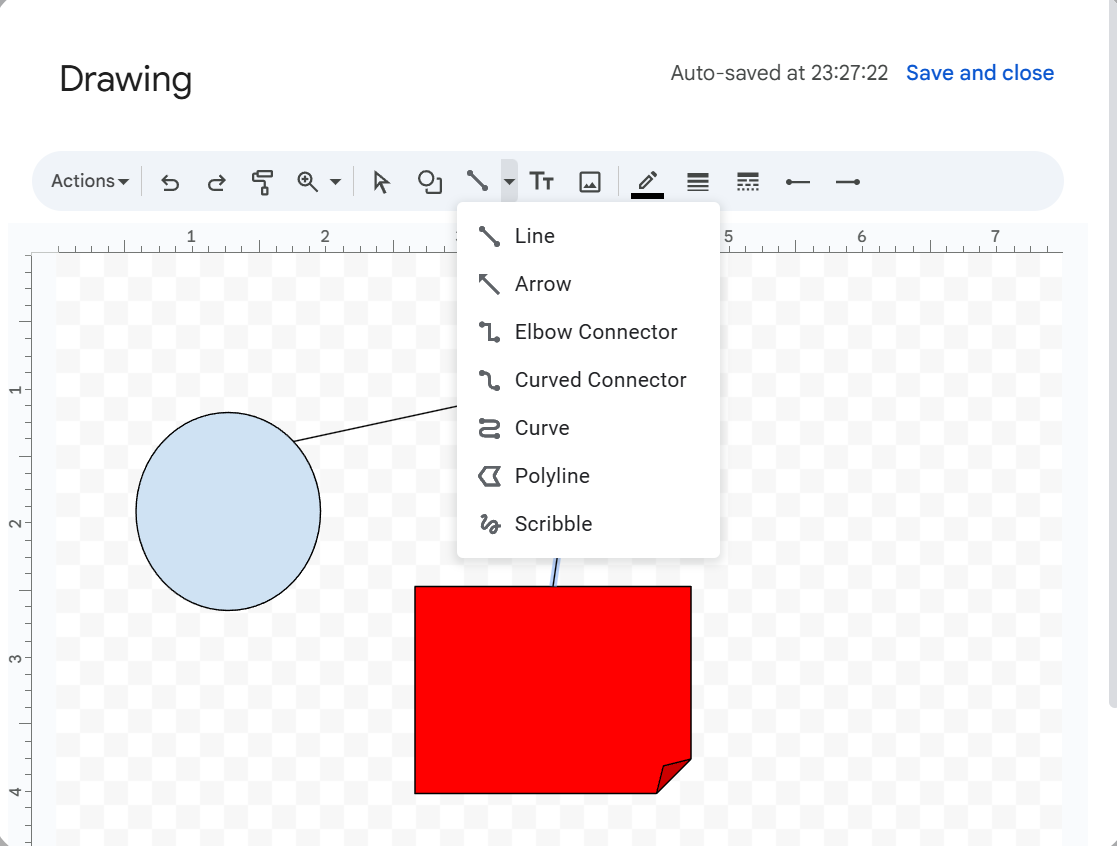
Double-click inside a shape to start typing. Want extra labels? Click the Text Box tool (T icon) and place text anywhere on the canvas.
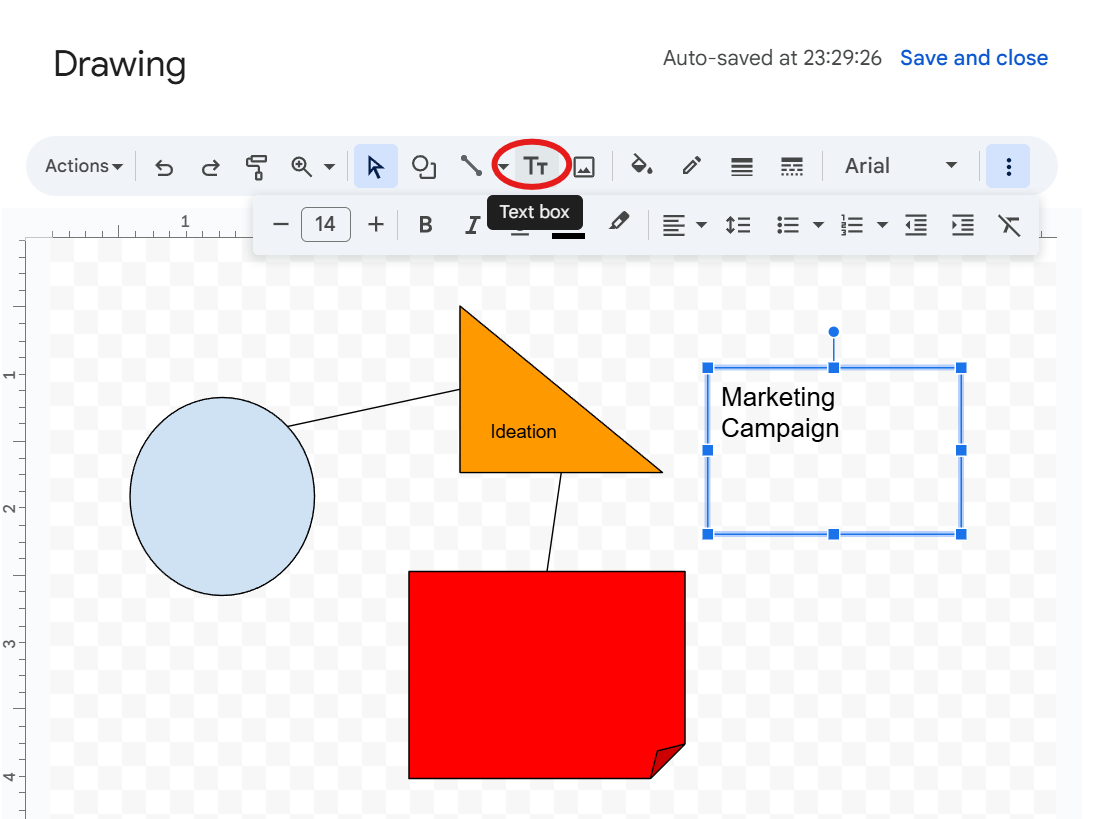
Once you’re happy with it, click Save & Close. The drawing will now appear inside your Google Docs document. If you want to edit it, click on your drawing and select Edit to make changes. Your updates will be reflected instantly.
🧠 Fun Fact: Venn diagrams were invented in 1880. British mathematician John Venn introduced this visualization technique to draw relationships between different sets.
If you want to implement more creative techniques, try Google Drawings.
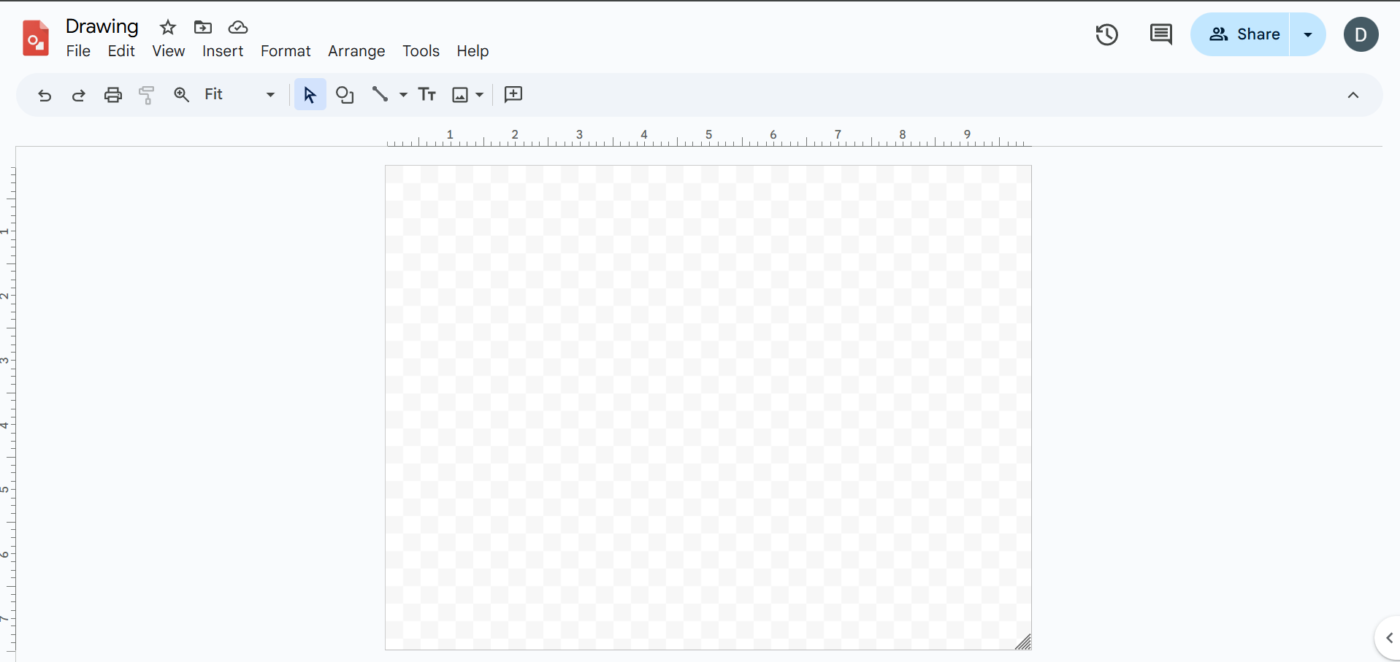
Go to Google Drive, click New > More > Google Drawings, and a new tab will open with a blank canvas—this is where you’ll design your graphic organizer.
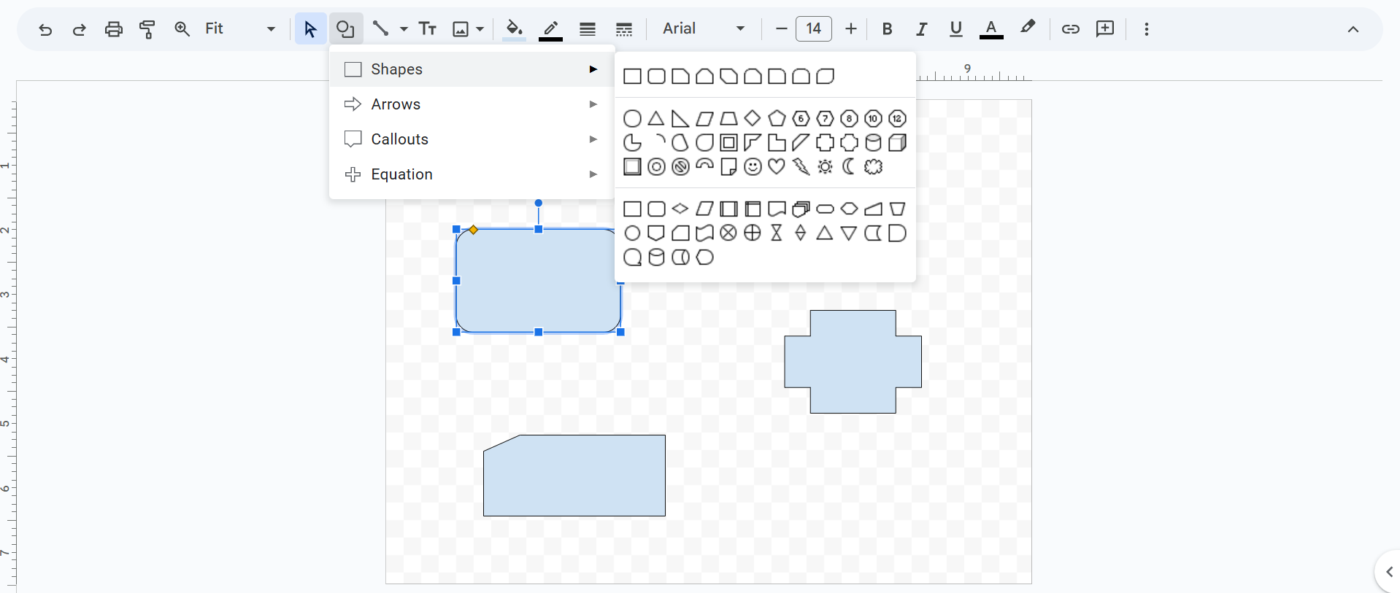
Use the Shape tool to add circles, rectangles, or other elements. Arrange your shapes freely; there are no table restrictions here.
🔍 Did You Know? Mind maps mirror how your brain works. Unlike traditional note-taking, mind maps follow a radial structure, branching out from a central idea, just like how neurons in the brain connect thoughts and memories.
Click the Text Box tool to add labels, explanations, or notes. To add an image file, click Insert > Image to add icons, pictures, or even custom graphics.

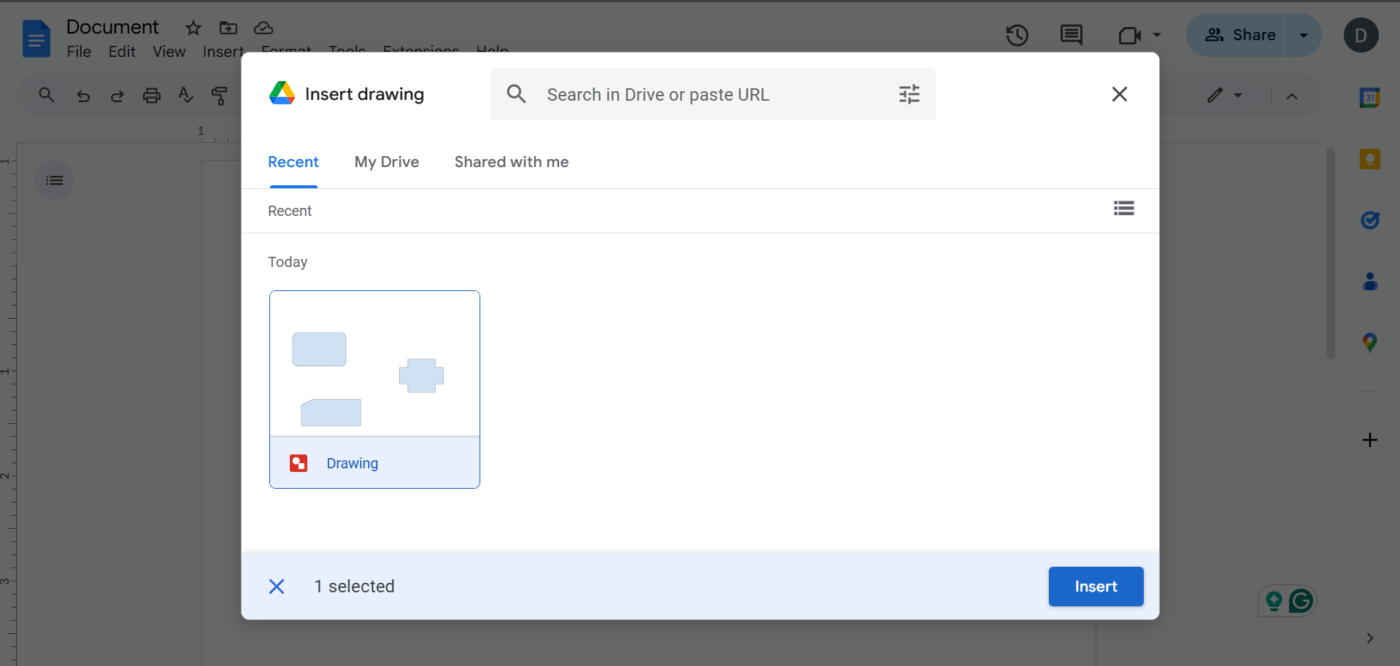
Once your organizer is complete, go back to Google Docs. Click Insert > Drawing > From Drive. Select your Google Drawing file and click Insert.
🧠 Fun Fact: Drawings made in Google Docs can be copied across other Google Classroom or Workspace apps. You can create a diagram in Docs and paste it directly into Google Slides or Google Sheets without losing formatting.
Google Docs is a versatile tool for creating graphic organizers. However, it has some limitations that can make the process less efficient than dedicated visual collaboration software.
Here are some key challenges you might face:
📮 ClickUp Insight: 88% of people now use AI in some form, with an impressive 55% using it multiple times a day. The rapid adoption of AI shows strong mainstream acceptance. Organizations are catching on, with leaders looking at AI as the next revolutionary workplace technology.
ClickUp embraces this shift by integrating AI into every aspect of work, from brainstorming on Whiteboards to automating repetitive tasks and generating content. Its AI-powered tools help teams organize ideas, make smarter decisions, and turn plans into action faster.
While Google Docs offers basic tools for creating graphic organizers, it lacks the flexibility and advanced features needed for seamless visual planning.
ClickUp, the everything app for work, combines project management, knowledge management, and chat—all powered by AI that helps you work faster and smarter.
It brings ideas to life with interactive elements, real-time collaboration, and AI-powered enhancements. Even better? Built-in visual task management makes organizing thoughts and turning them into action easy.
Let’s explore its features! 💪
Teachers mapping out lessons, students writing essays, content creators brainstorming ideas, and professionals organizing projects—all need a space where ideas can grow.
ClickUp Whiteboards bring them to life. 🤩

This collaborative workspace gives you an infinite digital canvas to sketch ideas, organize thoughts, and collaborate with your team in real time. From mind-mapping a book outline and designing a marketing strategy to planning curricula for different grade levels, this whiteboard software makes the process seamless.
A big advantage of using Whiteboards as a visual feedback tool is real-time collaboration. You can track live cursor drag-and-drop movements and see instant updates as ideas take shape.
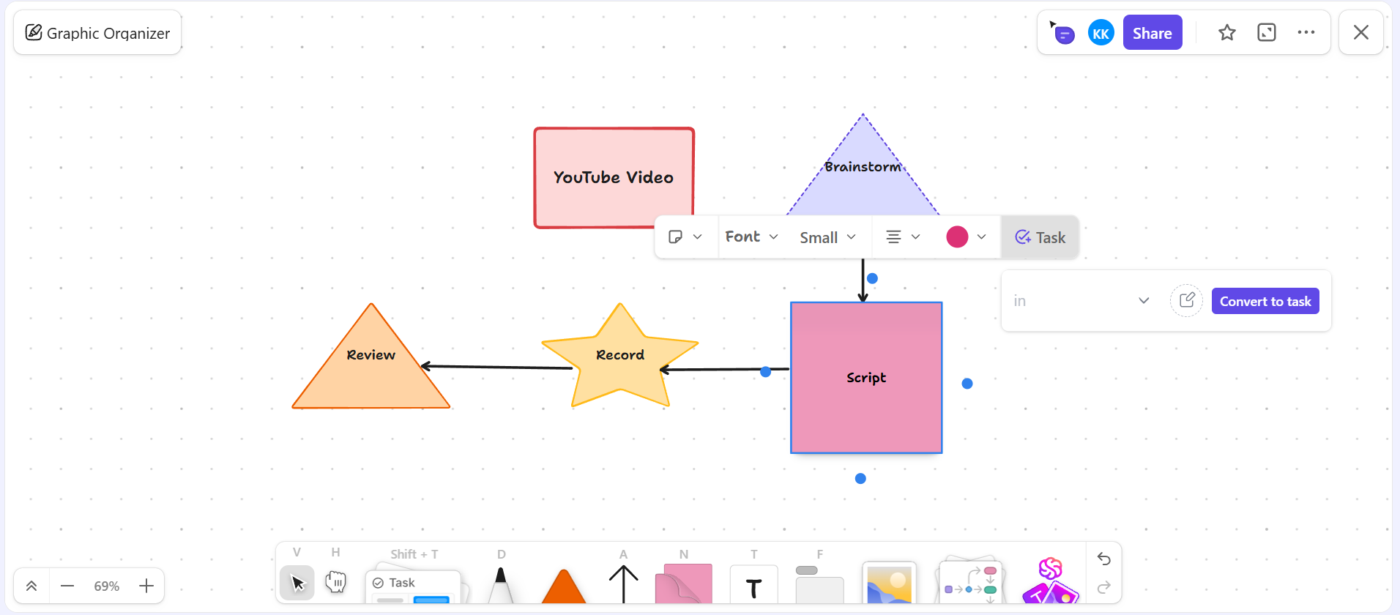
And it doesn’t stop there—task integration ensures that brainstorming sessions don’t just stay on the board. You can turn any idea into actionable ClickUp Tasks directly from the Whiteboard, keeping your workflow connected and organized.
Whiteboards offer pre-designed templates for brainstorming, project planning, lesson structuring, and mind mapping to make things even easier, saving you time and effort.
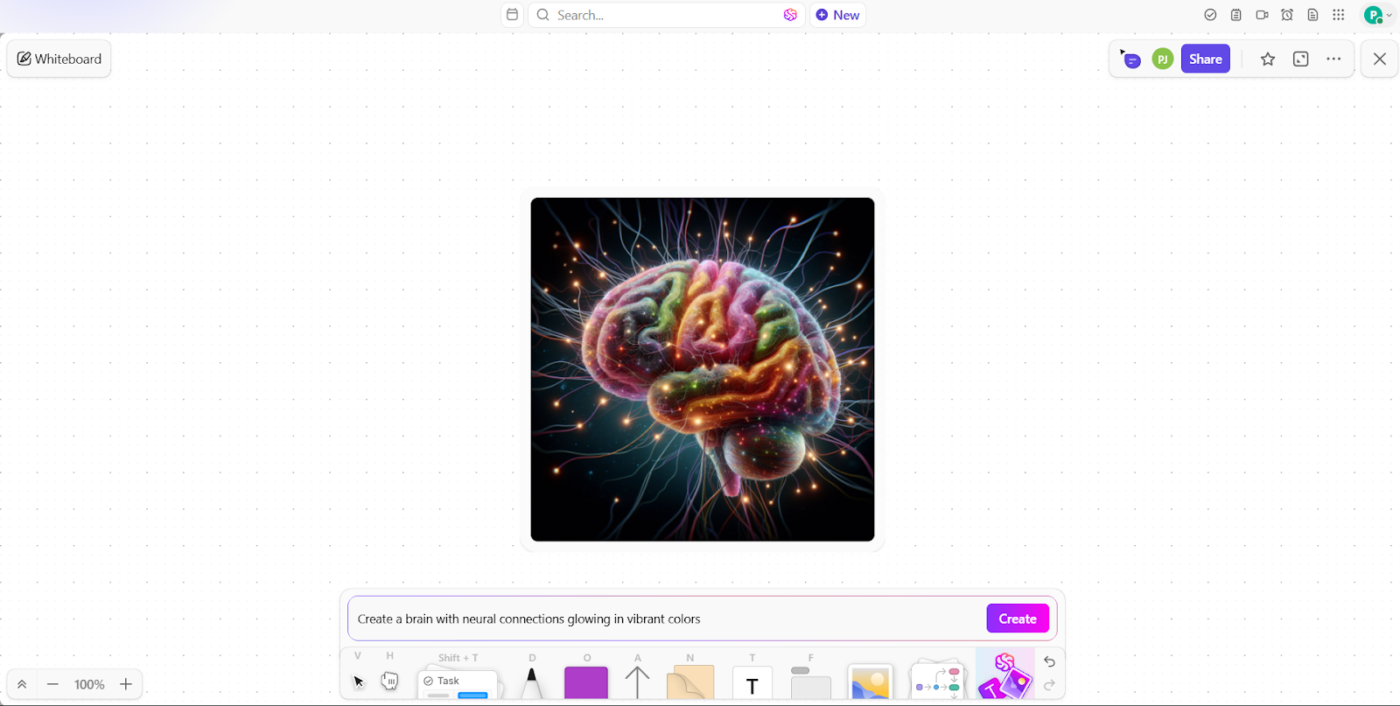
Want to create images without switching software? ClickUp Brain has you covered.
The AI-powered tool generates visuals that allow you to transform plain text into images, helping you visualize complex ideas effortlessly.
Think of a marketing team wanting to use AI for brainstorming during a new campaign. Instead of struggling to describe their vision, ClickUp Brain generates a quick visual representation of potential ad layouts. Business teams designing new workflows can instantly visualize step-by-step processes, helping them refine their strategies faster.
🔍 Did You Know? Flowcharts have been around since the 1920s. Engineers Frank and Lillian Gilbreth first introduced them to document industrial processes, making them one of the earliest tools for workflow visualization.
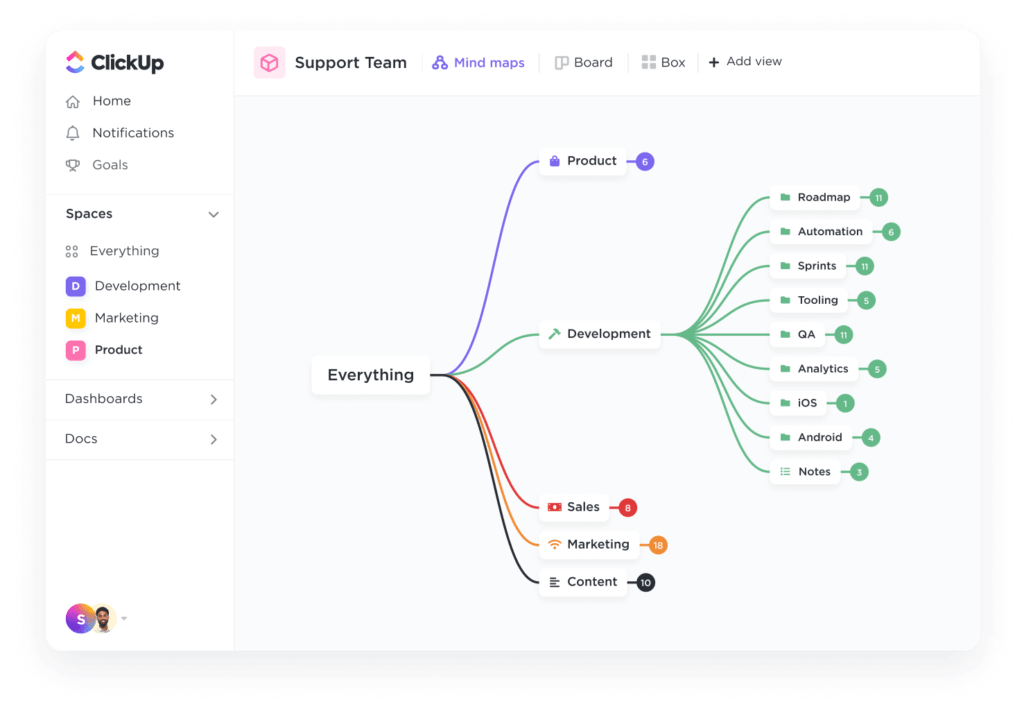
Now, let’s discuss structure. ClickUp Mind Maps allows you to visually connect thoughts, tasks, and projects in a meaningful way.
For students, this means breaking down complex topics into digestible chunks; for teachers, it means effortlessly structuring course content.
Mind Maps’ effortless drag-and-drop feature quickly arranges ideas and tasks to fit your workflow. You can convert any branch of your map into a Task while adding colors, shapes, and styles to categorize information for effective visual project management.
🧠 Fun Fact: Graphic organizers have been around for centuries! While they’re commonly associated with modern classrooms, the concept dates back to ancient philosophers like Aristotle, who used diagrams to map out logic and ideas.
Google Docs is a solid starting point for creating graphic organizers. But if you’re looking for something more powerful, ClickUp has you covered.
With interactive whiteboards, mindmaps, and seamless task integration, you can turn ideas into action without switching tools. After all, it is the everything app for work!
Bring your workflows together under one tool, starting now.
Sign up to ClickUp for free! ✅

© 2026 ClickUp

There’s an easier way. Try a free AI Agent in ClickUp that actually does the work for you—set up in minutes, save hours every week.