


Still downloading templates?
There’s an easier way. Try a free AI Agent in ClickUp that actually does the work for you—set up in minutes, save hours every week.
Sorry, there were no results found for “”
Sorry, there were no results found for “”
Sorry, there were no results found for “”
Think of a road trip to a new destination, but without a regular physical map or Google Maps—you’re bound to get lost. Frustrating, right? That’s what a website or app feels like to new users without a clear user flow.
A well-structured user flow is the backbone of a successful user experience (UX) design. It creates a smooth track for users, effortlessly guiding them from their initial interest (landing page) to the desired action (conversion).
Without it, users may face confusion and abandon carts or drop sign-ups, leading to missed opportunities and decreased conversion rates.
In this blog, we’ll explore user flow examples, learn how to create them, and discuss strategies and best practices to optimize your designs.
Let’s get started!
A user flow is a series of steps someone takes to complete a task on a website or app. It shows how users move from one page to another section to reach their intended destination.
The purpose of user flow diagrams is to visually outline all the steps that need to be followed clearly, from the initial interaction to the final action of the purchasing flow, like buying a product or signing up for a newsletter.
For example, a user flow might begin with a Google search, leading to a product page, followed by adding an item to the cart and ending with a successful checkout.
So, a well-designed user flow ensures a seamless, intuitive experience, minimizing friction and effortlessly guiding users toward conversion.
User flow diagrams help understand how a user interacts with a product, identify potential pain points or areas for improvement, and optimize the user journey. They also help you validate and refine an app idea. These diagrams can take various forms, each suited to different needs:
User flow is an essential part of UX strategy and design. It works as a blueprint for guiding users or customers, streamlining the user’s path, improving client satisfaction, and boosting engagement.
Without clear user flows, customers may face confusion, frustration, and dead ends, leading to higher bounce rates and lost conversions.
Mapping well-designed user flows offers valuable insights that lead to smarter UX design decisions. Here are the benefits of mapping and tracking user flows:
Also Read: How to study and analyze user behavior efficiently with user tracking software
At this point, you might wonder if user flow is the same as a user journey. While both terms are commonly used in the context of user experience, they refer to different concepts.
| User Flow | User Journey |
| User flow refers to the specific, short paths that users take on a website or app when making decisions, such as completing a purchase. It focuses on the step-by-step process within the site, guiding users toward a particular action or goal. Designing effective user flows involves creating user flow charts and considering app user flow to ensure a smooth, intuitive experience. | A user journey (or customer journey), on the other hand, is like a map that traces the path a user takes with your brand, starting before they even reach your website. This journey includes where they first heard about your product app or website—whether through an advertisement, newsletter, social media, or other channels. The user’s journey continues even after they leave your page. |
Seeing the user flow offered by successful products can help us create more effective user experiences. Let’s explore some real-world user flow examples:

This diagram outlines the steps Instagram users take to access their accounts or sign up for new ones. It starts with existing users entering their username and password or new users selecting the signup option.
New users then enter their email or phone number and go through a verification process, like receiving an OTP or email confirmation. After that, they can add a profile picture, sync contacts, and connect with Facebook to find friends.
The color scheme of this user flow diagram is basic: pink for main actions (login/signup), blue for extra steps (verification, syncing), and green for successful completions. This basic user flow example is simple and neat, making it easy for users to follow along and finish the registration process without confusion.

The Spotify user flow diagram illustrates the steps users take to navigate the web app. It starts from the Landing Page, where users either sign up or log in. The user flow then progresses to the Home Page, Search Page, and What’s New section.
Each stage of this music app user flow is color-coded: orange for primary user actions (login, sign-up), yellow for secondary actions (searching, playlists), blue for music selection, and green for successful actions (playing, liking, or sharing songs).
This simple user flow guides users through key actions like discovering music, managing playlists, and connecting with friends. The main goal of this user-centered design is to enable seamless music discovery while enhancing user engagement through social connections and personalized content.

The onboarding flow diagram is one of the most common user flow examples and presents a simple decision-based process. The main goal of this basic user flow chart is to guide users through key features efficiently, ensuring they understand the product before completing the onboarding process.
This user flow example uses black diamonds for decision points, green circles for ‘Yes’ actions, and red circles for ‘No’ actions. Here, yellow boxes represent key steps or tooltips.
The user flow begins with a welcome message, followed by the user’s choice to start onboarding. If they choose ‘Yes,’ the first feature is introduced via a tooltip. The user then has the option to click the ‘Next’ button. If they proceed, a second feature is introduced with another tooltip. If they choose ‘No’ at either decision point, the onboarding flow ends.

The review generation user flow diagram tracks the process of collecting user feedback through a Net Promoter Score (NPS) survey after the user has spent two weeks with the app. This is one of the popular user flow examples. Its goal is to gather user feedback and direct satisfied users (Promoters) to review the app on an external website, enhancing its reputation.
The diagram design uses black diamonds for decision points, yellow for survey prompts and actions, cyan for user engagement steps, and white for endpoints.
The NPS survey is the entry point of the user flow. The user can either engage with the survey or dismiss it. If the user chooses to engage, they fill out the NPS survey and, based on their feedback, are classified as Promoter, Passive, or Detractor.

The website user flow diagram outlines the steps a user takes, from landing on the homepage to completing various actions like login, registration, and purchasing via an app or website. The goal is to guide users through the primary functions of the website smoothly.
The minimalistic design of this purchasing flow uses a single color scheme of light blue and dark blue arrows to indicate flow direction. Rectangular boxes represent different actions and decisions.
The user flow starts with the user either logging in or registering. If the user forgets their password or requires two-step verification, additional steps must be followed. Once logged in, users can access the account page or initiate a purchase through a wire transfer, which involves three steps before completing the transaction.
To create user flow diagrams for your app development, follow these steps:
Before you begin the specific task of creating a good user flow, you must first understand your users’ goals, such as what drives them to use your product and how they expect it to function.
Conducting user research and creating a customer journey map is crucial at this stage as both provide insights into what services you should offer and how your target audience will interact with them.
At this point, you must also create user personas to identify user behaviors and map actual users throughout various user activities on different paths on your site or app.
Read More: To conduct successful user research, explore these user research methods!
Now, identify the multiple entry points (such as Google ads, social media, marketing emails, direct visitors, organic traffic, etc.) where users access your platform and reach the login screen. Understanding how users enter your site or app will enable you to design user flows that enhance the overall experience.
After identifying the different entry points, outline the user path and possible actions people take to reach their final destination.
Don’t forget to determine what happens once users reach the final stage. This could be a thank-you screen for subscribing or placing an order, or a redirection to a specific page, such as the home screen.
Once you’ve outlined the user flows, it’s time to visualize them. There are several flowchart software that can assist in this process.
Certain standard shapes are used to visualize the user flow diagram examples. They represent different elements or user behaviors in a user flow diagram, such as:
Once you’ve developed user flow diagrams, the next step is to create UI wireframes or mockups. This transition lets you visualize how content and user interactions will come together on the screen. It enables you to further enhance the overall UX by adding visual elements and refining details.
The final step is to validate your design through user testing, which can be done in many ways, including usability testing. Share your prototype with stakeholders and end-users to gather feedback on how well the UI aligns with user expectations. By analyzing user behavior and feedback, you can identify areas for improvement within your UX design process.
Here a some more tips you’ll find helpful as you start creating user flows for your website or app:
The right tools and resources can significantly streamline the user flow creation process. Many online platforms provide intuitive interfaces for designing user flow diagrams. These platforms offer a range of shapes, grids, and alignment options to ensure consistency and clarity.
One such tool that you can leverage to ideate and create flow charts is ClickUp.
ClickUp is a project management software that can help get your work done on a single platform.
Using ClickUp, you can create, automate, and manage tasks, track goals and timelines, brainstorm ideas, collaborate with teams, visualize projects in multiple views, manage team workload, and so much more.
Now, let’s show you how to create user flows in ClickUp!

ClickUp Whiteboards is a flexible virtual canvas that allows you to brainstorm, plan, ideate, and visualize processes.
Whether you’re working on a new feature or designing a user interface, whiteboards in ClickUp make it easy to see how everything connects. But they are also great for creating user flow diagrams, where you can map out the journey a user takes through your product or website.
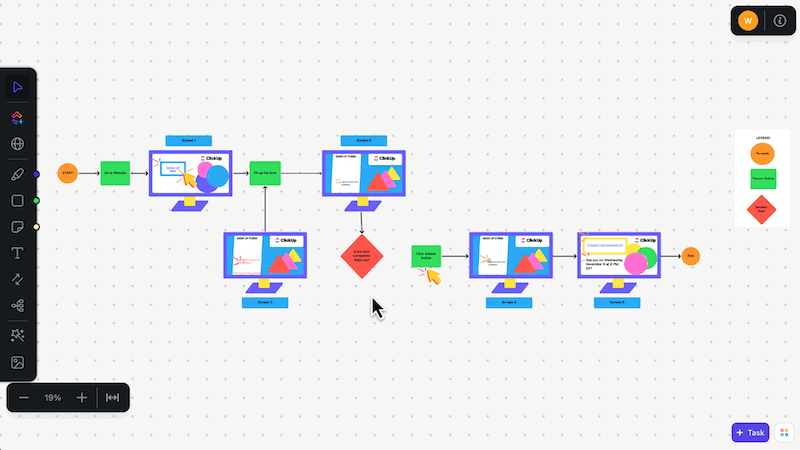
Create user flows using the mapping technique in ClickUp Whiteboards. This involves visually laying out each possible user interaction, combining user flows from the first click (app entry point) to the final conversion.
ClickUp Whiteboards offers a variety of tools to assist in this process:
You can even customize these connectors by changing the color or line weight or adding text to provide more detail in your user flow.

ClickUp Mind Maps can also be used to create user flows. It allows you to visualize ideas and concepts hierarchically, making it easier to structure complex user flows. With ClickUp Mind Maps, you can:

Also Read: How our onboarding team uses ClickUp! 💪
If you don’t want to start developing from scratch, ClickUp also offers these effective templates to optimize your UX design user flow processes:
ClickUp’s User Flow Template is perfect for visualizing your user’s experience and interactions with your product. For example, if you’re designing a new app, map out the user’s journey from signing up to completing their first task.
Create the user flow in this Whiteboard template using custom statuses like ‘Open’ and ‘Complete’ to track the progress of each user task. The Getting Started Guide View shows you how to use the template to visualize user flows.
The template helps you gain insights into user interaction with your website or app and identify areas for improvement.
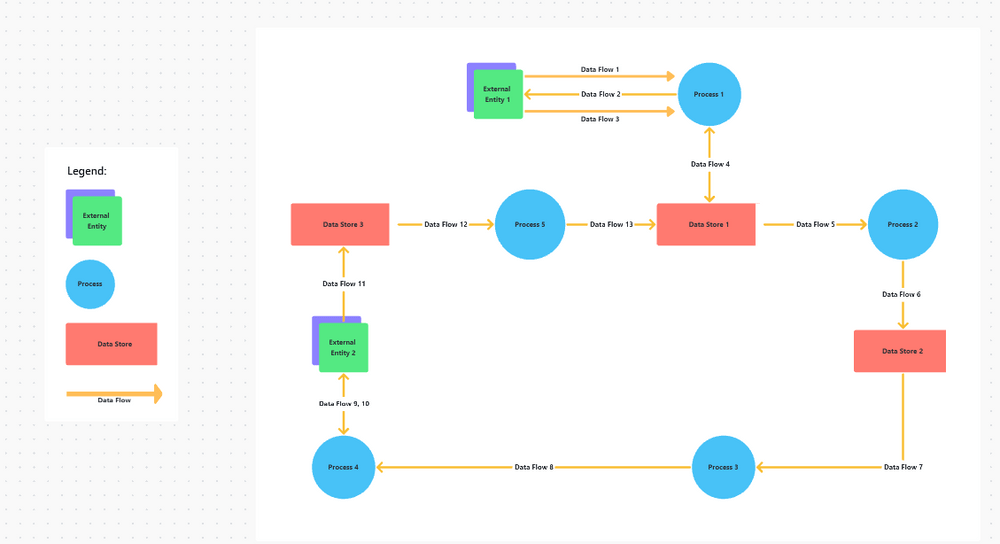
The ClickUp Data Flow Diagram Template is ideal for visualizing how data passes through your systems. If you’re developing a new software feature, for example, use this template to map out how user data is collected, processed, and stored.
The clear visual representation with connectors showing the flow between components enable you to identify potential bottlenecks or security risks.
This Whiteboard template helps you identify the relationship between data and processes, as well as the source and destination for each piece of data in the system. This helps you create more efficient systems for data retrieval and processing.
ClickUp’s Process Flow Chart Template provides a clear, structured approach to mapping out each step in a user flow process, helping you identify inefficiencies and optimize performance. For instance, if you’re managing a sales funnel, map out each stage from lead generation to conversion.
With customizable fields and connectors, you can tailor the flow chart to suit your specific needs, ensuring every detail is captured.
Documenting processes with this Whiteboard template helps standardize operations, ensuring the steps in a process are clear to all involved. This, in turn, makes it easier to troubleshoot issues and track progress.
Bonus: Access free flow chart templates to streamline your web app development processes!
User flows are crucial for maximizing user experience and boosting conversion rates by guiding users through a seamless journey.
The user flow examples in this blog are practical use cases that demonstrate how to create impressive user flows with effective user paths. With ClickUp, you can build your own user flows, too!
In fact, ClickUp optimizes the entire software or product development process. Its robust features allow you to streamline project management workflows, track progress, and collaborate seamlessly with your team as well.
Sign up for ClickUp today and start creating user flows that drive results!

© 2026 ClickUp

There’s an easier way. Try a free AI Agent in ClickUp that actually does the work for you—set up in minutes, save hours every week.