


Still downloading templates?
There’s an easier way. Try a free AI Agent in ClickUp that actually does the work for you—set up in minutes, save hours every week.
Sorry, there were no results found for “”
Sorry, there were no results found for “”
Sorry, there were no results found for “”
Quincy Smith is the co-founder of TEFL Hero, a training and resource company for people interested in teaching English as a second language. The former teacher currently lives in Shanghai with his partner and dog.
TEFL Hero is a digital business that provides training and resources to teachers looking to teach English either online or abroad.
Content is our biggest marketing channel by far and we use ClickUp to manage every aspect of it with an extremely small staff.
A well-designed content management system is like a flywheel – once it’s up and running, it will send your website targeted traffic as long as you keep it maintained. Outside of finding quality writers, the biggest hurdle companies face with content is designing a system that makes it easy to research, write, and maintain content over time.
In this post, I’ll pull back the curtain on the system we’ve implemented within ClickUp that makes it easy to publish and manage as much content as we want (and has helped our blog become our biggest marketing channel).
On its face, our content system is simple – we want to publish as much relevant content as we can without bottlenecks or losing track of older posts that might need to be updated.
In reality, there are a lot of moving parts that make this possible and we needed a platform that could support our current needs as well as where we see ourselves in 3 years.
There are 3 primary goals for our content system:
Our content management system is supported by 4 roles:
ClickUp is the hub of our content management system.
It links our different management views with our briefs and published articles, provides easy to understand updates to all parties, and houses regular tasks to support and manage all posts.
When it comes to content, we have a dedicated list with 2 main List views.
Content flows top to bottom depending on stage and moves to the ‘Live’ list when it’s completed.
There are a few things that we consider “must haves” when it comes to powering our content system in ClickUp.
Every one of these plays a big role in keeping our process consistent and efficient.
Templates are a lifesaver for us and we rely on them to make brief creation easier and ensure consistency in the end result.
We created different templates for different types of content and use custom statuses to keep track of them in our primary content view.
Using templates in ClickUp to speed up work processes and ensure consistency
Each template includes a variety of dependent subtasks that ensures a piece of content is researched, written, and published in the right order.
Subtasks allow us to outline and assign different parts of the content to different people and alert them automatically when their task has opened up. Each subtask has at least 1 checklist item to complete before it can be marked as done.
We rely heavily on Custom Fields to track and display relevant data like author, word count, brief URL, and status.
Combinations of fields are pulled through both of our List views and allow us to monitor, review, and group content easily. They have made it incredibly easy to get a high level look at content progress as well as provide our writers and staff with the information they need to do their jobs
Before ClickUp, a writer would need to find the brief link in Trello (or even their email!) and then our publishers would update all dates in a Google Sheet. Now, Custom Fields help us keep all of that information in one place and display it in the best way for that user.
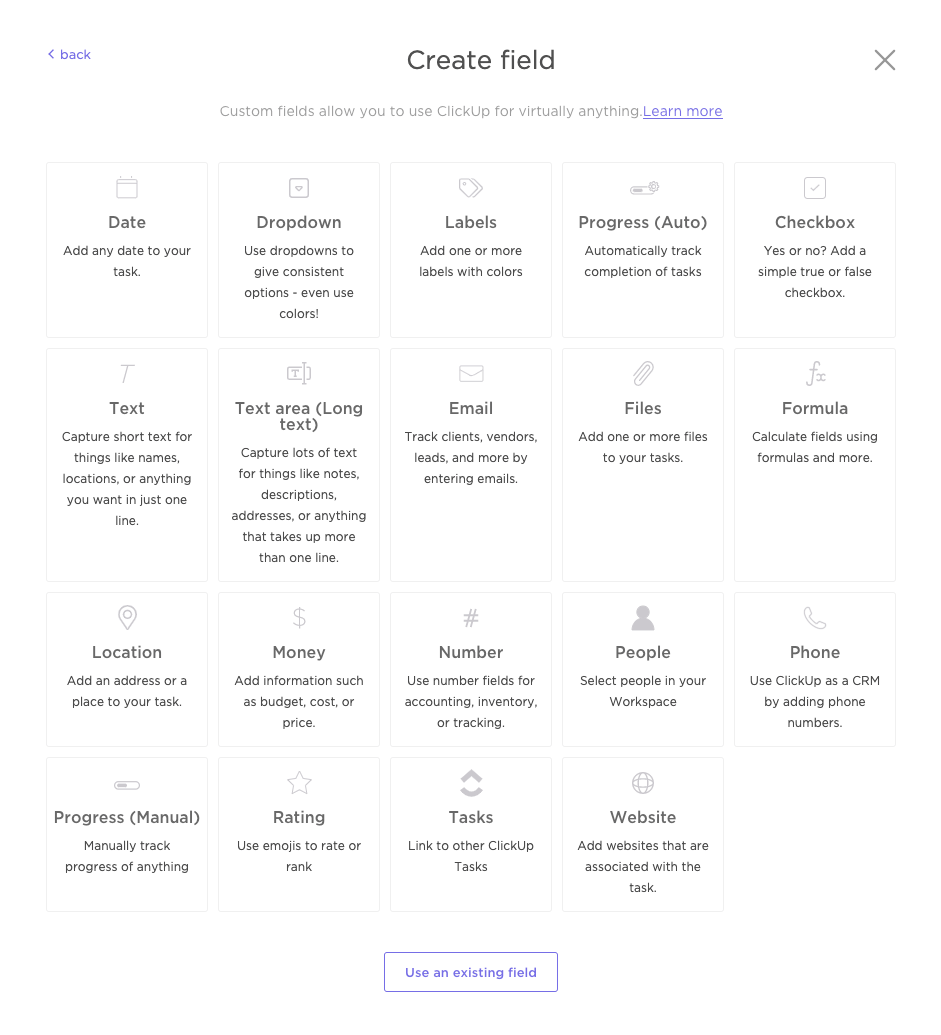
Custom Field Types in ClickUp
Views are where I spend most of my time and we use 2 primary layouts:
These give us the best high-level overview of where we are in terms of our content schedule and make it easy for us to sort all of our content by different custom fields.
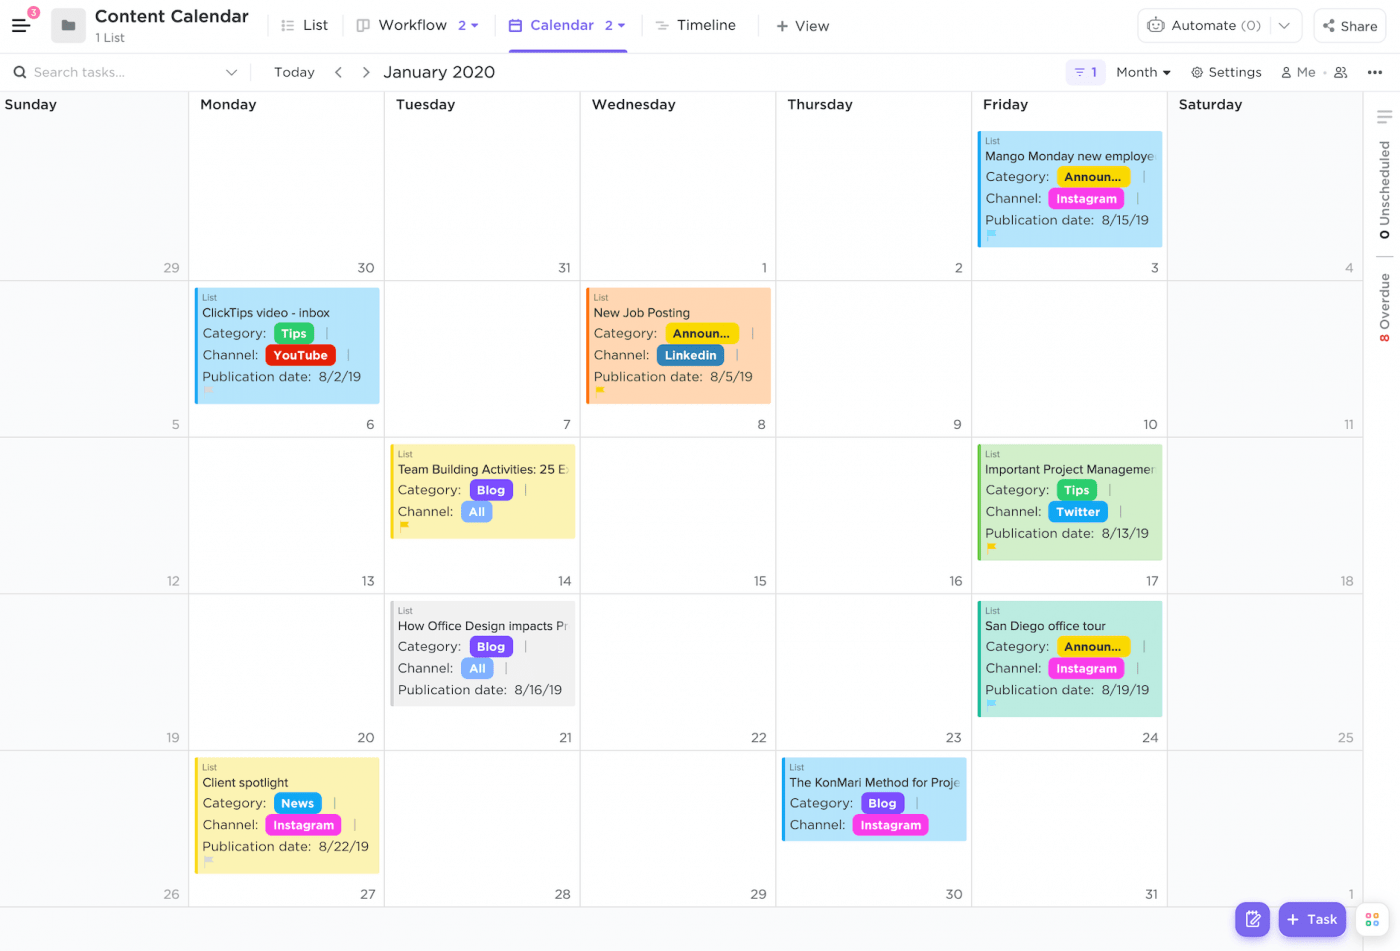
Using ClickUp’s Calendar view for content management
So now you’ve seen the setup, but what does it actually look like for a piece of content to make its way from an idea to a live blog post?
We use a simple 5 step process that is reflected in our stages:
All of our content research is handled in-house and we use Google Docs to organize and store our content briefs. The brief is stored within the content task via a custom URL field and makes it easy for the authors to get started without needing to search around.
Once a brief is ready to be passed off to a writer, we mark the ‘Create Brief’ subtask as complete and change the status from ‘Brainstorm’ to ‘Draft’.
The dependent subtasks mean the writer gets alerted automatically (assuming they’ve been assigned), but we also occasionally tag them in the main task comments.
Once the initial draft is done, the writer changes the status to ‘Edit’ and marks their subtask (and checklist items) as complete.
From there, the piece enters a pretty thorough review process but all edits and questions are kept in the Google Doc for simplicity.
If any changes are required, we will also tag the writer in the main task comments to ensure they get the message.
After editing, the status is moved to ‘Upload’ and the respective subtask is unlocked. A different team member is alerted and is responsible for uploading the finished piece and ensuring the formatting matches the Google Doc brief (with correct images, links, and spacing).
The post is saved as a draft and passed to a manager via another status change – this time to ‘Publish’. The manager reviews the draft and either publish it immediately or schedules it for a later date.
As the amount of content grows, maintaining the relevance and accuracy of that content becomes both more important and more of an effort. To help us stay organized, we rely on our second List view that displays custom date fields for when a post was published, reviewed, and last updated.
Using this, we are able to filter and sort content systematically for regular reviews. If we need to update a blog post, we can then move it back to ‘Draft’ and update the necessary status + subtasks.
Tip: We’re considering adding a Long Text Custom Field to better track review + update notes. The idea is that the more a piece of content is reviewed for performance the more valuable a running list of insights + changes will be.
After having used variations of this system for a few years, there are a few big takeaways to help you get it up and running without too many issues.
Remember the goal of having a content system that is easy to use?
SOPs (standard operating procedures) do most of the heavy lifting when it comes to showing users how each step gets done.
We keep our SOPs in 2 places internally:
Our SOPs are based on a Google Doc with a corresponding video – the doc has the steps and instructions needed to execute the task and the video provides an over-the-shoulder look for extra clarity.
I already touched on how important content maintenance is, but I really cannot overstate how much revisiting your old content can help increase your traffic and revenue.
We review our content every 3 months (so if you published something in January then you’d review it every 3 months starting in April), and if we find that it’s not performing or needs to be updated with new information then we add it back to our writing queue—it’s that simple.
After all, you wouldn’t let a car engine go without maintenance and you surely wouldn’t let it underperform without getting it fixed. So why not build regular reviews into your process to help you get the most out of your investment?
Getting results from your content efforts isn’t easy and it’s even harder to stay on top of everything at scale. To combat this, we use routines and batch processing whenever possible, including:
This helps us to stay organized and be super efficient with our time as we aren’t bouncing back and forth between tasks.
If you’re new to content marketing or have been surviving on a diet of Trello and Google Sheets, then this post was probably a lot to digest. To help you get you started I’ll leave you with 2 tips:
Good luck!

© 2026 ClickUp

There’s an easier way. Try a free AI Agent in ClickUp that actually does the work for you—set up in minutes, save hours every week.