Sorry, there were no results found for “”
Sorry, there were no results found for “”
Sorry, there were no results found for “”
If you’re a working professional, chances are you’ve heard of Zoom. Today, it’s almost synonymous with virtual meetings, after becoming immensely popular during the pandemic. Zoom’s success, in part, can be attributed to its free access, intuitive features, and simple user interface.
Whether you want to collaborate with your remote or dispersed team, sync with overseas clients, or just catch up with a friend in a personal meeting, Zoom can help. But the first step to all these conversations is scheduling a meeting via your Zoom account.
In this blog post, we’ll show you exactly how to do that—in quick, easy steps.
Consider a small meeting with maybe two or three of your colleagues. To schedule this meeting, you might simply go to Zoom’s desktop app, create an instant meeting link, paste it into your colleagues’ WhatsApp chat, and tell them the time.
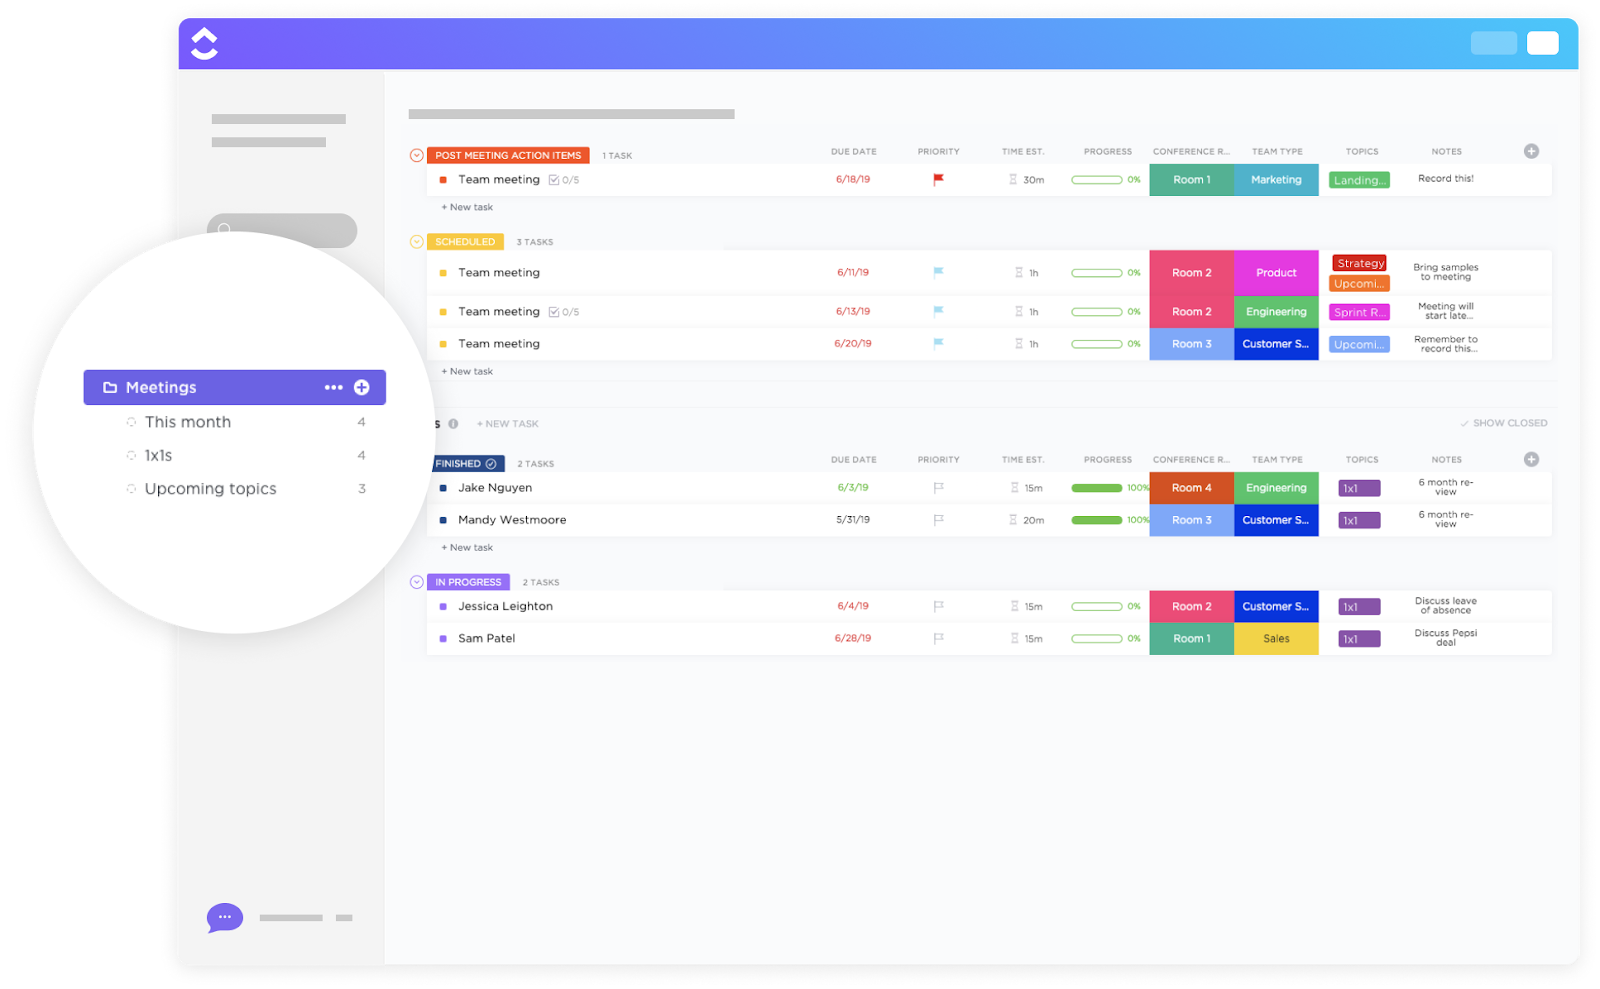
Before you send that Zoom invite, get everything organized with ClickUp’s free Meetings Template. It helps you set a clear agenda, jot down notes, and keep track of next steps—all in one spot.
While this method is fairly simple, it can be off-putting and unsustainable. What would you do if you had to organize a company or department-wide meeting?
You can’t just show up and expect people to join in on a moment’s notice. You need to check people’s availability, ensure there’s a clear agenda for the meeting, and be prepared to document the key discussions and takeaways to keep everyone on the same page.
This is where scheduling is most helpful.
Zoom lets you send meeting invites to block every participant’s calendars and gives users options to establish the meeting agenda (among other features), ensuring that participants have the time to prepare for it.
With these basics in place, you’ll be ready to schedule Zoom meetings like a pro.
You can schedule a Zoom meeting in multiple ways, depending on where you use your Zoom account. There are three options: the Zoom desktop app, the Zoom website AKA Zoom on the browser, and the Zoom mobile app.
All the methods work for scheduling both one-off and recurring meetings. Let’s see step-by-step instructions on how to schedule Zoom meetings on each platform.


The Zoom app is one of the fastest and most convenient ways to schedule a Zoom meeting. But, If you don’t have the Zoom app installed, you can schedule a meeting on your browser—via the Zoom website
Scheduling a meeting on the Zoom website is similar to the desktop app, with a few exceptions. After you log in or sign up, this is the screen that will appear:

If you work less on the browser and more on your phone, you’ll have an easier time scheduling a Zoom meeting via its mobile app.
Once you install the Zoom app on your Android or iOS device, the screen will allow you to schedule your meetings in integration with the calendar on your device.
This feature automatically adds the meeting details to your calendar and enables a push notification. You will receive a reminder 10 minutes before the meeting starts.
(Here’s hoping our colleagues who are always late take a hint from this) 🤞
Suppose you are scheduling a meeting that will take place regularly, for example, your daily huddle/team meeting, weekly reviews, or monthly check-ins with your manager. Check the Recurring Meeting option, which automatically schedules the meeting and sends reminders before each session.
Once you check this box, you will get further options about the meeting details, recurrence, and ending period.

With Zoom, you can choose from various advanced features to conduct, protect, and stream your online meetings. This includes capabilities like additional security measures and Zoom’s web SDK. Short for Web Software Development Kit (SDK), this typically lets you add additional functionality to the same software that may not be available through Its web or desktop apps.

Set meeting passwords on Zoom for additional meeting security and to prevent unauthorized meeting access. Create a password of your choice, or use the pre-set one generated by Zoom. Use advanced scheduling options to embed the scheduled meeting on other web pages, such as your personal website.
Your invitees can join the meeting without entering this password if they click on the link you sent them. Additionally, restrict access to invitees who have signed in using unfamiliar domains, for example, any email address other than your institutional email.
Encryption options are also available, including end-to-end encryption where your data is stored on the local device. 🔑
Note: If the following section is too technical or challenging for you, we suggest getting help from a technically resourceful colleague or friend.

You can embed the familiar Zoom meeting and webinar experience directly within your app or website. Users gain access to core Zoom features like joining calls, muting microphones, sharing screens, and using the chat, all within your custom interface.
This is done in two ways:
The Zoom web SDK doesn’t directly support scheduling meetings within your website. However, you can achieve this functionality by combining the SDK with the Zoom API, short for Application Programming Interface—which is the infrastructure that allows different software to connect with each other.
Use the Zoom API’s Create Meeting endpoint to schedule a meeting. This endpoint requires authentication via OAuth or Zoom’s JWT Marketplace Apps. OAuth (short for “Open Authorization“) is an open standard for access delegation, commonly used for internet users to grant websites or applications access to their information on other websites without giving them the passwords.
Next, specify dates, times, duration, topics, and other meeting options. The API returns a meeting object containing essential information, including the meeting ID and join URL.
After scheduling a meeting through the API, use the SDK to provide a Join button or functionality within your website. When users click ‘Join’, use the SDK’s Join Meeting function with the retrieved meeting ID to launch the Zoom meeting within your website seamlessly.
In addition to these features, you can even attend meetings on the go using Zoom’s phone call setting, which essentially converts your meeting into a phone call. Other features include language interpretation, adding alternative hosts, adding attachments to your meeting, and creating watermarks for presented screens.
Integrating your work calls within the software you use daily will help you work faster and reduce context switching.
Here’s how.
If you’re tired of switching from app to app to manage meetings while you work, ClickUp is the tool for you! ClickUp offers you a centralized workspace to manage all your tasks and projects—whether individual or collaborative.
And the best part? You can even manage all your Zoom meetings right within ClickUp itself.
ClickUp’s Zoom integration is convenient for managing your meetings without switching contexts.
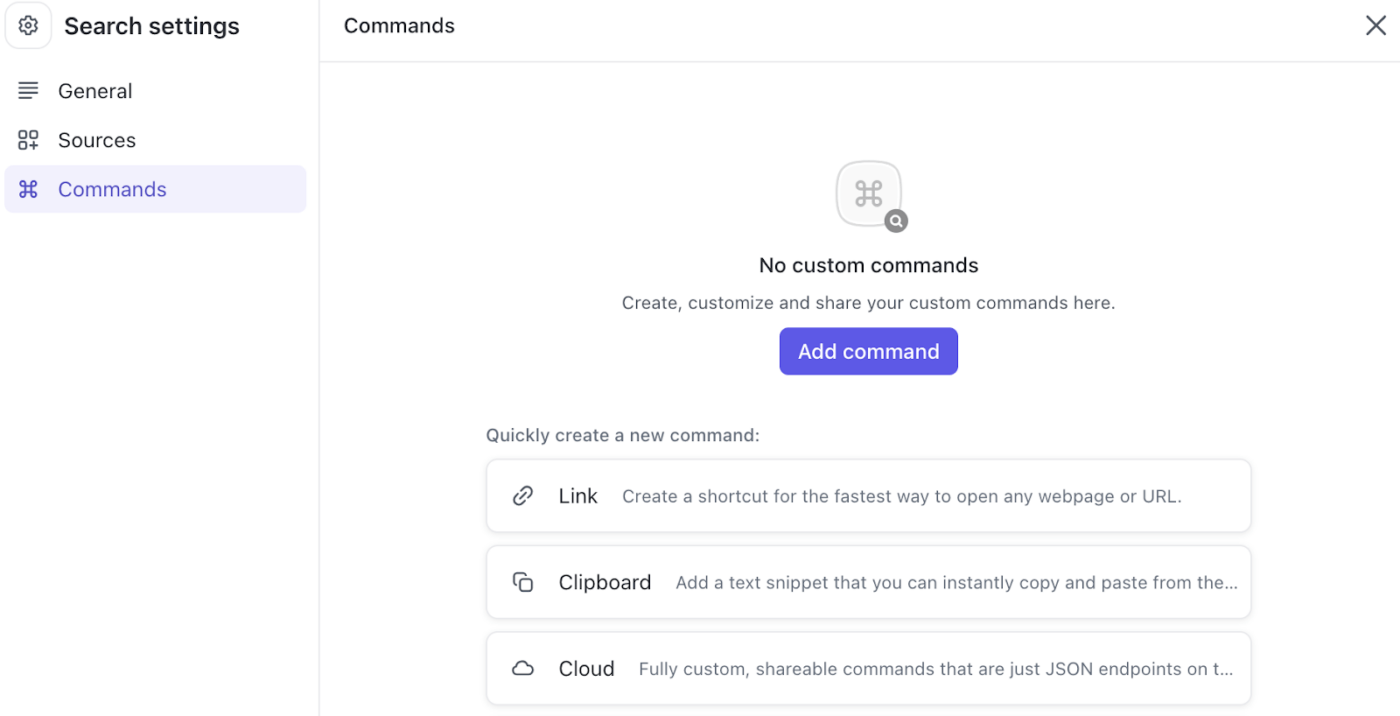
The Zoom integration is available for every ClickUp plan. If you are a workspace owner and admin, enable the Zoom ClickApp and sign in to ClickUp using Zoom. This is a one-time step you must follow after which a Zoom icon will appear permanently in your App Center.

Click on it or enter the command ‘/zoom’ on your dashboard, which will instantly help you schedule a meeting and automatically add it to your ClickUp Calendar. 🗓️
Integrating Zoom with ClickUp helps you organize your meeting notes and details in specified ClickUp Folders. Within these folders, you can Assign Comments in ClickUp and set up Recurring ClickUp Tasks for meetings that take place frequently.
You can use ClickUp’s Notepad to take notes during the meeting and the Chat View in ClickUp to communicate with your colleagues and meet participants in real time.
ClickUp doesn’t just make it easy to schedule meetings; it also helps increase your productivity.
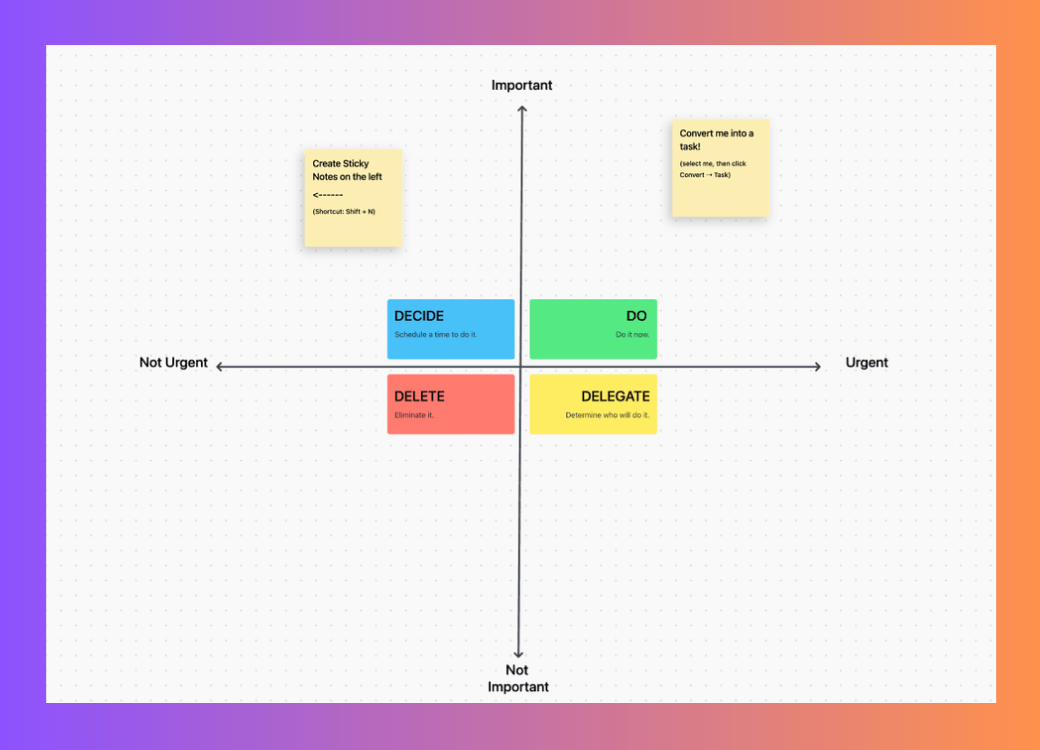
Use the many ClickUp meeting tools and templates to plan, run, manage, and follow up on your meetings effortlessly. Whiteboarding templates, for instance, allow you to conduct effective brainstorming sessions during team meetings and improve visual collaboration on tasks.
While Zoom has a whiteboard feature, these highly customizable and neatly designed options are ClickUp’s unique offering.
If long and intensive Zoom meetings confuse participants about what’s expected of them, you can rely on ClickUp tasks to create and assign tasks discussed during the meeting.
You can also use ClickUp’s AI Writer for Work in conjunction with ClickUp Notepad and ClickUp Docs to take meeting notes and manage the minutes of the meeting. 📝

The AI Writer for Work is also highly intuitive and molds its suggestions according to your job role and company profile. Aside from providing convenience and improving writing quality, it’ll help you fix grammatical and spelling errors, translate your notes to multiple languages, and make your content crisp.
Zoom offers two integration options with Outlook: the add-in and the plugin.
The plugin is an application installation, and the add-in provides a native integration within Outlook. Zoom recommends having the plugin for a better user experience, so let’s go over how to start a meeting using this option.
After downloading the plugin from Zoom’s Download Center, log in to your Zoom desktop app. You will find an option to schedule a Zoom meeting in your Outlook environment.

To link your Zoom account with your Google Calendar, install the Zoom for Google Workspace add-on. Once you’ve done this and signed in using the Google account you want to integrate with Zoom, accept all permissions and close that tab.
Then, go to your Google Calendar. You’ll notice that when you create an event now, you can make it a Zoom meeting.

Syncing Zoom with your CRM system, such as the ClickUp CRM, Salesforce, Zendesk, or Zoho can help you avoid the hassle of switching between different workplace applications.
This is especially useful if you conduct a webinar or information session and invite people outside your organization to participate.
The CRM integration will help you send webinar details and links to all your attendees. This ensures all important data, such as your attendees’ names, email addresses, comments, and feedback, is stored in one place.
This feature is helpful if you plan to contact them after the webinar or keep their data on file for further marketing initiatives.
To sum it up, managing your Zoom meetings well can have many positive implications for your workflow. Doing it right’ll ensure positive meeting outcomes such as defined action items, a clear division of responsibilities, stakeholder alignment, and much more.
Scheduling a meeting in advance amplifies the impact of these good outcomes, as everyone knows what to expect and what is expected of them. And it’s way more organized than an easy-to-miss WhatsApp message or a last-minute invitation.
Supplementing this practice with ClickUp Meetings will help you simplify your meeting workflows—from scheduling to note-taking and following up.
Explore ClickUp’s Zoom Integration in detail to know more about ClickUp’s built-in AI meeting tools, task creation, note-taking, and other features that will make your meetings more efficient and productive. 🚀
Sign up for ClickUp to get started!
You can schedule a Zoom meeting by clicking the Schedule button on the app’s homepage. After this, enter the details of your meeting, including the topic, time, duration, etc.
To invite other people, you can enter their email addresses in this tab to send them the meeting link directly. If you use ClickUp for Zoom meetings, you can do this in one click or by typing the /zoom command in your search box.
There are some prerequisites for automatically starting/stopping Zoom Room meetings.
✔️ Integration of Zoom Rooms with a Google or Microsoft calendar
✔️ Zoom Rooms global minimum version or higher
✔️ Zoom Rooms controller global minimum version or higher
To schedule a Zoom meeting automatically, first select the meeting or room you wish to apply this setting to. Then, click the Meeting tab and enable the toggle next to Automatic Start scheduled meetings. Click Enable to verify the change.
Zoom also permits users to apply this setting to the entire account by clicking the padlock 🔒 icon.
You must download the Zoom for Google Workspace add-on to send a Zoom meeting invite through Gmail or Google Calendar. After this, you should create an event at your Google Calendar.
Here, add the topic and details of your guests. This is where their email addresses or names need to be filled out. Then, click on Make it a Zoom Meeting, and your participants will receive the meeting link in their Gmail inbox.

Sudarshan Somanathan
Max 9min read
Sudarshan Somanathan
Max 12min read

Praburam Srinivasan
Max 14min read

© 2026 ClickUp