In workplaces and official setups, your signature isn’t just a formality but a commitment, a symbol of your agreement.
In the age of digital documentation, e-signatures are essential for various scenarios, including:
- Legal documents: Contracts, wills, and power of attorney documentation
- Business correspondence: Formal letters, proposals, and invoices
- Personal documents: Greeting cards, letters, and artwork
Whether you’re signing contracts or writing letters, there will be times when you will need to add your signature to a Google Doc. This article will show you how to do that.
How to Add a Signature in Google Docs
You may want to add a signature to your Google Docs for a variety of documents, such as cover letters, thank-you notes, contract renewals, proposals, or reports.
For all of these and more, you can directly add your signature to Google Docs in a few simple steps.
Method 1: Insert a handwritten signature image in Google Docs
If you’ve already created a handwritten signature and saved it as an image (e.g., a scanned image or a photo of a handwritten signature), you can directly insert it into your Google Doc using the steps below:
- Upload your signature to Google Docs: Open your Google Doc. Go to Insert > Image > Upload. You can select your signature image from your Computer/Google Drive/Google Photos
- Adjust size and position: Drag and resize the image to fit your desired location
Adjust image properties
- Right-click the inserted image and select Properties to fine-tune its appearance:
- Wrap text: Choose the appropriate option (e.g., In Line with Text) to control how text flows around the signature
- Size and position: Adjust the width, height, and position of the image to fit your document’s layout
- Transparency: If your electronic signature has a transparent background, you can maintain it by selecting Transparent in the Properties window
Additional things to keep in mind
- Use a high-resolution image of your signature. Avoid blurry or pixelated images, as they may appear distorted when inserted into the document. A scanned image or a photo taken with a good camera is ideal
- While most image formats (e.g., JPEG, PNG) are compatible with Google Docs, use PNG for lossless compression, especially if you want to maintain the original quality of your signature
Method 2: Draw your signature in Google Docs
If you prefer a more digital yet personalized look, you can design your signature directly in Google Docs.
Steps to draw and add a signature to Google Docs
To create and insert a personalized signature into your Google Doc, follow these steps:
- Locate the desired position: Click where you want the signature to appear
- Insert a drawing: Go to Insert > Drawing > New
- Choose the Scribble tool: Click the arrow (▼) next to the Line icon and select Scribble
- Draw your signature: Use your mouse or touchpad to draw your signature
- Save and close: Click Save and Close to apply the signature to your document
- Your document will now have a professional-looking signature
Steps to draw and edit a signature in Google Docs
Once you’ve drawn your signature in Google Docs, you can customize it to fit your preferences. Here’s a step-by-step guide to hand-hold you through this:
- Select the signature
- Click the Select icon
- Then click the part of the signature you want to edit
- Choose an action:
- Remove: Press Delete on your keyboard to remove the selected portion
- Resize: Hold Shift (for proportional resizing) and drag the blue corners to make it bigger or smaller
- Move: Drag the selection to a new position
- Format: Use line color, line weight, line dash, line start, and line end to format as per your choices
- Undo changes: Press Command+Z (Mac) or Ctrl+Z (Windows) to undo any mistakes
- Save your signature: Once you get the desired edits in, click Save and Close to apply the changes
Things to keep in mind:
- Experiment: Don’t be afraid to try different sizes, positions, and rotations to find the perfect fit for your document. You can use different pen types, thicknesses, and colors to find a signature style that reflects your personality. You can also add elements like a monogram or a personal symbol
- Use layers: If you have multiple elements in your signature (e.g., text, shapes), you can use layers to edit them independently
Also Read: 10 Free Editable Google Docs Templates
Method 3: Use an add-on for Google Docs signature
For a more advanced and hands-off approach, try using a signature add-on. Signature automation software can simplify adding hand-written signatures to your Google Docs.
They offer features like automatic insertion, customization options, and even integration with other Google Workspace tools. Here’s how you can go about it:
- Find a signature add-on: Go to the Google Workspace Marketplace and search for ‘signature add-on’
- Install the add-on: Follow the installation instructions for the chosen add-on
- Add your signature: Use the add-on’s features to create or upload your signature and insert it into your document
Beyond the basics, here are some additional tips to get the most out of your signature add-on:
- Some add-ons allow you to include dynamic elements like your current date, time, or even location, ensuring your signature is always up-to-date
- You can set up rules to automatically apply different signatures based on document content, recipient, or other criteria
- If your Google Docs add-on supports it, connect it to your Gmail account to automatically add your digital signature to outgoing emails
- Use bulk processing features to add signatures to multiple documents at once
- Ensure that your Google Docs add-on offers secure storage and transmission of your signature data
How to Add a Signature to Google Docs through Your Phone
While the core functionality of adding a digital signature to Google Docs remains consistent across phones and computers, the specific steps and user interface can vary slightly due to differences in hardware and software.
Steps to add signature to Google Docs using a phone
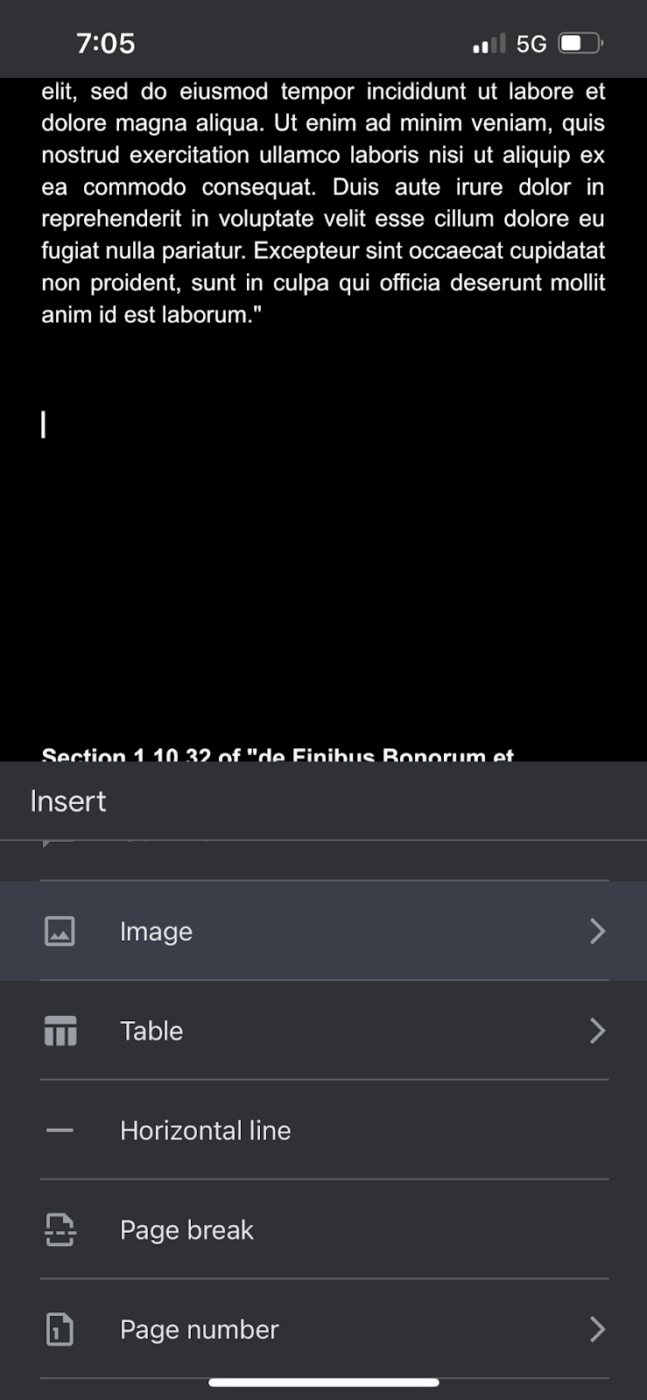
Here’s a step-by-step guide to signing your Google Doc using your phone:
- Download the Google Docs app from Playstore/Appstore
- Once you have the app, open/create the Google Doc you want to sign
- Place your cursor where you want the electronic signature to appear
- Tap the Insert (+) button and then Image
- Select your signature image from the device pictures and click on Add
- Save the document, and your signature image will be added
💡Pro Tip: Try practicing your signature on a piece of paper before attempting it on your phone for a more natural-looking signature.
Simplify Document Management with ClickUp
While a valuable tool, Google Docs can be limiting in certain aspects. Its file size restrictions, relatively basic formatting options, and potential integration challenges might not meet the needs of users seeking advanced features or seamless workflows.
If you want to enhance your productivity and collaboration, ClickUp is a document management solution that can help you address these limitations and enjoy additional benefits.
Here’s why ClickUp is superior to Google Docs:
- Easy document signing: Get digital signatures from your team members with just a few clicks, saving you time and hassle
- Custom Fields: Create Custom Fields in ClickUp to track specific information related to your documents, such as document status, due dates, or assigned owners.
- Bulk actions: Efficiently manage multiple documents at once with bulk actions like moving, copying, or deleting
- Seamless integration with your tasks: Connect documents directly to related ClickUp Tasks so everything stays organized and accessible
- Document templates for quick starts: Use pre-built ClickUp templates to create documents faster
- Rich text formatting: Add headings, bullet points, banners, images, and more to make your documents visually appealing and informative
- Whiteboarding: Collaborate visually with team members using ClickUp’s built-in whiteboarding capabilities
- Mind mapping: Create and organize ideas using ClickUp Mind Maps
- File attachments: Attach various file types to your documents, including images, PDFs, and spreadsheets
- Checklists: Use ClickUp Task Checklists to create checklists within your documents to track progress and ensure tasks are completed
- Time tracking: Track the time spent working on documents via ClickUp Project Time Tracking to improve project management and resource allocation
- Customizable dashboards: Create custom dashboards using ClickUp’s Dashboards to visualize document metrics and track progress
- Accessibility features: ClickUp Docs is designed with accessibility in mind, providing features like screen reader compatibility and keyboard navigation
Want to share your expertise with your team? Create an internal knowledge base and invite them to explore your collection of documents, notes, and ideas.
But that’s not all. With ClickUp, you can easily use AI for documentation.
ClickUp Brain is an AI-powered feature that enhances productivity by automating tasks like document creation, summarization, and data organization. It helps you manage information more efficiently by suggesting relevant content, generating insights, and simplifying how you handle and share documents.
But don’t just take our word for it. Here’s what Mitch Stephens, PMP Technical Program Manager, Shiptour has to say:
With ClickUp Brain, you can:
- Generate content: Whether you need a blog post, email, or report, ClickUp Brain can help you get started with a draft
- Improve your writing: ClickUp Brain offers the best AI writing tool that can suggest edits to make your writing clearer, more concise, and more engaging
- Brainstorm ideas: Stuck on writer’s block? ClickUp Brain can help you generate new ideas and perspectives
Beyond Google Docs: Using ClickUp for Signatures and More
That concludes our guide on how to add a signature to Google Docs! While it’s a reasonably straightforward process, there are a few things to remember, such as creating your signature image and inserting it into your document.
If you’re looking for a solution that’s more than just document editing software and has everything you need to manage your documents, you may want to try ClickUp.
ClickUp is a simple yet powerful all-in-one productivity platform that offers you access to a wide range of features, including document collaboration, e-signatures, and more. To learn more about ClickUp, you can sign up for a free account now.