


Still downloading templates?
There’s an easier way. Try a free AI Agent in ClickUp that actually does the work for you—set up in minutes, save hours every week.
Sorry, there were no results found for “”
Sorry, there were no results found for “”
Sorry, there were no results found for “”

Have you ever found yourself double-checking your reports, anxious that you’ve misplaced a decimal?
Or worse, maybe you discovered that misplaced decimal and had to rework your report from scratch?
Game-changing business insights and well-deserved recognition may depend on the accuracy and integrity of your data in a single spreadsheet.
That’s where data validation becomes a necessity.
Data validation ensures that the data entered into a system or spreadsheet meets specific criteria or rules. It saves you hours you’d otherwise spend sifting through mountains of data.
Understanding how to leverage data validation is the key to seamless data management.
If you’re using Google’s spreadsheet app, Google Sheets, like 900 million other people in the world, then this guide is exactly what you need.
We’ll walk you through everything from setting up basic validation rules to mastering advanced techniques, ensuring your data stays squeaky clean and error-free.
Data validation is a vigilant gatekeeper that ensures that only the correct data stays in your Google Sheets database. Like most validation techniques, this involves setting specific rules for what is allowed and what isn’t.
Here’s a clear, logical example to help break it down:
While this was a fairly straightforward example, it shows how much control data validation has over data quality.
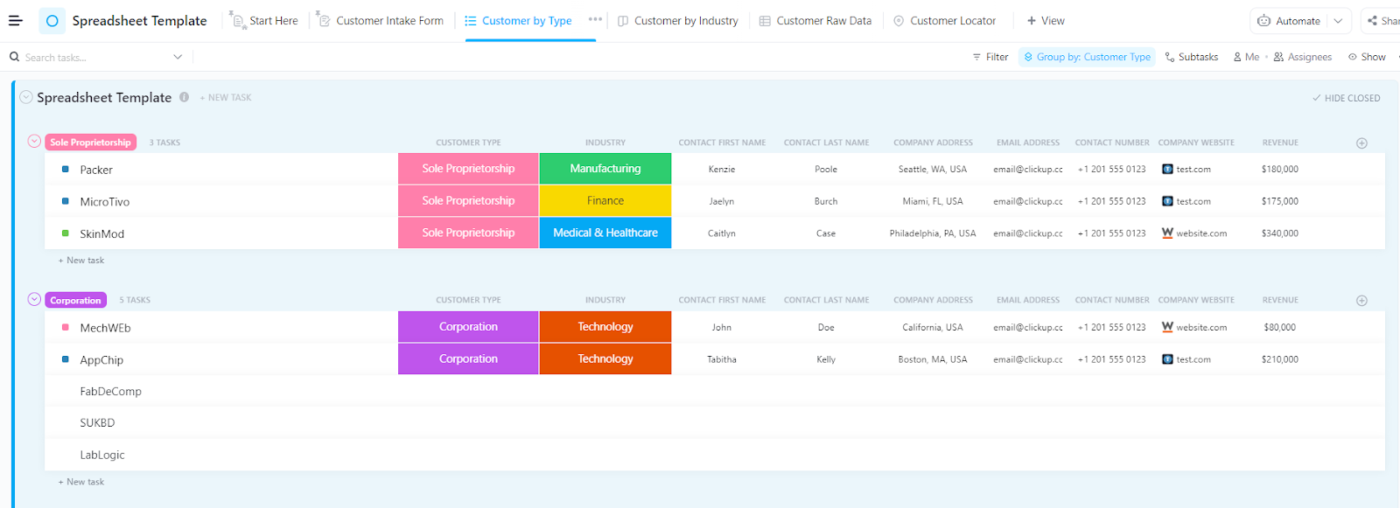
Data validation in Google Sheets can get complicated fast. ClickUp’s Spreadsheet Template makes keeping your data accurate and organized effortless—no complex setups or confusing rules needed.
Here are the six steps involved in creating data validation rules in Google Sheets:
Open your spreadsheet. For this, we’ll consider the above example of a customer order form.

Select the cells for which you want to set the rule.
Let’s set a rule for the field Order Quantity. Select the cell where customers would add their order quantity—D8.

Under the Data menu, select ‘Data Validation’ and click on ‘Add Rule.’

In the ‘Criteria’ section, choose the type of validation you want to apply.
Here, we’ll validate numbers, select ‘less than or equal to,’ and update 100 in the Value Field.

Next, navigate to the ‘Advanced Option’ section. Under ‘If the data is invalid,’ select what you want to do when someone enters invalid data. You can also add help text to guide users.
Here, we’ll select ‘Reject the input’ because your business won’t be able to accept the order. We’ll also add the help text ‘Order up to 100 pieces in one go.’

Select ‘Done’ to save and apply the rules you’ve defined.
Note: It’s best to set up data validation before entering your data. This is because existing values won’t be checked automatically. To validate existing data, you’ll need to review it manually or re-enter it.
With these steps, basic data validation is in the bag!
That said, before exploring advanced techniques, it’s important to understand more about the various types of data validation.
While we used numerical rules in the previous section, having a detailed overview of various data validations helps ensure accuracy and quality.
Here’s a breakdown of the data validation types available in Google Sheets:

Restrict data input to numerical values within a specified range. This includes conditions like ‘greater than,’ ‘less than,’ ‘equal to,’ or even ‘between a custom range.’

Limit text input based on length and specific characters. This also includes patterns such as email IDs or valid URLs.

This data validation type ensures that entered values are valid dates or within a specific range.

If you need to restrict the inputs to a list of options, you will use the ‘List’ or ‘Drop-down’ data validation.

Here, you restrict input to either ticking a box or not. You can also set what it means to leave the field ticked or unticked. This is used best when collecting customer preferences and quality checklists.
Bonus: Ready to transform your data management? Follow our step-by-step guide to create a Google Sheets database!
While we’ve covered the basics, Google Sheets offers more advanced data validation techniques, such as custom formulas and in-app feature integration.
This feature is an advanced form of data validation in Google Sheets that is available when setting the criteria. Unlike other validation types, a custom formula allows you to create rules beyond basic options like numbers or dates.
This customized rule is set up with the help of formulas you usually use for calculations. A key advantage is that you define the kind of data allowed in a cell through this logical formula with higher precision.
Custom formulas create rules powered by elements such as cell ranges or dependencies. They also allow you to add multiple layers of regulations.
Here’s an example:

Scenario: Imagine you’re tracking product inventory before a customer dispatch.
What’s needed:
You want to ensure the ‘inventory available for dispatch’ column only accepts:
Custom formula rule:
=AND(ISNUMBER(A1), A1>0)
This breaks down the rule into three parts:
Result: Accurate inventory details reach customers, and you don’t need to worry about the formulas you’ve used because the inventory figures will always be reliable and easy to read.
Advanced data validation also involves integrating other features into data validation.
Confused? Let’s review a few advanced data validation integrations that boost functionality.
Data validation in Google Sheets is easily paired with conditional formatting, creating a much more interactive and clear spreadsheet.
In this integration, a separate data validation rule triggers conditional formatting. It visually highlights important data points or potential errors, making it easier to identify trends and anomalies.
Let’s show you how with a clear example:
Scenario: You need a project management spreadsheet to help track tasks. It must visually highlight when you’re behind schedule.
Step 1: Create a spreadsheet with columns for task name, due date, and status. Add your latest tasks and statuses, too.
Step 2: Go to Format and click on conditional formatting.

Note: You can create a rule for the due dates column to ensure the user enters a valid date.
Step 3: Add your data validation rule, linking it with data validation.

Here, we’ll use the custom formula ‘=AND(TODAY() > C2, D2 <> ‘Completed’)’.
Here’s how that works:
Step 4: Add your formatting style. Here, we’ll keep the result as red (because it’s overdue).

Once you’ve clicked ‘Done,’ your rules will be active. The ‘Send performance report’ is pending and running behind schedule.
Another advanced data validation technique that Google Sheets features is automation.
Here, Google features its App Script extension, which creates code that triggers an action based on your data validation dialog.
Here’s an example of automating expense approvals with data validation:

If your data validation rule states that:
You can write a code that triggers a mail with all expense details to your manager based on the data in the ‘Approver’s email’ field.
Bonus: You can unlock the power of Google Sheets as your CRM with our easy-to-follow guide and ready-to-use templates.
While we’ve covered data validation techniques, one method stands out in almost every real-world application and deserves a deep dive—the drop-down list.
So, to kick things off, here are the steps involved in creating a drop-down list using data validation in Google Sheets:
Create your spreadsheet and list down what you want in your drop-down.
For this, we will review employee onboarding as a part of your Google CRM sheet.

Afterward, go to the Data tab, then Data validation, and ‘Add rule.’

Once the data validation rules dialog box is open, select the cell range (here, it’ll be the entire ‘Department’ column), then choose your Criteria.
Now, there are two types of drop-down list criteria.


Note: Each list option can also be assigned a color to keep things aesthetic and appealing. You must manually update each color while the list changes with the reference data.
The final step is to click ‘Done’ and watch the validation reflect in the cells.
For this example, all your list options will drop down when you click on the ‘Department’ field.

Just like that, your drop-down list is ready. However, creating a basic drop-down list is just the start of this versatile data validation method. Let’s cover how to use an additional layer of data validation.
While drop-down lists help focus responses, Google Sheets allows users to create dependent drop-down lists to extend control to upcoming data fields.
A dependent drop list of active filters will be used to revise the list of options. By creating these filters, options in one drop-down list change based on the selection made in a previous drop-down list.
This dynamic data validation is incredibly useful for organizing and filtering data efficiently, particularly when dealing with large datasets.

💡 Pro Tip: It’s important to remember that you don’t need to access data validation every time you need a drop-down list or tickbox. A quick Google Sheets hack is that it’s readily available in the Insert tab.
Now that you know how to set up data validations, you will also encounter common errors. Whether these may be from the input, its use, or complex range issues, it’s essential to know how to navigate them.
Here are two challenges or errors and how to troubleshoot them:
This error message appears when you attempt to enter data into a cell that doesn’t comply with the rule you’ve established to validate data for that cell.
This most likely means one of the following:
When this occurs even when the value entered seems to be correct, here are the key troubleshooting steps you must cover:
Another issue occurs when applying filters or sorting data. It disrupts the functionality of dependent drop-down lists or other data validation features. It might lead to incorrect or empty options in dependent lists or incorrectly enforced validation rules.
Here are the common factors behind these errors:
If you want to resolve this issue, you need to
While Google Sheets is used by many and offers features that update in real time, here are some challenges and limitations that they come with:
Google Sheets is an excellent tool for data organization, basic calculations, and merging data sheets. However, its capabilities are limited to those cells.
When you need to manage tasks and projects and collaborate more comprehensively, ClickUp—a project management veteran—emerges as a powerful alternative.
| Feature | Google Sheets | ClickUp |
|---|---|---|
| Spreadsheet functionality | ✅ | ✅ |
| Task management | ❌ | ✅ |
| Project management | ❌ | ✅ |
| Collaboration | ✅ | ✅ |
| Integrations | ✅ | ✅ |
| Gantt charts | ❌ | ✅ |
| Time tracking | ❌ | ✅ |
ClickUp is a platform solution that delivers tools to increase productivity and empower insights. It’s perfect for ensuring data accuracy and quality through data validation.
The platform also presents a dedicated spreadsheet tool that integrates functionality with robust work and project management features.
ClickUp Table View is designed to create fast spreadsheets and powerful visual databases. It’s an ideal solution for optimizing budgets, powering dashboards, and more. Use it to:
In essence, ClickUp’s features, such as Table View, instantly familiarize you with spreadsheets while adding depth and functionality.
📮ClickUp Insight: 83% of knowledge workers rely primarily on email and chat for team communication. However, nearly 60% of their workday is lost switching between these tools and searching for information. With an everything app for work like ClickUp, your project management, messaging, emails, and chats all converge in one place! It’s time to centralize and energize!
Data validation is a concept that transforms data accuracy in every business. Just by creating customized rules, it can potentially reject any incorrect data right when it tries to slip in.
Our comprehensive breakdown of how to use data validation in Google Sheets also applies to many other spreadsheet software.
That said, if you’re handling larger volumes of data or want to connect your projects with data processing, ClickUp’s Table View is a much better choice.
Sign up with ClickUp today and start transforming your data quality.

© 2026 ClickUp

There’s an easier way. Try a free AI Agent in ClickUp that actually does the work for you—set up in minutes, save hours every week.