


Still downloading templates?
There’s an easier way. Try a free AI Agent in ClickUp that actually does the work for you—set up in minutes, save hours every week.
Sorry, there were no results found for “”
Sorry, there were no results found for “”
Sorry, there were no results found for “”
GitHub Copilot can generate hundreds of test cases in minutes—with controlled experiments showing developers finish 35% faster—but here’s the catch: those AI-generated tests are only as useful as your ability to track, organize, and connect them to the rest of your development workflow.
This guide walks you through using GitHub Copilot to scaffold test cases quickly, then shows you how to manage them effectively so they don’t become just another pile of orphaned code files.
Writing unit tests is often seen as a tedious chore, but skipping them leads to fragile code.
When you don’t have a safety net of tests, a small refactor can introduce regression defects—bugs that break existing functionality and erode user trust, with IBM research showing defects discovered after release cost 15× more to fix.
This creates a cycle where developers avoid improving code because they’re afraid of what might break, leading to mounting technical debt.
AI-assisted test generation helps break this cycle, with 89% of organizations now piloting or deploying generative AI workflows in quality engineering and testing. By using a tool like GitHub Copilot to scaffold test cases, you can focus on what matters: designing meaningful tests and refining edge case coverage.
Here’s why consistent unit testing pays off:
To better understand how AI agents are transforming the coding landscape beyond just test generation, watch this overview of AI-powered coding assistants and their capabilities:
Before you can start generating tests, you need to install and configure GitHub Copilot in your integrated development environment (IDE). The setup process is straightforward and only takes a few minutes, but getting it right ensures Copilot has the context it needs to provide relevant suggestions.
You’ll need a few things before you start:

First, you need to install the Copilot extension into your IDE. This process is similar across most supported editors.
After restarting, you’ll be asked to sign in with your GitHub account. This step authenticates your subscription. Once you’re logged in, you should see a small Copilot icon in your IDE’s status bar, confirming that it’s active and ready to go.
GitHub Copilot generates more relevant tests when it understands your project’s specific testing setup. It does this by analyzing your existing test files and configuration to learn and match your team’s patterns.
pip install pytest). If you have a conftest.py file or any existing test files (even one), Copilot will use them as a reference for generating new testsjest.config.js file and your Jest dependency in your package.json to understand your setuppom.xml (for Maven) or build.gradle (for Gradle) fileHaving at least one well-written test file in your project is one of the best ways to guide Copilot. It will pick up on your naming conventions, assertion styles, and how you structure your tests, leading to more consistent output.
With the extensions installed, it’s time to get familiar with the Copilot interface in your IDE. The main way you’ll interact with it for test generation is through the Copilot Chat panel.

You can open the chat view with the keyboard shortcut Ctrl+Cmd+I (on Mac) or Ctrl+Alt+I (on Windows/Linux), or by clicking the Copilot Chat icon in your IDE’s activity bar. This chat panel is your command center for generating tests.
Copilot is context-aware, meaning it reads your currently open files, your project’s file structure, and any code you have selected. For the best results, always have the file containing the function or class you want to test open and visible in your editor.
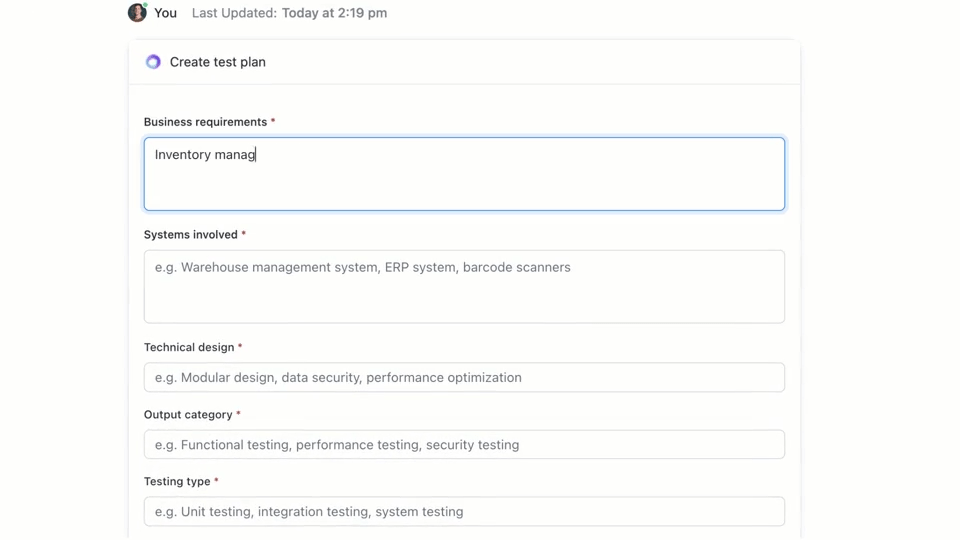
🌟 ClickUp Brain, the contextual AI integrated throughout ClickUp, can quickly create a test plan for you. Try it out today.
GitHub Copilot gives you three primary ways to generate test cases: using the chat panel with detailed prompts, using quick slash commands, and using smart actions directly in your editor. Each method is suited for different situations within your development workflow, depending on whether you need speed or fine-grained control.
Using Copilot Chat with a specific prompt is the most powerful method for test case generation. It’s best for complex functions or classes where you need to define specific scenarios, mock dependencies, or handle tricky edge cases.
Here’s the basic workflow:
For example, you could write prompts like:
The more detail you provide in your prompt, the better the generated tests will be.
When you need to generate tests quickly and don’t require highly specific scenarios, the /tests slash command is your best friend. It’s the fastest way to get a solid baseline of test coverage.
To use it:
/tests and press EnterCopilot will immediately generate a set of unit tests based on the structure and logic of your selected code. It will try to cover the primary functionality and some common inputs. If the results aren’t quite right, you can always refine them with a follow-up prompt like, “Now add a test for when the input is null.”
For moments when you want to generate tests without breaking your flow, you can use smart actions directly from your code editor. This keeps you from having to switch over to the chat panel.
Copilot will generate the tests and typically show them in a new, temporary editor tab. You can review the code there and then choose to create a new test file or append the tests to an existing one.
📚 Also Read: Test Case Templates for Software Testing
Your prompts are the steering wheel for GitHub Copilot. Generic prompts lead to generic tests, but well-crafted prompts that give the AI specific instructions result in comprehensive and useful test cases. The key is to tell Copilot not just what to test, but how to test it.
Here are some templates you can adapt for different scenarios:
| Scenario | Prompt Template |
|---|---|
| Basic unit test | “Write unit tests for the [function_name] function using [framework]. Make sure to cover normal inputs, boundary values like zero or negative numbers, and invalid inputs like null or undefined.” |
| Class with dependencies | “Generate tests for the [ClassName] class. Use [mocking_library] to create mocks for the [DependencyName] and [AnotherDependencyName] dependencies.” |
| Async functions | “Create tests for this asynchronous function. Include tests for the success case, a case where the promise rejects, and a scenario for request timeouts.” |
| API endpoint | “Write integration tests for this API endpoint. Cover a successful GET request, a POST request with valid data, a request with a missing authentication token, and a request with invalid data that should return a 400 error.” |
| Data validation | “Generate tests for this validation function. Include a test for a valid object, and then add separate tests for each validation rule failure to ensure the correct error messages are returned.” |
Prompt enhancement tips:
tests/test_user.py“ValueError is raised for invalid input”Here’s how this works in practice.
Imagine you have a Python function that calculates the total price of items in a shopping cart, including a discount.
Sample function to test:
def calculate_total(items: list[dict], discount_percent: float = 0) -> float:
    if not 0 <= discount_percent <= 100:
        raise ValueError("Discount must be between 0 and 100")
    subtotal = sum(item['price'] * item['quantity'] for item in items)
    discount = subtotal * (discount_percent / 100)
    return round(subtotal - discount, 2)
Prompt used: “Write pytest tests for calculate_total. Cover an empty list of items, a single item, multiple items, applying a discount, a 0% discount, a 100% discount, and an invalid discount percentage that should raise a ValueError.”
Generated test output:
import pytest
from your_module import calculate_total

def test_calculate_total_empty_list():
    assert calculate_total([]) == 0.0

def test_calculate_total_single_item():
    items = [{'price': 10.0, 'quantity': 2}]
    assert calculate_total(items) == 20.0

def test_calculate_total_multiple_items_with_discount():
    items = [{'price': 10.0, 'quantity': 2}, {'price': 5.0, 'quantity': 1}]
    assert calculate_total(items, discount_percent=10) == 22.50

def test_calculate_total_with_100_percent_discount():
    items = [{'price': 50.0, 'quantity': 1}]
    assert calculate_total(items, discount_percent=100) == 0.0

def test_calculate_total_invalid_discount():
    with pytest.raises(ValueError):
        calculate_total([{'price': 10.0, 'quantity': 1}], discount_percent=101)
Copilot correctly used pytest.raises to check for the exception and covered the main scenarios. You might still want to add tests for negative prices or quantities as a manual refinement.
Now, let’s try a TypeScript function that formats a user’s name.
Sample function to test:
export function formatDisplayName(user: { firstName: string; lastName: string; nickname?: string }): string {
  if (user.nickname) {
    return user.nickname;
  }
  return `${user.firstName} ${user.lastName}`.trim();
}
Prompt used: “Generate Jest tests for formatDisplayName. Cover a user with a first and last name, a user with a nickname, a user with an empty first name, and a user with only a nickname.”
Generated test output:
import { formatDisplayName } from './userUtils';

describe('formatDisplayName', () => {
  it('should return the full name when no nickname is present', () => {
    const user = { firstName: 'Jane', lastName: 'Doe' };
    expect(formatDisplayName(user)).toBe('Jane Doe');
  });

  it('should return the nickname when it is present', () => {
    const user = { firstName: 'John', lastName: 'Smith', nickname: 'Johnny' };
    expect(formatDisplayName(user)).toBe('Johnny');
  });

  it('should handle empty strings for names', () => {
    const user = { firstName: '', lastName: 'Doe' };
    expect(formatDisplayName(user)).toBe('Doe');
  });

  it('should return the nickname even if other names are empty', () => {
    const user = { firstName: '', lastName: '', nickname: 'Solo' };
    expect(formatDisplayName(user)).toBe('Solo');
  });
});
The generated tests use the standard describe and it blocks from Jest and correctly handle the different logic paths.
Using Copilot for test generation is a massive productivity boost, but it requires careful oversight to ensure quality.
test_login_fails_with_incorrect_password is far more useful than test_login_2📮ClickUp Insight: Our surveys show that while 34% of users operate with complete confidence in AI systems, a slightly larger group (38%) maintains a “trust but verify” approach. A standalone tool that is unfamiliar with your work context often carries a higher risk of generating inaccurate or unsatisfactory responses.
This is why we built ClickUp Brain, the AI that connects your project management, knowledge management, and collaboration across your workspace and integrated third-party tools. Get contextual responses without the toggle tax and experience a 2–3x increase in work efficiency, just like our clients at Seequent.
While GitHub Copilot is a massive productivity booster, it’s not a silver bullet for software testing. Knowing its limitations is key to using it effectively and avoiding common pitfalls. It’s a “copilot,” not the pilot—you’re still in charge of the flight plan.
The biggest limitation is its lack of business context. Copilot analyzes your code’s structure, but it has no idea what your application is actually supposed to do for your users. It can’t know that a “premium” user should have access to certain features while a “basic” user shouldn’t, unless that logic is explicitly clear in the code it’s reading.
Here are some other key constraints to keep in mind:
📚 Also Read: How to Use GitHub Copilot for Backend Development
Generating test cases with GitHub Copilot is only half the workflow. Once tests exist, teams still need to track them, link them back to requirements, and manage execution across sprints and releases.
ClickUp provides a centralized workspace where AI-generated test cases can live alongside development tasks, bugs, and sprint plans—so testing doesn’t stay trapped inside individual IDEs.
ClickUp acts as a Converged AI Workspace, bringing project management, documentation, and team communication into one system. For software teams, this means test case management is no longer a separate tool or spreadsheet.
Tests, requirements, pull requests, and release discussions all stay connected, reducing context sprawl and making QA a first-class part of the delivery workflow.
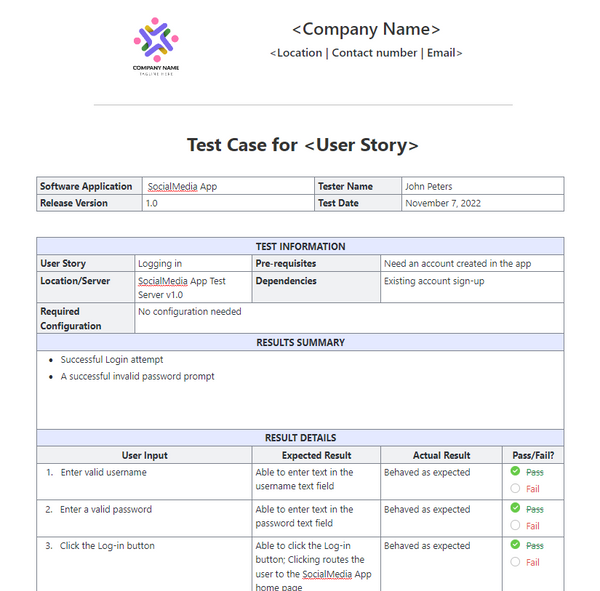
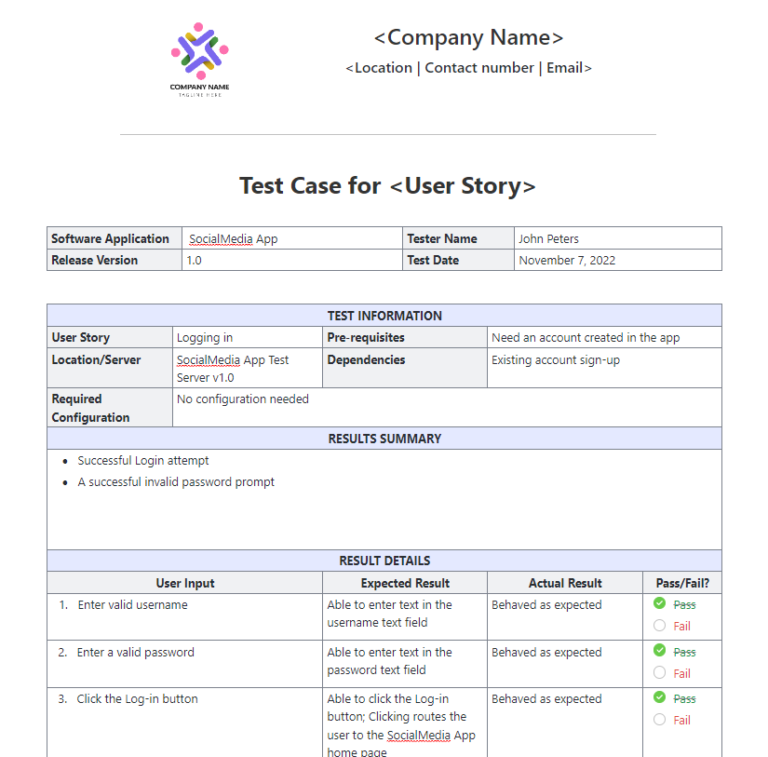
ClickUp’s Test Case Template is designed to help you track the progress of test cases. It makes it easy to:
Start by creating a dedicated ClickUp List to act as your test case repository. Each test case, whether generated by AI or written manually, becomes a task.
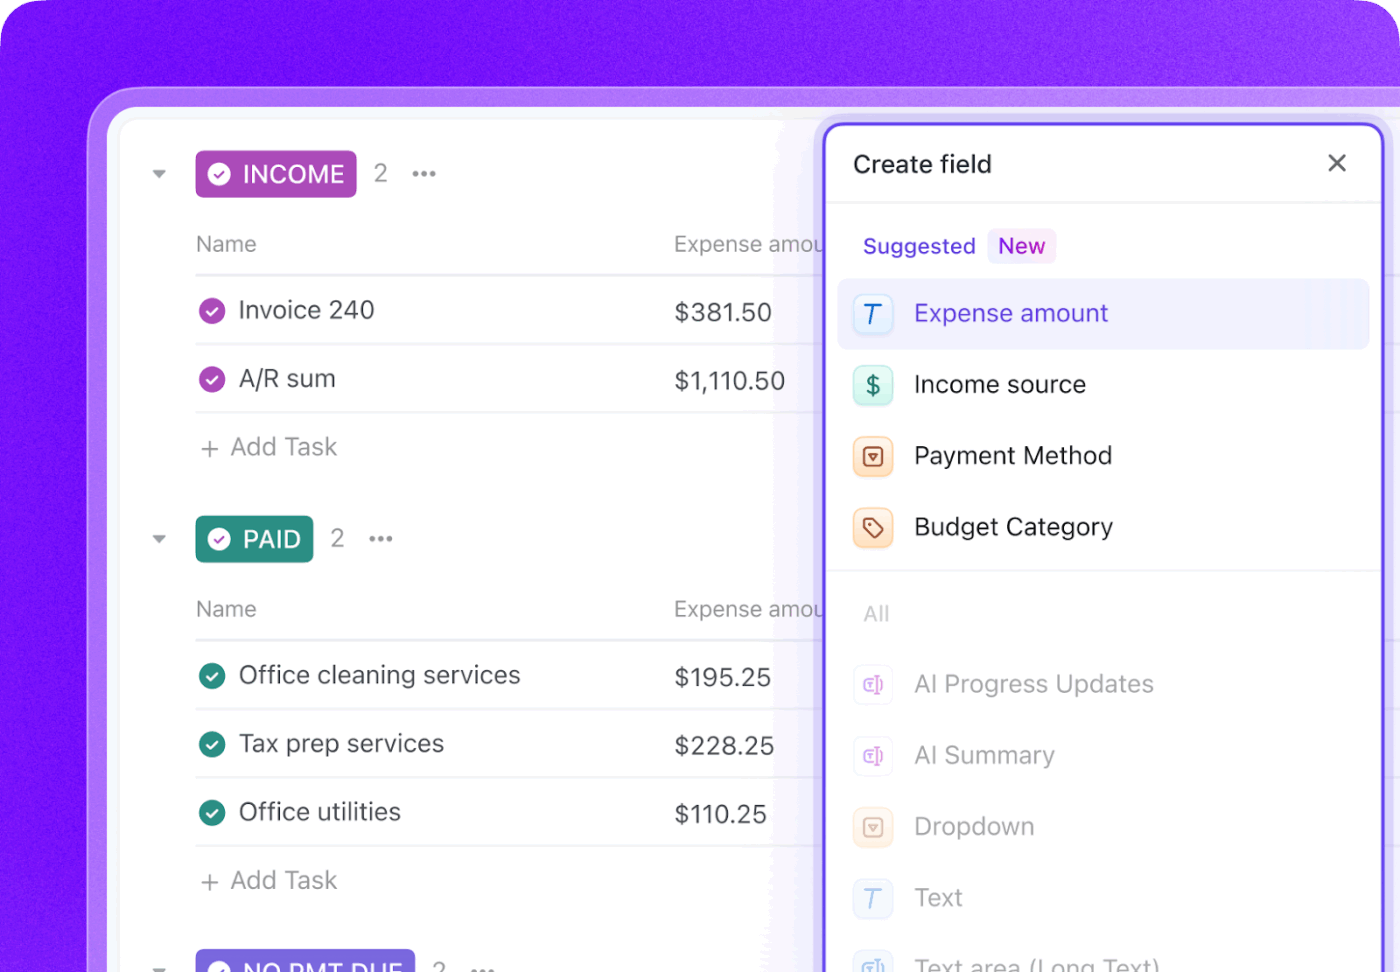
Enrich each test case with crucial metadata using ClickUp Custom Fields to track exactly what matters to your team.
Track your entire testing lifecycle with ClickUp Custom Statuses by creating a workflow that moves tests from Not Run to Passed, Failed, or Blocked. This gives everyone on the team, from developers to product managers, instant visibility into test execution progress.
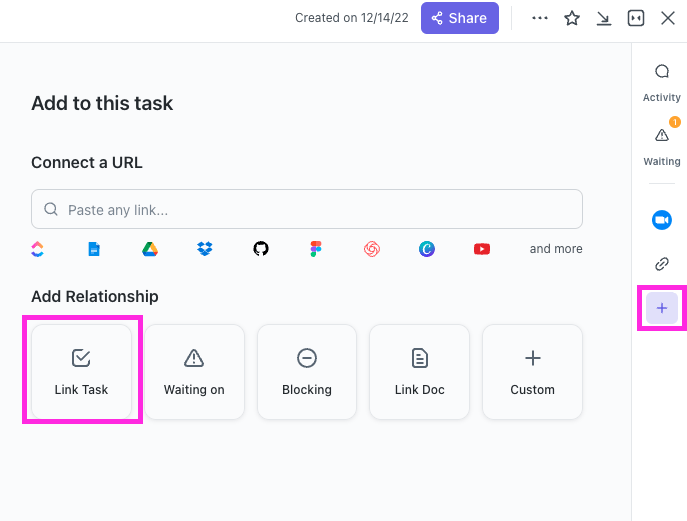
With ClickUp Relationships, test case tasks can be directly linked to user stories, features, or epics. If a test fails, you can create a bug report task and link it back to both the failed test and the original story, creating a complete chain of traceability.
Draft bug reports in seconds by pointing ClickUp Brain at a failed test case task. Since it has the context of your entire workspace, it can pull in details from the linked user story and the test case itself.
🌟ClickUp’s Test Report Template lets you create reports more quickly while ensuring that you identify and address issues that need improvement.
But that’s not all you can do. You know all the busywork we talked about, the boring and repetitive tasks testing always involves? You can automate these using ClickUp Automations.
Set up rules like “When a test case’s status is changed to Failed, automatically create a new task in the Bugs List and assign it to the lead developer.”

By integrating GitHub with ClickUp, test case tasks can be linked to commits and pull requests. When code changes are merged, related test tasks update automatically, keeping QA, developers, and release managers aligned on what’s changed and what needs retesting.
ClickUp Dashboards allow you to track real-time testing progress, visualize bug counts, test case execution, and more.
Together, this workflow bridges the gap between AI-generated tests in GitHub Copilot and team-wide test case management in ClickUp—giving teams a single system to plan, track, automate, and improve their QA process without constant manual coordination.
Watch this for tips on building an efficient release management workflow:
AI-generated tests are no longer isolated artifacts; they’re integrated components of your development process, visible, trackable, and actionable for the entire team.
GitHub Copilot generates test cases quickly, but speed alone doesn’t guarantee quality. Without clear ownership, requirements traceability, and visibility across sprints, even well-written tests can become stale or overlooked. That’s where a system of record matters.
By managing test cases in ClickUp, teams turn AI-generated output into a repeatable QA workflow—one that connects tests to requirements, code changes, and release timelines. Instead of juggling tools and manual updates, QA and engineering teams work from a shared, contextual workspace. The result is not just more tests, but more confidence in what’s shipping and why.
Ready to manage your test cases alongside your sprints and releases? Get started for free with ClickUp today.
Yes, Copilot can analyze the structure and logic of legacy code to generate a baseline of tests. However, these tests will likely require significant manual review and refinement, as the AI won’t have context on undocumented behaviors or historical business rules.
The syntactic accuracy is very high, but the logical accuracy depends on your code’s clarity and the specificity of your prompts. Always review the assertions to ensure they are verifying meaningful business requirements, not just confirming the current (and possibly flawed) implementation.
Yes, Copilot has excellent support for pytest, unittest, and other popular Python testing frameworks. It’s adept at recognizing and replicating existing patterns in your project, such as the use of fixtures or parametrized tests.
Effective teams use a centralized project management platform to manage their test suites. By tracking each test case as a task with custom metadata for status and priority, they gain visibility into coverage and execution results, connecting the QA process directly to sprint planning and bug tracking.

© 2026 ClickUp

There’s an easier way. Try a free AI Agent in ClickUp that actually does the work for you—set up in minutes, save hours every week.