
Sorry, there were no results found for “”
Sorry, there were no results found for “”
Sorry, there were no results found for “”
You know the moment when you update something in Notion and then remember that you have to duplicate the changes in other apps? Webhooks can save you from that chaos.
Notion webhooks coordinate and communicate with your other tools automatically. So, checking a box in your task list can update Google Sheets, send you a message, or initiate a new workflow.
In this blog post, we’ll show you exactly how to set up Notion webhooks. And if you want even deeper, no-code automation, we’ll look at ClickUp, which has all the built-in tools you need.
Let’s get started! 🤩
Notion webhooks are a real-time communication method that lets your workspace automatically notify another system when specific events occur. This can include triggers, such as creating a new page, updating a property, or modifying a database entry.
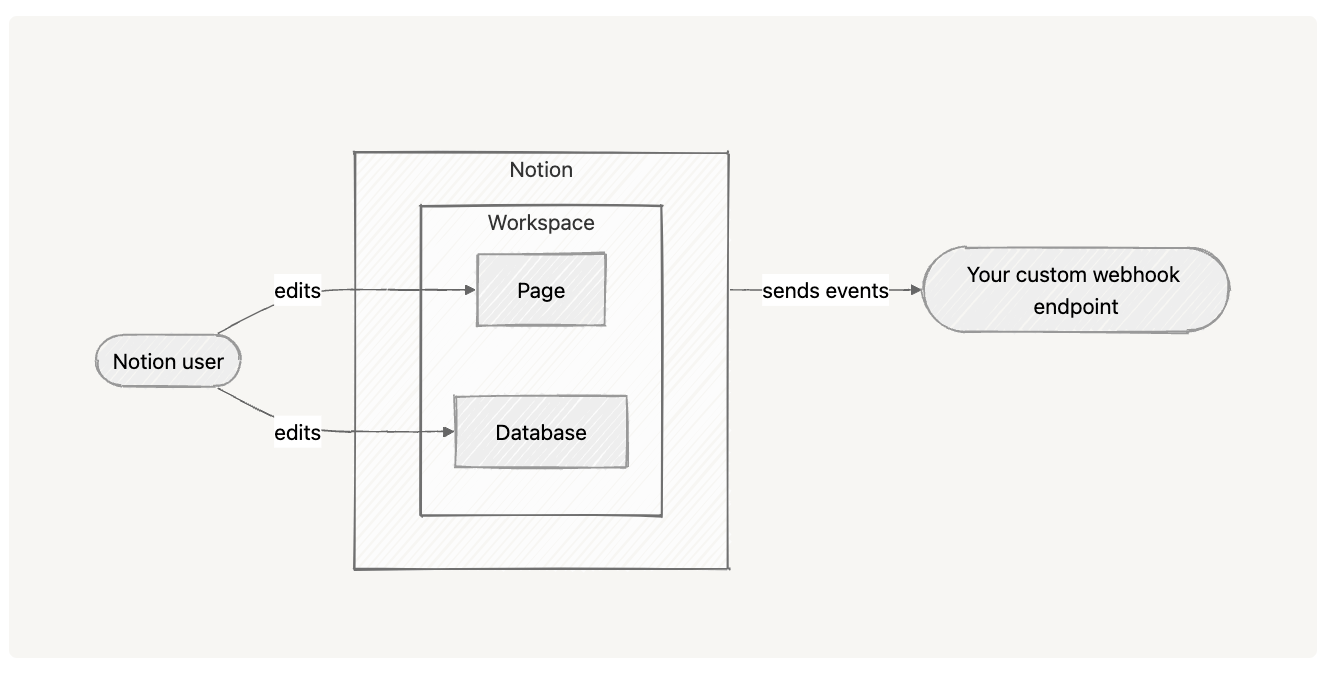
But how do they work? Here’s a concise explanation of webhooks in practice:
Because custom webhooks are event-driven, updates occur only when changes happen, making them faster and more efficient than polling methods.
📚 Glossary: HTTP refers to the HyperText Transfer Protocol. It’s the foundation of data communication on the web, allowing web browsers and servers to talk to each other. Whenever you open a website, your browser sends an HTTP request to a server, and the server responds with the content (like HTML, images, or videos).
Before you can start using Notion webhooks, there are a few things you need to have in place to make sure the setup works smoothly.
Let’s take a look. 👇
You must have a Notion account with access to the workspace where the webhook will be used.
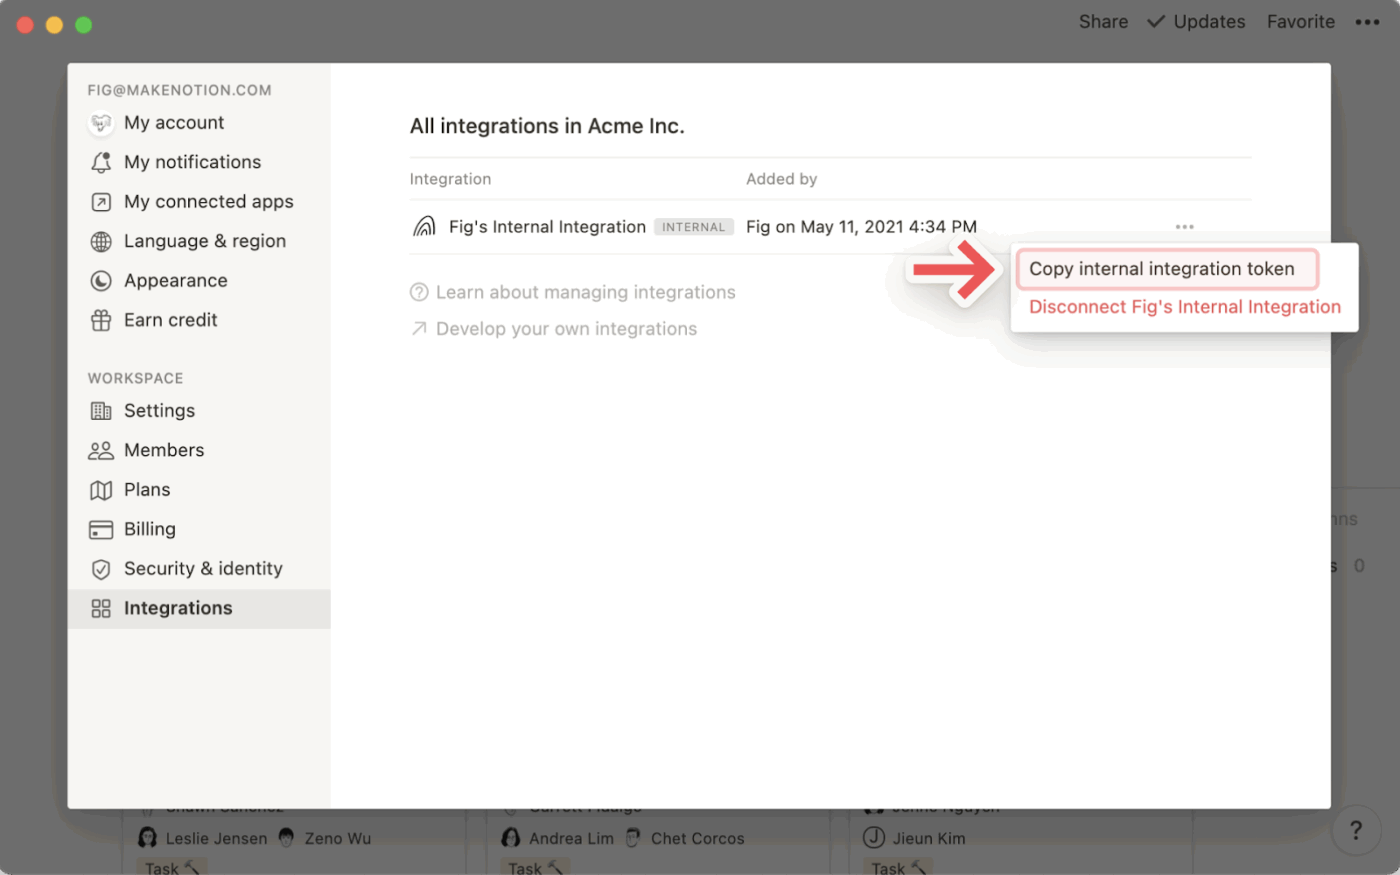
Create a new integration or use an existing one in Settings & Members → Integrations. Share the integration with the specific pages or databases you want to monitor so it can access the relevant data.
Provide a publicly accessible, HTTPS endpoint where Notion can send webhook event data. Localhost or unsecured HTTP URLs are not supported.
🤝 Friendly Reminder: Always protect your endpoints with HTTPS and validate SSL certificates to keep data safe in transit.
When you create a webhook subscription, Notion sends a one-time verification token to your endpoint. Respond with this token to confirm and activate your subscription.
After this, you get to define which events should trigger the webhook (e.g., page creation, property edits, database updates).
💡 Pro Tip: Monitor successes and failures with detailed API documentation. You’ll only thank yourself while debugging if you have accurate logs. You also want to add trigger events, the payload structure, and example responses.
Ensure your integration software has the correct read or write permissions for the pages or databases being monitored. Without these permissions, the webhook will not receive updates.
Typically, you must be a workspace owner or admin to create and manage webhook integrations.
Keep this in mind:
📖 Also Read: Zapier vs. IFTTT
Here’s a step-by-step guide to set up Notion webhooks. It’ll walk you through creating webhook URLs, configuring your Notion integration, and testing your webhook for seamless automation. 🖥️
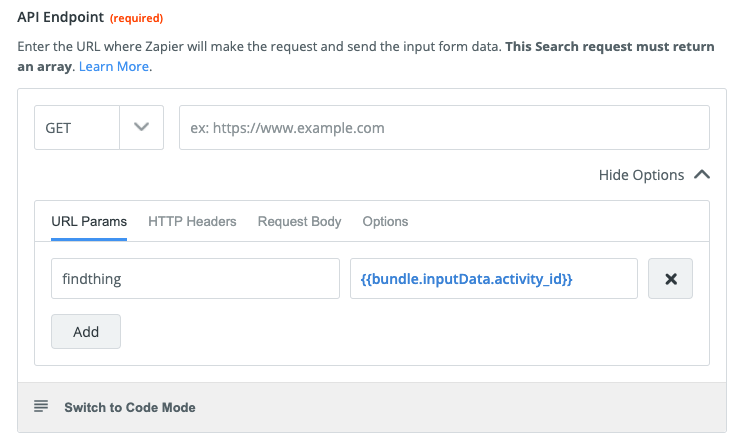
Decide where Notion will send events. You can create a webhook trigger in a no-code platform (such as Make, Zapier, n8n, or Pipedream) that provides a public URL.
The other option is to set up a simple HTTPS endpoint on your server that accepts POST requests and returns a 200 OK response.
💡 Pro Tip: Webhooks don’t always deliver. Add retry logic (such as exponential backoff) so that nothing gets missed.
Open Notion > Settings & Members > Integrations. Then, create a new integration (or select an existing one) and grant it the necessary scopes (read/write, as required).
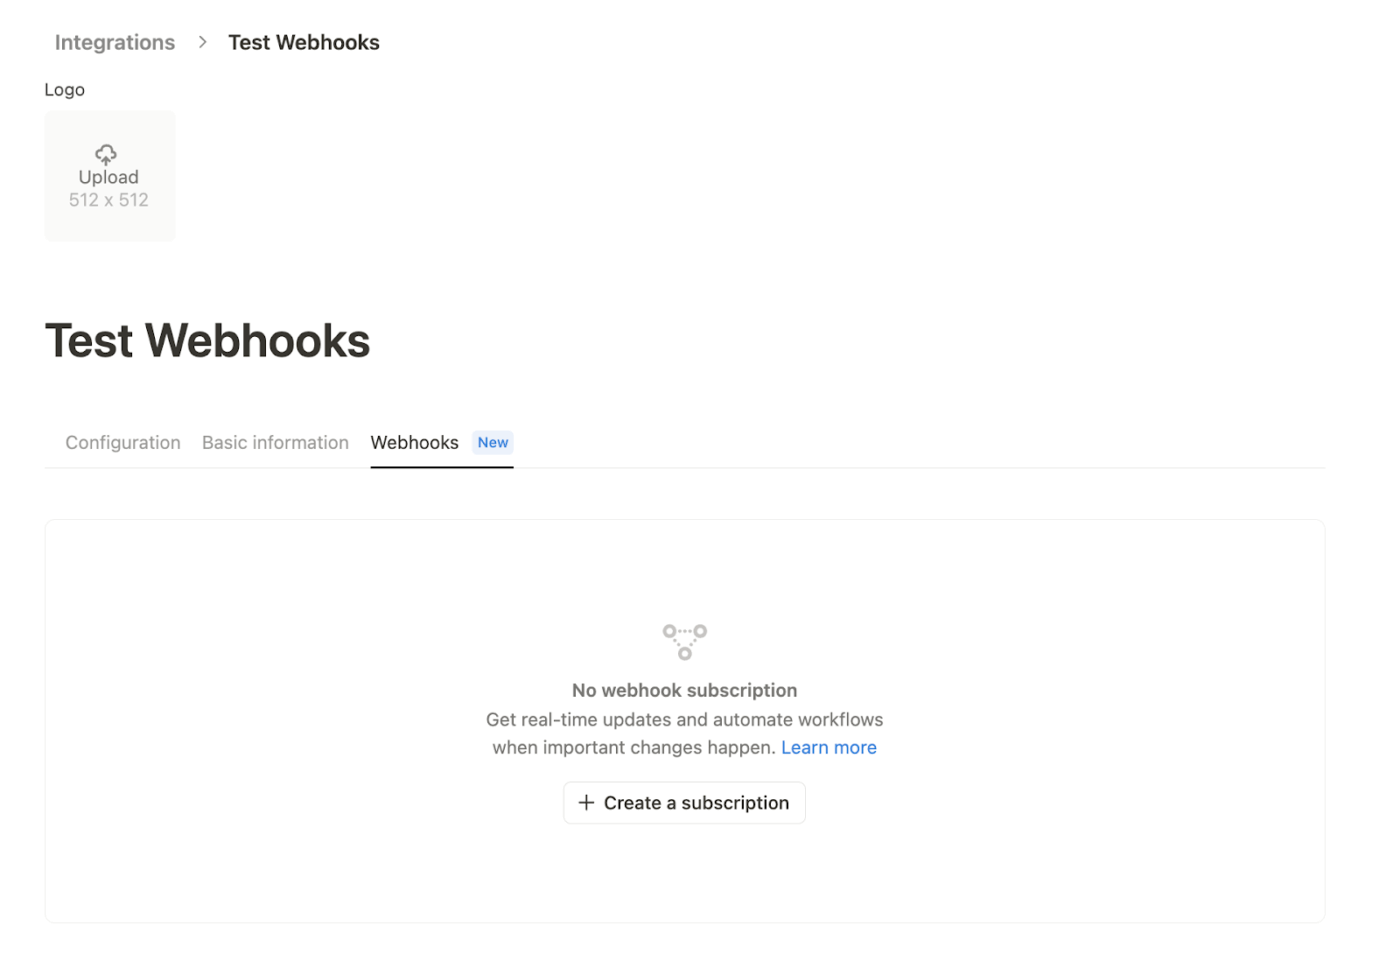
In the integration’s Webhooks tab, click + Create a subscription. Paste the webhook URL you prepared, select the event types to subscribe to (e.g., page created, page updated, database schema changed), and save.
You can update the event types your subscription receives at any time. However, once the webhook URL has been verified, it cannot be changed. If you want to use a different URL, you’ll need to create a new subscription.
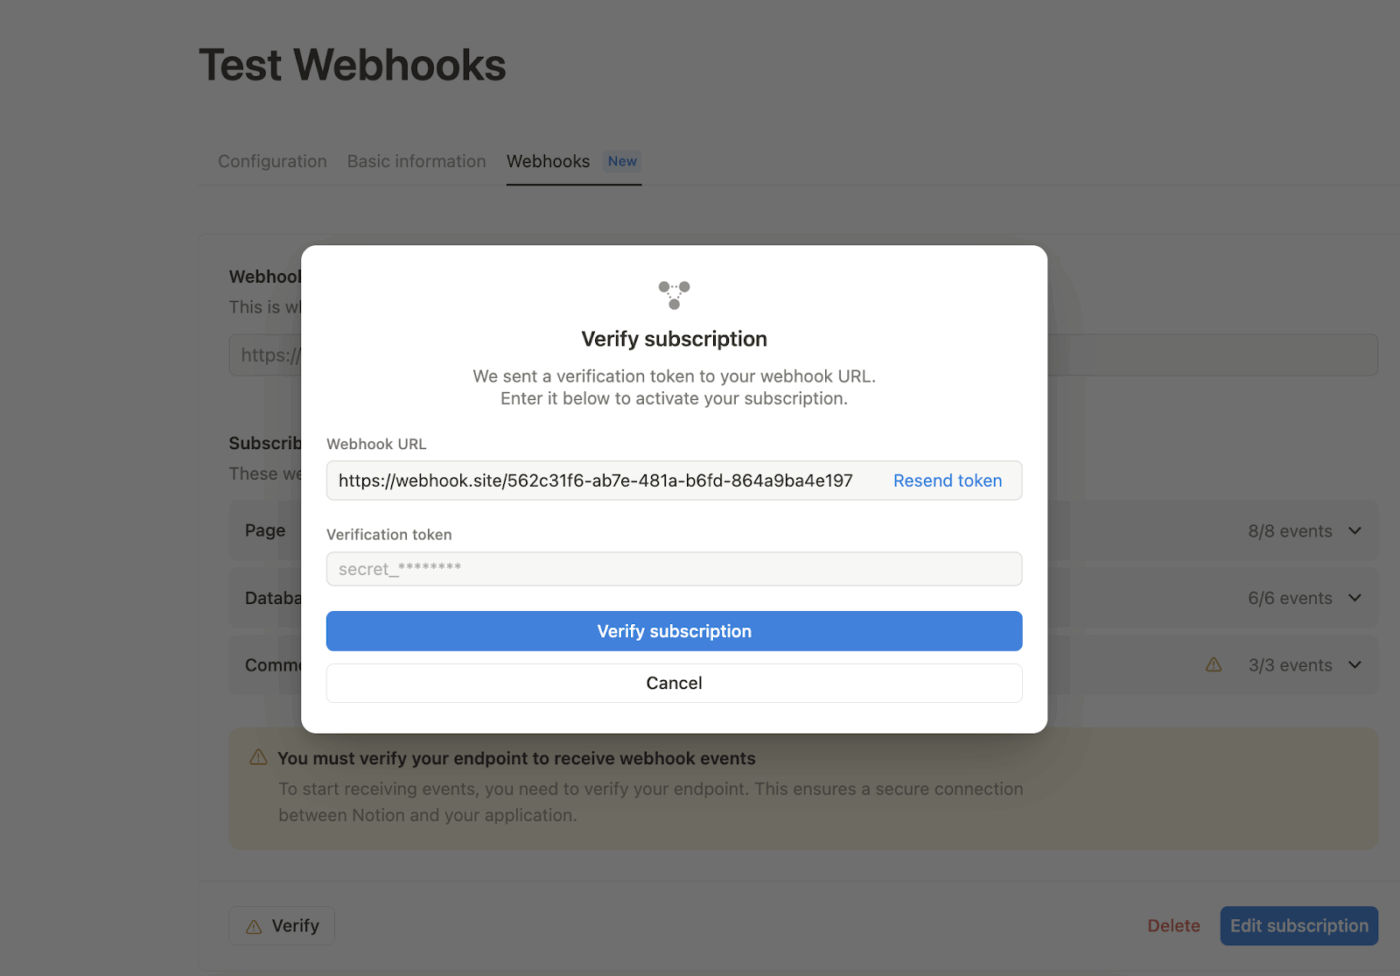
When you create the subscription, Notion sends a one-time POST to your webhook URL with a JSON body containing a verification token.
Your endpoint must inspect the request, extract that verification token, then paste it (or enter it) in the Notion integration UI under Webhooks → Verify to activate the subscription.
Ensure your endpoint reliably performs three tasks:
Treat the webhook payload as a signal. It contains event type, timestamp, and minimal object IDs. If you need full content, fetch it from the Notion API using the IDs in the payload. Also, handle retries and rate limits gracefully (Notion has incoming webhook request limits).
Notion includes an X-Notion-Signature header with each webhook POST. For production systems, recompute the signature on your side (use HMAC-SHA256 on the raw request body with the verification token as the secret).
Then, compare it to the header using a timing-safe comparison. If they match, the event is authentic; if not, discard it and log the discrepancy.
Notion’s docs include sample code for this in multiple languages. If you use a no-code platform, you may not be able to run this check. While the webhook will still function, signature validation is strongly recommended for production environments.
The final step is to verify all that you’ve done:
🔍 Did You Know? Unix pipes were born in 1973. It was a simple idea of connecting a program’s output (STDOUT) to another program’s input (STDIN) that became one of the most powerful constructs in computing.
When a Notion webhook isn’t delivering events as expected, the issue often involves configuration, permissions, or event timing.
Below are the most frequent causes and how to resolve them. 💁
Webhook events are only triggered for content your integration can access. If the event source is in a private page, database, or workspace section your integration isn’t connected to, Notion won’t send the event.
📌 Example: A page created inside a private workspace folder won’t trigger the webhook unless the integration is explicitly granted access.
Some webhook event types require specific capabilities enabled in your integration settings.
Without the right capability, events won’t be delivered even if the integration has access to the page or database. You can adjust these in the Capabilities section of your integration settings.
📌 Example: To receive ‘comment.created’ events, the integration must have the Comment read capability enabled.
Certain events, such as page.content_updated, are aggregated before being delivered to avoid flooding your endpoint with multiple updates during rapid changes (e.g., typing, formatting, or rearranging blocks).
If you need near-instant feedback for testing, start with non-aggregated events, such as comment.created or page.locked.
📌 Example: If a user edits a page title three times in quick succession, Notion sends a single aggregated event instead of three separate ones.
Even if permissions and capabilities are set correctly, events won’t reach your endpoint unless the webhook subscription is active.
Check the Webhooks tab in your integration settings to ensure the subscription is:
If the subscription is inactive or in a pending state, events won’t be delivered.
📌 Example: If you created a webhook but forgot to complete the verification step, the subscription will remain pending, and your endpoint won’t receive any events.
Here are some workflow automation examples of connecting Notion webhooks in action that go well beyond the usual ‘send an email notification.’
These will show how you can tailor and trigger automations to real team workflows:
You can transform Notion into a lightweight customer support hub using webhooks, your backend, and email.
Whenever a new email arrives, it automatically creates a new page in a Notion database, entirely replicating the email thread in the page’s comment section. You can reply directly from comments, and starting a reply with ‘#’ sends the response out via email.
🧠 Fun Fact: The term ‘webhook’ was coined in 2007 by Jeff Lindsay, based on the programming concept of a ‘hook.’
Another setup uses webhooks with Firebase functions to automate a QR-based inventory system. After creating or updating a part entry in Notion, the webhook runs server-side logic to generate a QR code.
That code is printed, scanned via a web app, and then time-stamped back into Notion to reflect the part’s status, whether it’s in the warehouse, out for delivery, or shipped.
With webhooks, you can automatically track work hours and log them into a timesheet tool whenever your Notion workspace is updated.
For example, if your team records task start and end times in a Notion database, a webhook can trigger an automation that pushes those values into a timesheet or payroll system.
You’re drafting social posts in Notion. You write your caption, drop in a media URL, set a publishing time, and mark the status as ‘Ready to Publish.’
This is when a webhook takes over, sending that data to your workflow automation software. Next, it delays until the scheduled time, then posts for you on Instagram, Facebook, and LinkedIn.
📮 ClickUp Insight: Only 10% of our survey respondents regularly use automation tools and actively seek new opportunities to automate.
This highlights a major untapped lever for productivity—most teams are still relying on manual work that could be streamlined or eliminated.
ClickUp’s AI Agents make it easy to build automated workflows, even if you’ve never used automation before. With plug-and-play templates and natural language-based commands, automating tasks becomes accessible to everyone in the team!
💫 Real Results: QubicaAMF cut reporting time by 40% using ClickUp’s dynamic dashboards and automated charts—transforming hours of manual work into real-time insights.
Although Notion webhooks allow for real-time updates and automation, they’re not without constraints. Understanding these limitations helps you design workflows that remain reliable, efficient, and cost-effective.
Here are some common ones:
🔍 Did You Know? Pingbacks on blogs were an early cousin of webhooks. Of course, webhooks are far more flexible, letting you send any arbitrary event data to any URL handler.
Disabling or removing a Notion webhook can be necessary when you no longer need the integration or want to prevent unnecessary event deliveries. It’s also imperative when you need to enforce stricter security and compliance policies.
Depending on your permissions and workspace plan, you can either stop webhook functionality at the workspace level or delete the webhook subscription entirely.
Let’s look at how:
If you’re a workspace owner on Notion’s Enterprise Plan, you can globally disable webhook actions for your entire workspace. This ensures that no member, regardless of role, can set up new webhook-based automations.
Here are the steps to disable webhook actions in an Enterprise workspace:
Once disabled, the Send webhook action will no longer be available in the automation builder for any member in the workspace. This change takes effect immediately and applies to all automations, regardless of who created them.
🧠 Fun Fact: Before webhooks, the web relied on polling; feeds and APIs weren’t really ‘pushing’ data to you. Instead, your app had to repeatedly check (‘poll’) for changes, often wasting resources.
If you simply want to stop receiving webhook events without disabling the entire webhook feature, here’s how to do it:
Removing a subscription will stop event deliveries to the specified endpoint, but won’t affect other webhook configurations in the same workspace.
ClickUp is the everything app for work that combines project management, knowledge management, and chat—all powered by AI that helps you work faster and smarter.
Building on what you’ve just mastered with Notion webhooks, let’s explore how ClickUp takes automation and productivity to the next level. The Notion alternative is especially useful if you’re looking to trigger smarter workflows, surface instant insights, or automate context-aware tasks across your workspace.
Here’s how. 👀
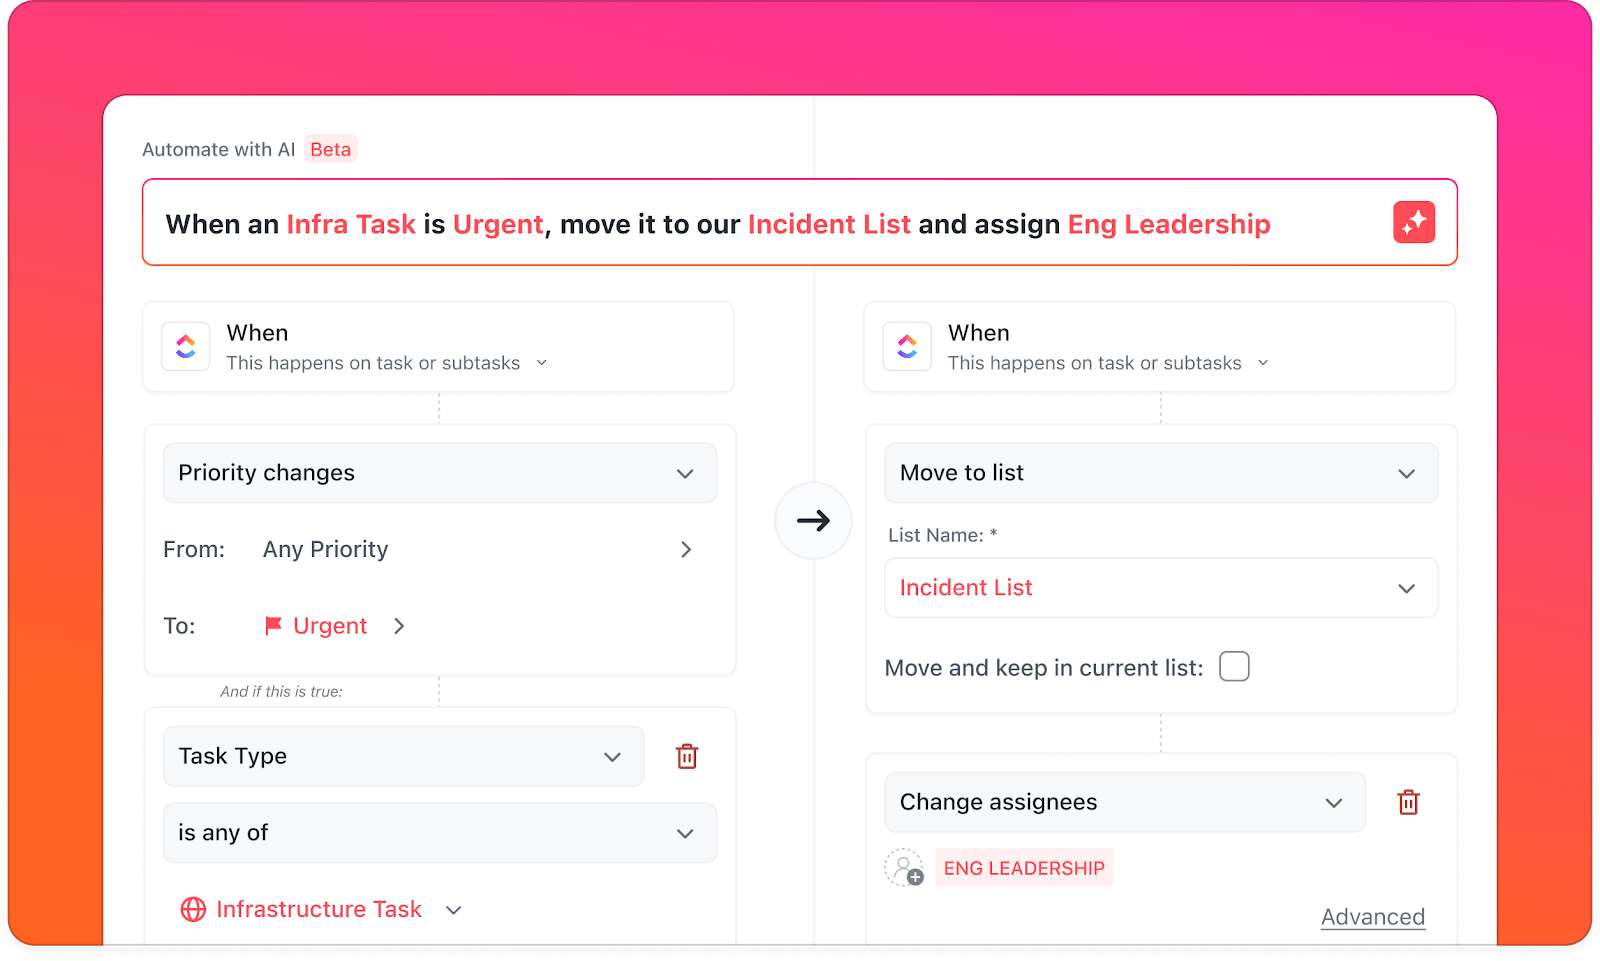
ClickUp Automations is your invisible helper. It lets you automate repetitive work using natural language with simple ‘if this, then that’ triggers.
For example, just write a rule like: ‘When a task status changes to ‘Accepted,’ apply the workflow template and set priority to ‘High.’ ClickUp will take it from there.
Watch how to set up your own automation:
Want to build something more complex? ClickUp Autopilot Agents are AI-driven agents, either prebuilt or custom, designed for advanced, real-time workflows.
You don’t have to start from scratch. You can instantly use AI to automate tasks with prebuilt Autopilot Agents right when you need them:
🎥 Watch: How to set up your first AI agent
From there, you can customize agents to match your exact workflow. For example, having them create summary tasks from meeting notes or evaluate job applications from form submissions.
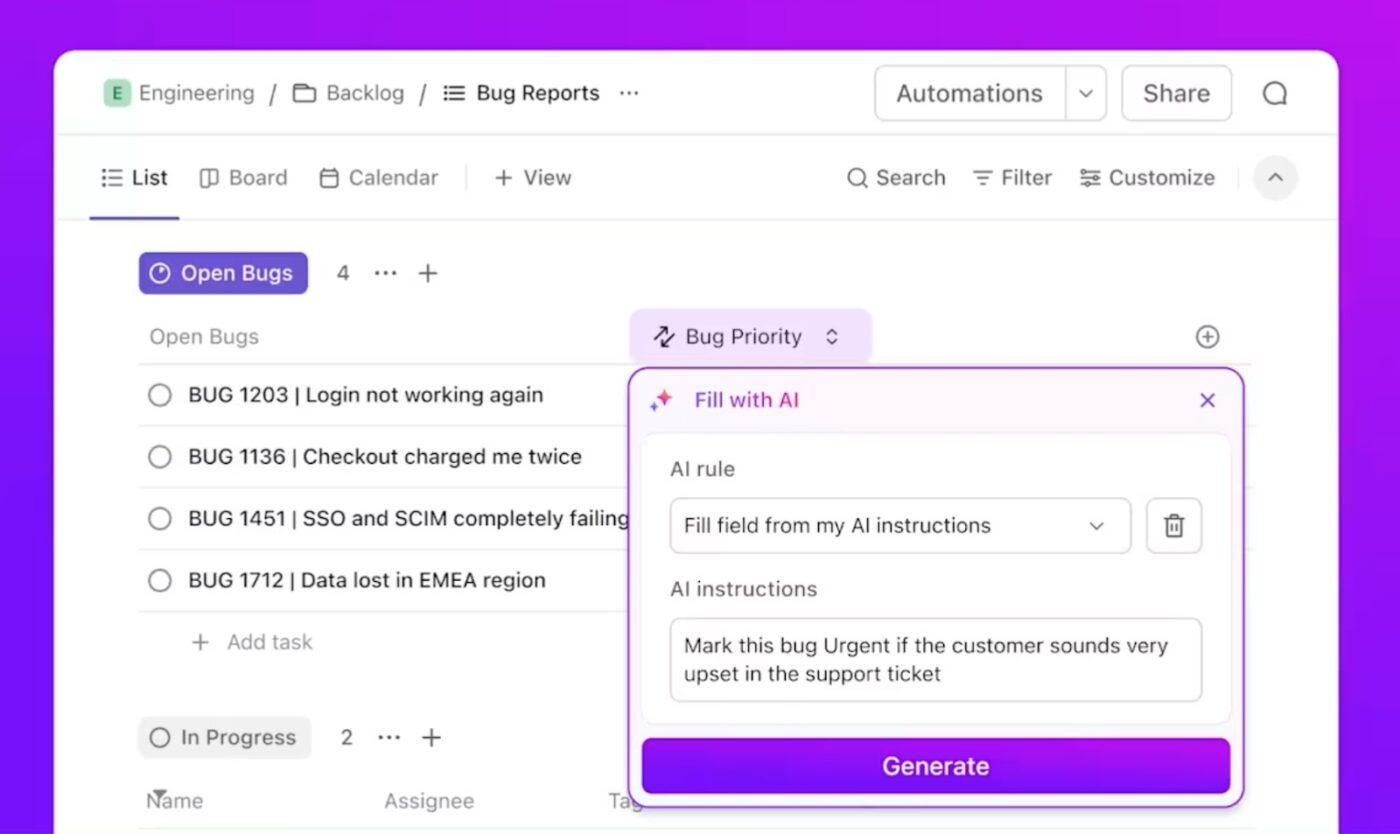
You can use ClickUp Brain to set up smart database automations in just a few clicks. These can instantly handle updates, like logging task times, syncing data, or triggering workflows. Simply type in a natural language prompt and let the tool handle the rest.
Wait, there’s more. If you feel that too much time is wasted hunting for information, piecing together status updates, or rewriting the same content repeatedly, ClickUp Brain solves for that too.
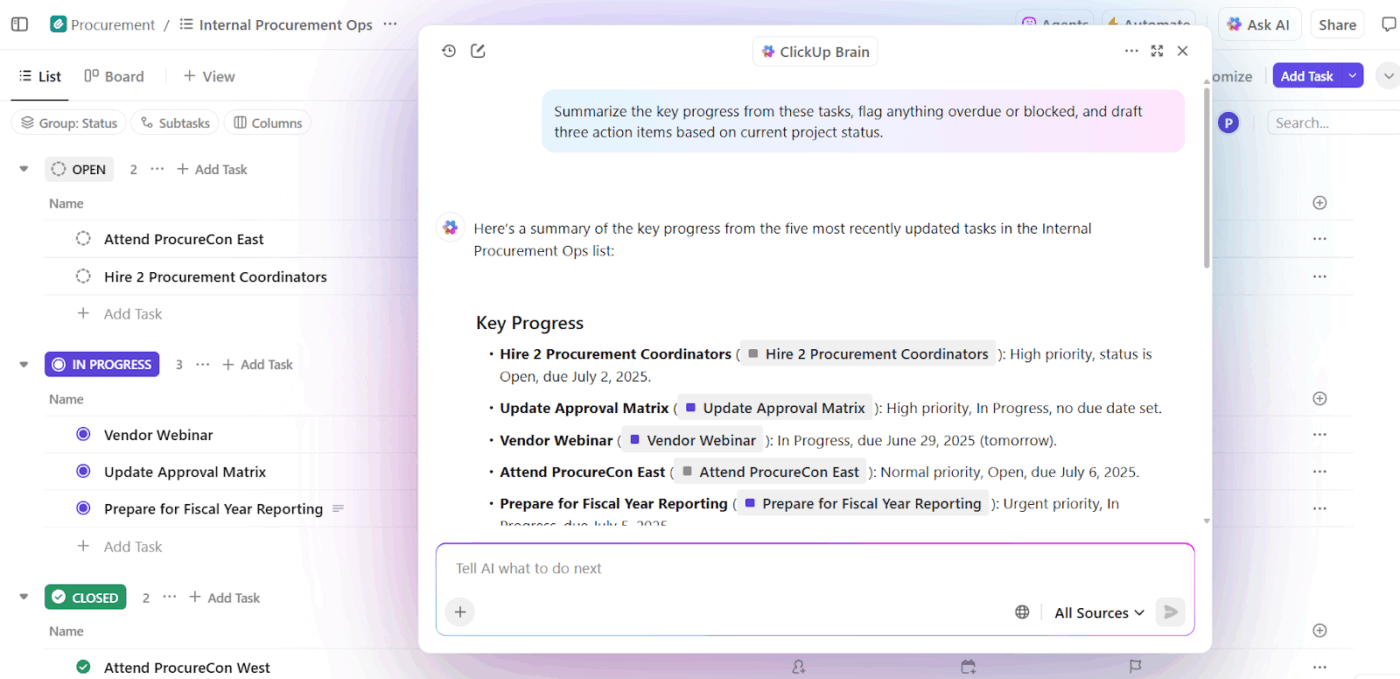
The platform’s AI-powered assistant takes multiple roles to ensure efficiency. Here’s how it helps:
📌 Try This Prompt: Summarize the sprint review meeting notes from February 8 and highlight blockers for the mobile app release.
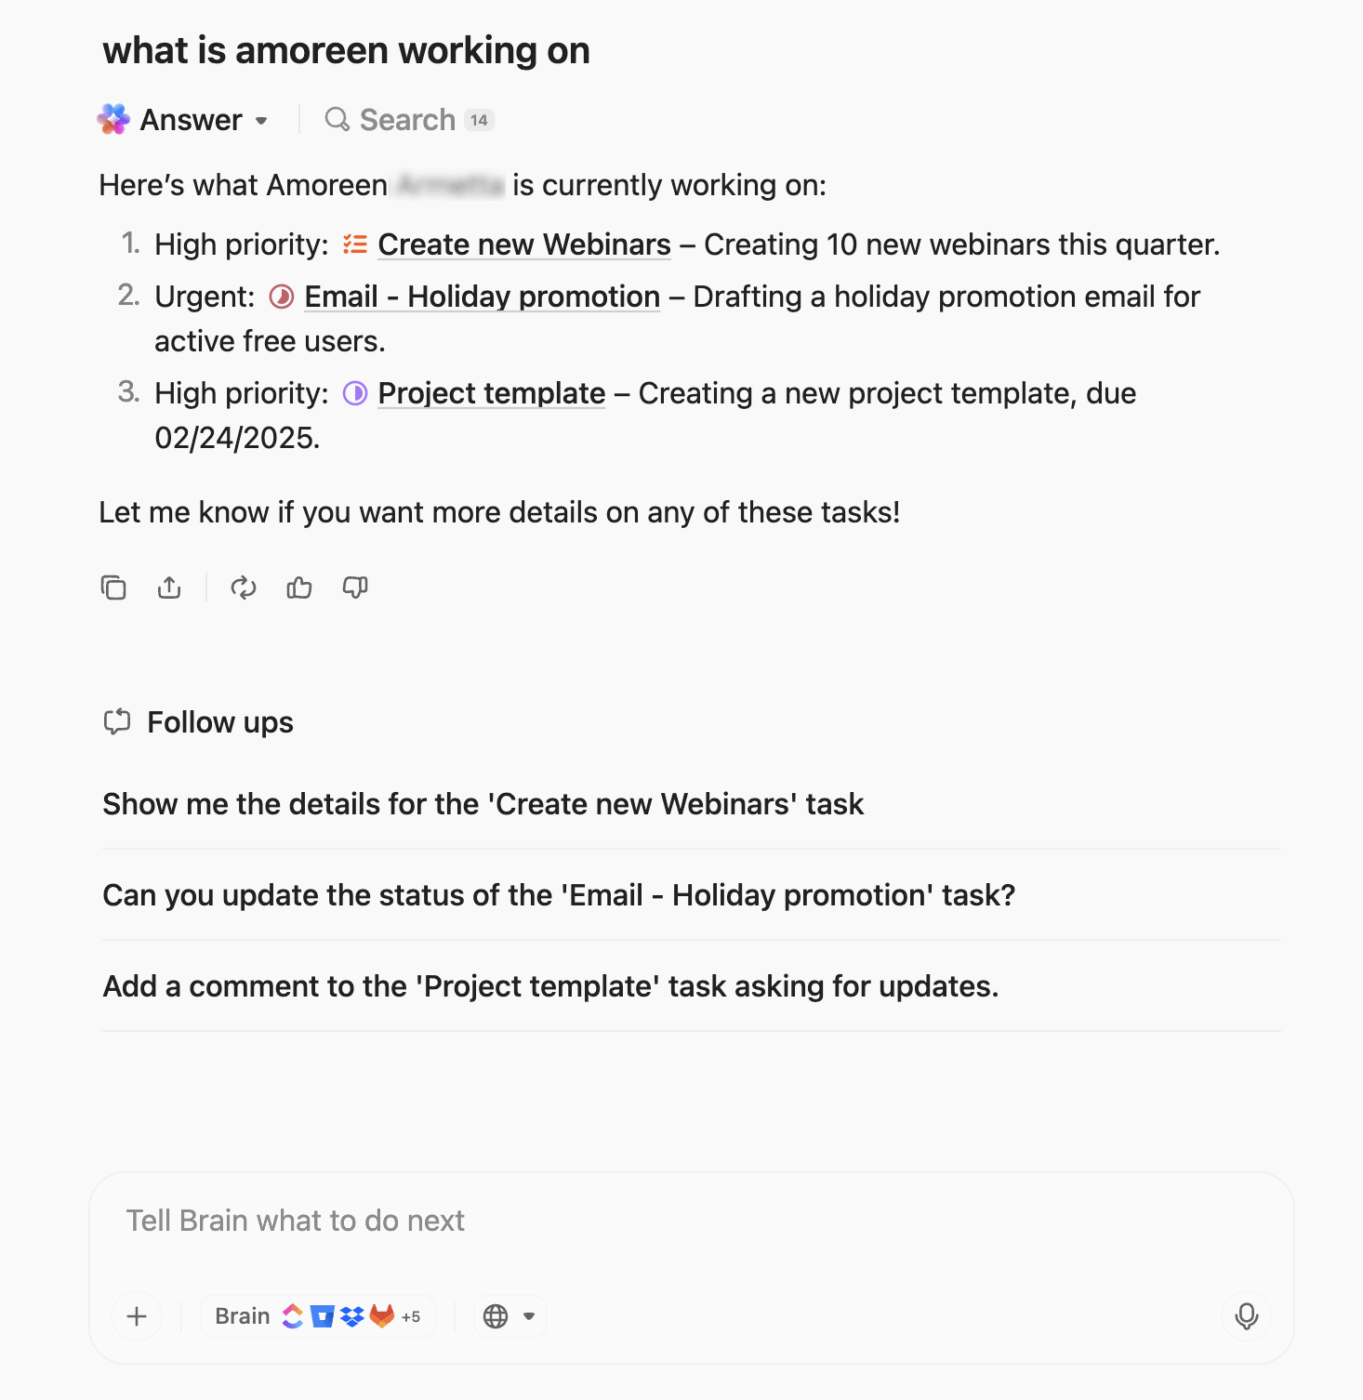
🚀 ClickUp Advantage: ClickUp Brain MAX is your all-in-one AI desktop app that gives you the right answers in context. For instance, you can just ask, ‘What’s the status of our Q3 launch?’ and instantly get a response.
With unified search, voice-first productivity, and access to the world’s top AI models, including GPT, Claude, and Gemini, in a single hub, Brain Max ensures you automate like a pro.
Modern teams often use multiple tools. You have your Google Drive for files, Zendesk for support, GitHub for code, and Salesforce for sales. While each tool solves a specific problem, constantly switching between them creates silos, delays, and lost context.
ClickUp Integrations connects your workspace with over 1,000 third-party apps to unify all your work in one place.
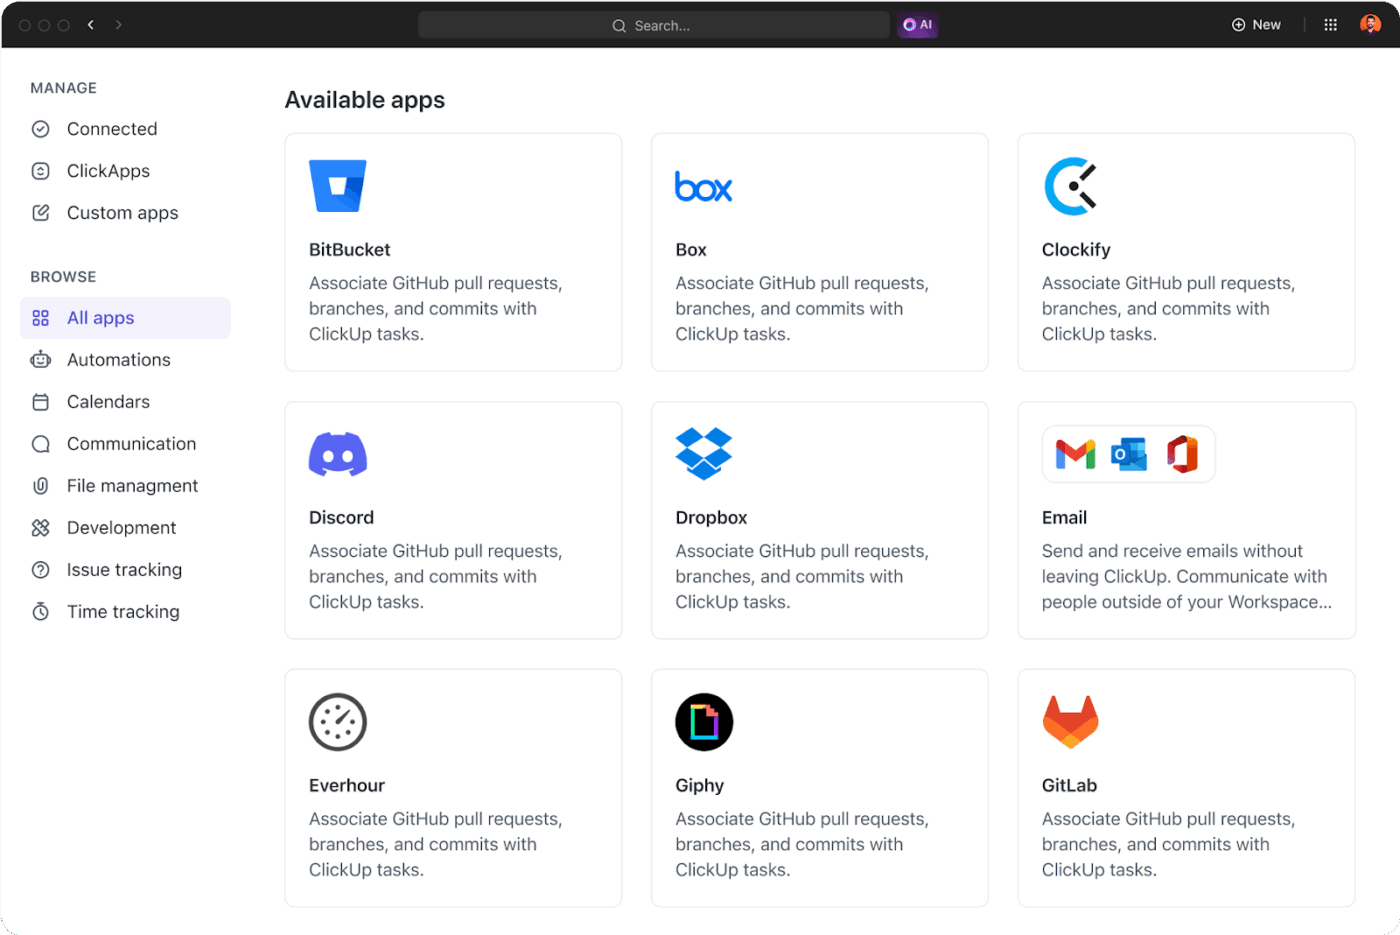
Your team can view Zendesk tickets, Google Drive attachments, or GitHub issues directly inside ClickUp.
For example, a support ticket raised in Zendesk can instantly create a linked task in ClickUp, where developers and customer success teams can collaborate without leaving their workflows.
📣 Customer voice: Here’s what Alexis Valentin, Head of Global Business Development, Pigment, has to say about ClickUp:
With ClickUp, we reduced the time it takes to dispatch tasks and execute them, from a couple of days to a couple of hours. Now people know which tasks are pending for their onboarding and what they have to do—which is a nightmare to try to organize by email. Managers are one click away, thanks to templates, of creating onboarding boards for each new joiner. Game changer.
When you’re building workflows with Notion webhooks, you’re essentially pushing data out of one platform to trigger something else. But what if you need to pull information back in? That’s where ClickUp Enterprise Search comes in.
The powerful, organization-wide search tool scans everything: tasks, docs, comments, attachments, and more. It doesn’t stop there either. With integrations, it also searches third-party services, like Google Drive, Slack, GitHub, or Dropbox, delivering unified search results.
For instance, Enterprise Search can export information from Notion, the spec from Google Drive, the design mockups in Figma, and even the support ticket in GitHub in just one search.
Notion webhooks are great for sending updates, triggering actions, and keeping different tools in sync. However, their limitations, such as request caps, setup complexity, and additional maintenance, can slow you down.
ClickUp makes it easier. It works for both quick setups and complex workflows. ClickUp Brain gives you instant, context-aware answers, summaries, and action items. And ClickUp Automations handle the repetitive stuff, so you don’t have to.
Consolidate projects, documents, and automations all in one place.
Sign up to ClickUp for free today! ✅
The Notion API allows you to pull or push data on demand, but webhooks automatically push updates to you when something changes. This saves you from (the dreaded) constant polling.
Notion will retry delivering the event a few times. If it keeps failing, you may lose that event, so having a reliable endpoint and failover strategy is critical.
Yes, but it’s not native. You’ll need an integration layer or middleware to receive webhook events from one workspace, transform them, and push updates to the other using the API.
Data is sent over HTTPS, and you can validate incoming requests using the shared secret from your webhook setup. Always store credentials securely and restrict access to your endpoint.
Generally, yes, but they can be affected by API rate limits, network issues, or downtime. They work well for most use cases but aren’t ideal for important, zero-tolerance systems without backups.
Basic backend development skills, such as working with HTTP requests, parsing JSON, and handling authentication, are required.
Notion webhooks give you full control and real-time triggers, but require coding. Zapier and IFTTT are no-code tools that make automation easier, though they may be slower or less customizable.
A better choice would be ClickUp. It combines the best of both, real-time triggers via ClickUp Automations and AI-powered actions with ClickUp Brain, without the steep learning curve.
© 2026 ClickUp

