


Still downloading templates?
There’s an easier way. Try a free AI Agent in ClickUp that actually does the work for you—set up in minutes, save hours every week.
Sorry, there were no results found for “”
Sorry, there were no results found for “”
Sorry, there were no results found for “”

A team that doesn’t collaborate effectively is akin to a car without a steering wheel. No matter how fast you’re going, you won’t get where you want to if you have no direction.
Miro is one of many platforms that lets you collaborate with your team(s) in a virtual workspace. Ideation, developing wireframes, assigning tasks, whiteboards, and strategizing are some of the many things you can do on Miro to be more productive.
However, sharing a Miro Board with someone who doesn’t have a Miro account can be challenging.
Ideally, a simple command like “export Miro Board” would simplify this process. But this isn’t currently possible. To share an existing or new board with someone, you’ll need to export it manually.
In this blog, we’ll provide a step-by-step guide on how to export from Miro effectively.
Miro export options vary by plan, browser, and device, and require board owner permissions. Boards can be exported as images, PDFs, or CSVs depending on how the content will be shared.
Before we get started, remember that your upload and export options depend on your Miro plan and the browser and device you’re using. It’s also worth knowing that you can only export a Miro Board if the board owner or co-owner enables the option.
| Free Plan | Starter, Business, Enterprise, Education plans | ||||
| Low Resolution | High resolution without watermark | Low resolution | High resolution without watermark | Export to CSV (all plans) | |
| Google Chrome | Yes | No | Yes | Yes | Yes |
| Safari | Yes | No | Yes | Yes | Yes |
| Firefox | Yes | No | Yes | Yes | Yes |
| Opera | Yes | No | Yes | Yes | No |
| Edge <79 | No | No | No | Yes | No |
| Desktop app | Yes | No | Yes | Yes | Yes |
| Tablet | Yes | No | Yes | Yes | No |
| Mobile | No | No | No | No | No |
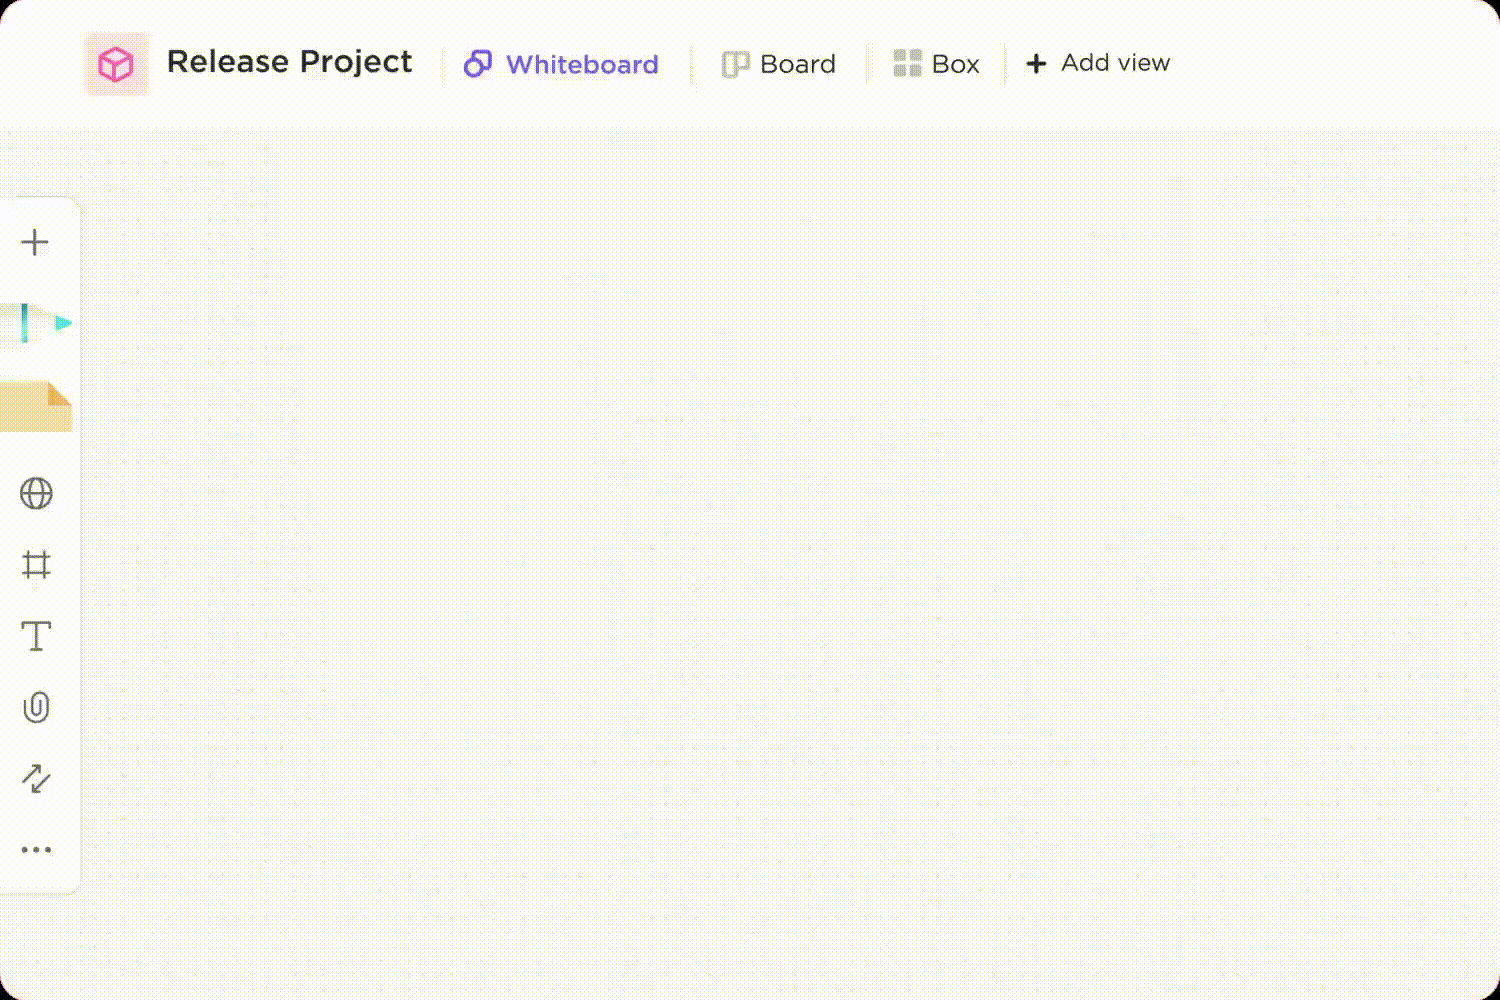
Still mapping work plans in Miro? ClickUp’s Work Plan Whiteboard Template gives you the same visual clarity with built-in tasks, ownership, and updates—so your brainstorm turns into actual progress.
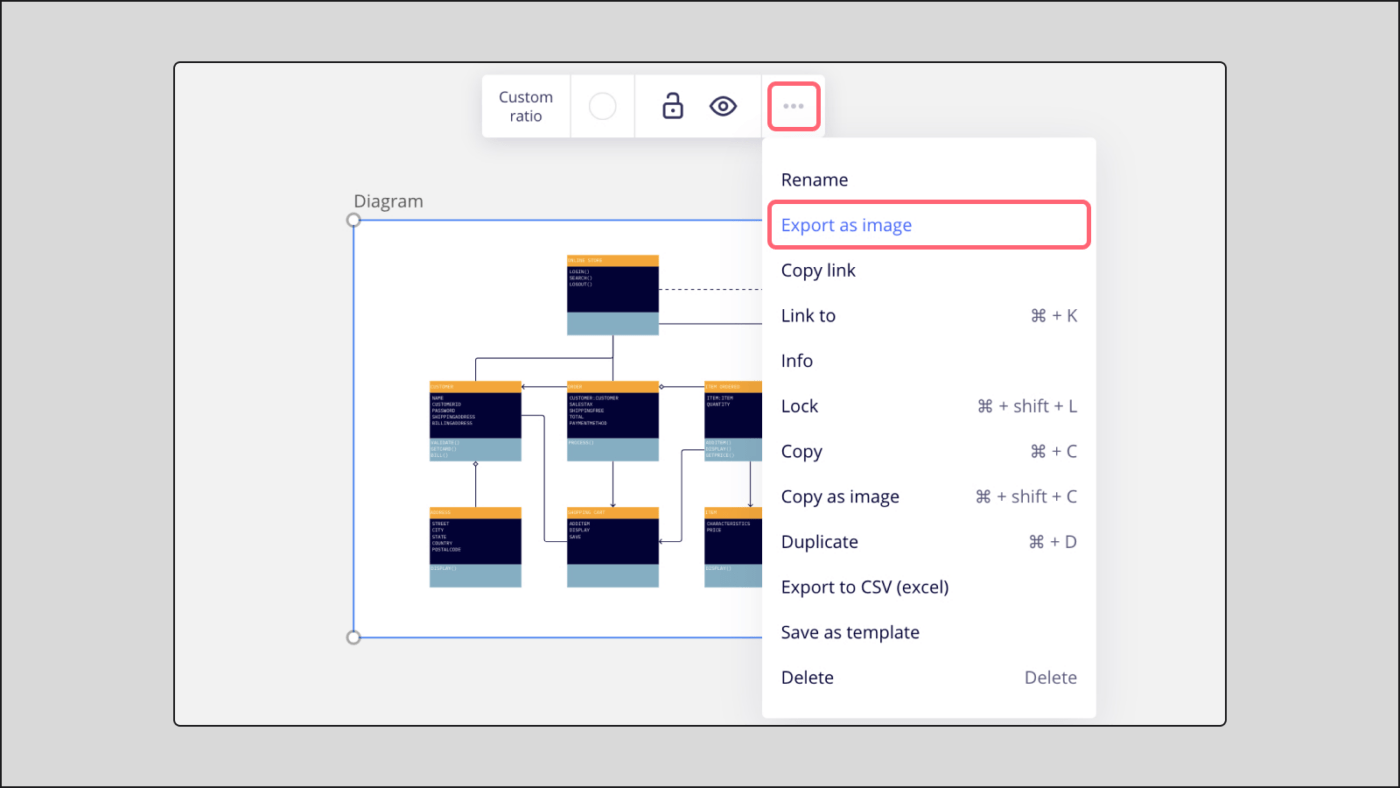
A JPG version of your Miro Board is ideal for a presentation, or simply sharing a visual summary of your work with colleagues or clients.
While JPEGs don’t preserve interactive elements like sticky notes or links, they effectively capture the overall visual composition and content of your board as an image. You can export your Miro Board to a JPG image in a few simple steps.
Note: Remember that Microsoft Edge (version < 79) supports Vector export only, while the free plan supports board export in small sizes. Free plan users can export boards in Chrome, Firefox, Opera, Safari, Desktop apps, or Tablet apps.
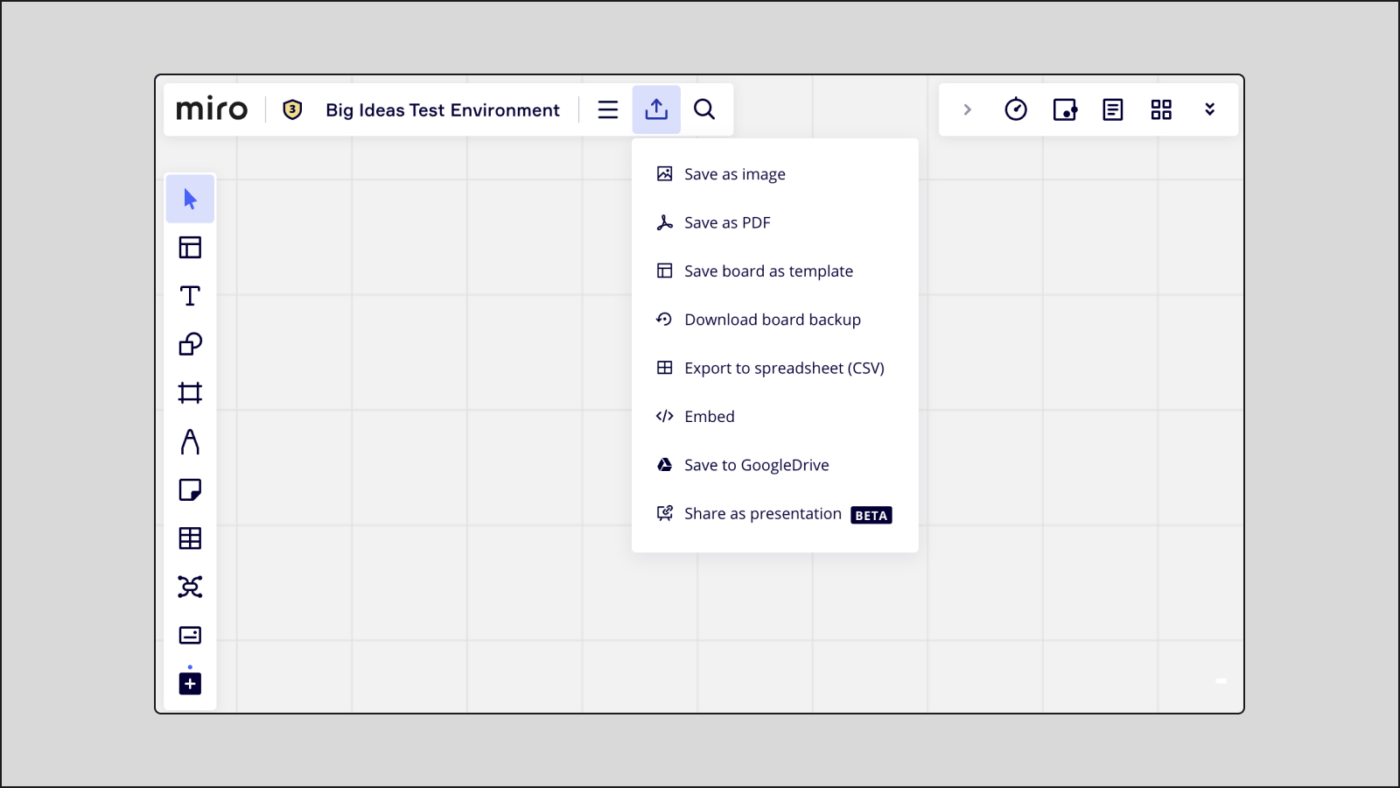


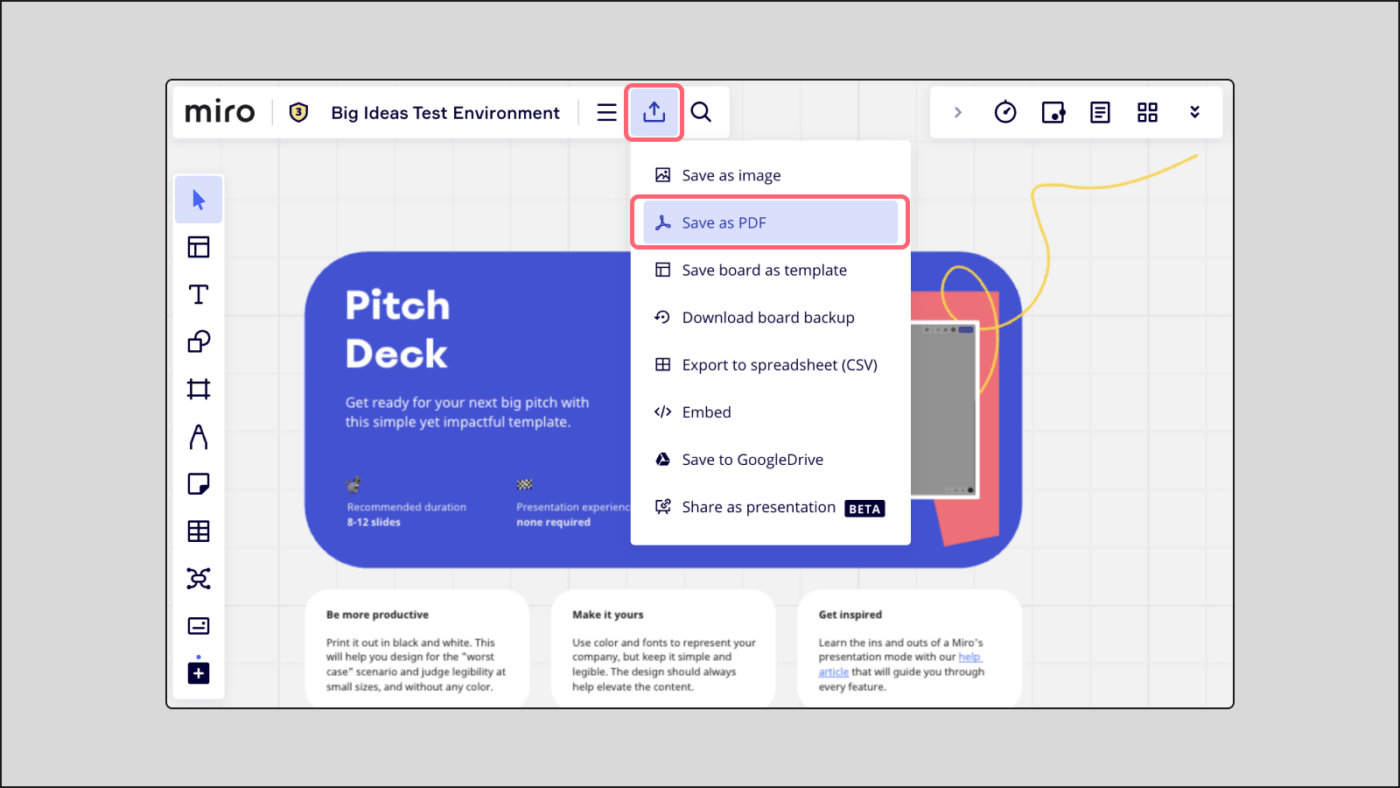
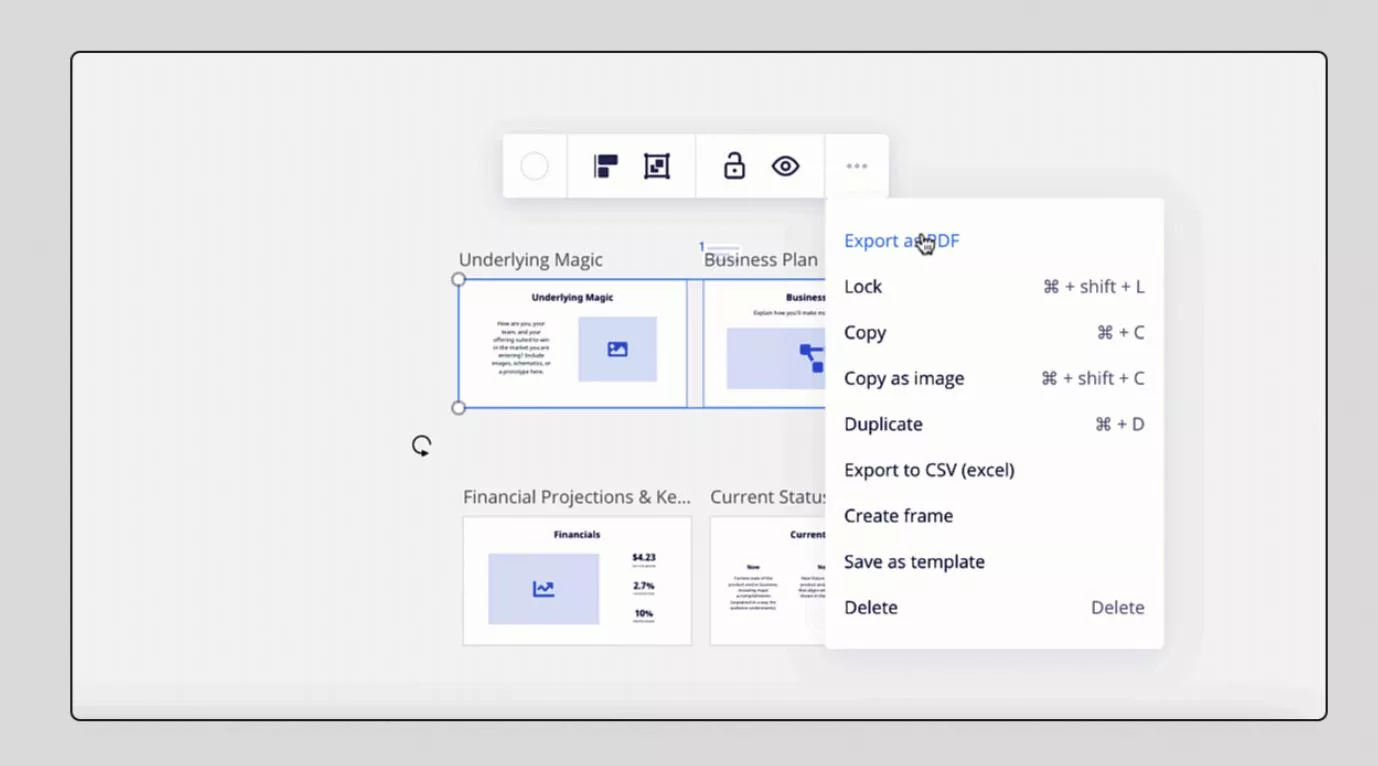
Miro lets you export boards as PDFs in different ways depending on whether you want the full board or only selected frames.
Exporting and saving your Miro Board as a PDF is beneficial for several reasons. Primarily, it preserves your board’s visual layout and content in a static, shareable format.
Plus, PDF files are widely accessible, ensuring that anyone can view your board without needing a Miro account. By organizing all the content in your board into frames, you can even convert it into a structured document, making complex information easier to digest.
CSV exports extract text-based content from boards, making it useful for documentation, spreadsheets, or task migration.
Sometimes, you don’t want the glitz and glam of colors and just want to stick to the basics. That’s where a CSV file comes in.
The text on any of your boards can be exported as a CSV file when you export Miro Boards.

Let’s look at why exporting your board might be useful.
After all the hard work you’ve put into creating a Miro Board, it would be a shame not to be able to showcase your work because the person you are presenting to isn’t using the Miro desktop app. Thankfully, you can easily export Miro Boards as images, PDFs, and CSV files as we’ve seen above.
Exporting Miro Boards also allows you to document your work on the cloud or save it to an external hard drive if you want to be extra cautious. 👀
As with all technology, software, and tools, there are pros and cons. Here’s the downside to using Miro for creating workflows:
ClickUp helps you visually map processes and instantly turn them into actionable tasks using built-in Whiteboards and Mind Maps.
While Miro is a great work tool, its limitations, like the lag in web-based collaboration, make a compelling case for using these top Miro alternatives.
Unlike Miro, which primarily excels as a whiteboarding tool, tools like ClickUp combine robust task management features with versatile brainstorming techniques.
With ClickUp, you’ve also got advanced templates like the Fishbone Diagram for root cause analysis and a PERT Chart Maker for detailed project scheduling, among many other data visualization techniques you can rely on for effective project management and problem-solving. Let’s explore some of ClickUp’s visualization features in detail:
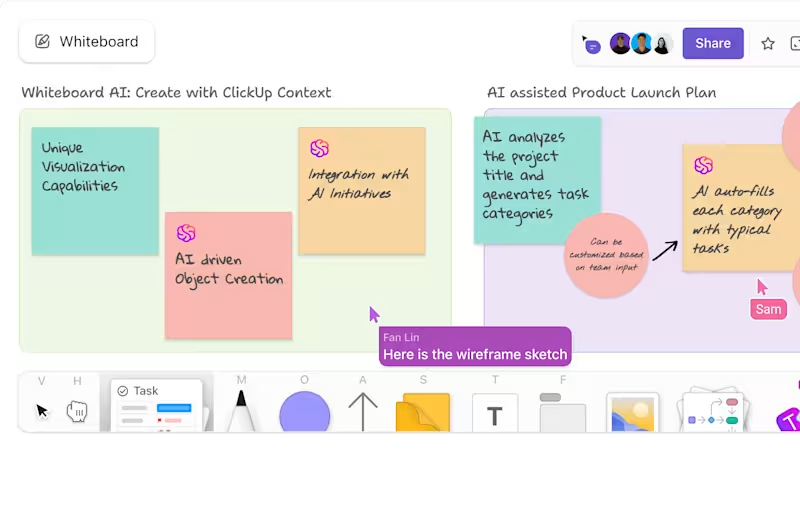
ClickUp Whiteboards is a compelling alternative to Miro because it seamlessly integrates with ClickUp’s robust project management platform. While Miro focuses solely on visual collaboration, ClickUp offers a comprehensive suite of tools, including task management, time tracking, and document sharing.
This means you can effortlessly transition from brainstorming on a whiteboard to launching and executing tasks within one platform.
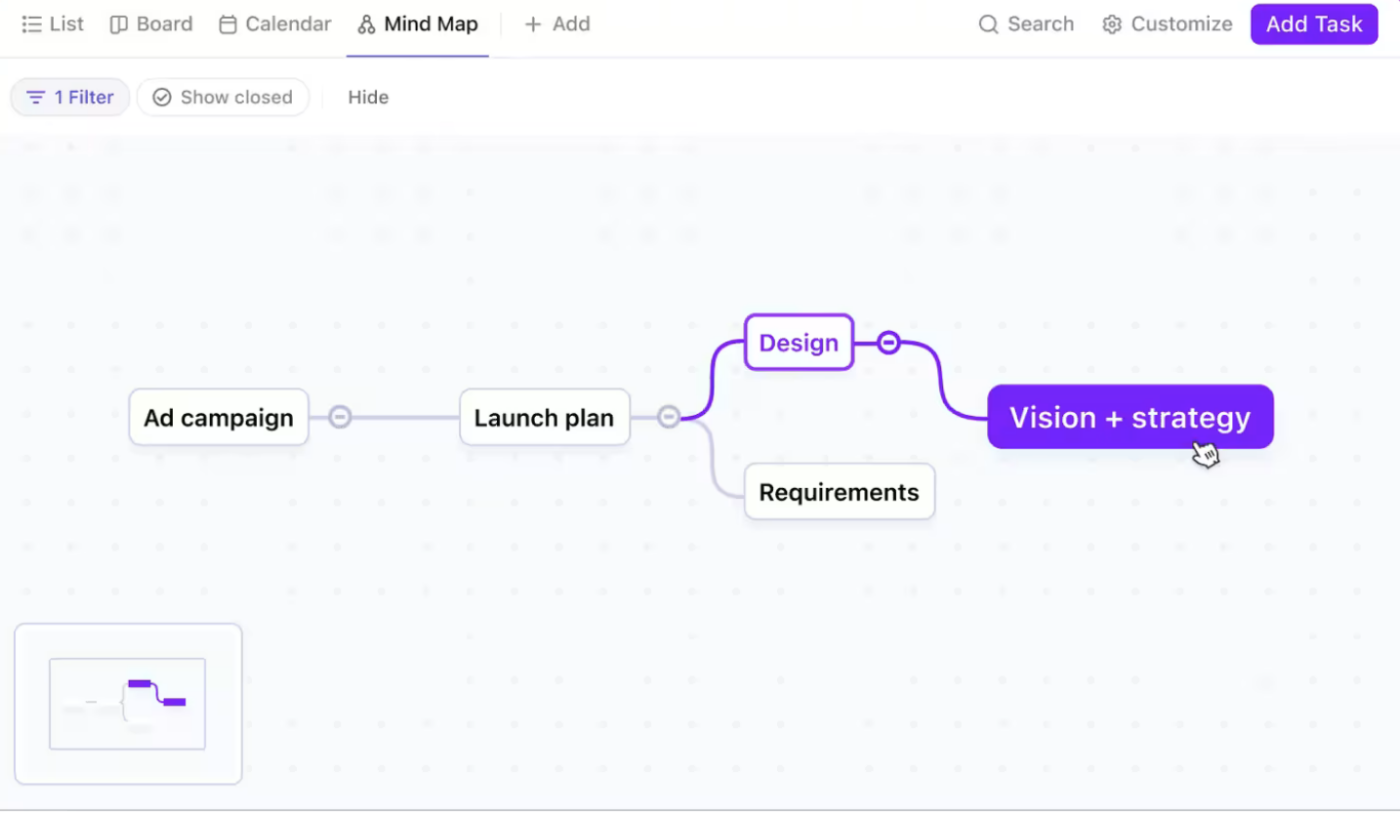
Ever had a great idea, thought about how to pull it off, and then got lost in execution? ClickUp Mind Maps is the tool that puts your thoughts and ideas and turns them into easy-to-follow visual guidelines.
It allows you to find a method to the madness work can be sometimes because you can’t remember who is working on design. ClickUp Mind Maps allows you to delegate tasks right from the board. Next time the Green Goblin rolls into town, your team will be ready.
📮ClickUp Insight: 11% of our respondents leverage AI primarily for brainstorming and ideation. But what happens to these brilliant ideas afterward? This is where you need an AI-powered whiteboard, like ClickUp Whiteboards, which helps you instantly turn ideas from the brainstorming session into tasks.
And if you can’t quite explain a concept, simply ask the AI image generator to create a visual based on your prompt. It’s the everything app for work that enables you to ideate, visualize, and execute faster!
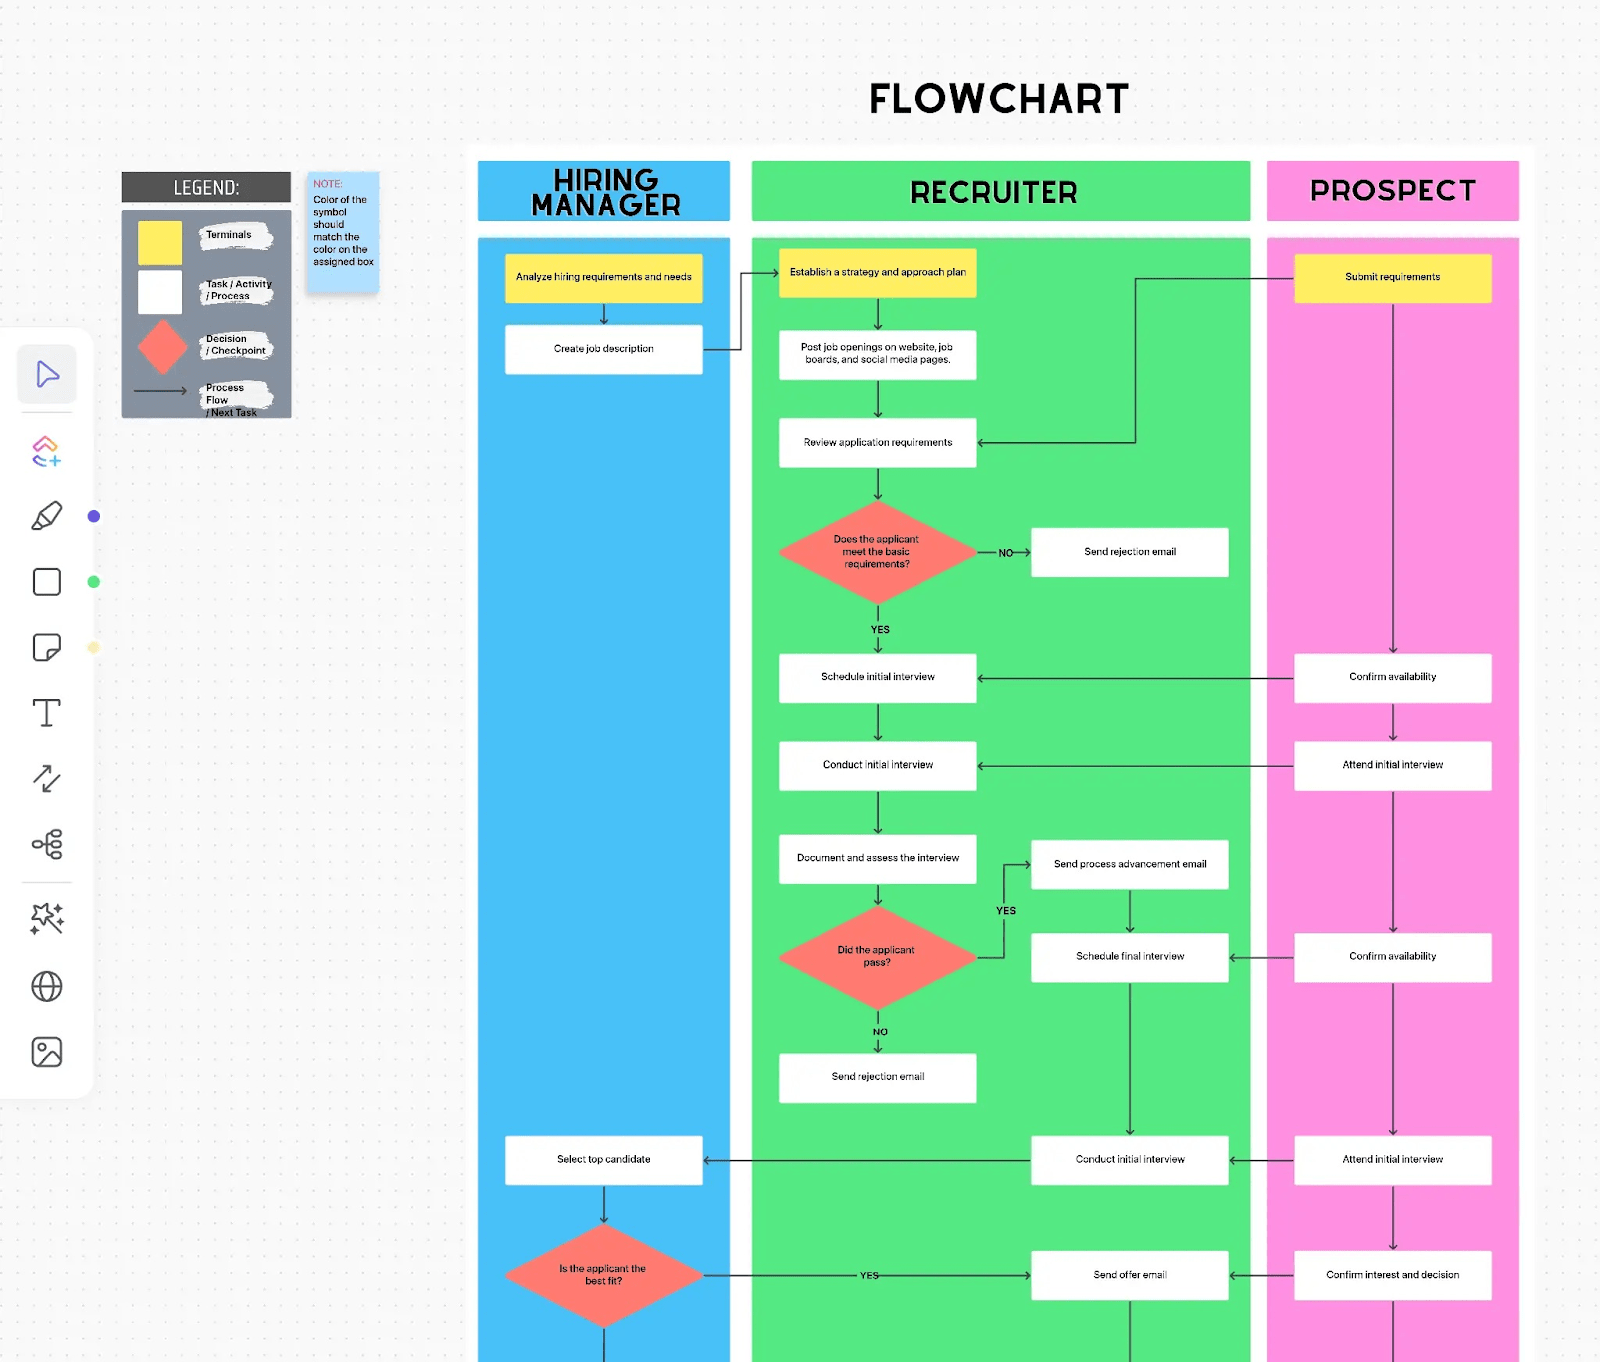
Creating flowcharts in ClickUp can be a highly effective way to visualize and manage your projects. The tool’s flexibility allows you to define and break down workflows, decision points, and process steps.
This approach can be beneficial for understanding complex processes and sharing them with your team.
Here’s a step-by-step guide that lays out exactly how to use ClickUp Mind Maps and ClickUp Whiteboards to create a flowchart in ClickUp:
Accessing ClickUp Mind Maps
Creating your Mind Map

Customizing your Mind Map
Migrating from Miro to ClickUp is as quick and easy as Peter Parker changing into his Spidey Suit, if you use ClickUp’s import and organization features. Here’s a step-by-step guide:
Preparation
Organize Content
Exporting from Miro
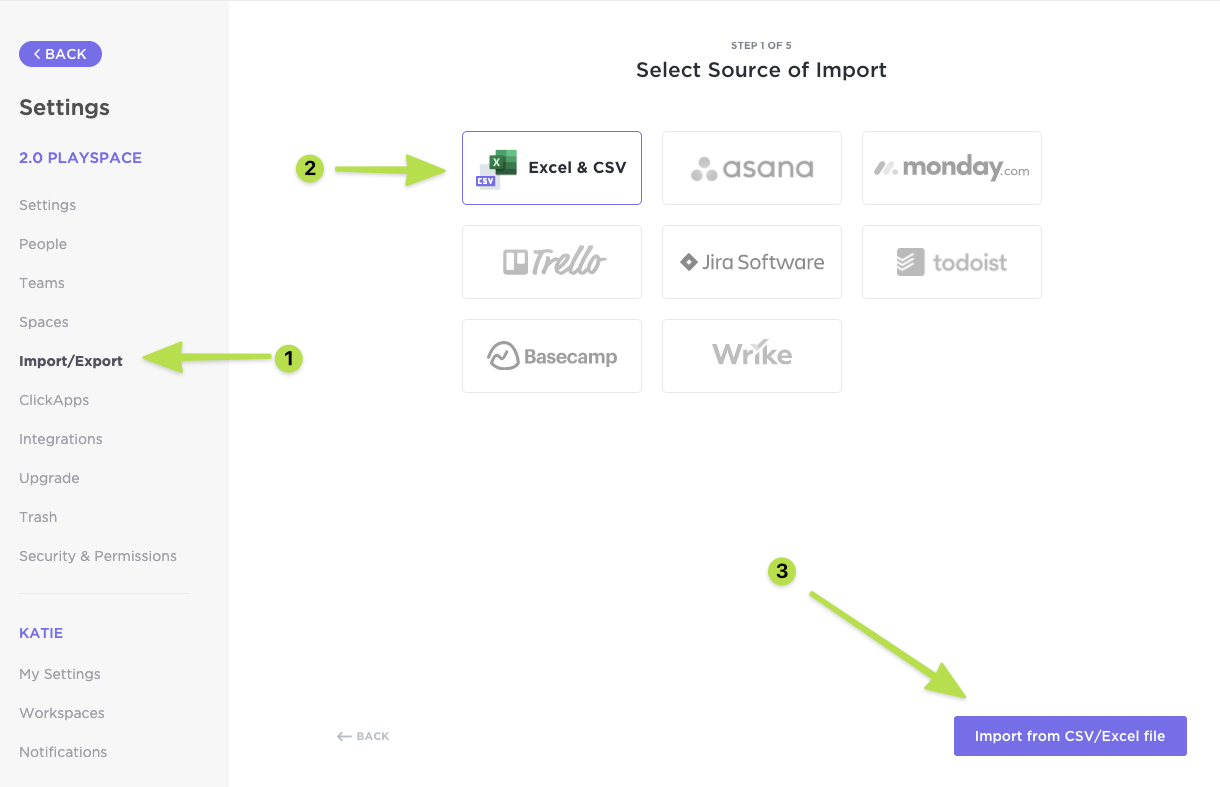
Importing to ClickUp
Before we wrap up, here are some handy resources to get you started:
Use ready-made ClickUp templates, such as the ClickUp Process Flow Chart Template and ClickUp Data Flow Diagram Template, to skip setup and start visualizing workflows instantly.
ClickUp Process Flow Chart Template
ClickUp’s Process Flow Chart Template simplifies process management by allowing you to create clear visual diagrams. Easily share these diagrams with your team for collaboration and to track progress as tasks move through different stages. Whether you’re an individual or a business, this tool helps you organize and streamline your workflows effectively.
Read More: Here’s a list of best flowchart software to help you level up your visualization process.
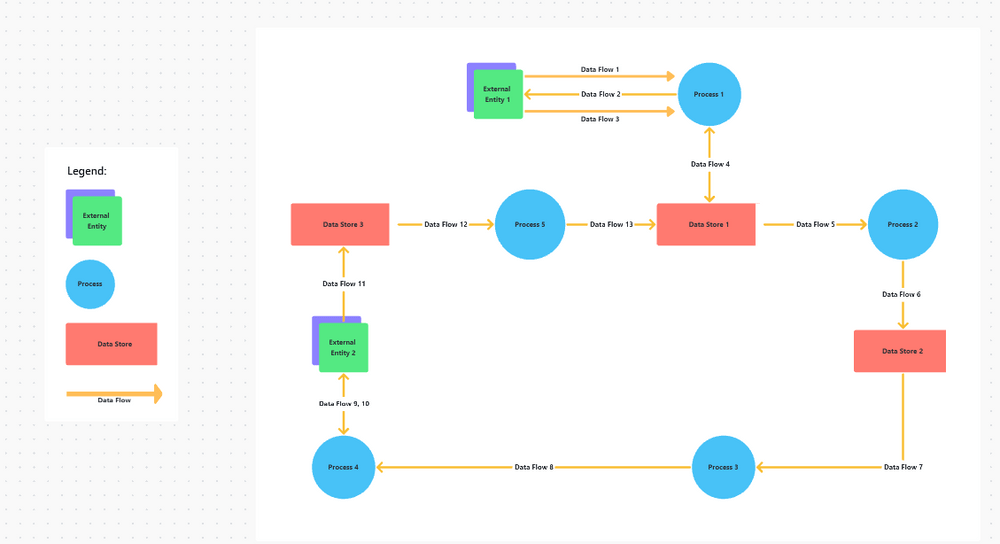
ClickUp Data Flow Diagram Template
Data flow diagrams visually depict how data moves within a business, from its initial input to the final output. ClickUp’s Data Flow Diagram Template simplifies this process by allowing users to map out data flow, identify data sources and destinations, and pinpoint potential bottlenecks or process issues. This tool is valuable for both designing new systems and troubleshooting existing ones, providing efficient and accurate data flow visualization.
If your team is looking for a comprehensive, integrated solution for project management and collaboration, you’re in luck.
ClickUp excels as a comprehensive project management tool, offering robust task management, collaboration features, and customizable workflows. While Miro shines in visual collaboration and brainstorming, ClickUp provides a broader range of features for planning, executing, and tracking projects from start to finish.
Experience the difference of seamlessly managing all aspects of your project lifecycle within a single platform. Your team will immediately benefit from and enjoy enhanced productivity, streamlined workflows, better support, and dream-like collaboration. Try ClickUp for free today!

© 2026 ClickUp

There’s an easier way. Try a free AI Agent in ClickUp that actually does the work for you—set up in minutes, save hours every week.