


Still downloading templates?
There’s an easier way. Try a free AI Agent in ClickUp that actually does the work for you—set up in minutes, save hours every week.
Sorry, there were no results found for “”
Sorry, there were no results found for “”
Sorry, there were no results found for “”

Ever come across an interesting article or detailed analysis you wish to share with your team later? You need the entire page, but taking multiple screenshots sounds like a nightmare.
We’ve good news! Ditch the painstaking effort and switch to scrolling screenshots, saving both time and effort by capturing everything in one go.
This post will show you how to make taking a full-page screenshot a breeze. Let’s get started.
🧠 Fun Fact: The first-ever ‘screenshot’ was captured in 1959 with a Polaroid camera. It wasn’t a webpage but a pin-up drawing displayed on a military-grade Cathode Ray screen worth €213 million!
1. How do you take a full-page scrolling screenshot in Chrome?
Use Chrome’s Developer Tools: open DevTools, access the Command Menu, search “screenshot,” and select Capture Full Size Screenshot to save the entire page as a single image.
2. Is there a one-click button for full-page screenshots in Chrome?
No—Chrome doesn’t offer a built-in one-button solution, so you must use DevTools or extensions for scrolling captures.
3. What are the limitations of Chrome’s scrolling screenshot feature?
Chrome struggles with very long pages, dynamic content, infinite scroll, complex layouts, and any site that blocks screenshots.
4. What’s a better alternative to capturing full-page content?
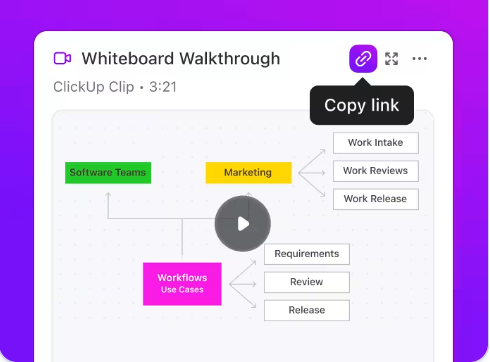
ClickUp Clips records your entire screen—including scrolling pages—without height limits and lets you annotate, narrate, and share recordings easily.
5. How does ClickUp enhance collaboration beyond screenshots?
With Clips, AI-powered transcripts, summaries, and integrated task sharing, teams can communicate asynchronously and keep all visual documentation in one workspace.
Screenshots are more than just a tool for sharing memes contextually or saving inspirational content. They can share detailed feedback or document vital information in professional or educational settings.
The market for advanced screenshot software is expanding rapidly, projecting a 9.3% CAGR from 2024 to 2031.
This is partly thanks to the surge in remote work and real-time digital collaboration globally. The ability to capture entire web pages or interfaces is critical for communication, record-keeping, and analysis.
📮ClickUp Insight: 50% of our survey respondents report Friday as their most productive day. This could be a phenomenon unique to modern work. Fridays tend to have fewer meetings, and this, combined with the context accumulated from the workweek, could mean fewer disruptions and more time for deep, focused work.
Want to retain Friday-level productivity all week long? Embrace async communication practices with ClickUp, the everything app for work! Record your screen with ClickUp Clips, get instant transcriptions through ClickUp Brain, or ask ClickUp’s AI Notetaker to step in and summarize meeting highlights for you!
Chrome doesn’t have a simple full-page screenshot button, but you can use Developer Tools to capture the entire page. You open DevTools, access the Command Menu, search for “screenshot,” choose Capture Full Size Screenshot, and Chrome scrolls and saves the page as a PNG in your downloads folder. This works well for many pages but still requires a few technical steps.
Unfortunately, Google Chrome has no button to capture full-page screenshots quickly. But don’t worry! There’s an easy way to capture scrolling screenshots in just a few steps.
👀 Did You Know: Google Chrome launched in 2008 but initially lacked a screenshot tool. In 2013, Chrome introduced DevTools, and by 2017 (Chrome 59), users could take a full-page screen capture directly from it.
Here’s a guide to using Chrome’s built-in Developer Tools to get the job done:
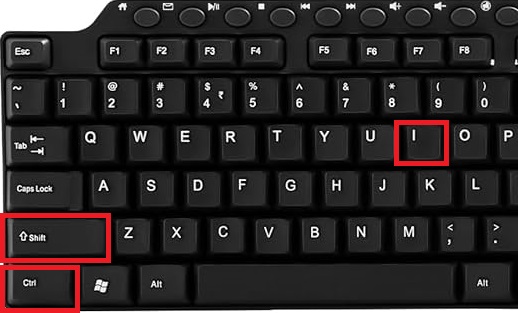
First, open the webpage you want to capture in Chrome. Press Ctrl + Shift + I (or Command + Shift + I on Mac) to open the Developer Tools interface.

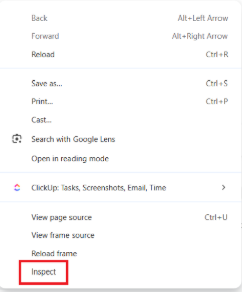
💡Pro tip: On some websites, like ChatGPT, pressing Ctrl + Shift + I might not open the Developer Tools. In such cases, right-click on any space on the webpage and select Inspect to open the Developer Tools interface.
With Developer Tools open, press Ctrl + Shift + P (or Cmd + Shift + P on Mac) to bring up the Command Menu. In this menu, you’ll see a prompt where you can search for the screenshot command.
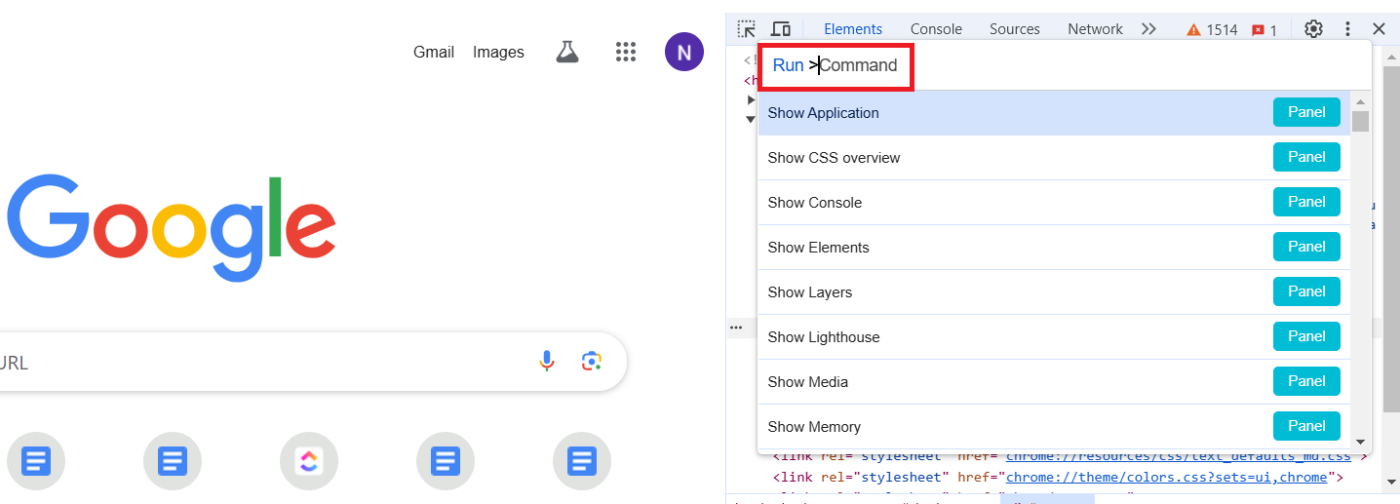
Open the Command Menu and type “screenshot” at the Run prompt to filter the available commands. Select the Capture Full Size Screenshot option from the list, then click the Screenshot button to capture the entire webpage.
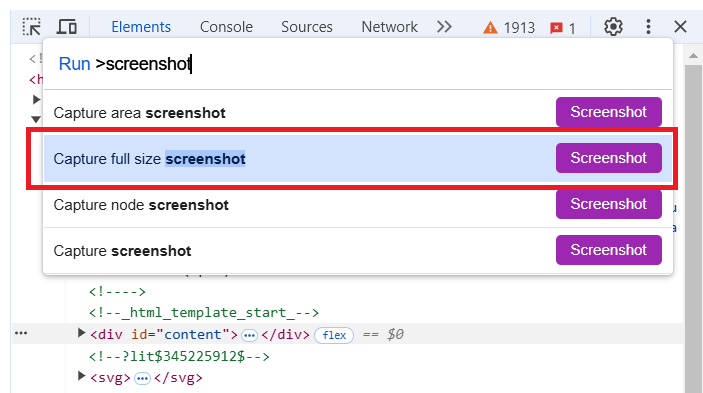
Chrome will automatically scroll through the webpage and capture it as a full-size screenshot. Wait a few moments for the image to be processed and saved.
Once the screen capture is complete, the screenshot will automatically download to your default downloads folder. You can find it there as a PNG file.
While scrolling screenshots in Chrome is a handy feature, it has some limitations. Here are a few to keep in mind.
These aren’t trivial limitations when capturing essential and time-sensitive information. Choosing an option like ClickUp can help you take more informative screen captures and do more with them.
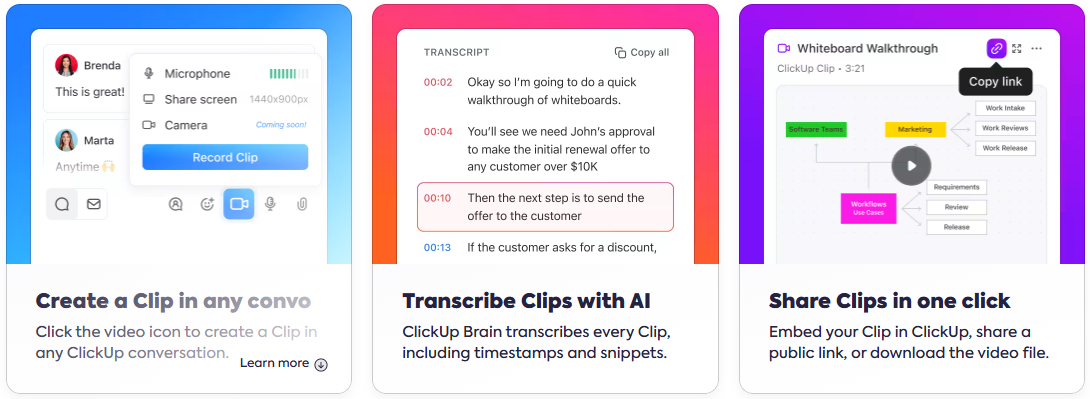
ClickUp Clips records your screen (including scrolling) as a video instead of a static image, so you can capture long pages, interactions, and workflows without worrying about height limits or layout issues. You can add narration and annotations, then share the Clip directly inside ClickUp alongside tasks, Docs, and Chat, keeping visual context tied to your work.
What’s ClickUp, you may ask? As the everything app for work, it combines project management, knowledge management, and chat—all powered by AI that helps you work faster and smarter.
Its screen-recording tool, ClickUp Clips is perfect for capturing the activity on your screen and enhancing it with voiceovers and annotations.
Clips also work with web page captures, offering a much-needed upgrade over traditional screenshot tools.
Unlike browser-based methods, which have limitations—like height restrictions, issues with dynamic content, or security blocks—Clips let you capture everything you need, including long, scrolling pages, without the hassle. How? Of course, through comprehensive video recordings.
Here’s what sets it apart and everything you can do with your content once it’s captured:
Unlike static screenshots, ClickUp Clips record your screen as a video. The tool captures dynamic elements like hover effects and JavaScript-loaded content with no issues. What you see is what you get.
Imagine recording an explainer video for your website or product. Static screenshots of your long page on a third-party app won’t have the same effect. Instead, a Clip can help you explain even the most intricate features and processes.
The result? You get to share lengthy web content without hitches (or glitches!).
Also Read: Best Snipping Tools for Video Recordings
Many Chrome extensions for screen recording struggle with complex page layouts or encounter limitations due to browser restrictions. ClickUp Clips operate independently, capturing everything on your screen regardless of webpage complexity.
By offering a comprehensive visual documentation tool, ClickUp empowers teams to overcome common issues like asynchronous loading. This ultimately fosters more transparent communication and improved project outcomes.
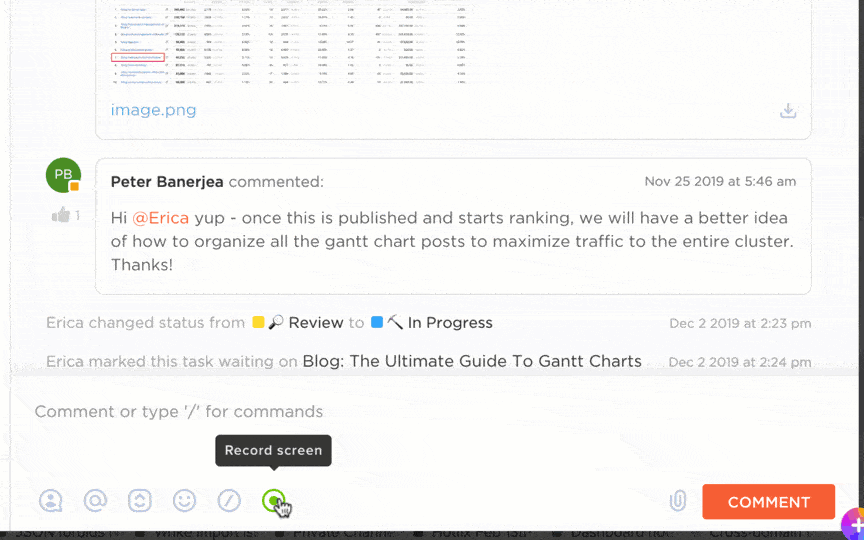
ClickUp Clips let you add voiceovers and annotations directly to your recording while capturing it, eliminating the need for separate video editing tools.
After completing a recording, you can also add comments to it and set the context for the viewers.
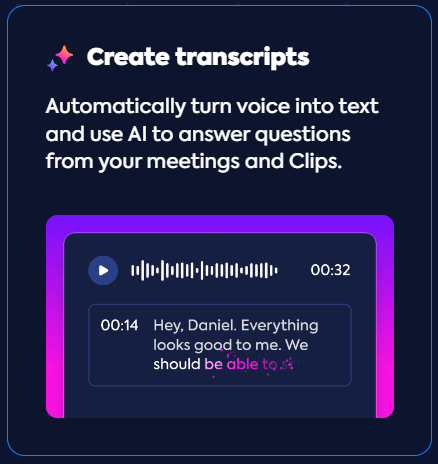
Why not do more with your recordings? With ClickUp Brain, you can automatically transcribe recordings quickly. This is particularly helpful for getting a gist of key messages from longer recordings or for team members who prefer written content.
Brain can also summarize these transcripts to save you time.
ClickUp’s AI features are designed to identify and automate various processes effectively. So, turning written content into actionable tasks and automating them or tracking status changes becomes super easy.
Also Read: Guide to Automations with ClickUp
Share Clips directly within ClickUp Tasks, Docs, and Chat. This facilitates better communication, reduces misunderstandings, and improves project collaboration among team members.
ClickUp’s centralized Clips management within the Clips Hub makes it easy for teams to organize and access their recordings, helping streamline workflows and boost productivity.
The ability to access and record Clips across various browsers, devices, and operating systems ensures you’ll never struggle to find the right video!
💡Pro tip: Want to extract information from your Clip transcripts? Simply ask ClickUp Brain to fetch it for you, using natural language prompts. This makes all your video knowledge instantly accessible to your team.
Now that you know why ClickUp is the better choice for capturing your screen recordings, let’s show you how it’s done!
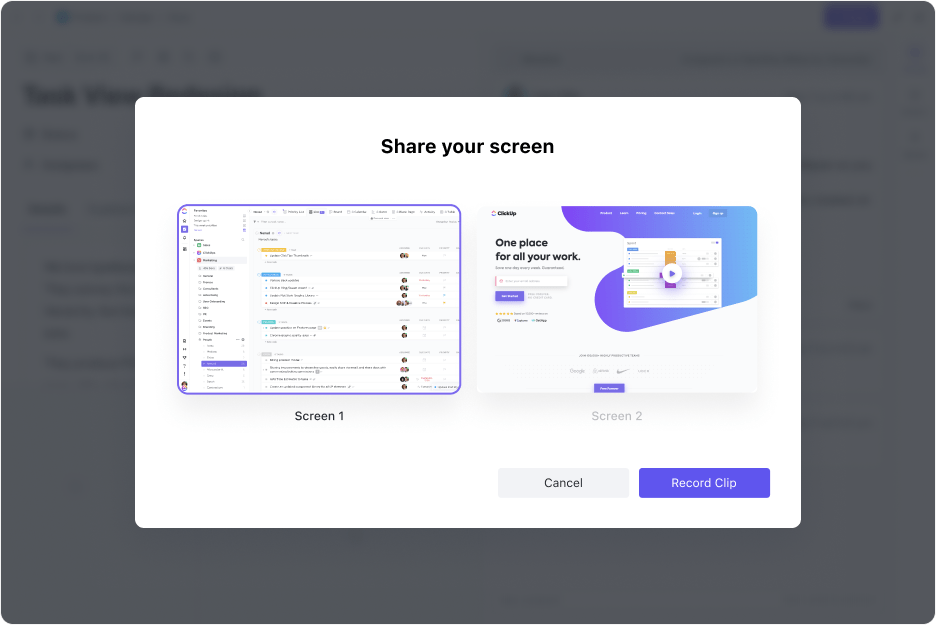
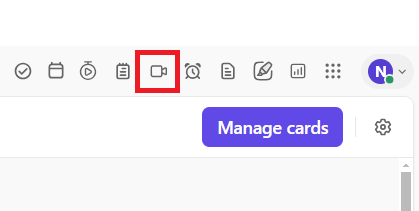
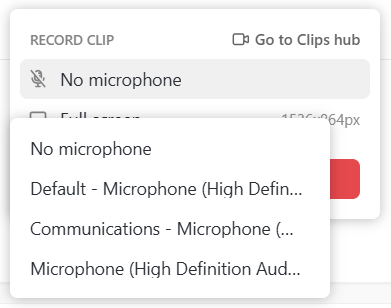
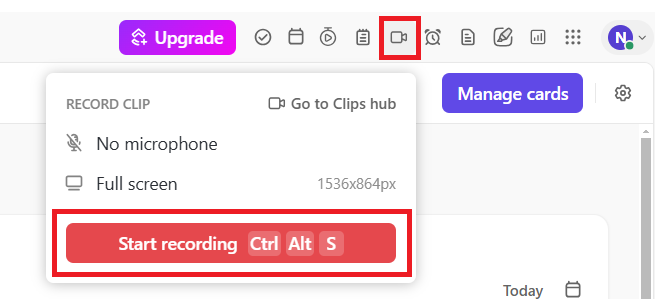
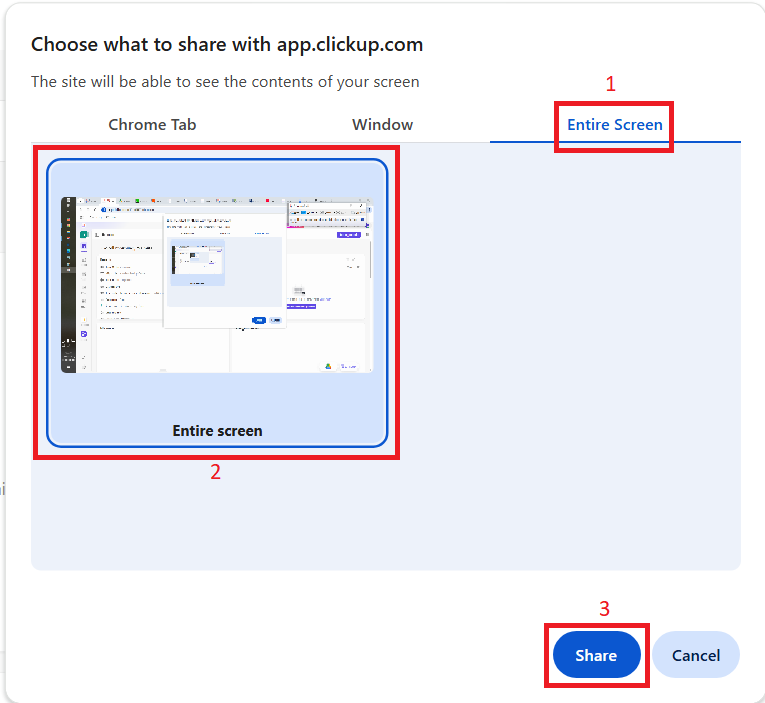
To record with ClickUp Clips, you sign in, click the record icon, choose your mic and what to capture (tab, window, or entire screen), then start recording and scroll or navigate as needed. When you stop, the Clip is automatically saved, and you can share or attach it to tasks, keeping all related context in one workspace. All recordings are stored in the Clips Hub for easy reuse and reference.
Before we walk you through the process step by step, check out this quick video guide to set up your ClickUp Clips faster.


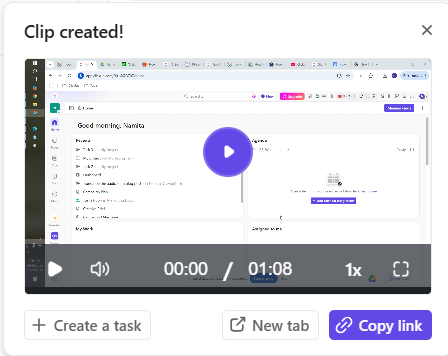
All your recorded Clips are stored in your Clips Hub, so you can easily access and manage them for better real-time collaboration.
💡Pro tip: During user testing, use ClickUp Clips to record your screen as you encounter a bug, talking through the issue as it happens. You can then assign the video to your developer as a ClickUp Task, making it easy to give clear, actionable feedback.
While Chrome’s built-in tools and extensions offer a starting point for capturing static screenshots, they cannot match what a screen recorder like ClickUp Clips does—provide a more collaborative approach to capturing scrolling content.
Also Read: Best AI Screen Recorders
While Chrome allows you to take scrolling screenshots with an extension or laborious workarounds, ClickUp offers a more efficient and integrated approach.
With ClickUp, you can capture full-page scrolling screenshots and annotate them. Add to it the power of AI to help you automate tasks and manage projects and visuals simultaneously.
In addition, you can collaborate with your team on tasks linked to these recordings without additional tools.
Convinced yet? Sign up for a ClickUp account today to rediscover convenience.

© 2026 ClickUp

There’s an easier way. Try a free AI Agent in ClickUp that actually does the work for you—set up in minutes, save hours every week.