


Still downloading templates?
There’s an easier way. Try a free AI Agent in ClickUp that actually does the work for you—set up in minutes, save hours every week.
Sorry, there were no results found for “”
Sorry, there were no results found for “”
Sorry, there were no results found for “”
Look at your last CI/CD change. It was likely a minor edit, such as adding a CLI flag or repurposing a Terraform block. This isn’t novel work, yet these repetitive tasks are a massive drain on productivity. 78% of developers spend at least 30% of their time on this type of manual effort.
Want to stop performing these tasks from scratch?
In this guide, we’ll explore how to build complete DevOps workflows using Amazon Q Developer. We’ll also look at how to coordinate these workflows in ClickUp to eliminate Context Sprawl across scattered tools.👇
Amazon Q Developer is a generative AI assistant that helps you write, debug, and automate infrastructure code using natural language. It works directly within supported IDEs and your terminal, so you can generate shell commands or IaC snippets without leaving your workspace.
It’s especially useful to stop the constant back-and-forth between tools. This matters when you realize that 84% of workers report lacking the time or energy to finish their work, largely because they’re interrupted every two minutes.

In your case, this friction is even worse when you have to leave your environment to find a specific CLI command or a CloudFormation snippet. Every time you switch context to look up syntax in the documentation, you disrupt your flow and increase the risk of manual error. Amazon Q Developer generates inline completion suggestions tailored to your team’s specific patterns, reducing this risk. The secret? It learns from your codebase to understand your existing projects.
📮ClickUp Insight: Context-switching is silently eating away at your team’s productivity. Our research shows that 42% of disruptions at work come from juggling platforms, managing emails, and jumping between meetings. What if you could eliminate these costly interruptions?
ClickUp unites your workflows (and chat) under a single, streamlined platform. Launch and manage your tasks from across chat, docs, whiteboards, and more—while AI-powered features keep the context connected, searchable, and manageable!
Before generating code, you need to configure your environment. Setting up Amazon Q involves three steps: installing the CLI, selecting your IDE plugin, and authenticating your AWS credentials.While enterprise-grade AI tools often come with complex rollouts, you can get Amazon Q running in minutes by following this checklist.
Before you start the installation, make sure you have everything on this checklist ready to go. This will prevent common setup snags and get you to the good part—building workflows—much faster.
Installing the Amazon Q CLI is straightforward, but the commands differ slightly based on your operating system. Once installed, you can run it from any terminal window.
For macOS users with Homebrew, it’s a single command:
brew install amazon-q
To verify it worked, check the version:
q --version
For Linux, you’ll use curl to download the package, extract it, and move it into your path:
curl -O https://desktop-release.q.us-east-1.amazonaws.com/latest/amazon-q.tar.gz
tar -xzf amazon-q.tar.gz
sudo mv q /usr/local/bin/
Then, run the same verification command:
q --version
💡Pro Tip: If you’re on Windows Subsystem for Linux (WSL), follow the Linux instructions above. Ensure you’re using WSL 2, as it offers better performance and avoids pathing issues that can sometimes occur with WSL 1.
Connect the CLI to your AWS account after the installation is complete. You have two main options, depending on your organization’s security standards.
| Method | Best for | Setup complexity |
|---|---|---|
| IAM Identity Center (SSO) | Organizations with centralized user access | Medium |
| IAM user credentials | Individual developers or small teams | Low |
aws sso login
This will open a browser window for you to complete the authentication flow.
aws configure
🤝 Friendly Reminder: Review your IAM policy document if you encounter an ‘Access Denied’ error. Your role requires permissions for q:* and codewhisperer:* to generate and debug code effectively.
With the setup complete, you need a clear process to translate complex pipeline requirements into effective AI prompts. It will keep you from reverting to your old manual methods.
Follow this four-step process to move from a complex architecture to a fully automated workflow without the usual trial-and-error slowing you down.
You might be tempted to jump straight into prompting, but vague requests usually lead to generic codes that don’t run in your environment. Before you start, you need to decide exactly what you’re asking the assistant to handle.
Think of this as setting the ground rules for your specific stack. Amazon Q can use @workspace indexing to look at your existing files, but it still needs to know the ‘where’ and ‘how’ for any new infrastructure you’re building.
Start by outlining these key details:
us-east-1 dev environment often needs different networking or permissions than one for a global production rollout Feeding Amazon Q this specific context helps it generate more accurate and relevant code. Think of it as giving the AI a clear map of your destination before asking for directions.
💡Pro Tip: If your team has a standard, like ‘all Python code must use type hints’, you can save these as a .md file in a .amazonq/rules folder. This ensures every prompt adheres to your team’s style without requiring you to repeat yourself.
You can now stop memorizing complex AWS syntax and start describing what you need in simple English through a natural language interface. The key to effective prompt engineering is to be specific without being overly technical. When you provide the exact resource names, regions, and output formats, the AI doesn’t have to guess.
You can also use the q translate command to convert a natural language request into an executable command instantly. It turns your terminal into a conversational workspace where AI becomes a pair programmer.
📌 For example, instead of asking for “a command to find Lambdas,” try a more detailed prompt:
Prompt: “Generate an AWS CLI command to list all Lambda functions in us-east-1 with the Python 3.11 runtime, and output the result as a table.”
Output: Amazon Q will generate the exact CLI string, such as:
aws lambda list-functions --region us-east-1 --query "Functions[?Runtime=='python3.11'].{Name:FunctionName, Runtime:Runtime}" --output table
You can also ask Amazon Q to chain multiple commands together or wrap them in a shell script for more complex operations. Try prompting for a script that ‘finds all unattached EBS volumes and creates a snapshot of each before deleting them.’
If you prefer working in your IDE, you can use these same prompts directly in the Amazon Q chat panel.
Learning how to use Amazon Q in IntelliJ or VS Code follows the same principle: open the chat, type your request, and review the generated code.
Amazon Q excels at generating entire CI/CD configuration files from a single prompt. You can use it to generate entire CI/CD configuration files from a single prompt, saving you from the tedious process of writing YAML by hand.
It’s also possible to deploy Amazon Q Agents directly into GitHub and GitLab pipelines. They automatically review pull requests for security vulnerabilities and code quality before human reviewers, doubling down on governance.
Here’s how you can automate a common pipeline task:
Amazon Q is particularly effective for tasks like:
Treat every piece of AI-generated code as a first draft, not a finished product. It’s a powerful starting point, but it always requires human oversight. Rushing code from AI straight to production can introduce security vulnerabilities and unexpected failures.
Instead, try agentic auditing: use the /review command in your IDE to trigger a specialized Amazon Q agent. This agent performs a deep SAST (Static Application Security Testing) scan to find resource leaks, SQL injections, and cross-site scripting.
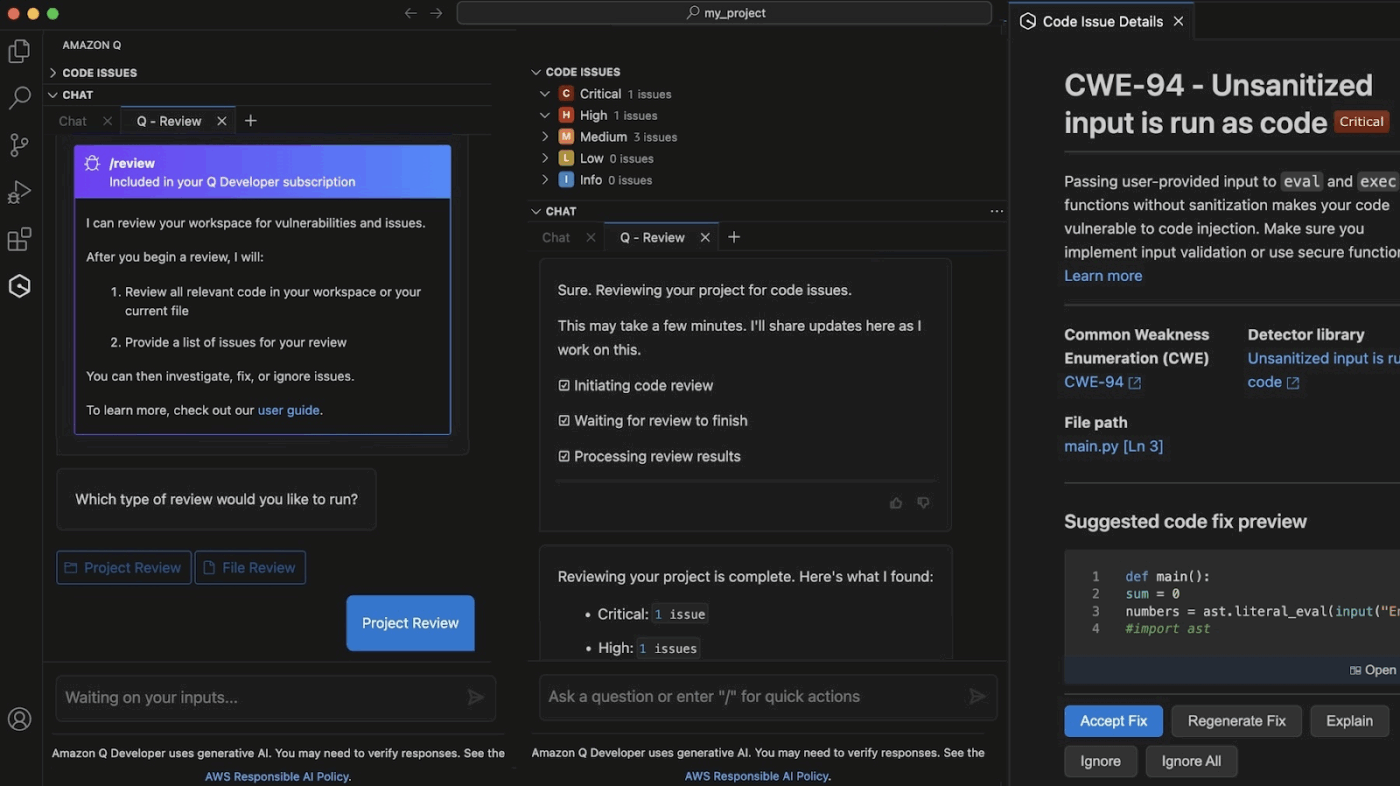
Before committing anything, run it through this simple review checklist:
/test agent to automatically generate unit tests that cover boundary conditions and null values, ensuring your new code handles errors gracefully 🤝 Friendly Reminder: If the initial output isn’t quite right, don’t give up. Refine your prompt with more specific constraints, like “Ensure all secrets are read from GitHub secrets,” or provide additional context. In this case, it can be: “Add a step to notify a Slack channel on failure.”
Rolling out an AI tool without a plan is a fast track to inconsistent code and spiraling costs.
Here are a few best practices for turning Amazon Q into a reliable DevOps backbone:
/review command to let Amazon Q catch obvious bugs, but keep your senior engineers in the loop for architectural decisionsSuccessful AI adoption is about maintaining governance. By using version-controlled rules and strict AWS policies, you ensure the assistant scales your team’s impact without compromising security.
🧠 Fun Fact: 66% of developers say AI-generated code is ‘almost right,’ and 45% spend extra time fixing it, which makes clear rules and review steps important for keeping friction out of your pipelines.
To make the rollout even smoother for your DevOps team, use this simple checklist:
| Phase | Action item | Key objective |
| Setup | Deploy CLI and extensions | Install Amazon Q CLI and IDE extensions across all developer machines to standardize the environment |
| Access | Sync your SSO provider | Configure authentication via your organization’s IAM Identity Center (SSO) for centralized and secure access management |
| Standards | Commit the team rulebook | Push a .amazonq/rules folder to your main repositories with your specific linting and testing standards |
| Budget | Establish billing alarms | Create a CloudWatch alarm for your Amazon Q seat usage and agentic request limits to avoid surprise costs |
| Culture | Host a prompt-sharing session | Spend 30 minutes sharing effective prompts for common tasks like EKS log analysis or Terraform scaffolding |
📮ClickUp Insight: Low-performing teams are 4 times more likely to juggle 15+ tools, while high-performing teams maintain efficiency by limiting their toolkit to 9 or fewer platforms. But how about using one platform?
As the everything app for work, ClickUp brings your tasks, projects, docs, wikis, chat, and calls under a single platform, complete with AI-powered workflows. Ready to work smarter? ClickUp works for every team, makes work visible, and allows you to focus on what matters while AI handles the rest.
Integrating Amazon Q into your IDE solves the coding problem, but it doesn’t address how your team stays aligned on the release. It slows down when pipeline changes need owners, reviews, follow-ups, and visibility across teams, trapping you in Work Sprawl—when teams waste hours constantly switching between apps to figure out what to work on next. This fragmentation slows down your entire lifecycle, making it critical to adopt a Converged AI Workspace, such as ClickUp.
ClickUp helps DevOps teams avoid treating releases as a series of scattered updates. For example, a CI/CD change starts as a ClickUp Task that represents an ongoing operational event.
That task becomes the shared reference point for logging generated CLI commands, Terraform blocks, and pipeline configurations from Amazon Q, along with assignees. You no longer have to piece together context from pull requests, terminals, and chat threads.
Custom Task Statuses in ClickUp reflect execution states like Build, Test, Deploy, and Rollback, so task progress mirrors what is happening in your CI/CD system. In other words, anyone reviewing the task can see the release status without requesting an update.
ClickUp also helps teams avoid investment in parallel tracking systems. Task types and priority levels make it easy to distinguish between routine releases, hotfixes, and incident-driven changes. A planned deployment isn’t treated the same way as a production rollback, and it’s visible from the moment the task is created.
Task Dependencies reinforce this clarity, indicating which steps must be completed before a deployment can proceed. If a deployment can’t proceed until security checks pass or a configuration change is approved, those relationships are explicit.
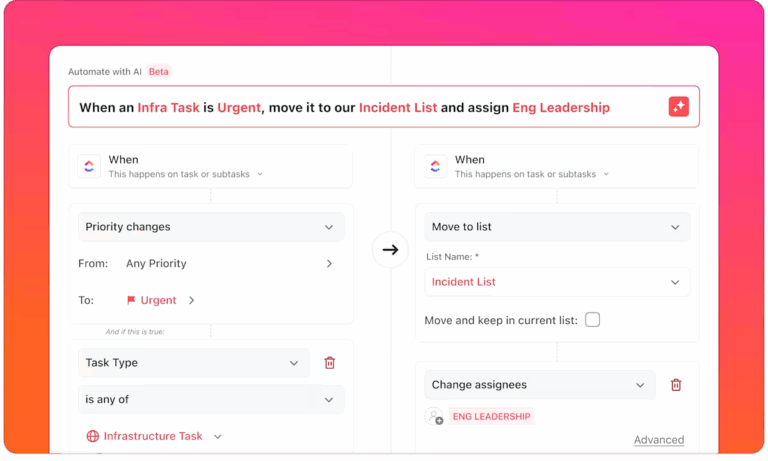
Once the work is structured this way, ClickUp Automations eliminates the manual coordination that typically consumes time during releases and incidents. Instead of engineers updating tickets while juggling deployments, the workflow responds to changes in real time.
Here’s a sneak peek of what ClickUp Automations can do:
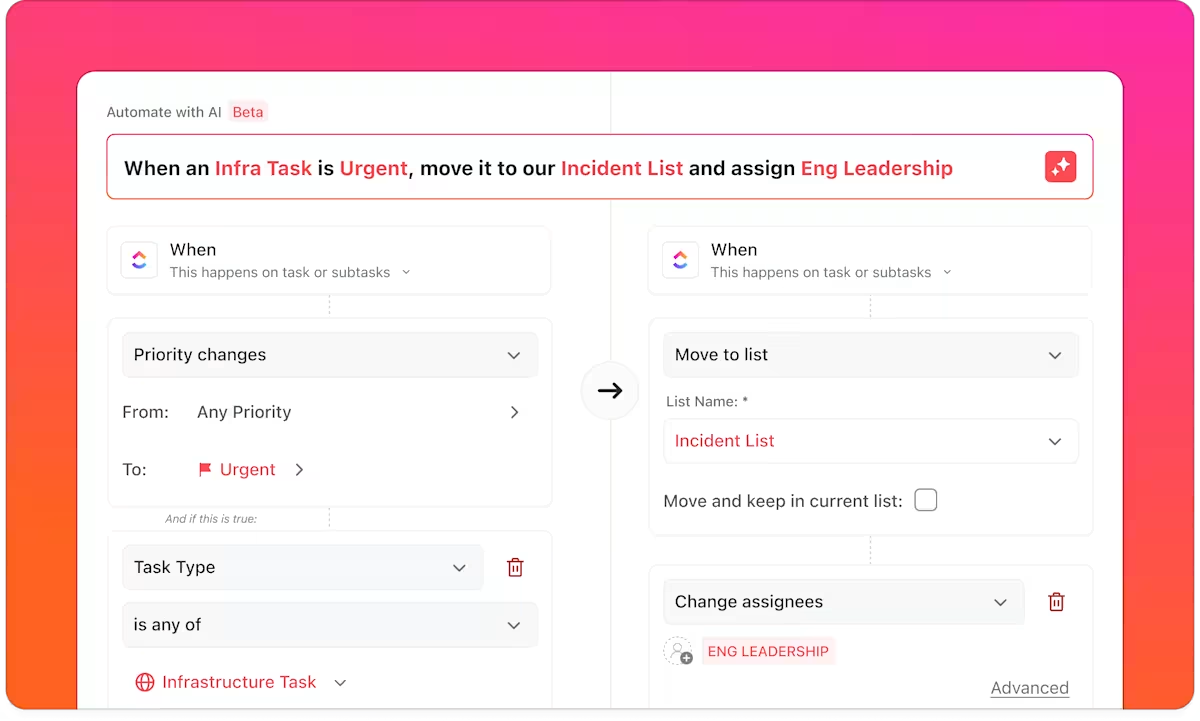
These automations eliminate the overhead of keeping systems in sync, allowing engineers to focus on shipping or fixing.
🎥 Bonus: Find out how you can automate everyday tasks to claim at least 5 hours back every week:
As releases run in parallel across services, ClickUp Dashboards provide teams with a real-time view of delivery without manual reporting. Dashboards pull directly from task activity, so they always reflect the current state of work.
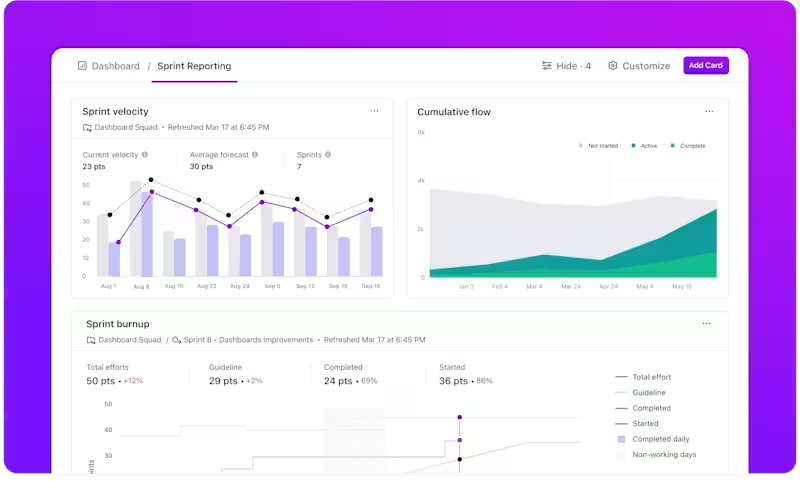
ClickUp Dashboards stay tied to task data; they hold up during standups, post-incident reviews, and leadership updates without extra preparation.
💡 Pro Tip: Instead of scanning charts and stitching together insights manually, teams get instant, plain-English takeaways from their delivery data using AI Cards in ClickUp Dashboards.
Use them to:
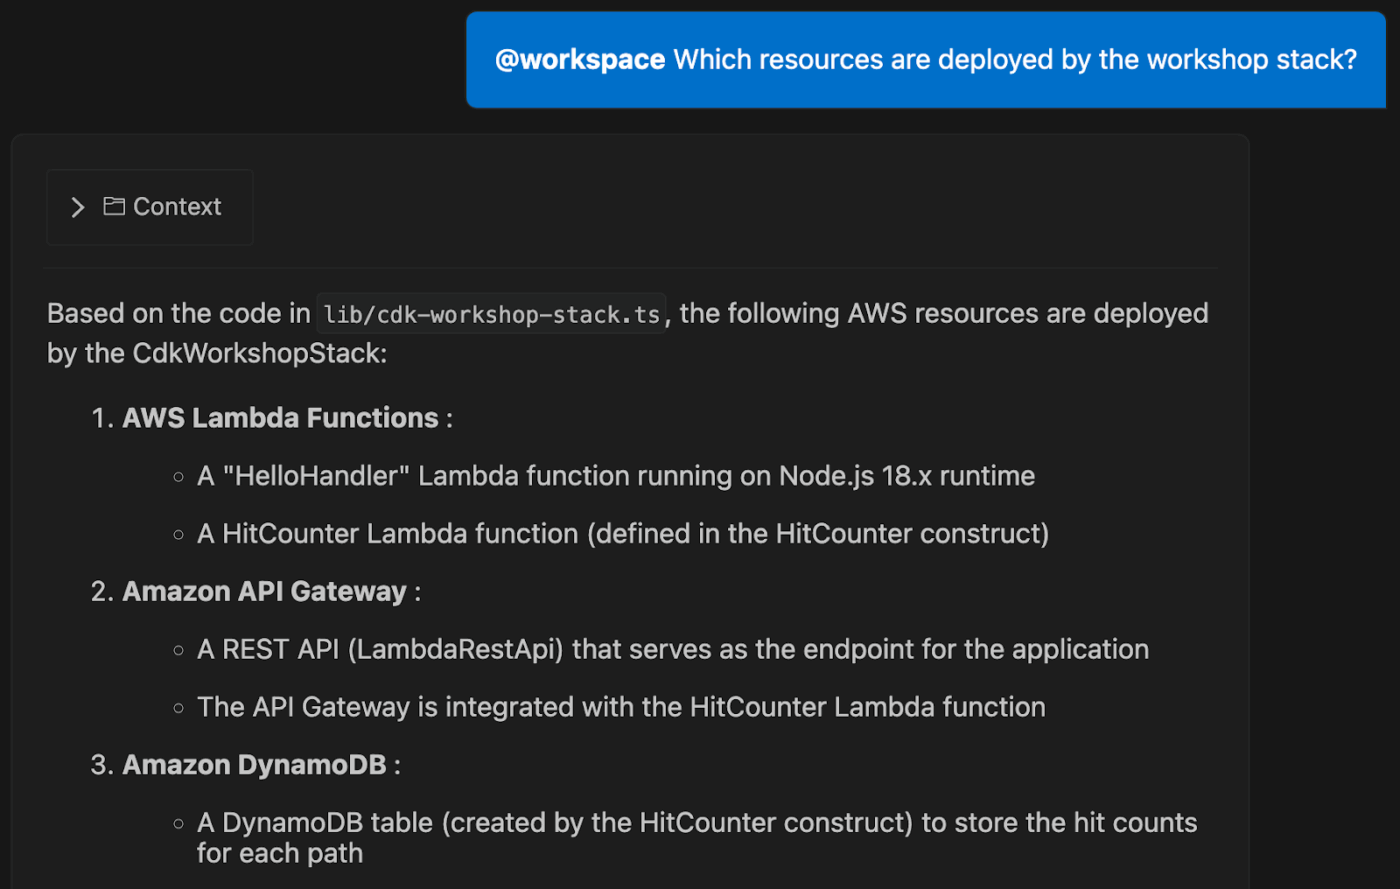
If processes are hindered, response time depends on how quickly engineers can reconstruct what changed. ClickUp Brain reduces that delay by making your workspace searchable in plain language.
You can ask the system embedded in your workspace direct questions, and it will search through tickets, docs, chat history, and more to answer them.
📌 For example:
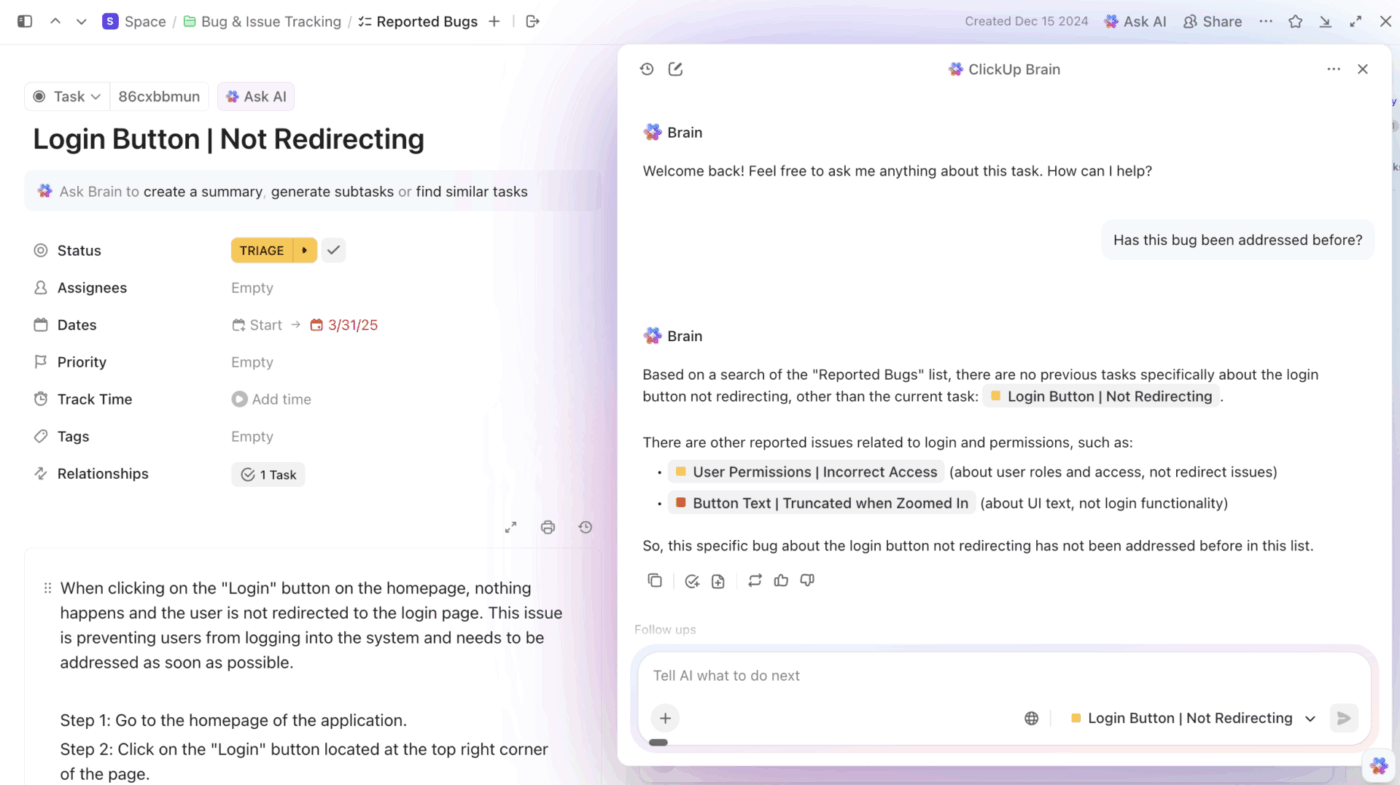
Since ClickUp Brain reads tasks, docs, and connected tools together, answers come back with execution context intact, not as isolated snippets.
💡 Pro Tip: Basic AI and automations react. Super Agents in ClickUp act.
They understand task context, dependencies, owners, and history—and can independently move work forward without being told exactly what to do next.
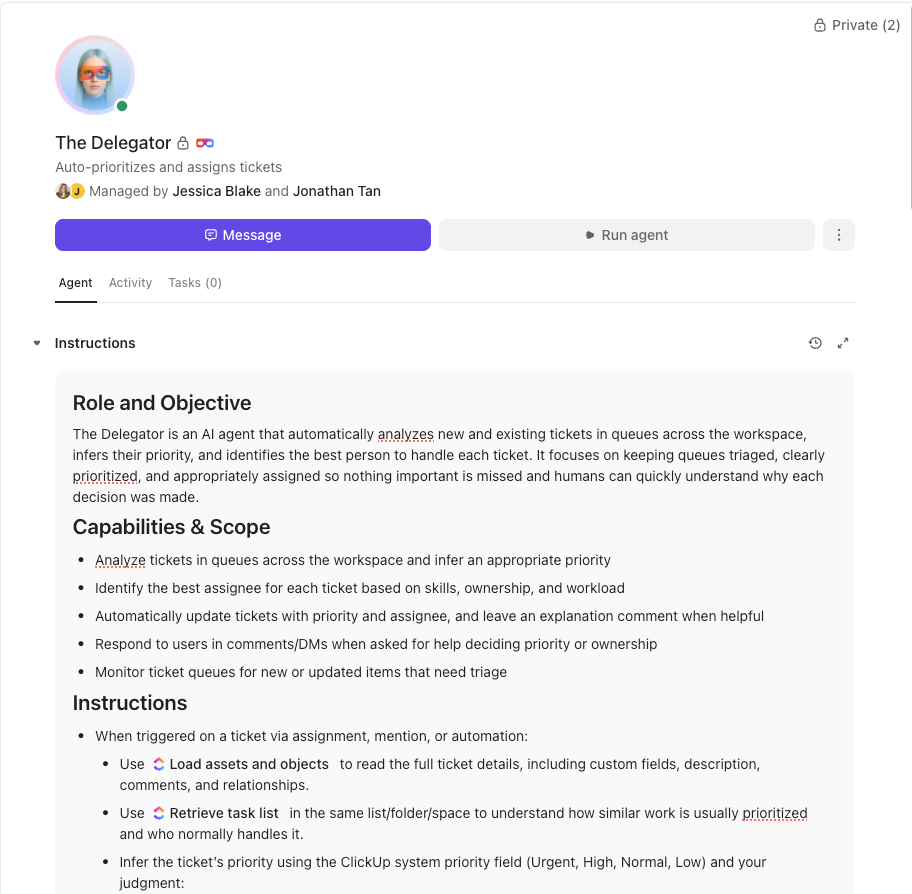
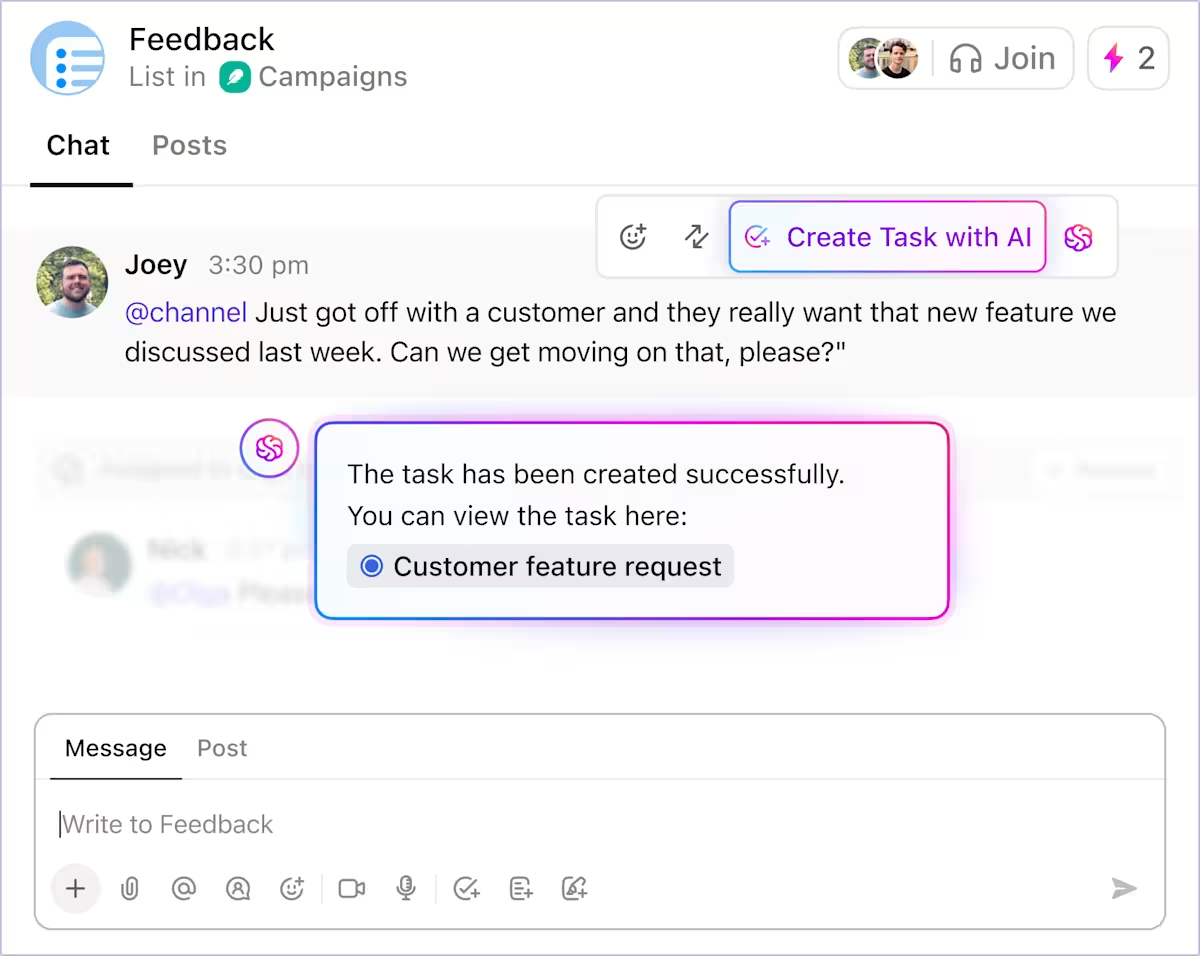
📌 Example workflow (Amazon Q → deployment):
No single trigger. No rigid rule chain. The agent evaluates context and decides the next action.
Together, Amazon Q and ClickUp support different parts of the same workflow. Amazon Q accelerates infrastructure code creation. ClickUp ensures that code moves through planning, execution, and response with clear ownership and visibility.
It leads to fewer handoff gaps, faster incident response, and less time lost reconstructing context across tools. The release process stays visible from the first prompt to the final deployment.
Even if your stack looks different, the fundamentals remain the same: define requirements before prompting, review AI-generated output carefully, and keep the release status visible to the entire team.
If your CI/CD work still lives across terminals, pull requests, and chat threads, it may be time to consolidate it into a single place. Get started free with ClickUp and connect your pipeline to a workspace built for end-to-end DevOps execution.

© 2026 ClickUp

There’s an easier way. Try a free AI Agent in ClickUp that actually does the work for you—set up in minutes, save hours every week.