How to Video Record Yourself Presenting a PowerPoint

How to Video Record Yourself Presenting a PowerPoint?

PowerPoint presentations are an effective means to communicate with your remote team members, pitch investors or clients, and share learning material with employees or students. 

However, a PowerPoint presentation can be boring, even after you add animations or images. 

One way to make them more engaging and personalized is to add videos. You can also demonstrate processes and explain complex concepts better through video presentations.

So, it’s time to move from traditional static decks, project presentations, or sales pitches and create interactive video presentations with PowerPoint or other video recording software.

This blog will walk you through the steps to record yourself while giving a PowerPoint presentation. 

Summarize this article with AI ClickUp Brain not only saves you precious time by instantly summarizing articles, it also leverages AI to connect your tasks, docs, people, and more, streamlining your workflow like never before.
ClickUp Brain
Avatar of person using AI Summarize this article for me please

How to Record Your Presentation in PowerPoint?

Before you start the recording process, ensure your presentation is polished and ready to go. Resolve any errors, formatting issues, or misplaced elements.

Now, let’s see how to video record yourself in a PowerPoint presentation.

1. Open PowerPoint

Launch the PowerPoint app and open the presentation you want to record.

2. Navigate to the ‘Record’ tab

Click on the ‘Record’ tab in the ribbon at the top of the screen to record a PowerPoint presentation.

powepoint_record_tab

3. Select ‘Record’ dropdown

In the ‘Record’ tab, click on the dropdown arrow.

4. Choose recording options:

You will see the following two options:

  • Start recording from the beginning: Choose this option to record a presentation from the beginning
  • Start recording from the current slide: Select this option to record the slide that you’re currently on

Click on the option that suits you and go to the recording section.

PowePoint Recording Options

5. Record your presentation

After selecting your preferred option, PowerPoint will direct you to the recording section. 

Go to the buttons on the lower-right corner of your screen to switch on the camera and microphone and add video narrations.

Once you are good to go, start recording. Select the ‘Record’ button to begin a three-second countdown, after which the screen recording will start.

PowerPoint recording button

Speak clearly and confidently as you navigate through your PowerPoint slides. You can also use the onscreen laser, colored pens, or highlighters in the tray below markup slides to explain ideas visually during the presentation.

PowerPoint Onscreen Laser

Navigate through the next or previous slides by clicking on the arrows appearing on the side of the slide.

PowerPoint Slide Arrows

6. Pause or stop recording

If you need to take a break, pause the video recording by simply clicking on the ‘Pause’ button in the recording toolbar. To stop recording the presentation altogether, click on ‘Stop’.

7. Review your recording

After recording, review your video presentation to ensure everything looks and sounds as intended. You should also play your video recording back to check for any errors or issues using the ‘replay’ button.

PowerPoint replay

8. Save your presentation

Once you’re satisfied with your presentation recording, save it to preserve your changes. Click on the ‘Export Video’ button to export the deck.

Using Slideshow timings and narrations

Let’s discuss Microsoft PowerPoint’s key features—the timings and narrations. 

  • Slideshow timing:  Set specific times for each slide while rehearsing, and the slides will automatically advance at the set time, ensuring your presentation flows smoothly. When recording, Microsoft PowerPoint slides automatically save these times, making it easier to synchronize your narration with your slides. Slideshow timing is for personal timekeeping to ensure that you can explain each slide.
  • Narrations: Adding narrations to your presentation can enhance engagement and understanding for your audience. You can record the presentation in your voice, providing context, explanations, and insights that complement your slides. Narrations are a more engaging way to provide information to your audience instead of blandly making them read all the PowerPoint slides.
Summarize this article with AI ClickUp Brain not only saves you precious time by instantly summarizing articles, it also leverages AI to connect your tasks, docs, people, and more, streamlining your workflow like never before.
ClickUp Brain
Avatar of person using AI Summarize this article for me please

Making Use of Advanced Features

With PowerPoint, you can easily integrate multimedia resources into your presentation to make your content more interesting and impactful. For example, you can embed a YouTube video in the presentation and play it live while recording.

Let’s see the advanced presentation recording features—writing, drawing, and annotating during the presentation

  1. Inking tools: Write or draw directly on your slides during a presentation by accessing inking tools in the ’Draw’ tab in the ribbon
  2. Pen and highlighter: Choose from different pen colors and thicknesses to emphasize critical points or underline important information
  3. Eraser: Correct mistakes or remove annotations quickly with the ‘Eraser’ tool
  4. Laser pointer: Use the laser pointer feature to draw attention to particular areas of your slide, guiding your audience’s focus and enhancing clarity

How to insert a YouTube video or other multimedia resources:

  1. Navigate to the slide: Select the slide where you want to insert the video or multimedia resource
  2. Insert tab: At the top of the screen, click the ‘Insert’ option in the ribbon.
  3. Video or audio: Depending on your multimedia resources, choose ‘Video’ or ‘Audio’ from the toolbar
  4. Inserting a YouTube video:
    • Select ‘Online Video’
    • A dialog box will pop up, prompting you to enter the URL of the YouTube video you want to insert
    • Paste the URL of the YouTube video and click ‘Insert’
    • PowerPoint will embed the video into your slide
  5. Inserting other multimedia resources:
    • If you have a video or audio file saved on your computer, choose ‘Video’ or ‘Audio’ and then select ‘Video on My PC’ or ‘Audio on My PC,’ respectively.
    • Navigate to the file location, select the video or audio file, and click ‘Insert’
  6. Adjust multimedia settings:
    • After inserting, you can resize and reposition the multimedia resource on your slide.  In the ‘Playback’ tab, you can customize the playback options to play the video or audio during your presentation

Tips for effective use of advanced features:

To effectively use advanced features in your PowerPoint presentation, remember to:

  • Practice: Familiarize yourself with the advanced features before the presentation to ensure smooth execution
  • Use sparingly: Avoid overusing advanced features as they may distract from your message
  • Test compatibility: Test multimedia resources to ensure they play seamlessly on the presentation computer before presenting
Summarize this article with AI ClickUp Brain not only saves you precious time by instantly summarizing articles, it also leverages AI to connect your tasks, docs, people, and more, streamlining your workflow like never before.
ClickUp Brain
Avatar of person using AI Summarize this article for me please

Tips for a Successful PowerPoint Presentation

Creating a successful PowerPoint presentation requires careful planning, preparation, and execution. Here are some tips to ensure your PowerPoint slides captivate your audience and effectively deliver your message:

Preparing your slides and talking points:

  • Keep it simple: Avoid cluttering slides by keeping minimal text. Use concise bullet points and visuals to convey the key ideas effectively
  • Ensure consistency: Maintain a uniform presentation theme by using consistent fonts, colors, and slide layouts
  • Focus on key points: Use slides as visual aids to highlight the main points and reinforce your message. The slides should complement your verbal presentation, not overshadow it.

Pro tip: Use the ClickUp Presentation Template to create effective PowerPoint presentations in less time. It helps you design the presentation outline to quickly arrange and format the slides. Moreover, the customized tasks, statuses, and views let you visualize the presentation and track the progress of each slide.

Easily organize presentation sections with ClickUp’s Presentations Template

Importance of rehearsal

  • Practice, practice, practice: Rehearse your presentation multiple times to become familiar with the content and flow. Keep notes handy for presentation and refer to them to maintain proper flow
  • Time yourself: Time your rehearsal to ensure your presentation fits the allotted time frame. Adjust your pacing as needed to avoid rushing or dragging out certain sections
  • Anticipate questions: Anticipate potential questions from your audience and add a short FAQ or summary towards the end for a quick recap of the essential details

Making the content engaging and effective

  • Tell a story: Structure your presentation like a narrative, with a clear beginning, middle, and end. Engage your audience by including examples and case studies in your presentation 
  • Use visuals wisely: Incorporate relevant infographics such as charts, graphs, images, and videos to enhance understanding and retention. Break text-heavy slides into different sections to explain complex information 
  • Inject energy: Maintain a lively and enthusiastic delivery throughout your presentation. Use formal hand gestures to keep your audience engaged and attentive
  • Know your audience:  Consider your audience’s knowledge level and interests to tailor your content and delivery style

These tips will help you create and deliver an informative, well-structured, engaging, and impactful PowerPoint presentation. Remember to stay confident, adaptable, and responsive to your audience’s needs throughout the presentation.

Summarize this article with AI ClickUp Brain not only saves you precious time by instantly summarizing articles, it also leverages AI to connect your tasks, docs, people, and more, streamlining your workflow like never before.
ClickUp Brain
Avatar of person using AI Summarize this article for me please

Limitations of Recording PowerPoint Presentations within PowerPoint

Recording a PowerPoint presentation is convenient and straightforward. However, there are certain limitations you should be aware of:

  • Limited editing capabilities: PowerPoint does not support advanced editing. So you will have to re-record the presentation if you need a lot of changes 
  • Inability to incorporate advanced multimedia features: PowerPoint supports basic multimedia insertion, such as videos and audio files. However, it’s challenging to add advanced multimedia features while recording
  • File size and compatibility issues: PowerPoint presentations have large file sizes, especially if they contain embedded multimedia elements. Sharing the presentation via email or other platforms is difficult because of file size limitations. You may also face compatibility issues while sharing recorded presentations with others with different PowerPoint versions or alternative presentation software
  • Limited customization options: PowerPoint offers limited control over video resolution, audio quality, and playback settings. It restricts the ability to tailor the recording to specific audience preferences or technical requirements
  • Limited interactivity: PowerPoint presentations offer limited interactive elements, which reduces the effectiveness of the presentation, especially for training or educational purposes
Summarize this article with AI ClickUp Brain not only saves you precious time by instantly summarizing articles, it also leverages AI to connect your tasks, docs, people, and more, streamlining your workflow like never before.
ClickUp Brain
Avatar of person using AI Summarize this article for me please

How to Video Record PowerPoint Presentations in ClickUp

Creating presentations on PowerPoint and then recording, editing, and sharing them takes a lot of time. 

Instead, you can use quick video and screen recording tools on platforms like ClickUp for effective communication. ClickUp is a versatile tool that enables seamless project management, collaboration, and documentation. With ClickUp Clips, you can instantly record and send a screen recording to give feedback, share ideas, or collaborate with your team. You can also convert Clips into tasks.

ClickUp Clips 
Communicate ideas and feedback effectively with ClickUp Clips

Go to ClickUp Brain to transcribe your Clips and find information from them.

ClickUp Brain
Use ClickUp Brain to transcribe your Clips automatically

Recording presentations in ClickUp

Here’s how you can record presentations on ClickUp:

  • Go to any task that you want to record
  • Head to the comment for which you want to record the video and click on the video icon
record presentations on ClickUp
  • Choose your mic from the given options to record audio
Choose your mic from the given options to record audio
  • Select the presentation tab that you want to record and start presenting
presentation tab that you want to record and start presenting
  • Once you are done recording, your clip is automatically added to the comment so you can send it to the team in one go.
  • You can download the video file for future use
download the recorded video

Record Clips anywhere on Clickup

You can also record Clips anywhere on Clickup by following the below steps:

1. Click on the global action tool of video recording on your ClickUp page

ClickUp global action tool of video recording

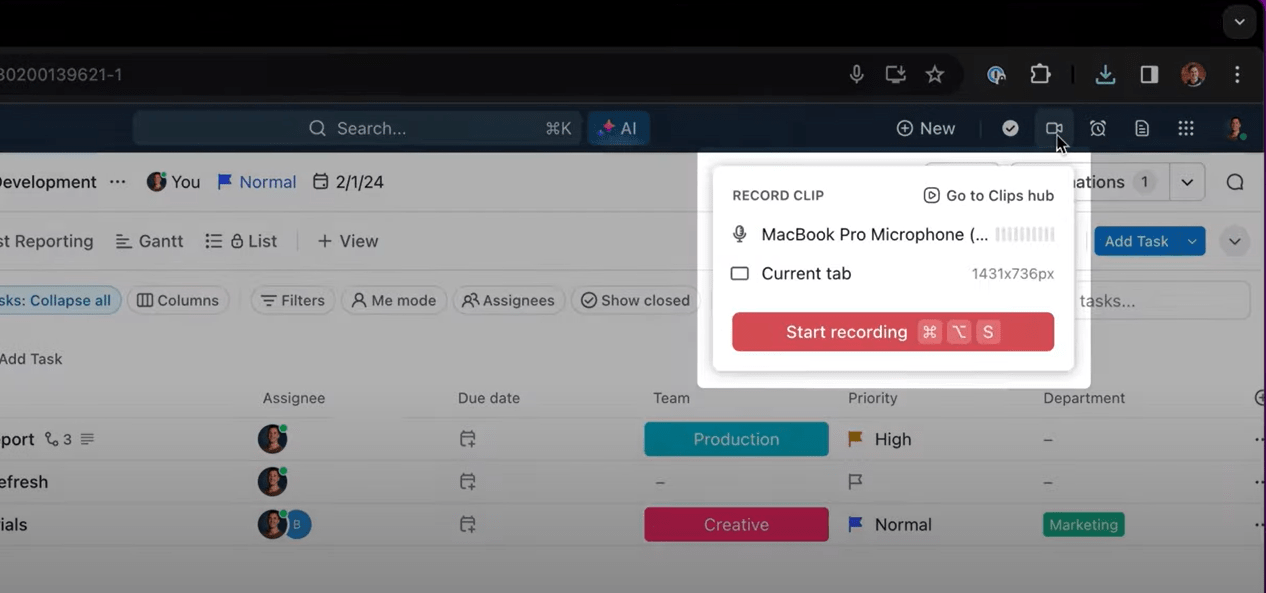
2. Once you have recorded a video, you can easily access it in your Clips Hub

ClickUp Clips Hub

Benefits of recording in ClickUp

  • Transparent communication: Streamline collaboration and share quick feedback with your team 
  • Efficiency and productivity: Eliminate the need for external meeting minutes software, saving time and eliminating endless comment threads 
  • AI-powered transcription: Send videos automatically transcribed using ClickUp Brain to provide clear context to the viewers and enable quick search
Summarize this article with AI ClickUp Brain not only saves you precious time by instantly summarizing articles, it also leverages AI to connect your tasks, docs, people, and more, streamlining your workflow like never before.
ClickUp Brain
Avatar of person using AI Summarize this article for me please

Level up Your Interactive Communication with ClickUp

Skip the traditional and boring ways of pitching your ideas and ensure interactive communication with modern tools like ClickUp. It also eliminates the need for multiple software to create, present, record, or take meeting minutes. Sign Up for free on CickUp to get an all-in-one app for all your presentation needs.

Questions? Comments? Visit our Help Center for support.

Sign up for FREE and start using ClickUp in seconds!
Please enter valid email address