


Still downloading templates?
There’s an easier way. Try a free AI Agent in ClickUp that actually does the work for you—set up in minutes, save hours every week.
Sorry, there were no results found for “”
Sorry, there were no results found for “”
Sorry, there were no results found for “”

Most teams treat SQL generation like a magic trick. You type a question and get a query.
But here’s the reality: Snowflake Cortex Analyst only works as well as the semantic model you build first, and that setup isn’t trivial. Learning how to use Snowflake Cortex for SQL generation, data teams can now transform natural language into complex, executable queries in seconds.
This guide walks you through the actual implementation process, from defining your YAML semantic model to querying your data warehouse using natural language, so you understand both the power and the prerequisites before you start.
We also look at where Snowflake Cortex falls short and how ClickUp can support the broader workflows that surround SQL generation.
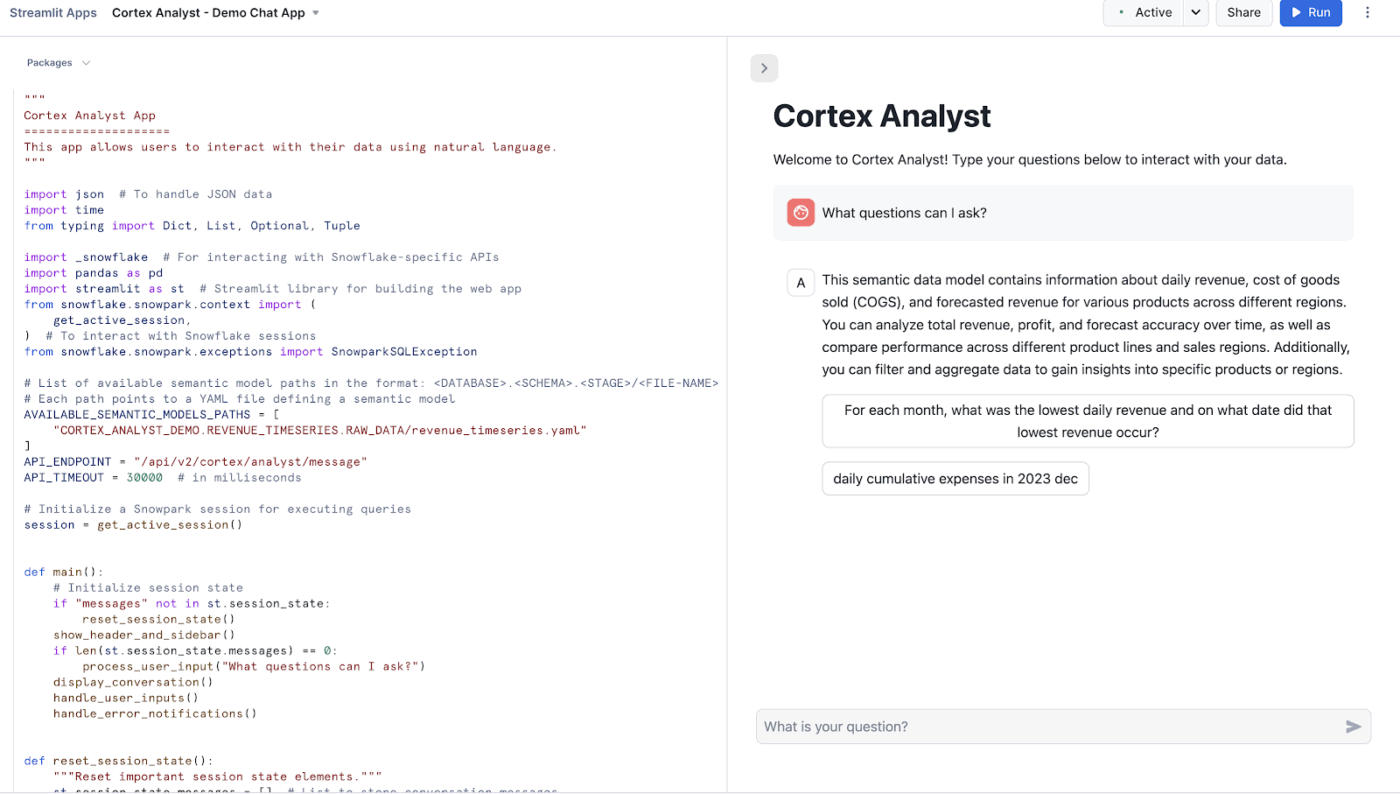
Snowflake Cortex Analyst is a fully managed service that allows you to build conversational applications over your analytical data.
It uses a specialized text-to-SQL agent to turn natural language questions into accurate, executable queries. This service bridges the gap between complex data structures and business users who need answers without writing code.
Key capabilities include:
📮 ClickUp Insight: 88% of our survey respondents use AI for their personal tasks, yet over 50% shy away from using it at work. The three main barriers? Lack of seamless integration, knowledge gaps, or security concerns.
But what if AI is built into your workspace and is already secure? ClickUp Brain, ClickUp’s built-in AI assistant, makes this a reality. It understands prompts in plain language, solving all three AI adoption concerns while connecting your chat, tasks, docs, and knowledge across the workspace.
Find answers and insights with a single click!
Jumping into Snowflake Cortex without the right setup leads to frustration. You might get inaccurate results, waste time troubleshooting, and wrongly conclude the tool is broken when the real issue is a weak foundation.
To avoid this, you need to get three foundational elements in place first.
Your AI is only as smart as the data it can access. If your database schema is a maze of cryptic column names like cust_dat_v2_final, both your analysts and the AI will struggle to make sense of it.
This confusion leads to the AI generating incorrect joins or pulling from the wrong columns, and your team wastes hours just trying to decipher the schema before they can even write a query.
Start by ensuring your data warehouse software contains the tables you want Cortex Analyst to query. Whenever possible, use clear, descriptive column names. For example, a column named customer_lifetime_value is far more intuitive for both humans and AI than clv_01.
To proceed with the setup, your Snowflake role will need the following permissions:
The biggest hurdle with any text-to-SQL tool is that the AI doesn’t speak your company’s unique language. It doesn’t inherently know that “ARR” means “Annual Recurring Revenue” or that your customers’ table joins to your orders table on the customer_id field.
Without this context, the AI might generate SQL that is technically valid but logically wrong, giving you answers that look correct but are dangerously misleading.
The semantic model is the solution. It’s a YAML file that acts as your custom “translation layer,” teaching Cortex Analyst the specific vocabulary and logic of your business. Building and maintaining this file is a collaborative effort between data engineers who use ETL tools to know the schema and business analysts who know the terminology.
Your semantic model file should contain these key components:
| Component | Purpose |
| Tables | Lists each table with a plain-language description of its purpose |
| Columns | Defines each column’s semantic type (like category or metric) and can include sample values |
| Relationships | Specifies how tables connect through joins, removing any guesswork for the AI |
| Verified Queries | Provides example question-and-SQL pairs that act as powerful guides for the LLM |
Sometimes, the answers you need are hidden in unstructured text, like product descriptions, support tickets, or call transcripts. Standard SQL queries can’t touch this data, which means you’re often missing the ‘why’ behind the ‘what.’
You can optionally add Snowflake Cortex Search Service here. It’s a search-as-a-service layer that allows you to query both your structured tables and your unstructured text data using AI agents for data analysis at the same time.
You should configure Cortex Search if your analysts need to ask questions that require pulling context from text before generating SQL. For example, you could first search for all product reviews containing the phrase ‘battery issue’ and then generate a SQL query to aggregate the sales data for only those products.
For pure SQL generation against structured tables, this service isn’t necessary.
🧠 Fun Fact: In the early 1970s, IBM researchers Donald Chamberlin and Raymond Boyce created ‘Structured English Query Language.’ They had to change the name to SQL because ‘SEQUEL’ was already trademarked by a British aircraft company.
You’ve done the prep work, but now you’re facing a blank screen, unsure of the actual workflow. How do you go from a question in your head to an executable SQL query? When workflow management isn’t clear, new tools often go unused, and the investment in setup is wasted.
The hands-on process is refreshingly straightforward. Here’s a closer look!
Before anything else, your structured data needs to live inside Snowflake. Each Cortex Analyst application is pointed at either a single table or a view composed of one or more tables. Make sure your tables are created and populated.
If you’re loading from flat files:
📖 Also Read: How to Use Snowflake Cortex for Enterprise Analytics
This is the most critical setup step. Cortex Analyst’s power comes from combining large language models (LLMs) with semantic models, a YAML file that sits alongside your database schema and encodes business context.
Semantic Views are now Snowflake’s recommended method for Cortex Analyst. They store business metrics, relationships, and definitions directly inside Snowflake. Legacy YAML semantic model files still work, but Snowflake directs new implementations toward Semantic Views.
Your semantic model or view should include:
🤝 Friendly Reminder: Snowflake suggests using no more than 10 tables and no more than 50 selected columns for optimal performance in the Snowsight workflow.
If you’re using a YAML-based semantic model, it needs to be staged so Cortex Analyst can reference it at runtime.
If you’re using a Semantic View, this step is handled natively within Snowflake, and no separate upload is needed.
🔍 Did You Know? NULL in SQL does not mean zero or empty. It represents unknown or missing data, which leads to unintuitive behavior like comparisons that return neither true nor false.
Now the actual SQL generation begins. The REST API generates a SQL query for a given question using a semantic model or semantic view provided in the request.
Structure your API request with:
You can have multi-turn conversations where you can ask follow-up questions that build upon previous queries.
Each message in a response can have multiple content blocks of different types. Three values that are currently supported for the type field are: text, suggestions, and SQL.
Here’s what each type means:
🔍 Did You Know? The order you write SQL is not the order it runs. Even though you write SELECT first, databases actually process FROM and WHERE before selecting columns. This confuses beginners and experienced users alike.
Once you have the SQL block from the response, run it against your Snowflake virtual warehouse. The generated SQL query is executed in your Snowflake virtual warehouse to generate the final output. Data stays within Snowflake’s governance boundary.
Key things to know at execution time:
Getting a perfect query on the first try isn’t always guaranteed. Here’s how to improve results over time:
🧠 Fun Fact: One missing JOIN condition can create massive problems. Forgetting a join condition can produce a Cartesian product, multiplying rows dramatically and sometimes crashing systems.
The quality of your semantic model directly determines the accuracy of the queries it generates. Here are the best practices that improve accuracy. 🛠️
Snowflake Cortex works well when teams want to generate SQL and run queries across structured data. Teams define schemas, map relationships, and write queries to extract insights. That setup makes sense for data-heavy environments, especially when analysts own reporting.
Many teams, however, don’t need a full SQL layer to answer everyday operational questions. Product managers, program leads, and operations teams often want quick answers tied to active work.
ClickUp offers a more accessible path. Teams ask questions in plain language, review live dashboards, and act on insights without writing SQL or building semantic models.
Snowflake Cortex focuses on generating SQL queries from structured datasets inside a warehouse environment. That works well when your data already lives in Snowflake, and you have schemas mapped out.
ClickUp Brain supports SQL generation in a more flexible, execution-focused way. Teams generate, refine, and store SQL queries directly inside their workspace where analysis, discussions, and decisions already happen.
Suppose a product analyst works on a retention analysis task inside ClickUp. Instead of switching tools to write queries, they ask ClickUp Brain:
📌 Try this prompt: Write a SQL query to calculate seven-day retention for users grouped by signup cohort.
ClickUp Brain generates a structured query that includes cohort grouping, date filters, and retention logic. The analyst pastes the query into Snowflake or another warehouse and runs it immediately.
It helps:
For example, during a growth experiment review, a marketer asks: ‘Write a SQL query to compare conversion rates between two landing pages over the last 14 days’.
ClickUp Brain generates the query using conditional aggregation and date filters. The team runs it in Snowflake and validates experiment results.
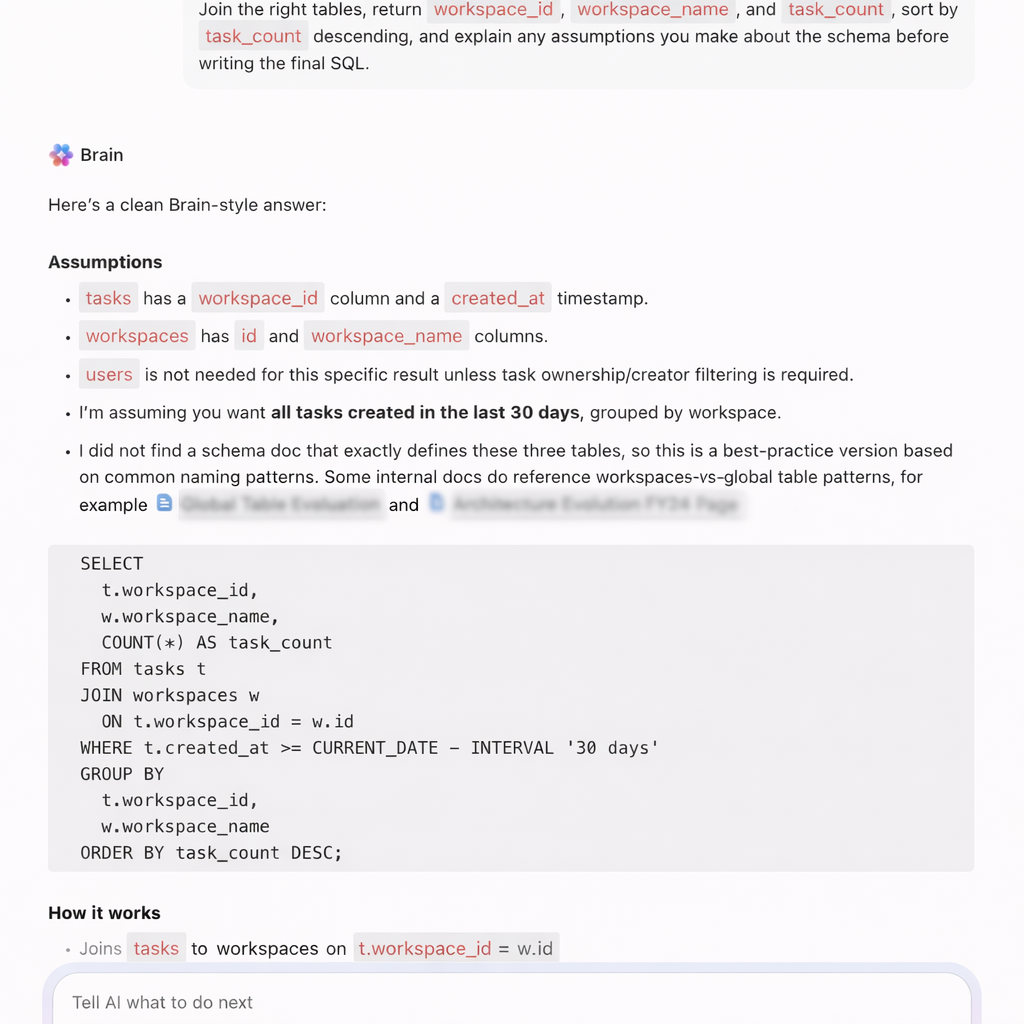
📌 Try this prompt: Fix this SQL query where the join duplicates rows and explain the issue.
ClickUp Brain identifies the join problem, corrects the query, and explains how duplicate rows occurred due to incorrect join conditions.
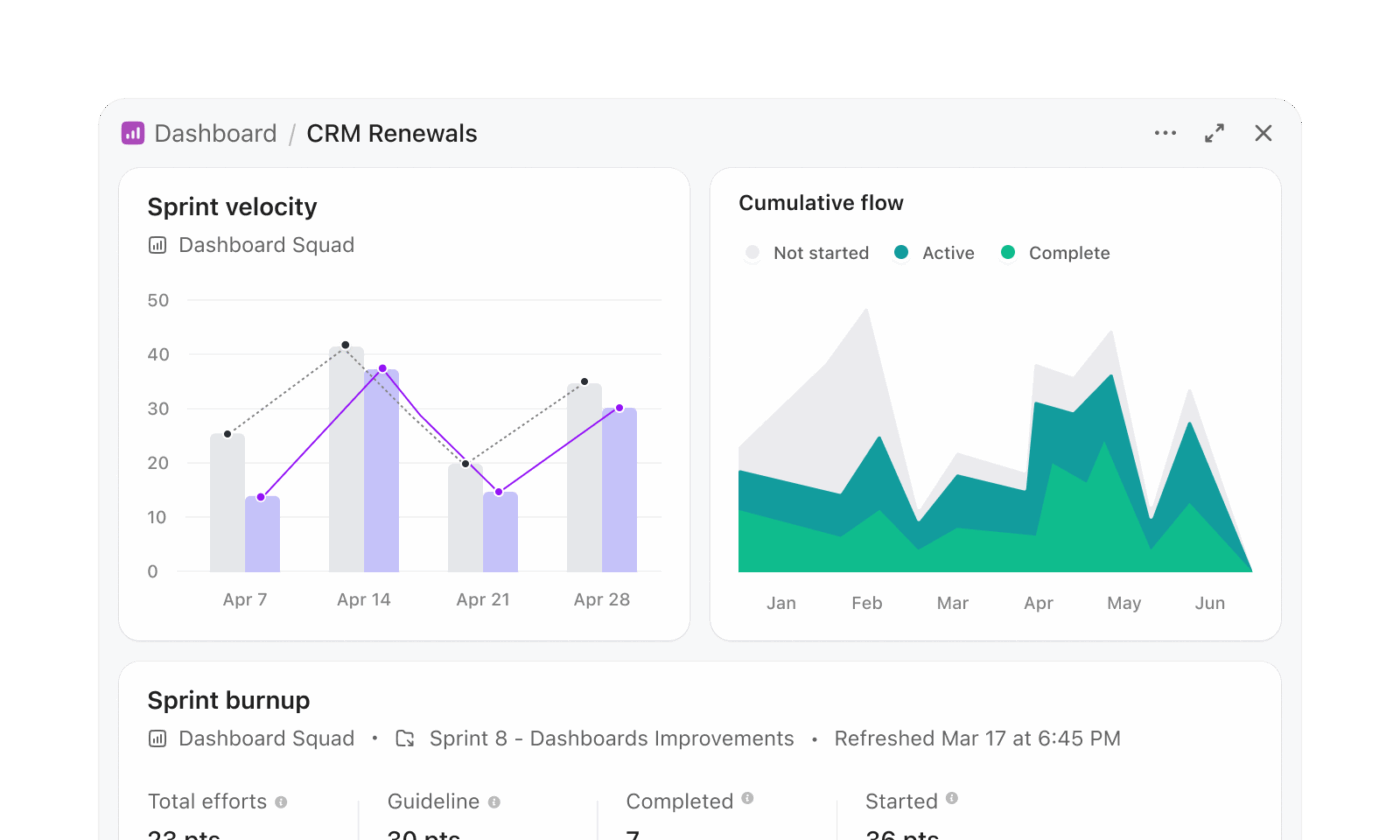
Snowflake Cortex workflows often involve generating SQL, running queries, and visualizing results in a separate layer. ClickUp Dashboards remove that multi-step process and present insights directly from live work.
A program management team tracking release readiness can build a dashboard without writing queries. For instance, a release dashboard may include:
Suppose a program lead reviews this dashboard before a release meeting. They immediately see that backend services show higher delay rates. They open the task list card and inspect the exact tasks causing risk.
A real-life ClickUp user shares:
ClickUp allows us to QUICKLY pass projects to each other, EASILY check the status of projects, and gives our supervisor a window into our workload at any time without her having to interrupt us. We have certainly saved one day per week using ClickUp, if not more. The number of emails is SIGNIFICANTLY reduced.
Snowflake Cortex focuses on generating insights from data. Teams still need to interpret results and trigger actions separately.
ClickUp AI Super Agents close that gap and turn insights into execution. They operate as AI teammates that monitor workspace data continuously and take action based on conditions.
Suppose a program manager oversees multiple product initiatives. A Super Agent can:
For example, during a release cycle, a Super Agent detects that more than 10 high-priority tasks missed deadlines across two teams. It creates a ClickUp Task titled ‘Release risk: missed deadlines’, attaches all relevant tasks, and assigns the program manager for immediate review.
Teams can also interact directly with the Super Agent: ‘Analyze all active projects and highlight delivery risks for this sprint’.
The Super Agent reviews deadlines, dependencies, and task status, then posts a structured summary inside the workspace.
Here’s how to set up your own Super Agent in ClickUp:
Text-to-SQL tools like Snowflake Cortex make data more accessible. At the same time, getting reliable results still takes effort.
Teams need clean schemas, strong semantic models, and continuous iteration to keep outputs accurate. Even after generating the right query, work doesn’t stop there. Someone still needs to interpret the results, share insights, and turn them into decisions.
ClickUp brings a different approach. Instead of separating analysis from execution, ClickUp connects both. Teams generate SQL, document insights, collaborate on findings, and act on them inside the same workspace.
ClickUp Brain helps write and refine queries, while Dashboards and AI Agents help teams track outcomes and move work forward without jumping across tools.
Snowflake Cortex helps you get answers. ClickUp helps you do something with them. Sign up for ClickUp today!
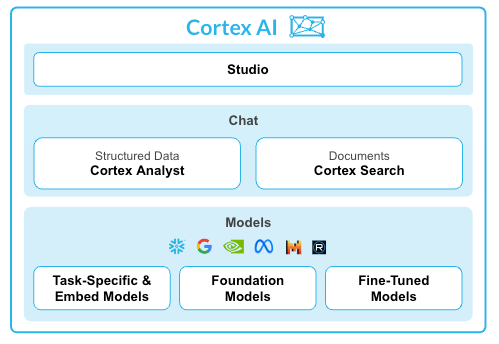
Snowflake Cortex Analyst is a specialized service within the broader Snowflake Cortex AI suite. Cortex Analyst is focused specifically on text-to-SQL generation using semantic models, while Cortex AI includes a wider range of LLM functions, machine learning model inference, and search capabilities.
Yes, Cortex Analyst can query Apache Iceberg tables that are managed through Snowflake. As long as the tables are accessible within your Snowflake environment and properly defined in your semantic model, you can generate queries against them.
The accuracy for complex queries depends almost entirely on the quality of your semantic model. A model with well-defined table relationships, numerous verified queries, and descriptive metadata will produce significantly more accurate results for multi-table joins and complex aggregations.
Snowflake Cortex Analyst pricing follows Snowflake’s consumption-based model, which means you are billed based on the compute credits used during the query generation process. For the most current rates, you should always refer to Snowflake’s official pricing documentation.

© 2026 ClickUp

There’s an easier way. Try a free AI Agent in ClickUp that actually does the work for you—set up in minutes, save hours every week.