


Still downloading templates?
There’s an easier way. Try a free AI Agent in ClickUp that actually does the work for you—set up in minutes, save hours every week.
Sorry, there were no results found for “”
Sorry, there were no results found for “”
Sorry, there were no results found for “”
AI assistants have become an inseparable part of our daily routine, from using home assistants for recipes to checking nearby restaurants on our smartphones.
In fact, over 8.4 billion AI assistants are projected to be in use as of now—which is almost more than the world population! 👀
Today, these assistants do much more than just answer questions. They help with content creation, workflow automation, and much more. But there’s a catch: publicly available chat assistants aren’t great for your specific requirements.
That’s why it’s more vital than ever to know how to make your own AI assistant. And we’re here to guide you!
At the end of this blog, you’ll not only know how to build your own chat assistant for your specific requirements, but we’ll also provide you with a smarter, easier alternative that eliminates all the guesswork!
An AI assistant is a computer program designed to automatically perform actions that would otherwise require human effort and intelligence. By using AI to automate tasks, you can spend your time on more complex projects.
These digital helpers understand queries in human language through the power of Natural Language Processing (NLP) and Machine Learning (ML). This helps them perform specific actions requested by you, the user.
While the capabilities of an AI Assistant depend on what it has been programmed to do, examples of some tasks they can do include:
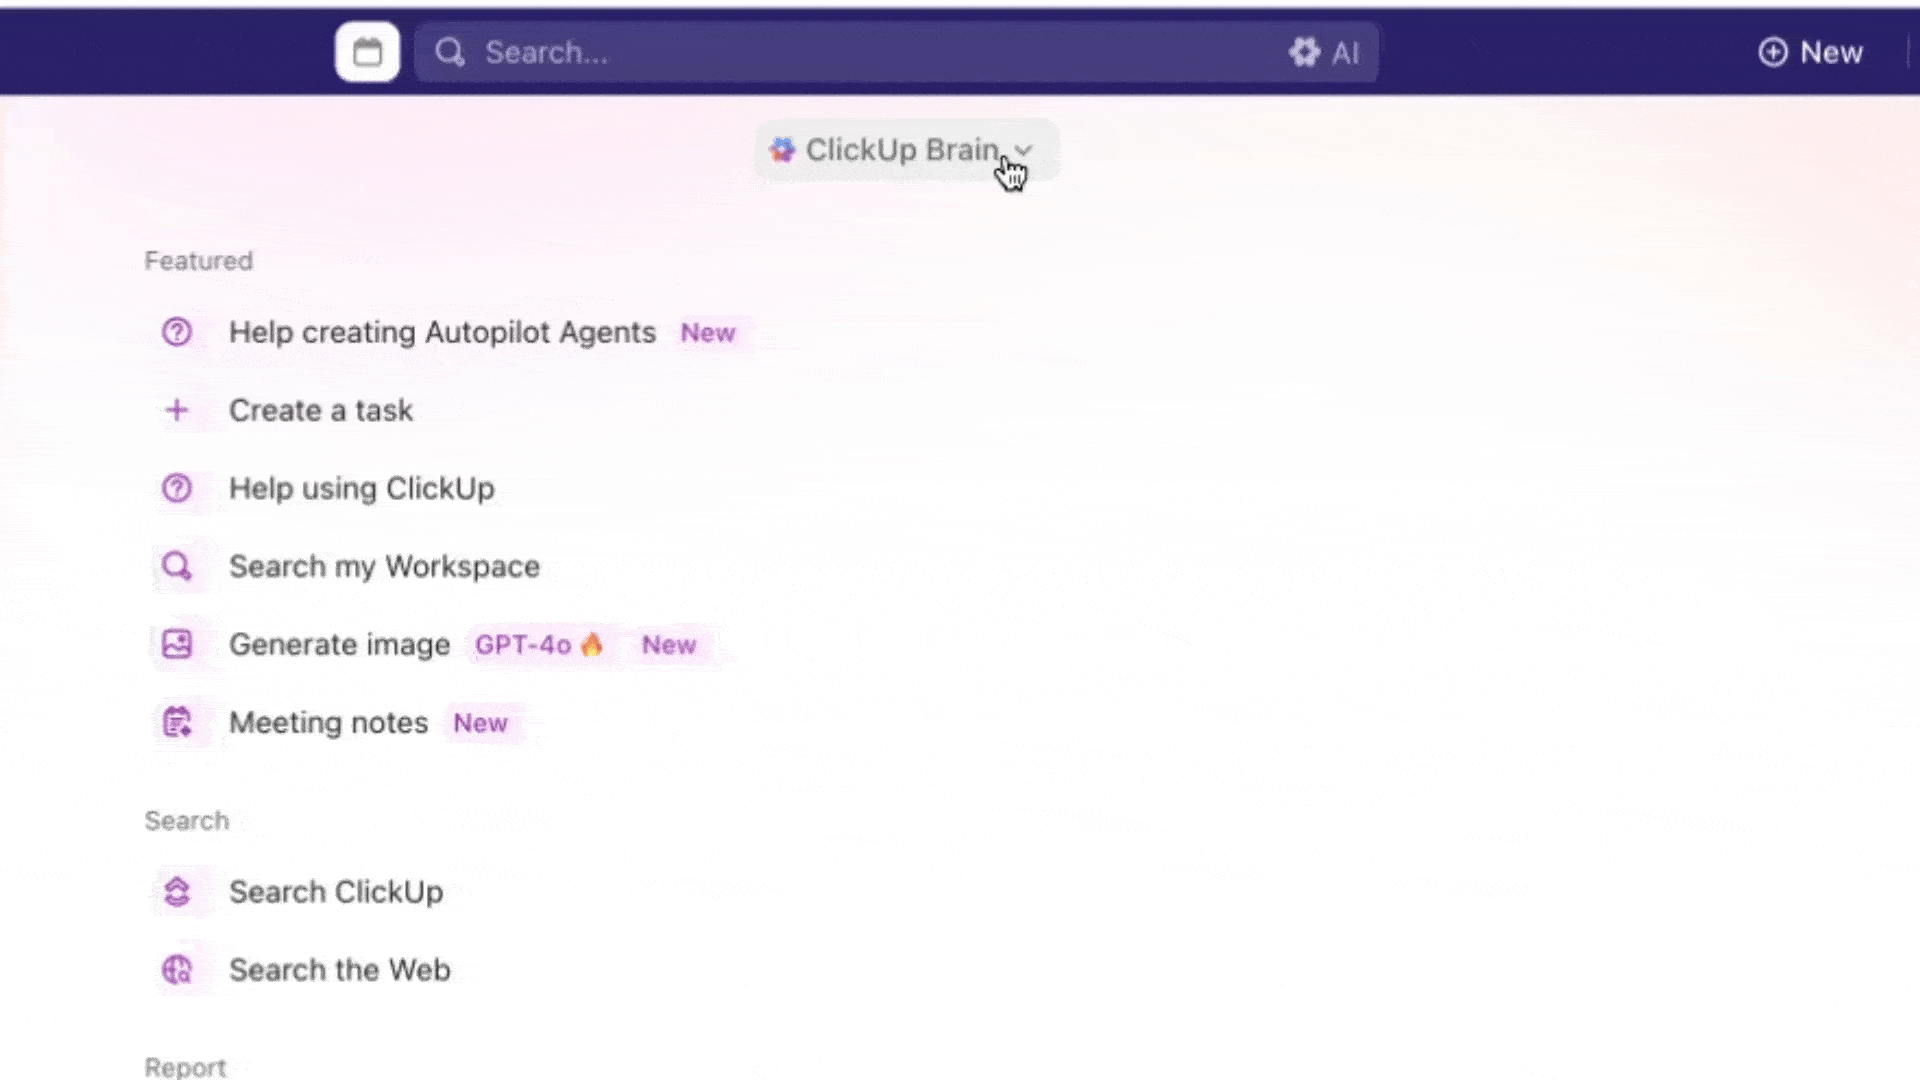
Examples of some popular AI virtual assistants include ClickUp Brain, Google Assistant, Siri, Alexa, and ChatGPT. See how Brain works in ClickUp for instance.👇🏼
While you can use personal AI assistants for a great number of things and integrate them using APIs, building an AI assistant offers four unique advantages.
Let’s look at the detailed steps involved in creating your own AI assistant.
The first thing you want to do is define the use case of your AI assistant—its capabilities and limitations.
If this planning isn’t done carefully, it’ll leave you with a build that can’t perform the intended tasks in a desired manner. Here are the things you must clearly define and note about your AI assistant before you start working on it:
Type of assistant
Are you building a personal AI assistant? Or an assistant that would be used for cases like customer support or business operations? While a general-purpose AI personal assistant has multiple capabilities that allow it to perform many kinds of actions, case-specific assistants require special training.
Target users and their skill set
Who are the target users of your AI assistant, and what is their skill set? Understand how familiar they are with AI apps, what kind of language they use to define a problem, and how they prefer to use a virtual assistant (i.e., by sending commands or using their voice as an app or on the web).
📮ClickUp Insight: 37% of workers send follow-up notes or meeting minutes to track action items, but 36% still rely on other, fragmented methods.
Without a unified system for capturing decisions, key insights you need may get buried in chats, emails, or spreadsheets. With ClickUp, you can instantly turn conversations into actionable tasks across all your tasks, chats, and docs—ensuring nothing falls through the cracks.
Problems to solve
Consider the AI assistant’s capabilities and what you want it to solve. For instance, a productivity assistant needs the ability to manage your calendar, email, and to-do list at a minimum. Or, you may also want it to summarize your meetings and write emails for you.
Limitations
Developers often set some limitations on the AI assistant to ensure that it doesn’t lead to any unfavorable outcomes. So, define those limits well in advance. For instance, how long should it save user data? What type of actions should it not perform? Define and document these and any other limitations you want in your assistant.
💡Pro Tip: While setting limitations, create a “Will Do / Won’t Do” list. For example:
✅ Will Do: Answer customer FAQs, provide order tracking info
❌ Won’t Do: Process payments, store sensitive user data
Once you have documented the capabilities and limitations of your AI assistant, you can think of the right technology stack to build it. This includes all the libraries and frameworks you’ll use to fast-track the development of your assistant and other infrastructure, such as:
💡Pro Tip: Choose a tech stack based on scalability and ease of integration.
✅ Avoid overengineering in the early stages
Now, you need to find the data to train your personal AI assistant. You can source this data from many places, such as third-party data sites, user-generated data sources, and your organization’s activity logs or customer data.
As far as data types are concerned, you’ll need three types of training data for your AI assistant:
💡Pro Tip: Regardless of the dataset you choose, make sure that it’s large enough to train an AI model. A good starting point is the 10x rule, which suggests having a dataset at least 10 times larger than the number of parameters in your model.
Once you have your data, it’s time to clean, label, and prepare it for training the assistant’s model. This is a crucial step because it will define how the model interprets your data, so don’t rush this step. Here’s how you’d perform each of them:
💡Pro Tip: Once you’ve cleaned and labeled your data, divide it into two datasets—one each for training and testing purposes. Keep 70% of the dataset for training and 30% for testing.
Your data is now ready, and your tech stack is in place. It’s time to start training your AI assistant. Install and launch the necessary tools in your hosting environment and feed them with your training dataset. Tweak training parameters like training rate and batch size, and start the training process.
The exact steps for this process vary depending on the NLP and ML libraries you choose, so refer to the manuals of your tech stack. To reduce errors, monitor the training process continuously.
💡Pro Tip: If the training speed is slow, adjust the learning speed and batch size parameters and restart the process. If you face any errors, refer to the troubleshooting tips of your libraries.
Once your AI assistant has been trained, test it on the testing dataset. Check the accuracy of its performance. At this stage, you may face two kinds of problems:
Retrain your AI assistant model with the solutions provided above to fine-tune its functionality. Once it starts generating accurate results with the testing dataset, move to the next step.
💡Pro Tip: Create scenarios that push the boundaries of your assistant’s capabilities, including long/short inputs, inputs in different languages, inputs with special characters or unusual formatting, and incomplete or ambiguous requests.
When your AI assistant starts to work as expected, you can shift the focus to its UI. Ultimately, a chat assistant’s personality is as good as its user experience (UX)—nobody wants to use one that looks and feels choppy. So, you must design a user-friendly UI for it. If you’ve never designed one yourself, hire a UX designer for the job!
Once the UI is designed, combine it with the Assistant and deploy it in your hosting environment to conduct your final testing and debugging.
💡Pro Tip: Add smart UI features, like auto-suggestions and quick replies, to speed up interactions with smart predictions.
It’s time to conduct your final testing on the AI assistant you built. Ensure that the UX, the assistant’s AI model, and all other elements are working as intended. Send the prompts to perform your desired tasks and see how accurate the outcomes are. Also, test the speech-based functionality.
To do this, invite some users from the assistant’s target user base to try it. See how they frame their queries and how well the assistant responds to them. If something is not working as intended, debug and fix it.
💡Pro Tip: Invite some users from the assistant’s target user base to try it. See how they frame their queries and how well the assistant responds to them. If something is not working as intended, debug and fix it.
Finally, you can make it accessible to the target users within or outside your organization. Monitor how well it performs in the real world and analyze user feedback. Based on the feedback, improve it as required.
💡Pro Tip: Help your AI assistant continuously improve by feeding it with new data. Add real-world interactions to improve accuracy and adjust language models to understand user intent better.
Here’s a step-by-step video tutorial on building your own AI agent with ClickUp. 👇🏼
Don’t want to start from scratch? Take your lead from the power players!
One popular approach is using OpenAI’s powerful language models.
You can access these models in a couple of ways: directly through their API (which requires an API key) or, more conveniently, using their Python library, which makes things much smoother. A key tip for any AI assistant is managing the conversation history. It’s like giving your assistant a good memory!
You’ll need to store past interactions, whether in your code for quick chats, a file for more involved conversations, or a database for complex projects. When you ask your AI something, include the relevant history in your “prompt” so it understands the context. If you’re using OpenAI, their Python library is your best friend, handling all the technical details of communicating with their servers.
Despite all the libraries, frameworks, and community support available, creating your own AI personal assistant isn’t easy. You’ll face challenges, including:
If you want to avoid the challenges involved with building your own AI assistant but still use one for your organization, there’s a hassle-free solution available already!
ClickUp—the everything app for work—comes with its own AI assistant, ClickUp Brain, which teams can use across a variety of use cases.
Thanks to its deep integration with ClickUp’s project management features, ClickUp Brain helps you find information, create content, and perform other project-specific actions with a simple text prompt.
Let’s explore what it is and how it can help you get more done at your workplace.
ClickUp Brain is your built-in AI assistant within ClickUp. Due to its deep integration into your workflows and any documentation available within the workspace, ClickUp Brain is always context-aware.
Whether you use it to draft a message to your colleagues about projects or while searching for a document, it always finds the right information from your ClickUp workspace.
ClickUp Brain allows you to use AI’s strengths without facing the challenge of building your own assistant. Here are four of its major benefits:
There are many ways you can use ClickUp Brain as your AI assistant of choice for your work. You can ask it about project and task statuses, and it will give you an up-to-date answer.

And you can also ask it to summarize documents, meetings, chat threads, transcribe recorded Clips, or any other bit of information you found elsewhere. ClickUp brain doesn’t skimp on important details!
It can help you:
💡Pro Tip: If you want to take it a step further, Brain MAX can help! As your AI desktop companion, it lets you communicate using voice commands, delivers 10x faster search, generates images, lets you access multiple LLMs via a single interface, and more! It’s the only agent you need!
Imagine having a digital teammate that handles repetitive work, answers questions, or keeps projects moving—all without you lifting a finger. That’s exactly what you get when you build your own Agents in ClickUp! Setting up an Agent is surprisingly simple, and you don’t need to write a single line of code.
Here’s how it works:
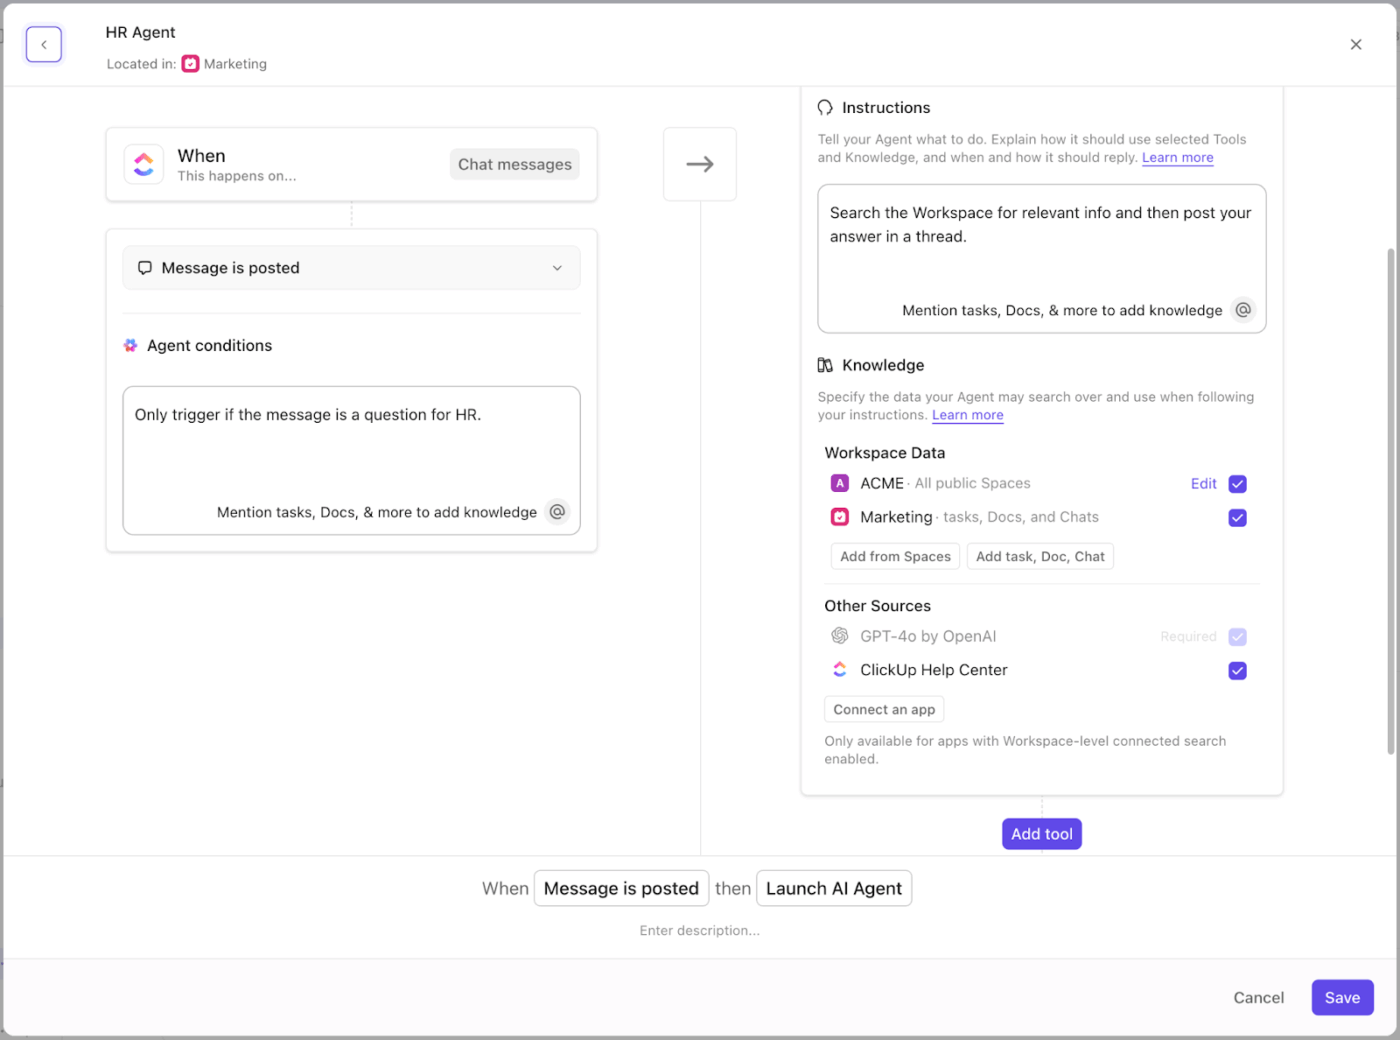
The best part? You can build as many Agents as you need, each tailored to your team’s unique processes. It’s like having a whole crew of digital helpers, ready to jump in whenever you need them.
AI isn’t just a buzzword anymore—it’s redefining how we work and live. It can create your emails, help you with research, and automate mundane tasks. So, if you want to beat the competition, integrating AI into your workflows is no longer optional!
And as we’ve shown here, building your own AI assistant is complex and costly. However, with ClickUp, you get a versatile, affordable solution through ClickUp Brain.
Its powerful features fetch project details, summarize chats, create mind maps, and so much more—all for your project management needs!
So what are you waiting for? Sign up to ClickUp, and experience the power of AI for yourself!

© 2026 ClickUp

There’s an easier way. Try a free AI Agent in ClickUp that actually does the work for you—set up in minutes, save hours every week.