

In today’s fast-paced technology environment, you may need more than a skilled development and operations team to create the software your customers will enjoy using. A successful software release entails quick problem-solving and continuous improvement both during product development and after the product hits the market.
This is why many businesses have turned to a DevOps workflow to simplify and speed up their software development process. In fact, the DevOps framework has become so popular that its market reached $10.9 billion in 2023 and is expected to grow to $63.4 billion by 2032.
But what makes this approach a favorite among Dev and Ops teams? In this article, you’ll learn all you need to know about DevOps workflow, its benefits, and its main phases. Plus, we’ll show you how to create a DevOps process using a powerful, user-friendly project management platform. 🛠
Adopting a DevOps Workflow: Phases and Best Practices
What Is a DevOps Workflow?
A DevOps workflow refers to a set of practices that help bridge the gap between software development (Dev) and IT operations (Ops). Its goal is to speed up system development and enable continuous delivery. These workflows are focused on process automation and support enhanced collaboration between IT and development teams, helping them achieve faster deployment.
A typical DevOps workflow comprises six phases with specific actions, goals, and expected results. Progressing through the workflow allows you to make adjustments in each phase and automate actions to decrease mistakes and increase efficiency. 📈
What are the benefits of a DevOps workflow?
The biggest advantage of a DevOps workflow is that it significantly shortens the system development process. Its other notable benefits include:
- More effective collaboration: The DevOps workflow tools facilitate communication between Dev and Ops teams throughout the development lifecycle. This results in faster problem-solving and higher-quality software
- Reduced costs: As a DevOps workflow is focused on automating tasks and improving efficiency, it can help lower the cost of software development and maintenance
- Improved product quality: One of the main components of a DevOps workflow is the continuous monitoring of every development phase, which ensures bugs are discovered and fixed on time
- Technical scalability: The constant monitoring and continuous development of a DevOps workflow provide more opportunities to upgrade your technology and keep your products updated
- Better customer experience: DevOps workflows entail continuous feedback, which lets you fix issues faster and keep the customers happy with the product 🤗
6 Phases of a DevOps Workflow
A DevOps workflow relies on agility and automation to quickly and efficiently close the loop between development and operations. Doing so entails phases like integration, testing, monitoring, feedback, and deployment for successful product development. Let’s explore each of these phases in more detail.
Continuous development
The continuous development phase is reserved for planning and building a product by outlining a vision and letting the development teams turn it into reality.
The developers work in short development cycles, which allows them to adjust the product according to evolving requirements and user input. They usually use a version control system like GitHub for coding in this stage.
The role of the operation teams in this phase is to monitor changes and return to previous versions of the product with version control if necessary.
Continuous integration
The continuous integration phase is all about finding and fixing bugs to increase code reliability. The developers modify the code and incorporate these changes into a central repository so the updates are accessible to everyone and are ready to be automatically tested.
Continuous integration prevents development delays by letting multiple developers work on the same source code instead of waiting to integrate different code sections on release day. This speeds up the development process and makes the code more secure and dependable. 🔐
Continuous testing
In the continuous testing phase, the code is automatically tested using open-source tools. This way, testers and developers are instantly notified of any bugs and errors. This automated testing process aims to confirm that the source code adheres to software requirements.
If any bugs are found, the product goes back to the development stage so that the issues can be fixed.
Continuous monitoring and feedback
In this stage, you monitor your product performance, collect data, and analyze it to see if there’s room for improvement. You also observe the software’s infrastructure and user activity to see if the customers are satisfied with the product.
Like testing, this process should be automated to provide continuous feedback you can evaluate and leverage to make necessary changes. This ensures your future product releases are more reliable.
Continuous delivery
The continuous delivery phase is about automatically building and testing the changes in the source code so it’s ready for release into any production environment. The release process is also automated, as this stage aims to deliver fast and sustainable software updates.
Continuous deployment
The continuous deployment process eliminates the need for scheduled release days—every product change is automatically released to users. This means developers receive user feedback quickly, allowing them to address issues and provide faster and more accurate solutions. 👌
How to Create a DevOps Workflow: 7 Steps
Building a DevOps workflow from scratch may seem like a hassle due to the many continuous operations you need to monitor. However, with a powerful project management platform like ClickUp, implementing a DevOps workflow is easier than ever!
ClickUp offers user-friendly tools to help you plan, organize, and track tasks within a single platform. It also encourages cross-functional collaboration so your teams can work more efficiently.
Let’s see how to create a DevOps workflow step-by-step and use ClickUp’s project management and software development features to make this journey smooth sailing. ⛵
Step 1: Define your goals and objectives
To implement a functional DevOps workflow, consider your current DevOps strategy and identify any problems you’ve encountered and want to improve. Typical issues may be related to frequent software errors, the lack of collaboration between Dev and Ops teams, or the workflow roles not being clearly defined.
Once you’ve identified the main problems, it’s time to determine the goals you wish to achieve with your new DevOps workflow. Ask yourself if you:
- Need a faster release schedule
- Want to automate certain operations
- Have DevOps tools that need replacing
- Wish to upgrade your infrastructure more often
Answering these questions will help you decide which tools and techniques should be a part of your revamped DevOps workflow. Keep these goals in one place and track their progress regularly—this will help ensure you’re on track and aren’t repeating old mistakes. 🙅♀️
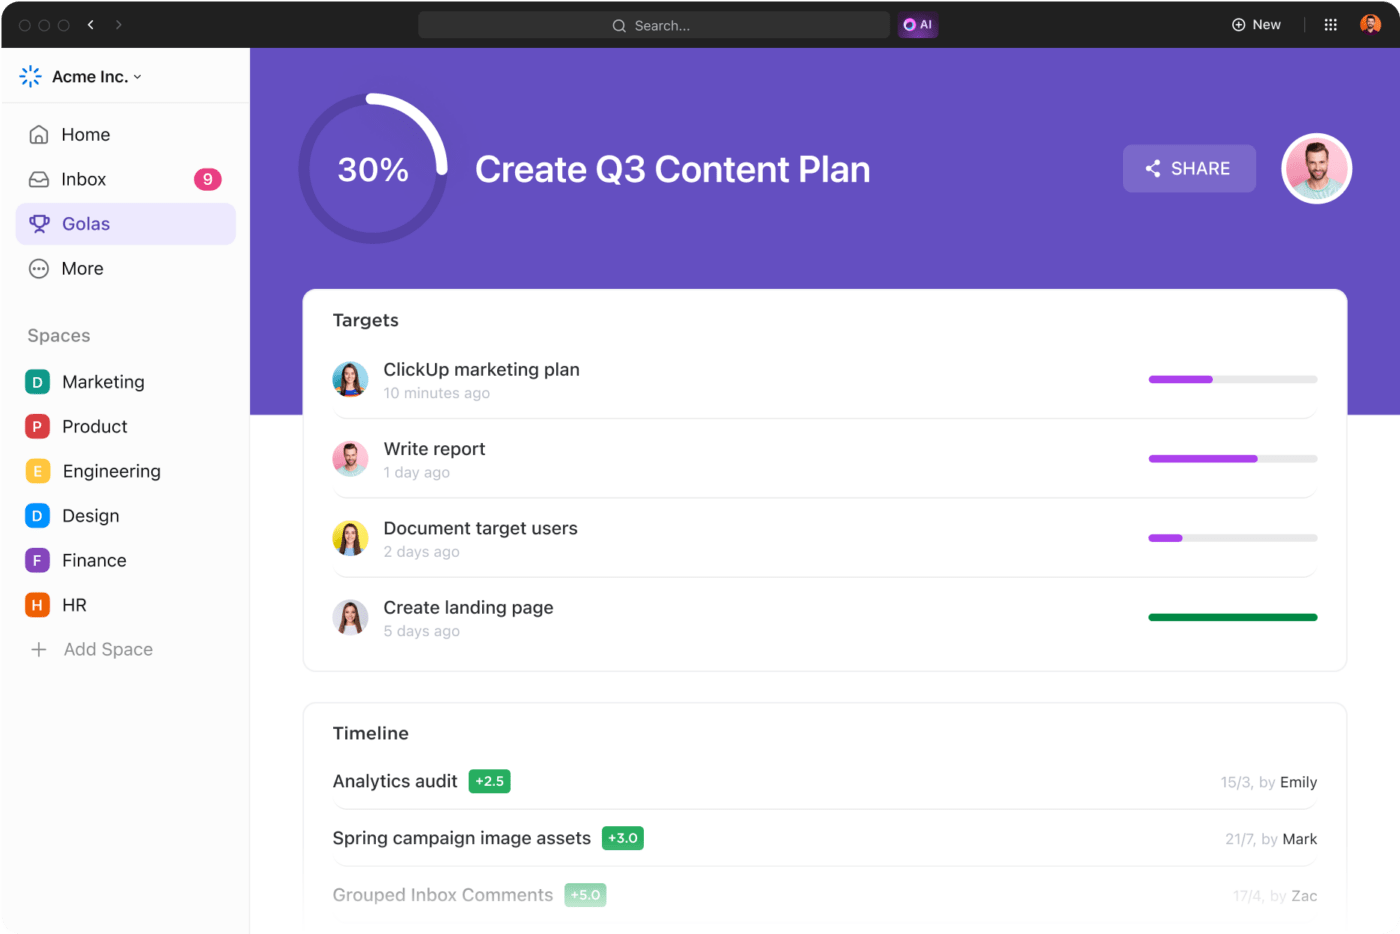
A great way to organize and monitor your goals and objectives is to rely on the ClickUp Goals feature, which lets you create measurable targets and automate the goal-tracking process!
This feature lets you create goals and break them into smaller, more easily achievable Targets. This approach not only keeps your goals neatly organized but also boosts motivation in your DevOps team. 🙌
When a Target is completed, your real-time progress percentage is automatically updated. That way, you can clearly see how close you are to achieving your goal.
The Goals feature also allows you to:
- Make folders to track OKRs (Objectives and Key Results)
- Create weekly employee scorecards to celebrate achievements
- Track projects in real time
Step 2: Develop a plan as a team
After defining your goals, you must devise a strategy for effectively introducing the new workflow. Ensure you discuss the plan with your stakeholders, particularly the DevOps team, as they will be the ones actually implementing the new approach.
Successful DevOps workflows hinge on robust collaboration between development and operations teams. Developers write code and pass it to the operations team for testing, integration, and deployment. This is why your DevOps plan must be clearly laid out and accessible to all team members, allowing them to track progress and keep up with the latest updates. 🔔

To streamline the planning process, use the ClickUp DevOps Teams Strategic Plan Template. It’s a pre-designed framework that helps the entire team visualize the work necessary to achieve long-term objectives. The template provides List and Board views to efficiently filter tasks based on the department in charge, priority levels, or due date.
If you want to see how many tasks are in progress, done, or on the to-do list, simply open the template’s Progress Board view. The ClickUp Task Statuses are fully customizable, so instead of using generic terms like In Progress, you can create bespoke statuses like Undergoing Beta Testing or Bug Testing to fit your project’s needs perfectly.

On top of everything, ClickUp Tasks have a built-in Comment section, simplifying task-specific discussions for your DevOps team. You can use the Comment feature to:
- Address problems with the proper context
- Tag team members to draw their attention to task-related issues
- Clarify how to solve an issue directly in the task
- Share relevant files within the task
Step 3: Automate DevOps processes
Automation is an integral part of the DevOps workflow, so the more operations you can automate, the merrier. This increases the overall speed of the workflow and results in faster software deployment. ⚡
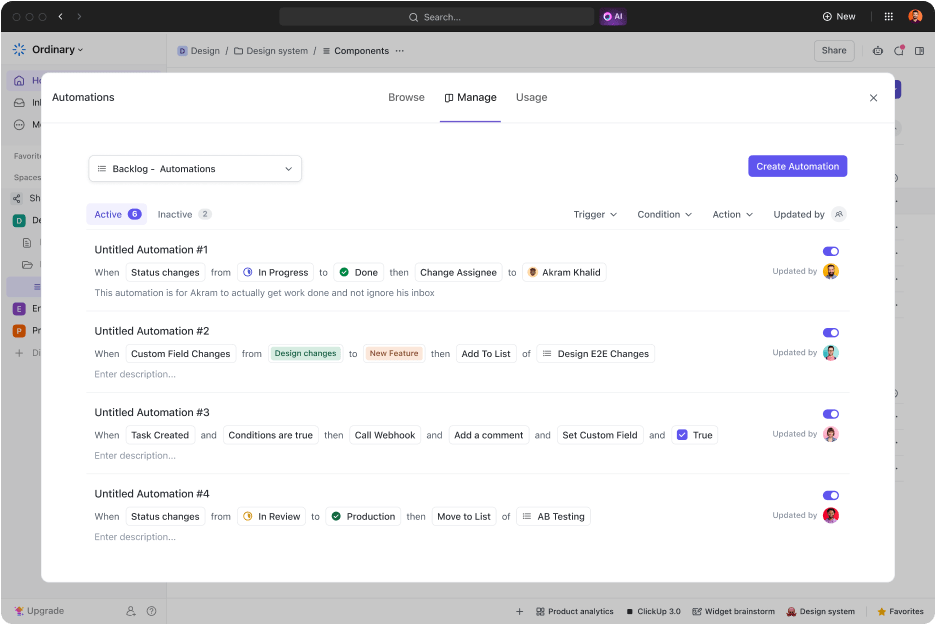
You can streamline your work and improve efficiency using ClickUp Automations. This feature lets you put your repetitive and routine tasks on autopilot, freeing time to focus on high-impact, value-adding activities.
ClickUp lets you create a custom automated process for your DevOps workflow or leverage 50+ prebuilt Automations to get a headstart. You can use the prebuilt Automations to:
- Automatically change the task assignee when a task’s status changes
- Update task priority as soon as its checklist is cleared
- Archive tasks once their priorities change
- Switch task tags when a deadline approaches
- Apply a template when you create a new task
Step 4: Test your software continually
Regular testing is a must when implementing DevOps workflow—it helps you identify and fix bugs to prevent major issues from occurring after deployment. For this reason, continuous testing is critical during the development process.
Instead of constant manual testing, you can conduct automated tests periodically. Ensure the software is tested after implementing each change, no matter how small, since even minor changes can cause errors. ⚠️
After detecting bugs, you should record them in a single location. This makes it easier to prevent issues from reoccurring, as you’ll always know which problems have been fixed, where they occurred, and what caused them.
If you want to start monitoring bugs and errors immediately, the ClickUp Bug Tracking Report Template is the perfect solution! This easy-to-use template lets you organize your bugs using the following Custom Fields:
- Source (e.g., Internal or Customer)
- Report type (e.g., Defect or UI Refinement)
- Environment (e.g., Web, Mobile, or Desktop)
- Product feature (e.g., Login, Integrations, or Core Product)
All fields and statuses are fully customizable, so you can modify them to fit your workflow and include dropdown menus, checkboxes, progress bars, and tags as needed. Filter the tasks by assignee, due date, or priority for a specific overview and move them around the Kanban board view for simple status changes. ✌
Step 5: Collect feedback
Ensure your software meets customers’ expectations by collecting user feedback after releasing your product. This will help you analyze software performance and make the necessary adjustments to your system based on the received feedback. 🗣️

Since the DevOps workflow requires continuous feedback, keeping all customer feedback in one place can help you implement changes more effectively. The ClickUp Feedback Form Template is a great tool that lets you do exactly that—collect user feedback, keep it in a central location, and organize it using Custom Fields for easy accessibility.
All the feedback you’ve collected by distributing the template’s Feedback Form will be clearly visible in the List view, where you can also gain insight into details like:
- Overall rating
- Reason for score
- Suggestions for improvement
The DevOps team can use this template to review customer feedback regarding the software interface, new features, and performance and use it to improve the product further.
Step 6: Measure the performance of your DevOps process
With a DevOps workflow in place, you should now keep track of its performance to see how well it works compared to your previous approaches. Make sure to answer the following questions:
- Which improvements were made?
- Which problems were solved?
- How many issues occurred?
- How fast was the product released?
- Has there been an increase in uptime?
- Has the resource consumption changed?
Tracking and analyzing these metrics will help you determine if you’ve implemented the DevOps workflow effectively and highlight areas that may need improvement in the future.
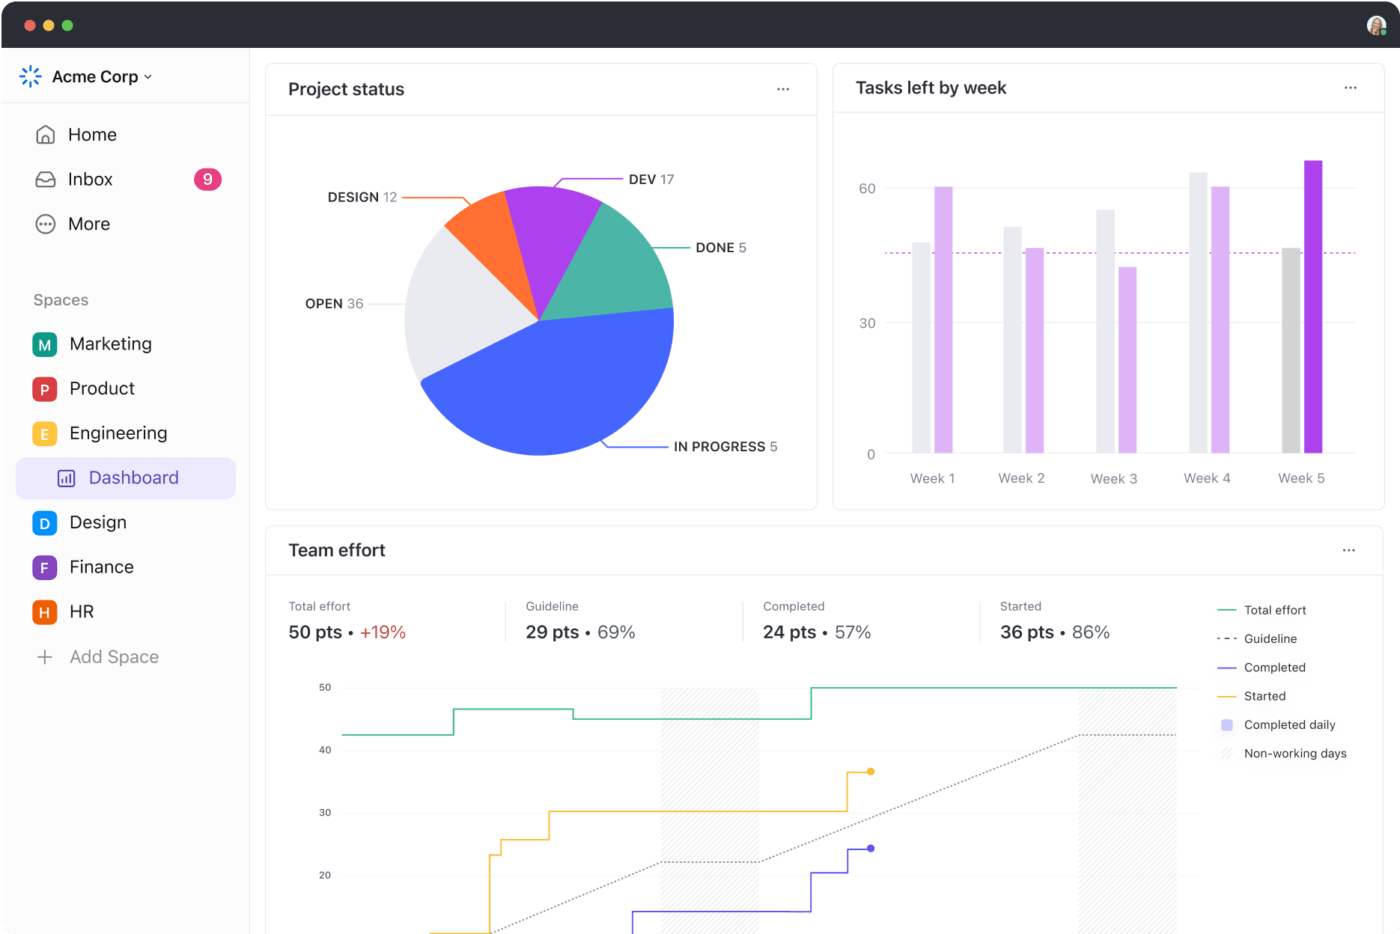
You can track the performance of your new DevOps workflow easily with ClickUp Dashboards—your very own mission control center for any kind of work. The Dashboards provide a high-level overview you can share with the DevOps team to keep everyone up to speed on the status of your development project. 📢
Dashboards are completely customizable, displaying exactly the kind of information you need. For example, you can get a visual presentation of your task’s progress through graphs like:
- Velocity charts: Represent your task’s completion rate
- Burndown charts: Display the amount of work left on the project
- Burnup charts: Show how much work is already completed in a project
- Cumulative flow charts: Display task progress over time, helping you identify potential roadblocks
Step 7: Make improvements
Once you’ve gathered feedback and analyzed your DevOps workflow performance, use this data to adjust your software for future releases. To ensure improvements are successfully implemented, you should also continually refine the development, deployment, and operational processes.
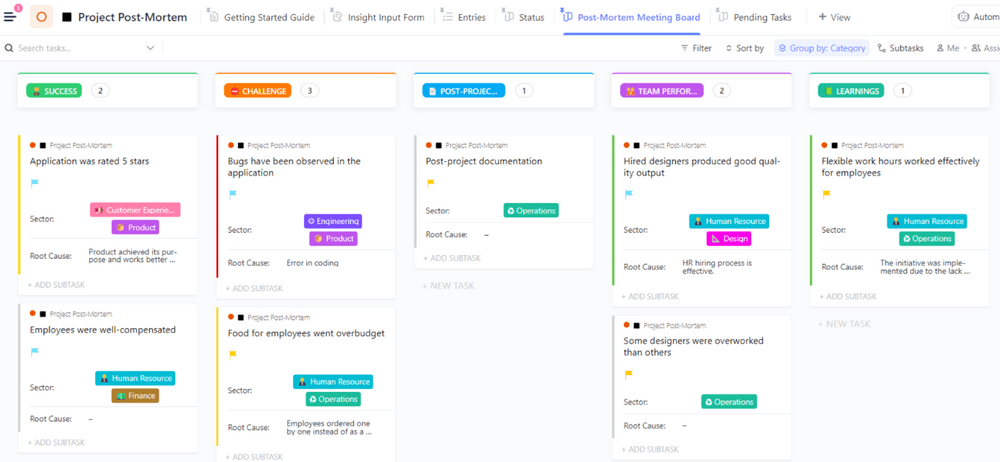
Make this process more efficient by using the ClickUp Project Post-Mortem Template to gather everything you’ve learned throughout the project. It lets you categorize the insights by:
- Success: Things you’ve achieved
- Challenge: Roadblocks you’ve encountered
- Post-Project Task: Tasks that are still pending
- Team Performance: How well the team performed and collaborated
- Learnings: Lessons learned during the project
You can share this port-mortem template with your team during a meeting to ensure everyone’s on the same page and ready to work on continuous improvement. 🔄
Streamline Your DevOps Processes with ClickUp
Implementing DevOps principles and setting up a DevOps workflow can do wonders for your teams and product—it boosts collaboration, promotes agility, and increases accuracy.
If you want to create a DevOps process flow with minimal effort, try ClickUp for free! Use its powerful project management tools to set clear goals, keep track of bugs, and fix issues quickly and collectively! 💪


Everything you need to stay organized and get work done.


