


Still downloading templates?
There’s an easier way. Try a free AI Agent in ClickUp that actually does the work for you—set up in minutes, save hours every week.
Sorry, there were no results found for “”
Sorry, there were no results found for “”
Sorry, there were no results found for “”
Complex projects often involve numerous interdependent tasks, making it challenging to track progress and meet deadlines.
Project managers need effective tools to break down these complex projects into manageable components. Jira, a popular project management tool, offers a feature called subtasks to address this need.
You can use subtasks in Jira to break down your project into smaller, more specific work units. Because subtasks are linked to their parent tasks, this granular approach can improve project visibility, facilitate collaboration, and help teams work more efficiently. With subtasks, you can assign roles and responsibilities to team members, track progress more accurately, and generate more detailed reports.
In this guide, we will explore the basics of subtasks in Jira. You will learn what they are, how to track task progress, and how to create subtasks in Jira.
Later in the article, we’ll also compare Jira with ClickUp, another popular project management tool, to help you make an informed decision about which solution might best suit your team’s needs.
Subtasks in Jira are smaller segments of a larger task, acting as child tasks within a parent task. They allow you to break down a complex project into more manageable pieces.
Imagine your project as building a house. The main task is the overall construction, while Jira subtasks could represent specific stages like laying the foundation, framing the walls, or installing the roof. Each subtask is a crucial part of the project, but handling them individually makes the overall task more manageable.
To get started, you’ll just need permission to create issues and enable subtasks in your project’s issue-type scheme.
You can create Jira subtasks using two methods:
Here’s a detailed breakdown of these methods.
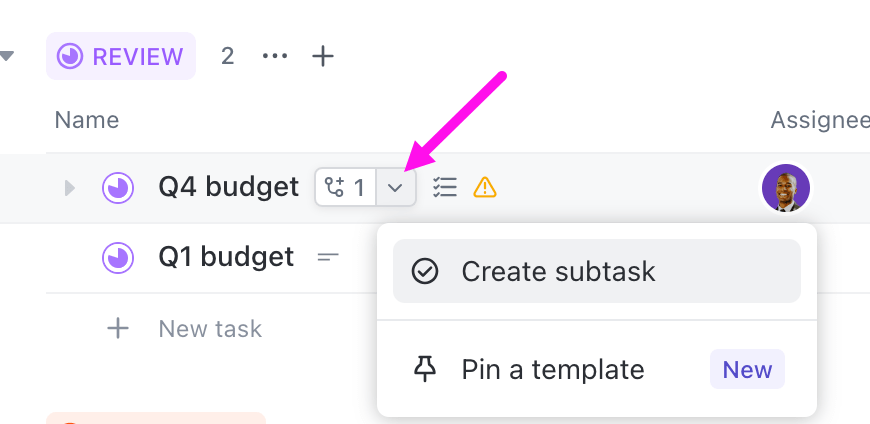
Locate and open the issue for which you want to create a subtask.
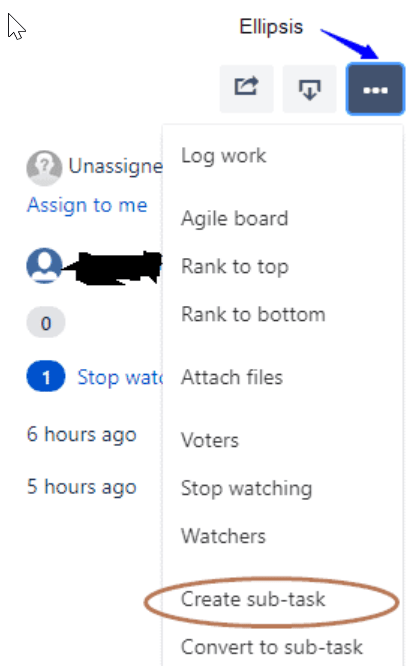
Click the ‘… ‘button (Ellipsis) in the top right-hand corner to expand the drop-down menu.
Choose the ‘Create Sub-task’ option from the menu.
A ‘Create Sub-task’ popup page will appear at the top of the main issue page. Note that a Jira administrator must enable the ‘Create Subtask’ submenu, and the subtask issue type should be added to the project’s issue type scheme.
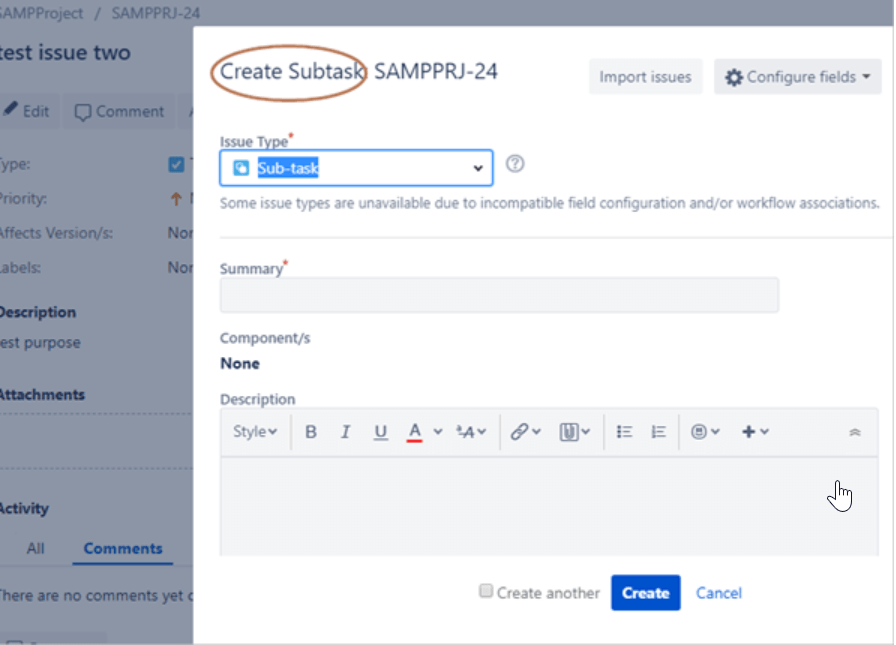
Select ‘Sub-task’ in the issue type drop-down, complete the mandatory fields, and add any required information. Click the ‘Create’ button at the bottom of the page to finalize the subtask creation.
The new subtask will be displayed in the ‘Subtasks’ section of the primary/parent issue.
It is important to note that Fields on the ‘Create Subtask’ popup can be customized. All you have to do is click the Configure Fields (gear ⚙️ icon) at the top right-hand corner to open a dialog box where you can check or uncheck fields as needed. You can toggle between default and customized fields using the ‘All’ and ‘Custom’ links.
By following these steps, you can simplify Jira project management and keep better track of task progress, blockers, and completion using Jira’s ‘create subtask’ functionalities.
Start by opening the issue you want to convert to a subtask. You can do this by searching for the issue in the search bar or navigating your project’s issue list.
Once the issue is open, locate the “More” dropdown menu. This is typically found in the top-right corner of the issue view. Click on this menu to reveal additional options.
From the dropdown options, select “Convert to Sub-task.” This option allows you to change the current issue into a subtask of another issue.
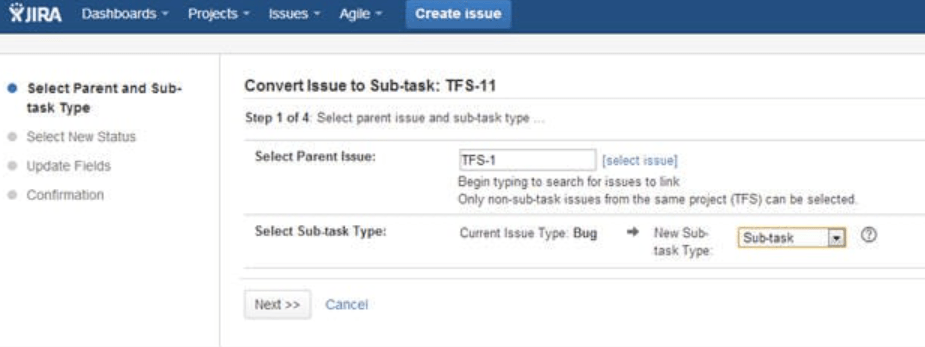
A new screen will appear, prompting you to choose the parent task. You can either type in the ID of the parent task or search for it using the provided link. This parent task is the issue under which the subtask will be nested.
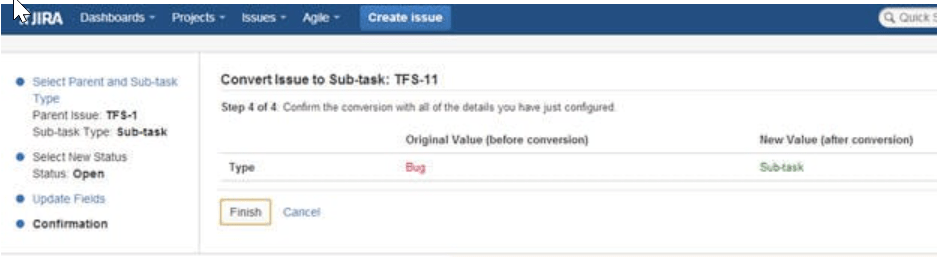
After specifying the parent task, click “Convert” to finalize the process.
The issue will be transformed into a subtask and now appear under the “Sub-tasks” section of the parent task, helping you better organize your Jira project management modules.
While Jira subtasks can be incredibly useful for breaking down complex projects, the tool has certain limitations.
By acknowledging these limitations, you can enhance your task management skills and devise strategies to mitigate these challenges, ensuring a smoother project management experience in Jira.
If you’ve faced limitations with task management tools like Jira, you’ll find ClickUp’s flexible and customizable approach to task and subtask management refreshing. ClickUp simplifies complex project management needs by adapting to your workflows, integrating with the apps you use daily, and ensuring you never hit a roadblock in getting your projects to the finish line.
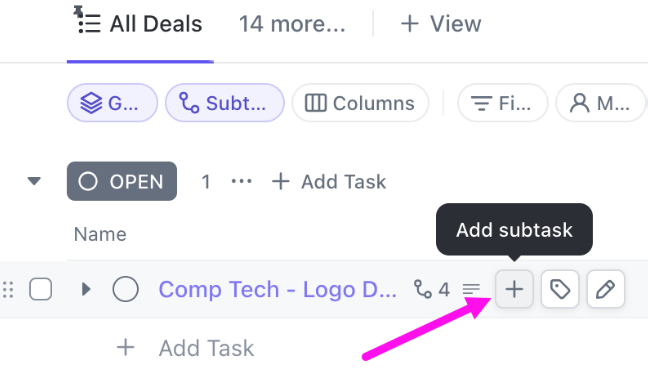
Creating ClickUp Tasks is intuitive and straightforward.
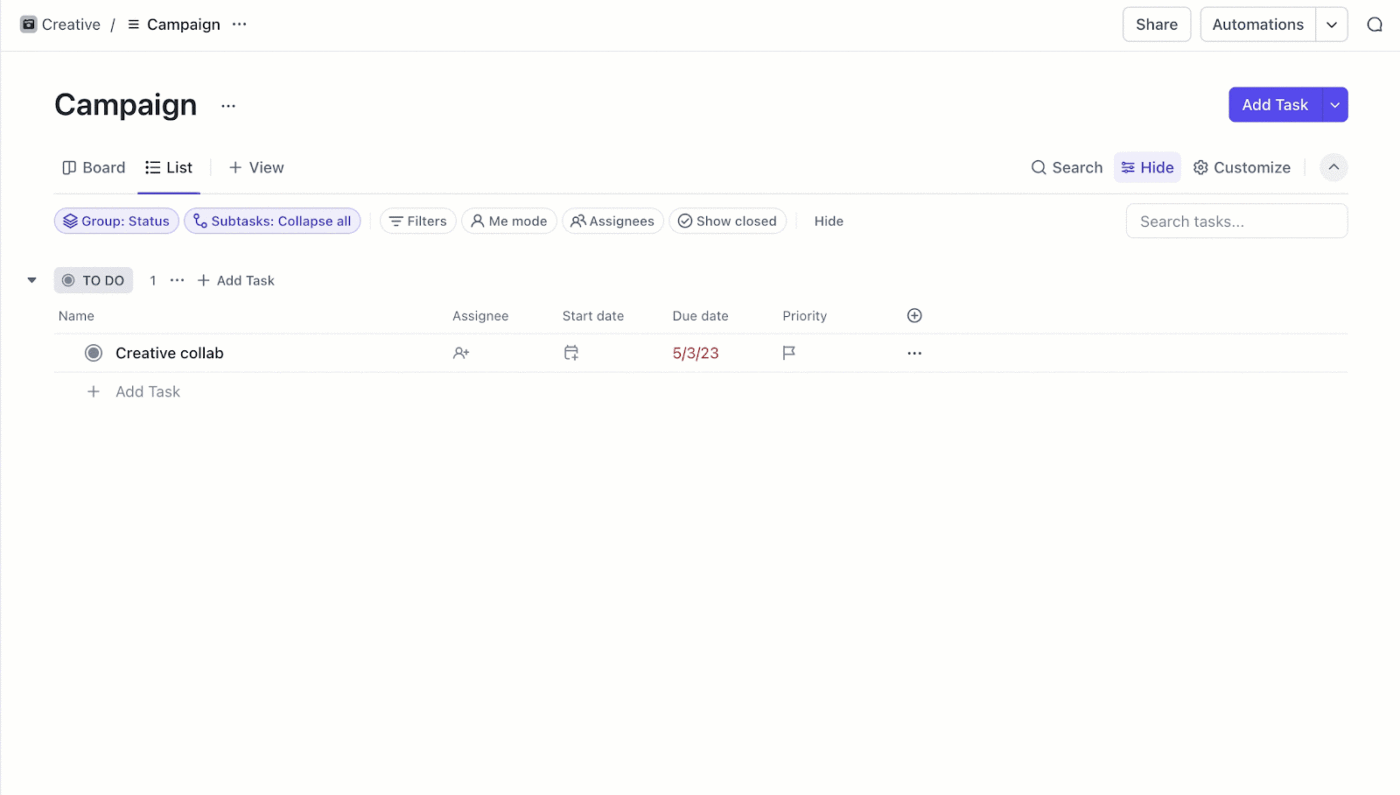
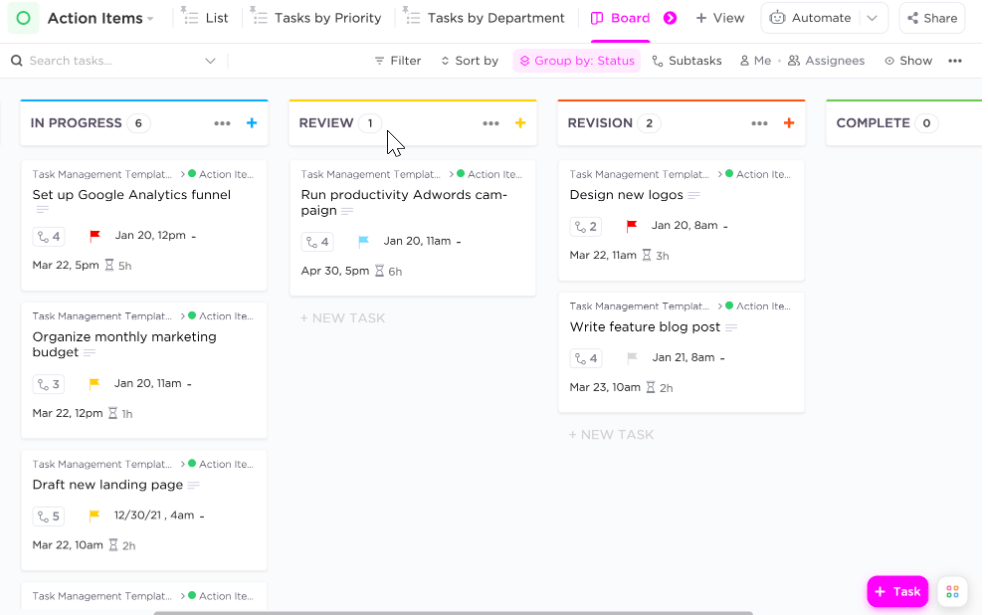
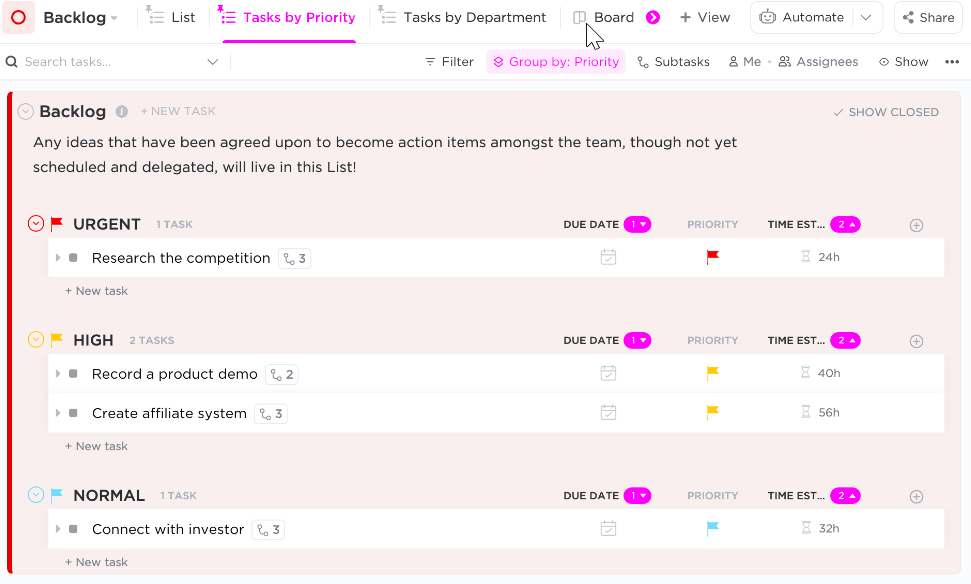
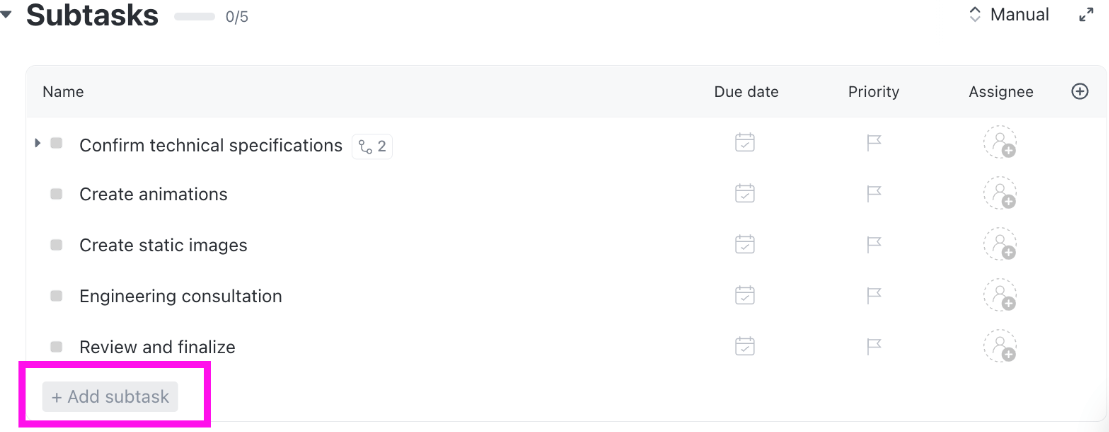
Subtasks in ClickUp are just as easy to create and manage as main tasks. You can create subtasks from a task or two of your ClickUp Views, namely the Board view and the List view.
💡Pro tip: Subtask creation and editing are accessible to all users on every ClickUp plan, including guests with edit or full permissions.
ClickUp allows you to create as many subtasks as needed, which is a significant advantage over tools like Jira. Other Jira alternatives might not offer such flexibility.

You can control subtask visibility using the “Subtasks” option at the top of the List or Board view:
Subtasks in ClickUp maintain a clear hierarchy under their parent tasks, making it easy to navigate and manage them.
💡Pro tip: Use the Bulk Action Toolbar to modify multiple subtasks or tasks efficiently. Ensure you expand the subtasks before starting.
You can also use task list templates and task management templates to create and manage subtasks for team-managed projects quickly, saving time and ensuring consistency across similar tasks.
The ClickUp Task Management Template can significantly streamline your organizational workflow. By integrating this template into the daily workflow, your team can bypass the time-consuming process of identifying the most efficient framework for your project settings. Once the template is set up, you only need to input the specific details relevant to your tasks.
Use the template to:
The template also features six dynamic views to tailor task management to your needs:
Project visibility is crucial for effective teamwork. That’s why the template includes pre-configured Custom Fields for each task, allowing you to instantly see details such as the assignee, due date, estimated duration, and additional elements like budgets, URLs, or file attachments.
Additionally, the template organizes your tasks into three distinct Lists: Action Items, Ideas, and Backlog. This setup helps reduce clutter and focus on tasks within the same category.
This efficient structure ensures that your team can seamlessly manage tasks and projects, enhancing productivity and collaboration.
While Jira is a powerful project management tool, it has limitations, particularly in managing subtasks and dependencies. These constraints can hinder efficient task management.
ClickUp, on the other hand, offers a superior alternative with a user-friendly interface and advanced features that address these challenges.
Whether you are looking for better customization, advanced dependency management, or comprehensive reporting, ClickUp provides the tools to manage your tasks and subtasks effectively and ensure that you complete projects smoothly and successfully.
After transitioning to ClickUp, teams report a significant reduction in time spent on task management and a marked increase in on-time project deliveries.
Our executive team decreased project delay by over 70% throughout our first year using ClickUp.
By choosing ClickUp, you, too, can streamline your workflow, enhance your task management skills, and achieve your project goals more effectively. All these features—and more—make it a preferred choice for modern project management!

© 2026 ClickUp

There’s an easier way. Try a free AI Agent in ClickUp that actually does the work for you—set up in minutes, save hours every week.