Breaking Down the Critical Path Method (CPM) in Project Management (+Templates)


Sorry, there were no results found for “”
Sorry, there were no results found for “”
Sorry, there were no results found for “”
In the world of complex projects, delivering on time is a must.
A realistic and meticulous planning approach is crucial to ensuring success. You may not have superhuman capabilities, but you have the critical path method.
This powerful technique can help you manage projects efficiently by precisely analyzing task dependencies and critical sequences! 💥
This article explains the critical path method, its benefits, use cases, and main elements. It also provides step-by-step guidelines and shows you how helpful project management software like ClickUp makes implementing the method easier, even for beginners.
The critical path is a series or sequence of must-do tasks determining the project’s overall timeline. We call such tasks critical activities or critical tasks, and they’re essential for the successful and timely execution of a project. ⏲️
The critical path method (CPM) is a project management technique for identifying the longest sequence of dependent tasks in a project.
It helps project managers understand which tasks are critical (i.e., if delayed, they will delay the entire project) and which have float (i.e., can be delayed without affecting the overall timeline). It also helps them determine the shortest possible project duration.
Also known as critical path analysis (CPA), the critical path method helps project managers form accurate schedules across the entire project. They identify critical dependent tasks by calculating their duration using a specialized formula (or critical path algorithm).
They also often use Gantt charts or other diagrams to visualize and better understand the project timeline. Project managers use this to get a bird’s-eye view of the entire project and its dependent tasks to make better decisions.
Did You Know: The critical path method was developed in the 1950s by Remington Rand’s James E. Kelley and DuPont’s Morgan R. Walker, who were looking to cut costs associated with inefficient scheduling. The pair also invented the Program Evaluation and Review Technique (PERT), a similar method often used alongside the critical path method.
CPM and PERT are both project management methodologies for planning and scheduling. Unlike CPM, which is a deterministic model, PERT is probabilistic, meaning it considers a range of possible durations for each task to provide a more flexible timeline estimation.
To delve deeper into their differences, refer to the table below:
| Critical path method | PERT |
| • Used when task duration is known • Activity-oriented • Better for repetitive tasks • Focuses on the time-cost trade-off • Calculates the earliest and latest start and finish times for tasks based on their dependencies | • Used when task duration is unknown • Event-oriented • Better for non-repetitive tasks • Focuses on time only • Calculates the duration based on three types of estimates—optimistic, pessimistic, and most likely |
Gantt charts, while essential for project scheduling and management, are different from the critical path method. Here’s a quick overview of their differences.
| Feature | Critical Path Method (CPM) | Gantt Chart |
| Purpose | Identifies the longest sequence of dependent tasks to determine the shortest project duration | Provides a visual timeline of tasks and their durations |
| Focus | Task dependencies and critical vs. non-critical tasks | Scheduling and progress tracking |
| Visualization | Uses network diagrams (nodes & arrows) to map task dependencies | Uses horizontal bar charts to represent tasks over time |
| Task Dependencies | Explicitly highlights dependencies and float/slack time | Shows task overlap but doesn’t inherently display dependencies |
| Best For | Complex projects with interdependent tasks where delay analysis is crucial | Simple to medium-complexity projects requiring a high-level schedule view |
Project managers will find many benefits to using the critical path method, including:
Critical path analysis should happen at the beginning of the project lifecycle. It’s typically performed in the planning stage before scheduling. In some cases, project managers carry this out even earlier and include it in the project proposal.
Industries that deal with complex projects, such as construction, engineering, and event planning, are the ones that benefit most from the critical path method.
Besides projects involving many moving parts, the critical path method can also be helpful when it comes to time- or resource-constrained projects. 🚨
Also Read: Top Project Management Charts
Before we start exploring CPM step-by-step, let’s learn its main concepts and their meaning. Think of the next section as your critical path method glossary! 📖
In CPM, activities can be critical or non-critical. Critical activities (or critical tasks) are those you identify as important and include in the critical path. Non-critical project activities are all other tasks. They are less time-sensitive or essential, giving you more flexibility in scheduling.
Here’s a simplified example: If your project is to build a house, laying the foundation and installing the roof would be considered critical activities, while interior decoration would fall into the non-critical category. 🏠
Activities have relationships, i.e., dependencies. That means they have to happen in a specific order. For instance, some dependent tasks have to finish before others can start, or they have to start simultaneously.
To continue with our house-building example—you can’t start furnishing a room until you’ve finished the flooring and the wall paint has fully dried. 🛋️
The network critical path diagram is a flowchart for visualizing your project’s timeline and task dependencies. It consists of nodes, which are usually represented with rectangles or circles, and connectors, i.e., arrows.
Visualizing the structure of activities this way makes it easier to understand and identify the critical activities. A critical path diagram sometimes highlights areas in different colors to stand out from the non-critical task sequences.
You can also use Gantt charts and PERT charts to visualize your project timeline and critical paths, but more on that in the how-to section! 👀
📮 ClickUp Insight: 31% of managers prefer visual boards, while others rely on Gantt charts, dashboards, or resource views.
But most tools force you to pick one. If the view doesn’t match the way you think, it just becomes another layer of friction.
With ClickUp, you don’t have to choose. Switch between AI-powered Gantt charts, Kanban Boards, Dashboards, or Workload View in a single click. And with ClickUp Brain, you can auto-generate tailored views or summaries based on who’s looking—whether it’s you, an exec, or your designer.
💫 Real Results: CEMEX sped up product launches by 15% and cut communication delays from 24 hours to seconds using ClickUp.
The critical path method consists of a series of calculations to determine the duration of tasks and the critical path. The primary metrics are:
The critical path formula has two parts, which we’ll explain below.
We use the forward pass to calculate the ES and EF.
The ES of the first activity on any path will always be 1 since it indicates the start, i.e., the first day of your project.
The ES of all other activities equals the earliest endpoint of the preceding activity plus 1:
ES = EF of preceding activity + 1
The EF equals the sum of ES and the duration of the activity minus 1:
EF = ES + t – 1
With the backward pass, we calculate the LS and LF.
The LF of the last activity on any path will always be the same, as it indicates the end, i.e., the last day of the project.
The LS of an activity equals the difference between LF and the duration of the task plus 1:
LS = LF – t + 1
The LF of an activity equals the LS of the succeeding activity minus 1:
LF = LS of succeeding activity – 1
The float or slack represents how long a non-critical task can be delayed without affecting the entire project timeline. Critical tasks don’t allow delays, so their float score is automatically 0.
There are two types of float:
Also Read: Steps to Efficient Project Time Management
Now that you’ve mastered all the elements of the critical path method, it’s time to put your knowledge to the test. In this section, we’ll show you how to calculate your project’s critical path in six steps. 🧮
The first thing you should do is determine the project scope. Collect all your activities in one place and define your goals, budget, and deadline.
Build your Work Breakdown Structure (WBS) and use this to create a complete list of every task the project entails.
💡Pro Tip: ClickUp’s List View provides you with the perfect framework to list all the tasks, subtasks, and relevant information about them in Custom Fields, such as start and due dates, etc.
Not a fan of spreadsheets and lists? Project managers can do everything in a Kanban-style ClickUp Board view as well to stay on top of the project schedule, uncover resource constraints, and see actual progress toward project completion.
Accurately identifying dependencies is crucial for successful time estimation and planning. Discuss with your team and use your previous experience to determine the most logical order of tasks.
This will help you identify tasks that must be tackled first, as well as those that can be taken up in parallel.

Use a network diagram, work breakdown structure (WBS), PERT chart, or any other visualization method to make the complex project task structure more comprehensible. Draw the flowchart and arrange tasks based on their chronological order and dependencies.
You can use pen and paper, a text editing or drawing program, or project management software like ClickUp.
💡Pro Tip: ClickUp’s Whiteboard helps you create critical path diagrams quickly. Use shapes and connectors to create the structure. Add additional elements like images and documents to make the diagram more informative.
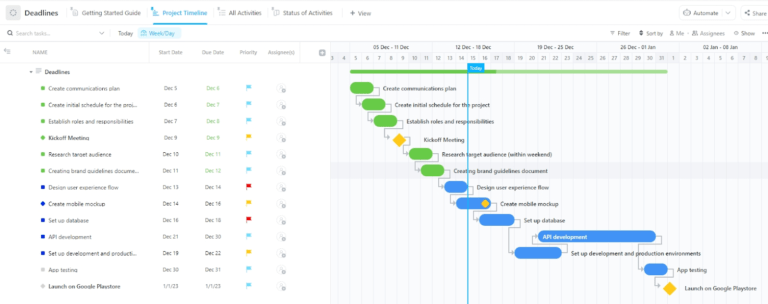
Although different in terms of structure, Gantt charts are also a convenient way to envision the sequence of tasks in a project and estimate their duration.
The next step is to define the t for each task, i.e., how many days it will take to complete it.
Estimate based on your experience, historical data, and industry standards. Consult others, particularly experts, to gain multiple perspectives and make the most accurate predictions.
Using the formula shared earlier, calculate the ES, LS, EF, LF, and slack. Begin with the first task, which has a start time of 1, then define the EF and LF based on its duration. Repeat the same for all other tasks.
The longest sequence of critical activities (those that have 0 slack) is your critical path. You can also have multiple critical paths.
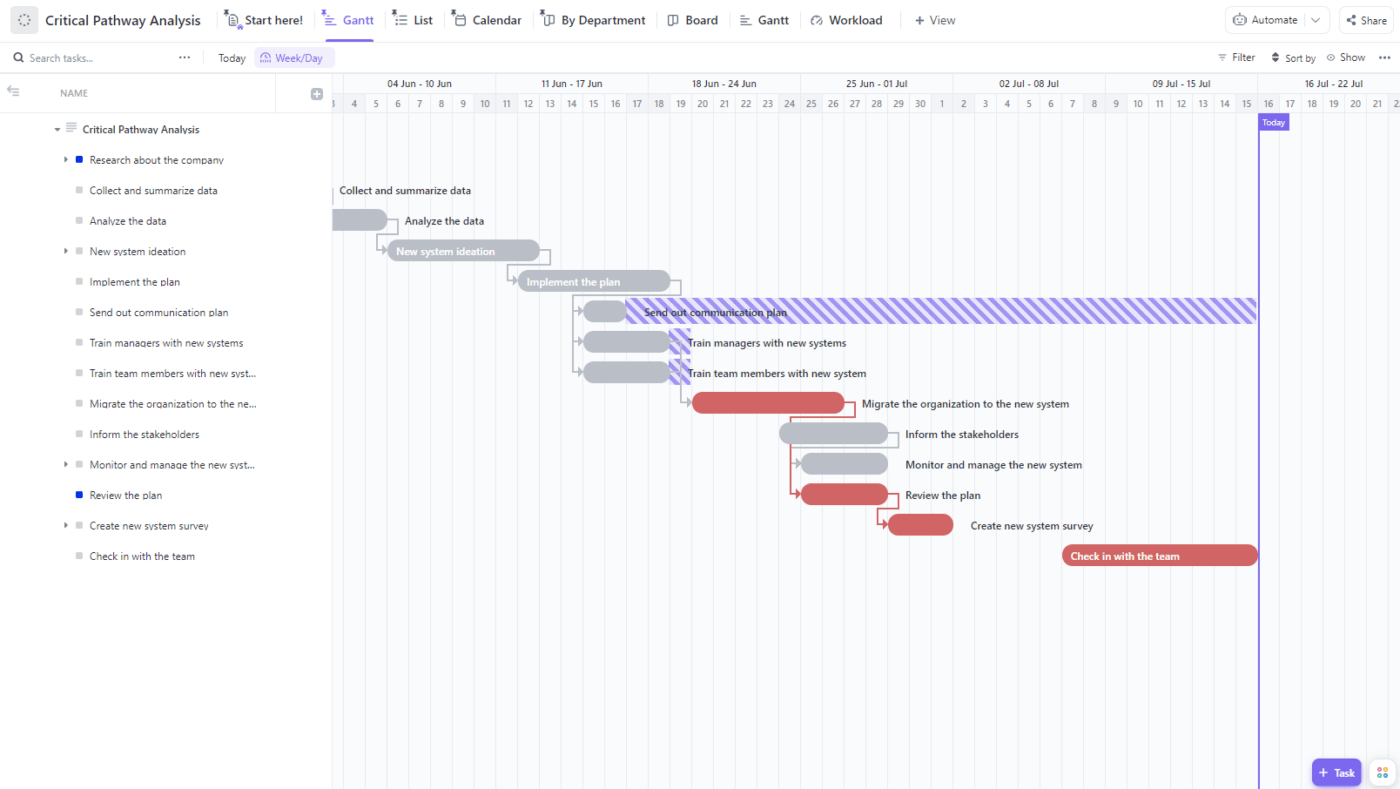
💡Pro Tip: ClickUp’s Gantt charts make these calculations much more manageable. In your project Gantt chart, choose the Show option again, but this time, enable Critical Path and/or Slack Time.
The critical path will show up with a different color scheme, highlighting tasks with the blocking dependency in red. 🛑 With the Slack Time option enabled, a purple striped bar will appear alongside non-critical activities to depict the wiggle room they allow for. 🟣
Another way to discern critical from non-critical tasks is by adding priority tags and color codes. For instance, you can assign critical activities with a high-priority tag and non-critical activities with a low-priority tag, and the software will color them accordingly.
Finally, start bringing your project to life task-by-task. 🧱
As you go through tasks, you might realize some aren’t necessary or run into unexpected resource constraints. The delay caused by such events is called the critical path drag.
Monitor activities closely to ensure adherence to the schedule and catch any plan changes in time.
By closely monitoring your targets and progress, you can ensure your project stays on the right path at all times. 🛣️
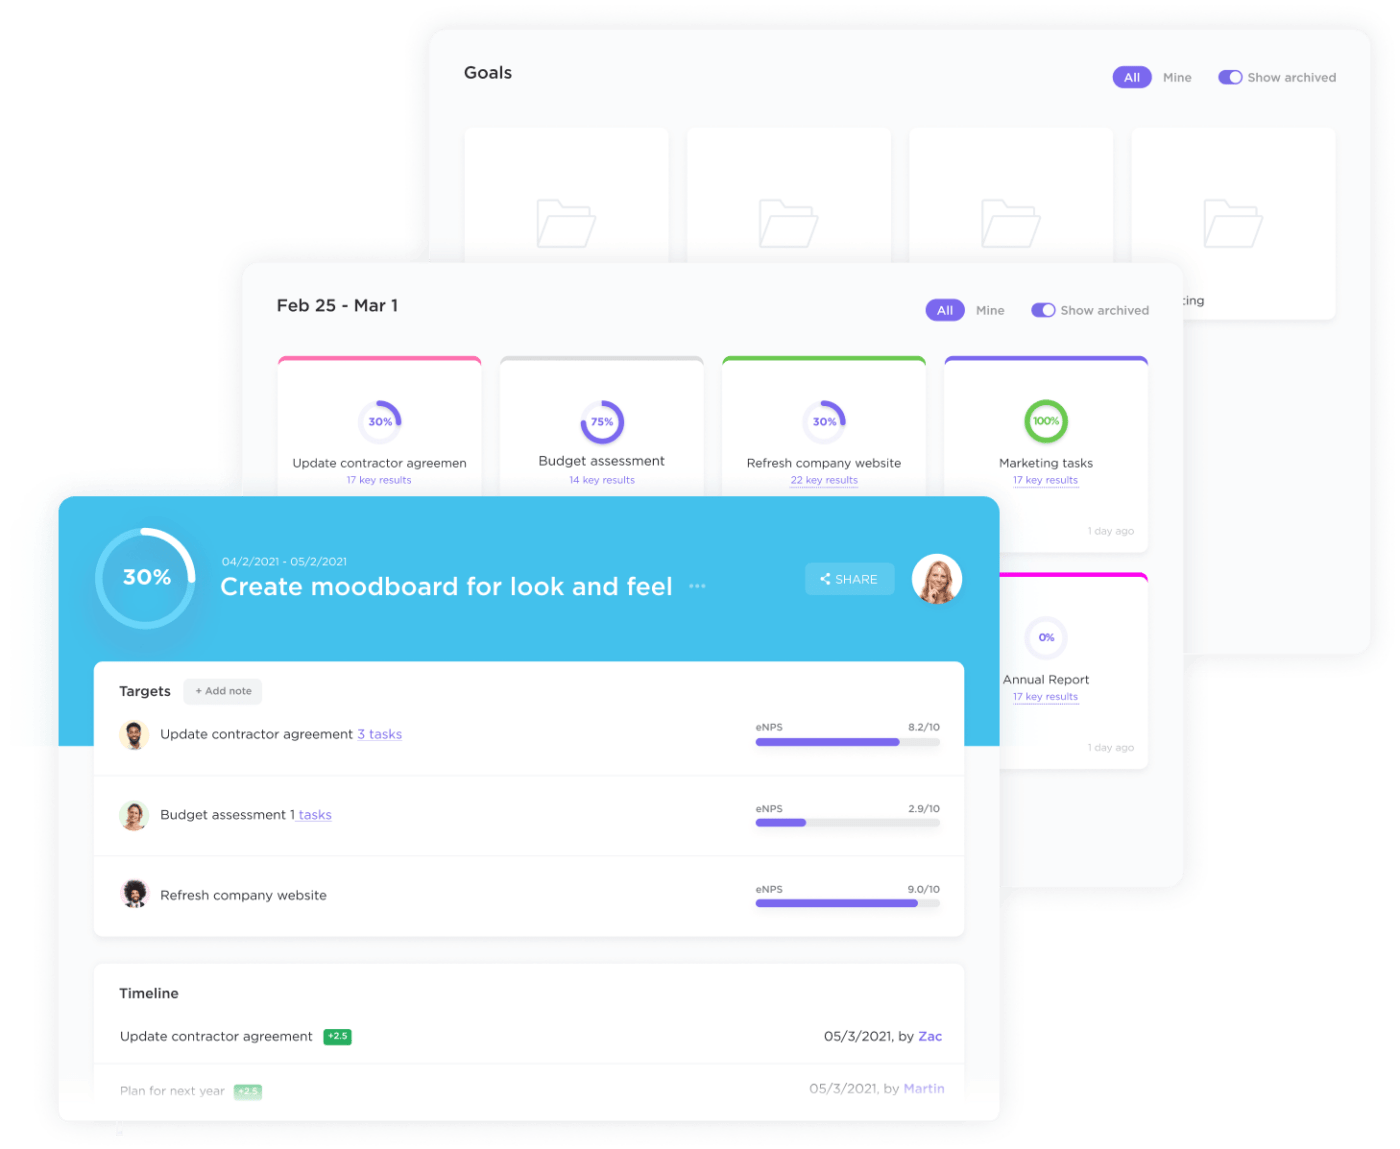
💡Pro Tip: In ClickUp, you can ClickUp Goals and automatically track progress. Choose between task, numerical, monetary, and True/False targets, then manage them all in one place.
If you opt for a project management tool like ClickUp, you can spare yourself from the manual and repetitive work.
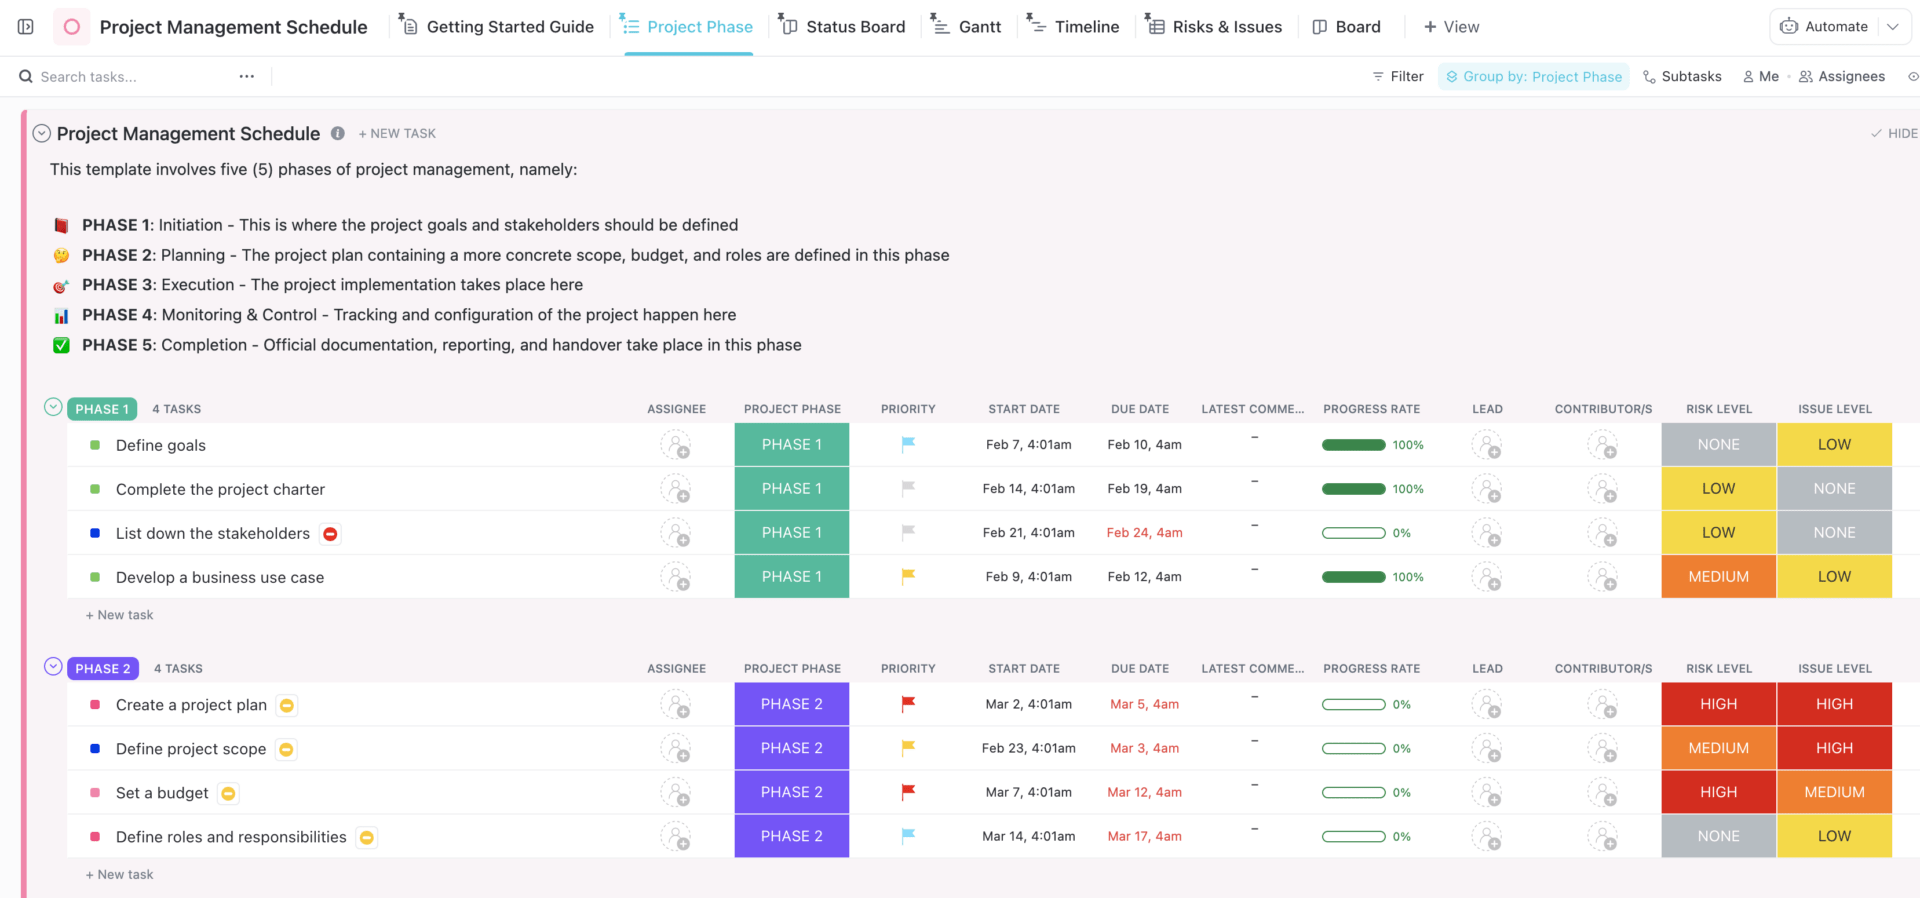
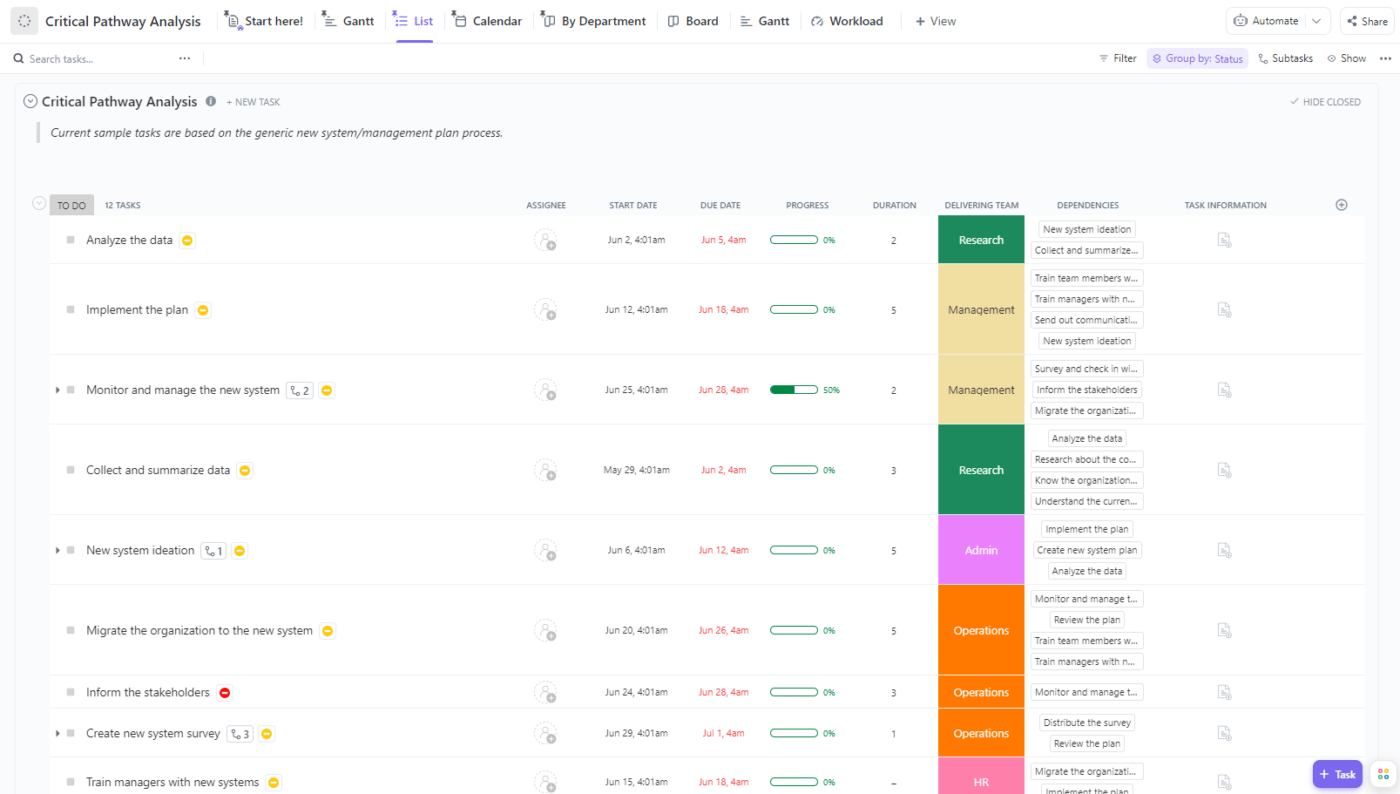
Instead of starting from scratch, use the pre-built ClickUp Critical Pathway Analysis Template. 🙌
ClickUp’s CPA template makes it easy to map out the tasks that are essential for project success. It also helps you:
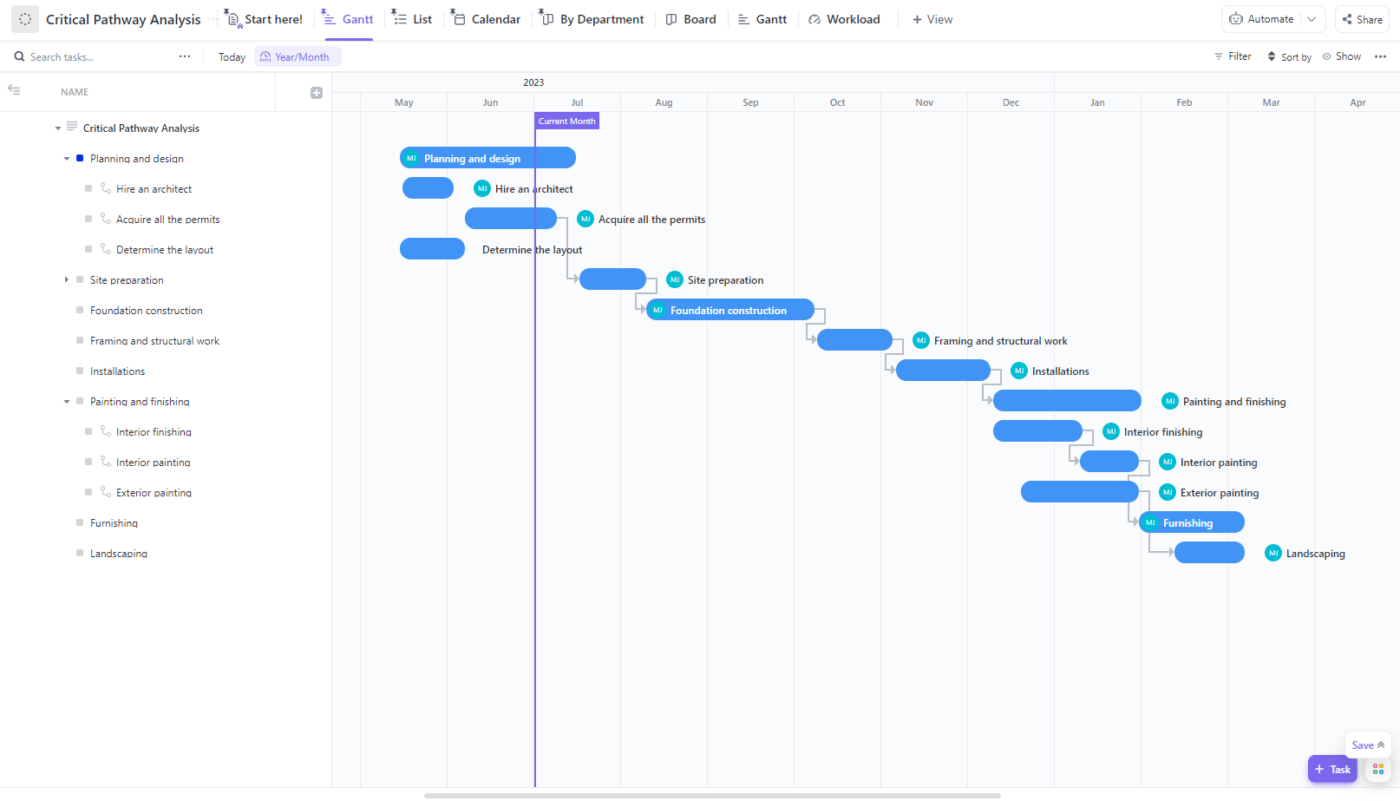
Remember our house-building example from earlier? Let’s expand on it! We’ll show you how to apply the critical path analysis to a real-life example.
We’ll be using the same ClickUp Critical Pathway Analysis Template.
Let’s start by listing all the tasks we need to take to build a house:
We’ll also jot down the subtasks. For instance, in the planning and design stage, those would include:
We’ll also define the project’s desired start and end date—May 18 to Mar 5.

Next, we’ll create a diagram in ClickUp Whiteboards. Considering the dependencies and allotting larger shapes to tasks that require the longest time, we’ll create the flowchart to visualize the work ahead.
To define task relationships in ClickUp, right-click on a task and select the Dependencies option. You can choose between three types:
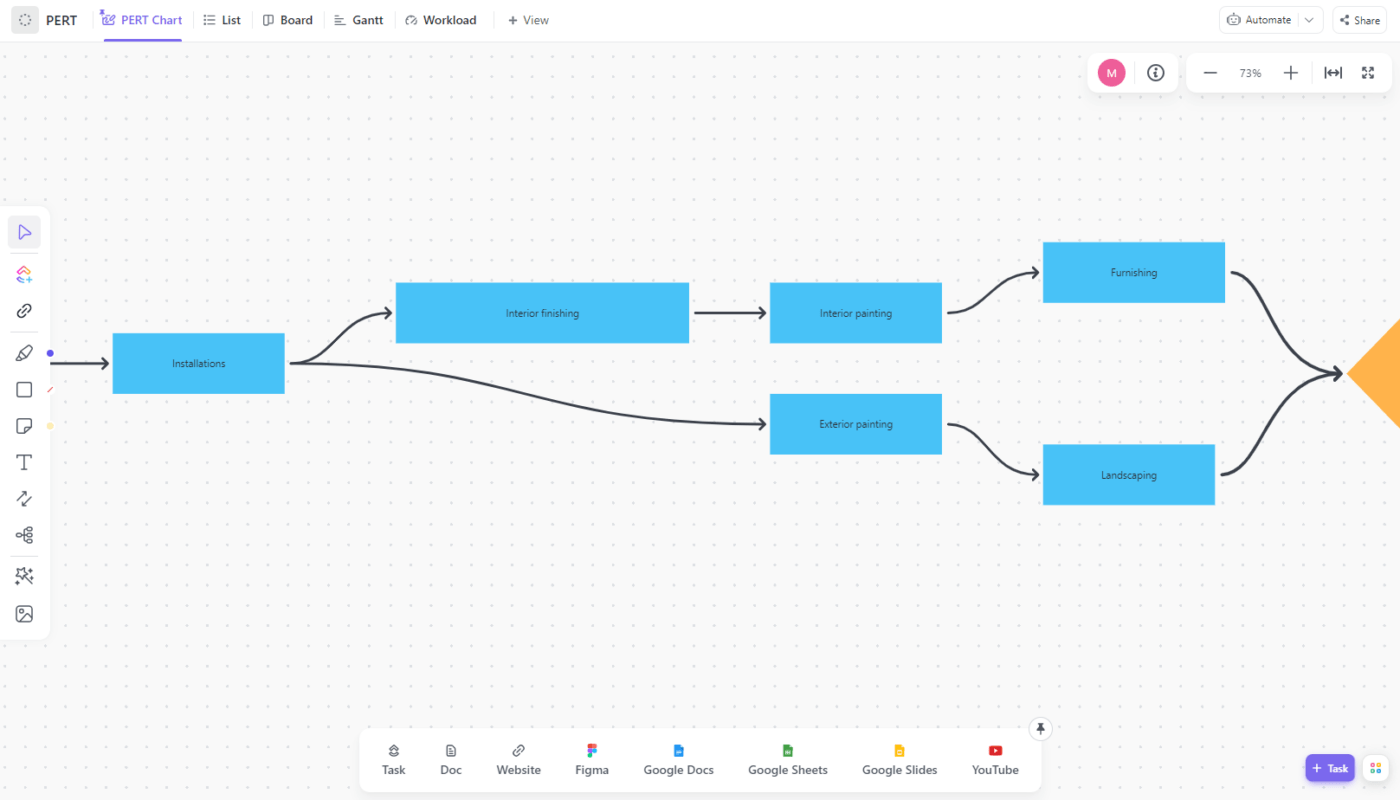
Notice how the steps fork out after the Installations step? This is to indicate that:
Defining relationships is even easier in Gantt view. You only need to select the point on either side of the taskbar and drag it over to the corresponding point on the other task.
The best part is—this view allows you to automatically reschedule dependent tasks. To activate it, open the Show dropdown menu and toggle on the Reschedule Dependencies option.
After completing the diagram, display the dependencies in your ClickUp Gantt Chart or List View.
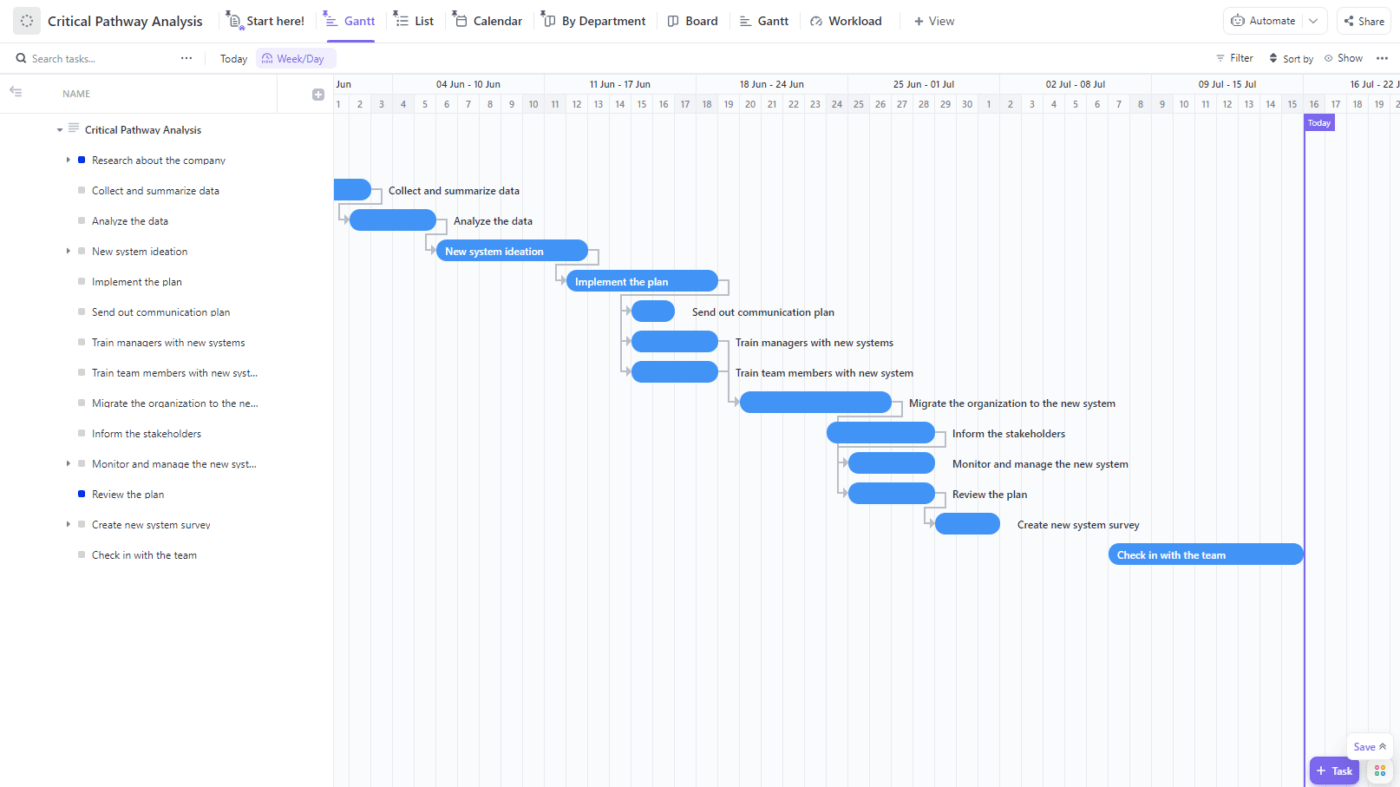
Next, we’ll estimate the duration of tasks, writing the number of days in the designated field in List View. Considering that information, we’ll schedule tasks and/or subtasks in Gantt View.
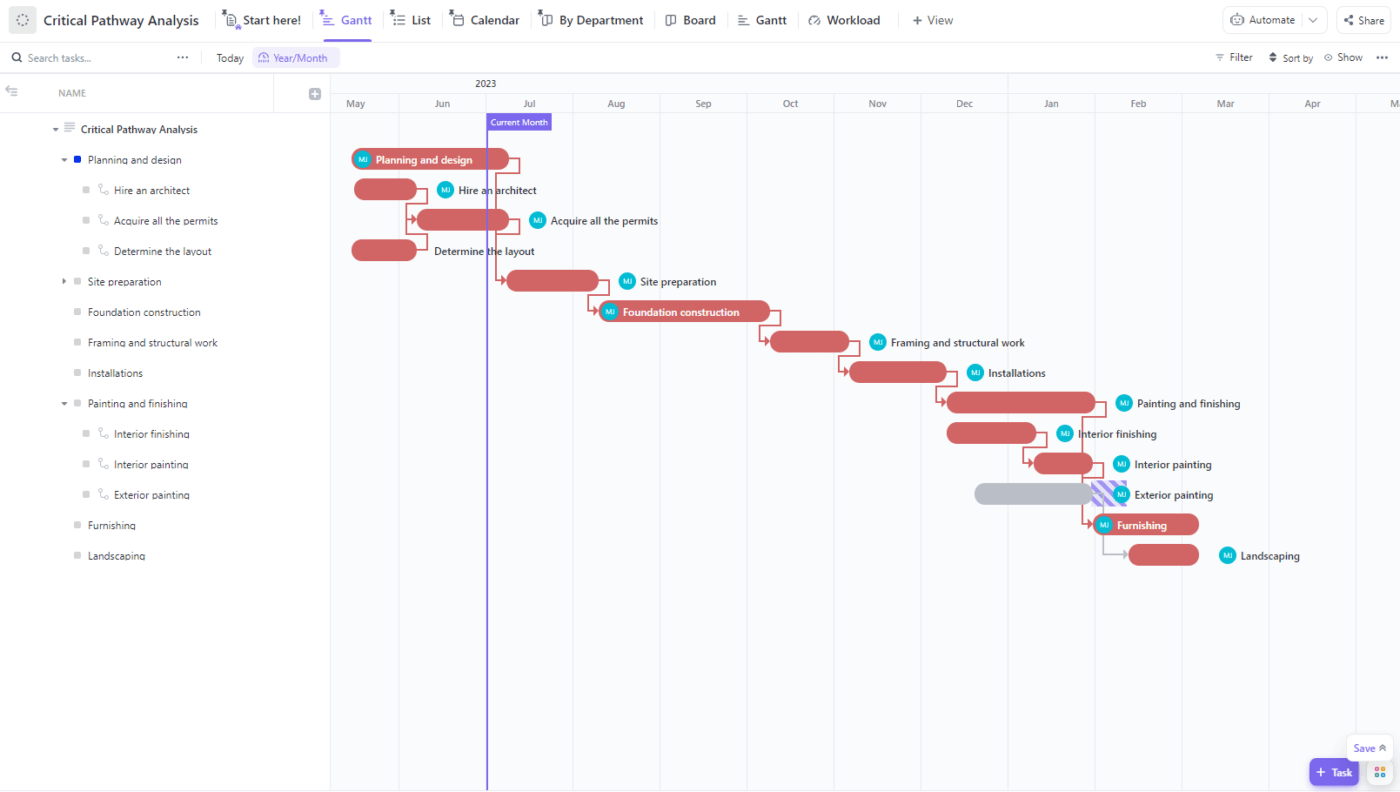
Finally, we’ll calculate the critical path and slack. In our case, there’s little leeway since most activities are crucial.
As you can see in the image above, the only task with slack is the exterior painting. Once the installations are completed, exterior painting can occur at any point, provided enough time is allotted to drying and, eventually, landscaping.
Say there’s been a change of plans, and our flooring contractors asked to reschedule for the following week. In that case, we’ll move the subtask bar to its new spot. With the automatic rescheduling option activated, the other tasks will be updated accordingly!
Related vlog: How to fast-track a project when you’re falling behind schedule.
Also Read: Analogous Estimating in Project Management
The critical path method is not just for large projects—it can be a tool for project managers to keep tasks on track, allocate resources effectively, and ensure timely project completion. Here’s how you can practically apply CPM:
Not all tasks are equally important. Tasks on the critical path have zero slack, meaning any delay affects the whole project.
✅ How to apply:
Daily use case: If you’re organizing an event, venue booking, vendor contracts, and guest invitations might be on the critical path, while promotional materials have more flexibility.
CPM helps track if your project is on schedule and alerts you early if something is slipping.
✅ How to apply:
Daily use case: A project manager overseeing software development can monitor coding, testing, and deployment to prevent delays in the product launch. ClickUp Dashboards make project tasks easier to monitor in real time.

CPM assumes unlimited resources, but in real life, you may need to balance workloads across teams.
✅ How to apply:
Daily use case: If a key developer is assigned to two critical tasks simultaneously, reassign one to another team member to prevent slowdowns. Use ClickUp’s Workload View to manage team workloads effectively.
Projects rarely go exactly as planned. CPM helps you recalculate project timelines if delays occur.
✅ How to apply:
Daily use case: If a supplier delays delivery for a construction project, update your CPM plan and see how it impacts the completion date—then find ways to compensate.
CPM helps identify which parts of the project cannot afford delays, allowing for proactive risk management.
✅ How to apply:
Daily use case: If a construction project is at risk due to weather conditions, CPM can help adjust schedules or reallocate resources to minimize delays.
The critical path method (CPM) is ideal for projects that:
Industries and projects where CPM works best include:
Examples: Building a bridge, constructing a skyscraper, road development
Why CPM?
Examples: Developing a mobile app, launching a website, software migration
Why CPM?
Examples: Corporate conferences, weddings, music festivals
Why CPM?
Examples: Car manufacturing, setting up a new production line
Why CPM?
Examples: Pharmaceutical drug development, product prototyping
Why CPM?
Examples: Aircraft design, satellite launches, military equipment development
Why CPM?
While CPM is a powerful project management tool, it has several limitations that project managers should be aware of.
CPM relies on fixed estimates for task durations, but in reality, projects often face uncertainty (unexpected delays, scope changes, resource availability issues). For instance, In a software development project, coding might take longer due to unforeseen bugs.
✅ Workaround: Use PERT charts (Program Evaluation and Review Technique), which consider best-case, worst-case, and average estimates.
CPM assumes unlimited resources, meaning tasks on the critical path might require the same team members or equipment, leading to scheduling conflicts. For example, if two critical tasks need the same expert, one task will be delayed.
✅ Workaround: Use resource leveling or the critical chain method (CCM) to optimize resource allocation.
This method focuses only on the critical path, but non-critical tasks may become critical if delayed. For instance, a delayed content review in a marketing project may later block website development.
✅ Workaround: Regularly update the project schedule and monitor near-critical tasks.
CPM works best for linear, sequential projects, but agile projects (software development, marketing campaigns) involve iterative work that CPM struggles to model. In Agile development, for example, tasks change dynamically based on feedback, which CPM doesn’t easily accommodate.
✅ Workaround: Use Agile methodologies (Scrum, Kanban) alongside CPM for adaptive project management.
As projects grow in size, CPM diagrams become complicated and hard to manage with hundreds of tasks and dependencies. For instance, a large construction project with thousands of interdependent tasks can make CPM overwhelming.
✅ Workaround: Use project management software like ClickUp to automate scheduling. Check out ClickUp’s Free Forever plan to learn more.
CPM doesn’t account for external risks like supplier delays, economic downturns, or natural disasters. Raw material shortages might disrupt a factory’s production timeline, which CPM won’t flag.
✅ Workaround: Combine CPM with risk management strategies, such as Monte Carlo simulations.
The critical path method can be an excellent helping hand when dealing with a demanding project. It enables you to meticulously assess and sequence tasks, ensuring that you meet deadlines, keep the project schedule in order, maintain healthy client relationships, and drive actual progress and growth.
When your tasks are sorted out, the rest of the project falls into place.
Project managers should combine CPM with other techniques like Agile, resource management, and risk analysis to create a more realistic project plan. This comes together even more effectively when you have a modern project management solution like ClickUp at hand.
Get started with ClickUp today! ✨
The Critical Path formula calculates the earliest and latest start and finish times for tasks in a project. The goal is to find the longest sequence of dependent tasks (the critical path) that determines the shortest possible project duration.
The key formulas involved are:
By applying these formulas across all tasks, project managers can identify which tasks must stay on schedule to prevent project delays.
The Critical Path Algorithm consists of two main parts:
1. Forward pass (earliest times calculation): This step determines the earliest start (ES) and earliest finish (EF) for each task, ensuring the project is completed in the shortest possible time.
Example: If a task starts on Day 5 and takes 3 days, then:
2. Backward pass (latest times calculation): This step calculates the latest start (LS) and latest finish (LF) without delaying the project deadline.
Example: If a task must finish by Day 12 and takes 4 days, then:

Praburam Srinivasan
Max 22min read

Manasi Nair
Max 20min read
Praburam Srinivasan
Max 24min read

© 2026 ClickUp