Microsoft Word Hacks Featured Image

25 Microsoft Word Hacks to Optimize Your Work

Whether you’re a student doing assignments, professional drafting reports, or just someone organizing personal documents, you’ve probably used Microsoft Word. 

Microsoft tools are known for their intuitive interface, extensive features, and universal compatibility. All the interfaces of Microsoft Office are simple to use, making work easier, faster, and safer.

But achieving their current versions and perfecting them has taken decades. Microsoft Word was launched in 1983. Over the years, it has undergone several updates and improvements, winning the tech giant over 750 million active users monthly!

This success can be attributed to the platform’s user-friendliness, which makes it accessible for both beginners and advanced users. 

But few people know about the following Microsoft Word hacks and tricks that can save you a lot of effort and time!

Summarize this article with AI ClickUp Brain not only saves you precious time by instantly summarizing articles, it also leverages AI to connect your tasks, docs, people, and more, streamlining your workflow like never before.
ClickUp Brain
Avatar of person using AI Summarize this article for me please

25 Microsoft Word Hacks to Become a Super User

We know Microsoft Word helps you get a lot of stuff done. And these hacks will ensure you get to do much more with the time you save. These Microsoft Word tips are best implemented on a Windows computer. 

1. Using keyboard shortcuts for paragraph alignment and spacing

If you’re a fan of quick typing and streamlining your writing, you will love these keyboard shortcuts that will help you align and format your entire document as you need.

It’s one of the most basic Word tricks.

Other than the common copy/paste, undo/redo, and bold/italics functions, the following shortcuts will let you pen that project summary (or that long-delayed book) much faster.

ShortcutPurpose
Align leftCtrl + L
Align centerCtrl + E
Align rightCtrl + R
Justify textCtrl + J
Increase the font sizeCtrl + ]
Decrease the font sizeCtrl + [
Create a bulleted listCtrl + Shift + L
Using keyboard shortcuts in MS Word

2. Adding a password to your Word file

Don’t want your confidential data leaking out? Set up a passkey so only you or other authorized people can access the file. Here’s how:

  1. Click ‘File’ and then go to ‘Info’
  2. Choose ‘Protect Document’ and click ‘Encrypt with Password’
  3. Follow the instructions to set a password. Word will ask for this password every time you open the document

3. Changing your file’s read/edit access

If setting a passkey is not your thing, but you still want to protect your document from being tampered with, you can remove the editing permissions from the file. This will make the file read-only for other users. You can achieve this by doing the following:

  1. In the ‘Protect Document’ menu, select ‘Restrict Editing’
  2. Limit formatting styles and decide on changes like tracking, comments, or making it read-only
  3. If you want specific people to edit the document, select the text, add their name under exceptions, and click ‘Yes, Start Enforcing Protection’

4. Adding or removing watermarks

If you want to personalize your document, indicate its purpose, or protect its confidentiality, follow these steps:

  1. Open your document in Microsoft Word
  2. Go to the ‘Design’ tab
  3. Click ‘Watermark’
  4. Choose from the provided options like ‘Draft’, ‘Urgent’, ‘Confidential’, or ‘Top Secret’, or use your own text or image
  5. If using a picture, we recommend making it faint using the washout effect. For text, it’s better to make it semi-transparent

To remove a watermark, go back to the ‘Design’ tab, select ‘Watermark’, and then choose ‘No Watermark’.

5. Using Word’s clipboard history tool

When you’re busy working on your document, you’ll probably need to do some copy-pasting. Word supports frequently used shortcuts such as Ctrl+X, Ctrl+C, and Ctrl+V, but this nifty tool called the Office Clipboard can store up to 24 items (text and images) at once.

Accessing the Office Clipboard is easy:

  1. Click the small arrow next to the ‘Clipboard’ label under the ‘Home’ tab or hit Ctrl+C twice if you enable this shortcut in the ‘Options’ menu
  2. The Clipboard pane will show you the last 24 items you copied from different programs, like a browser link, email text, or worksheet data
  3. Double-click on an item to paste it, or click ‘Paste All’ to insert all items into your document in one go

Once you’re done with your project, you can click ‘Clear All’ to empty the clipboard. Not only does this keep your work private, but it also gives you a fresh slate for your next task.

6. Exporting a Word file as PDF

PDFs are super handy for sharing files while keeping the layout and formatting precisely as the original user intended. But how will you convert your Word file into PDF? Follow these easy steps:

  1. Open your Word document
  2. Go to ‘File’ and choose ‘Export’
  3. Click ‘Create PDF/XPS’
  4. Select ‘Options’ to fine-tune settings
  5. For long-term archiving, check ‘PDF/A compliant’
  • For top-notch image quality, select ‘Optimize for image quality’
  • For the perfect font, select ‘Bitmap text’
  • For password protection, check ‘Encrypt the document with a password’ and set a password
  1. Save your PDF and voilà! Your document is secure and ready

7. Importing a PDF file into a Word file

Exporting a Word file as a PDF is easy. But what if you want to edit your work within a PDF File? While many document editing software are available, you can edit your PDF by importing the file into Word.

Here’s how you can import a PDF file into Word:

  1. Open Word and go to ‘File’
  2. Choose ‘Open’ and browse to your PDF document
  3. Select ‘PDF’ as the document type

Alternatively, you can right-click your PDF file and open it with Word.

Don’t worry about Word alerting you to potential limitations through a dialog box. Simply edit your document in Word, save it, and export it back to PDF if needed.

8. Reorganizing long documents

The Outline View feature can come in handy when dealing with long documents in Word. It gives you a nice bulleted list of your document’s content without all the images, showing different heading levels and subtexts.

It’s perfect to understand the document’s contents without scrolling endlessly through multiple pages.

Follow these steps to enable it: 

  1. Switch to ‘Outline View’ from the ‘View’ tab in Word’s ribbon or toolbar
  2. You can also drag and drop stuff around to make organizing even faster and easier

9. Recovering old versions of unsaved files

It’s a bummer when your computer crashes while you are working on Word, and you lose all your precious data because you forget to hit Save!

But fear not. Microsoft Word has got our backs with a nifty file recovery option. Here’s how to use it:

  1. Go to ‘File’ and click ‘Info’
  2. Choose ‘Manage Document’ and click ‘Recover Unsaved Documents’
  3. A dialog box will appear with a list of unsaved files. Select the one you want to recover

10. Turning on AutoSave in Word

There’s another way to prevent losing your life’s work in Word. You can now connect your Word account to the cloud and turn on the AutoSave feature.

Now, if your computer decides to call it quits, all you have to do is connect your OneDrive to your MS Word to recover the data.

Or, you can do this by adjusting the auto-recovery settings:

  1. Click ‘File’ and then go to ‘Options’
  2. In the pop-up menu, select ‘Save’
  3. Here, you can change the auto-recovery settings
  4. Specify the frequency of autosaves by specifying the number of minutes
  5. Choose a different location for storing auto-recovery files

11. Compressing images in Word

Have you ever felt annoyed while waiting for your Word files to load? Why’s it so slow, you wonder. Mostly, it’s because the images in the document are heavy! 

If you want your file to open faster, you need to shrink your file by downsizing your images. Do it in two easy steps:

  1. Select an image and go to the ‘Format’ tab
  2. Click ‘Compress Pictures’ and choose a lower resolution for the image

Keep in mind that resizing your images can also affect their quality. So striking a balance is critical here!

12. Reorganizing the Quick Access Toolbar

Now, let’s talk about the Quick Access Toolbar that sits right under the title bar in Word. It’s one of the most used ribbons that houses all your key functions like Save, Undo, Redo, and even AutoSave in newer Word versions. 

The fun part is that you can customize this ribbon easily to make your favorite functions and commands more accessible—simply click the small arrow at the right corner of the toolbar.

You can also drag and drop this toolbar anywhere on the window, like just below the ribbon, to enjoy a more organized workspace.

13. Customizing the Status Bar

Have you ever noticed the bar at the bottom of your Word window? It’s called the Status Bar and behaves like your document’s personal assistant—keeping you informed about your document features and reading modes while packing in a handy zoom slider. 

Here are some things you can do with your Status Bar:

  1. Right-click anywhere on the bar to customize it according to your taste and preferences
  2. Add more features like page numbers and word count to make the interface more user-friendly

14. Turning on the dark mode

If you’re a fan of the dark mode because it’s easy on the eyes, Microsoft has got you covered. This useful feature lets you switch your Word’s bright white (often blinding) canvas to a soothing dark grey. 

Here’s the lowdown on how to switch it on:

  1. Open your Word file
  2. Go to ‘File’ and select ‘Account’
  3. Under ‘Office Theme’, choose ‘Black’ from the available themes
  4. Your MS Word, including the canvas, will transform into a soothing dark mode

15. Switching between the dark and light modes

And if you’re in the mood, you can always return to the light mode. Switching between modes is pretty simple. All you have to do is:

  1. Click the ‘View’ tab in the ribbon
  2. Select ‘Switch Modes’, which appears when the Office Theme is set to ‘Black’
  3. Select ‘Light Mode’

16. Getting a readability score

Want your readers to understand your text better? Check your document’s readability score. A higher score is better and ensures your text is simple and clear. 

Here’s a quick rundown on how to know your text’s readability score:

  1. Click ‘File’ and then select ‘Options’
  2. From the menu, click ‘Proofing’
  3. Under ‘When correcting spelling and grammar in Word’, make sure to select Check grammar with the spelling check box
  4. Select ‘Show readability statistics’
  5. Return to your document
  6. Select ‘Spelling & Grammar’
  7. Correct or ignore any spelling or grammar corrections, and then Word opens the Readability Statistics window with information about the reading level of the document

For Microsoft 365, follow these steps:

  • Open your Word document
  • Select the Home tab
  • Choose ‘Editor,’ and then go to ‘Document stats’
  • A dialog box lets you know Word is calculating your document stats. Choose OK.  A dialog explaining that readability stats are being calculated, and this may take a few minutes. Choose ‘OK’ or ‘Cancel’
  • Word will open a window that shows you information about the statistics and reading level of your document

This score helps you understand how easy it is to read your text. 

There are two types of readability scores in MS Word:

  • Flesch Reading Ease: Scores range from 0-100, with higher scores indicating easier reading. Aim for 60-70 for most documents.
  • Flesch-Kincaid Grade Level: This score represents the U.S. grade level needed to understand the text easily. Target 7.0-8.0 for general audiences.

17. Removing extra spaces between the text

Until a few years ago, ‘word processors’ used to add double spaces to improve the text readability of a printed document. With everything moving online these days, this practice has become obsolete. Despite this, some of us still stick to the old ways.

No need to worry, though! We can rectify this by following four steps:

  1. Hit Ctrl + H to open the ‘Find/Replace’ tool in Word
  2. In the ‘Find’ box, type ‘( ){2,}’ against ‘Find what’
  3. In the ‘Replace with’ box, type ‘\1’
  4. Click ‘Replace All’ to eliminate the extra spaces

18. Removing extra spaces between paragraphs

If you’re struggling with extra spaces after your paragraphs and want to reduce them to a single line gap, there’s a simple way of tackling it. 

Eliminate double-paragraph spaces by following these steps:

  1. Press Ctrl+H to open the ‘Find/Replace’ tool in Word
  2. Use the tool to find ‘^p^p’ (symbols for a paragraph break)
  3. Replace it with ‘^p’
  4. Click ‘Replace All’ to remove extra spaces between paragraphs

You can do this multiple times to remove all the double spaces until only single-line spaces are left between the paragraphs.

19. Controlling the paste options

What if you want to paste text from another file but it refuses to format? How do you solve this puzzle? Here’s how:

  1. While pasting your text, use the ‘Paste Options’ button 
  1. Use it to keep, merge, or discard formatting
  2. Paste your text by right-clicking and pasting or using the Ctrl+V option
  3. Then, you can access ‘Paste Options’ either using the cursor or by clicking ‘Tab’

20. Expanding the cut-copy-paste functions using Spike

For most of us, Ctrl+C and Ctrl+V are our beloved shortcut keys! But only a handful of people know about this lesser-known Word feature, Spike. 

It’s a storage space for several snippets that can be pasted one or more times into your file. This is a useful trick to move separate sections of text while reorganizing a large file.

Here is how you can use Spike in Word:

  1. Instead of cutting and pasting text, highlight the text you want to move
  2. Hit Ctrl+F3. This saves the selected text in Spike
  3. Repeat this for other text snippets you want to move. Each time you press Ctrl + F3, it adds more text to the Spike
  4. Now, place your cursor where you want to paste the text
  5. Press Ctrl+Shift+F3 to paste the saved text from the Spike into your document. This only works once
  6. If you want to paste the saved text multiple times,
  • Type ‘Spike’ where you want the text to go
  • Press F3. This will insert the text from Spike
  • You can do this as many times as you need

If you wish to see your snippets in Spike, do the following:

  1. Go to the ‘Insert’ tab
  2. Click the ‘Quick Parts’ button
  3. Choose ‘Building Blocks Organizer’
  4. Select Spike on the left to see its contents
  5. Insert the contents directly into your document from this screen by clicking the ‘Insert’ button

21. Browsing the internet in Word

While working on your document, you no longer have to open your browser to search the internet. You can easily do this using the Smart Lookup feature in Word. 

Here’s how:

  1. Highlight the word or phrase you want to learn more about
  2. Right-click on the selected text to bring up a menu
  3. Choose ‘Smart Lookup’ from the menu options

A new window will appear on the side, showing you search results from the internet related to the selected text. You’ll find everything from definitions and explanations to images. And the best part is that you can click those search results to find more information or related content.

22. Showing hidden characters in Word 

Every time your Word file starts acting up and the text alignment goes for a toss; chances are that there are many hidden characters at play. To reveal those sneaky spaces, tabs, and paragraph marks in Microsoft Word, take the following steps:

  1. Click the ‘Home’ tab 
  2. Look for the ‘¶’ symbol in the ‘Paragraph’ group and click it to reveal the hidden characters
  3. Once clicked, these hidden characters will show up in your document
  4. If you want to hide the characters again, click the ‘¶’ symbol once more

23. Removing hidden characters in Word 

It’s also possible to do away with these hidden characters simultaneously! You can use the ‘Find and Replace’ feature to find and replace hidden characters. Here’s how:

  1. Click the ‘Home’ tab
  2. Look for the ‘Find’ button in the ‘Editing’ group, and click the small arrow next to it to reveal the drop-down menu. Then select ‘Advanced Find’
  3. In the ‘Find and Replace’ dialog box, click the ‘More >>’ button to show more options
  4. Check the box next to ‘Special’ and select the type of hidden character you want to find from the list. For example:
  • To find paragraph marks, select ‘Paragraph Mark (^p)’
  • To find tab characters, select ‘Tab Character (^t)’
  • To find space characters, select ‘Space (^s)’
  1. Alternatively, to replace the hidden character with something else, enter the replacement text in the ‘Replace with’ field
  2. To replace the found instance, click ‘Replace’ or ‘Replace All’ depending on your preference

24. Adding a keyboard shortcut for your favorite command

If there’s a command you love using now and then, all you have to do is create a keyboard shortcut for it!

To assign a preferred keyboard shortcut to your favorite command in Microsoft Word, follow these steps:

  1. Click ‘File’ in the top-left corner, and then select ‘Options’
  2. In the ‘Word Options’ dialog box, choose ‘Customize Ribbon’ from the left sidebar
  3. Click ‘Keyboard shortcuts: Customize’ at the bottom
  1. In the ‘Customize Keyboard’ dialog box, select the category containing your command and choose your command from the list on the right
  2. Click the ‘Press new shortcut key’ field and press the combination of keys you want to assign as the shortcut. Make sure it’s not already in use. You can check for conflicts in the ‘Current keys’ box
  3. Once you’ve found a unique shortcut, click ‘Assign’
  4. Confirm and save your changes by clicking ‘OK’ in the ‘Word Options’ dialog box

25. Using the keyboard to navigate the screen

One of the most straightforward MS Word hacks is to use the Alt key, which allows for quick navigation and access to several commands. It certainly makes life easier as it enhances efficiency in Word by providing swift access to commands and navigation options.

Here’s how you can do it:

  1. Pressing Alt once displays key tips over Ribbon commands
  1. Keyboard shortcuts with Alt streamline actions, like Alt+F for the File menu
  2. The Alt key combined with numbers accesses Quick Access Toolbar commands
  3. Alt enables menu navigation and activates dialog box options
Summarize this article with AI ClickUp Brain not only saves you precious time by instantly summarizing articles, it also leverages AI to connect your tasks, docs, people, and more, streamlining your workflow like never before.
ClickUp Brain
Avatar of person using AI Summarize this article for me please

Limitations of Using Microsoft Word

While Microsoft Word might be one of the best word-processing software, it still has some limitations. Some of these are:

  1. Expensive pricing: MS Office Suite is a pretty costly subscription. If you’re not ready to spend too much money, use one of the many free Microsoft Word alternatives. You can also choose between Microsoft Word and Google Docs 
  2. Feature complexity: Word has so many features that you can barely scratch the surface. This complexity can feel very overwhelming, especially for new users
  3. Unintuitive actions: Aligning text or adjusting pictures in Word is not as easy as it sounds. And spacing the paragraphs is another ballgame. Many of its features are not the most intuitive
  4. Feature bloat: Mail merge, Spike, and document automation are tools you may or may not always use. It requires a lot of patience and practice to master their uses in this word-processing program 
Summarize this article with AI ClickUp Brain not only saves you precious time by instantly summarizing articles, it also leverages AI to connect your tasks, docs, people, and more, streamlining your workflow like never before.
ClickUp Brain
Avatar of person using AI Summarize this article for me please

The Future of Word Processing

While traditional word processors like Microsoft Word remain popular, the future of text creation lies in integrated, collaborative, and AI-powered writing tools.

And one of them is ClickUp! 

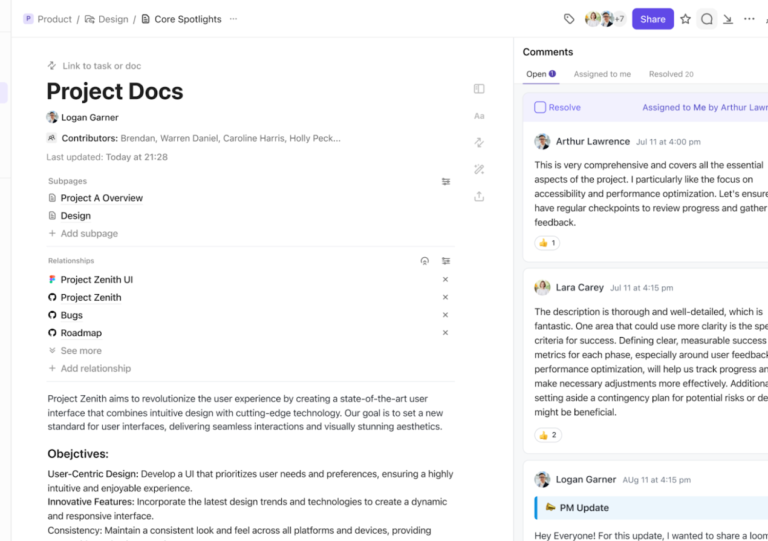
ClickUp Docs offers various document creation and editing capabilities, which you can use directly within ClickUp. It goes beyond the siloed experience of traditional word processors, offering real-time co-editing, document sharing, and seamless communication within teams. 

ClickUp Docs
Work on a document with your teammates simultaneously using ClickUp Docs

ClickUp Docs isn’t limited to text alone. You can seamlessly embed images, videos, and other multimedia elements, creating rich and engaging documents beyond the static page. This versatility makes ClickUp Docs suitable for various content creation needs, from reports and proposals to presentations and marketing materials.

For instance, if you’re preparing a project proposal, you can use nested pages to organize information intuitively, add task assignments within the doc for actionable insights, and even attach files for reference. 

ClickUp Docs
Easily manage your content using ClickUp Docs

And when you pair Docs with ClickUp Brain, you can enjoy word processing and brainstorming superpowers! Imagine smart suggestions for phrasing, grammar, and even content ideas tailored to your writing style and target audience. ClickUp Brain could become an invaluable assistant, enhancing your written work’s clarity, flow, and overall quality.

Use ClickUp Brain’s AI Writer for Work for its:

  • ​​Content generation capabilities:
    • AI-powered writing suggestions to kickstart document creation
    • Automated content templates for various use cases (e.g., meeting notes, project plans)
    • Contextual idea generation for blog posts, reports, and more within ClickUp Docs
  • Editing capabilities:
    • Real-time grammar and spell-checking
    • Style and tone adjustments to match the desired voice of the document
    • Sentence structure optimization for clarity and readability
  • Collaboration and workflow integration:
    • Seamless collaboration with team members directly in ClickUp Docs
    • Commenting and suggestion mode for peer reviews and feedback
    • Task assignments from within documents to streamline project management
  • Customization and organization:
    • Customizable views and templates tailored to individual or team needs
    • Easy organization of documents into folders and lists for efficient retrieval
    • Integration with ClickUp tasks and goals to align documentation with project objectives
  • Data-driven insights:
    • Content analytics to track engagement and performance within ClickUp
    • Automated summarization of lengthy documents for quick overviews
    • Smart search capabilities to find relevant information across all ClickUp Docs
  • Accessibility and compatibility:
    • Cross-platform accessibility for a consistent experience on the web, desktop, and mobile
    • Compatibility with various file formats for easy import and export of documents
    • Voice-to-text feature for hands-free content creation within ClickUp Docs

It’s a handy technical writing tool to help you save time and focus on work that interests you. 

ClickUp Brain
Use ClickUp Brain to generate content within seconds

It’s evident that ClickUp is not just about creating and editing text—it’s also about project management and team collaboration. 

Summarize this article with AI ClickUp Brain not only saves you precious time by instantly summarizing articles, it also leverages AI to connect your tasks, docs, people, and more, streamlining your workflow like never before.
ClickUp Brain
Avatar of person using AI Summarize this article for me please

Know Your Way Around Word

We know Word is often the go-to choice for simple writing and complex word processing needs. And understanding these hacks can make your (work) life simpler, turning you into a Microsoft Word guru!

But why limit yourself to Word when you can integrate document creation with task management in one tool? With all-in-one tools such as ClickUp, you’re not just typing words on a page; you’re creating actionable items that can be tracked and managed within your team’s workflow.

With access to features like an AI writing assistant, collaborative editing, brainstorming templates, etc., your writing will jump from good to great in no time. 

And the best part? You can unlock all these capabilities for free! 

Sign up on ClickUp today!

Summarize this article with AI ClickUp Brain not only saves you precious time by instantly summarizing articles, it also leverages AI to connect your tasks, docs, people, and more, streamlining your workflow like never before.
ClickUp Brain
Avatar of person using AI Summarize this article for me please

Common FAQs

1. How can I make Microsoft Word more attractive?

Improve Word’s appearance by choosing stylish fonts, color palettes, and engaging images or charts. Keep a neat and consistent layout for a polished look.

2. How can I enhance my word-processing skills?

Level up by carefully proofreading for errors, organizing content with clear headings and bullet points, and learning useful keyboard shortcuts to work faster.

3. How do I add creativity to my Word documents?

Infuse creativity by exploring unique font styles, incorporating shapes, SmartArt, or visuals, and experimenting with page borders. Consider using templates to give your document a distinct and creative flair.

Questions? Comments? Visit our Help Center for support.

Sign up for FREE and start using ClickUp in seconds!
Please enter valid email address