
Sorry, there were no results found for “”
Sorry, there were no results found for “”
Sorry, there were no results found for “”
The world of Apple’s Macs opens up a realm of possibilities, often beyond what’s commonly achieved with other operating systems. Macbooks, with their sleek design and intuitive interface, offer a suite of features and shortcuts that many users, both novice and expert, may not yet have discovered.
Whether you’re working on an iMac, a MacBook Pro, or a MacBook Air, there are impressive MacBook hacks to optimize your experience and enhance your productivity.
For seasoned Mac enthusiasts, this might be an opportunity to uncover a new trick or a hidden feature you didn’t know. On the other hand, if you’re a new Mac user, you’ve hit the jackpot right at the start.
MacBook Hacks hacks are clever tips, tricks, and shortcuts designed to enhance the functionality and efficiency of Macintosh computers. They range from simple keyboard shortcuts that speed up everyday tasks to more complex tweaks that can alter system performance or aesthetics.
These hacks aim to help users unlock the full potential of their Mac, whether it’s customizing the interface, automating repetitive tasks, optimizing storage, or accessing hidden features.
Mac hacks offer both novice and advanced users a way to personalize the computing experience and make the most out of the powerful macOS ecosystem.
Discover the top 10 MacBook hacks to streamline your workflow and increase productivity. From integrating comprehensive tools to mastering shortcuts, these hacks will revolutionize the way you interact with your MacBook:
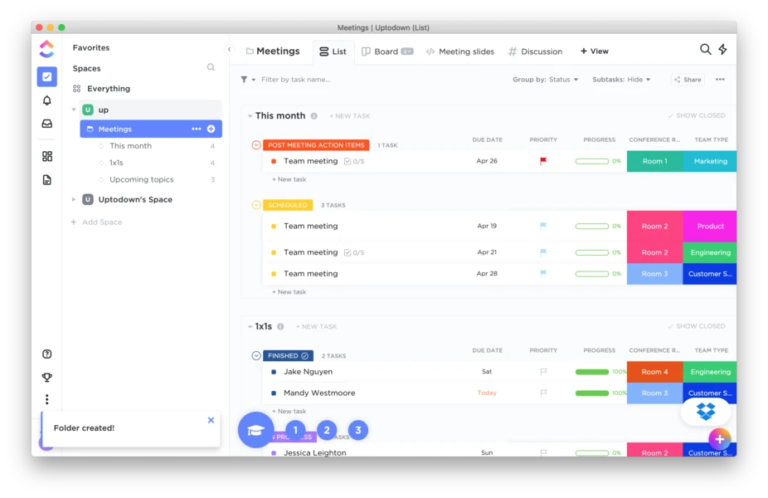
ClickUp is a versatile project management desktop app for teams of all sizes and industries, enhancing collaboration, task management, and productivity on MacBook. It combines various productivity tools into one platform, reducing the need for multiple apps.
ClickUp’s Teams help manage product roadmaps, prioritize development tasks, and collaborate effectively, all in one centralized place. It’s designed for seamless integration and enhanced productivity for any product-focused team.
Whether you’re part of a small team or a large enterprise, ClickUp provides a cohesive space to bring your work together. For Mac users, ClickUp is a game-changer with its range of task management apps, to-do list capabilities, and best productivity tools to enhance your workflow.
Writers can explore specialized writing apps for Mac, while developers have access to tailored productivity tools and developer tools.
For those seeking organization, ClickUp offers work schedule apps, daily planner templates, and operations management software to keep your projects on track. ClickUp is more than a tool; it’s a holistic solution for anyone looking to elevate their productivity and manage their work more efficiently.
Moreover, its ability to seamlessly integrate with popular work apps such as Outlook, HubSpot, Slack, OneDrive, Discord, and over 1000 other tools means your entire work ecosystem is interconnected, enhancing collaboration and productivity while keeping all your essential tools and tasks in one centralized location.
Ready to get started? Begin by downloading ClickUp for your Macbook.

The batch rename feature in Finder is a powerful yet underutilized tool that allows you to quickly rename multiple files simultaneously, streamlining the organization and saving time.
This feature is especially useful for photographers, designers, or anyone dealing with a large number of documents or files. Here’s how to use it:
By using the Batch Rename feature, eliminate the tedious process of renaming each file individually, making your workflow more efficient and organized.

Text clippings on a Mac allow you to save snippets of text for quick access and reuse. Here’s how to create and use them:
This feature acts as a convenient storage for frequently used text, quotes, or any information you might need to reuse, enhancing productivity by saving time on retyping or searching for the text.
Custom keyboard shortcuts on a Mac let you create specific keystrokes to perform menu actions in apps, streamlining your tasks. Here’s how to set them up:

Customizing your shortcuts can significantly speed up your workflow by providing instant access to frequently used functions with a keystroke.
📮ClickUp Insight: 83% of knowledge workers rely primarily on email and chat for team communication. However, nearly 60% of their workday is lost switching between these tools and searching for information. With an everything app for work like ClickUp, your project management, messaging, emails, and chats all converge in one place! It’s time to centralize and energize!

Enhance your digital communication by effortlessly adding emojis on your Mac. Here’s how to swiftly access the emoji keyboard:
Keep in mind that while this method works in most business messaging and email fields, it might not function in every text entry area. If an emoji doesn’t display correctly, it will usually show as a triangle.
Gone are the days of capturing your entire Mac screen. With Mac’s advanced screenshot feature, you have the power to capture exactly what you need.
Press Command + Shift + 5, and a variety of options will appear at your command.
| Action | Tools |
| Capture the entire screen |  |
| Capture a window |  |
| Capture a portion of the screen |  |
| Record the entire screen |  |
| Record a portion of the screen |  |
Description of the screenshot tools via Apple Support
Grabbing a specific window or a portion of the screen is effortless. Additionally, if you need to record a video of your screen for a tutorial or presentation, your Mac has you covered for that as well.
Once you’ve made your selection, you can even decide where to save it for easy access later. It’s like having a versatile camera for your digital world!

Ever come across a word while reading on your Mac and wondered what it means?
There’s no need to interrupt your flow and open a browser.
With a simple hover and Command + Control + D, your Mac becomes an instant dictionary and thesaurus.
It acts like a wise professor, ready to provide definitions, synonyms, and even Wikipedia entries when available.
Whether you’re reading an article, studying for a class, or satisfying your curiosity, this is one of the most useful MacBook hacks which turns your Mac into a powerful research assistant that’s always ready to expand your vocabulary and knowledge.
Dive deeper into your Mac’s capabilities with Terminal commands. This powerful tool gives you access to a world of advanced settings and features.
Whether you want to customize your Mac’s appearance, tweak its behavior, or enhance its performance, Terminal commands offer a direct way to make these adjustments.
By entering specific lines of code, you can unlock new functionalities and tailor your Mac experience to fit your needs precisely. Here are some basic Terminal commands to help familiarize yourself with the macOS Terminal:
| Command | Description |
| pwd | Prints the current working directory path. |
| ls | Lists all files and folders in the current directory. |
| cd [directory] | Changes the current directory to the specified one. |
| mkdir [name] | Creates a new directory with the specified name. |
| rm [file] | Deletes the specified file. |
| cp [source] [destination] | Copies a file from the source to the destination. |
| mv [source] [destination] | Moves a file from the source to the destination. |
| man [command] | Displays the manual page for the specified command. |
| touch [file] | Creates an empty file or updates the timestamp on the existing file. |
| echo [text] | Displays the specified text in the terminal. |

Tackle lengthy articles or documents effortlessly with the Summarize Text feature on your Mac.
First, enable the ‘Summarize’ service by navigating to System Preferences > Keyboard > Shortcuts > Services.
Once activated, simply highlight the text you wish to condense, right-click, and select ‘Summarize.’ A concise version of the text will appear, allowing you to grasp the core information quickly. It’s particularly useful for students, researchers, or anyone needing to digest large amounts of information efficiently.

Streamline your online research with the Quick Website Search feature in Safari.
Once you’ve visited a website frequently, Safari remembers and allows you to search it directly from the address bar.
Type the website’s name, add a space, followed by your query, and hit enter. For example, typing “Wikipedia space travel” will directly search Wikipedia for articles on space travel.
It’s a time-saver for frequent researchers, students, or anyone looking to get specific information from their favorite sites quickly.

Typing special characters like é, è, or ü on your Apple device is straightforward. Simply press and hold the main letter key; a menu bar with various accent options will appear for you to choose from. For quick access to certain symbols, there are specific keyboard shortcuts:
| Character | Shortcut |
| ç | Option + C |
| œ | Option + Q |
| ¥ | Option + Y |
| € | Option + Shift + 2 |
For an extensive selection of special symbols, utilize the Character Viewer:

Streamline your daily routine by setting your Mac to automatically open your most-used apps, such as Mail, Slack, Safari, and Calendar, as soon as you log in.
Alternatively, for a faster setup:
This simple tweak ensures your essential tools are ready and waiting, optimizing your productivity from the moment you start your day.
Your Mac can accommodate multiple users, making it perfect for households where several individuals share a single computer. Each user can personalize their space with unique wallpapers, layouts, preferences, and apps. Additionally, you can ensure your privacy by setting up a Guest user account.
This feature is ideal when someone needs to borrow your Mac, as it restricts access to your files and documents.
This simple setup provides a personalized and secure experience for everyone using your Mac.

Quick Look is a potent feature that allows you to preview the contents of a file without having to open it. This can be incredibly useful when you’re looking for a specific document, photo, or other files among many.
Here’s how to use Quick Look:
With Quick Look, you can preview photos, documents, PDFs, and even videos, making it easier to find what you’re looking for without opening multiple files.
This simple yet powerful tool significantly speeds up your file navigation and selection process, adding another layer of efficiency to your Mac usage.
Embracing the multitude of MacBook hacks and features significantly enhance your productivity and streamline your workflow. From mastering ClickUp’s all-encompassing project management tools to utilizing essential shortcuts and hidden functionalities, your MacBook can transform into a powerhouse of efficiency.
As you integrate these MacBook hacks, remember that ClickUp stands ready to unify your tasks, collaborations, and projects into one seamless experience.
Whether you’re a seasoned Mac user or starting, these insights aim to unlock new levels of convenience and effectiveness, making every interaction with your MacBook smarter and more productive. Embrace these tips and step into a more organized, productive, and efficient world with your Mac and ClickUp.

Manasi Nair
Max 28min read

Sudarshan Somanathan
Max 26min read
Manasi Nair
Max 24min read

© 2026 ClickUp