How to Organize OneNote for Project Management at Work

Sorry, there were no results found for “”
Sorry, there were no results found for “”
Sorry, there were no results found for “”

The sheer volume of notes, tasks, and ideas swirling around a project can overwhelm even the most experienced project manager. Here, OneNote is a good tool for the job.
Microsoft’s digital notebook app, OneNote, has steadily grown in popularity as a tool for note-taking and project management. Its versatility allows users to capture ideas, efficiently organize their information, and collaborate with colleagues.
But its wealth of features and customization options can sometimes make navigating tricky.
In this article, we’ll explore practical tips and tricks on how to organize OneNote for work like a pro and turn it into a powerful project management tool.
Having trouble keeping your project notes organized in OneNote? This video shows a simple way to manage tasks and stay on top of work—no complicated steps, just easy solutions!
Let’s get started!
1. What’s the simplest way to organize OneNote for project management at work?
Create a notebook for each project, break it into sections, and use pages or subpages for tasks, meetings, and milestones to keep everything neatly organized.
2. How can I prioritize and track tasks effectively in OneNote?
Use tags like To Do, Important, and custom labels to organize priorities, build checkable task lists, and link related pages for faster follow-ups.
3. What’s the best way to store files, ideas, and visuals inside OneNote?
Embed documents directly on pages, use drawing tools for diagrams, and create section groups or subpages to keep large projects clean and easy to navigate.
4. Where does OneNote fall short for project management?
It lacks automation, advanced task management, project templates, and robust collaboration features—making complex or cross-functional work harder to manage.
5. How does ClickUp help where OneNote struggles?
ClickUp unifies notes, tasks, collaboration, AI, and automation in one workspace—so you can manage projects end-to-end without juggling tools.
Before discussing the specifics, let’s first explore the benefits of using OneNote:
Struggling with OneNote’s limited project management features? Get Clickup’s free Project Management Template that combines advanced note-taking, task management, collaboration, and workflow automation, and ensuring team alignment.
When you understand how to organize OneNote, finding specific notes, tasks, or references quickly becomes easier. For example, dividing your notebook into sections, pages, and subpages according to project phases, topics, or categories reduces the time spent searching through disorganized content.
A clean and structured OneNote workspace prevents clutter, helping you focus on tasks rather than getting distracted by unnecessary information. By prioritizing tasks using tags, creating checklists, and maintaining a transparent system allows you to stay on top of your work efficiently.
Organizing notebooks by project, team, or department ensures everyone involved can navigate through the content easily. Consequently, this helps team members locate relevant updates or tasks among their general notes and prevents miscommunication that can arise from chaotic note-taking. Knowing how to organize OneNote for work is key to ensuring efficient team collaboration.
Structuring your OneNote notebooks consistently for all projects sets a standardized approach. This makes transitioning between projects smoother, as everyone understands the format and where to find essential details like meeting minutes, task lists, and progress reports.
By organizing content into logical sections, you prevent duplicating notes, tasks, or project plans. For instance, creating dedicated sections for ongoing tasks or research prevents you from recreating project documents or adding redundant information.
Organized OneNote notebooks make it easy to keep track of revisions, updates, and completed tasks. By grouping related notes, it becomes easier to archive old notes and focus on the current priorities without information overload.
Organizing OneNote improves its integration with other Microsoft tools. When notebooks are systematically categorized, syncing tasks with Outlook, embedding Excel sheets, or accessing linked Teams conversations become more intuitive.
An organized notebook makes the syncing process across devices smoother, as all your sections and pages are already neatly categorized. This saves time when switching between devices and ensures that you can pick up where you left off seamlessly.
Set up a clear project-first hierarchy (notebooks → sections → pages), then use built-in tools (tags, links, templates, embeds, visuals) to track work fast and keep everything easy to find.
To fully use OneNote for project management, you must set it up to make your projects and tasks easy to manage.
Below are ten tips on how to organize content in OneNote for better project management:
The first step to organizing OneNote for project management is to create a separate notebook for each project. This keeps all relevant notebook content within one digital space, making it easier to find information when needed.
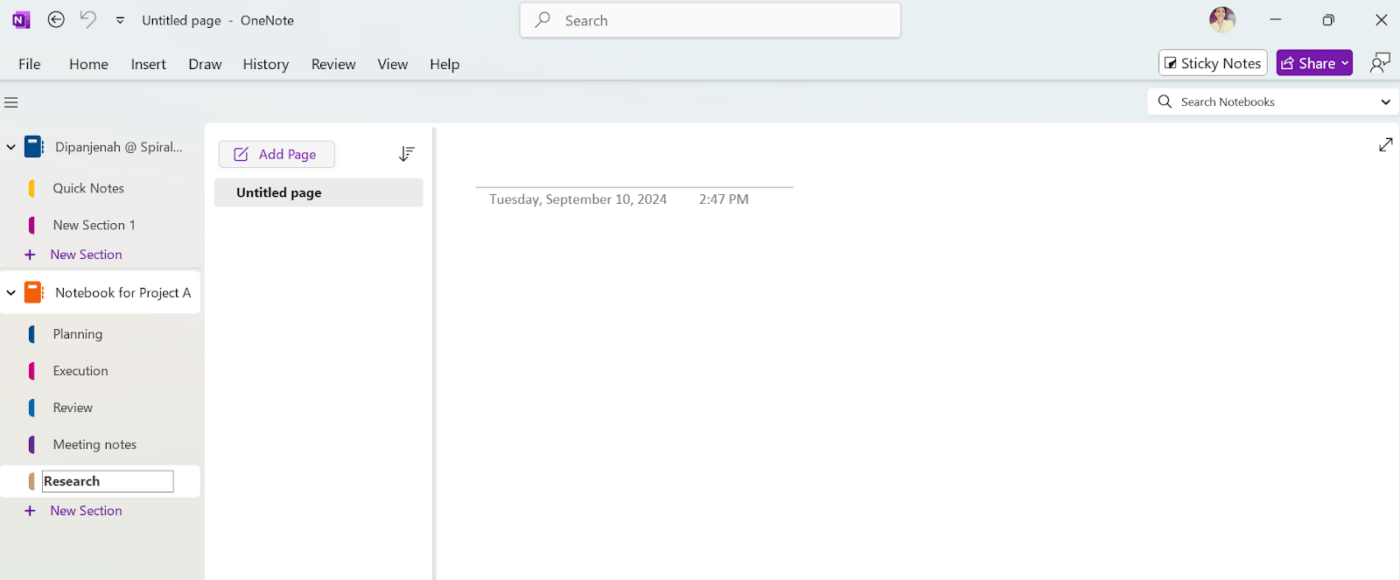
Within each project notebook, divide your content using sections. For instance, you can create sections for different project phases, such as ‘Planning,’ ‘Execution,’ and ‘Review.’ Alternatively, use sections representing key areas such as ‘Meeting Notes,’ ‘Research,’ or ‘Task Management.’
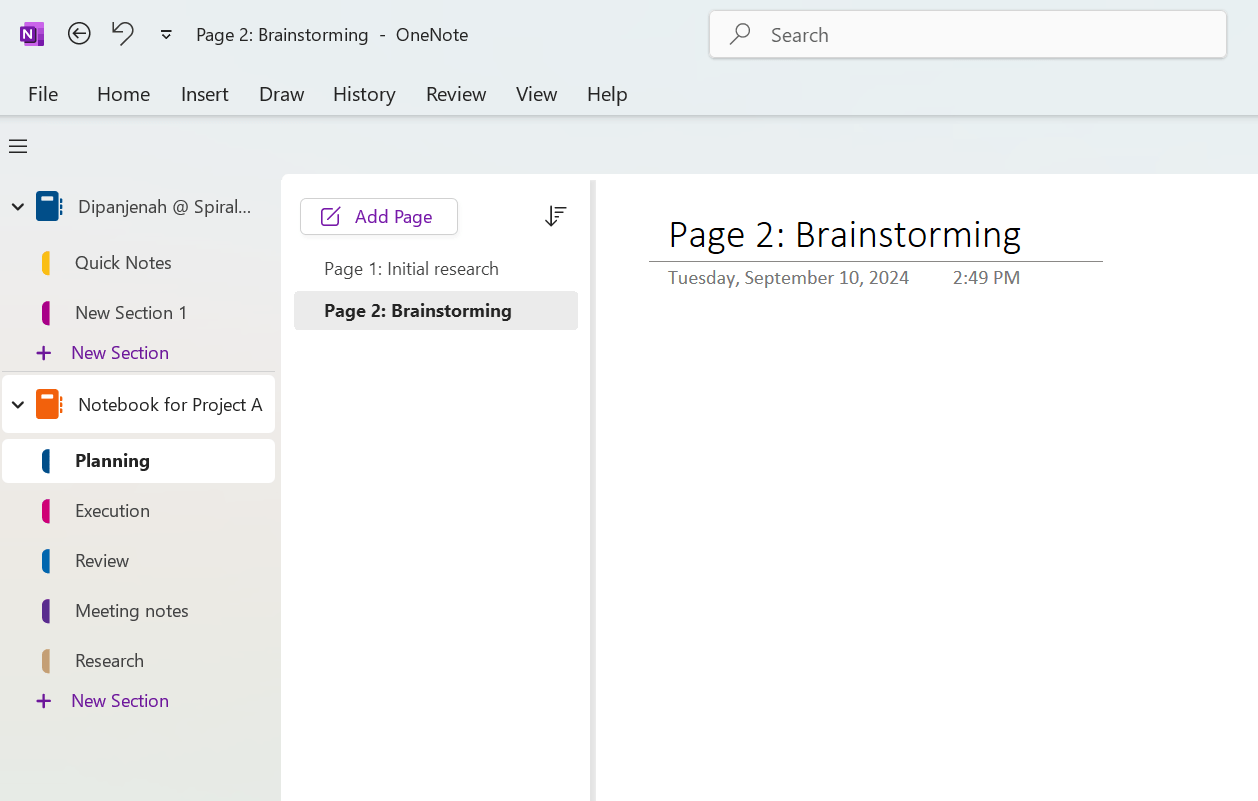
Create individual pages for specific tasks, meetings, or milestones within each section. For example, in the ‘Planning’ section, you could have several pages like ‘Initial Research’ or ‘Brainstorming.’ This structure makes it easier to track specific information and reference it later.

OneNote’s tagging feature can be beneficial when learning how to organize OneNote for project management. You can use tags to prioritize tasks, mark to-dos, or highlight important information.
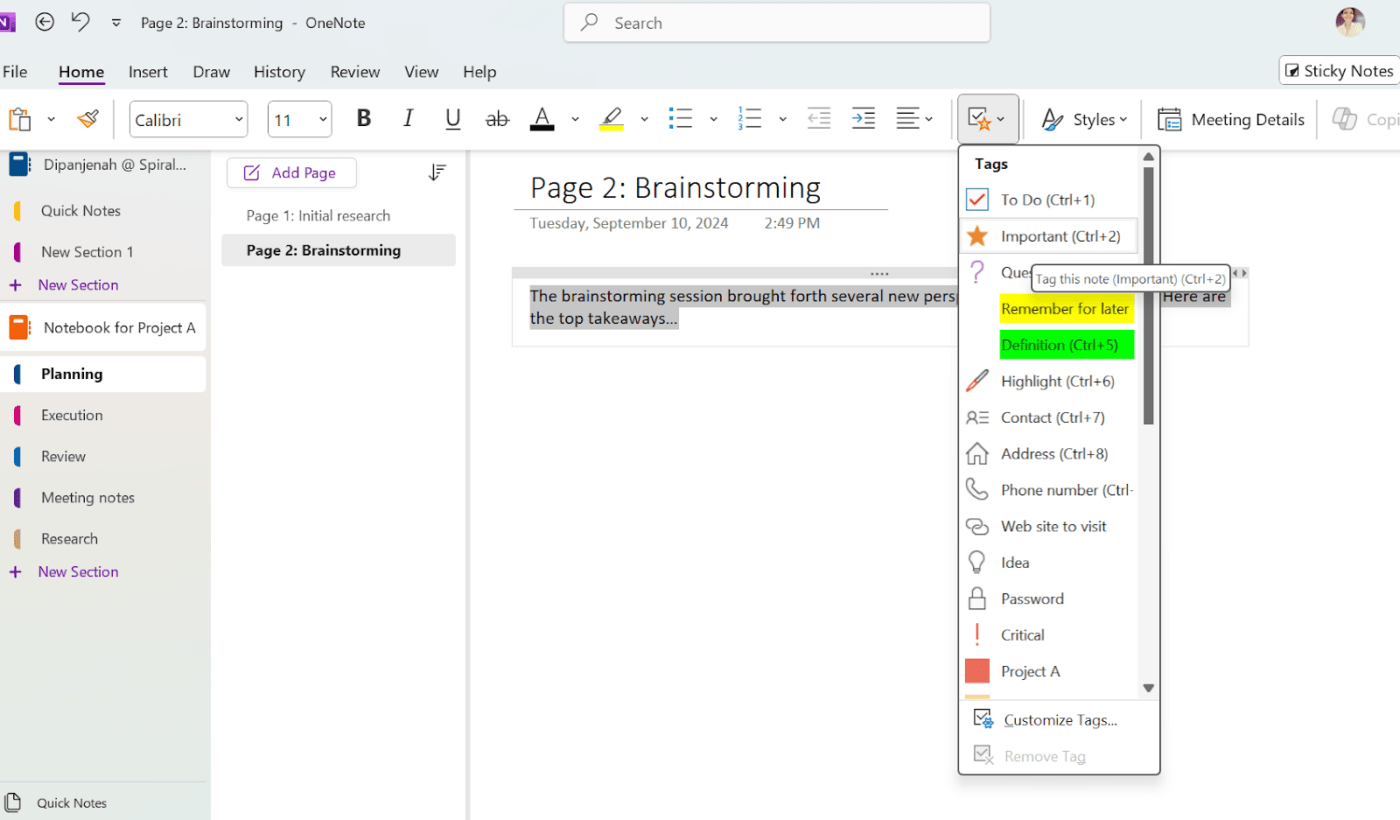
For instance, mark high-priority tasks with a ‘To Do’ tag or use the ‘Important’ tag for crucial deadlines. Additionally, the To-do tag is a quick way to create task lists with checkboxes.
💡 Pro Tip: Create a dedicated ‘Task Management’ section in each project notebook where you can outline the tasks you need to complete and mark them off as you go.
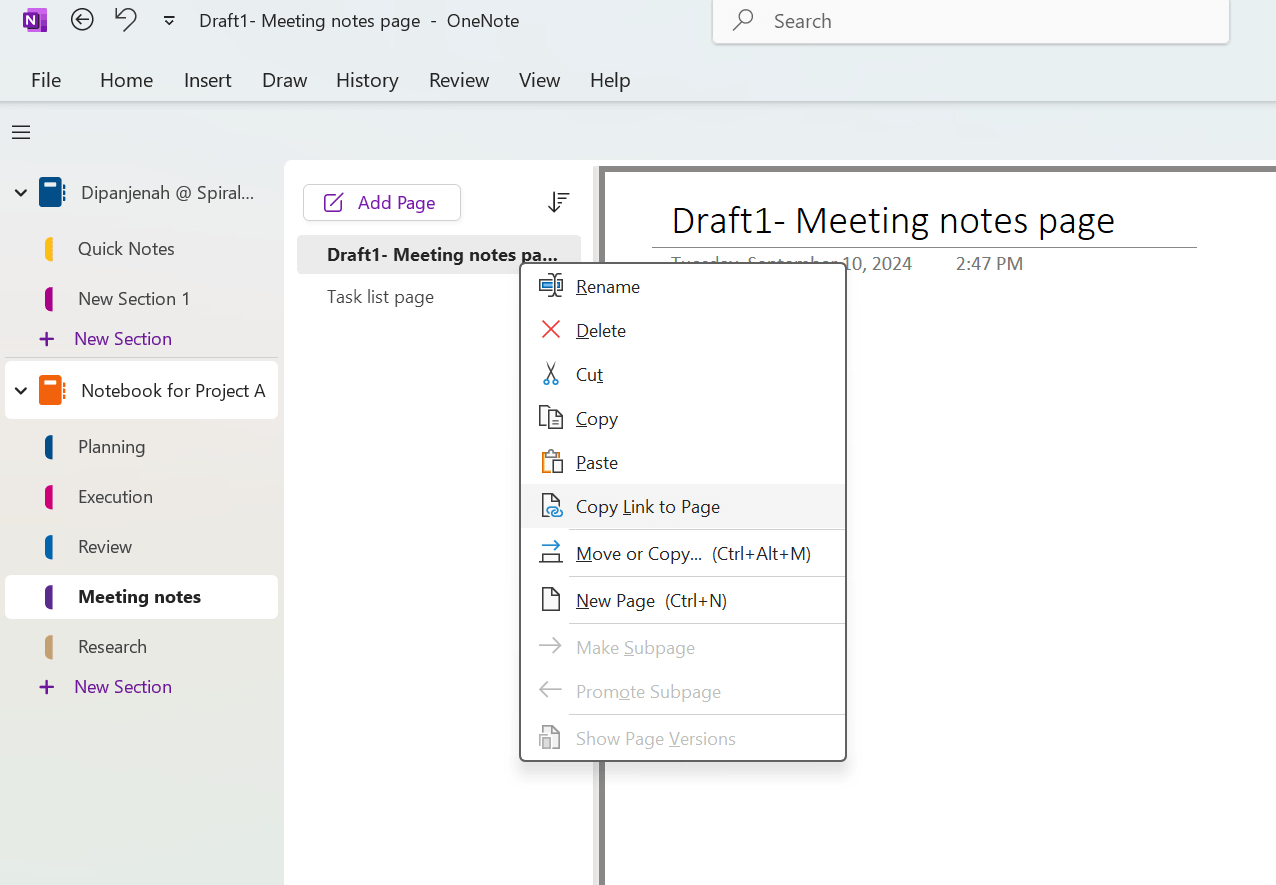
Linking pages within OneNote can enhance navigation and efficiency, a critical aspect of how to organize OneNote for complex projects. By creating hyperlinks to other pages, you can quickly jump between relevant content.
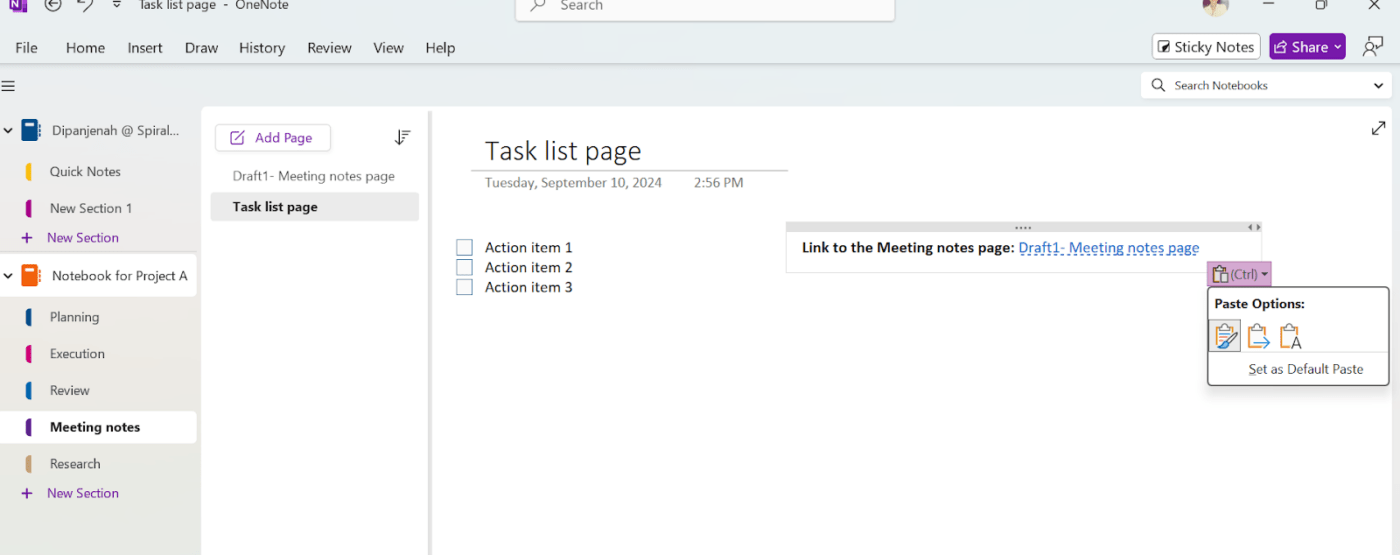
For example, link your meeting notes page to the task list page to follow up on action items more easily. A simple ‘Copy link to page’ and ‘Paste’ works.
Take advantage of OneNote’s drawing tools to create diagrams, flowcharts, and mind maps that visually represent all your project information.
Here’s how:
Step 1: Use the ‘Draw’ tab to access various drawing tools, such as pens, pencils, and shapes.
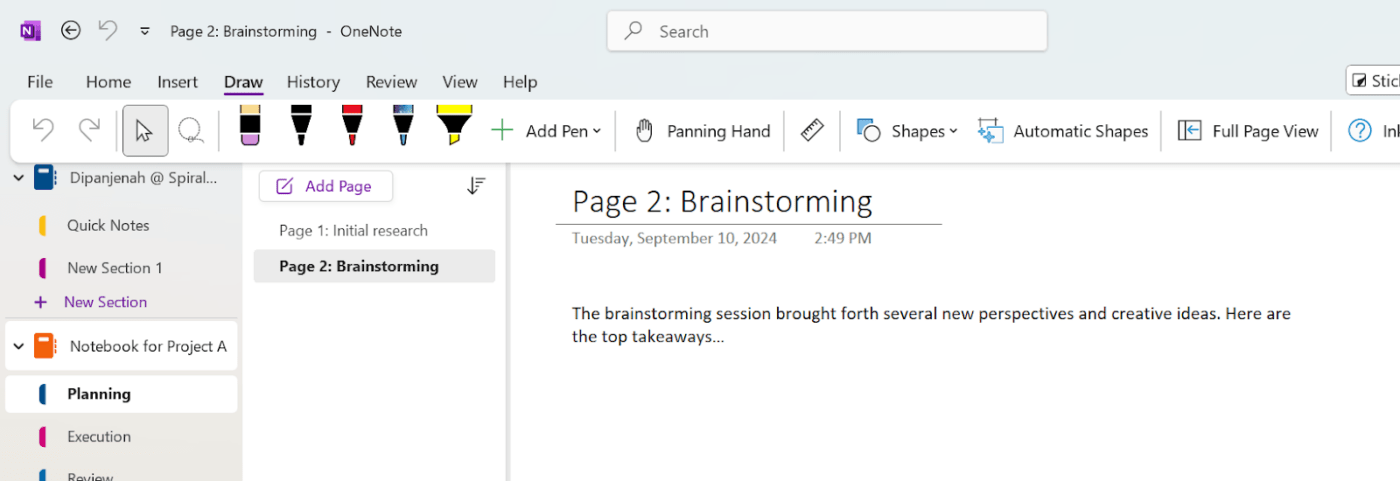
Step 2: Draw your diagram or flowchart freehand or use the shapes to create more structured elements.
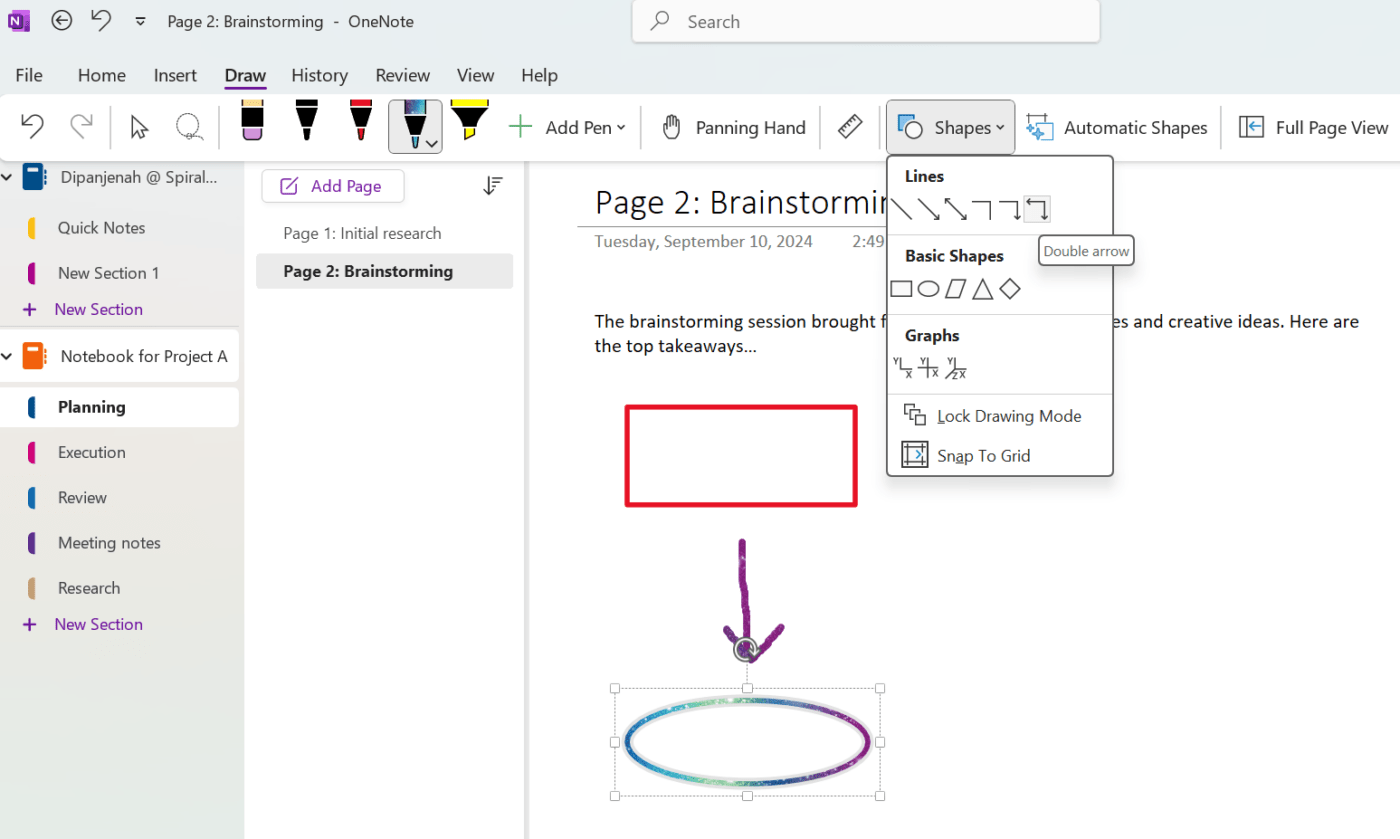
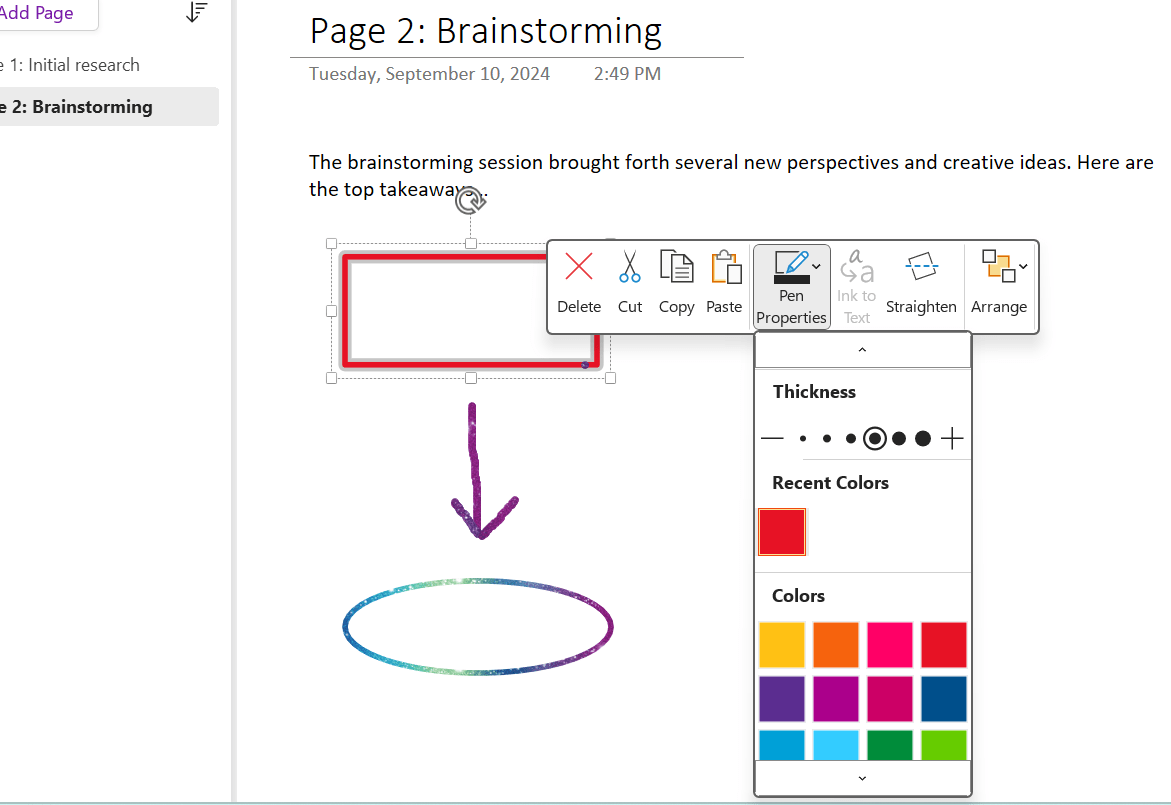
Step 3: Right-click on the different elements to customize your diagram by adjusting the shapes’ size, color, and outline.
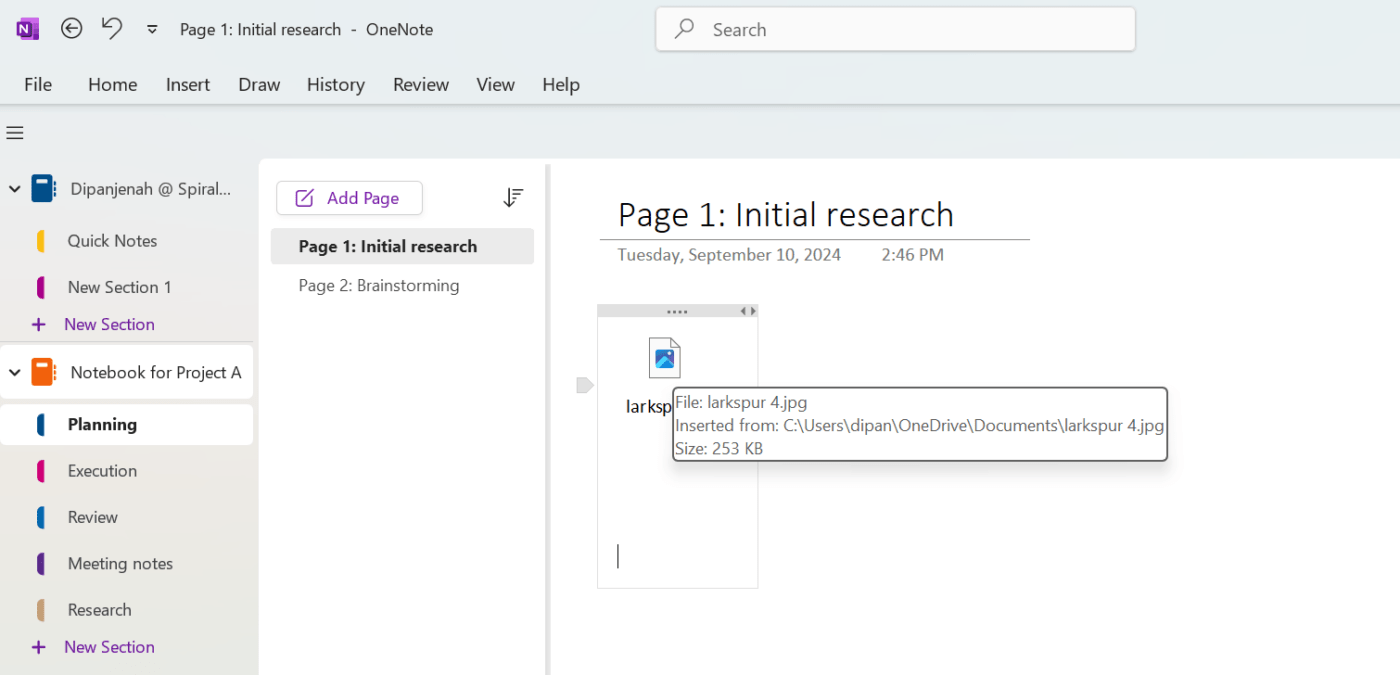
OneNote allows you to embed files directly into your OneNote notes. If you’re working on a project that involves multiple documents, such as project briefs, contracts, or design files, you can embed these directly into your notebook for easy access.
Here’s how to do it:
Step 1: Open OneNote and navigate to the page where you want to insert the file.

Step 2: Click on the ‘Insert’ tab.

Step 3: Select ‘File Attachment’ to launch the ‘Choose a file’ pop-up.
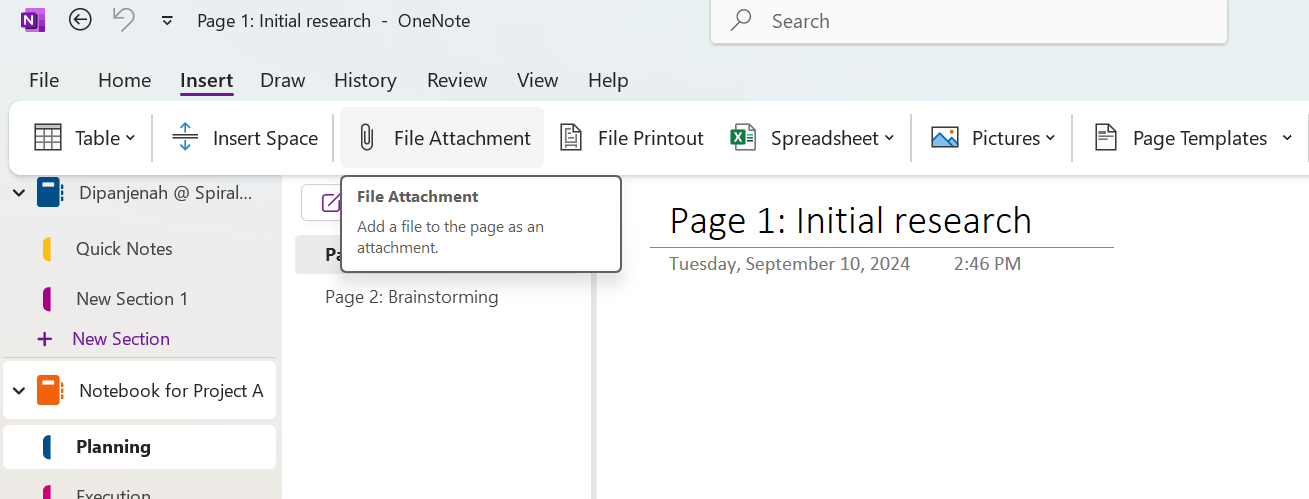
Step 4: Browse to the location of the file you want to attach and select it.
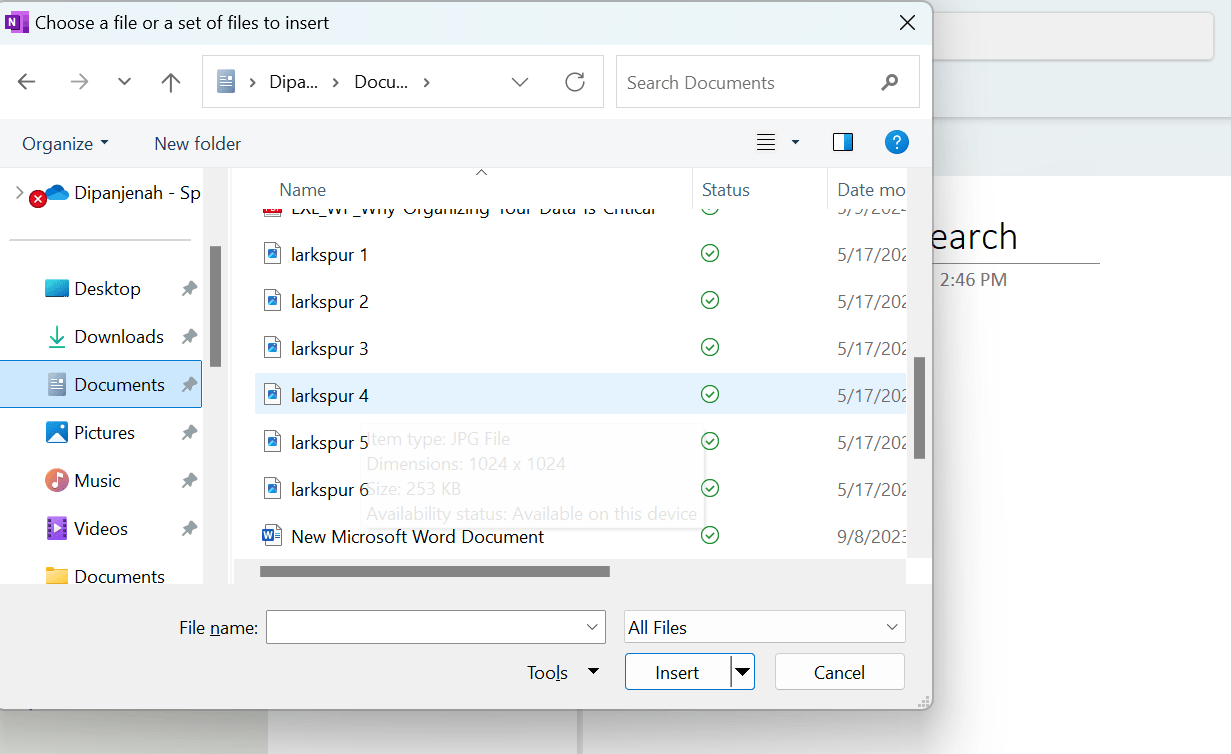
Step 5: Click ‘Insert’.
In addition to project-specific notebooks, set up a ‘Weekly Review’ notebook to summarize project progress. Overall, these templates simplify your note-taking experience, making it fun and more versatile.
OneNote templates are pre-designed note structures that can save you time and effort. They provide a consistent format for your notes, ensuring they’re organized and easy to find.
Here’s a step-by-step guide on how to use them:
Step 1: Navigate to the page where you want to insert a template.
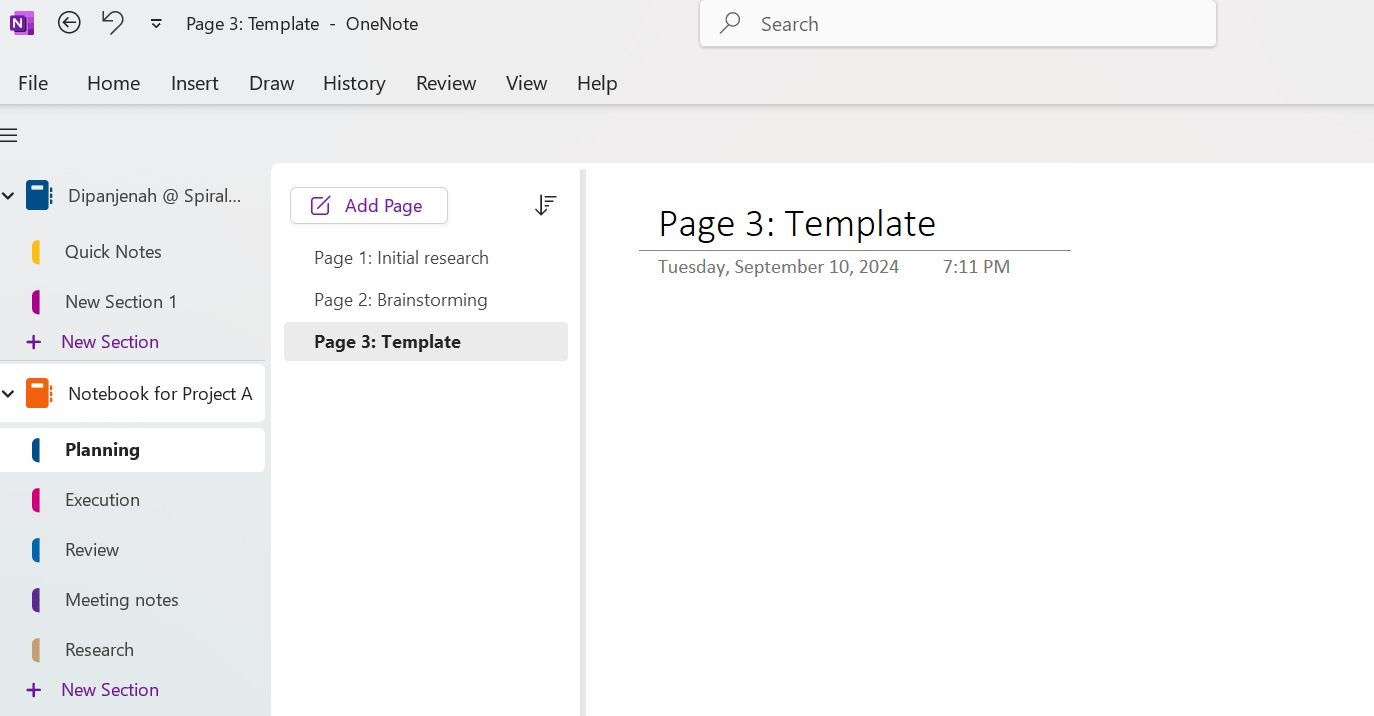
Step 2: Click the ‘Insert’ tab at the top and then the ‘Page Templates’ button. This will open the Templates panel on the right.
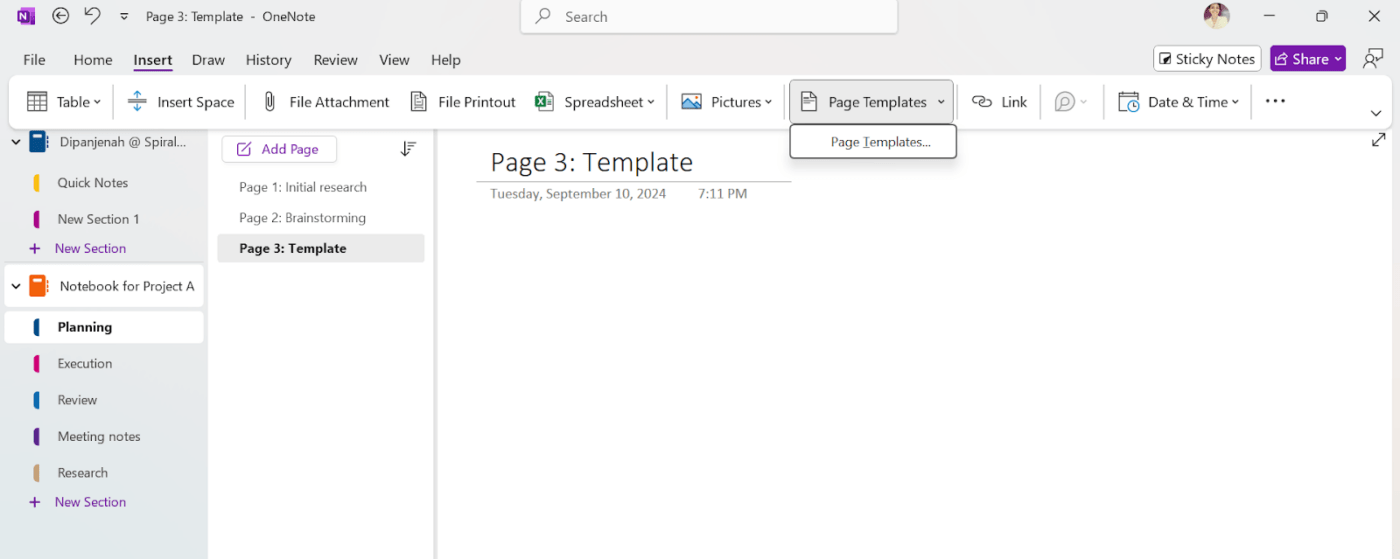
Step 3: From the side panel, choose a template that matches your requirements, such as ‘Academic,’ ‘Business,’ ‘Decorative,’ etc. Clicking on each category reveals more specific template options. Clicking on any option automatically applies the template to a new page.
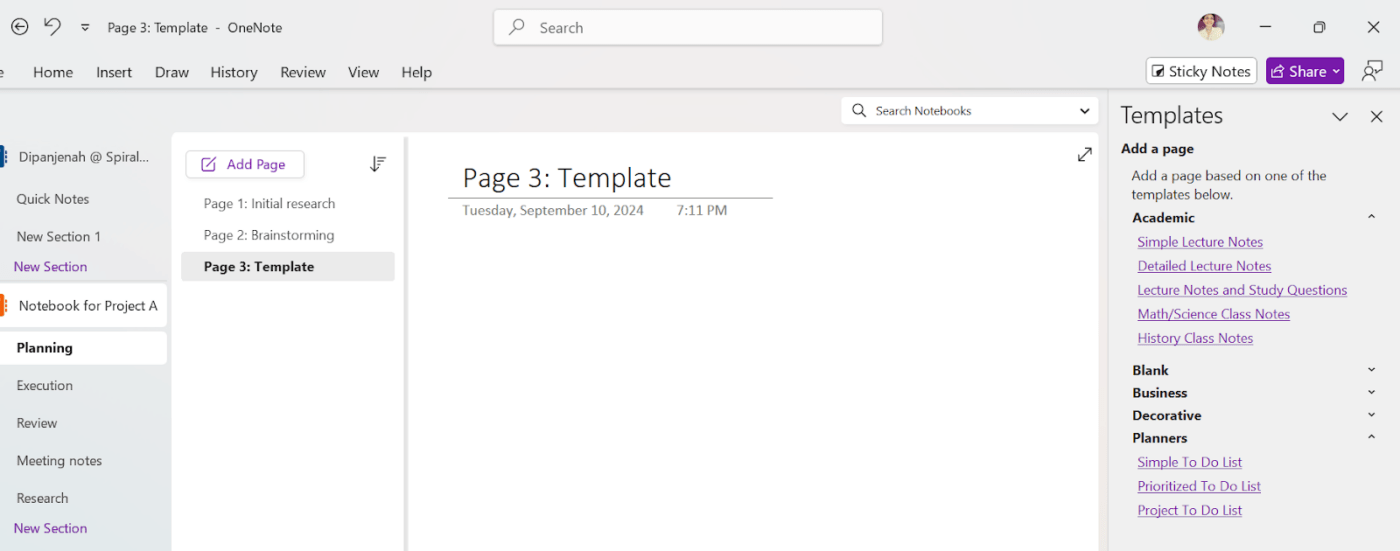
Step 4: Edit/use the template.
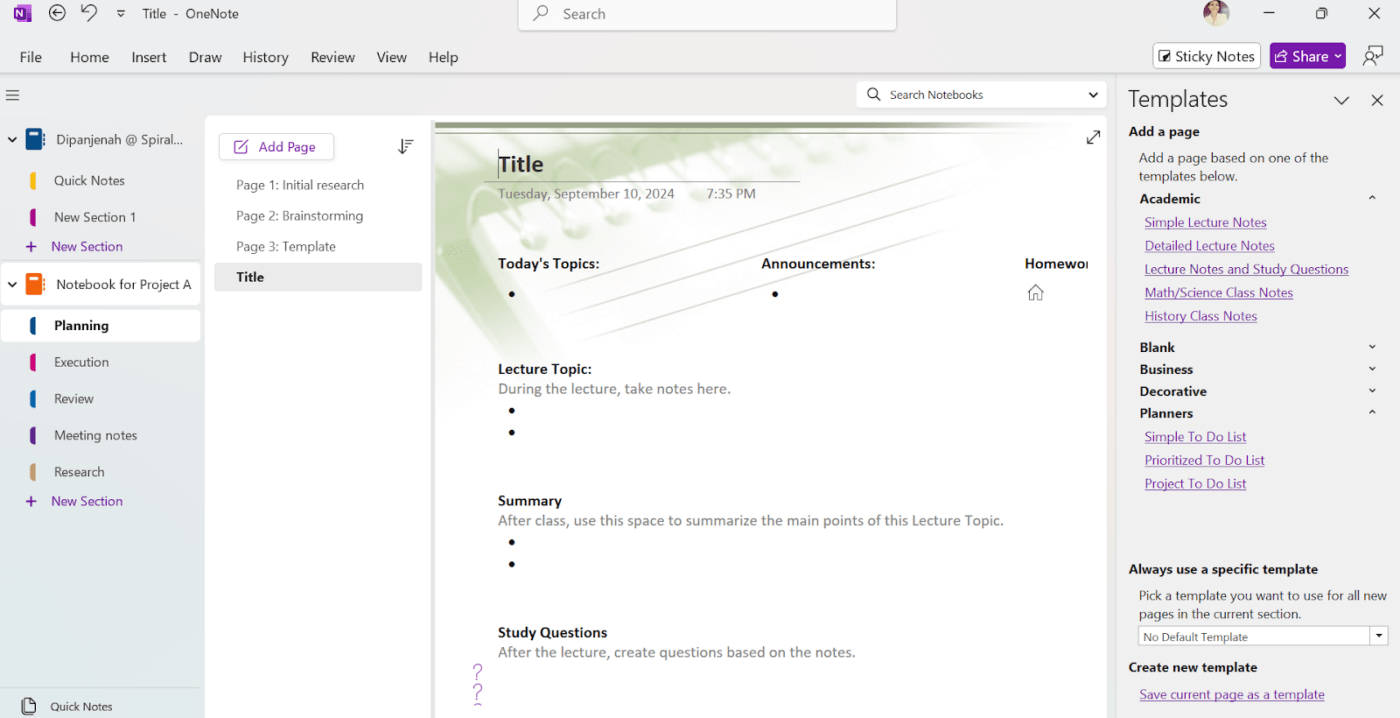
OneNote offers various templates, such as meeting notes, travel journals, and project plans. These templates simplify your note-taking experience, making it fun and more versatile.
In addition to the notebooks, pages, and sections, there are several other ways to organize your notes in the app. Let’s look at a few examples:
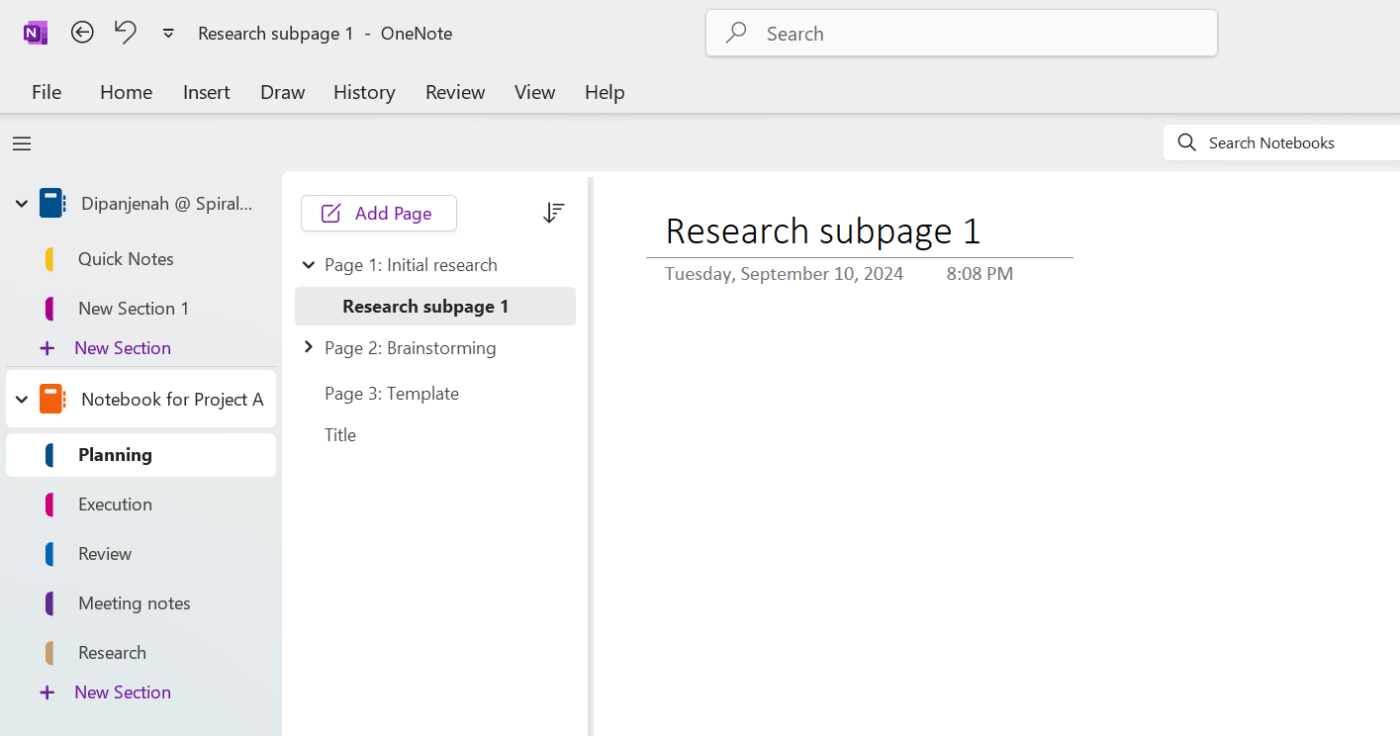
Subpages: You can create subpages within a page to further organize your notes. This is especially useful for making outlines or hierarchical structures.
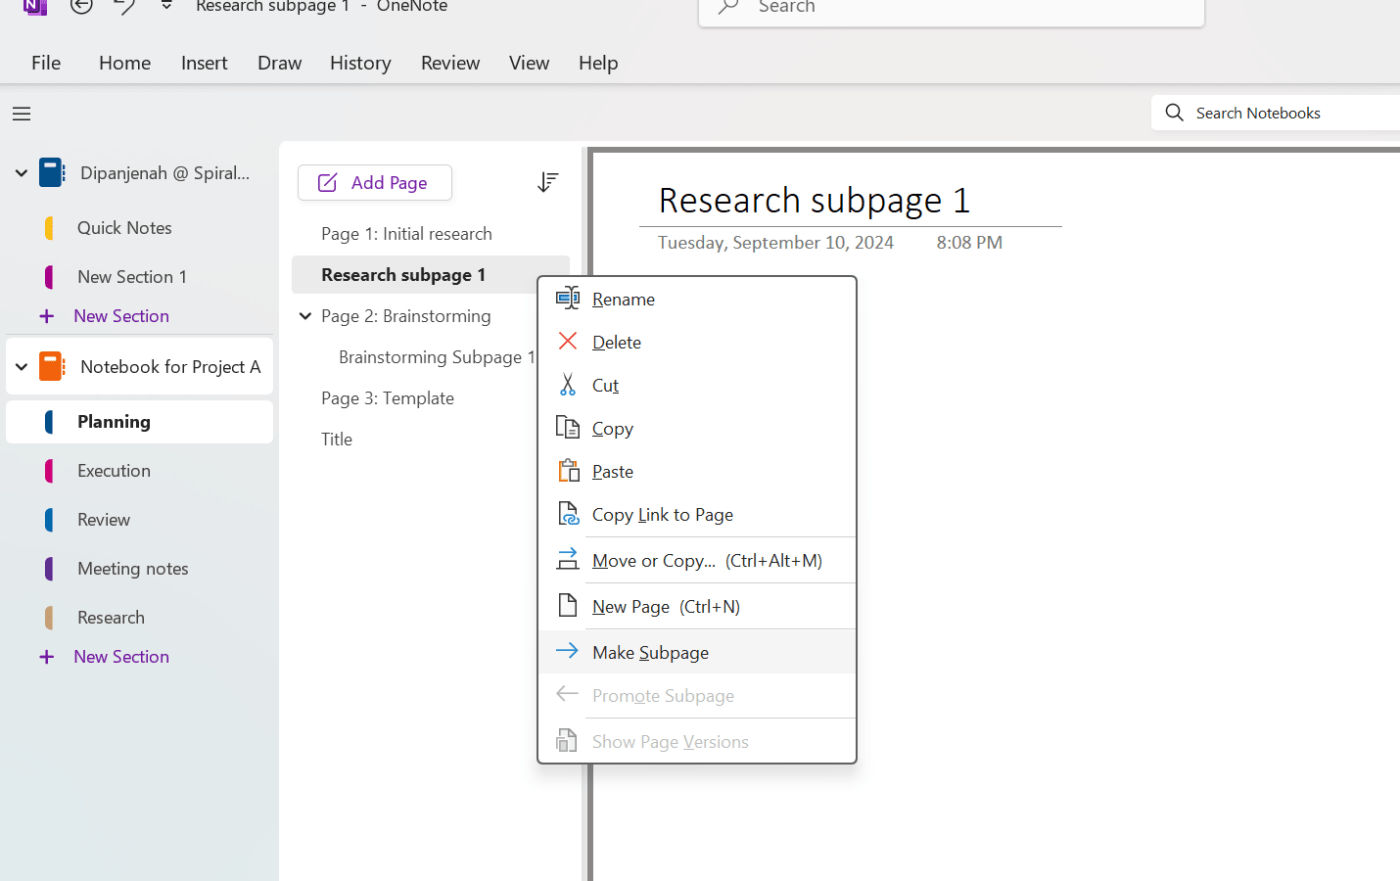
To create a subpage, drag and drop a new page under your preferred main page. Then right-click on this new page and click on ‘Make Subpage.’
Section groups: Section groups allow you to group multiple sections for better organization. Here are some scenarios where they can be particularly beneficial:
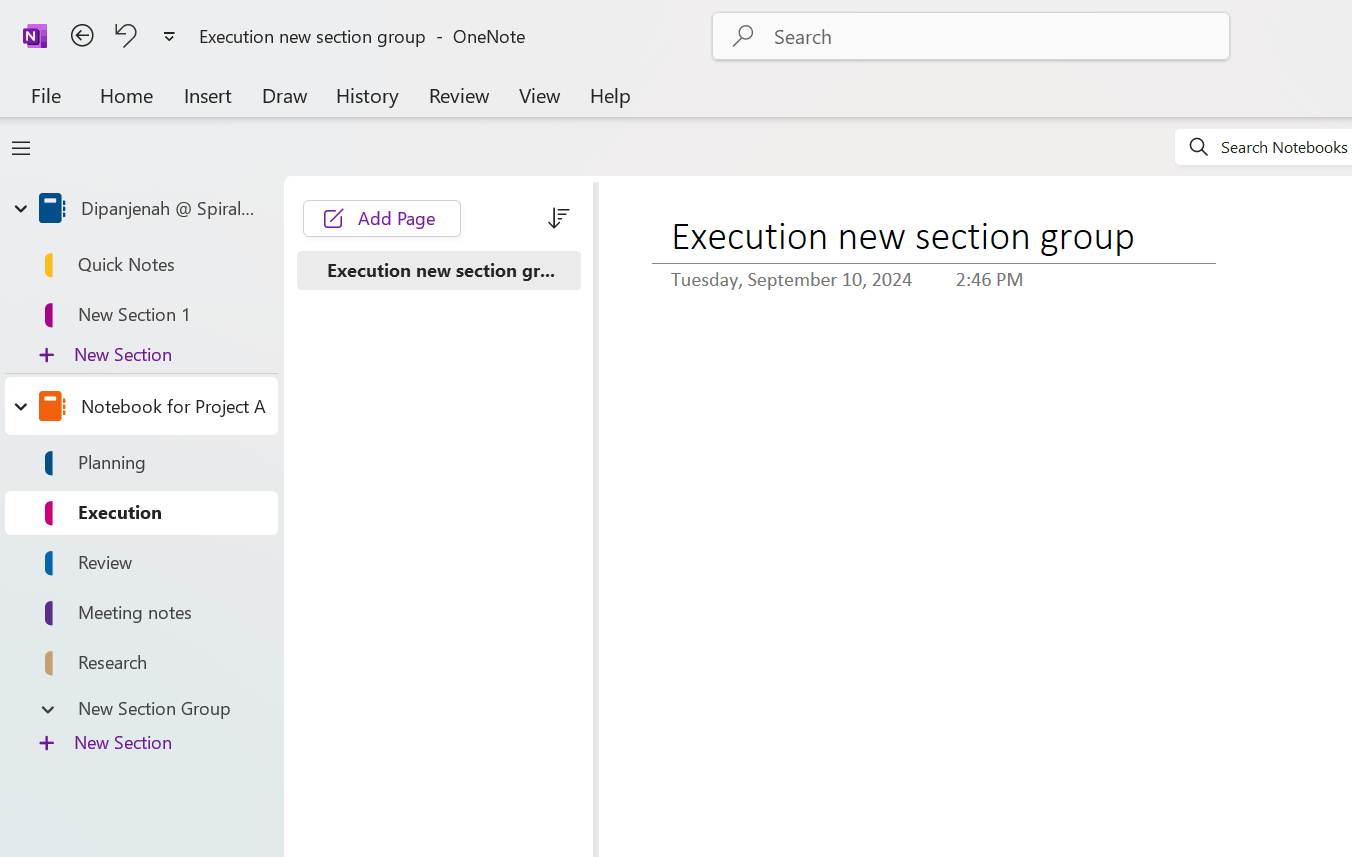
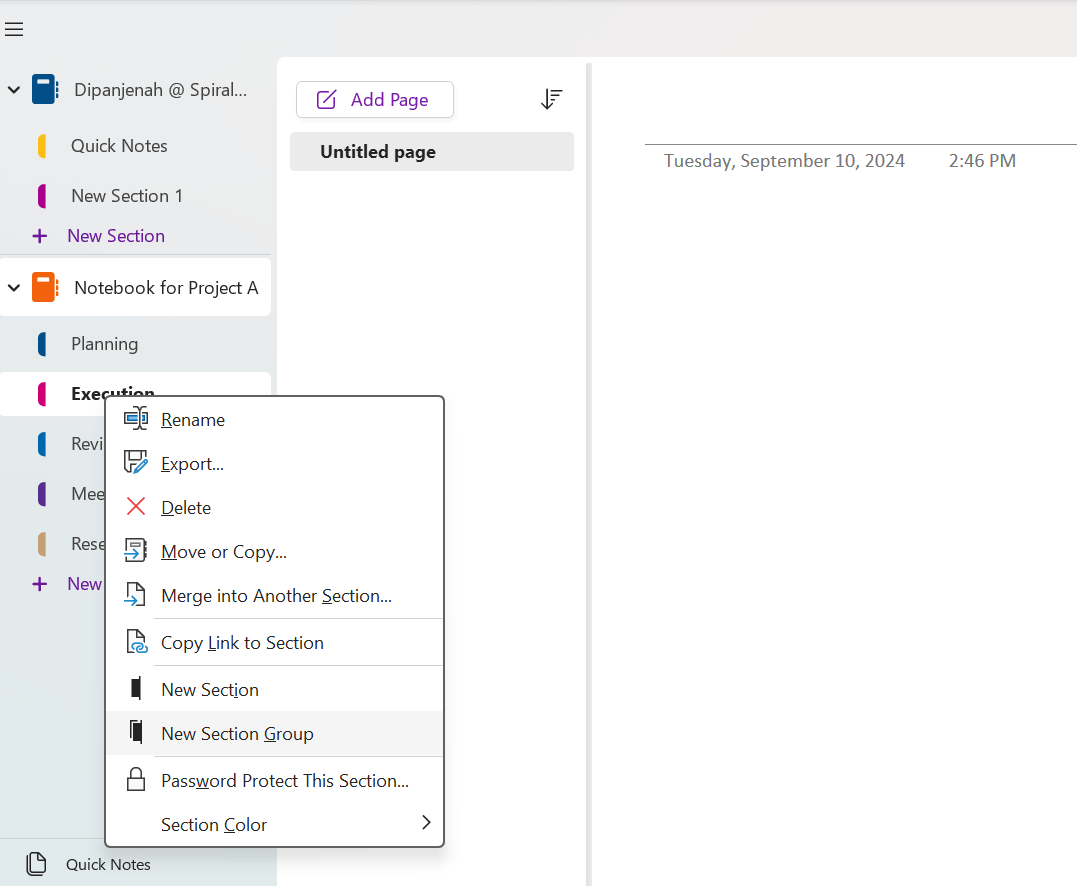
To create a section group, right-click on an existing section and choose ‘New Section Group.’ Rename and edit as per your requirement.
You can also play around with tags and other customizations to simplify your OneNote notebook organization.
In addition, by incorporating these tips on how to organize OneNote, you’ll improve the efficiency and clarity of your project management workflow. Whether managing multiple projects or collaborating with a team, having an organized OneNote notebook ensures you always stay on top of your tasks.
Also Read: Learn How to Delete a Notebook in OneNote
While OneNote offers several benefits for managing projects, its limitations can affect its effectiveness. Understanding these limitations can help you determine the best strategies for overcoming them and might even highlight how to organize OneNote to work around specific issues.
Exploring new and more advanced platforms and OneNote alternatives like ClickUp can help you overcome these limitations.
Let’s understand how.
Because ClickUp combines collaborative docs, AI, tasks, and automation in one system—so notes directly drive execution.
ClickUp is an all-in-one project management platform. Unlike OneNote, it integrates advanced note-taking, task management, collaboration, and workflow automation into one powerful tool.
ClickUp also allows you to automate recurring tasks, send reminders, and integrate with other tools like Slack, Google Drive, and Outlook. These automation features help reduce manual work and ensure every team member stays on the same page.
Here’s what a user has to say about their note-taking experience on ClickUp:
I’m able to enter every task and project assigned to me quickly with start dates, due dates, and notes. I can then set up automation so that every time a start date comes up, that task is added to my current project list automatically.
Here are some benefits of using a project management tool like ClickUp for note-taking:
ClickUp Docs lets you take comprehensive notes and link them directly to tasks and projects.
Docs offers a range of features designed to simplify note-taking, storage, and sharing:
🎯Also Read: How to Export Notes from OneNote into Other Apps
ClickUp’s AI tool, ClickUp Brain, enhances your workflow by helping you automate repetitive tasks, summarize notes, and generate reports.
For example, you can use it to automatically analyze meeting notes, create action items, or generate summaries of key project milestones.
Unlike OneNote, ClickUp offers robust task management features such as ClickUp Time Tracking, ClickUp Gantt Charts, task dependencies, and workload management. These features allow you to manage not only your notes but also complex projects from start to finish.
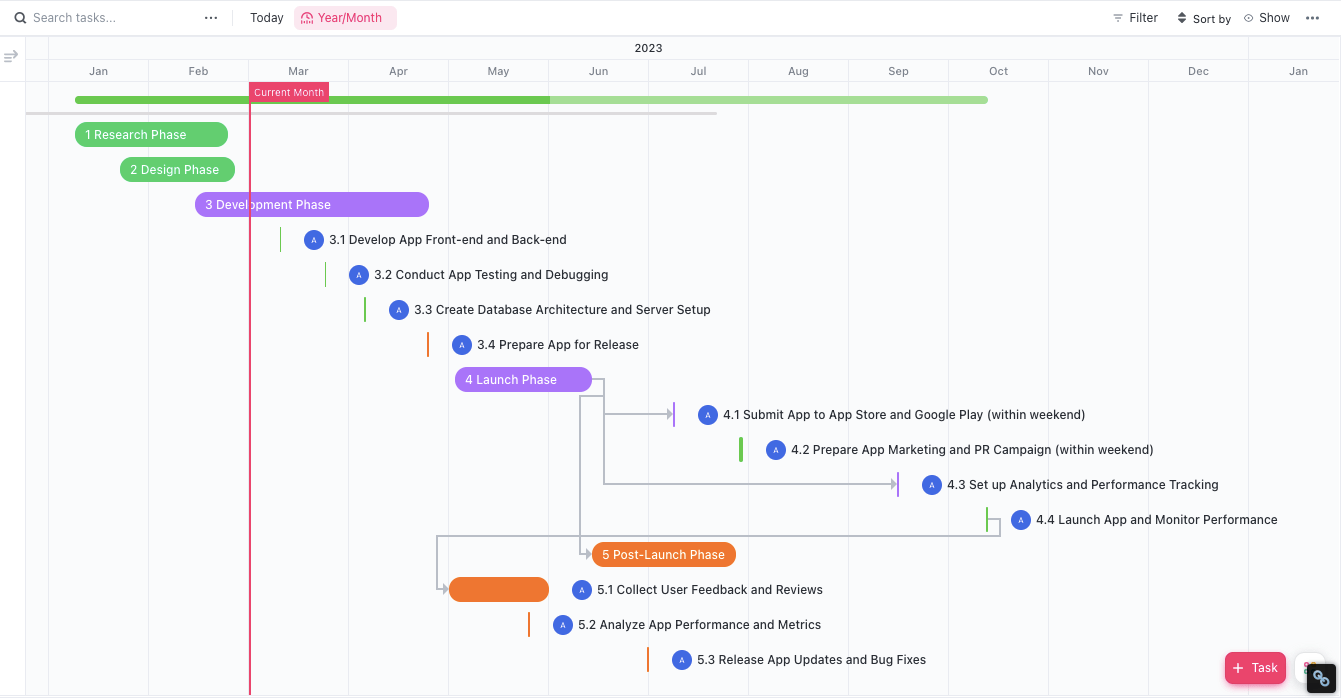
It also provides customizable ClickUp Dashboards where you can view all your projects, tasks, and deadlines in one place. This visual approach makes it easier to track progress and keep every detail in check.
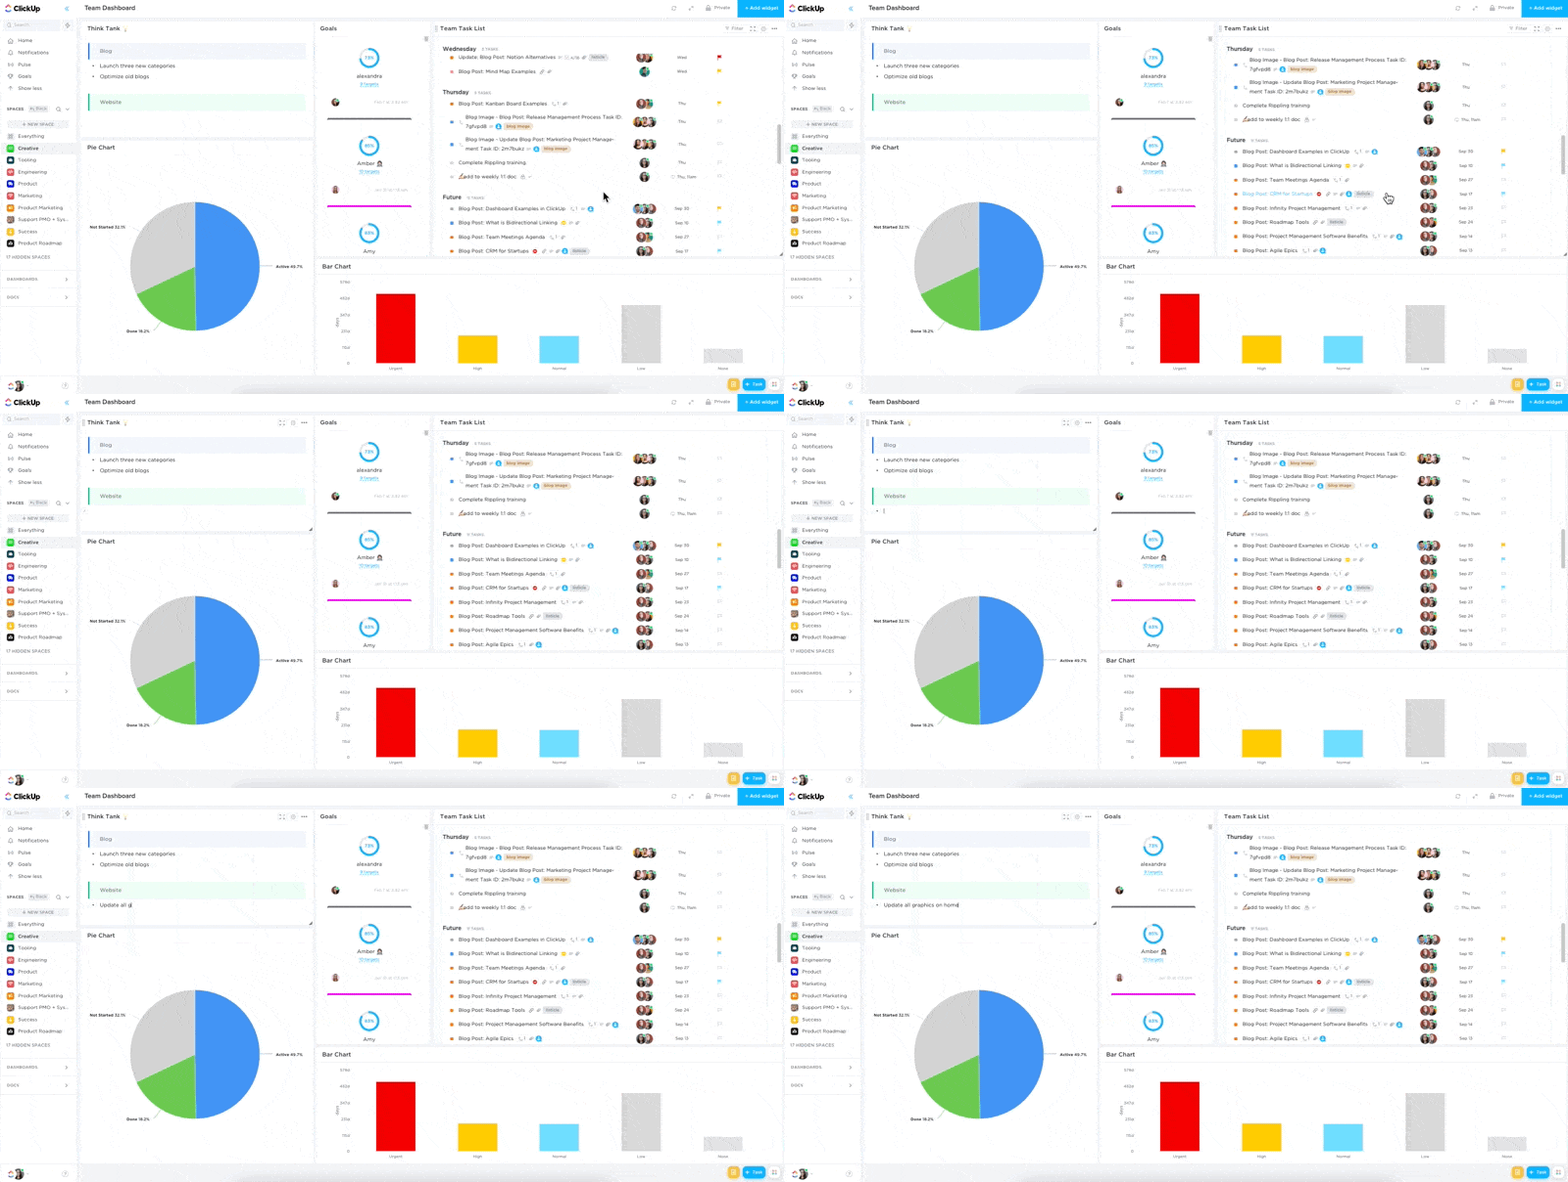
ClickUp also facilitates team collaboration. You can Assign tasks to team members, add comments, track activity logs, and create custom workflows. ClickUp’s communication tools eliminate the need for lengthy email threads, making project management more efficient.

Additionally, ClickUp integrates with other note-taking apps to provide users with more flexibility and options with ClickUp Integrations. It can integrate with apps like Notion, Evernote, Google Docs, and Equip.
💡 Pro Tip: Whether managing a creative project, a product launch, or a software development sprint, use one of ClickUp’s project management templates to get you started.
While OneNote is a great tool for organizing project notes and information, it is limited in its advanced project management features. For professionals looking for a more comprehensive solution, ClickUp is the ideal choice.
With its integrated note-taking, task management, and automation features, ClickUp offers everything you need to manage projects effectively. Switching to a powerful tool like ClickUp can simplify your workflow, improve team collaboration, and ensure that every aspect of your project is organized and accounted for.
Try ClickUp today!
© 2025 ClickUp