Sorry, there were no results found for “”
Sorry, there were no results found for “”
Sorry, there were no results found for “”
Before MCP, getting an AI assistant to work with your project data meant copying context into chat windows, over and over. Anything beyond that required a custom API integration or separate wiring for every model.
MCP changed that. It’s an open standard that lets AI clients connect to external systems, pull data, and take action. Build the integration once, and it works across any model or client that supports the protocol.
The ClickUp MCP server puts the protocol to work in your Workspace. Connect a supported client, such as Claude, ChatGPT, Cursor, or VS Code, and authorize access. From there, the client can read and act on tasks, Docs, comments, time entries, and more, all through natural-language prompts.
This guide covers setup, available tools, supported clients, and real examples you can use in day-to-day work.
| At a glance | What to know |
|---|---|
| Best for | AI-assisted workflows that read, act on, and connect work across your ClickUp Workspace |
| Official endpoint | https://mcp.clickup.com/mcp |
| Authentication | OAuth; API keys and personal access tokens aren’t supported |
| Works with | Claude, ChatGPT, Cursor, VS Code, and other supported MCP clients |
| Can access | Tasks, Docs, comments, Chat, time tracking, Workspace hierarchy, reporting, and more |
| Use the ClickUp API when | You need deterministic logic, webhooks, scheduled jobs, or higher-volume integrations |
| Watch for | Workspace permissions, shared MCP limits, and AI Search boundaries |
| Advanced setup | ClickUp can also act as an MCP client. Connect external MCP servers so Brain and Super Agents can use tools outside your Workspace |
ClickUp’s MCP server turns your Workspace into a set of tools any compatible AI client can call. Instead of screen-scraping or working through custom API code, the client gets structured access to tasks, Docs, comments, time entries, and hierarchy, and can read, create, or update them in a single session.
Two things to know up front. The server works on every ClickUp plan, Free Forever included. And whatever an AI client does through the MCP stays within your account’s existing permissions.
MCP is an open standard, not a single vendor’s project. Anthropic open-sourced the protocol in late 2024. It now lives under the Linux Foundation, backed by OpenAI, Google, Microsoft, AWS, and Block. That matters because any integration you build on MCP won’t break when you switch AI clients.
ClickUp MCP goes well beyond simple task search. Since an AI client can combine several tools within a single request, a single prompt can trigger a multi-step workflow.
In practice, that covers:
Pro Tip: MCP becomes more useful once you stop thinking in single tool calls. Design the outcome first, then let the AI client combine the searches, updates, and actions needed to get there. This agent-building walkthrough shows the same multi-step mindset in practice.
You need four things, and none of them requires you to build an integration.
You don’t need a ClickUp Workspace admin to enable custom MCP before connecting. Your access follows the permissions of the ClickUp account you authorize.
Your AI client may still have its own admin controls. In ChatGPT Business, for example, only admins and owners can enable developer mode and publish custom MCP apps. Enterprise and Edu workspaces can also grant developer access to selected users through role-based controls.
To set up ClickUp’s MCP server, add it to your client, authorize with OAuth, confirm the tools have loaded, and test it with a prompt. The steps are the same across clients, but where each one stores MCP settings and whether you work in a UI, a terminal, or a JSON file will vary. In detail:
Open the MCP or connectors settings in your client. The specific MCP settings depend on which client you’re using and, in Claude’s case, which plan you’re on.
In Claude Pro, Team, or Enterprise, open Settings in the sidebar, scroll to Connectors at the bottom, and click Add. On Claude Free, the setup goes through the Claude desktop app instead: open the app, navigate to Settings, then Developer, then Edit Config. That opens your claude_desktop_config.json file, where you add the ClickUp server entry and restart the app.
In Claude Code, add the server from the terminal:
claude mcp add --transport http clickup https://mcp.clickup.com/mcp
Once you’ve opened a session, run /mcp to complete the authentication flow.
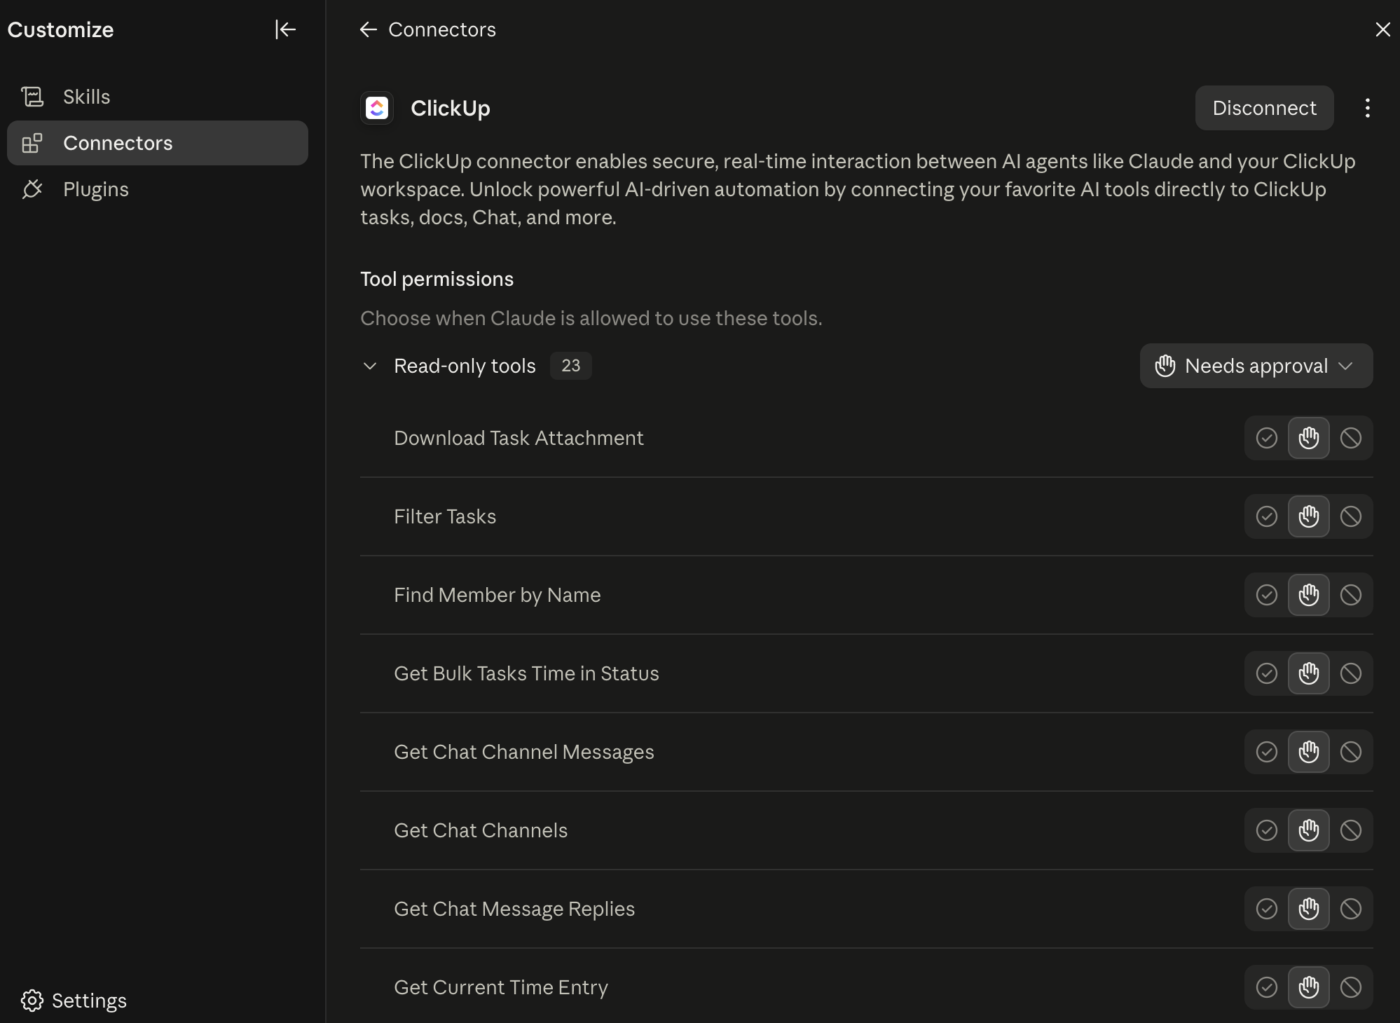
In ChatGPT, the setup doesn’t use a config file or settings page. Go to Apps, search for ClickUp, and select it. Click Connect, then Connect ClickUp, sign into your ClickUp account, and select the Workspaces you want to use. Click Connect Workspace, then Start Chat. You can reconnect or disconnect anytime from the app’s settings page.
In Cursor, the fastest route is the official ClickUp Cursor Plugins, which is verified by Cursor and handles the connection in one click. You can also set it up manually by adding ClickUp to your mcp.json file.
In VS Code, add the server from the terminal with:
code --add-mcp '{"type":"http","name":"clickup","url":"https://mcp.clickup.com/mcp"}'
After that, open your extensions section, find ClickUp MCP at the bottom of the MCP servers list, click the settings cogwheel, and click Start Server.
In Windsurf, press "Ctrl + ," on Windows or "Cmd + ," on Mac to open settings, scroll to Cascade, click MCP servers, then Add Server, and select Add custom server. Lastly, in Antigravity, add the server entry to your mcp_config.json file following Google’s documentation for connecting custom MCP servers.
Note: We’re covering Claude, Claude Code, ChatGPT, Cursor, VS Code, Windsurf, and Antigravity here. There are other supported clients as well, and the setup for most of them follows almost the same pattern.
ClickUp’s official MCP endpoint is: https://mcp.clickup.com/mcp
It’s the same URL for every client and every Workspace.
The field name for that URL changes depending on the client. Cursor uses url in its mcp.json configuration. Windsurf and Antigravity both use serverUrl. Claude Free wraps the connection through a local bridge package called mcp-remote, so the config entry looks different: your command is npx and your arguments are -y mcp-remote https://mcp.clickup.com/mcp.
For clients not listed above, ClickUp recommends that same mcp-remote fallback, and no environment variables are needed.
Note: ChatGPT handles this differently: the connection is managed entirely through the Apps interface, so you won’t enter the URL manually.
Once the server is registered, your client will open ClickUp’s OAuth authorization flow in a browser window. Sign in and select the Workspace or Workspaces you want the client to access.
ClickUp only supports OAuth for MCP authentication. Personal API keys and access tokens won’t work, and that’s intentional.
OAuth ties every action to the user who authorized it and scopes access to the Workspaces they selected, which makes permissions easier to audit and revoke than a static key would be. If you’re building a custom MCP client, it needs to implement OAuth 2.1 with PKCE, JSON-RPC 2.0 over HTTP, and the full MCP specification.
Worth Knowing: A study of 7,973 live remote MCP servers found that 40.55 percent had no authentication at all. ClickUp’s OAuth-only approach means your connection never falls into that bucket: access is tied to your account, scoped to the Workspaces you picked, and revocable any time.
After authorization completes, verify that ClickUp appears as an active MCP server with its tools available. How you verify depends on the client.
In Claude Code, run /mcp to view the server status and finish the authentication flow.
If you’re working with VS Code, find ClickUp under the MCP servers section and confirm the server is running. In Devin, check under Settings, then Connections, and in MCP servers, where ClickUp should appear with its tools listed. And lastly, Cursor’s Marketplace installation handles most of the verification automatically.
In ChatGPT, start a new chat and type a ClickUp prompt. If the connection is active, ChatGPT will call the ClickUp tools automatically. For Claude Desktop, start a new conversation and confirm that ClickUp appears in your available tools or connectors list.
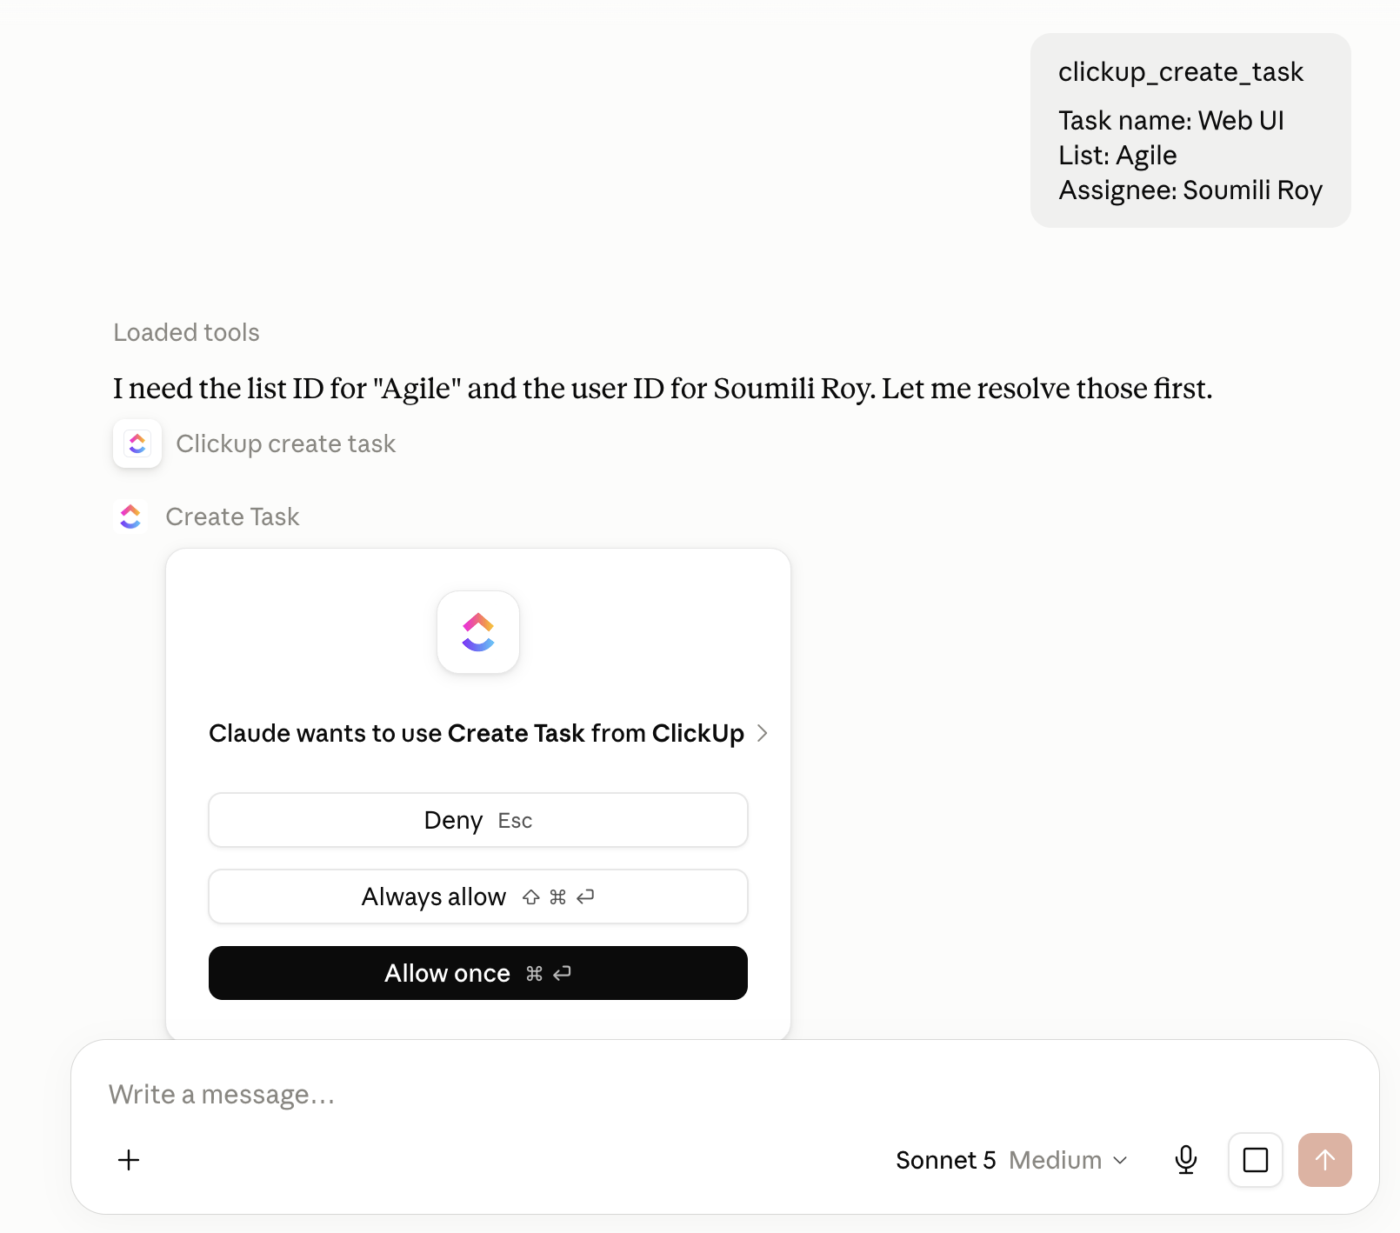
If ClickUp connects but no tools appear, the most likely cause is an incomplete OAuth flow. Go back, re-authorize, and check again before troubleshooting anything else.
Start with a read-only prompt to confirm everything is connected:
“Show me the Spaces in my ClickUp Workspace.”
This verifies that your client can reach ClickUp and reveals which Workspace is active before you ask it to create or modify anything.
Once that works, try something more demanding:
“Find my overdue tasks, group them by List, and summarize the ones with unresolved comments.”
ClickUp’s MCP server exposes around 50 tools that cover most of what you’d use day-to-day (task management, Workspace search, Docs, Chat, time tracking, and reporting). But the more useful behavior is tool chaining. Your AI client can combine several tools behind the scenes to complete one request. A prompt like “Create a bug task, assign it to Maya, mark it urgent, and link it to the parent feature” may call four or five tools, but you ask for it in one sentence.
| Category | What it covers | Example tools |
|---|---|---|
| Search | Finding work and content across the Workspace | Search Workspace, Search tasks by task type, Search tasks by tag |
| Task management | Creating, reading, updating, and bulk-editing tasks | Create Task, Get Task, Update Task, Set Custom Fields, Create Bulk Tasks, Update Bulk Tasks |
| Task organization | Attachments, tags, links, dependencies, and List membership | Attach File to Task, Add Tag to Task, Add Dependency, Move Task to a New List, Add Task to Another List |
| Comments | Reading conversations and posting updates | Get Task Comments, Get Threaded Replies, Create Task Comment |
| Time tracking | Timers and historical time entries | Start Time Tracking, Stop Time Tracking, Add Time Entry, Get Task Time Entries |
| Workspace structure | Spaces, Folders, Lists, members, and assignees | Get Workspace Hierarchy, Create List, Create Folder, Update Folder, Find Member by Name |
| Docs and Chat | Working with Doc pages and ClickUp Chat | Create Document, Get Document Pages, Update Document Page, Create Document Page, Get Chat Channels, Send Chat Message |
| Reporting | Measuring how long work stays in each status | Get Time in Status for a Task, Get Time in Status for Tasks in a List |
| Deletion* | The only destructive tool on the server | Delete Task (confirms the task before deleting) |
The simplest MCP prompts ask ClickUp for one thing: find a task, create a task, or show logged time. Those are useful for testing the connection, but they barely touch what the server can do.
The better prompts combine three ingredients:
ClickUp MCP can combine several supported tools behind one request, which means a single prompt can search for work, inspect its context, and then act on the result.
Here are some examples:
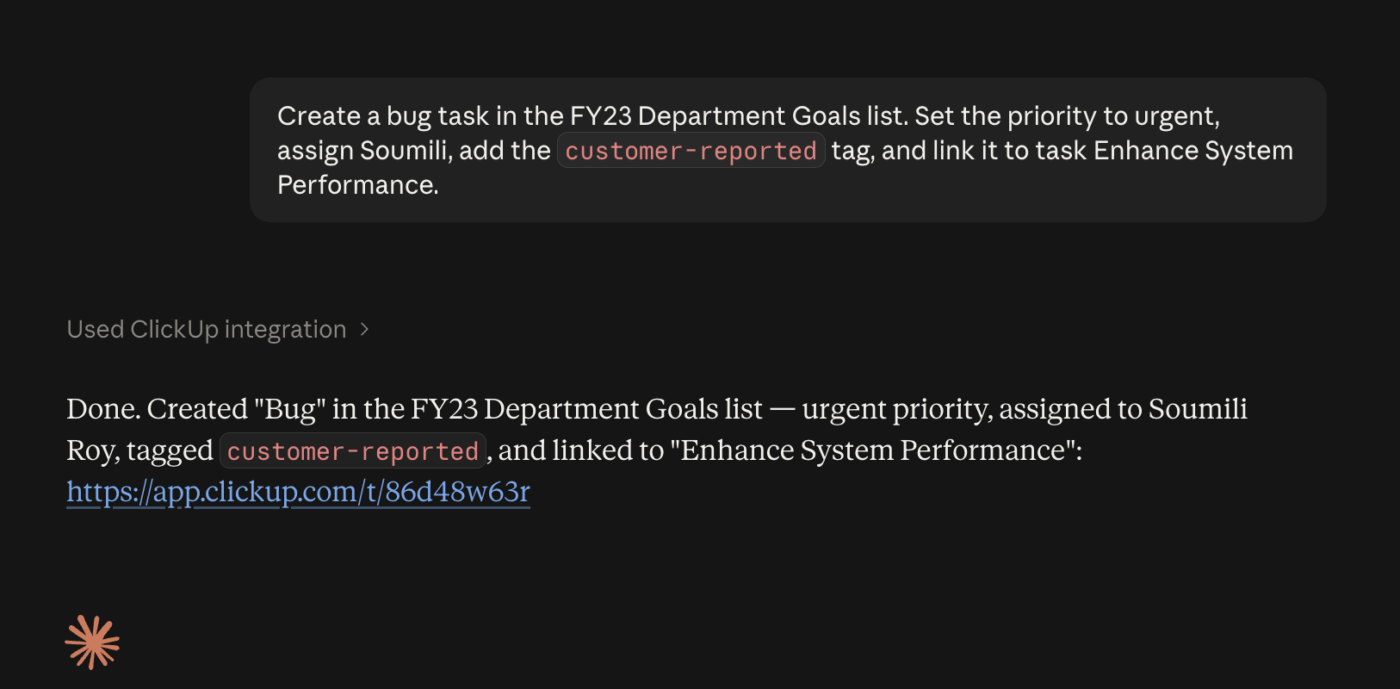
“Create a bug task in the Engineering Bugs List from the issue we just discussed. Set the priority to urgent, assign Priya, add the customer-reported tag, and link it to task APP-482.”
One prompt can involve task creation, assignee resolution, tags, priority, and task relationships. You give the assistant the outcome, and it figures out which tools to call.
“In the Sprint 14 List, find every task still in progress or review. Summarize what each task is waiting on, flag anything past its due date, and tell me which tasks have unresolved discussion in the comments.”
The assistant can retrieve the relevant tasks, inspect their details and comments, and turn the results into a briefing you can act on. ClickUp MCP supports Workspace search, task retrieval, and task-comment access.
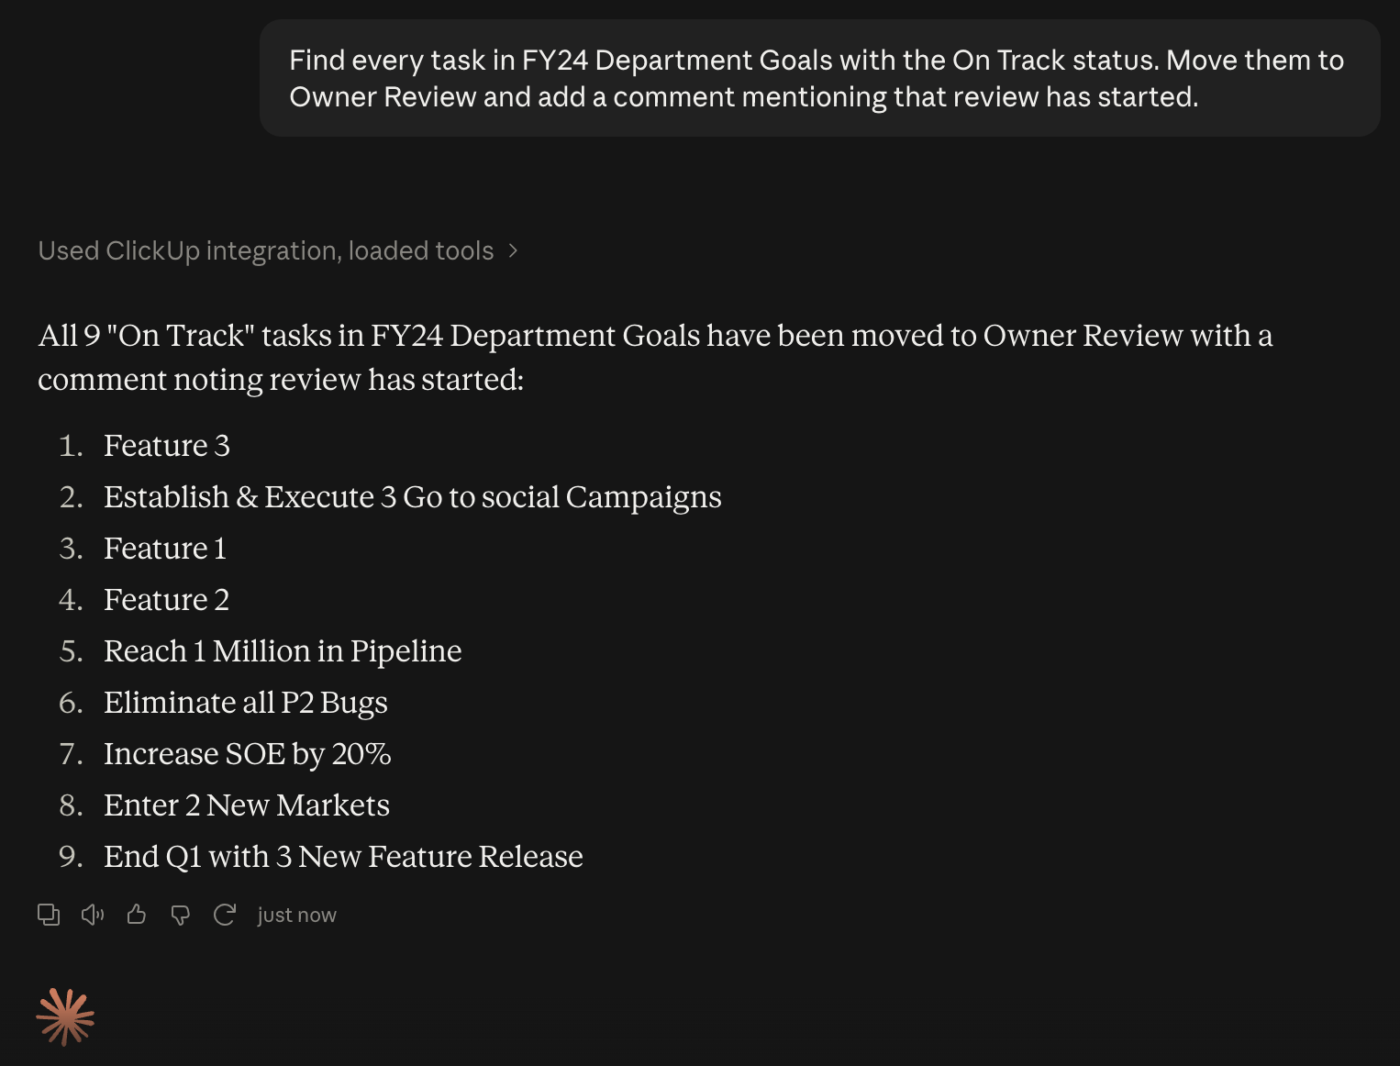
“Find every task in Sprint 14 with the Ready for Review status. Move them to In Review and add a comment mentioning the current assignee that review has started.”
That request crosses task search, bulk updates, comments, and member resolution. ClickUp supports bulk task updates and comments with @mentions through MCP.
“Using tasks completed in the Platform Space between August 24 and August 30, draft release notes grouped into new features, improvements, and bug fixes. Include the task IDs and call out anything that shipped later than its original due date.”
You don’t have to assemble the source material first. MCP can search the Workspace and retrieve task context, while the AI client handles the synthesis.
The more precisely you define the scope and desired outcome, the less work the assistant has to do to resolve what you mean.
If you repeat the same kind of prompt often, turn it into a reusable workflow. Our guide to automating tasks with AI covers patterns that work better when the process needs to run on a schedule.
ClickUp MCP rate limits depend on two things: your Workspace plan and whether your Workspace has the Everything AI add-on.
With Everything AI, MCP requests use the same per-minute, per-token limits as ClickUp’s public API. Without it, ClickUp applies a Workspace-wide limit over a rolling 24-hour window.
| Plan | Without Everything AI | With Everything AI |
|---|---|---|
| Free Forever | 100 calls/24 hours | 100 requests/minute/token |
| Unlimited | 300 calls/24 hours | 100 requests/minute/token |
| Business | 1,000 calls/24 hours | 100 requests/minute/token |
| Business Plus | 2,500 calls/24 hours | 1,000 requests/minute/token |
| Enterprise | 5,000 calls/24 hours | 10,000 requests/minute/token |
The rolling limit is shared across the entire Workspace. Every MCP client connected to that Workspace draws from the same pool. If several people connect Claude, Cursor, ChatGPT, or any other MCP client to the same Workspace, their requests all count toward one allowance.
Every MCP request counts toward that limit. Reads, creates, and updates all consume it equally. A single natural-language prompt can also trigger multiple MCP requests behind the scenes if the client needs to search, retrieve context, and then take an action.
Use the ClickUp MCP server when you want an AI assistant to read your request, pull the right context from ClickUp, and decide which tools to call. Use the ClickUp API when you’re writing code with fixed logic, like a scheduled sync, a webhook flow, or a custom app.
| Comparison | ClickUp MCP server | ClickUp API |
|---|---|---|
| Interface | Natural-language requests through an MCP-compatible AI client | REST requests from your own code |
| Authentication | OAuth only; custom clients must support OAuth 2.1 with PKCE | Personal API token or OAuth |
| Rate limits | Workspace-wide rolling limits without Everything AI; API-aligned per-minute limits with Everything AI | Per minute, per token, based on Workspace plan |
| Best for | Ad hoc analysis, cross-tool workflows, reporting, task updates, and agent-assisted work | Scheduled jobs, event-driven workflows, custom apps, data syncs, and high-volume integrations |
| Setup | Connect the MCP endpoint and authorize ClickUp | Build the requests, authentication, error handling, and integration logic |
| How work is decided | The AI client interprets your request and chooses the ClickUp tools to call | Your code determines exactly which endpoint runs and when |
They work well together, too. Let the API handle the repeatable plumbing, and use MCP when the next step depends on context that an assistant is better at reading than a script.
Yes. Everything above treats ClickUp as something AI talks to. But ClickUp also talks back. It can connect to external MCP servers as a client, which means ClickUp Brain and ClickUp Super Agents can call tools in your CRM, code repository, billing system—basically anywhere that exposes an MCP server.
That’s a different kind of setup entirely. Beyond giving Claude a window into your tasks, you’re giving a ClickUp agent the ability to reach across your entire tech stack.
Say a ticket lands in ClickUp. A Super Agent reads it, looks up the customer in your CRM through its MCP server, creates the support record there, updates the ClickUp task with the CRM link, and posts a summary to Chat.
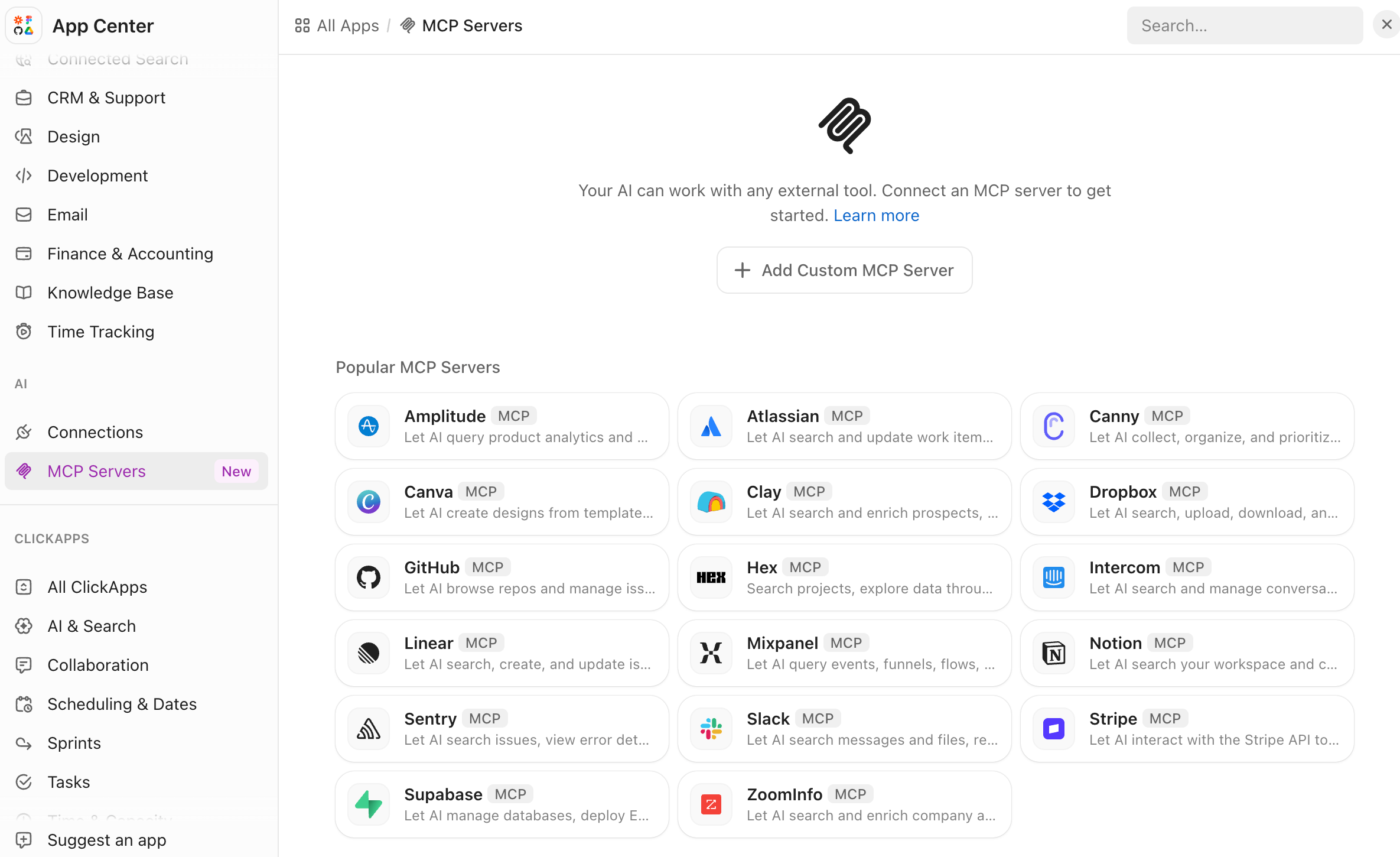
You can connect them in the App Center under MCP Servers. Templates cover GitHub, Stripe, Atlassian, and others. Custom servers need a public URL and an auth method (OAuth, API key, or none). Once connected, the tools show up in AI Tools. Assign them to any Super Agent, one by one or the full set. You can also add custom MCP servers in ClickUp.
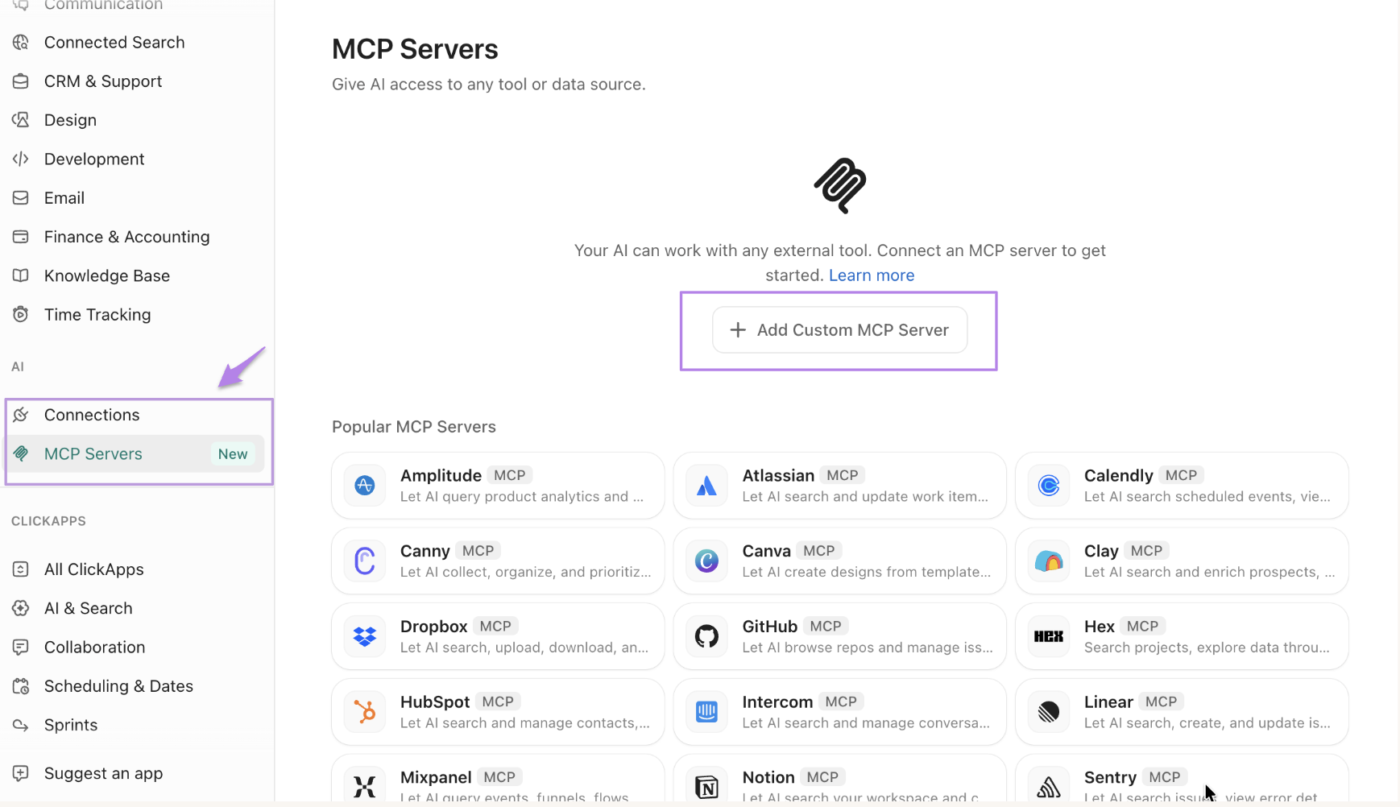
This is arguably the more important half. Connecting Claude to ClickUp gives you a smarter assistant. Connecting ClickUp to everything else gives you an orchestration layer.
FYI: Only Workspace owners and admins can create Workspace-wide connections. ClickUp logs every connection change in the audit logs. Access is available on all plans for now, with pricing subject to change.
If you’re weighing how much autonomy to hand these workflows, our guide to the different types of AI agents covers the full spectrum.
Also Read: How to Build an AI Agent?
Several of the ClickUp MCP issues come down to access, search boundaries, or usage limits. Check these four things first:
429 RATE_LIMIT_EXCEEDED response as your signal that the window is full. Scoping prompts to a List, Folder, or time window keeps you well under the allowanceClickUp MCP is easy to connect, but the way you prompt and deploy it matters. These are the mistakes you need to steer clear of as early as possible:
ClickUp’s official MCP server isn’t the only option. Third-party servers existed long before the first-party release, and some cover tools, hosting models, or auth methods, too.
The most established alternative is taazkareem/clickup-mcp-server. It started as an open-source project and has since moved to a paid model. It offers both a hosted remote endpoint and a local mode that connects through your ClickUp API key. The tool count is broader (around 150 tools, including checklists, sprints, goals, and deletion of Lists, Folders, and Docs), and local mode lets you authenticate with an API key.
You need to know this for the rate limits. A third-party server that calls the ClickUp API directly doesn’t draw from the official MCP server’s daily allowance. It runs on the API’s per-minute, per-token limits, which are more generous on paid plans. The trade-off is another dependency to manage, whether that’s hosting the server yourself or trusting a third-party endpoint.
Zapier MCP takes a different approach. It can expose selected ClickUp actions to Claude, ChatGPT, Cursor, and other MCP clients through a single Zapier endpoint, alongside actions from 9,000+ other apps. The tradeoff is cost: each successful MCP tool call consumes two Zapier tasks from the same quota your Zaps use. On the Free tier (100 tasks/month), that’s 50 tool calls, and failed calls don’t count.
Verdict: For most users, the official server is the simplest default because it’s maintained by ClickUp, OAuth-based, and needs nothing extra to host or pay for. A third-party option makes more sense when you need a tool or auth method the official server doesn’t offer, or you want to build around the ClickUp API’s per-minute limits to avoid the daily MCP cap.
ClickUp MCP is at its best when the next step depends on context, not a predetermined rule. Connect one client, test it with a read-only prompt, then build toward workflows that combine search, analysis, and action in a single conversational request.
Use ClickUp Automations for the processes that repeat the same sequence every time. Use MCP for the work that needs an assistant to evaluate context, reason through options, and decide what happens next.
And don’t stop at the inbound direction. ClickUp connects to external MCP servers too, which means Brain and Super Agents can reach into the rest of your software stack without anyone leaving the Workspace.
No. MCP is request-response: it only acts when an AI client sends a prompt. Nothing runs in the background, watches for changes, or fires on a schedule. For event-driven or scheduled workflows, use ClickUp Automations or Super Agents.
Yes. During the OAuth flow, you select which Workspace to authorize. To work across more than one, authorize each Workspace separately in your client. Some clients support multiple MCP server entries, so you can add one per Workspace.
Not directly. The MCP connection lives in your desktop AI client (Claude, Cursor, VS Code, etc.). If your AI client has a mobile app with remote connector support (like Claude’s), the connection carries over to your account. But there’s no standalone mobile MCP setup.
Yes. Since MCP uses OAuth, you can revoke access from your ClickUp account settings the same way you’d revoke any connected app. Once revoked, the AI client loses access immediately.
Yes. Every MCP action runs under the OAuth token of the user who authorized the connection. If your account can’t see a private Space or restricted List in the ClickUp UI, the assistant can’t see it through MCP either.
ClickUp Brain is the AI built into the ClickUp Workspace; the MCP server lets outside AI clients such as Claude, ChatGPT, and Cursor read and act on ClickUp data from their own interface. They also work in opposite directions: Brain and Super Agents can consume external MCP servers (GitHub, Stripe, Atlassian, HubSpot) through the MCP server to your Workspace, while the MCP server exposes ClickUp to other tools. Brain requires an AI plan; the MCP server works on all plans, including Free Forever.

Manasi Nair
Max 27min read
Manasi Nair
Max 44min read
Manasi Nair
Max 18min read
© 2026 ClickUp