
Nikdo si neinstaluje desktopovou aplikaci jen proto, aby otevřel stejný software jiným způsobem. Dělají to proto, že prohlížeče jsou přeplněné příliš mnoha záložkami. Nakonec se záložka ClickUp ztratí mezi dokumentem Google Docs a ticketem v Jira a vy platíte malou „poplatek za přepínání “ pokaždé, když ji hledáte.
Studie časopisu Harvard Business Review zjistila, že lidé přepínají mezi aplikacemi zhruba 1 200krát denně a ztrácejí téměř čtyři hodiny týdně tím, že se musí znovu orientovat. Vlastní výzkum společnosti ClickUp s názvem „Work Sprawl“ odhalil, že týmy tráví 61 % svého času hledáním a aktualizací informací namísto samotné práce.
V tom spočívá skutečná hodnota desktopové aplikace ClickUp. Poskytuje ClickUp vyhrazené místo na vašem počítači, usnadňuje navigaci a dává vám na dosah často používané funkce (zadávání úkolů, připomenutí, vyhledávání a oznámení), takže vás méně z těch 1 200 denních přepnutí zcela nevytrhne z práce v ClickUp.
TL;DR: Desktopová aplikace ClickUp je nainstalovaná verze ClickUp pro Windows, macOS a Linux, dostupná ve všech tarifech, včetně těch pro hosty. Je nejužitečnější pro lidi, kteří tráví významnou část dne v ClickUpu. Nastavení, které se opravdu vyplatí: stáhněte si správnou verzi, zapněte klávesové zkratky (ve výchozím nastavení jsou vypnuté), vyladěte oznámení, nastavte odkazy v prohlížeči tak, aby se automaticky otevíraly v aplikaci, a jakmile budou základy stabilní, přidejte AI nástroje jako Brain MAX a Talk to Text. Používejte desktopovou aplikaci k realizaci úkolů, prohlížeč si nechte na rešerše.
Co je to desktopová aplikace ClickUp?
Desktopová aplikace ClickUp je nainstalovaná verze ClickUp pro váš počítač. Nejedná se o samostatný produkt a nevytváří samostatný pracovní prostor. Poskytuje vám další způsob přístupu ke stejné práci, avšak v prostředí, které je k tomuto účelu lépe přizpůsobené než záložka v prohlížeči.
Na tom záleží. Desktopová aplikace je cenná, protože mění profil tření při používání ClickUpu. V samostatném okně aplikace se snáze soustředíte než v záložce prohlížeče, kde o vaši pozornost soupeří e-maily, schůzky a rešerše.
Poznámka: Desktopová aplikace ClickUp je k dispozici pro všechny tarify ClickUp a mohou ji používat všichni uživatelé, včetně hostů.
Proč používat desktopovou aplikaci ClickUp?
Desktopová aplikace ClickUp zkracuje dobu zadávání úkolů, eliminuje hledání správné záložky, poskytuje nativní oznámení operačního systému a automaticky otevírá odkazy ClickUp z prohlížeče – to vše jsou akce, které připnutá záložka v prohlížeči nedokáže napodobit. Je neocenitelná zejména tehdy, když v ClickUp strávíte většinu dne a drobné potíže spojené s používáním prohlížeče se začnou kumulovat.
1. Zaznamenáte úkol hned, jak si ho všimnete
Jste uprostřed videohovoru a někdo zmíní změnu termínu. V prohlížeči byste museli najít správnou kartu (nebo úplně znovu spustit ClickUp), přejít k danému úkolu a aktualizovat ho, než se rozhovor posune dál. Do té doby už jste ztratili nit.
V desktopové aplikaci vám globální klávesová zkratka, jako je Cmd/Ctrl+E, umožní vytvořit nový úkol odkudkoli na vašem počítači, aniž byste museli přepínat okna nebo ztratit kontext. Časová prodleva mezi myšlenkou „Musím něco udělat“ a „Teď je to v ClickUp“ se zkrátí na méně než dvě sekundy.
2. Už se vám nestane, že ztratíte přehled
Cmd/Ctrl + Tab. To je vše. Postranní panel, otevřený úkol, pozice posuvníku: vše přesně tam, kde jste to nechali. Desktopová aplikace běží ve vlastním okně v Docku nebo na hlavním panelu, takže návrat do ClickUp po schůzce je otázkou jediného stisknutí klávesy, nikoli hledání jehly v kupce sena mezi 34 otevřenými záložkami.
Tyto úspory se sčítají. Pokud se šestkrát denně vracíte zpět do ClickUp a každý návrat vám ušetří třeba jen deset sekund hledání správné záložky, získáte zpět jednu minutu denně jen na samotné navigaci. Je to sice málo, ale právě takové drobné překážky vedou lidi k tomu, že nástroj zavřou, místo aby ho používali.
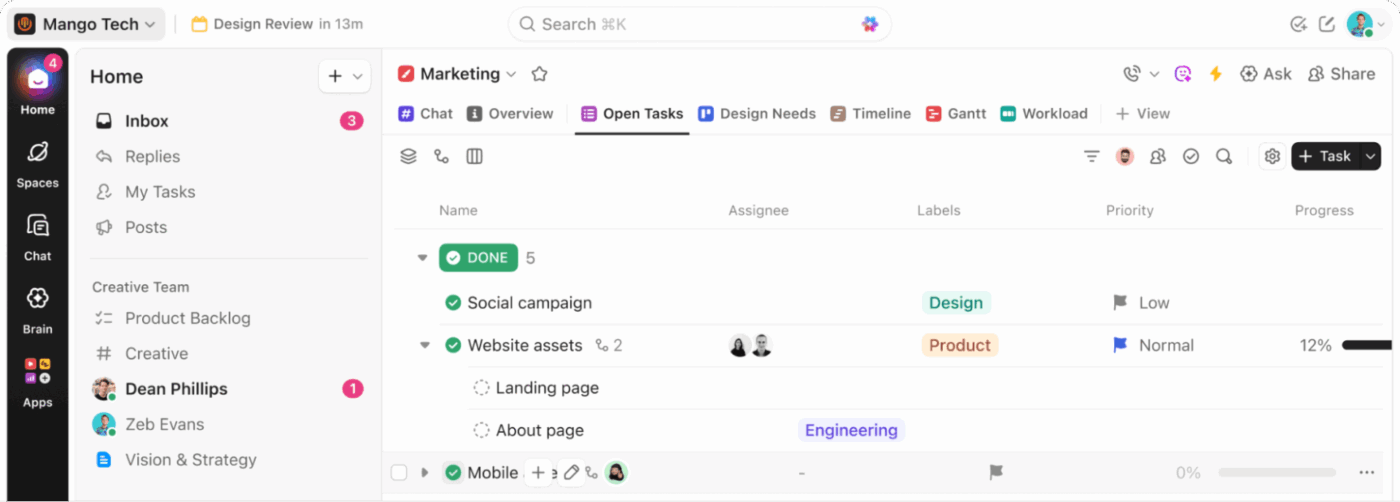
3. Chat, úkoly a dokumenty zůstávají ve stejném okně
Kolega vám v chatu ClickUp pošle zprávu s dotazem na aktuální stav. Zkontrolujete úkol, odpovíte v konverzaci a připojíte odkaz na dokument – to vše bez opuštění okna. Při práci v prohlížeči by stejná výměna zpráv často znamenala: najít záložku „Chat“, otevřít úkol v nové záložce, zkopírovat odkaz na dokument ze třetí záložky a vložit ho zpět do první.
Právě tato konsolidace je důvodem, proč Goutham R., odborník na zákaznickou spokojenost, v recenzi na G2 poukázal na tuto změnu:
Díky ClickUp jsme se zbavili závislosti na 4–5 samostatných nástrojích (Trello pro úkoly, Confluence pro dokumenty, samostatné tabulky pro OKR atd.). Tím se snížilo přepínání mezi úkoly a zlepšila se přehlednost napříč odděleními. Úspory nákladů plynoucí pouze z konsolidace nástrojů samy o sobě ospravedlnily investici – skutečná návratnost investic však spočívá v rychlejším rozhodování a menším počtu zmeškaných předání úkolů.
Díky ClickUp jsme se zbavili závislosti na 4–5 samostatných nástrojích (Trello pro úkoly, Confluence pro dokumenty, samostatné tabulky pro OKR atd.). Tím se snížilo přepínání mezi úkoly a zlepšila se přehlednost napříč odděleními. Úspory nákladů plynoucí pouze z konsolidace nástrojů samy o sobě ospravedlnily investici – skutečná návratnost investic však pramení z rychlejšího rozhodování a menšího počtu zmeškaných předání úkolů.
4. Oznámení se zobrazují přímo ve vašem operačním systému, ne v zapadlé záložce
Oznámení v prohlížeči jsou často nespolehlivá. Vyžadují, aby byla karta otevřená, konkurují všem ostatním webům, které odesílají upozornění, a často jsou blokována oprávněními na úrovni operačního systému, na jejichž nastavení uživatelé zapomněli.
Desktopová aplikace odesílá oznámení prostřednictvím nativní oznamovací vrstvy vašeho operačního systému. To znamená, že se zobrazují ve vašem oznamovacím centru společně s upozorněními z kalendáře, zprávami a aktualizacemi systému. Vidíte je bez ohledu na to, zda je ClickUp v popředí, či nikoli.
Skutečnou hodnotou není větší počet oznámení, ale možnost jejich přizpůsobení. Jelikož se upozornění spouštějí prostřednictvím vašeho operačního systému, můžete pomocí režimu soustředění, funkce „Nerušit“ nebo naplánovaných časových oken pro oznámení ovládat, kdy vás ClickUp smí vyrušit – což záložka v prohlížeči nedokáže s takovou přesností.
5. Odkazy z prohlížeče se automaticky otevírají v aplikaci
Prohlížíte si informace v prohlížeči Chrome a kliknete na odkaz na ClickUp, který vám někdo poslal v e-mailu. Bez desktopové aplikace se otevře další karta v prohlížeči, která se přidá k ostatním. Pokud máte zapnuté automatické otevírání, otevře se tento odkaz přímo v desktopové aplikaci.
To je most mezi vyhledáváním v prohlížeči a prováděním úkolů na počítači. Prohlížeč slouží k prohlížení. ClickUp slouží k práci. Jedno nastavení (podporované v prohlížečích Chrome, Firefox a Edge) udržuje tyto dva světy oddělené bez jakéhokoli ručního zásahu.
Desktopová aplikace ClickUp vs. ClickUp v prohlížeči: hlavní rozdíly
Desktopová aplikace ClickUp i verze pro prohlížeč mají přístup ke stejnému pracovnímu prostoru, stejným datům a stejným oprávněním. Rozdíly jsou v prostředí: jak k vám přicházejí oznámení, jaké klávesové zkratky jsou k dispozici, jak fungují odkazy a co se stane, když ztratíte připojení k internetu.
| Dimension | Aplikace pro stolní počítače | Prohlížeč |
|---|---|---|
| Oznámení | Aplikace je dostupná prostřednictvím oznamovacího centra vašeho operačního systému (macOS, Windows, Linux). Lze ji ovládat pomocí režimu soustředění a funkce „Nerušit“ na systémové úrovni. | Vyžaduje, aby byla záložka otevřená. Soutěží s každým jiným webem, který odesílá upozornění. Často je blokována oprávněními na úrovni operačního systému, na jejichž nastavení uživatelé zapomněli. |
| Globální klávesové zkratky | Kombinací kláves Cmd/Ctrl + J otevřete panel AI Command Bar z libovolného místa na vašem počítači, a to i když je ClickUp spuštěn na pozadí. Klávesami T a R můžete v aplikaci vytvářet úkoly a připomenutí. | Klávesové zkratky fungují pouze tehdy, když je aktivní karta ClickUp |
| Přístup offline | Vytvářejte úkoly a připomenutí, prohlížejte si dříve otevřené úkoly. Úpravy a podúkoly se synchronizují, jakmile se znovu připojíte. | Není k dispozici offline režim. Ztráta připojení znamená úplnou ztrátu přístupu. |
| Automatické otevírání odkazů | Odkazy na ClickUp, na které kliknete v prohlížečích Chrome, Firefox nebo Edge, se otevírají přímo v aplikaci, místo aby se spouštěla nová karta. | Odkazy se ve výchozím nastavení otevírají v nových záložkách prohlížeče |
| Rozšíření pro prohlížeče | Není podporováno. Rozšíření pro Chrome (nástroje pro sledování času, nástroje pro snímání obrazovky, integrace třetích stran) v aplikaci nefungují. | Plná podpora rozšíření |
| Vložený obsah | Některý vložený obsah (Tabulky Google, tabule Miro) se po kliknutí otevře v prohlížeči | Zobrazuje se přímo v prohlížeči, aniž byste museli opustit kartu |
| Správa oken | Vyhrazené okno v Docku/na hlavním panelu. Pomocí klávesové zkratky Cmd+Tab (nebo Alt+Tab) se k němu okamžitě přepnete. Poloha posuvníku a stav postranního panelu zůstávají zachovány | Jedna z mnoha záložek. Po každém přepínání mezi kontexty je nutné najít správnou záložku. |
| Chování na pozadí | Aplikace běží na pozadí i při zavřeném okně, takže klávesové zkratky a oznámení zůstávají aktivní | Zastaví zasílání oznámení, pokud je karta zavřená nebo je prohlížeč ukončen |
Jak se rozhodnout, kterou z nich použít
Desktopovou aplikaci použijte, když:
- V ClickUp trávíte velkou část svého dne
- Chcete oddělit práci od obecného nepořádku v prohlížeči
- Během dne se spoléháte na doručenou poštu, připomenutí, dokumenty a chat
- Chcete rychlejší zadávání pomocí klávesových zkratek
- Chcete využívat pracovní postupy s umělou inteligencí na počítači prostřednictvím Brain MAX a Talk to Text
ClickUp v prohlížeči nadále používejte, pokud:
- ClickUp kontrolujete jen občas
- Většina vašeho pracovního postupu závisí na záložkách v prohlížeči a vyhledávání na webu
- Potřebujete funkce dostupné pouze v prohlížeči nebo integrace založené na rozšířeních
- Porovnáváte mnoho zdrojů vedle sebe a zatím nepotřebujete samostatné okno pro provádění úloh
Aplikace pro stolní počítače není automaticky lepší. Je vhodnější pro uživatele, jejichž práce v ClickUp je již natolik náročná, že má smysl omezit zátěž spojenou s opakovanými úkony. Pokud ClickUp používáte jen málo nebo příležitostně, je prohlížeč jednodušší a kromě výše uvedených výhod pro životní prostředí neztrácí nic z funkčnosti.
Jak se vyhnout rozptýlení pozornosti: prohlížeč pro rešerši, desktop pro realizaci
„Pozůstatek pozornosti“ (attention residue), termín pocházející z výzkumu Sophie Leroyové z roku 2009 na Minnesotské univerzitě, představuje kognitivní náklady spojené s přepínáním mezi úkoly ve stejném prostředí. Váš mozek si do následujícího kontextu přenáší fragmenty toho předchozího. Oddělení výzkumu (prohlížeč) od provádění (stolní aplikace) vytváří environmentální hranici, která signalizuje kognitivní reset a tím tento pozůstatek snižuje.
Největší výhodou desktopové aplikace není nahrazení prohlížeče, ale záměrné oddělení těchto dvou prostředí.
Takto to vypadá v praxi. Procházíte tři vstupní stránky konkurence v rámci projektu redesignu a najdete potřebný poznatek. Pomocí klávesové zkratky Cmd+Tab přepnete do desktopové aplikace, vytvoříte úkol s tímto poznatkem, označíte designéra, nastavíte stav na „v procesu“ a klávesovou zkratkou Cmd+Tab se vrátíte zpět. Prohlížeč zůstane otevřený pro výzkum. ClickUp zůstane přehledný pro práci. Ani jedno prostředí se nezahltí nepořádkem z toho druhého.
Nejde o to, že „stolní aplikace je dobrá a prohlížeč špatný“. Jedná se o jeden pracovní postup se dvěma specializovanými zónami. Stolní aplikace si své místo zaslouží v okamžiku, kdy ji přestanete používat na všechno a začnete ji využívat pouze pro práci, která vyžaduje přesun.
Nezbytná nastavení, která byste měli provést, než začnete desktopovou aplikaci používat
Devět možností nastavení rozhoduje o tom, zda se desktopová aplikace ClickUp stane každodenním zvykem, nebo zůstane nepoužívaná. Vyberte si správnou verzi pro váš operační systém, nainstalujte Brain MAX, nastavte pravidla pro spouštění, oznámení a klávesové zkratky, vyberte pracovní prostor, nastavte preference automatického otevírání, seznamte se s offline funkcemi a známými omezeními.
Dobrý pracovní postup na počítači obvykle zahrnuje tyto prvky:
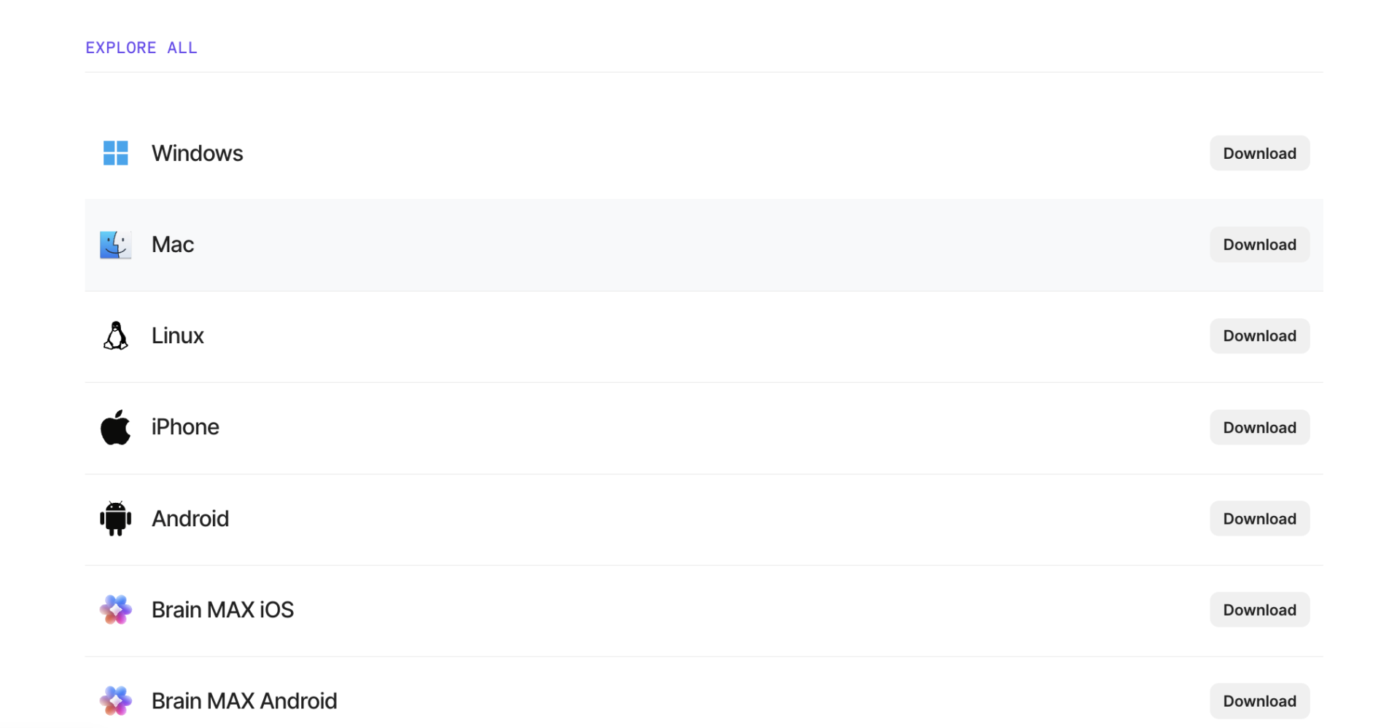
- Správná verze pro instalaci: Windows, Intel Mac, Apple Silicon Mac nebo Linux AppImage, v závislosti na zařízení. Vezměte také na vědomí minimální požadavky na operační systém: Windows 10 nebo macOS 10.16 (Big Sur). Starší operační systémy nejsou podporovány.
- Brain MAX: Pokud chcete využívat AI vyhledávání na počítači, hlasové zadávání nebo multimodální pokyny, nainstalujte si ClickUp Brain MAX samostatně ze stránky pro stažení. Běží souběžně s hlavní desktopovou aplikací.
- Chování při spuštění: Rozhodněte se, zda se má ClickUp spouštět automaticky při startu počítače
- Pravidla pro oznámení: Omezte rušivé podněty, než vás aplikace naučí ignorovat upozornění
- Nastavení klávesových zkratek: Zapněte a ponechte si pouze ty klávesové zkratky, které si zapamatujete a budete používat
- Výběr pracovního prostoru: Ujistěte se, že pracujete ve správném pracovním prostoru, zejména pokud jich používáte více než jeden.
- Nastavení automatického otevírání: Rozhodněte se, zda se odkazy na ClickUp z prohlížeče mají otevírat v aplikaci. V prohlížečích Chrome, Firefox a Edge můžete nastavit, aby se odkazy na ClickUp otevíraly přímo v desktopové aplikaci namísto v prohlížeči. Prohlížeč Safari tuto funkci přesměrování v současné době nepodporuje.
- Možnosti v režimu offline: Zjistěte, co aplikace dokáže a nedokáže bez připojení k internetu. S desktopovou aplikací ClickUp můžete v režimu offline vytvářet úkoly a připomenutí a prohlížet si úkoly, které jste již otevřeli. Stávající úkoly ani poznámky však nemůžete upravovat a nelze vytvářet podúkoly, dokud se znovu nepřipojíte k internetu.
- Známá omezení: Při plánování počítejte s integracemi vyžadujícími rozšíření prohlížeče a vložený obsah, který se může otevírat mimo aplikaci.
Jak nastavit a používat desktopovou aplikaci ClickUp v 6 krocích
Nastavení desktopové aplikace ClickUp zahrnuje šest kroků: stažení správné verze, přihlášení a konfigurace nastavení aplikace, seznámení se se základními prvky navigace, aktivace klávesových zkratek pro rychlé zadávání, uspořádání každodenních pracovních postupů a následné zapojení umělé inteligence. Největší přínos přinášejí první tři kroky.
Krok 1: Stáhněte si správnou verzi a nainstalujte ji čistě
Nejlepší nastavení začíná správnou instalací. ClickUp podporuje Windows, macOS a Linux a desktopová aplikace je k dispozici ve všech tarifech, včetně těch pro hosty.
Pokud používáte Linux, desktopová aplikace využívá AppImage. Pokud používáte Mac, ujistěte se, že stahujete správnou verzi pro vaše zařízení, zejména pokud máte Apple Silicon. Výběr správného instalačního programu hned na začátku vám později ušetří čas a vyhnete se zbytečnému řešení problémů.
Tip pro pokročilé: Používejte oficiální stránku pro stažení ClickUp, místo abyste se spoléhali na staré instalační soubory nebo uložené odkazy z předchozích verzí.
Krok 2: Nejprve se přihlaste a zkontrolujte nastavení konkrétní aplikace
Po instalaci se přihlaste a než začnete pracovat, věnujte chvilku nastavení aplikace.
Na začátku jsou nejdůležitější tři nastavení:
- Spustit při startu systému, pokud chcete mít ClickUp k dispozici každý den, aniž byste o tom museli přemýšlet
- Klávesové zkratky pro desktopovou aplikaci, pokud plánujete vytvářet úkoly nebo rychle vyhledávat odkudkoli
- Kontrola verze, abyste nemuseli řešit problém způsobený starou verzí
Tip pro pokročilé: Klávesové zkratky jsou ve výchozím nastavení deaktivovány. Ručně je aktivujte ve svých osobních nastaveních.
Krok 3: Seznamte se s nejdůležitějšími navigačními úrovněmi
Nemusíte hned od prvního dne ovládat celou hierarchii. Stačí vědět, kde se stav práce mění.
Začněte s těmito vrstvami:
- Globální navigace (svislá lišta vlevo). Vaše stálá lišta pro Chat, AI Hub, Planner a celou hierarchii pracovního prostoru. Zůstává viditelná z jakéhokoli místa v aplikaci.
- Boční panel na úvodní stránce pro přehled o oznámeních, přidělených úkolech a nedávných konverzacích na první pohled
- Plánovač: Váš osobní rozvrh a priority na daný den
- Chat: Kanály, soukromé zprávy a vlákna konverzací připnutá v globální navigaci
- Dokumenty a Poznámkový blok: Psaní delších textů a rychlé zaznamenávání
- AI Hub: Brain, propojené vyhledávání a historie zadávaných dotazů
V ClickUp 4.0 zůstává globální navigace viditelná v celé aplikaci. Díky tomu už nikdy nebudete muset znovu hledat chat nebo svůj seznam úkolů – vždy jsou k dispozici pouhým jedním kliknutím ve stejné svislé liště.
Pokud je váš pracovní postup zaměřen především na úkoly, stanou se ClickUp Tasks ústředním bodem vašeho pracovního prostředí. Pokud je váš pracovní postup zaměřen především na dokumentaci, stane se ClickUp Docs stejně důležitým. Ať tak či onak, aplikace funguje nejlépe, když víte, která část aplikace je určena pro jaký druh práce.
Krok 4: Nastavte si rychlé zaznamenávání pomocí klávesových zkratek, připomínek a automatického otevírání
Desktopová aplikace se začne vyplácet, jakmile pocítíte, že zaznamenávání proběhlo okamžitě.
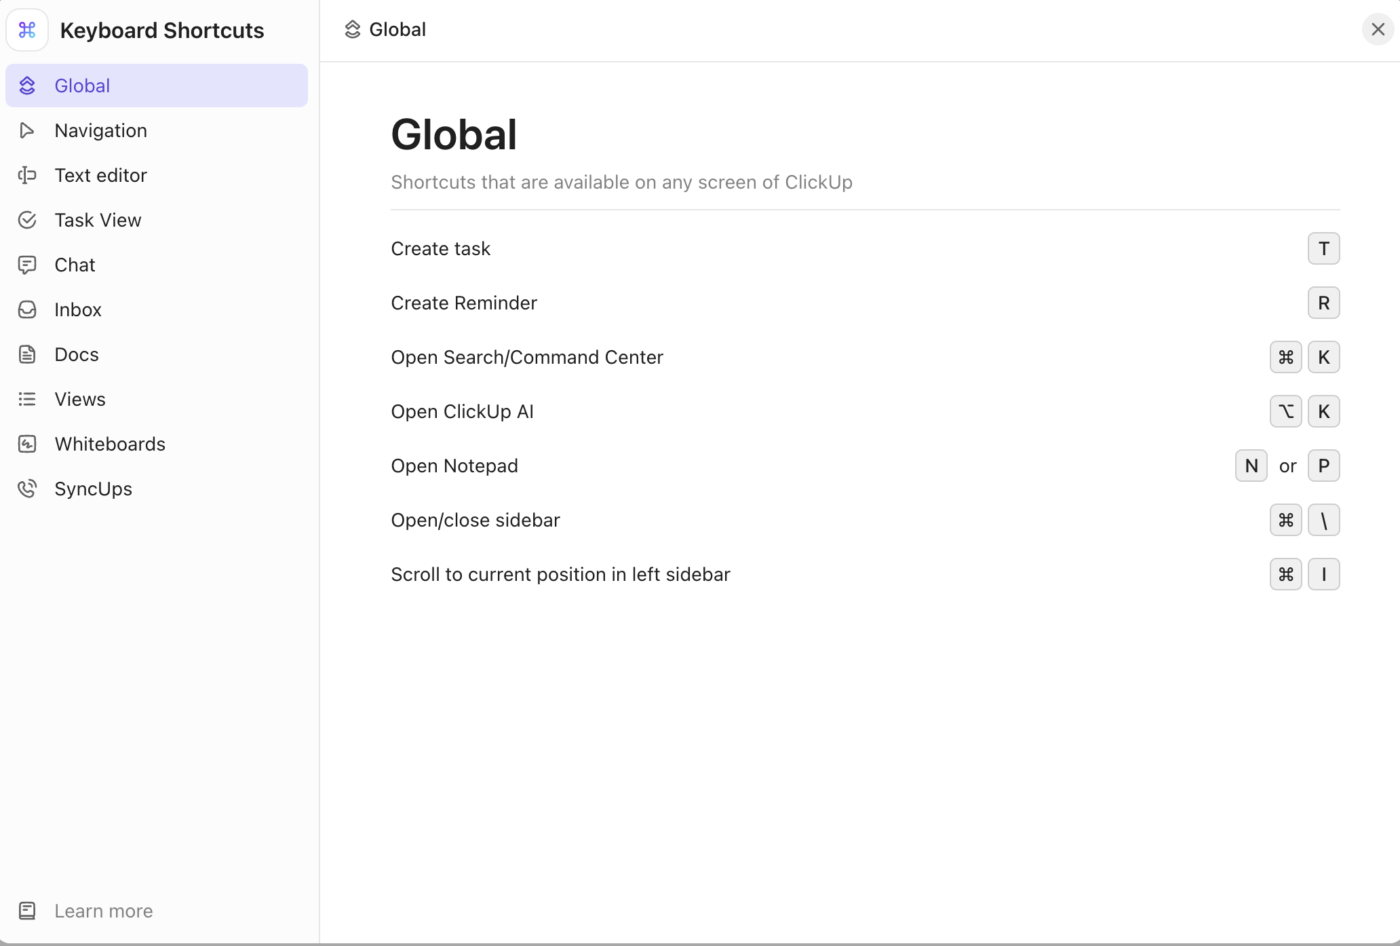
Začněte s těmito čtyřmi klávesovými zkratkami. Pokrývají 80 % každodenních úkonů při zadávání a vyhledávání.
- T — vytvořit úkol (v aplikaci)
- R — vytvořit připomenutí (v aplikaci)
- Cmd/Ctrl + K — otevřete panel příkazů AI v aplikaci ClickUp
- Cmd/Ctrl + J — otevřete panel příkazů AI z libovolného místa na vašem počítači, i když je ClickUp spuštěn na pozadí
Poslední z nich funguje na úrovni počítače, pokud je spuštěna aplikace ClickUp. Pokud tyto funkce kolidují s jinými nástroji, můžete je v nastavení desktopové aplikace přizpůsobit nebo deaktivovat.
Tip pro pokročilé: Pokud často otevíráte odkazy na ClickUp z prohlížeče, zapněte na počítači funkci automatického otevírání. Zajistíte tak plynulejší přechod mezi vyhledáváním v prohlížeči a prováděním úkolů na počítači. Je to sice drobná změna, ale odstraní z vašeho pracovního dne další moment, který vás zdržuje.
Krok 5: Používejte aplikaci pro pracovní postupy, u nichž je výhodné, aby zůstaly viditelné
Jakmile si nastavíte klávesové zkratky a navigaci, vytvořte si své denní rozvržení. Desktopová aplikace je nejúčinnější, když podporuje průběžnou práci, nikoli jen příležitostné klikání.
Otevřete pracovní postupy, které opakujete každý den, a promyšleně je uspořádejte:
- Kontrola a vyprázdnění složky „Doručená pošta“ v průběhu dne
- Nechte úkol otevřený, zatímco pracujete s briefem nebo dokumentem
- Využití rozložení s více okny pro dokumenty, úkoly a řídicí panely
- Správa připomínek, aniž by se ztratily v nepořádku prohlížeče
- Odpovídání na zprávy v chatu a komentáře bez přepínání mezi nástroji
Praktické nastavení: připněte Chat a Plánovač do globální navigace, nechte svůj hlavní pracovní seznam nebo tabuli otevřený uprostřed a pomocí klávesové zkratky Cmd/Ctrl + K přeskakujte kamkoli jinde. Toto rozložení se třemi prvky (komunikace + plánování + realizace) pokryje většinu pracovních dnů bez nutnosti otevírat další záložky.
Krok 6: AI a automatizaci zapojujte až poté, co budou fungovat základy
Nezačínejte s aktivovanými všemi funkcemi umělé inteligence nebo automatizace. Začněte až poté, co bude základní pracovní postup již stabilní.
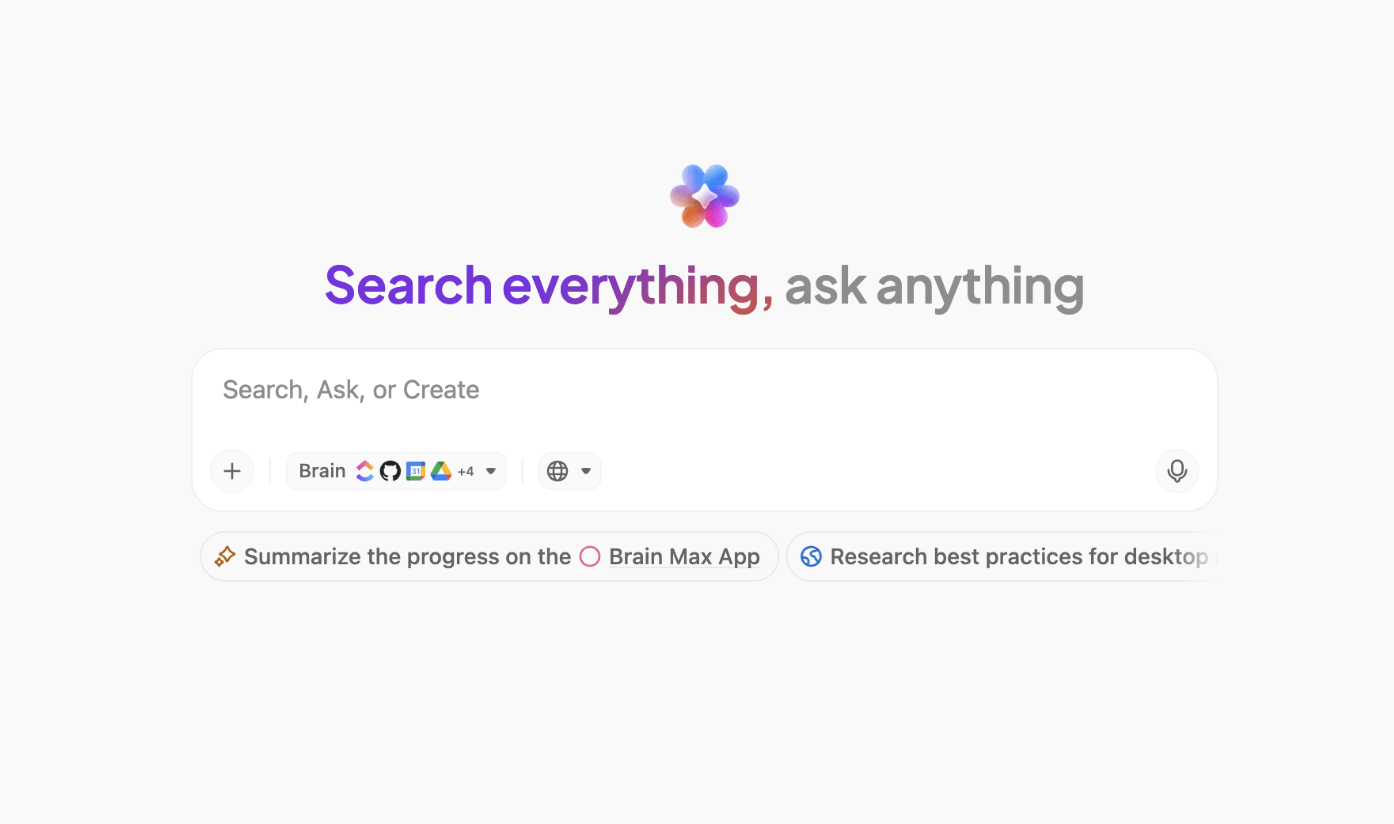
Brain MAX je samostatná desktopová aplikace, která pomocí jediného vyhledávacího pole prohledává ClickUp, propojené aplikace (GitHub, Google Drive, SharePoint a další) i internet. Ve výchozím nastavení používá model Brain, který má plný přístup k informacím ve vašem pracovním prostoru. Můžete přepnout na ChatGPT, Claude nebo Gemini a získat tak alternativní úvahy, ale tyto modely nemají přístup k vašim datům v ClickUp.
Desktopová aplikace Brain MAX je v současné době k dispozici pouze pro macOS 13 a novější. Uživatelé Windows mohou k aplikaci Brain přistupovat prostřednictvím panelu AI Command Bar (Cmd/Ctrl + J) v hlavní desktopové aplikaci.
Funkce Talk to Text převádí řeč na upravený text v aplikaci Brain MAX nebo v jakémkoli textovém poli na vašem počítači (e-mail, dokument Google Docs, zpráva v chatu). Stiskněte a podržte klávesu „fn“ (nebo vlastní klávesovou zkratku) pro nahrávání, uvolněním zastavíte nahrávání. Výstup je automaticky formátován podle vašeho stylu psaní a jazykových preferencí, které můžete nastavit v nastavení aplikace Brain MAX.
Díky těmto novinkám je tato desktopová aplikace zajímavější než běžná aplikace pro správu úkolů. Neotevíráte jen pracovní prostor. Vytváříte rychlejší spojení mezi myšlenkou, zaznamenáním a akcí.
Chcete se dozvědět více o funkci Talk to Text? Podívejte se na toto video.
Jak postupně získat z desktopové aplikace ještě větší užitek
Desktopová aplikace ClickUp přináší největší užitek, když ji přizpůsobíte opakujícím se pracovním postupům (třídění příchozích zpráv, zadávání úkolů, odpovědi v chatu) a pravidelně odstraňujete to, co nefunguje. Odstraňte nepoužívané zkratky, upravte nastavení oznámení při změnách v projektech a aktualizujte aplikaci ještě předtím, než začnete řešit případné problémy.
Zaměřte se na opakující se úkoly, ne na zkoumání funkcí
Nejúčinnější nastavení je obvykle nudné. Jedná se o malou sadu úkonů, které opakujete každý den: zkontrolovat doručenou poštu, otevřít úkol, aktualizovat stav, zadat připomenutí, zkontrolovat dokument, odpovědět na zprávu v chatu, pokračovat dál. Pokud zjistíte, že děláte něco mimo aplikaci, co byste mohli dělat přímo v ní (kontrolujete připomenutí v telefonu, hledáte úkoly v prohlížeči), je to pro vás signál, abyste upravili nastavení na počítači, a ne přidávali další nástroj.
Po týdnu si zopakujte klávesové zkratky
Pokud se vám nějaká klávesová zkratka zdá užitečná, ale nikdy ji nepoužíváte, zbavte se jí, abyste si ulehčili. Nechte si jen dvě nebo tři, které vám skutečně ušetřily čas. Pro většinu lidí to nakonec bývají T, R a Cmd/Ctrl + J. Pokud máte jiné, nevadí. Jde o to mít krátký seznam, který můžete používat bez přemýšlení.
Používejte oznámení jako prostředek k třídění úkolů, nikoli jako rušivý šum
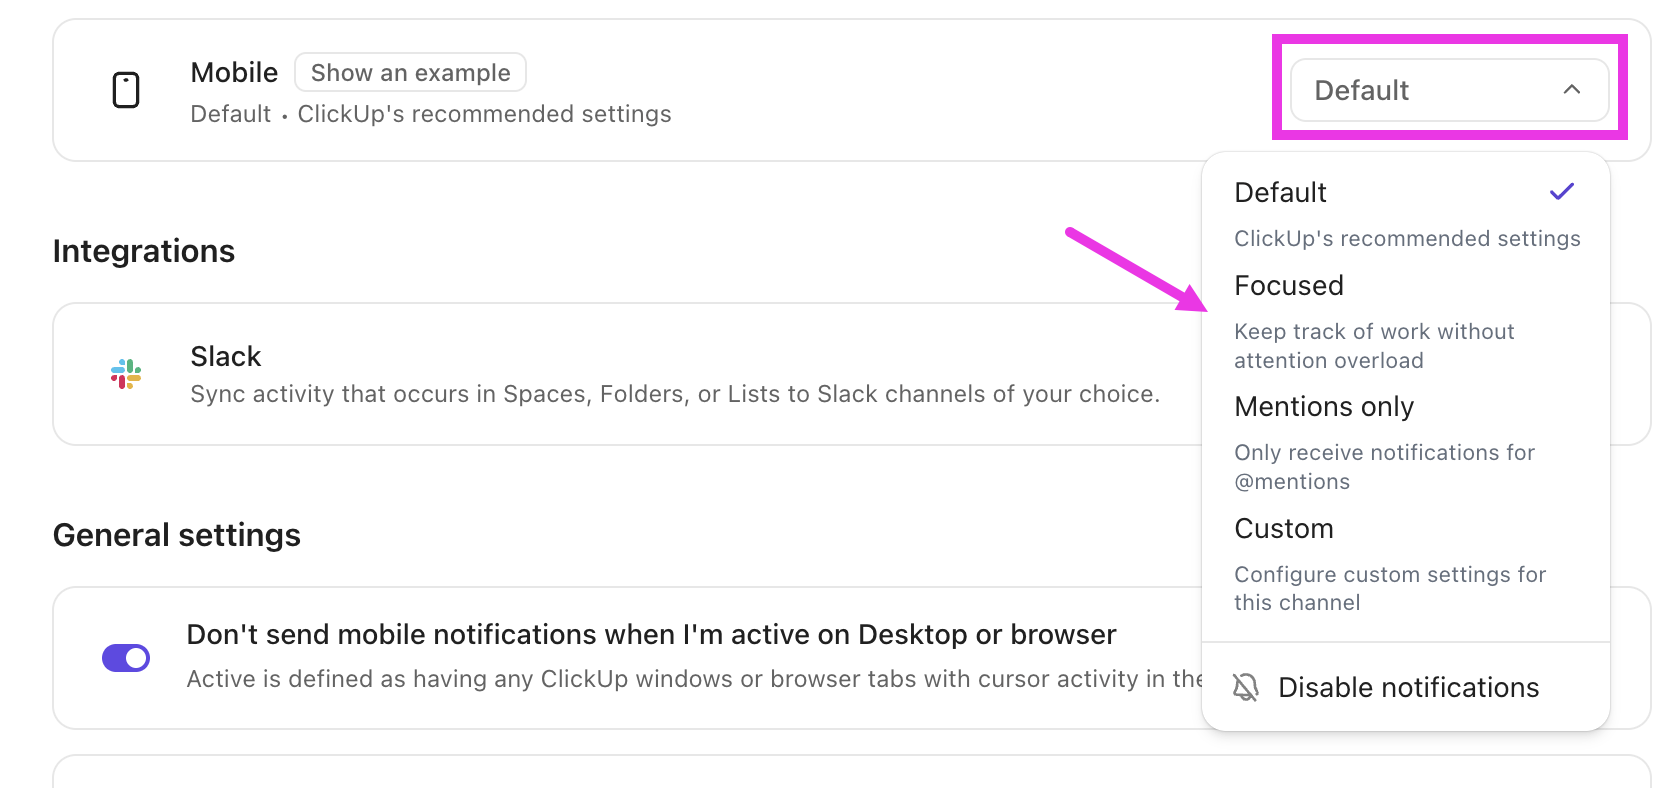
Aplikace ztrácí na užitečnosti, pokud se každá aktualizace jeví jako stejně naléhavá. Upravte nastavení oznámení tak, aby upozornění na počítači odrážela skutečnou prioritu. Přehodnoťte je, jakmile se změní vaše pracovní vytížení. Nový projekt nebo nový rytmus sprintů znamenají, že naléhavé jsou jiné věci. Nastavení, která fungovala minulý měsíc, mohou být tento měsíc jen rušivým prvkem.
Nastavte správná očekávání ohledně práce offline
Režim offline je užitečný pro zachování kontinuity. Nejedná se o plnohodnotnou spolupráci. Využijte jej k zaznamenávání, kontrole a pokračování v práci, dokud se znovu nepřipojíte. Pamatujte: v režimu offline můžete vytvářet a prohlížet obsah, ale úpravy a dílčí úkoly počkají, až se znovu připojíte.
Před řešením problémů aktualizujte aplikaci
Většina hlášení o „nefunkčních“ desktopových aplikacích souvisí s rozdíly mezi verzemi. Pokud vám něco nesedí, než začnete cokoli dělat, zkontrolujte ClickUp → O aplikaci ClickUp.
Kdy se stolní aplikace ClickUp nejlépe hodí pro váš pracovní postup?
Desktopová aplikace ClickUp je pro vás ideální volbou, pokud je vaše práce již rozdělena mezi úkoly, dokumenty, připomenutí, chat, přehledy a umělou inteligenci.
Právě v tom spočívá největší výhoda ClickUp. Nepoužíváte desktopovou aplikaci jen proto, abyste si zkontrolovali úkoly. Slučujete několik pracovních ploch do jediného pracovního prostředí.
Upřímné upozornění: Desktopová aplikace ClickUp může být nad vaše potřeby, pokud máte jednoduchý pracovní postup nebo pokud práci kontrolujete jen příležitostně. Není také vhodná, pokud potřebujete často pracovat s integracemi založenými na rozšířeních pro Chrome, protože ty zde nejsou podporovány.
Pokud však již trávíte celý den v ClickUpu, právě díky desktopové aplikaci se tento produkt stává ještě ergonomičtějším. Zkracuje vzdálenost mezi plánováním, komunikací a realizací.
Pokud je vaším cílem efektivnější organizace každodenní práce, stáhněte si desktopovou aplikaci ClickUp a nastavte ji tak, aby se zaměřila na tři činnosti, které provádíte nejčastěji.
Časté chyby, které vám brání v plném využití desktopové aplikace
Za většinu neúspěšných instalací desktopové aplikace ClickUp může šest chyb: ponechání zkratek deaktivovaných, považování aplikace za klon prohlížeče, povolení příliš mnoha zkratek najednou, očekávání, že budou fungovat rozšíření pro Chrome, zavření okna a domněnka, že aplikace přestala běžet, a zavádění umělé inteligence dříve, než jsou stabilní základní funkce.
Nainstalujte si ji a nic neměňte
Jak to vypadá: Stáhnete si aplikaci, přihlásíte se a hned začnete pracovat. Oznámení se jen hrnou, protože jste si je nikdy nenastavili. Klávesové zkratky nefungují, protože jsou ve výchozím nastavení deaktivované. Po dni aplikaci zavřete a řeknete si: „Je to stejné jako v prohlížeči.“
Řešení: Při prvním spuštění si vyhraďte pět minut. V osobních nastaveních povolte klávesové zkratky, nastavte pravidla oznámení tak, aby se zobrazovaly pouze úkoly a zmínky, a rozhodněte se, zda se má aplikace spouštět při startu systému. Tato jednorázová úprava zcela změní váš zážitek z používání aplikace.
Používejte ji jako klon prohlížeče
Jak to vypadá: V desktopové aplikaci otevřete patnáct zobrazení ClickUp a přepínáte mezi nimi stejným způsobem, jako přepínáte mezi záložkami v prohlížeči. Aplikace působí stejně přeplněně jako Chrome.
Řešení: Vyhraďte si v desktopové aplikaci pouze to, co potřebujete k práci: úkol, na kterém právě pracujete, vaši schránku a chat. Vyhledávání, porovnávání a prohlížení více zdrojů současně nechte v prohlížeči. Hodnota spočívá v rozdělení, ne v přesouvání všeho do aplikace.
Zapnutí příliš mnoha klávesových zkratek najednou
Jak to vypadá: Zapnete všechny dostupné klávesové zkratky a pak omylem spustíte akce, které jste nechtěli. Z frustrace pak všechny klávesové zkratky vypnete.
Tip: Začněte se třemi: T (úkol), R (připomenutí) a Cmd/Ctrl J (AI Command Bar z libovolného místa). Další klávesové zkratky přidávejte až poté, co si na tyto zvyknete, obvykle po týdnu.
Očekáváte, že rozšíření pro Chrome budou fungovat uvnitř aplikace
Jak to vypadá: Pro sledování času, pořizování snímků obrazovky nebo integraci s aplikacemi třetích stran používáte rozšíření pro Chrome. Nainstalujete si desktopovou aplikaci a divíte se, proč tam tyto funkce chybí.
Řešení: Jedná se o omezení platformy Electron, nikoli aplikace ClickUp. Všechny desktopové aplikace postavené na Electronu (Slack, Notion, VS Code, Figma) mají stejné omezení. Pracovní postupy závislé na rozšířeních ponechte v prohlížeči a desktopovou aplikaci používejte pro nativní práci v ClickUp. Některý vložený obsah (Tabulky Google, tabule Miro) se po kliknutí může také otevřít v prohlížeči; jedná se o očekávané chování, nikoli o chybu.
Zavření okna aplikace a domněnka, že přestala běžet
Jak to vypadá: Zavřete okno ClickUp a pak se divíte, proč stále funguje klávesová zkratka Cmd/Ctrl + J nebo proč se stále zobrazují oznámení.
Oprava: Aplikace pro stolní počítače běží ve výchozím nastavení na pozadí, i když je okno zavřené. Je to záměrné: díky tomu zůstávají aktivní globální klávesové zkratky a oznámení. Pokud chcete aplikaci úplně ukončit, použijte ClickUp → Ukončit ClickUp (Mac) nebo klikněte pravým tlačítkem myši na ikonu v systémové liště → Ukončit (Windows). Pokud chcete, aby aplikace běžela na pozadí, ale s menším počtem přerušení, upravte nastavení oznámení, místo abyste aplikaci ukončovali.
Zavádění umělé inteligence dříve, než jsou základy stabilní
Jak to vypadá: První den nainstalujete Brain MAX, propojíte tři aplikace a začnete zadávat vyhledávací dotazy. Ještě jste však nenastavili strukturu úkolů, pravidla pro oznámení ani navigaci. Umělá inteligence vám vrátí výsledky, se kterými nemůžete pracovat, protože základní pracovní prostor je neuspořádaný.
Rada: Nástroje s umělou inteligencí, jako jsou Brain MAX a Talk to Text, znásobují hodnotu přehledného uspořádání. Nenahrazují ho. Nejprve si zajistěte, aby vám fungovala navigace, klávesové zkratky a přehledné oznámení. Až poté, co budete vědět, kde se vaše práce nachází a jakým způsobem probíhá, přidejte umělou inteligenci. Na pořadí záleží.
Časté problémy a tipy pro řešení potíží
Většina problémů s desktopovou aplikací ClickUp má pět hlavních příčin: vypršení platnosti přihlašovacích údajů nebo tokenu SSO, zastaralé verze aplikace, oprávnění k oznámením na úrovni operačního systému, zmatek v procesech na pozadí a globální konflikty klávesových zkratek s jinými nástroji.
- Problémy s přihlášením: Pokud se aplikace při přihlašování zasekne, zkontrolujte postupně tři věci: přihlašovací údaje, připojení k síti a verzi aplikace. Pokud váš pracovní prostor vyžaduje SSO nebo dvoufaktorové ověření, desktopová aplikace používá stejné metody. Nejčastější příčinou skrytých selhání přihlášení je vypršený token SSO. Pokud nic z toho problém nevyřeší, přeinstalujte aplikaci (tím se automaticky vymažou lokální data). Mnoho problémů s přihlášením na počítači souvisí s vaším konkrétním zařízením, nikoli s celým Workspace
- Synchronizace úkolů a aktualizací: Pokud se aktualizace nezobrazují, nejprve aktualizujte aplikaci. Poté se odhlaste a znovu přihlaste. Pokud používáte více zařízení, ověřte, zda se jedná skutečně o problém se synchronizací, nebo pouze o starší verzi aplikace pro stolní počítače. Pokud jste nedávno používali režim offline, zkontrolujte, zda se úkoly, které jste vytvořili offline, synchronizovaly. Synchronizují se automaticky při opětovném připojení, ale pokud byla aplikace před opětovným připojením násilně ukončena, mohou být tyto položky stále v lokální frontě.
- Oznámení se nezobrazují: Zkontrolujte nastavení oznámení v ClickUp i oprávnění pro oznámení na ploše ve vašem operačním systému. Mnoho problémů s oznámeními pramení spíše z nastavení na úrovni operačního systému než ze samotné aplikace ClickUp. Na počítačích Mac zkontrolujte Systémová nastavení → Oznámení → ClickUp. Ve Windows zkontrolujte Nastavení → Systém → Oznámení. Pokud se ClickUp v žádném ze seznamů neobjeví, může být nutné aplikaci jednou znovu spustit, aby se zaregistrovala v operačním systému.
- Hlášení o selhání aplikace nebo nestabilní chování: Před přeinstalací zkontrolujte verzi aplikace ClickUp. Aplikace pro stolní počítače se aktualizuje automaticky, ale připnuté zástupce v Docku nebo na hlavním panelu mohou i po aktualizaci systému stále odkazovat na zastaralou verzi, což může vyvolat dojem, že se aplikace nepodařilo aktualizovat, zatímco skutečným problémem je právě zástupce. Pokud se ujistíte, že používáte nejnovější verzi a selhání přetrvávají, proveďte přeinstalaci, abyste vymazali lokální data.
- Globální klávesové zkratky nereagují: Pokud klávesové zkratky Cmd/Ctrl + J (AI Command Bar) nebo Cmd/Ctrl + E (rychlé vytvoření úkolu) nefungují, nejčastější příčinou je, že desktopová aplikace není spuštěna. Zavření okna ve výchozím nastavení aplikaci neukončí, ale pokud jste použili ClickUp → Ukončit ClickUp (Mac) nebo klikli pravým tlačítkem na ikonu v systémové liště → Ukončit (Windows), aplikace je zcela zastavena a klávesové zkratky nebudou fungovat. Aplikaci znovu otevřete, aby se klávesové zkratky obnovily. Pokud aplikace běží a klávesové zkratky stále nefungují, zkontrolujte, zda nedochází ke konfliktům s jinými nástroji (Raycast, Alfred nebo klávesové zkratky na systémové úrovni, které používají stejnou kombinaci kláves).
Pokud žádný z těchto kroků váš problém nevyřeší, nahlaste chybu přímo týmu ClickUp spolu s nahrávkou obrazovky a číslem verze aplikace. Uveďte také, zda se problém vyskytuje i v prohlížeči, protože to týmu pomůže izolovat chyby specifické pro desktopovou aplikaci.
Zůstaňte produktivní díky desktopové aplikaci ClickUp
Nejlepší způsob, jak používat desktopovou aplikaci ClickUp, je nepovažovat ji za duplikát prohlížeče. Berte ji jako místo, kde se práce skutečně vykonává.
Nainstalujte si správnou verzi. Projděte si nastavení, která ovlivňují váš den. Vytvořte si sadu jednoduchých zkratek. Používejte aplikaci pro úkoly, připomenutí, dokumenty, chat a další často prováděné akce. Až si na základy zvyknete, začleňte do práce umělou inteligenci a automatizaci.
Právě v tu chvíli pro vás desktopová aplikace začne skutečně pracovat: snazší vyhledávání, rychlejší zaznamenávání a méně ztracených kroků mezi zjištěním úkolu a jeho realizací.
Vyzkoušejte to sami. Zaregistrujte se ještě dnes zdarma na ClickUp.
Často kladené otázky týkající se desktopové aplikace ClickUp
Je desktopová aplikace ClickUp zdarma?
Ano. Desktopová aplikace je součástí každého tarifu ClickUp, včetně tarifu Free Forever, bez dalších nákladů a je dostupná všem uživatelům, včetně hostů. K její instalaci na Windows, macOS nebo Linux není potřeba žádná samostatná licence ani upgrade.
Jak aktualizuji desktopovou aplikaci ClickUp?
Aplikace pro stolní počítače se aktualizuje automaticky, ale připnutá zkratka v Docku nebo na hlavním panelu může i po aktualizaci systému stále odkazovat na starší verzi. Před přeinstalací nebo nahlášením chyby zkontrolujte svou verzi v nabídce ClickUp → O aplikaci ClickUp. Většina hlášení o „nefunkční aplikaci“ se týká nesouladu verzí, nikoli skutečných chyb.
Mám na počítači přístup ke všem funkcím ClickUp?
K dispozici je většina základních pracovních postupů, ale ne vše funguje úplně stejně. Integrace založené na rozšířeních pro Chrome nejsou v desktopové aplikaci podporovány a některý vložený obsah se může otevírat v prohlížeči.
Jaký je rozdíl mezi desktopovou aplikací ClickUp a Brain MAX?
Desktopová aplikace je nainstalovaná verze ClickUp pro úkoly, dokumenty, chat a oznámení. Brain MAX je samostatná desktopová aplikace zaměřená na umělou inteligenci: z jednoho panelu prohledává ClickUp, propojené aplikace jako GitHub a Google Drive i web a podporuje hlasový vstup prostřednictvím funkce Talk to Text. Brain MAX běží souběžně s hlavní aplikací a v současné době je k dispozici pouze pro macOS 13 a vyšší.