تم إنشاء مخططات جانت من قبل المهندس الميكانيكي والاستشاري الإداري هنري جانت في عشرينيات القرن العشرين، واستخدمت مخططات جانت في البداية لتسجيل تقدم عمليات الإنتاج وتم التركيز على تواريخ بداية العمليات ونهايتها.
أما اليوم، فإن مخططات جانت هي أدوات لا غنى عنها لإدارة المشاريع. فهي ديناميكية ومرنة وشاملة، مما يسمح لك بمراقبة الجدول الزمني لمشروعك وإجراء تغييرات في الوقت الفعلي في ثوانٍ.
في هذه المقالة، سوف نعرض لك كيفية إنشاء مخطط جانت في انقر فوق الحائز على جوائز أداة إدارة المهام والمشاريع . سنرشدك أيضًا إلى الميزات وأفضل الممارسات والاستخدامات الشائعة لمخططات جانت لمساعدتك على غزو عالم إدارة المشاريع. 🌍
ما هو مخطط جانت؟

تصور أي مشروع وإدارته باستخدام مخططات جانت الخاصة ب ClickUp
مخطط جانت هو أحد الأدوات الأكثر شيوعًا لتصور العمل الذي يدعم العديد من تقنيات إدارة المشاريع والمنهجيات. يمكنك استخدامها لتخطيط وإدارة ومراقبة الجدول الزمني للمشروع والجدول الزمني، مما يضمن سير مشروعك في الاتجاه الصحيح.
يحتوي كل مخطط جانت على محورين - محور رأسي ومحور أفقي. يسرد المحور الرأسي جميع مهامك، بينما يمثل المحور الأفقي الجدول الزمني. يعكس طول أشرطة المهام الأفقية مدة كل نشاط.
إلى جانب تصور الوقت المستغرق لإكمال كل مهمة، توضح مخططات جانت تبعيات المهام، وتسلط الضوء على العلاقات التي تعتمد فيها مهمة ما على إكمال مهمة أخرى. يساعدك ذلك على تحديد الاختناقات وإزالتها لضمان التقدم المنظم للمهام. ✨
ميزات مخطط جانت
قد تشعر عند قراءة مخطط جانت وكأنك تحاول حل أكبر الألغاز في العالم، خاصةً إذا كنت قد دخلت للتو عالم إدارة المشاريع
لحسن الحظ، تتمتع مخططات جانت ببنية عالمية - وبمجرد أن تتعلمها، لن تواجه أي مشكلة في فك رموز حتى أكثر المشاريع تعقيدًا.
فيما يلي المكونات الأساسية لمخططات جانت:
- قائمة المهام: توجد قائمة رأسية بجميع المهام على الجانب الأيسر من مخطط جانت. عادةً ما يتم ترميز القائمة بالألوان لتسهيل التصفح
- الخط الزمني: فترة محددة يراعيها مخطط جانت الخاص بك. اعتمادًا على مستوى التفاصيل التي تريد تصورها ومدى تعقيد المشروع، يمكن أن يعرض أيامًا أو أسابيع أو شهورًا أو حتى سنوات
- الأشرطة: الأشرطة الأفقية التي تمثل مهامك ومدتها وتقدمها. يمكنك الحصول على معلومات عن مدة كل مهمة في لمحة سريعة بمجرد النظر إلى أطوال الأشرطة. كلما أحرزت تقدمًا في مهامك، ستصبح أشرطتك مظللة أكثر فأكثر
- الأسهم: تشير إلى التبعيات وتخبرك بالترتيب المحدد لمهام معينة
- الماسات: تُستخدم لتمييز معالم المشروع، وهي ليست سوى نقاط مهمة تشير إلى اكتمال مرحلة مهمة من مراحل المشروع
- المعينات: اعتمادًا على أداة إدارة المشروع التي تستخدمها، سترى صورة صغيرة أو الأحرف الأولى من اسم المُعيَّن لمهمة محددة على الجانب الأيمن من أشرطة المهام. وهذا يساعد في تخصيص الموارد ويضمن توزيع أعباء العمل بشكل متساوٍ
- خط التاريخ: خط عمودي يشير إلى التاريخ الحالي حتى تتمكن من تحديد المهام القادمة بسرعة
- شريط التقدم: شريط أفقي بين الخط الزمني وأشرطة المهام يوضح التقدم المحرز في المشروع بأكمله
- المسار الحرج: أطول تسلسل مهام تحتاج إلى إكماله لتنفيذ المشروع
## أفضل ممارسات مخطط جانت
يمكن أن تكون مخططات جانت سلاحًا قويًا في ترسانة إدارة مشروعك إذا كنت تعرف كيفية استخدامها بشكل صحيح. إليك بعض الحيل التي ستساعدك على تحقيق أقصى استفادة من مخطط جانت الخاص بك:
- تقسيم المهام الكبيرة: تعد المهام الكبيرة أمرًا صعبًا في إدارتها وتصورها. وللتغلب على هذه المشكلة، قم بتقسيمها إلى مهام ومهام فرعية أصغر حتى تتمكن من تخصيص الوقت بدقة وإنشاء مخطط جانت مفصلجدول زمني مفصل للمشروع. من الجيد استخدامهيكل تقسيم العمل (WBS) أوالخرائط الذهنية لتصور جميع المهام
- احسب التبعيات: استخدم التبعيات لتحديد ترتيب إنجاز المهام وإنشاء علاقات بين مهامك. وبهذه الطريقة، ستحصل على رؤية متعمقة للجدول الزمني للمشروع وتفهم كيفية ارتباط المهام ببعضها البعض
- ضع في اعتبارك أيام عدم العمل: لا يعمل فريق مشروعك على مدار الساعة طوال أيام الأسبوع. عند إنشاء مخطط جانت الخاص بك، من المهم أن تأخذ في الحسبان أيام العطلات غير أيام العمل، مثل عطلات نهاية الأسبوع والعطلات الرسمية، وأيام الإجازات المجدولة مسبقًا لفريقك. قم بتضمينها في مخططات جانت الخاصة بك للتأكد من أن جدولك الزمني والجدول الزمني للمشروع في مكانه الصحيح
- استفد من الألوان: إلى جانب تأثيرها الجمالي، تُعد الألوان عنصرًا أساسيًا في كل مخطط جانت لأنها تساعدك على التمييز بين المهام أو الأنشطة أو المراحل أو المهام الموكلة إليك. استخدم الألوان للإشارة إلى حالة المهمة أو أولويتها والتمييز بين المعلومات في لمحة سريعة
- استخدم أداة عالية الجودة لإدارة المهام والمشاريع: تساعدك منصات الكل في واحد مثل ClickUp على إنشاء مخططات جانت وإدارتها، وإجراء تغييرات في الوقت الفعلي، والتعاون والتواصل مع فريقك لتبسيط العمل. باستخدام ClickUp، يمكن لمديري المشاريع جدولة مهام المشروع بسهولة، وتتبع التقدم المحرز، وتحديد الأولويات، والتكيف مع الظروف غير المتوقعة أثناء التنقل
قراءة إضافية: اطلع على أفضل برنامج الجدول الزمني للمشروع في عام 2024
كيفية إنشاء مخطط جانت في 8 خطوات
ليس عليك القفز عبر الأطواق لإنشاء مخططات جانت - إذا كنت تستخدم أداة إدارة المشروع الصحيحة.
تتميز أداة ClickUp عن غيرها من منصات إدارة المشاريع الأخرى بسبب ميزاتها الفريدة التي تتيح لك مركزية العمل، وتقليل التبديل بين السياقات والحصول على رؤية متعمقة لجميع مشاريعك في جميع الأوقات. سيساعدك على وضع الأساس المثالي لمخطط جانت الخاص بك والتكيف بسلاسة مع التغييرات المحتملة. 💪
دعنا نرى كيف يمكنك إنشاء مخططك الخاص بك انقر فوق مخطط جانت في ثماني خطوات سهلة
نصيحة: إذا كنت من النوع الذي يحبّذ الرؤية البصرية أكثر، تحقق من فيديو تعليمي حول تعظيم مخططات جانت ClickUp Gantt البيانية لإدارة المهام والتبعيات دون عناء.
الخطوة 1: وضع الخطوط العريضة للمشروع
إن خطوتك الأولى نحو إنشاء مخطط جانت الفعال هي تحديد مشروعك للحصول على فهم واضح للغرض منه. إذا لم تكن على دراية بـ نطاق المشروع أو الأهداف، أو المنجزات الرئيسية، أو الموارد المتاحة، هناك احتمال كبير أن تسقط المهام المهمة من خلال الثغرات وتؤدي إلى التأخير وسوء الفهم وحتى فشل المشروع.
يحتوي ClickUp على عدد من الخيارات لمساعدتك في جمع وتركيز جميع معلومات المشروع. على سبيل المثال، يمكنك استخدام أهداف ClickUp لتحديد أهدافك وإنشاء أهداف لتتبع التقدم المحرز. نظّم أهدافك في مجلدات لمزيد من الراحة وسهولة التتبع. 🥰

استخدم أهداف ClickUp Goals لتحديد أهدافك ونتائجك الرئيسية، أي الأهداف القابلة للقياس مستندات ClickUp ميزة أخرى مفيدة - يمكنك استخدامها لتوثيق جميع تفاصيل المشروع. أضف أعضاء الفريق المعنيين إلى مستنداتك واسمح لهم بالمساهمة في إنشائها. يحصل كل شخص على مؤشر باسمه حتى يتمكن الفريق بأكمله من العمل معًا في وقت واحد دون مشاكل. يتم عرض جميع التغييرات في الوقت الفعلي.

تبسيط تعاون الفريق مع مستندات ClickUp Docs من خلال وضع علامات وتعليق وتعيين المهام
الخطوة 2: ضع قائمة بجميع مهامك
فكّر في المهام والأنشطة التي يجب عليك إكمالها لتسليم مشروعك وقم بإدراجها. قسّم المهام الضخمة إلى عدة مهام أصغر وأنشئ مهام فرعية لتنظيم الأنشطة.
لا تهتم بالترتيب المناسب بعد؛ فقط قم بتدوين كل مهمة تفكر فيها.
الميزة المثالية لتنظيم المهام هي عرض قائمة ClickUp واحدة من المنصة أكثر من 15 مشاهدة والوحيد الذي تحصل عليه افتراضيًا في جميع مساحات ClickUp والمجلدات والقوالب.
دعنا نرى كيفية استخدام طريقة عرض القائمة وإنشاء مساحة لمخطط جانت الخاص بك في نفس الوقت:
- انتقل إلى مساحة العمل الخاصة بك وحدد علامة الجمع بجوار المساحات على الجانب الأيمن من الشاشة
- اختر اسمًا لمساحتك الجديدة وقدم وصفًا لها. استخدم شيئًا يمكن التعرف عليه، مثل مجلد مخطط جانت لمشروعي X
- حدد اللون والصورة الرمزية المرغوبة لمساحتك
- اخترانقر فوق التطبيقات التي تريد استخدامها (ClickApps هي ميزات تستخدمها لتخصيص سير العمل). يأتي بعضها بشكل افتراضي، مثل الحقول المخصصة أو الأولوية أو تتبع الوقت، ولكن يمكنك اختيار ميزات إضافية إذا أردت
- حدد طرق العرض التي تريدها في مساحتك. في هذه الحالة، أنت تريد مخطط جانت، لذا ستقوم بتبديل التبديل المجاور له وإنشاء المساحة
- سيتم إنشاء طريقة عرض القائمة تلقائيًا، ويجب أن تبدو مساحتك كما يلي

تتمثل الخطوة الأولى في إدراج المهام والأنشطة المتعلقة بالمشروع في ClickUp
الخطوة 3: تقديم تفاصيل حول مهامك
يحتوي ClickUp على ميزة فريدة تسمى الحقول المخصصة والتي تتيح لك توفير تفاصيل حول كل مهمة تضيفها إلى المساحة التي تم إنشاؤها حديثًا. يمكنك استخدامها لإضافة التواريخ أو مستويات الأولوية أو المكلفين أو معدلات التقدم.
تحتوي طريقة عرض القائمة على ثلاثة حقول افتراضيًا-المُعيّن، وتاريخ الاستحقاق، والأولوية. نظرًا لأن مخطط جانت يتطلب تواريخ بدء لكل مهمة، ستضيف العمود الإضافي، وإليك الطريقة:
- اضغط على علامة الجمع الموجودة على يمين الحقل الأولوية
- اكتب تاريخ البدء في مربع البحث وحدده
- انقل عمود تاريخ البدء قبل عمود تاريخ الاستحقاق لسهولة التنقل والراحة. يتميز ClickUp بمحرر السحب والإفلات، لذلك كل ما عليك فعله هو النقر مع الاستمرار على عمود تاريخ البدء وإفلاته قبل تاريخ الاستحقاق
- املأ الحقول المخصصة. اكتب تواريخ بدء المهام وتواريخ استحقاقها، وأضف المكلفين بالمهام، وحدد الأولويات (إذا أردت). في مثالنا، أنشأنا خمس مهام تدور حول اختبار البرنامج وإطلاقه

استفد من الحقول المخصصة ClickUp لتوفير معلومات حول جميع المهام
الخطوة 4: قم بإنشاء مخطط جانت الخاص بك
في ClickUp، مخطط جانت هو أحد طرق عرض المشروع المتعددة التي تتيح لك رؤية مهامك من زوايا مختلفة. لقد أضفنا بالفعل طريقة العرض هذه عندما أنشأنا المساحة الخاصة بنا، لذا فإن الإجراء الوحيد المتبقي هو الضغط على Gantt في أعلى الشاشة.
في حال لم تقم بإضافة طريقة عرض مخطط جانت عند إنشاء المساحة، إليك كيفية القيام بذلك الآن:
- حدد +عرض من شريط الأدوات أعلى الشاشة
- حدد جانت واضغط إضافة جانت

أضف عرض مخطط جانت البياني إلى مساحتك وسيقوم ClickUp تلقائيًا بتصور مهامك
بمجرد فتح عرض مخطط جانت، سترى ما يلي:

إنشاء مخطط جانت ClickUp Gantt البياني لتصور المهام
لا تقلق؛ هذا ليس خطأً - فقط اضغط على السهم الصغير الموجود على يسار List، وسيقوم ClickUp بإنشاء مخطط جانت الخاص بك بناءً على المهام التي أدخلتها في طريقة عرض القائمة. يبدو مخطط جانت الخاص بنا بهذا الشكل:

مخطط جانت البياني لـ ClickUp Gantt يوضح خمس مهام
الخطوة 5: تخصيص مخطط جانت الخاص بك
ستظهر إعدادات التخصيص على الجانب الأيمن من الشاشة عند فتح مخطط جانت الخاص بك. إذا لم تظهر، حدد تخصيص على الجانب الأيمن من الشاشة.

استخدم إعدادات تخصيص مخطط جانت البياني لضبطه حسب تفضيلاتك
هذا هو المكان الذي يمكنك فيه تغيير اسم مخطط جانت الخاص بك، وتخصيص الخيارات، والتحكم في المشاركة والأذونات. الأمر متروك لك لتخصيص الإعدادات وفقًا لاحتياجاتك وتفضيلاتك. في الوقت الحالي، نوصي بإخفاء عطلات نهاية الأسبوع - إليك كيفية المتابعة:
- توجه إلى خيارات جانت
- قم بتبديل مفتاح التبديل بجوار إخفاء وتخطي عطلات نهاية الأسبوع

استفد من خيارات جانت في ClickUp لتخصيصها
نوصي أيضًا بتمكين خيار إعادة جدولة التبعيات في قائمة الإعدادات نفسها. إذا قمت بإعادة جدولة المهام ذات التبعيات، سيؤدي هذا الخيار الملائم إلى نقل المهام التابعة وفقًا لذلك.
استنادًا إلى عدد المهام ومستوى التفاصيل التي تريد عرضها، يمكنك تغيير الإطار الزمني الذي يركز عليه مخطط جانت الخاص بك. إليك كيفية القيام بذلك:
- انقر على زر المقاييس الزمنية أعلى قائمة المهام. بشكل افتراضي، سترى الأسبوع/اليوم المحدد هنا
- اختر أحد الخيارات المتاحة - يوم/ساعة، أو شهر/يوم، أو سنة/شهر، أو سنة/شهر، أو سنة
/الساعة/اليوم https://clickup.com/blog/wp-content/uploads/2022/01/ClickUp-Gantt-Chart-Timescales.png النقر فوق الجداول الزمنية لمخطط جانت البياني /%img/
استخدم الجداول الزمنية لمخطط ClickUp Gantt البياني لتخصيص الفترة الزمنية التي تريد التركيز عليها
الخطوة 6: إنشاء التبعيات
إن أحد الأسباب التي تجعل كل مدير مشروع يحب مخططات جانت هو قدرتها على تصور تبعيات المهام (أي المهام التي تعتمد على مهمة أخرى).
في مثالنا، تعتمد كل مهمة على المهمة التي تسبقها - لا يمكنك تعديل البرنامج إذا لم تختبره أولاً، ولا يمكنك تقديمه لأصحاب المصلحة إذا لم تقم بتعديله بناءً على نتائج الاختبار. لذا، سنحتاج إلى إنشاء تبعيات لكل مهمة. لحسن الحظ، القيام بذلك في ClickUp سهل للغاية. 🍃
إليك كيفية القيام بذلك:
- مرر مؤشر الماوس فوق المهمة التي تريد توصيلها بمهمة أخرى وحدد مع الاستمرار النقطة الرمادية (كما في الصورة أدناه)

ربط المهام لإنشاء تبعيات في مخطط جانت الخاص بك ClickUp Gantt
- قم بتوصيل الخط بالمهمة المطلوبة عن طريق السحب والإفلات. في مثال مخطط جانت، سنقوم بربطه بمهمة تعديل البرنامج بناءً على نتائج الاختبار. سيقوم ClickUp برسم اتصال بين المهام على هذا النحو:

يتيح لك تصميم السحب والإفلات في ClickUp ربط المهام لإنشاء تبعيات في لمح البصر
كرر العملية لأي عدد من المهام التي تريد إنشاء تبعيات لها لضمان الترتيب المناسب.

إنشاء تبعيات المهام في مخطط جانت ClickUp Gantt البياني
الخطوة 7: إنشاء المراحل الرئيسية معالم مخطط جانت البياني تبقيك على المسار الصحيح، وتقيس التقدم المحرز، وتساعدك على تحديد المخاطر والمشكلات. في ClickUp، تعتبر المعالم هي
نوع المهمة المخصصة (تتيح لك المهام المخصصة تمثيل أنواع مختلفة من العمل لسهولة التصفح وتعزيز الشفافية) ممثلة بالماس الأصفر. 🔶
اتبع هذه الخطوات لتحويل مهمة إلى متطلب رئيسي في مخطط جانت الخاص بك:
- انقر فوق المهمة الموجودة داخل مخطط جانت
- حدد مهمة أعلى اسم المهمة

قم بتغيير نوع المهمة لإنشاء معالم رئيسية في مخطط جانت الخاص بك ClickUp Gantt
- اختر Milestone
الخطوة 8: مراقبة مخطط جانت الخاص بك وتحديثه
بفضل تصميم السحب والإفلات من ClickUp، يمكنك بسهولة إدارة مخطط جانت الخاص بك، وإعادة تنظيم المهام، وتقصير المواعيد النهائية للمهام وتمديدها، وتنسيق الجدول الزمني للمشروع أثناء إحراز تقدم.
لنقل المهام الفردية، ما عليك سوى الضغط مع الاستمرار على المهمة المحددة وإسقاطها إلى الحقل الزمني المطلوب.
إذا أردت تمديد أو تقصير مدة مهمة ما، مرر مؤشر الماوس فوق أي من جانبيها. ستظهر أسهم صغيرة يمكنك سحبها لتخصيص تاريخ بدء المهمة أو تاريخ انتهائها.
إذا قمتَ بتمكين خيار إعادة جدولة التبعيات في إحدى الخطوات السابقة، فلن تقلق بشأن نقل المهام ذات التبعيات، حيث سيتم نقل جميع المهام التابعة وفقًا لذلك.
قم بإضافة مهام جديدة إلى مخطط جانت الخاص بك عن طريق تحديد علامة الجمع بجوار List:

إضافة مهام جديدة في مخطط جانت ClickUp Gantt ببضع نقرات
ثم حدد تواريخ البدء والاستحقاق في مخطط جانت الخاص بك. على سبيل المثال، سنقوم بإضافة مهمة اسأل العملاء للحصول على تعليقاتهم:

اطلب ملاحظات العملاء في مخطط جانت ClickUp Gantt البياني
إذا عدت إلى طريقة عرض القائمة، سترى أن المهمة الجديدة ظهرت هناك أيضًا، لأن ClickUp يقوم بمزامنة جميع المعلومات في الوقت الفعلي. هذا يعني أنه لا داعي للقلق بشأن إعادة إدخال معلومات المهمة.

عند إضافة مهمة جديدة إلى مخطط جانت ClickUp Gantt، ستظهر تلقائيًا في عرض القائمة
أضف مهام فرعية إلى مهمة محددة بالضغط على علامة الجمع الموجودة بجانبها:

أضف مهام فرعية جديدة في مخطط جانت ClickUp Gantt لتنظيم عملك
كيفية إضافة مخطط جانت إلى مساحة موجودة في ClickUp
إذا كنت تدير بالفعل مشروعًا موجودًا في ClickUp وتريد جني فوائد مخططات جانت، فكل ما عليك فعله هو إضافة عرض مخطط جانت في ClickUp Gantt إلى مساحتك. إليك كيفية القيام بذلك:
- انتقل إلى مساحة العمل الخاصة بك
- قم بالوصول إلى المجلد أو القائمة التي تحتوي على المهام التي تريد تصورها على مخطط جانت
- حدد أيقونة +عرض في أعلى الشاشة
- اختر جانت واضغط إضافة مخطط جانت

إضافة طريقة عرض مخطط جانت إلى مساحة موجودة في ClickUp
سيقوم ClickUp تلقائيًا بإنشاء مخطط جانت تلقائيًا يصور جميع المهام وتفاصيل المشروع.
## قوالب مخطط جانت البياني لإدارة المشاريع
يحتوي ClickUp على مكتبة قوالب مذهلة تحتوي على أكثر من 1,000 خيار لمختلف حالات الاستخدام، من الموارد البشرية والتسويق إلى إدارة المشاريع. إذا كنت لا ترغب في إنشاء مخططات جانت من الصفر أو كنت جديدًا في عالم مخططات جانت، استخدم قالب مخطط جانت ClickUp Gantt البياني كاختصار ونجم إرشادي. 💫
فيما يلي أربعة قالب مخطط جانت البياني توصيات لتبسيط عملك وتتبع المهام وتصور جداول المشروع:
- قالب الجدول الزمني ل ClickUp Gantt Timeline: استخدمه لإنشاء المهام مع أشرطة الجدول الزمني، وتحديد الموارد وتخصيصها، وتتبع التقدم المخطط له مقابل التقدم الفعلي للمشروع، وتقليل مخاطر التأخير أو المشكلات
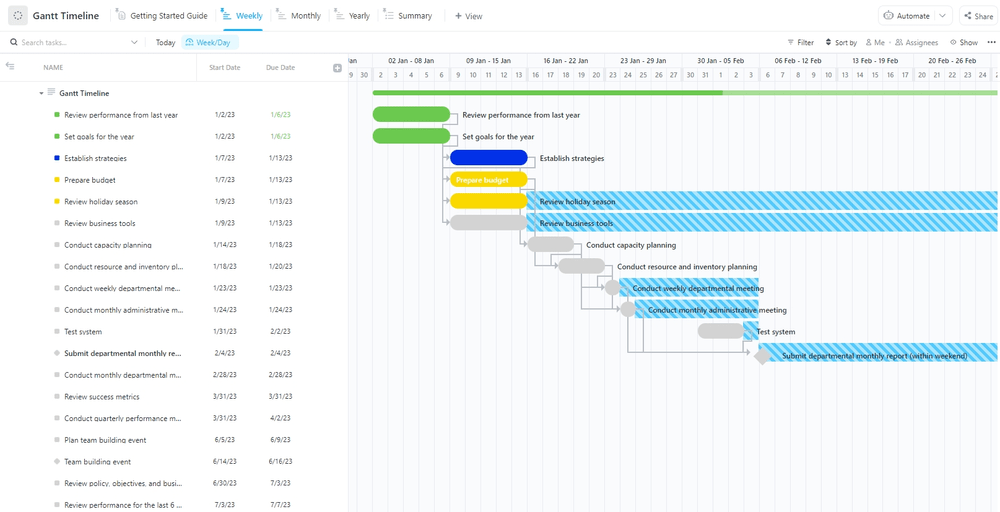
عرض مشاريع متعددة على مخطط جانت واحد في ClickUp
- قالب جانت البسيط في ClickUp: يساعد على تبسيط إدارة المشروع، ويعزز تعاون الفريق ورؤيته، ويوفر الوضوح فيما يتعلق بعلاقات المهام. يأتي قالب مخطط جانت هذا مع عرضين (قائمة ومخطط جانت) ومثال لمشروع، لذا فهو ممتاز للمبتدئين
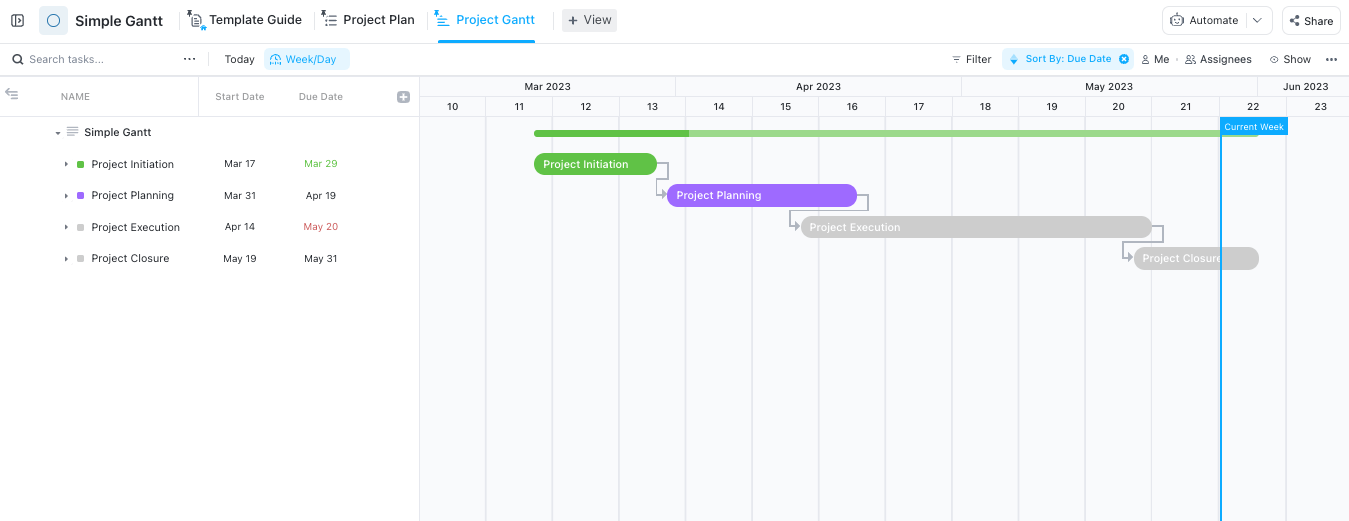
قم بتوسيع الشريط الجانبي في طريقة عرض جانت في ClickUp لعرض المهام والمهام الفرعية
- قالب جانت الإنشاءات ClickUp Gantt: يساعد قالب مخطط جانت الحديث هذا في تخصيص الموارد، وتخطيط المشروع، وتتبع التكاليف والمواعيد النهائية، وإنشاء وتعديل المراحل الرئيسية، مما يجعله مثاليًا لمشروع البناء. بالطبع، يمكنك استخدامه لمشاريع أخرى أيضًا لأن القالب يوفر رؤية متعمقة للمشروع
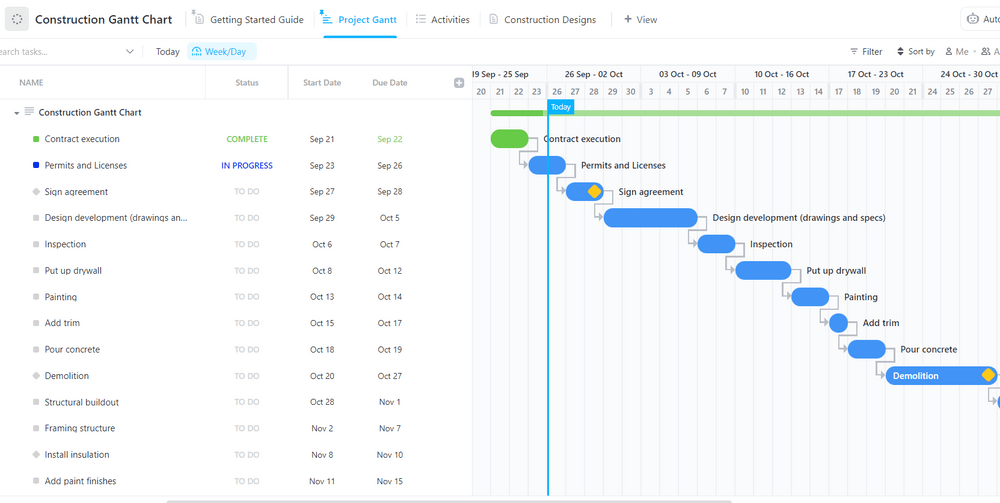
تأكد من أن الجميع على نفس الصفحة باستخدام مخطط جانت الإنشاءات البسيط هذا لتتبع المعالم الرئيسية وتسليم المشاريع في الوقت المحدد
- قالب تحليل المسار الحرج ClickUp: هذاقالب المسار الحرج يساعدك على تصور المهام الخاصة بك في مخطط جانت، وتحديد أفضل تسلسل للمهام، وتحديد المخاطر
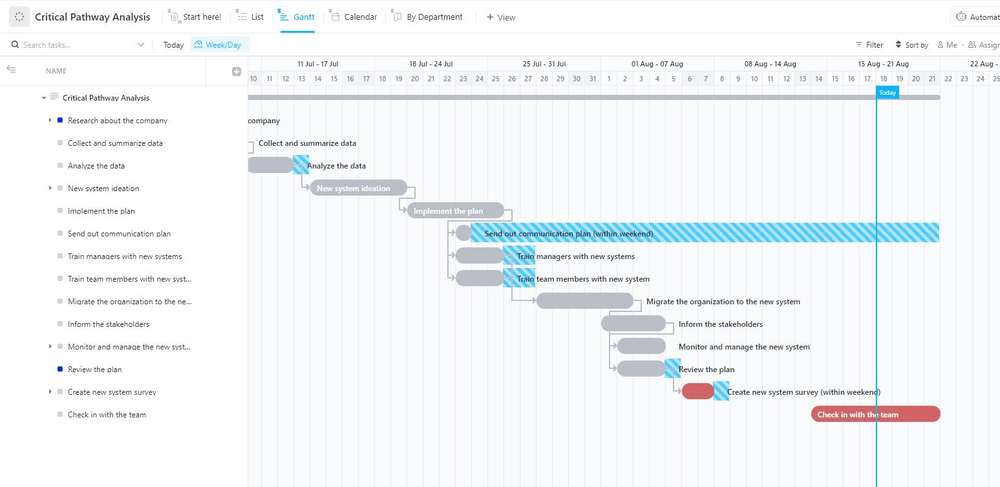
عرض المهام غير الحرجة في طريقة عرض ClickUp Gantt لإعادة تخصيص الموارد
ما هي أنواع المشاريع التي تستفيد من مخططات جانت
يكمن جمال مخططات جانت في تعدد استخداماتها - حيث يمكن استخدامها لجميع أنواع المشاريع طالما أنها محددة زمنيًا.
على سبيل المثال، يمكنك استخدام مخطط جانت لـ التخطيط للفعاليات، بدءًا من مؤتمرات العمل وحتى حفلات الزفاف وحفلات الزفاف وحفلات عيد الميلاد. سيساعدك مخطط جانت على تقسيم مشروعك إلى مراحل، وتحديد الترتيب المناسب، وإدارة المواعيد النهائية لضمان اكتمال كل شيء في الوقت المحدد.
تطوير البرمجيات هو مجال آخر مناسب لمخطط جانت. يتكون كل مشروع تطوير برمجيات من مراحل متعددة، ويمكنك تصور كل هذه المراحل باستخدام مخطط جانت. يمكنك تعيين مهام المشروع، وتقدير الموارد، ومراقبة المواعيد النهائية، وتحديد الاختناقات، وتعديل مشروعك وفقًا لأحدث الظروف.
يعد مخطط جانت أداة قيّمة لإدارة مشاريع التسويق أيضًا استخدمه لتصور الحملات المختلفة عبر المراحل وتتبع تقدمها، وإدارة إنشاء المحتوى، وتنسيق فريقك لتحقيق الأهداف دون عوائق.
يمكنك أيضًا استخدام مخططات جانت لإدارة مشاريع البناء أو الموارد البشرية أو التصميم أو التمويل أو التعليم - طالما أن هناك جدولًا زمنيًا لتصوره، يمكن أن يكون مخطط جانت مفيدًا.
كيف تستخدم الفرق المختلفة مخططات جانت البيانية
دعنا نتحقق من بعض أمثلة على كيفية استخدام فرق العمل المختلفة لمخططات جانت لإدارة المشاريع:
فرق التسويق
لنفترض أنك جزء من فريق تسويق وأنت تدير حملة جديدة على وسائل التواصل الاجتماعي على Instagram وFacebook وTikTok.
باستخدام مخطط جانت، يمكنك تصور مشروعك (حملتك) بأكمله وتقسيمه إلى مراحل، مثل جمع المعلومات وإجراء البحوث، ووضع مؤشرات الأداء الرئيسية، والنشر، وقياس الأداء. بعد ذلك، يمكنك إنشاء مهام ومهام فرعية لكل مرحلة، وتوزيع عبء العمل، وإنشاء جدول زمني مفصل للمشروع.
نظرًا لأن الحملات التسويقية تحتوي على العديد من الأجزاء المتحركة، تمنحك مخططات جانت المرونة اللازمة لتعديل جدولك الزمني سريعًا ببضع نقرات فقط.
مكافأة: استخدم قوالب ClickUp مع مخططات جانت لإدارة حملاتك التسويقية. نوصي باستخدام قالب إدارة حملات ClickUp الترويجية والحملات التسويقية لأنه يساعدك على تنظيم الجداول الزمنية والمهام، وأتمتة سير العمل، وتحليل الأداء.

استخدم قالب الحملة والترويج ClickUp لتصور الحملات التسويقية وإدارتها
فرق التصميم
تخيل أنك عضو في فريق التصميم مكلفون بتصميم ملصق جديد لوعاء عسل. 🍯
ستقوم بتقسيم العملية إلى مراحل أسهل في الإدارة، مثل البحث، وتكرار التصميم، واستشارة فريق التسويق، وجمع ملاحظات العملاء، والموافقة على التصميم، وإعداد الطباعة، والطباعة.
ولضمان سير العملية بأكملها بسلاسة، ستقوم بتقسيم المراحل إلى مهام ومهام فرعية، وتنظيم أعباء عمل فريقك، وتحديد المواعيد النهائية.
نصيحة احترافية: تحب فرق التصميم كليك أب السبورات البيضاء . تساعدك هذه اللوحات الرقمية اللانهائية على تبادل الأفكار والتعاون مع فريقك في الوقت الفعلي.

ضع جميع أفكارك في مكان واحد واعمل عليها مع فريقك باستخدام ClickUp Whiteboards
إذا كنت ترغب في توفير الوقت، فاستفد من انقر فوق قالب تصميم الجرافيك البسيط ونقل مشروعك من مرحلة التفكير إلى مرحلة الإنجاز في لمح البصر.
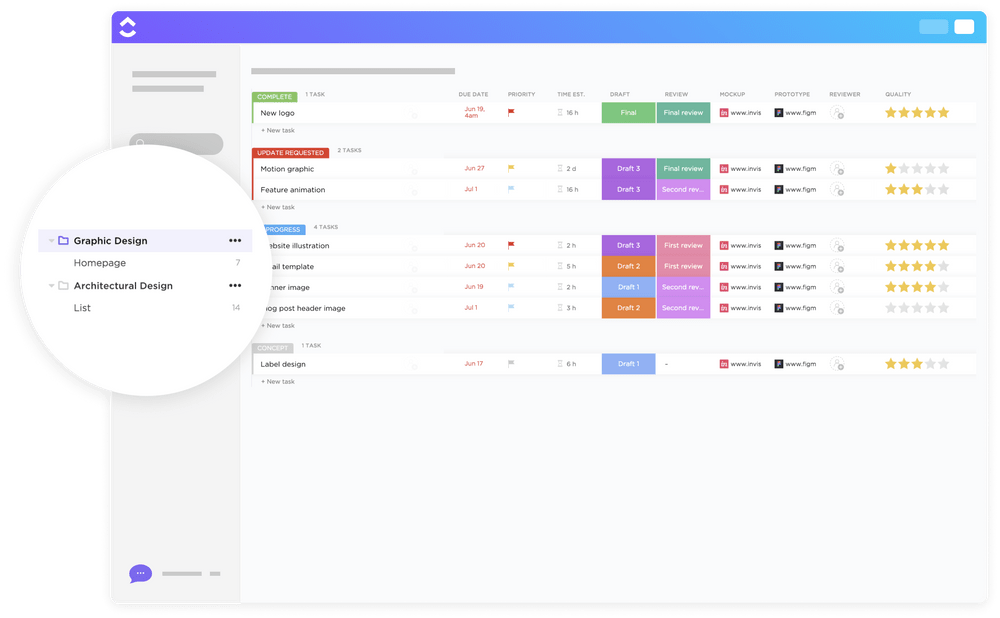
قم بتبسيط سير عمل التصميم الجرافيكي وتعزيز تعاون الفريق مع قالب التصميم الجرافيكي البسيط من ClickUp
مخططو الأحداث
تخيل أنك منظم حفل زفاف. يساعدك مخطط جانت على تقسيم مشروعك إلى عدة مراحل، مثل الاجتماع مع العروس والعريس، أو اختيار مكان الحفل، أو طلب الزينة، أو تنسيق الزهور، أو اختيار البائعين.
يمكنك أيضًا تقسيم هذه المراحل إلى مهام متعددة ومهام فرعية لتسهيل تتبعها. قم بإنشاء وإدارة الجداول الزمنية والتبعيات لضمان الترتيب المناسب ومنع حدوث أزمات في اللحظة الأخيرة.
نصيحة: استخدم قالب تخطيط الحدث المفرد ClickUp لإدارة الضيوف، واختيار البائعين، وتخطيط الميزانية، وإدارة الموظفين، واستكمال أنشطة التخطيط للفعاليات الأخرى.

استخدم قالب تخطيط الفعاليات المفرد من ClickUp لتنسيق الفعاليات
متى يجب تجنب استخدام مخططات جانت البيانية
يمكن أن يكون مخطط جانت أداة رائعة لتصور الجدول الزمني لمشروعك، ولكنه لا يناسب جميع السيناريوهات. فيما يلي ثلاثة سيناريوهات قد ترغب في تخطي مخطط جانت:
1. مخطط جانت ليس الخيار الأفضل في مرحلة التخطيط الأولي
لا يكون إنشاء مخطط جانت الخاص بك منطقيًا إلا عندما تكون أنت وفريق مشروعك قد قسمتم المشروع بالفعل إلى مهام وفهمتم المدة التي سيستغرقها كل منها (على الأقل تقريبًا). مخطط جانت هو تصور لمهامك، وليس أداة تساعدك على تحديد مهامك في البداية.
2. لا يساعدك مخطط جانت في تخصيص الموارد
يساعدك مخطط جانت على تخصيص الوقت ولكنه لا يتيح لك إدارة الموارد مثل الميزانية والمعدات.
نصيحة: بالإضافة إلى مخطط جانت، يقدم ClickUp أكثر من 15 طريقة عرض، مما يتيح لك تمثيل جميع الموارد وتنسيقها دون عناء.

قم بتخصيص طرق عرض ClickUp لمساعدة فريقك على البقاء متناسقًا - بغض النظر عن أسلوب عمل كل شخص
3. قد لا يكون مخطط جانت هو الحل الأفضل للمشاريع المعقدة
مخطط جانت مفصل إلى حد معين فقط لأنه يركز بشكل أساسي على متغير الوقت. إذا كنت ترغب في تصور مشروع عالي التفصيل، فإن مخطط جانت ليس الخيار الأفضل لأنه سرعان ما سيصبح مشوشًا بل ومن المستحيل قراءته.
مكافأة: جرّب قالب خطة مشروع ClickUp عالي المستوى لتمثيل وإدارة المشاريع المعقدة. يتيح لك إنشاء نظرة عامة عالية المستوى للمشروع، وتنظيم المراحل والمهام والمهام الفرعية، وتحديد الأهداف وإدارتها.
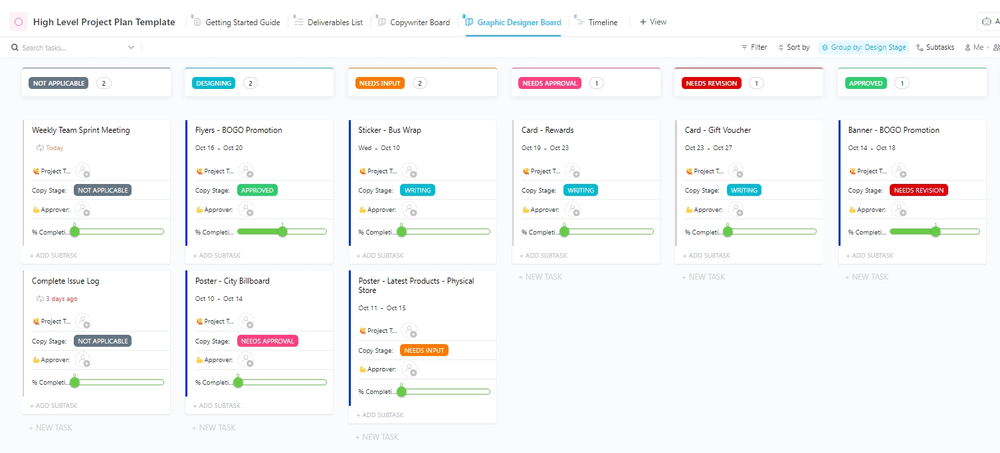
تم تصميم قالب خطة المشروع عالية المستوى من ClickUp لمساعدتك في تخطيط وإدارة أي مشروع بسهولة
الأسئلة الشائعة حول مخطط جانت الشائع
1. كيف يمكنني إنشاء مخطط جانت في Excel؟
إليك كيفية إنشاء مخطط جانت في Microsoft Excel:
- قم بإنشاء جدول في Microsoft Excel وأضف بيانات مشروعك إليه
- انتقل إلى علامة التبويب إدراج وأضف مخطط شريطي مكدس
- انقر بزر الماوس الأيمن على المخطط الشريطي المكدس واضغط تحديد البيانات لإضافة بيانات إلى المخطط
- قم بتنسيق المخطط الشريطي
تجدر الإشارة إلى أنه يمكنك فقط إنشاء مخطط جانت بسيط بمرونة محدودة في Excel.
2. هل لدى Google أداة مخطط جانت البياني؟
ليس لدى Google أداة مصممة خصيصًا لإنشاء مخططات جانت. ومع ذلك، يمكنك استخدام جداول بيانات جوجل و مستندات جوجل لإنشاء مخطط جانت الأساسي للمشاريع البسيطة.
3. هل لدى مايكروسوفت أداة مخطط جانت غير Excel؟
إلى جانب Microsoft Excel، يمكنك استخدام Word أو باور بوينت لإنشاء مخططات جانت . نظرًا لأن هذه الأدوات لا توفر المرونة ولا يمكنها تمثيل المهام بمستوى عالٍ من التفاصيل، فإن استخدامها محدود.
4. هل لا يزال الناس يستخدمون مخططات جانت؟
نعم! تستخدم العديد من فرق المشروع مخططات جانت لأنها تساعدهم على تصور الجداول الزمنية والجداول الزمنية وتمهد الطريق نحو إنجاز المشروع.
5. ما هي أفضل أداة لمخطط جانت البياني؟
ClickUp هو أفضل صانع لمخططات جانت لأنه يسمح لك بتمثيل المهام الحرجة وتصور المشاريع المعقدة ببضع نقرات. توفر مخططات المنصة الغنية بالميزات المرونة، وبما أن كل تغيير يحدث في الوقت الفعلي، يمكن لفرق مشروعك البقاء على نفس الصفحة حتى لو لم يعملوا من نفس الموقع.
بالإضافة إلى ذلك، كأداة لإدارة المهام والمشروعات من الدرجة الأولى، تقدم ClickUp الكثير من الخيارات لتنسيق عملك وتبسيط العمليات. اشترك في ClickUp اليوم إنشاء مخططات جانت مجاناً واستكشف كيف يمكن دمجها في سير عملك!
