هل شعرت يومًا ما أن بياناتك تحتاج إلى مساعدة إضافية لسرد قصتها؟
يمكن أن يكون تصدير بيانات Airtable الخاصة بك إلى Excel عاملاً مغيراً لقواعد اللعبة. فهو يساعدك في الكشف عن الاتجاهات المخفية وإنشاء تقارير مفصلة، خاصةً عند إدارة مشاريع متعددة وتحتاج إلى مزيد من المرونة في التحليل وإعداد التقارير.
تخيل أنك جزء من فريق دعم عملاء مزدحم يتتبع مئات التذاكر أسبوعيًا. بينما يساعدك برنامج Airtable على تنظيم هذه التذاكر وترتيب أولوياتها، قد ترغب في استخدام ميزات Excel المتقدمة مثل XLOOKUP لإنشاء تقارير مفصلة عن الاتجاهات أو أوقات الاستجابة.
يمكن أن يؤدي تصدير تذاكر Airtable إلى Excel إلى تبسيط سير عملك وتعزيز تعاون الفريق. هذا مفيد بشكل خاص عند إدارة مجموعات البيانات الكبيرة أو التحضير للاجتماعات المهمة.
دعنا نستكشف كيفية جعل هذه العملية سلسة وفعالة!
## متى يتم تصدير Airtable إلى Excel
يعد تصدير بيانات Airtable إلى Excel أمرًا منطقيًا في حالات معينة، خاصةً عندما تحتاج إلى أدوات معالجة وتحليل بيانات أكثر تقدمًا.
بينما يتمتع Airtable بوظائف قوية، غالبًا ما يوفر Excel رؤى أعمق وتقارير قابلة للتخصيص وتكامل أفضل مع الأنظمة الأساسية الأخرى. فيما يلي بعض السيناريوهات التي يكون فيها تصدير بيانات Airtable يدويًا إلى Excel خيارًا ذكيًا.
1. تحليل البيانات المتقدمة
يوفر Excel صيغًا متنوعة لإجراء عمليات حسابية معقدة أو إنشاء جداول محورية أو تشغيل نمذجة بيانات مفصلة.
🌟🌟مثال: عندما تعمل مع مجموعات بيانات كبيرة وتحتاج إلى حساب الاتجاهات أو الارتباطات أو التحليلات الإحصائية، فإن تصدير بيانات Airtable إلى Excel يمنحك الوصول إلى ميزات قوية مثل VLOOKUP والمخططات المتقدمة ووحدات الماكرو.
📖 اقرأ أيضًا: أفضل 10 أدوات للذكاء الاصطناعي في Excel لتحسين سير عمل جداول البيانات الخاصة بك
2. تقارير مفصلة
هل تحتاج إلى إنشاء تقارير مفصلة ومخصصة للغاية؟
يوفر Excel خيارات واسعة لتنسيق الجداول والتخطيط. يمكنك تنسيق الجداول وإضافة رسوم بيانية وحتى أتمتة أجزاء من التقارير لتقديم البيانات بشكل واضح وجذاب بصريًا.
🌟 🌟مثال: عند تقديم بيانات المبيعات الفصلية إلى أصحاب المصلحة أو العملاء، يعد Excel أداة قيمة. يمكنك تصدير سجلات Airtable إلى Excel، وإنشاء جداول محورية لتلخيص المبيعات حسب المنطقة وإضافة رسوم بيانية تفاعلية لمقارنة النمو الشهري بصريًا. هذا المستوى من التخصيص يجعل تقارير Excel غنية بالبيانات وسهلة الفهم.
3. التوافق عبر المنصات
يمكن أن تكون مرونة Airtable محدودة عند التكامل مع أنظمة أعمال متعددة.
يضمن تصدير بياناتك إلى Excel التوافق عبر الأنظمة الأساسية، مما يسهل التعاون السلس ومشاركة البيانات. هذا يجعل من السهل إدارة معلوماتك وتحليلها.
🌟 🌟مثال: إذا كان قسم الشؤون المالية لديك يستخدم برنامج محاسبة مثل QuickBooks أو SAP الذي لا يتكامل مباشرةً مع Airtable، فإن تصدير بيانات مشروعك إلى قاعدة بيانات Excel يمكن أن يساعدك. يمكنك بسهولة تنسيق البيانات واستيرادها إلى النظام المالي، وتبسيط مشاركة التقارير بين الأقسام، وإفساح المجال لتعاون أفضل.
بصرف النظر عن ذلك، لاحظ أنه يمكنك تصدير Airtable إلى Excel إذا كنت ترغب في ذلك:
- تجنب التقيد بمنصة Airtable الخاصة وتقليل تكاليف التحويل
- العمل مع مجموعات البيانات الكبيرة التي يصعب على Airtable التعامل معها بكفاءة
- تعمل في مجال شديد التنظيم، مثل الرعاية الصحية أو التمويل، وتحتاج إلى ضوابط أكثر صرامة للامتثال والأمان
- تجد أن عمليات الأتمتة والتكامل في Airtable أساسية للغاية بالنسبة لاحتياجاتك، أو أنك تصل إلى حدود واجهة برمجة التطبيقات
- ابحث عن قيمة أفضل مقابل المال، حيث يمكن أن تتصاعد أسعار Airtable مع الفرق ومجموعات البيانات الأكبر حجمًا
📖 أيضًا اقرأ: Airtable مقابل. جداول بيانات جوجل: المواجهة النهائية لجداول البيانات
## كيفية تصدير البيانات من Airtable إلى Excel
إليك دليل بسيط خطوة بخطوة لتصدير البيانات من Airtable إلى Excel ببضع نقرات فقط لتحسين التحليل وإعداد التقارير:
الخطوة 1: إنشاء طريقة عرض في Airtable
- قم بتسجيل الدخول إلى Airtable: افتح القاعدة التي تحتوي على البيانات التي تريد تصديرها
- أنشئ طريقة عرض: انقر على أيقونة عرض الجلاد وحدد "إنشاء" لإنشاء طريقة عرض جديدة. اختر نوع العرض بناءً على الطريقة التي تريد عرض بياناتك، مثل الشبكة أو كانبان أو التقويم
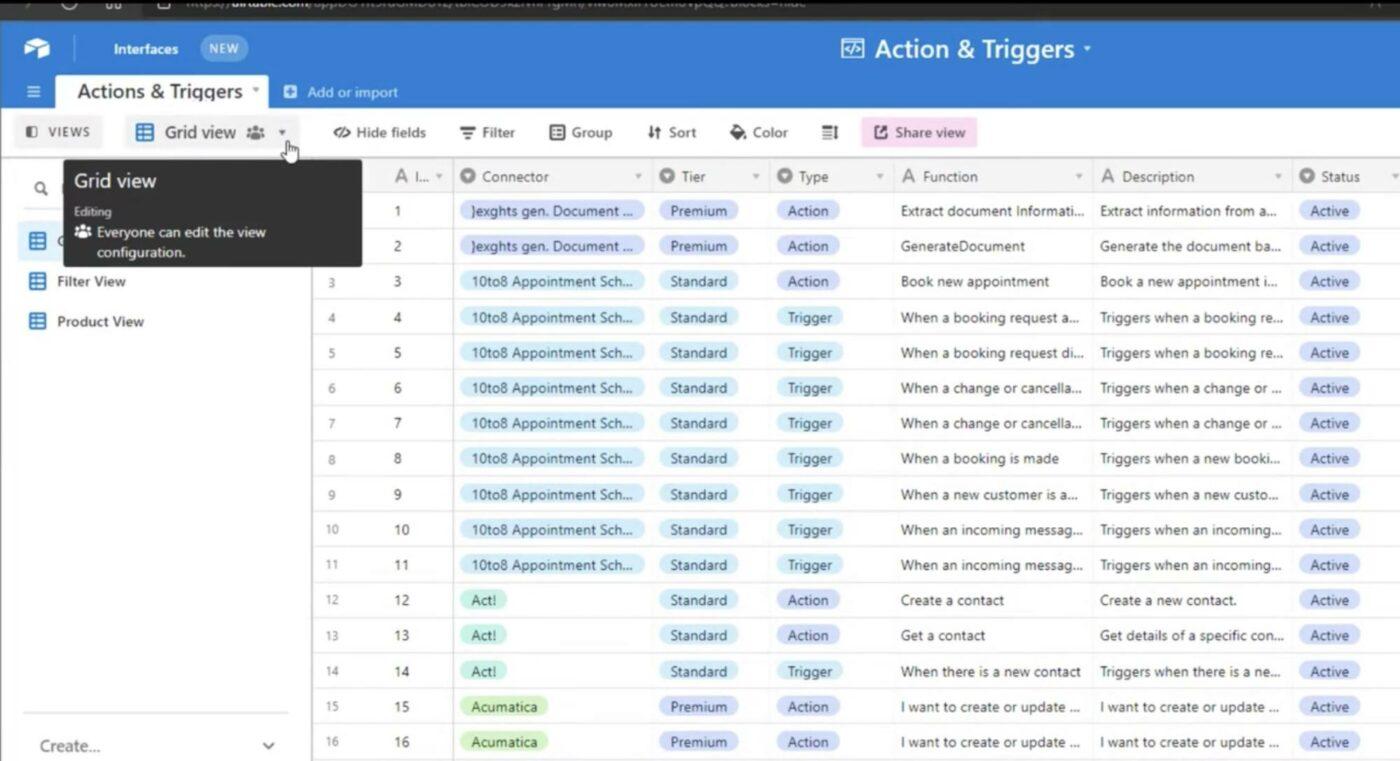
عبر لوي إياكوبيليس
- قم بتخصيص طريقة العرض: قم بتسمية طريقة العرض الجديدة ونظم الحقول عن طريق فرز السجلات أو إخفائها أو تصفيتها. هذا يضمن لك تصدير البيانات التي تحتاجها فقط بالتنسيق الذي تفضله
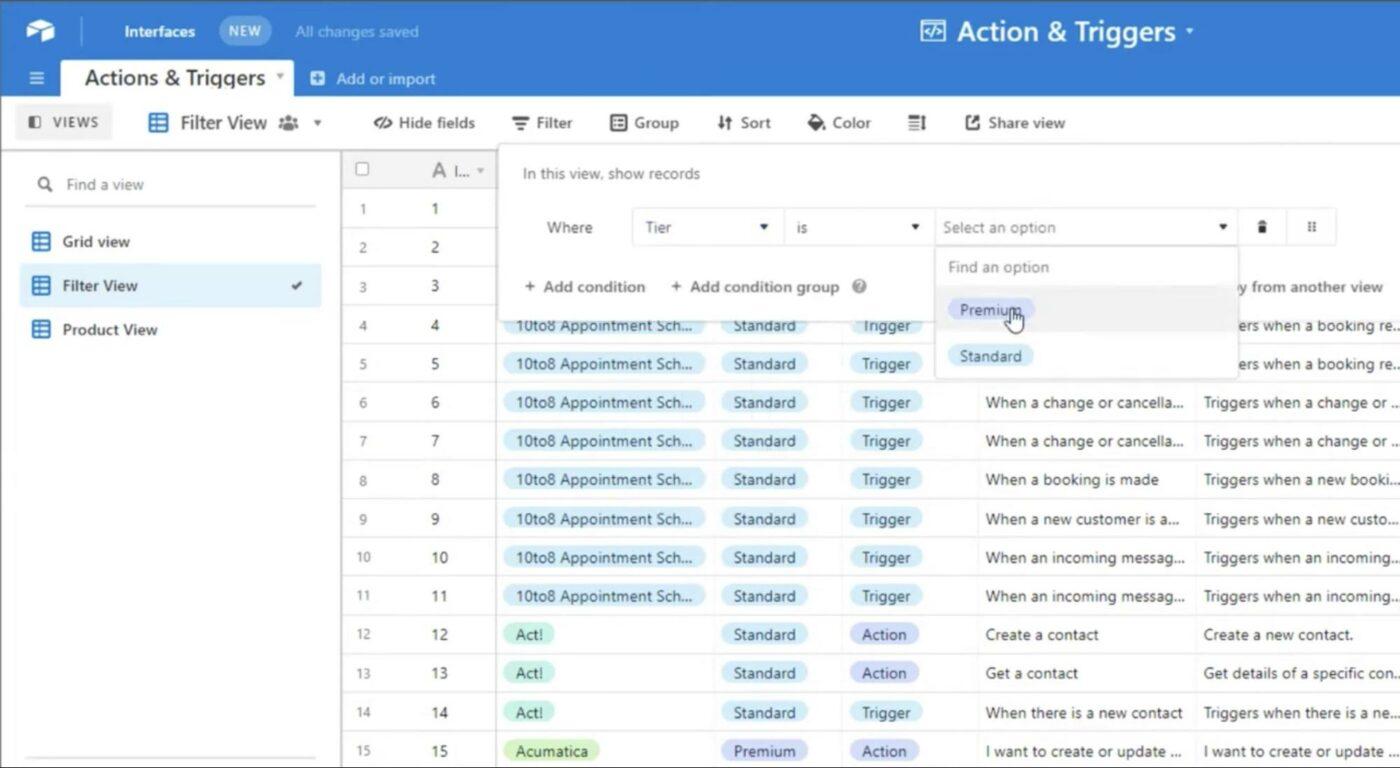
عبر: لوي ياكوبيليس
الخطوة 2: تصدير بيانات Airtable كملف CSV
- انتقل إلى قائمة العرض: انقر على زر عرض القائمة (---)
- حدد "تنزيل ملف CSV": من القائمة المنسدلة، حدد خيار "تنزيل ملف CSV". تتوفر هذه الميزة على تطبيقات Airtable على الويب وتطبيقات سطح المكتب
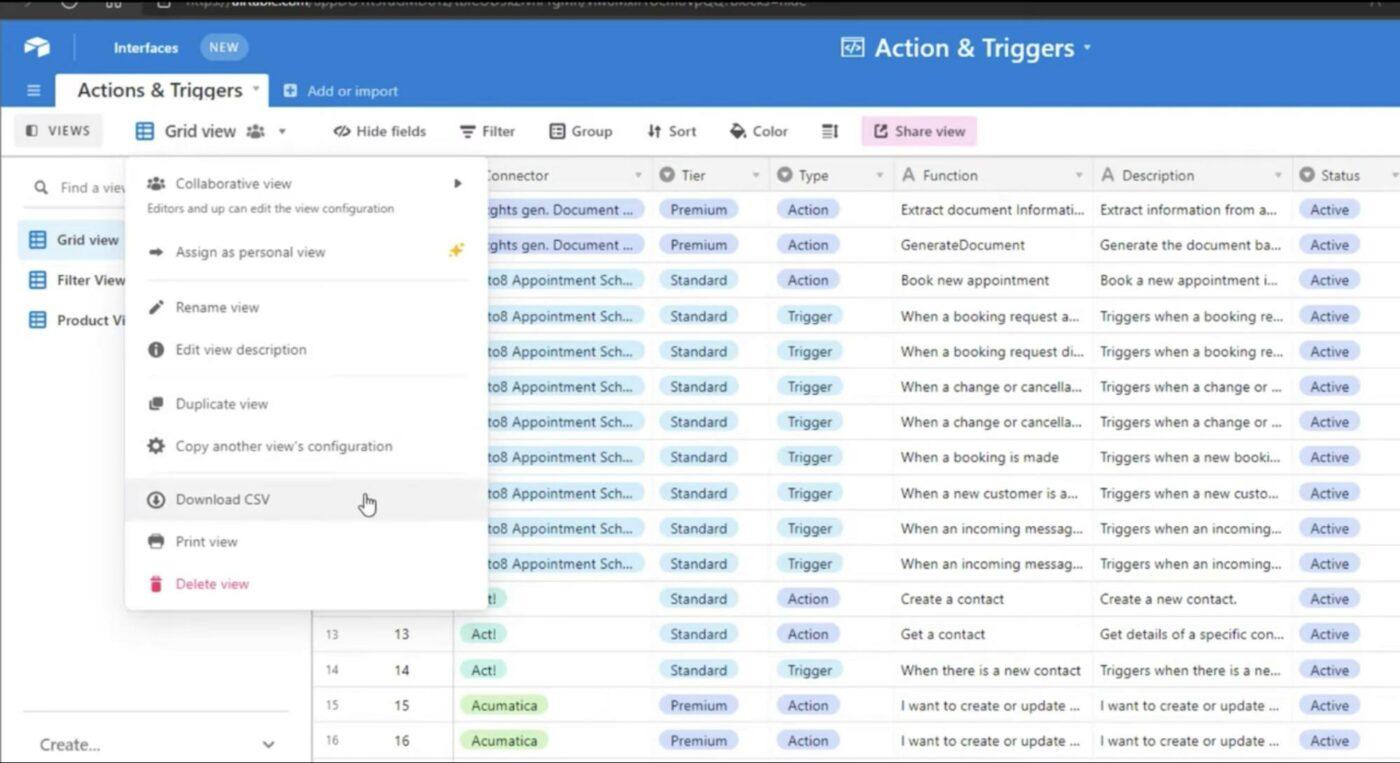
عبر لوي ياكوبيليس
- احفظ الملف: سيتم تنزيل ملف CSV الخاص بك إلى الموقع الافتراضي لجهازك
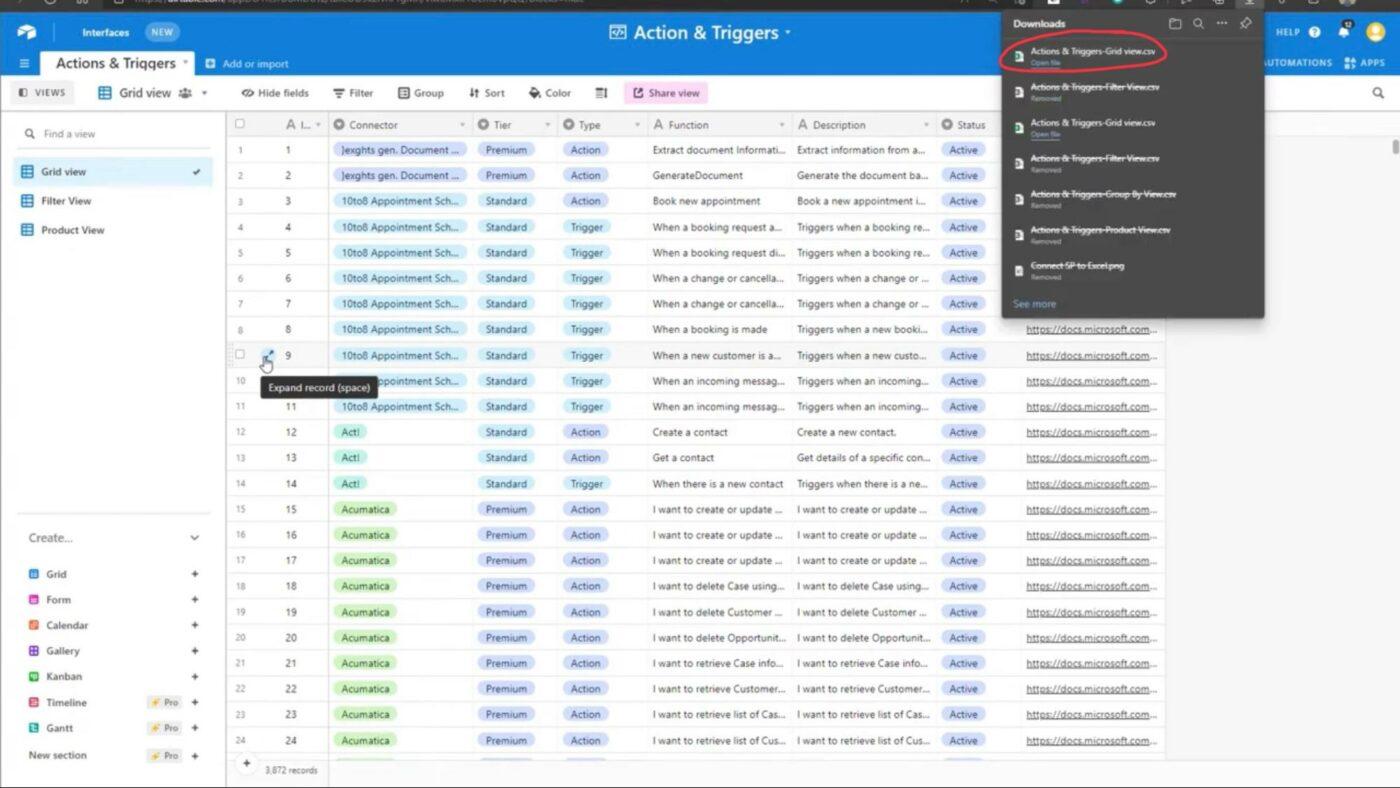
عبر لوي ياكوبيليس
الخطوة 3: افتح ملف CSV في Excel
- افتح ملف CSV: انتقل إلى مجلد التنزيلات الافتراضي وحدد موقع ملف CSV الذي تم تنزيله. انقر نقرًا مزدوجًا فوق الملف لفتحه مباشرة في Excel
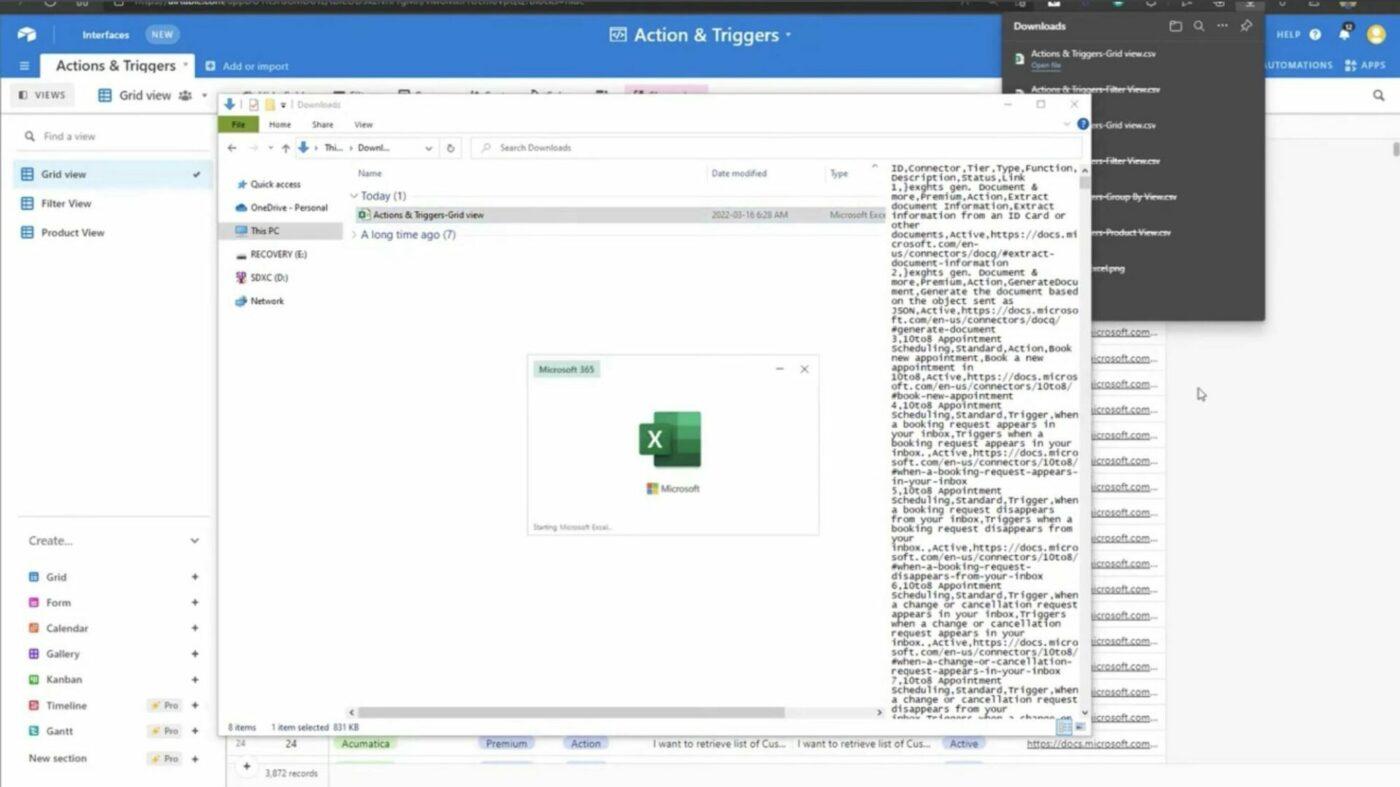
عبر لوي ياكوبيليس
أو
- افتح Excel: قم بتشغيل Excel على جهازك
- قم بتحميل ملف CSV: انتقل إلى "ملف"> "فتح"، وانتقل إلى مجلد التنزيلات، وحدد ملف CSV الذي قمت بتنزيله للتو. سيفتح Excel الملف تلقائيًا لمزيد من التحليل
الخطوة 4: أتمتة التصدير باستخدام Airtable (اختياري)
إذا كنت تريد أتمتة عملية تصدير البيانات، يمكنك إعداد أتمتة في Airtable لإرسال تصدير البيانات إلى Excel. يمكن استخدام أدوات مثل Zapier و Workato وما إلى ذلك لإعداد مثل هذا التكامل. هذا مفيد للفرق التي تحتاج إلى تصدير البيانات بشكل متكرر دون جهد يدوي.
⭐️ نصائح لتصدير Airtable إلى Excel
- تأكد من أن جميع بياناتك صحيحة ونظيفة قبل التصدير. ستنتقل الأخطاء في Airtable إلى Excel
- قم بتطبيق الفلاتر في Airtable لتصدير البيانات المطلوبة فقط، مما يجعل قاعدة بياناتك في Excel أكثر قابلية للإدارة. استخدم اختراقات Excel هذه لفرز بياناتك أو تنظيمها بمجرد تصديرها بسرعة
- احرص دائمًا على إنشاء نسخة احتياطية من جدول/بيانات Airtable قبل البدء في تصدير البيانات، تحسبًا لحدوث خطأ ما
- تأكد من أن رؤوس الأعمدة في Airtable واضحة وموجزة. ستظهر كأسماء أعمدة في Excel
## نقاط الألم الشائعة في Airtable
على الرغم من أن Airtable تقدم منصة متعددة الاستخدامات لإدارة المشاريع وتنظيم البيانات، إلا أنها لا تخلو من التحديات. واجه العديد من المستخدمين قيودًا تؤثر على كفاءة سير العمل وقابلية التوسع وسهولة الاستخدام بشكل عام.
_ منحنى التعلم شديد الانحدار، على الرغم من أن التقديم الأخير لأكاديمية Airtable قد يساعد المستخدمين الجدد على التأقلم بشكل أفضل قليلاً. بالنسبة للميزات الأكثر تقدمًا، مثل الروابط المعقدة بين الجداول في القاعدة أو الأتمتة المعقدة، يزداد التعقيد وغالبًا ما لا يكون من الواضح كيفية الوصول إلى المكان الذي تحاول الوصول إليه، حتى كمستخدم قوي راسخ للمنصة مراجعة G2 يمكن أن يساعدك فهم نقاط الألم هذه في تقييم ما إذا كان Airtable يناسب احتياجاتك أو إذا كنت قد تستفيد من بدائل Airtable مثل انقر فوق التي تعالج هذه التحديات بفعالية.
فيما يلي بعض نقاط الألم الشائعة التي يواجهها مستخدمو Airtable:
سجلات الربط التلقائي بين الجداول غير متوفرة. نقل الجداول بين القواعد ذات السجلات المرتبطة محدود، مما يجعل إدارة البيانات ذات الصلة عبر الجداول أمرًا مرهقًا.من ناحية أخرى, انقر فوق قواعد البيانات العلائقية يسمح بالربط السلس بين المهام والمشاريع، مما يقلل من الحلول اليدوية
التبعيات مخفية عن المستخدمين من غير المؤسسات. يتطلب تتبع تبعيات المهام في المشاريع المعقدة الترقية إلى مستوى المؤسسة المكلف. انقر فوق حالات المهام المخصصة تمكنك من إدارة التبعيات بشفافية عبر جميع المستويات، مما يضمن لك تتبع التقدم المحرز دون تكاليف خفية
الأذونات غير قابلة للتخصيص. يمكن أن تؤدي أذونات Airtable المحدودة إلى مخاطر أمنية أو اختناقات في سير عملك الذي يتطلب أتمتة متقدمة. للتغلب على ذلك، يوفر ClickUp الأدوار المخصصة مما يسمح لك بتخصيص الوصول وفقًا لاحتياجات فريقك والحفاظ على الأمان
إدارة المساحات البيضاء والتفاف النص في الرؤوس أمر صعب. هذا يعيق الرؤية، خاصة عند التعامل مع مجموعات البيانات الكبيرة. إن عرض لوحة ClickUp القابلة للتخصيص يسهل عليك إدارة البيانات مع ضمان الرؤية بدون خطوات إضافية
التسعير المستند إلى المستخدم يجعل التوسع مكلفًا. قيود إدخال البيانات وقيود التخزين في باقات المستوى الأدنى من Airtable تعني أنه مع نمو فريقك، يمكن أن تتصاعد التكاليف بسرعة. يوفر نموذج تسعير ClickUp المرونة وقابلية التوسع، مما يسمح لك بالنمو بسهولة
قد تكون الميزات المتقدمة مخيفة. غالبًا ما يتم تجنب ميزات مثل البرمجة النصية والمخططات والأتمتة بسبب تعقيدها، مما يؤدي إلى تفويت الفرق على الكفاءات المحتملة. انقر فوق الأتمتة الشرطية والميزات الأخرى سهلة الاستخدام، مما يمكّن فريقك من الاستفادة من الوظائف المتقدمة بسهولة
تأمين البائعين وعدم وجود خيار الاستضافة الذاتية. طبيعة ملكية Airtable تحد من التحكم في أمن البيانات والخصوصية
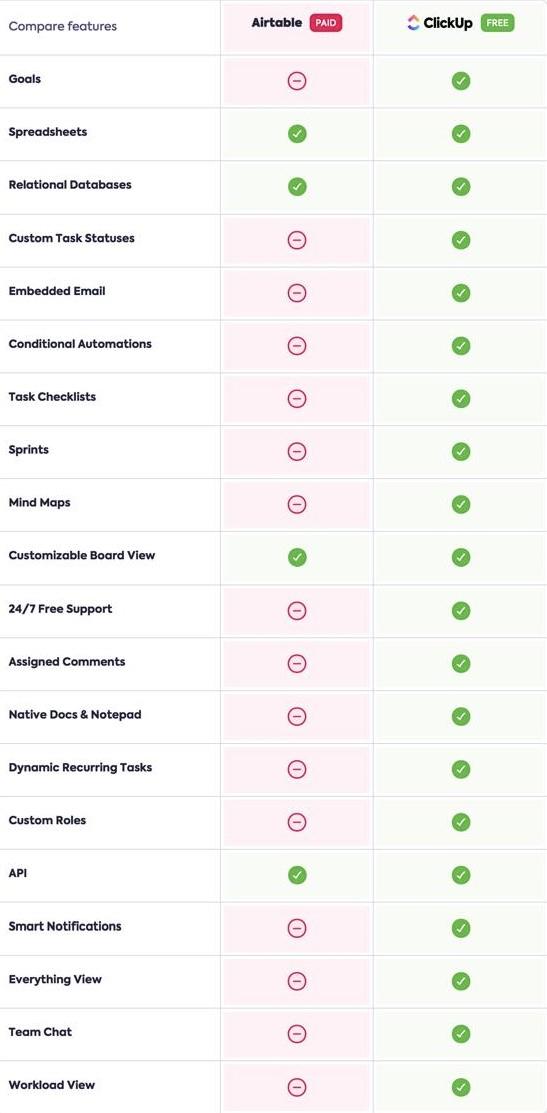
تتفوق ClickUp على Airtable في العديد من الميزات والإمكانيات، وتقدم حلاً أكثر شمولاً لإدارة المشاريع وتنظيم البيانات
تعرف على ClickUp: حل Airtable & Excel
يمكن أن يصبح استخدام كل من Airtable و Excel لإدارة المشاريع غير مريح بسرعة. فغالبًا ما تؤدي إدارة البيانات عبر منصات متعددة إلى الارتباك وعدم كفاءة سير العمل وإضاعة الوقت.
على سبيل المثال، قد تجد نفسك تنقل المعلومات ذهابًا وإيابًا بين Airtable وExcel، فقط لتواجه مشاكل في اتساق البيانات والرؤية. قد يكون هذا النهج المنفصل محبطًا، خاصةً عندما يحاول فريقك التعاون بفعالية.
يعالج ClickUp هذه التحديات - التي تناولنا بعضها في القسم السابق - من خلال توفير مساحة عمل شاملة تدمج إدارة المشروع وتنظيم البيانات واحتياجات التعاون في منصة واحدة.
إحدى الميزات البارزة هي عرض جدول ClickUp الذي يحاكي المألوف في جداول البيانات مع تقديم وظائف متقدمة، مما يجعلها موثوقة برنامج جداول بيانات .

ما عليك سوى سحب المهام وإسقاطها لتحديث التقدم المحرز أو تحديد أولويات العمل أو إعادة تعيين المسؤوليات بسرعة في مهام ClickUp Tasks
على عكس التنقل بين Airtable وExcel، يتيح لك ClickUp إنشاء جداول بيانات منظمة وتعاونية في مكان واحد. مع أكثر من 15 طريقة عرض، يمكنك إدارة كل شيء بدءًا من تقدم المهام إلى التكاليف وتصدير وإرفاق المستندات مباشرةً بجداولك.
بالإضافة إلى طريقة عرض الجدول, ClickUp Dashboards توفر طرقًا فعالة لتصور بياناتك وتتبع التقدم المحرز في الوقت الفعلي. باستخدام لوحات المعلومات المخصصة، يمكنك تتبع أداء المشروع وأعباء عمل الفريق والحملات التسويقية وتجنب عناء التنقل بين تطبيقات متعددة.
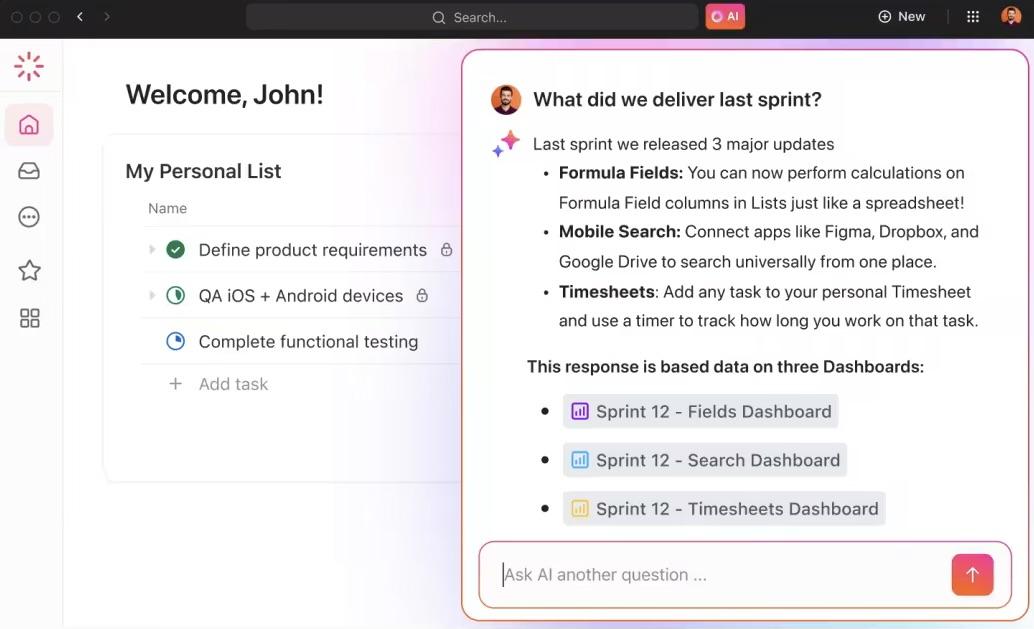
يمكنك استخدام الذكاء الاصطناعي لإظهار الرؤى على الفور من أي مشروع في لوحات معلومات ClickUp Dashboards
🌟 🌟مثال: اسأل فقط انقر فوق الدماغ سؤال، وسيقوم بالبحث في جميع بيانات لوحة التحكم الخاصة بك لتقديم إجابات فورية. وهذا يلغي التواصل المستمر ذهابًا وإيابًا ويوفر رؤى في الوقت الفعلي عبر فريقك.
📖 اقرأ أيضًا: 20 قالب جدول بيانات مجاني في Excel و ClickUp
انتقالات سلسة باستخدام ClickUp
إذا كنت تنتقل من أداة أخرى، فلا داعي للبدء من الصفر. يمكنك بسهولة استيراد عملك الحالي إلى ClickUp دون فقدان أي معلومات. يتيح ClickUp الاستيراد من Excel أو حساب جداول بيانات Google وتطبيقات أخرى مثل Asana وTrickUp وJira وWrike.
يمكنك استيراد ما يصل إلى 60 مرة في اليوم عبر جميع الخطط، ولا يستغرق الأمر سوى بضع خطوات بسيطة: قم بإعداد قاعدة البيانات الخاصة بك، وحدد الحقول التي تحتاجها، ثم قم بالاستيراد!
إنه سريع ومباشر، مما يزيل متاعب التبديل يدويًا بين تطبيقات متعددة.

قم باستيراد بياناتك باستخدام ملفات Excel (.xls أو .xlsx) أو CSV (.csv) أو TSV (.tsv) أو XML (.xml) أو Text (.txt) مع أي عدد من الأعمدة وسجل واحد لكل صف
تضمين Airtable إلى ClickUp
علاوة على ذلك، يكون الانتقال سهلاً بنفس القدر إذا كنت تفكر في الانتقال من Airtable إلى ClickUp. يمكنك تصدير بيانات Airtable الخاصة بك ودمجها بسرعة في ClickUp، مع الحفاظ على سير عملك الحالي دون فقدان معلومات قيمة.
من هناك، يمكنك الاستفادة من ميزات ClickUp القوية، مثل لوحات المعلومات القابلة للتخصيص، وتبعيات المهام، والأتمتة، مع الحفاظ على بيانات Airtable سليمة.
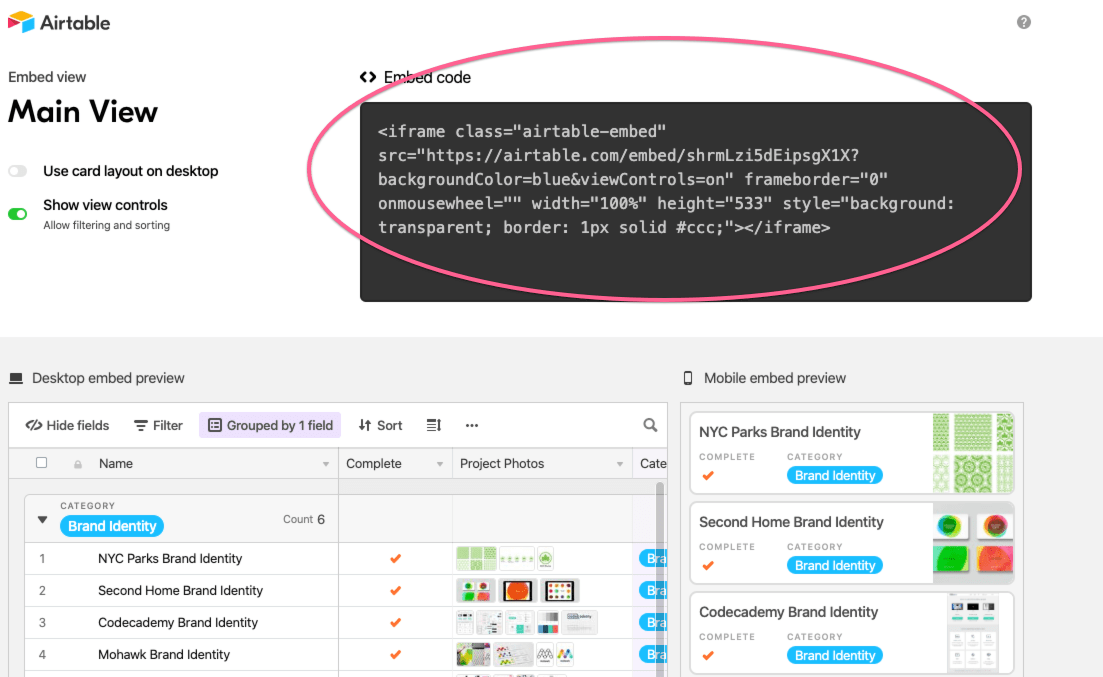
تضمين Airtable في ClickUp من خلال مشاركة رابط عرض الشبكة، ونسخ رمز التضمين ولصقه في طريقة عرض التضمين في ClickUp
ترحيل بياناتك إلى ClickUp من تطبيقات أخرى:
الاستيراد من Asana إلى ClickUp التحويل من Asana إلى ClickUp سهل مع ميزات الاستيراد الفريدة من ClickUp. وتتمثل إحدى الميزات البارزة في إمكانية تعيين أقسام مشروع Asana إما كحالات أو قوائم في ClickUp، مما يمنحك المرونة التي تحتاجها لإدارة سير عملك.
بالإضافة إلى ذلك، يسمح لك ClickUp بتعيين المستخدمين بسلاسة، حتى دعوة مستخدمين جدد أثناء الاستيراد دون تعطيل تعيينات المهام.
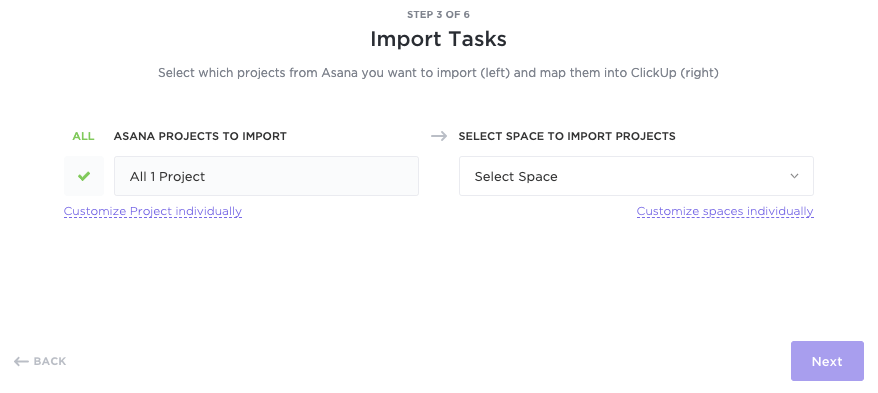
يمكنك تخصيص المشاريع التي يتم استيرادها وأين توضع، مما يساعدك على تنظيم مساحات ClickUp الخاصة بك بسهولة
الاستيراد من Jira إلى ClickUp
عندما الاستيراد من Jira إلى ClickUp يتم نقل العديد من التفاصيل الرئيسية بسلاسة. ويتضمن ذلك معرف Jira، وأوصاف المهام، والمهام الفرعية، والمكلفين، والمراقبين (المحولين من متابعي ومراسلي Jira)، وتبعيات المهام، والعلاقات.
للاستيراد من جيرا إلى ClickUp، اتبع الخطوات التالية:
- ابدأ الاستيراد: انتقل إلى الإعدادات في ClickUp، واختر استيراد/تصدير، وحدد برنامج Jira
- اختر إصدار جيرا: اختر إما جيرا كلاود أو جيرا سيرفر بناءً على الإصدار الخاص بك
- تحميل بيانات جيرا: قم بتنزيل بيانات جيرا الخاصة بك، ثم قم بتحميلها إلى ClickUp
- استيراد المشاريع: اختر مشاريع جيرا لاستيرادها، وقم بإعداد التسلسل الهرمي الخاص بك، وقم بتعيين الحالات
بمجرد الانتهاء من تنزيل قاعدة البيانات، ستتلقى إشعارًا عند اكتمال استيراد قاعدة البيانات.

قم بمحاذاة مستخدمي Jira والحقول المخصصة والحالات مع ما يعادلها في ClickUp بسلاسة
اجعل بياناتك تنبض بالحياة مع ClickUp
يفتح تصدير Airtable إلى Excel عالمًا من إمكانيات تحليل البيانات المتقدمة وإعداد التقارير. سواء كنت تتطلع إلى الاستفادة من ميزات جداول بيانات Excel للحصول على رؤى تفصيلية أو تبسيط عمليات إعداد التقارير الخاصة بك، يمكن أن يكون هذا التصدير خطوة قيّمة.
ومع ذلك، إذا كنت تبحث عن حل أكثر تكاملاً يجمع بين وظائف Airtable وExcel، فإن ClickUp هو الحل.
باستخدام ClickUp، يمكنك إدارة مشاريعك ومهامك وبياناتك في مكان واحد، مما يلغي الحاجة إلى التنقل بين أدوات متعددة.
هل أنت جاهز لتبسيط سير عملك باستخدام جدول ClickUp ولوحات المعلومات؟ اشترك في ClickUp اليوم .

