أنت تتعاون مع فريقك في مستند، والتعديلات تأتيك بسرعة - يتم إعادة صياغة الأقسام، وحذف الفقرات، وإضافة محتوى جديد لسياق إضافي.
وفجأة، يصبح المستند عبارة عن خليط من التنقيحات، وتجد نفسك تحاول معرفة من قام بتغيير ماذا وما إذا كان يجب أن يبقى أو يُلغى.
هنا يصبح تتبع التغييرات أمرًا ضروريًا، ويبسط محرر مستندات Google ذلك من خلال السماح للفرق بعرض التعديلات في الوقت الفعلي وإدارة المراجعات دون عناء.
برنامج شائع قائم على السحابة برنامج تعاون المستندات ، يحفظ مستندات Google Docs المستندات تلقائيًا كل بضع دقائق، مما يلغي الحاجة إلى الحفظ اليدوي. بالإضافة إلى ذلك، يحتوي البرنامج على خيارات مشاركة سهلة تتيح لك دعوة أعضاء الفريق للمساهمة، مما يمنحه ميزة واضحة على برنامج Microsoft Word.
سيخبرك هذا الدليل بكيفية تتبع التغييرات في محرّر مستندات Google للحفاظ على سير عمل المستندات منظماً وخالياً من الإجهاد.
كيفية تتبع التغييرات في مستندات جوجل؟
يقدم محرر مستندات Google ميزة "الاقتراح" لتتبع التغييرات. مع تمكين وضع الاقتراح، يتم تمييز التعديلات كاقتراحات بدلاً من التغييرات الدائمة.
يشبه وضع التحرير هذا ميزة "تتبع التغييرات" في مستند Word. هناك طريقتان لتمكين وضع الاقتراح في محرّر مستندات Google.
الخيار 1: قم بتنشيطه عن طريق الانتقال إلى عرض > الوضع > وضع الاقتراح.

الخيار 2: حدد خيار "اقتراح" من القائمة المنسدلة في الزاوية العلوية اليمنى من شريط التنسيق.

على الرغم من أن وضع "الاقتراح" مفيد لإدارة التعديلات، إلا أنه يمكن أن ينتهي به الأمر إلى تشويش المستند وجعل قراءته صعبة - خاصة مع وجود العديد من المساهمين.
لمراجعة التعديلات بشكل أوضح و تحسين التعاون في المستندات ، دعنا نستكشف كيفية تتبع التغييرات دون استخدام وضع الاقتراح.
الخطوة 1: افتح ملف مستند Google Docs الخاص بك
ابدأ بفتح ملف محرر مستندات Google حيث تريد تتبع التغييرات.

الخطوة 2: مشاركة الملف
بمجرد أن يصبح المستند جاهزًا للتعاون، شاركه مع أعضاء الفريق المعنيين.
حدد موقع زر "مشاركة" في الزاوية العلوية اليمنى من المستند وانقر فوقه.

يمكنك مشاركة مستندك عن طريق تعيين الأذونات على 'محرر' للسماح للمتعاونين بإجراء تغييرات مباشرة على المستند بدلاً من اقتراحها.
حاول دعوة أشخاص محددين عبر البريد الإلكتروني لمنع التزاحم والتعديلات المتضاربة.
بدلاً من ذلك، قم بإنشاء رابط قابل للمشاركة بحيث يمكن لأي شخص لديه الرابط عرض المستند أو التعليق عليه أو تحريره.
الخطوة 3: انتقل إلى سجل الإصدارات التحكم في إصدار المستند ضروري لمراجعة التعديلات السابقة واستعادة المسودات القديمة.
للوصول إلى "محفوظات الإصدار" في مستندات Google، انتقل إلى ملف > محفوظات الإصدار > الاطلاع على محفوظات الإصدار.

بدلاً من ذلك، يمكنك النقر على أيقونة الطابع الزمني، بجوار عنوان المستند في الأعلى، والتي تقول "آخر تعديل كان [المدة ] منذ"
![]()
الخطوة 4: البحث عن الإصدارات السابقة من المستند الخاص بك
تُظهر اللوحة اليمنى قائمة الإصدارات السابقة، بالإضافة إلى من أجرى التغييرات ومتى.
الجزء الأفضل؟ يتم ترميز تغييرات كل متعاون بالألوان، مما يساعدك على تتبع المساهمات وإدارة المساءلة في المشاريع الجماعية.

الخطوة 5: إعادة تسمية الإصدارات السابقة
يتيح لك ذلك تحديد المراحل الرئيسية للمستند، مثل "مسودة 1" أو "المراجعة النهائية"، ويساعد المتعاونين على فهم تقدم المستند والتحديثات الرئيسية بسرعة.
انقر على النقاط الثلاث بجوار الإصدار الذي تريد إعادة تسميته واختر "تسمية هذا الإصدار" أو ببساطة اضغط على التاريخ وأضف العنوان المطلوب.
استخدم نظام تسمية متسق يتضمن التواريخ أو الأغراض (على سبيل المثال، "مسودة 1 - أبريل 2024" أو "المقترح النهائي - تمت مراجعته").

الخطوة 6: استعادة الإصدارات السابقة
إذا كنت بحاجة إلى التراجع عن التعديلات غير المرغوب فيها، يمكنك استعادة إصدار سابق من لوحة "سجل الإصدارات".
ومع ذلك، تأكد من إبلاغ فريقك لتجنب الارتباك أو التعارض.

قد تؤدي استعادة إصدار سابق إلى إزالة تعديلات جديدة مفيدة من المسودة الحالية. لذلك، راجع دائمًا النسخة المستعادة وأضف أي تغييرات مهمة من المسودة الأخيرة حسب الحاجة.
علاوةً على ذلك، يحتفظ محرر مستندات Google بأحدث نسخة سليمة من مستنداتك بحيث يمكنك العودة إليها بسهولة إذا لزم الأمر. يمكنك أيضًا إنشاء نسخة من أي نسخة من أي إصدار من مستندات Google للرجوع إليها في المستقبل.

الخطوة 7: التحقق من التعليقات
يسمح قسم التعليقات في محرّر مستندات Google للمتعاونين بمناقشة التغييرات وتقديم الملاحظات.
للوصول إليه، انقر على أيقونة "التعليقات" (فقاعة الكلام) في الزاوية العلوية اليمنى من المستند. بدلاً من ذلك، يمكنك عرض التعليقات بالنقر على أي تعليق مميز داخل مستند Google.

استخدم ميزة @mention للإشارة إلى المتعاونين عند طلب التعليقات أو تعيين المهام. يضمن ذلك وصول رسالتك إلى الشخص المقصود.
💡 نصيحة احترافية: راجع بانتظام الاقتراحات وسجلّ التعديلات لاكتشاف أي تغييرات تم تجاهلها وتجنب المشكلات المحتملة - مثل التعديلات المتضاربة أو التحديثات المفقودة أو الملاحظات غير المكتملة.
الخطوة 8: إيقاف تشغيل تتبع التغييرات
بمجرد الانتهاء من التعامل مع جميع التعديلات والملاحظات، قم بإيقاف تشغيل تعقب التغييرات لتبسيط المستند وصقله. هذا يجعل من السهل اكتشاف أي مشاكل متبقية.
إليك كيفية إيقاف تشغيل تعقب التغييرات في مستندات جوجل:
- إخفاء التعليقات: انتقل إلى عرض > التعليقات > إخفاء التعليقات لإزالة جميع التعليقات المرئية من المستند
- حل التعليقات: قم بمعالجة كل تعليق بالنقر على علامة الاختيار (✓). هذا يحافظ على تنظيم سلسلة التعليقات ويشير إلى أن المشكلة قد تم حلها
- إدارة الاقتراحات: إذا كانت لديك اقتراحات في المستند، انقر على كل اقتراح وحدد قبول (✓) أو رفض (X)
بهذه الخطوات، يمكنك جعل المستند جاهزاً للمراجعة النهائية أو النشر.
اقرأ المزيد: كيفية إضافة صفحة جديدة في مستندات جوجل
قيود استخدام محرّر مستندات Google لتتبع التغييرات
يتفوق محرر مستندات Google في تتبع وإدارة إصدارات المستندات. يمكنك استخدام المستندات المصممة مسبقًا قوالب مستندات جوجل لكل شيء، من إنشاء السير الذاتية إلى صياغة خطة مشروع مفصلة.
ومع ذلك، فإن لديه بعض القيود على احتياجات التحرير الأكثر تعقيدًا مقارنةً بالتحرير المتقدم برنامج التحكم في إصدار المستندات .
- واجهة مزدحمة: يمكن أن تؤدي التعديلات والتعليقات المتكررة إلى إرباك مستند مستندات Google Docs، مما يجعل من الصعب قراءته وإدارته
- مشاكل التعاون: مع وجود فريق كبير يعمل على مستند واحد، يمكن أن تؤدي التعديلات المتزامنة المتعددة إلى تعارضات. على سبيل المثال، إذا قام اثنان من أعضاء الفريق بتحديث نفس القسم في الوقت نفسه، فقد تتداخل التغييرات التي يجريها كل منهما وتؤدي إلى حدوث ارتباك
- تصفح الإصدارات المرهقة: قد يكون من الصعب إدارة مستند يحتوي على العديد من الإصدارات. إذا كان لديك مشروع طويل يحتوي على عدة مسودات، فقد يكون التنقل بين كل إصدار للعثور على تحديثات محددة أمرًا مملًا
- الاعتماد على الإنترنت: تتبُّع التغييرات دون اتصال بالإنترنت ليس بنفس السلاسة. على سبيل المثال، إذا كنت تعمل في منطقة نائية بدون إنترنت أو اتصال محدود بالإنترنت، فقد تفوتك التحديثات والتغييرات التي يجريها الآخرون في الوقت الفعلي
- أدوات مراجعة محدودة: يفتقر محرر مستندات Google إلى أدوات المراجعة المتقدمة، مثل المقارنة بين إصدارات المستندات جنبًا إلى جنب أو لوحات مراجعة مخصصة لتتبع التغييرات. يجب عليك التحقق يدويًا من كل إصدار أو استخدام أداة أخرى لإجراء مقارنة مفصلة
إذا كنت ترغب في الحصول على ميزات متقدمة لإدارة المستندات لتبسيط سير عملك، فعليك البحث عن بديل مستندات جوجل .
إليك ما نوصي به ⬇️
تعرف على ClickUp: طريقة أكثر أمانًا لتتبع التغييرات في المستندات ClickUp هو برنامج شامل لإدارة المشاريع يعزز تواصل الفريق وتتبع المشاريع ومشاركة المستندات في منصة مركزية.
ميزته البارزة, مستندات ClickUp يمكّن الفرق من إنشاء المستندات وتحريرها ومشاركتها في الوقت الفعلي، مما يعزز التعاون السلس.

شارك المستندات وتعاون بشأنها على الفور باستخدام ClickUp Docs
دعنا نرى كيف يمكنك استخدام ClickUp Docs لتتبع التغييرات دون عناء:
1. الوصول إلى سجل التحرير
يوفر ClickUp Docs محفوظات تحرير شاملة لكل مستند، مع عرض الطوابع الزمنية لجميع التعديلات. يتضمن ذلك من الذي أجرى التغيير، وما الذي تم تغييره، ومتى حدث ذلك.
هذه الميزة ضرورية للمساءلة والعودة إلى الإصدارات السابقة إذا لزم الأمر. للوصول إليها:
- افتح مستند
- في الزاوية العلوية اليمنى، انقر على قائمة الحذف ...
- من القائمة المنسدلة، حدد "سجل الصفحات
- تصفح الإصدارات المختلفة للاطلاع على التغييرات التفصيلية
- إذا لزم الأمر، استعد نسخة سابقة عن طريق تحديدها والنقر على 'استعادة'

راجع سجلًا مفصلاً للتغييرات، بما في ذلك الطوابع الزمنية ومعلومات المستخدم، في مستندات ClickUp
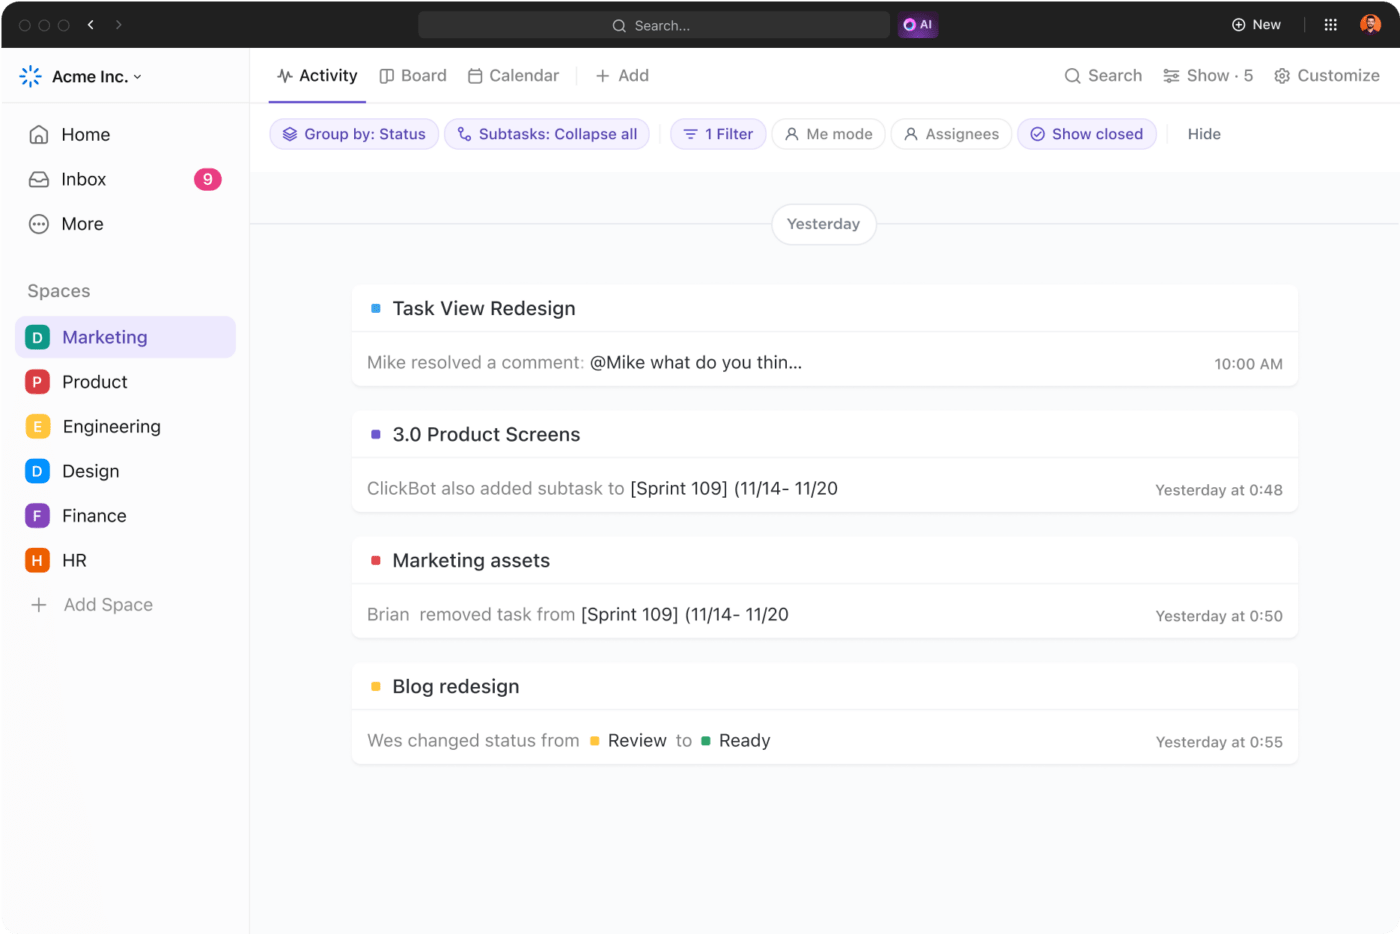
بالإضافة إلى ذلك، فإن عرض النشاط يوفر سجلًا في الوقت الفعلي لجميع الإجراءات الأخيرة داخل المستندات. يتضمن ذلك التعديلات والتعليقات وتغييرات الأذونات والمزيد.
تتيح لك طريقة عرض النشاط اكتشاف التعديلات المتداخلة أو تغييرات الأذونات المتداخلة وحلها بسرعة ومراقبة تقدم الفريق.
لإضافته:
- انتقل إلى مساحة العمل الخاصة بك وانقر على "+ عرض" في شريط طرق العرض لفتح نموذج طرق العرض
- اختر 'نشاط'
- بمجرد إنشاء طريقة العرض، قم بتسميتها وتخصيصها من خلال قائمة "تخصيص" على اليمين

احصل على سجل محدث لتغييرات المستند باستخدام طريقة عرض النشاط
2. التحكم في أذونات الوصول
يمكن أن يتسبب الوصول غير المصرح به إلى المستندات في عدم اتساق البيانات وخرق الامتثال وكشف المعلومات السرية.
على سبيل المثال، يمكن أن تتسبب مشاركة تقرير مالي غير مقيد مع موظفين غير مصرح لهم في خسارة مالية وضرر بالسمعة.
ولمنع ذلك، توفر ClickUp Docs ميزات قوية للتحكم في الإصدار وتتيح لك تعيين أدوار محددة، مثل "المالكين" و"المساهمين". واعتمادًا على احتياجاتك، يمكنك أيضًا إنشاء روابط قابلة للمشاركة يمكن توزيعها حصريًا على فرق معينة أو ضيوف أو الجمهور
على سبيل المثال، يمكنك أن تقصر تحرير تقرير مالي على كبار المديرين التنفيذيين والمديرين الماليين فقط، مع إتاحة الوصول للقراءة فقط للموظفين الآخرين ومدققي الحسابات.
تضمن هذه المرونة أن أعضاء الفريق المصرح لهم فقط إجراء التعديلات أو اقتراحها، مما يحافظ على سلامة المستند.
💡 نصيحة احترافية: قم بالتدقيق الدوري في من لديه حق الوصول إلى مستنداتك وقم بتحديث الأذونات حسب الضرورة. هذا يحافظ على أمان المستند، خاصة عند انضمام أعضاء الفريق أو مغادرتهم.
على سبيل المثال، إذا انتقل أحد أعضاء الفريق من دور المشروع إلى دور الدعم، قم بتحديث صلاحية الوصول الخاصة به لضمان عدم قدرته على تعديل خطط المشروع النشطة.
3. التعاون في الوقت الفعلي
عندما يقوم العديد من أعضاء الفريق بتحرير مستند في وقت واحد، يمكن أن يصبح الأمر فوضويًا بدون برنامج تعاون الفريق الذي يوفر رؤية واضحة لتصرفات بعضهم البعض.
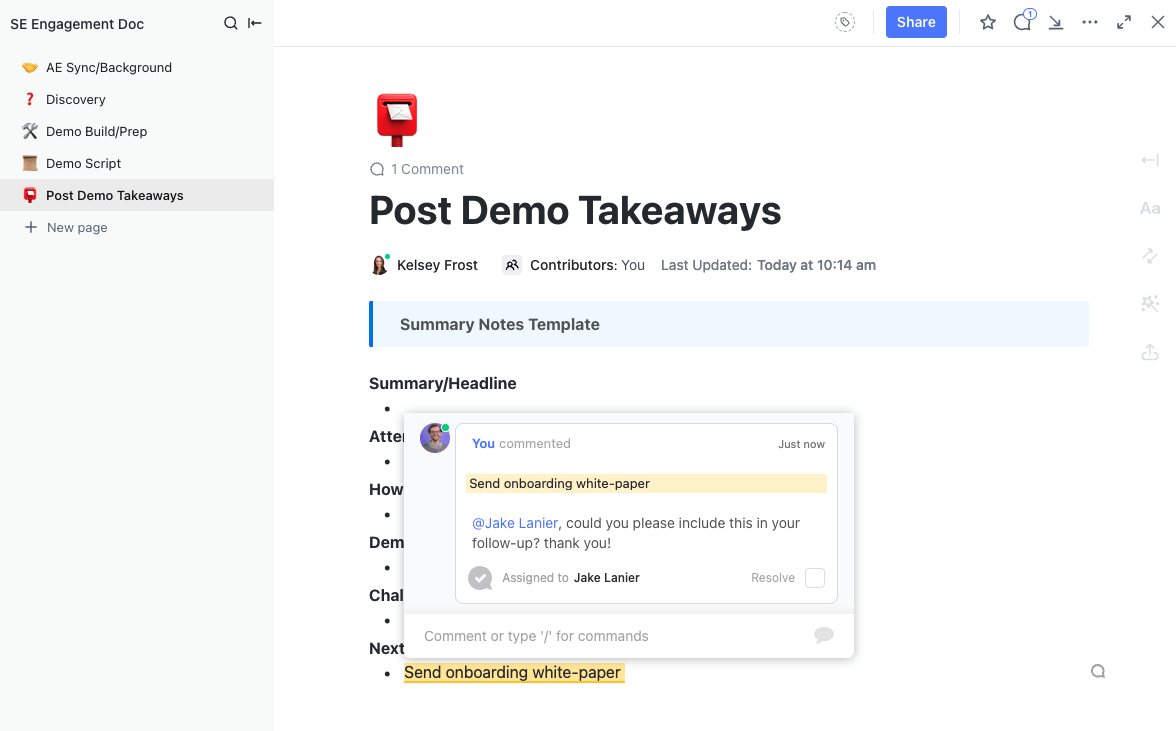
إن كشف تعاون ClickUp تحل هذه المشكلة.
على سبيل المثال، إذا كان أحد أعضاء الفريق يقوم بتحديث التوقعات المالية وآخر يقوم بمراجعة استراتيجية التسويق في تقرير ربع سنوي، فإنها تكشف بالضبط من يعمل على كل قسم. هذا يمنع الازدواجية ويضمن التكامل السلس للتحديثات في المستند النهائي.

عزز وضوح المستند وتنسيقه باستخدام كشف التعاون في ClickUp Collaboration
بالإضافة إلى ذلك، فإن انقر فوق تعيين التعليقات تتيح لك الميزة تعيين عناصر الإجراءات والمسؤوليات مباشرةً من داخل المستند. إذا أشار أحد التعليقات إلى وجود خطأ في توقعات الإيرادات، فقم بتعيين مهمة التصحيح إلى أحد أعضاء الفريق مباشرةً من التعليق. هذا يحافظ على تنظيم المهام ويضمن المتابعة في الوقت المناسب.

استخدم ClickUp Assign Comments لتفويض عناصر الإجراء من داخل المستند الخاص بك
💡 نصيحة احترافية: استخدم انقر فوق الإشعارات للحصول على تنبيهات في الوقت الفعلي للتعليقات المعينة. هذا يبقي فريقك على اطلاع دائم بتقدم المهام ويضمن الوفاء بالمواعيد النهائية.
علاوة على ذلك، استفد من عرض دردشة ClickUp لتسهيل التواصل الفوري أثناء العمل على المستندات. هذا مفيد بشكل خاص لمناقشة التعديلات أو معالجة الأسئلة في الوقت الفعلي، مما يقلل من الاجتماعات وسلاسل رسائل البريد الإلكتروني.
حافظ على التعاون في المسار الصحيح مع ClickUp
مستندات Google Docs جيدة لإدارة المستندات في الوقت الفعلي. تساعد أوضاع التحرير المختلفة في تتبع التغييرات، والحفظ التلقائي يعني عدم وجود المزيد من عمليات الحفظ اليدوي أو القلق بشأن فقدان العمل.
ومع ذلك، يمكن أن يصبح الأمر فوضويًا مع التعديلات والإصدارات المتعددة. وهنا يأتي دور ClickUp Docs.
فهو يوفر سجلات تحرير مفصلة توضح من قام بتغيير ماذا ومتى. يمكنك العودة بسهولة إلى الإصدارات السابقة إذا لزم الأمر، كما أن خاصية التحكم في الإصدار تقصر التعديلات على المستخدمين المصرح لهم.
هل تريد أن تجعل إدارة المراجعات سهلة؟ اشترك في ClickUp مجانًا اليوم.

