If you’ve ever had a project go off the rails because everybody thought Task X was someone else’s responsibility, you already know that defining roles and responsibilities is essential to success. Here’s how to do it well.
Prep
Before the meeting, prepare your whiteboard (whether physical or virtual). There are two common ways of organizing a whiteboard for this type of discussion:
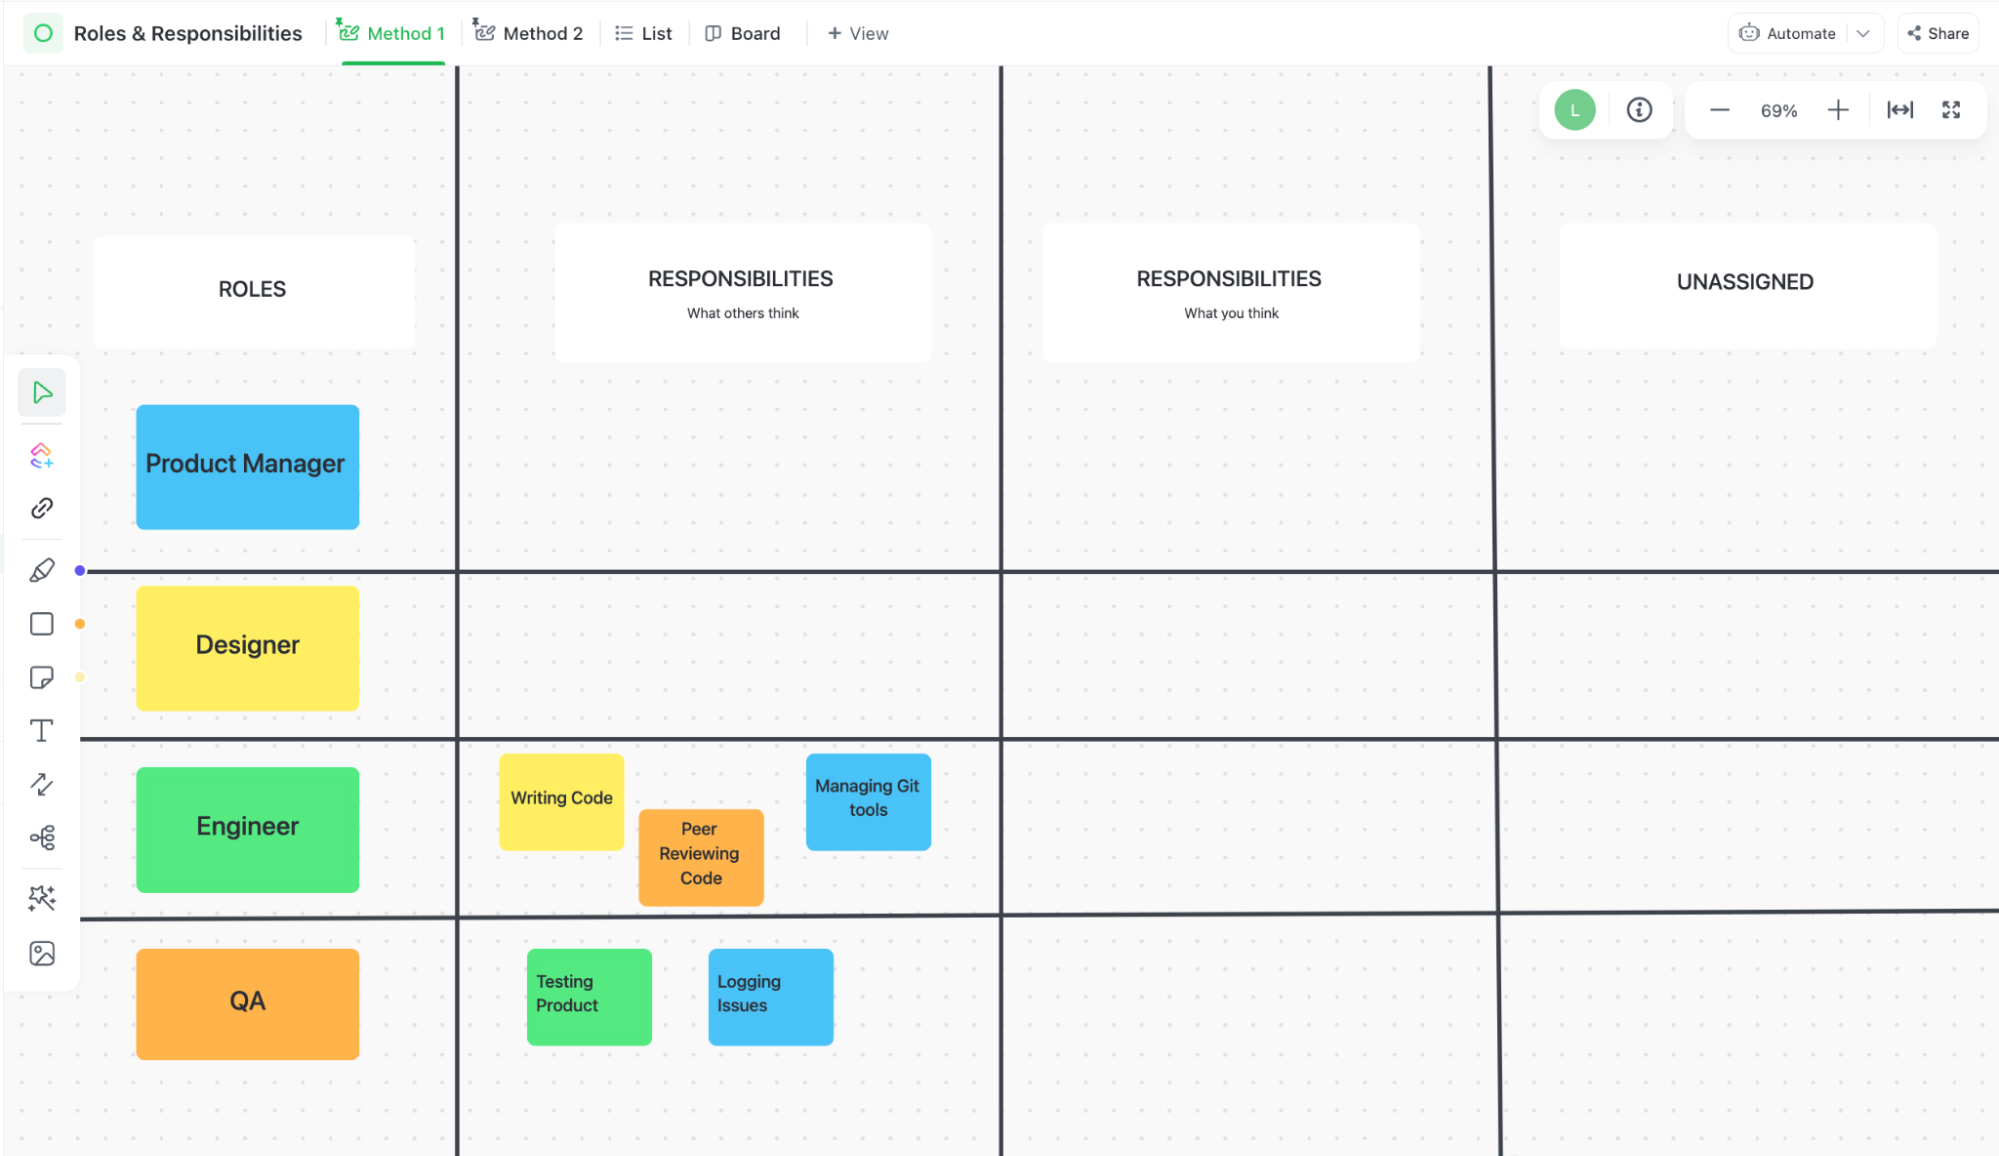
Method 1: With one column for roles, two columns for responsibilities, and an unassigned column
![]()
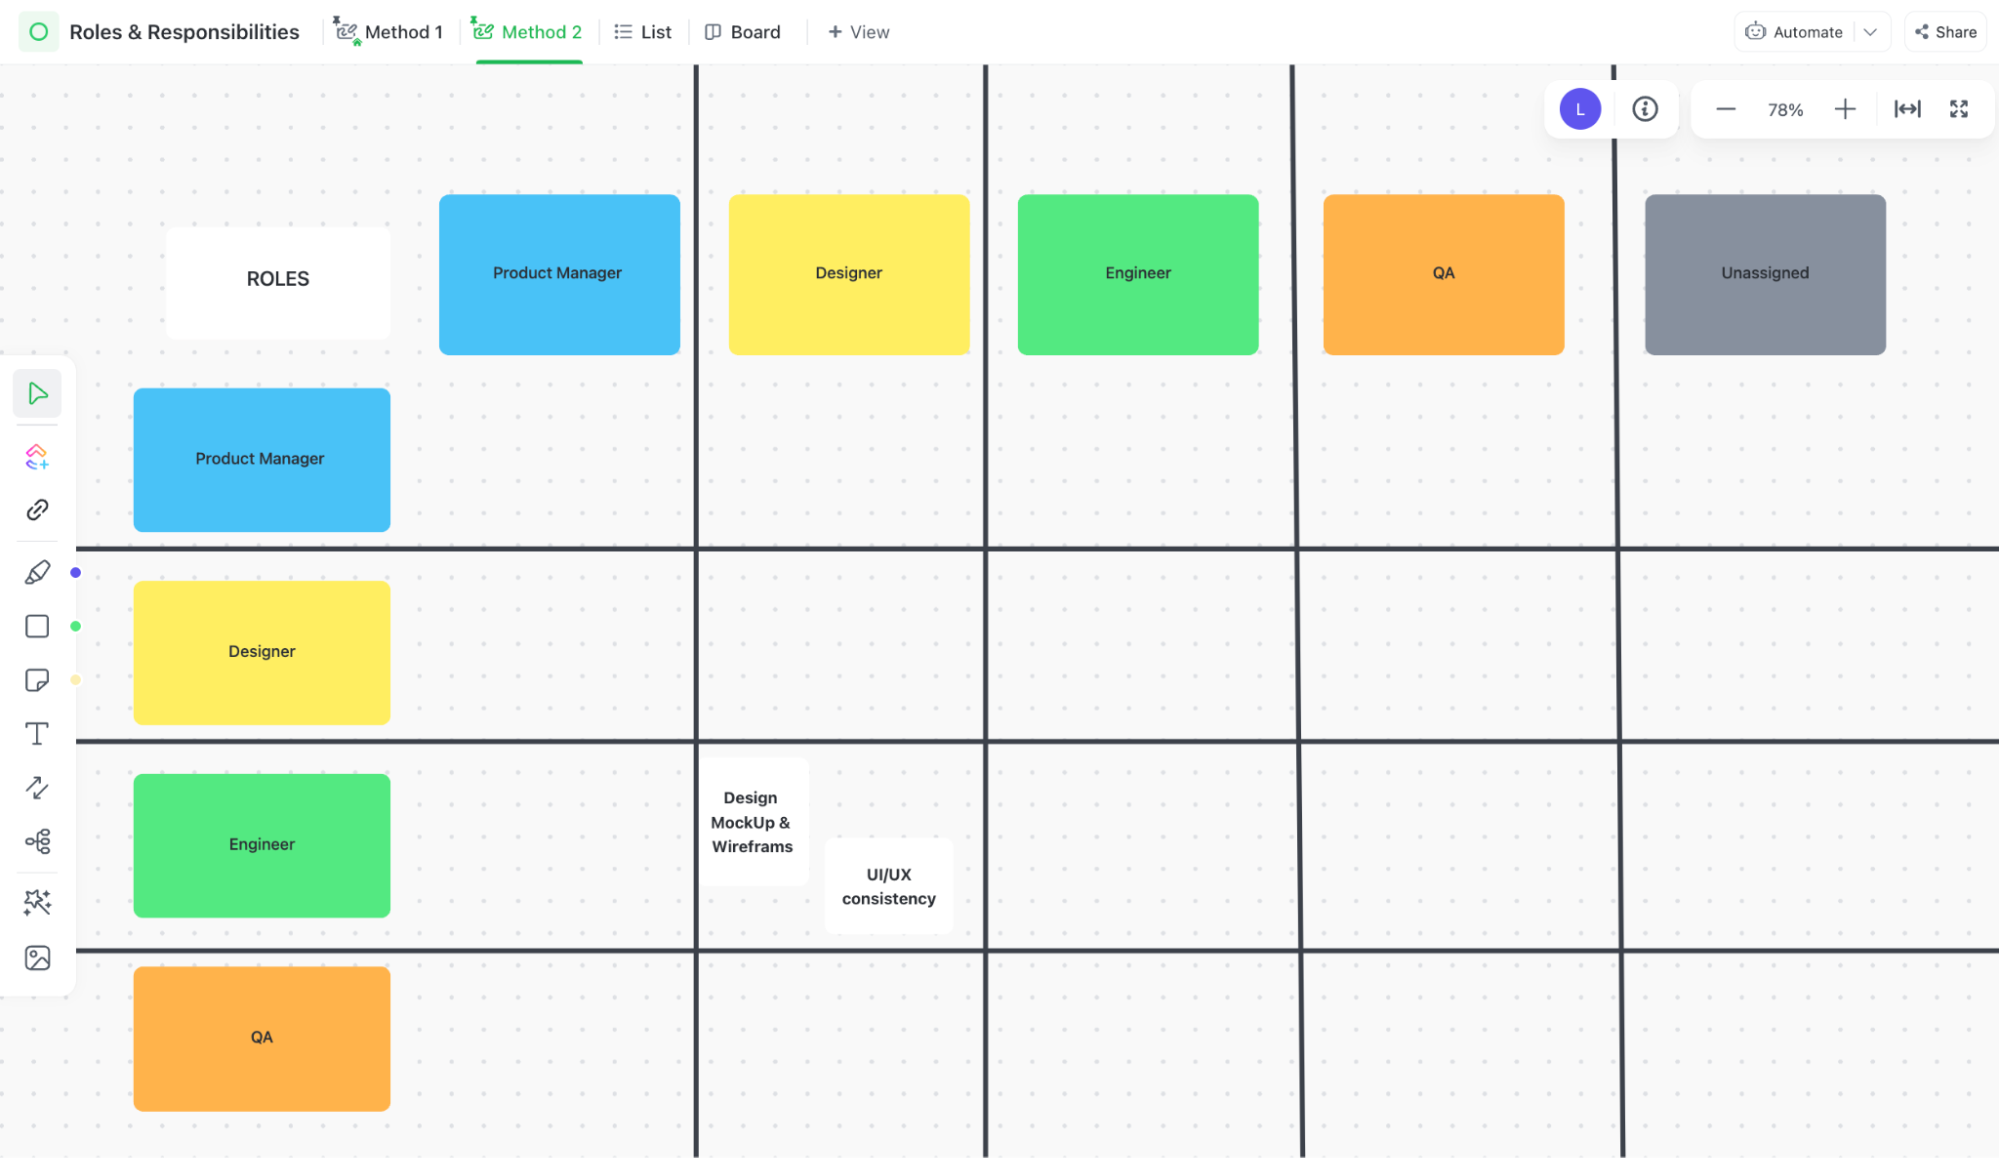
Method 2: With each role listed on both axes of a grid
![]()
IMPORTANT: Make sure to communicate the scope of the discussion before you start. Are you defining team roles and responsibilities overall? Are you defining roles and responsibilities for a specific project or sprint? Or is this specifically about a new product or new team responsibilities that need to be divvied up?
Depending on the scope of the information, you may choose to communicate it in an email or Slack discussion or collect it in one location for reference and let people know that they need to review in advance of your meeting. The clearer you are up front, the more smoothly the meeting will go.
The meeting
1. Outline the roles on the project, product, or team
Who will be working on this project or product? What are their job titles? Keeping with the scope of the meeting (as determined before you start), in the roles column, include each of the relevant job titles.
If you have multiple people in a role (for example, three developers), include the title once and recognize that the workload in those roles’ responsibility columns might be commensurately larger. If someone is filling two roles, you can still include both titles in order to make it clear what each of their roles includes.
2. Collaborate to identify responsibilities
If you are using whiteboard method #1: In the first responsibility column, have each team member add the responsibilities that they think each role should take on. For now, have them skip their own role and only identify what they think other team members are responsible for.
For example, the developer role is likely responsible for writing code, peer-reviewing code, and launching final product. Q&A is probably responsible for product testing at key intervals.
If you are using method #2: rather than having everyone include responsibilities in a single column, ask them to place their assumptions in the box where their role intersects with the role they are assigning responsibilities.
For example, if a developer is putting in assumptions for the designer’s role, they would find the engineer box at left, find the design box at top, and choose the intersecting box to put the designer’s responsibility stickies into.
Depending on the scope of the meeting, you may also want to limit the number of responsibilities each person can add. Some experts suggest limiting each team member to 3 - 5 sticky notes.
Having each team member contribute will often surface misunderstandings, unassigned responsibilities, and important clarifications that need to be made.
TIP
If there are responsibilities you know exist and have no idea who they belong to, put them in the unassigned column.
RISK
If you’re struggling to identify responsibilities, these questions might help: What hasn’t gotten done on past projects? What would improve future projects? What tasks are still on the to-do list from your last project? What tasks are on each person’s daily to-do list? What tasks are in people’s job descriptions?
3. Have each individual outline their responsibilities
Once everyone has scoped responsibilities for their colleagues, ask them to take a moment to write down their own responsibilities as they understand them. Aim to identify 3 – 5 things that fall under each person’s care.
In whiteboard method #1, add these responsibilities to the second responsibilities column. In method #2, add them where the same title intersects in the grid.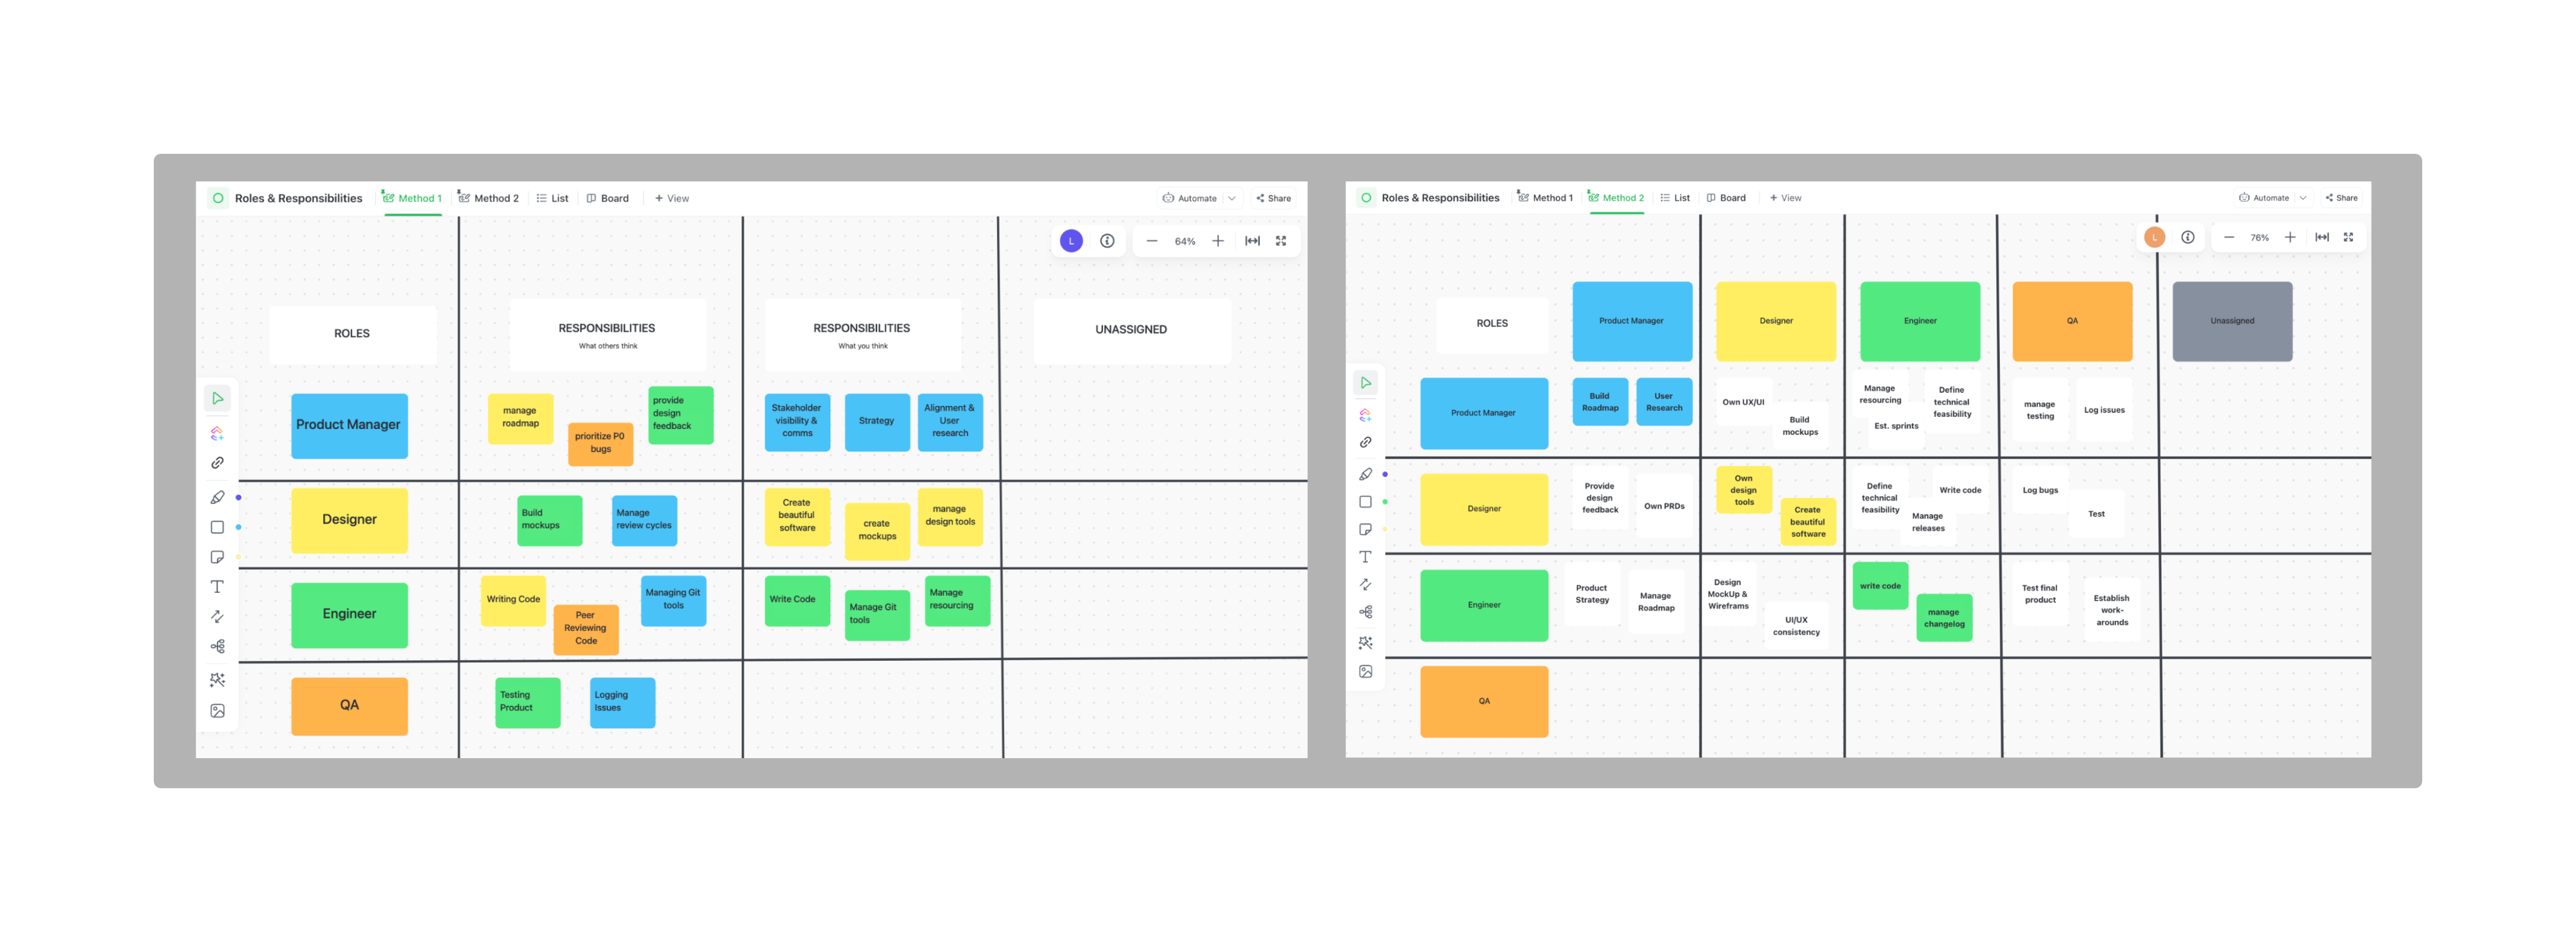
TIP
In method #1, to make it clear where one person’s perceptions diverge from the team's, you can choose to color code your sticky notes, giving each person a different color or style so that it’s easy to differentiate visually when reviewing.
4. Review unassigned responsibilities
Is there anything in the unassigned column that no one has claimed? This is the moment to figure out who needs to take those things on, if they can be discarded, or if perhaps a new role is needed.
5. Come to an agreement
With everyone’s sticky notes on the board…do you all agree about who is in charge of things? Is there anyone unduly burdened? Is there anyone who could take on more?
This is your chance to shift things around, offer up help, or identify where there might be gaps in the team that HR or leadership need to fill.
This is also a good time to identify who the backups are. If someone is out sick, has an emergency, or gets pulled into another high-priority project, who is the secondary person that can take on their tasks? The more you can identify these things up front, the smoother projects will go.
TIP
To get clarity on who is completing a task, who is approving it, and who else is involved, now’s a good time to consult your RACI chart.
6. Prioritize responsibilities
With your whiteboard full of sticky notes and agreement about who they belong to, it’s time to (collaboratively) prioritize. What are the most important responsibilities on each person’s plate? What takes precedence when two tasks collide?
There are multiple ways to approach prioritization. If you aren’t sure how to handle yours, here’s our prioritization blueprint.
RISK
While identifying responsibilities is vital, make sure not to over-plan. Research says that teams thrive when given objectives and outcomes to work toward, and left to forge the path to those goals themselves.
Post-meeting
1. Document
Document everything that has been decided or confirmed in a shared location where everyone can revisit as needed.
You can clean up the (virtual) whiteboard to represent final decisions and refer back to it as your source of truth moving forward. Or you can transfer your whiteboard notes into formal documentation for team reference. Either way, make sure to update this documentation with changes as they happen so that people can be confident they are referencing the latest, most accurate information.
2. Schedule a review
Schedule a time in advance when you’ll revisit this as a team.
This strategy not only keeps you on top of shifts in responsibilities, but it also takes the pressure off those who do offer to take on more. If they end up overburdened, the team can revisit the things on their plate, and they don’t even have to ask for a meeting because you’ve already got one set up.